
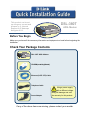
Before You Begin
Make sure you have all the necessary information and equipment on hand before beginning the
installation.
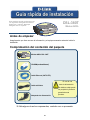
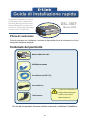
Check Your Package Contents
If any of the above items are missing, please contact your reseller.
This product can be set
up using any current web
browser, e.g., Internet
Explorer 6 or Netscape
Navigator 6.2.3.
DSL-380T
ADSL Modem
Using a power supply
with a different voltage
rating will damage and void
the warranty for this product.
DSL-380T ADSL Modem
CD-ROM (containing Manual)
Ethernet (CAT5 UTP) Cable
Telephone Cable
Power Adapter

2
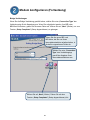
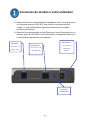
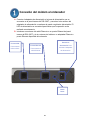
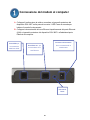
Connecting the Modem to Your Computer
A. First, connect the power adapter to the receptor at the back panel of the
DSL-380T and then plug the other end of the power adapter to a wall outlet or
power strip. The Power LED will turn on to indicate proper operation.
B. Insert one end of the cable into the Ethernet port on the back panel of the
DSL-380T and the other end of the cable to an Ethernet Adapter or available
Ethernet port on your computer.
C. Insert the ADSL (telephone) cable included with the Modem into the ADSL port
and then connect the cable to your telephone line.
ADSL Port -
Connect to
ADSL line
Ethernet Port -
Connect to
Ethernet cable
Reset
Button
Power Input -
Connect to power
adapter

3
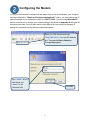
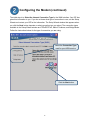
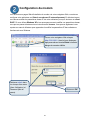
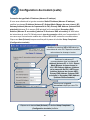
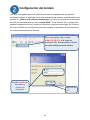
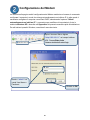
Configuring the Modem
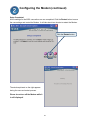
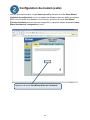
To use your Web browser to access the web pages used to set up the Modem, your computer
must be configured to “Obtain an IP address automatically,” that is, you must change the IP
network settings of your computer so that it is a DHCP Client. If you are using Windows XP
and do not know how to change your network settings, skip ahead to Appendix A and read the
instructions provided. You may also read the User Manual for instructions on changing IP
settings for computers running Windows operating systems.
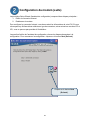
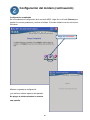
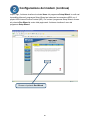
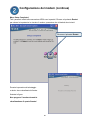
Type “admin” for the
User Name and
“admin” in the
Password field.
Click OK.
Open your Web browser and type
“http://192.168.1.1” into the URL address
box. Then press the Enter or Return key.
The login dialog appears.

4
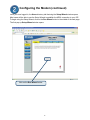
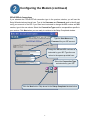
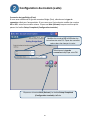
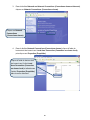
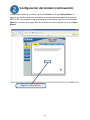
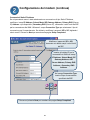
Configuring the Modem (continued)
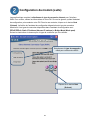
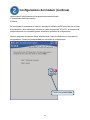
Once you have logged in, the Home directory tab featuring the Setup Wizard window opens.
Most users will be able to use the Setup Wizard to establish the ADSL connection to your ISP.
To begin using the Setup Wizard, click on the Run Wizard button in the middle of the web page.
The first pop-up Setup Wizard window opens.
Click on the Run Wizard button.

5
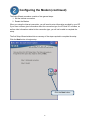
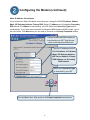
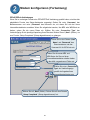
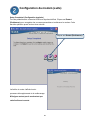
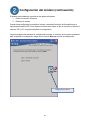
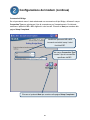
Configuring the Modem (continued)
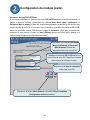
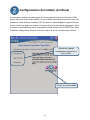
The Setup Wizard procedure consists of two general steps:
1. Set the Internet connection
2. Restart the Modem
When you setup the Internet connection, you will need to enter information provided by your ISP.
If you have not been given information about the connection type, the VPI and VCI numbers, as
well as other information related to the connection type, you will not be able to complete the
setup.
The first Setup Wizard window lists a summary of the steps required to complete the setup.
Click the Next button to begin setup.
Click the Next button.

6
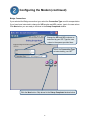
Configuring the Modem (continued)
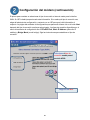
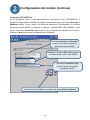
The initial step is to Select the Internet Connection Type for the WAN interface. Your ISP has
given this information to you. If you do not know what type of connection to use, exit the Setup
Wizard and contact your ISP for the information. The Setup Wizard window that appears when
you click the Next button depends on what connection type you select. The connection types
available in the Setup Wizard window are PPPoE/PPPoA, Static IP Address, and Bridge Mode.
Follow the instructions below for the type of connection you are using.
Select the Connection Type
used for your ADSL service.
Click the Next button.

7
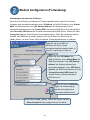
Configuring the Modem (continued)
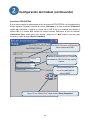
PPPoE/PPPoA Connections
If you selected the PPPoE/PPPoA connection type in the previous window, you will see the
Setup Wizard window pictured here. Type in the Username and Password used to identify and
verify your account to the ISP. If you have been instructed to change the VPI number and VCI
number, type in the new values. Select the Connection Type used for encapsulation specific to
your service. Click Next when you are ready to continue to the Setup Completed window.
Type the User Name and
Password for your ISP account.
Change the VPI and VCI numbers as
instructed by your ISP. Type the new
values in the spaces provided here.
Select the Connection Type
as instructed by your ISP.
Click the Next button. Skip ahead to the Setup Completed window below.

8
Configuring the Modem (continued)
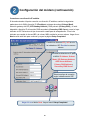
Static IP Address Connections
If you selected the Static IP Address connection type, change the WAN IP Address, Subnet
Mask, ISP Gateway Address, Primary DNS (Server IP) Address and (if available) Secondary
DNS (Server IP) Address as instructed by your ISP. Select the Connection Type used for
encapsulation. If you have been instructed to change the VPI number and VCI number, type in
the new values. Click Next when you are ready to continue to the Setup Completed window.
Select the Connection Type
as instructed by your ISP.
Change the VPI and VCI numbers as
instructed by your ISP. Type the new
values in the spaces provided here.
Type the IP addresses for the
WAN IP Address, WAN Subnet
Mask, ISP Gateway Address,
ARP Server Address, Primary
DNS Address and Secondary
DNS Address.
Click the Next button. Skip ahead to the Setup Completed window below.

9
Configuring the Modem (continued)
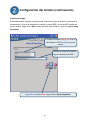
Bridge Connections
If you selected the Bridge connection type, select the Connection Type used for encapsulation.
If you have been instructed to change the VPI number and VCI number, type in the new values.
Click Next when you are ready to continue to the Setup Completed window.
Select the Connection Type
as instructed by your ISP.
Click the Next button. Skip ahead to the Setup Completed window below.
Change the VPI and VCI numbers as
instructed by your ISP. Type the new
values in the spaces provided here.

10
Configuring the Modem (continued)
Setup Completed
All the settings for the ADSL connection are now completed. Click the Restart button to save
the new settings and restart the Modem. It will take about two minutes to restart the Modem.
The window pictured on the right appears
during the save and restart process.
Please do not turn off the Modem while it
is still displayed!
Click the Restart button.

11
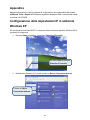
Appendix
For additional settings or information, refer to the Advanced, Tools, or Status tabs on the Web
Management interface; or to the manual located on the CD-ROM.
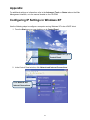
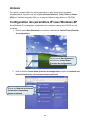
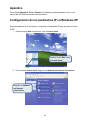
Configuring IP Settings in Windows XP
Use the following steps to configure a computer running Windows XP to be a DHCP client.
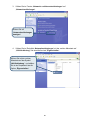
1. From the Start menu on your desktop, go to Control Panel.
2. In the Control Panel window, click Network and Internet Connections.
Click Network and
Internet Connections.
From the Start menu, go to
Control Panel.

12
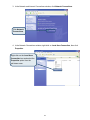
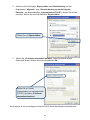
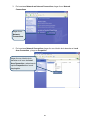
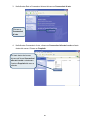
3. In the Network and Internet Connections window, click Network Connections.
4. In the Network Connections window, right-click on Local Area Connection, then click
Properties.
Right-click on the Local Area
Connection icon and select the
Properties option from the
pull-down menu.
Click Network
Connections.

13
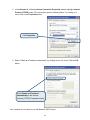
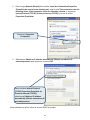
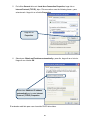
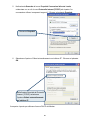
5. In the General tab of the Local Area Connection Properties window, highlight Internet
Protocol (TCP/IP) under “This connection uses the following items:” by clicking on it
once. Click on the Properties button.
6. Select “Obtain an IP address automatically” by clicking once in the circle. Click the OK
button.
Your computer is now ready to use the Modem’s DHCP server.
Click Properties.
Select Obtain an IP address
automatically in the Internet
Protocol (TCP/IP) Properties window

14
Technical Support
You can find software updates and user documentation on the D-Link websites.
D-Link provides free technical support for customers within Canada,
the United Kingdom, and Ireland.
Customers can contact D-Link technical support through our websites,
or by phone.
For Customers within
The United Kingdom & Ireland:
D-Link UK & Ireland Technical Support over the Telephone:
08456 12 0003 (United Kingdom)
+44 8456 12 0003 (Ireland)
Lines Open
8.00am-10.00pm Mon-Fri
10.00am-7.00pm Sat & Sun
D-Link UK & Ireland Technical Support over the Internet:
http://www.dlink.co.uk
ftp://ftp.dlink.co.uk
For Customers within Canada:
D-Link Canada Technical Support over the Telephone:
1-800-361-5265 (Canada)
Mon. to Fri. 7:30AM to 9:00PM EST
D-Link Canada Technical Support over the Internet:
http://support.dlink.ca
email: [email protected]

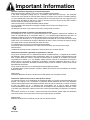
Important Information
Important information regarding your internet subscription
Users who subscribe to limited or "pay as you use" broadband internet access.
In the WAN configuration settings, there is a parameter called Maximum idle timer. This parameter
controls how many seconds of inactivity before dropping connection to the internet. The default setting is
"0" which disables this functionality and the internet will be connected all the time. We suggest that you
should change the Maximum idle timer to "300" (5 minutes) so that the device will drop the line after 5
minutes of inactivity and keep usage costs down.
Users who subscribe to unlimited broadband internet access.
You can just leave this parameter unchanged or enable Auto-reconnect to be always on line.
Technical Notes:
The Maximum idle timer is only relevant if your ISP is using PPPoE connection.
Information importante concernant votre abonnement internet
Aux utilisateurs qui ont souscrit un abonnement limité ou avec paiement uniquement à l'utilisation Au
niveau du paramétrage de la configuration WAN, il y a un paramètre appelé Maximum idle timer. Ce
paramètre contrôle le nombre de secondes d'inactivité avec la coupure de la connexion à Internet.
Le paramètre par défaut est à "0", ce qui dévalide cette fonctionnalité et vous connecte à internet tout le
temps. Nous vous conseillons de changer le Maximum idle timer à "300" (5 minutes) de sorte que la ligne
soit coupée après 5 minutes d'inactivité pour limiter les coûts.
Aux utilisateurs qui ont souscrit un abonnement internet illimité.
Vous pouvez laisser ce paramètre à 0 ou valider l'Auto-reconnexion pour toujours être en ligne.
Note technique :
Le Maximum idle timer est utile uniquement si votre FAI utilise une connexion PPPoE.
Informazione importante riguardante la registrazione in internet
Per gli utenti che sottoscrivono un abbonamento Internet broadband limitato o a “pagamento per il traffico
dati effettuato” Nelle impostazioni della configurazione WAN, c'è un parametro chiamato Maximum idle
timer. Questo parametro controlla i secondi di inattività prima di chiudere la connessione ad Internet.
L'impostazione di default è “0” che disabilita questa funzione cosicché la connessione ad Internet è
sempre attiva in ogni momento. Suggeriamo di cambiare il parametro di Maximum idle timer a “300” (5
minuti) cosicché il dispositivo fermerà la connessione dopo 5 minuti di inattività. In questo modo il costo
della telefonate sarà ridotto.
Per gli utenti che sottoscrivono un abbonamento Internet broadband illimitato.
E' possibile lasciare questo parametro invariato o abilitare la funzione di auto-connessione per rimanere
sempre connessi
Nota Tecnica :
Il parametro Maximum idle timer è rilevante solo se l'ISP utilizza una connessione PPPoE
Información importante acerca de la subscripción a Internet
Los usuarios suscritos, en los parámetros de configuración WAN, a un acceso a Internet de banda ancha
limitado o de "pago por uso", encontrarán un parámetro llamado Maximum idle timer. Este parámetro
controla cuántos segundos de inactividad se permiten antes de que se interrumpa la conexión a Internet.
El valor por defecto es "0", y desactiva esta funcionalidad, con lo que se estará conectado
ininterrumpidamente a Internet. Se recomienda que se modifique el valor de Maximum idle timer a "300"
(5 minutos); así el dispositivo cortará la línea tras 5 minutos de inactividad y se reducirán los costes por
uso.
Los usuarios suscritos a un acceso a internet de banda ancha ilimitado pueden dejar este parámetro
como se encuentra o bien activar Auto-reconnect para estar siempre conectados.
Notas técnicas:
Maximum idle timer sólo es relevante si el ISP usa una conexión PPPoE.

WICHTIGE Hinweise zur Internet-Verbindung
Beachten Sie bitte, das bei dem Einsatz eines Routers hohe Verbindungskosten entstehen können.
Sie müssen die Einstellungen des Routers Ihrem Tarif und Ihren Surfgewohnheiten anpassen, um
zusätzliche Kosten zu vermeiden. Insbesondere dann, wenn sie einen Tarif nutzen, bei dem Ihnen die
Kosten auf der Basis Ihrer Online-Zeit in Rechnung gestellt werden (zeitbasierend), müssen Sie Ihren
Router durch korrekte Einstellung dazu veranlassen, die Verbindung bei Inaktivität zu trennen.
Bei Nutzung eines Tarifs der auf einem festgelegten Volumen (übertragene Datenmenge) beruht, sollten
Sie entsprechende Einstellungen verwenden. Auch bei der Nutzung einer Flatrate (Volumen und Zeit
unabhängiger Tarif) ist die richtige Wahl der Routereinstellung vorzunehmen.
Nach Durchführung der Einstellungen sollten Sie sich vergewissern, dass Ihre Einstellungen vom Gerät
übernommen worden sind. Am besten können Sie dies prüfen, indem Sie das Gerät kurz von der
Versorgungsspannung trennen und dann das Konfigurationsmenü erneut aufrufen.
Im Weiteren werden die Einstellungen erläutert, die Sie aktivieren müssen um das entsprechende Verhalten
des Gerätes auszulösen.
„ALWAYS-ON“ - „MANUAL“ - „CONNECT-On-DEMAND“
„IMMER AN“ - „MANUELL“ - „AUF ANFRAGE“
Diese Funktionen steuern das Online-Verhalten der Produkte:
DI – Produkte: (siehe auch Hinweis Î Maximum Idle Time)
Always-On : Router bleibt ständig mit dem Internet verbunden
Manual: Sie müssen im Menü Status des Routers die Verbindung manuell aktivieren
Connect on Demand: Bei einer Verbindungsanfrage aus Ihrem LAN baut der Router die Verbindung
zum Internet automatisch auf.
DSL – Produkte: (siehe auch Hinweis Î Maximum Idle Time)
Connect On Demand: Bei einer Verbindungsanfrage aus Ihrem LAN baut der Router die Verbindung
zum Internet automatisch auf. Wird dieser Funktion nicht
aktiviert, dann
bleibt das Gerät ständig mit dem Internet verbunden.
"MAXIMUM IDLE TIME"
"Maximal untätige Zeit / Leerlaufzeit"
Nach dieser Zeitdauer wird der Router eine ungenutzte Internetverbindung trennen.
Wird hier die Ziffer "0" eingegeben, dann trennt der Router die Verbindung nicht
und bleibt mit dem
Internet verbunden. Dieses Verhalten ist unabhängig von den anderen Einstellungen des Routers.
Bewährt hat sich eine "MAXIMUM IDLE TIME" von 5 Minuten oder 300 Sekunden.
Zusätzlicher Hinweis:
In vielen Fällen werden unerwünschte Anwahlen durch installierte Messenger Programme, Virenscanner
oder Programme, die Online Updates suchen, verursacht.
Auch ein E-Mail Programm kann das Verbinden oder „Online bleiben“ verursachen, genauso aber auch ein
Trojaner oder Virus im System. Eine fehlende Verschlüsselung im Wireless Bereich über das gleiche Gerät
oder einen von Ihnen zusätzlich installierten und über das Netzwerk mit Ihrem Router verbundenen
Accesspoint kann externen Personen die Nutzung Ihres DSL Anschlusses erlauben. Überprüfen Sie Ihre
Geräte in dieser Hinsicht.
Wir empfehlen Ihnen, www.dlink.de
auf aktuelle Firmware zu überprüfen und die Produkte zu aktualisieren.
Überprüfen Sie nach einem Firmware Update erneut das WAN Menü auf die korrekten Einstellungen und im
Betrieb den Router auf das Online-Verhalten.

15
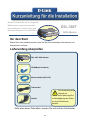
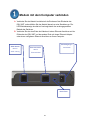
Vor dem Start
Stellen Sie vor der Installation sicher, dass Sie über alle notwendigen Informationen und
Komponenten verfügen.
Lieferumfang überprüfen
Sollte eines dieser Teile fehlen, wenden Sie sich an Ihren Fachhändler.
DSL-380T ADSL-Modem
CD-ROM (mit Handbuch)
Ethernet-Kabel (CAT5 UTP)
Telefonkabel
Netzteil
Dieses Produkt kann mit den folgenden
Webbrowsern eingerichtet werden:
Internet Explorer 6 (oder höher) und
Netscape Navigator 6.2.3 (oder höher).
DSL-380T
ADSL-Modem
Die Verwendung eines
Netzteils mit
abweichender Spannung führt
zur Beschädigung des Geräts
und zum Erlöschen der
Garantie.

16
Modem mit dem Computer verbinden
A. Verbinden Sie das Netzteil zunächst mit der Buchse auf der Rückseite des
DSL-380T, und schließen Sie das Netzteil danach an eine Steckdose an. Die
LED-Betriebsanzeige leuchtet auf und zeigt damit den ordnungsgemäßen
Betrieb des Geräts an.
B. Verbinden Sie das eine Ende des Kabels mit einem Ethernet-Anschluss auf der
Rückseite des DSL-380T und das andere Ende mit einem Ethernet-Adapter
oder einem verfügbaren Ethernet-Anschluss an Ihrem Computer.
ADSL-Anschl
uss zur
ADSL-Leitung
Ethernet-Anschl
uss für
Ethernet-Kabel
Reset-Taste
Stromeingang für
das Netzteil

17
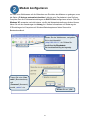
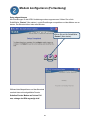
Modem konfigurieren
Um über Ihren Webbrowser auf die Webseiten zum Einrichten des Modems zu gelangen, muss
die Option „IP-Adresse automatisch beziehen“ aktiviert sein. Das bedeutet, dass Sie Ihren
Computer über die IP-Netzwerkeinstellungen als DHCP-Client konfigurieren müssen. Falls Sie
Windows XP verwenden und nicht wissen, wie Sie die Netzwerkeinstellungen ändern können,
fahren Sie mit den Anweisungen im Anhang fort. Weitere Informationen zur Änderung der
IP-Einstellungen bei Computern mit Windows-Betriebssystemen finden Sie auch im
Benutzerhandbuch.
Tragen Sie unter „User
name“ (Benutzername)
und
„Password“ (Kennwort)
jeweils „admin“ ein.
Starten Sie den Webbrowser, und geben
Sie in das Adressfeld
„http://192.168.1.1“ ein. Drücken Sie
anschließend die Eingabetaste.
Die Anmeldeaufforderung wird angezeigt.
Klicken Sie auf „OK“.

18
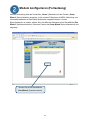
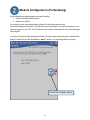
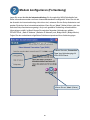
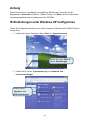
Modem konfigurieren (Fortsetzung)
Nach der Anmeldung wird das Verzeichnis „Home“ (Startseite) mit dem Fenster „Setup
Wizard“ (Setup-Assistent) angezeigt. In den meisten Fällen kann die ADSL-Verbindung zum
Internetdienstanbieter mit dem Setup-Assistenten hergestellt werden. Um den
Setup-Assistenten zu starten, klicken Sie in der Mitte der Webseite auf die Schaltfläche „Run
Wizard“ (Assistenten starten). Das erste Fenster des Setup Wizard (Setup-Assistenten) wird
angezeigt.
Klicken Sie auf die Schaltfläche
„Run Wizard“ (Assistent starten).
La pagina si sta caricando...
La pagina si sta caricando...
La pagina si sta caricando...
La pagina si sta caricando...
La pagina si sta caricando...
La pagina si sta caricando...
La pagina si sta caricando...
La pagina si sta caricando...
La pagina si sta caricando...
La pagina si sta caricando...
La pagina si sta caricando...
La pagina si sta caricando...
La pagina si sta caricando...
La pagina si sta caricando...
La pagina si sta caricando...
La pagina si sta caricando...
La pagina si sta caricando...
La pagina si sta caricando...
La pagina si sta caricando...
La pagina si sta caricando...
La pagina si sta caricando...
La pagina si sta caricando...
La pagina si sta caricando...
La pagina si sta caricando...
La pagina si sta caricando...
La pagina si sta caricando...
La pagina si sta caricando...
La pagina si sta caricando...
La pagina si sta caricando...
La pagina si sta caricando...
La pagina si sta caricando...
La pagina si sta caricando...
La pagina si sta caricando...
La pagina si sta caricando...
La pagina si sta caricando...
La pagina si sta caricando...
La pagina si sta caricando...
La pagina si sta caricando...
La pagina si sta caricando...
La pagina si sta caricando...
La pagina si sta caricando...
La pagina si sta caricando...
La pagina si sta caricando...
La pagina si sta caricando...
La pagina si sta caricando...
La pagina si sta caricando...
La pagina si sta caricando...
La pagina si sta caricando...
La pagina si sta caricando...
La pagina si sta caricando...
La pagina si sta caricando...
La pagina si sta caricando...
-
 1
1
-
 2
2
-
 3
3
-
 4
4
-
 5
5
-
 6
6
-
 7
7
-
 8
8
-
 9
9
-
 10
10
-
 11
11
-
 12
12
-
 13
13
-
 14
14
-
 15
15
-
 16
16
-
 17
17
-
 18
18
-
 19
19
-
 20
20
-
 21
21
-
 22
22
-
 23
23
-
 24
24
-
 25
25
-
 26
26
-
 27
27
-
 28
28
-
 29
29
-
 30
30
-
 31
31
-
 32
32
-
 33
33
-
 34
34
-
 35
35
-
 36
36
-
 37
37
-
 38
38
-
 39
39
-
 40
40
-
 41
41
-
 42
42
-
 43
43
-
 44
44
-
 45
45
-
 46
46
-
 47
47
-
 48
48
-
 49
49
-
 50
50
-
 51
51
-
 52
52
-
 53
53
-
 54
54
-
 55
55
-
 56
56
-
 57
57
-
 58
58
-
 59
59
-
 60
60
-
 61
61
-
 62
62
-
 63
63
-
 64
64
-
 65
65
-
 66
66
-
 67
67
-
 68
68
-
 69
69
-
 70
70
-
 71
71
-
 72
72


D-Link DSL-380T Quick Instruction Manual
- Tipo
- Quick Instruction Manual
- Questo manuale è adatto anche per
in altre lingue
- English: D-Link DSL-380T
- français: D-Link DSL-380T
- español: D-Link DSL-380T
- Deutsch: D-Link DSL-380T
Documenti correlati
Altri documenti
-
Belkin F5D9630uk4A Manuale utente
-
-
-
SMC 7804WBRB Manuale utente
-
Intellinet 524872 Quick Installation Guide
-
Conceptronic ADSL2+ Router Manuale utente
-
Linksys BEFDSR41W Manuale del proprietario
-
 Atlantis Land I-Fly A02-WRA2-11B Manuale utente
-
Sitecom DC-227 Guida d'installazione
-
 Topdon UltraDiag Manuale utente

