NEC Car Stereo System SB-06WC Manuale utente
- Categoria
- Proiettori
- Tipo
- Manuale utente
Questo manuale è adatto anche per

User's Manual
Wireless Display Media Player
SB-06WC

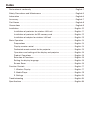
Index
Declaration of conformity ··················································································English-1
Safety Precautions and Maintenance ·······························································English-5
Information ········································································································English-6
Accessory ··········································································································English-7
Part Names ········································································································English-8
Connections ······································································································English-9
Installation ·······································································································English-10
Installation of protector for wireless LAN unit ········································English-11
Installation of protector for SD memory card ·········································English-12
Installation of adapter for wireless LAN unit ··········································English-13
Basic Operation ·······························································································English-14
Preparations ···························································································English-14
Display remote control ···········································································English-14
Dedicated remote control for the projector ············································English-15
Operations and settings of the display and projector ····························English-16
Product Operations ················································································English-16
Selection of Functions ············································································English-16
Setting the display language ··································································English-16
Screen Saver ··························································································English-16
Function Controls ····························································································English-17
1. Wireless Display ·················································································English-17
2. Media Player ······················································································English-19
3. Settings ······························································································English-24
Troubleshooting ······························································································English-34
Specifications ··································································································English-36

English-1
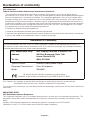
Declaration of conformity
FCC statement
Federal Communication Commission Interference Statement
This equipment has been tested and found to comply with the limits for a Class B digital device,
pursuant to Part 15 of the FCC Rules. These limits are designed to provide reasonable protection against
harmful interference in a residential installation. This equipment generates, uses and can radiate radio
frequency energy and, if not installed and used in accordance with the instructions, may cause harmful
interference to radio communications. However, there is no guarantee that interference will not occur in
a particular installation. If this equipment does cause harmful interference to radio or television reception,
which can be determined by turning the equipment off and on, the user is encouraged to try to correct
the interference by one or more of the following measures:
• Reorient or relocate the receiving antenna.
• Increase the separation between the equipment and receiver.
• Connect the equipment into an outlet on a circuit different from that to which the receiver is connected.
• Consult the dealer or an experienced radio/TV technician for help.
Declaration of Conformity
This device complies with Part 15 of FCC Rules. Operation is subject to the following two conditions. (1)
This device may not cause harmful interference, and (2) this device must accept any interference received,
including interference that may cause undesired operation.
U.S. Responsible Party: NEC Display Solutions of America, Inc.
Address: 500 Park Boulevard, Suite 1100
Itasca, Illinois 60143
Tel. No.: (630) 467-3000
Type of Product: Wireless Display Media Player
Equipment Classification: Class B Peripheral
Model: SB-06WC
We hereby declare that the equipment specied above
conforms to the technical standards as specied in the FCC Rules.
FCC Caution: Any changes or modifications not expressly approved by the party responsible for
compliance could void the user’s authority to operate this equipment.
This device and its antenna(s) must not be co-located or operating in conjunction with any other antenna or
transmitter.
IMPORTANT NOTE:
FCC Radiation Exposure Statement:
This equipment complies with FCC radiation exposure limits set forth for an uncontrolled environment. This
equipment should be installed and operated with minimum distance 20cm between the radiator & your
body.
Country Code selection feature to be disabled for products marketed to the US/CANADA
Operations in the 5.15-5.25GHz band are restricted to indoor usage only.

English-2
IC
Industry of Canada statement
This device complies with Industry Canada licence-exempt RSS standard(s). Operation is subject to the
following two conditions:
(1) this device may not cause interference, and
(2) this device must accept any interference, including interference that may cause undesired operation
of the device.
Caution:
(With DFS band)
(i) the device for operation in the band 5150-5250 MHz is only for indoor use to reduce the potential for
harmful interference to co-channel mobile satellite systems;
(ii) the maximum antenna gain permitted for devices in the bands 5250-5350 MHz and 5470-5725 MHz
shall comply with the e.i.r.p. limit; and
(iii) the maximum antenna gain permitted for devices in the band 5725-5825 MHz shall comply with the
e.i.r.p. limits specified for point-to-point and non point-to-point operation as appropriate.
(iv) Users should also be advised that high-power radars are allocated as primary users (i.e. priority
users) of the bands 5250-5350 MHz and 5650-5850 MHz and that these radars could cause
interference and/or damage to LE-LAN devices.
Radiation Exposure Statement:
This equipment complies with IC radiation exposure limits set forth for an uncontrolled environment. This
equipment should be installed and operated with minimum distance 20cm between the radiator & your
body.
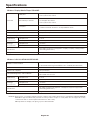
Antenna list:
Model Type Connector 2.4~2.4835GHz 5.15~5.25GHz 5.25~5.35GHz 5.47~5.725GHz 5.725~5.85GHz
Ant ( L ) PCB ant. NA 0.34 dBi -2.8 dBi -2.72 dBi -1.29 dBi -0.19 dBi
Ant ( R ) PCB ant. NA 1.15 dBi -0.58 dBi -0.45 dBi 3.24 dBi 1.78 dBi
Canadian Department of Communications Compliance Statement (for Canada)
This Class B digital apparatus complies with Canadian ICES-003.

English-3
CE statement
Europe – EU Declaration of Conformity
This device complies with the essential requirements of the R&TTE Directive 1999/5/EC. The following test
methods have been applied in order to prove presumption of conformity with the essential requirements of
the R&TTE Directive 1999/5/EC:
- EN 60950-1:2006+A11:2009+A1:2010+A12:2011
- EN62311 : 2008
- EN 300 328 V1.8.1: 2012
- EN 301 893 V1.7.1: 2012
- EN 301 489-1 V1.9.2: 2011
- EN 301 489-17 V2.2.1: 2012
In Italy the end-user should apply for a license at the national spectrum authorities in order to obtain
authorization to use the device for setting up outdoor radio links and/or for supplying public access to
telecommunications and/or network services.
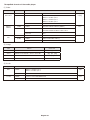
Česky
[Czech]
NECDisplaySolutions,Ltd.tímtoprohlašuje,žetentoWirelessDisplayMediaPlayer
(Model:SB-06WC)jeveshoděsezákladnímipožadavkyadalšímipříslušnýmiustanoveními
směrnice1999/5/ES.
Dansk
[Danish]
UndertegnedeNECDisplaySolutions,Ltd.erklærerherved,atfølgendeudstyrWireless
DisplayMediaPlayer(Model:SB-06WC)overholderdevæsentligekravogøvrigerelevante
kravidirektiv1999/5/EF.
Deutsch
[German]
HiermiterklärtNECDisplaySolutions,Ltd.,dasssichdasGerätWirelessDisplayMediaPlayer
(Model:SB-06WC)inÜbereinstimmungmitdengrundlegendenAnforderungenunddenübrigen
einschlägigenBestimmungenderRichtlinie1999/5/EGbendet.
Eesti
[Estonian]
KäesolevagakinnitabNECDisplaySolutions,Ltd.seadmeWirelessDisplayMediaPlayer
(Model:SB-06WC)vastavustdirektiivi1999/5/EÜpõhinõuetelejanimetatuddirektiivist
tulenevateleteisteleasjakohastelesätetele.
English Hereby,NECDisplaySolutions,Ltd.,declaresthatthisWirelessDisplayMediaPlayer
(Model:SB-06WC)isincompliancewiththeessentialrequirementsandotherrelevant
provisionsofDirective1999/5/EC.
Español
[Spanish]
PormediodelapresenteNECDisplaySolutions,Ltd.declaraqueelWirelessDisplay
MediaPlayer(Model:SB-06WC)cumpleconlosrequisitosesencialesycualesquieraotras
disposicionesaplicablesoexigiblesdelaDirectiva1999/5/CE.
Ελληνική
[Greek]
ΜΕΤΗΝΠΑΡΟΥΣΑNECDisplaySolutions,Ltd.ΔΗΛΩΝΕΙΟΤΙWirelessDisplayMediaPlayer
(Model:SB-06WC)ΣΥΜΜΟΡΦΩΝΕΤΑΙΠΡΟΣΤΙΣΟΥΣΙΩΔΕΙΣΑΠΑΙΤΗΣΕΙΣΚΑΙΤΙΣΛΟΙΠΕΣ
ΣΧΕΤΙΚΕΣΔΙΑΤΑΞΕΙΣΤΗΣΟΔΗΓΙΑΣ1999/5/ΕΚ.
Français
[French]
ParlaprésenteNECDisplaySolutions,Ltd.déclarequel'appareilWirelessDisplayMedia
Player(Model:SB-06WC)estconformeauxexigencesessentiellesetauxautresdispositions
pertinentesdeladirective1999/5/CE.
Italiano
[Italian]
ConlapresenteNECDisplaySolutions,Ltd.dichiarachequestoWirelessDisplayMedia
Player(Model:SB-06WC)èconformeairequisitiessenzialiedallealtredisposizionipertinenti
stabilitedalladirettiva1999/5/CE.
Latviski
[Latvian]
AršoNECDisplaySolutions,Ltd.deklarē,kaWirelessDisplayMediaPlayer(Model:SB-06WC)
atbilstDirektīvas1999/5/EKbūtiskajāmprasībāmuncitiemartosaistītajiemnoteikumiem.
Lietuvių
[Lithuanian]
ŠiuoNECDisplaySolutions,Ltd.deklaruoja,kadšisWirelessDisplayMediaPlayer(Model:SB-
06WC)atitinkaesminiusreikalavimusirkitas1999/5/EBDirektyvosnuostatas.

English-4
Nederlands
[Dutch]
HierbijverklaartNECDisplaySolutions,Ltd.dathettoestelWirelessDisplayMediaPlayer
(Model:SB-06WC)inovereenstemmingismetdeessentiëleeisenendeandererelevante
bepalingenvanrichtlijn1999/5/EG.
Malti
[Maltese]
Hawnhekk,NECDisplaySolutions,Ltd.,jiddikjaralidanWirelessDisplayMediaPlayer
(Model:SB-06WC)jikkonformamal-ħtiġijietessenzjaliumaprovvedimentioħrajnrelevantili
hemmd-Dirrettiva1999/5/EC.
Magyar
[Hungarian]
Alulírott,NECDisplaySolutions,Ltd.nyilatkozom,hogyaWirelessDisplayMediaPlayer
(Model:SB-06WC)megfelelavonatkozóalapvetõkövetelményeknekésaz1999/5/ECirányelv
egyébelõírásainak.
Polski
[Polish]
NiniejszymNECDisplaySolutions,Ltd.oświadcza,żeWirelessDisplayMediaPlayer
(Model:SB-06WC)jestzgodnyzzasadniczymiwymogamiorazpozostałymistosownymi
postanowieniamiDyrektywy1999/5/EC.
Português
[Portuguese]
NECDisplaySolutions,Ltd.declaraqueesteWirelessDisplayMediaPlayer(Model:SB-06WC)
estáconformecomosrequisitosessenciaiseoutrasdisposiçõesdaDirectiva1999/5/CE.
Slovensko
[Slovenian]
NECDisplaySolutions,Ltd.izjavlja,dajetaWirelessDisplayMediaPlayer(Model:SB-06WC)
vskladuzbistvenimizahtevamiinostalimirelevantnimidoločilidirektive1999/5/ES.
Slovensky
[Slovak]
NECDisplaySolutions,Ltd.týmtovyhlasuje,žeWirelessDisplayMediaPlayer(Model:SB-
06WC)spĺňazákladnépožiadavkyavšetkypríslušnéustanoveniaSmernice1999/5/ES.
Suomi
[Finnish]
NECDisplaySolutions,Ltd.vakuuttaatätenettäWirelessDisplayMediaPlayer(Model:SB-
06WC)tyyppinenlaiteondirektiivin1999/5/EYoleellistenvaatimustenjasitäkoskevien
direktiivinmuidenehtojenmukainen.

English-5
Safety Precautions and Maintenance
For optimum performance, please note the following when setting up and using the Wireless Display
Media Player.
Please adhere to the precautions stated in the user’s manual of the projector or display to be
connected to this product.
In the event of a fault occurring, pull out the power plug of the display or projector
immediately!
Ifnot,thismayresultinreorelectricshock.Pulloutthepowerplugfromtheelectricaloutletimmediately.Consult
yourdealerforrepairssubsequently.
Do not use when there is a failure (e.g. the screen does not appear etc.) or when there is
smoke or strange odors
Thismayresultinreorelectricshock.
Do not place foreign objects inside the product
Donot placeforeignobjectsinsidethe devicewhen mountingthedisplay orprojector tothisproduct.This may
resultinreorelectricshock.
Do not disassemble or modify the product
Thismayresultininjury,reorelectricshock.
Do not touch the power cable when there is thunder
Donottouchthepowercableofthedisplayorprojectorwhenthereisthunder.Thismayresultinelectricshock.
Do not replace this product with the power cable still connected to the electrical outlet
Donotreplacethisproductwiththepowercableofthedisplayorprojectorstillconnectedtotheelectricaloutlet.
Thismayresultinafailure.
Do not use this product in a location where it may get wet
Cutoffthepowersupplyimmediatelyifwaterweretogetinsidethisproduct,thedisplayorprojectorandconsult
yourdealerafter pullingout thepower cablefromthe electricaloutlet. Ifnot, thismayresult ina failure,re or
electricshock.
Do not use the wireless LAN unit as a life-saving device or equipment
Thewireless LANunit attachedtothisproductis notdesigned tobeusedasa life-savingequipment ordevice
suchas amedical device,nuclear powerequipment /device, aeronauticaldevice, transportequipment /device
orequipment/devicethatrequiresahighlevelofreliability,norisitdesignedtobeusedincombinationwithsuch
devices.
• DonotusethewirelessLANunitnearpeoplewhoarettedwitharticialpacemakers.
• DonotusethewirelessLANunitmedicaldevices.Thismayresultinelectromagneticinterferenceinthemedical
deviceandposearisktohumanlife.

English-6
Information
Corresponding regions, corresponding countries of Wireless LAN Unit
Please refer to our company website for the list of regions and countries where the use of the product
is supported. Please duly note that use of the product in a region or country which does not support its
use may contravene the laws on electromagnetic transmissions in that country.
URL: http://www.nec-display.com/ap/en_projector/others/wlan.html
GPL/LGPL Software Licenses
The product includes software licensed under GNU General Public License (GPL), GNU Lesser
General Public License (LGPL), and others.
For more information on each software, see “readme.pdf” inside the “about GPL&LGPL” folder on the
supplied CD-ROM.
About Trademarks
• Intel and the Intel
®
logo are trademarks of Intel Corporation in the US and/or other countries.
• Windows
®
is a registered trademark of Microsoft Corporation in the US and/or other countries.
• SD and SDHC are the trademarks of SD-3C, LLC.
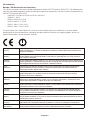
WEEE Mark (European Directive 2012/19/EC)
Within the European Union
EU-wide legislation, as implemented in each Member State, requires that waste electrical
and electronic products carrying the mark (left) must be disposed of separately from
normal household waste. This includes monitors and electrical accessories, such as
signal cables or power cords. When you need to dispose of your NEC display products,
please follow the guidance of your local authority, or ask the shop where you purchased
the product, or if applicable, follow any agreements made between yourself and NEC.
The mark on electrical and electronic products only applies to the current European
Union Member States.
Outside the European Union
If you wish to dispose of used electrical and electronic products outside the European Union, please
contact your local authority so as to comply with the correct disposal method.
NOTE:
• Unauthorized reproduction of the information in this manual in part or in whole is strictly prohibited.
• The information in this manual may differ from the information shown in the actual display screen.
• The information in this manual is subject to future changes without notice.
• While every endeavor has been made to ensure the information in this manual is accurate and
complete, please contact us if you find any errors or omissions.

English-7
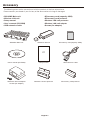
Accessory
The following accessories are enclosed with the product at the time of purchase.
Please contact your dealer if you find any of the accessories missing or damaged.
• SB-06WC Main unit
• Wireless LAN unit
• Setup manual
• User’s manual (CD-ROM)
• USB extension cable
• SD memory card (capacity: 8GB)
• SD memory card protector
• Wireless LAN unit protector
• Wireless LAN unit adapter
• Screws (for adapter)
SB-06WCMainunit WirelessLANunit SDmemorycard(capacity:8GB)
Setup
Manual
User’smanual(CD-ROM) Setupmanual USBextensioncable
WirelessLANunitadapter
Screws(foradapter)
WirelessLANunitprotector SDmemorycardprotector

English-8
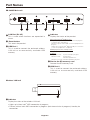
Part Names
SB-06WC Main unit
Wireless LAN unit
7
Indicator
Display the status of the wireless LAN unit.
• Lights up in blue: Intel
®
WiDi connection in progress
• Flashes in blue: Intel
®
WiDi connection in progress (data transmission in progress)/standby for
connection
1
LAN Port (RJ-45)
This is used when functions are expanded in
future.
2
Reset button
This resets the product.
3
USB Port 1
This is used to connect the enclosed wireless
L AN unit or a commercially-ava ilable USB
memory.
4
Indicator
Displays the status of the product.
When using the Intel
®
WiDi function:
•Lights up in green: Intel
®
WiDi connection in progress
(communication in progress)
•Flashes in green: Intel
®
WiDi connection preparation in
progress
•Lights up in orange: Intel
®
WiDi standby for connection
(connection preparation completed)
Media player function, setting screen:
•Lights up in green: Power ON
Common
•Lights up in red: System startup in progress
•Flashes in red: System error
Firmware update error
•Flashes in orange: Firmware update in progress
5
Slot for the SD memory card
Connect the SD memory card.
6
USB Port 2
This is used to connect the enclosed wireless
L AN unit or a commercially-ava ilable USB
memory.

English-9
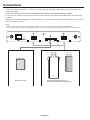
Connections
Insert the enclosed wireless LAN unit or a commercially-available USB memory or SD memory card
into the product.
• Insert the wireless LAN unit into the product first before turning on the power supply.
• Insert the SD memory card into the slot for the SD memory card so that the label faces the top of the
product.
• Please refer to the paragraph on “Specifications” for the specifications of the USB memory, SD memory
card that can be used.
NOTE:
• The Intel
®
WiDi function cannot be used if the wireless LAN unit is connected after the product is powered up.
• The enclosed wireless LAN unit and USB memory can be used when inserted into either USB Port 1 or USB Port 2.
Enclosed wireless LAN unit or
commercially-available USB memory
SD memory card

English-10
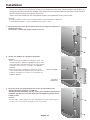
Installation
Attach this product to the display main unit or projector main unit. Depending on the display, an
optional slot board conversion adapter SB-02AM may be required. Refer to the Quick Start Guide of
the SB-02AM on how to install the SB-02AM.
Check with your dealer for the compatible displays and projectors that can be used.
CAUTION:
• During installation, do not leave any foreign objects inside the display or projector.
Do not drop the product, screws and optional slot cover as well.
1. Remove the two screws on the optional slot of slot 2 type to remove the
optional slot cover.
For displays, remove the handle where necessary.
2. Attach this product to a display or projector.
CAUTION:
• When attaching this product to a display, make sure
the top side of this product (side opposite to the side
where the label is pasted) faces the rear of the display.
Damages may result if it is inserted in the opposite
direction.
• When attaching this product to a projector, make
sure the top side of this product faces the top of the
projector. Damages may result if it is inserted in the
opposite direction.
3. Securely fasten this product with the screws on the optional slot.
(tightening torque 49.0N・cm - 68.6N・cm)
Securely fasten the handle with the screws if the handle of the display is
removed. See the manual of the display for the tightening torque of the
handle screws.
CAUTION:
• Do not apply a force higher than the specified force when tightening the
screws. This may result in damages to the screw holes.
Rear of the display
Top side of
this product

English-11
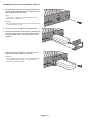
Installation of protector for wireless LAN unit
1. Remove the screws for securing the protector at
the top of the USB Port where the wireless LAN
unit is going to be connected.
NOTE:
• The wireless LAN unit can be inserted into either
USB Port 1 or USB Port 2.
CAUTION:
• Do not lose the removed screws. Do not leave them
inside the device as well.
2. Insert the wireless LAN unit to the USB Port.
3. Attach the protector for the wireless LAN unit. At
this point, fit the two studs on the protector into
the two square holes on the front panel of the
product.
4. Securely fasten the protector with the screws.
(tightening torque 4.7N•cm - 7.3N•cm)
CAUTION:
• Do not apply a force higher than the specified force
when tightening the screws. This may result in
damages to the screw holes.

English-12
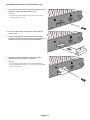
Installation of protector for SD memory card
1. Remove the screws for securing the protector at the
top of the slot for the SD memory card.
CAUTION:
• Do not lose the removed screws. Do not leave them
inside the device as well.
2. Insert the SD
memory card
into the slot for the SD
memory card
.
3. Attach the protector for the SD memory card. At
this point, fit the two studs on the protector into the
square holes on the front panel of the product.
4. Securely fasten the protector with the screws.
(tightening torque 4.7N•cm - 7.3N•cm)
CAUTION:
• Do not apply a force higher than the specified force
when tightening the screws. This may result in damages
to the screw holes.

English-13
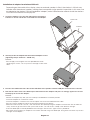
Installation of adapter for wireless LAN unit
Depending on the model of the display, when an external speaker is fitted, the wireless LAN unit may
interfere with the external speaker, making direct connection to the product impossible. In this case, use
an adapter for the wireless LAN unit (hereinafter “adapter”) and a USB extension cable to install the wireless
LAN unit to the back of the display etc.
1. Install the adapter such that the indicator on the wireless
LAN unit is on the side of the screw holes on the adapter.
Indicator
Screw hole
2. Securely fasten the adapter with the enclosed adapter screws.
(tightening torque 19.6N•cm - 29.4N•cm)
CAUTION:
• Do not apply a force higher than the specified force when
tightening the screws. This may result in damages to the screw
holes.
3. Connect the USB extension cable to the USB Port of the product and the USB port of the wireless LAN unit.
4. Peel off the cover of the two-sided tape at the bottom of the adapter and press it strongly against the rear of
the display to secure the adapter.
CAUTION:
• Secure the adapter only after you have carefully considered the installation position.
• Install the adapter on a horizontal surface.
• Install the adapter in a location that will not impose stresses on the USB extension cable.
• Do not install the adapter on top of the heat release outlet on the display.
• Remove all moisture, dust, oil, etc., from the location first before pasting the adapter at the location. Do not allow the
sticky surface to get into contact with your hands or dust. This will result in a drop in the adhesive strength.
• The two-sided tape cannot be peeled off and used again. Do not use it again once it is peeled off.
• Be careful when removing an adapter that has been attached using two-sided tape. Using excessive force may result in
damages to the adapter.

English-14
Basic Operation
Preparations
For displays
•Remote control enclosed with the display
For projectors
•Remote control enclosed with the projector
•Dedicated remote control for operating the product
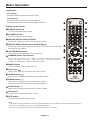
Display remote control
1
POWER ON button
Turn on the power of the display.
2
STANDBY button
Turn off the power of the display.
3
SWITCH INPUT button (OPTION)
Switch the video input of the display to the product.
4
SWITCH AUDIO INPUT button (AUDIO INPUT)
Switch the audio input of the display. Select [OPTION] when outputting
the audio of the product.
5
OPTION MENU button
Used for the menu operations of the product.
6
NUMBER button, PLAY button
U s e d f o r t h e i n p u t o f n u m b e r s . W h e n p l a y i n g c o n t e n t s
w i t h t h e m e d i a p l a y e r , t h e f u n c t i o n s a r e a s f o l l o w s .
1: Back, 2: Playback, 3: Skip, 5: Stop, 6: Pause.
7
MENU button
Turn the display OSD screen ON/OFF.
8
UP button (
)
Move to the setting at the top of the menu screen.
9
DOWN button (
)
Move to the setting at the bottom of the menu screen.
0
MINUS button ( - )
Move to the setting on the left of the menu screen.
Delete the number in front when inputting numbers.
!
PLUS button ( + )
Move to the setting on the right of the menu screen.
@
SET button
Confirm the setting in the menu screen.
#
EXIT button
Return to the previous menu screen.
NOTE:
• The remote control enclosed with the display differs depending on the model. Use the OPTION button for menu
operations of the product if there is no OPTION MENU button.
• See the manual of the display for button operations other than the above.

English-15
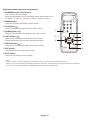
Dedicated remote control for the projector
1
NUMBER button, PLAY button
Used for the input of numbers.
When playing contents with the media player, the functions are
as follows. 1: Back, 2: Playback, 3: Skip, 5: Stop, 6: Pause.
2
MENU button
Used for the menu operations of the product.
3
UP button (
)
Move to the setting at the top of the menu screen.
4
DOWN button (
)
Move to the setting at the bottom of the menu screen.
5
LEFT button (
)
Move to the setting on the left of the menu screen.
Delete the number in front when inputting numbers.
6
RIGHT button (
)
Move to the setting on the right of the menu screen.
7
SET button
Confirm the setting in the menu screen.
8
EXIT button
Return to the previous menu screen.
NOTE:
•Use the remote control enclosed with the projector to turn the power of the projector ON/OFF.
•See the manual of the projector regarding the button operations of the remote control enclosed with the projector.
•Check with your dealer regarding the dedicated remote control for the projector.
MENU
EX IT
PO WE R ON
STAND BY
3
2
6
8
4
5
7
1

English-16
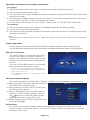
Operations and settings of the display and projector
For displays
(1) Connect the power cable to the display first before connecting to the electrical outlet.
(2) Turn on the main power of the display.
(3) The video input of the display changes to the product upon pressing the OPTION button on the remote
control of the display.
(4) The audio input changes upon pressing the AUDIO INPUT button on the remote control of the display.
Set the input to “OPTION” to select the audio of the product.
(5) Use the display OSD function to set the “AUDIO” setting under “OPTION SETTING” to [DIGITAL].
For projectors
(1) Connect the power cable to the projector first before connecting to the electrical outlet.
(2) Turn on the main power of the projector.
(3) The video input of the projector changes to the product upon pressing the SLOT button on the remote
control of the projector.
NOTE:
• Depending on the model, the projector may not support the audio output of the product. Please check with your dealer
for details.
Product Operations
Use the remote control enclosed with the display to operate the product when using a display.
Use the dedicated remote control for the projector to operate the product when using a projector.
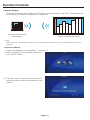
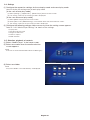
Selection of Functions
The “Home” Screen is displayed during startup
in initial state. Select the function using the -/+
buttons on the remote control and press the SET
button to move to the execution screen of each
function.
Press the OPTION MENU button* on the remote
control to return to the previous screen.
* * : The remote control of the display differs depending on the
model. Use the OPTION button if there is no OPTION MENU
button on the remote control.
* * : Use the MENU button when using a dedicated remote control
for the projector.
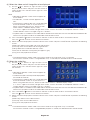
Setting the display language
The display language in the initial state is “English”. Change the display language where necessary.
(1) Select [Settings] in the home screen and press the
SET button on the remote control.
(2) Select [General] and press the SET button when
the Settings menu appears.
(3) Select [Language] and press the SET button to
display a list of the display languages, and use
the
/ buttons to select the desired display
language before pressing the SET button.
(4) Select [Done] and press the SET button to switch
the display language.
Screen Saver
• The screen saver screen will appear if there are no operations on the home screen or Intel
®
WiDi
standby screen for 30 or more seconds. Press the EXIT button to return to the previous screen from
the screen saver screen.

English-17
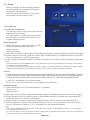
Function Controls
1. Wireless Display
Video from a computer that supports Intel
®
Wireless Display (hereinafter “Intel
®
WiDi”) can be received
and displayed on a display or projected with a projector.
Computer that supports Intel
®
Wireless Display
Projector or display
which is connected to this product
NOTE:
• Refer to the user’s manual of the computer and the Intel website for details on the use and update of the Intel
®
WiDi
software.
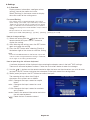
Connection Method
Explains the operations using Windows
®
7, Windows
®
8.
(1) Select [Intel® WiDi] from the home screen and
press the SET button.
(2) The right screen is displayed when the upon
completing the connection preparation of the
product.

English-18
(3) Start up the Intel
®
WiDi software with the computer.
(4) Operate the Intel
®
WiDi software to select “SB06WC”
(
adapter name of the product when shipped from the factory
)
and then click [Connect].
If the adapter name has been changed, select the
specified adapter, and then click [Connect].
NOTE:
• Depending on the operating environment, the product
“SB06WC” may not be detected. In that case, click [Scan] to
scan again.
• For Windows
®
8.1, open the Charm bar, select [Devices] –
[Project] – [Add a wireless display], and then click “SB06WC”.
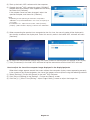
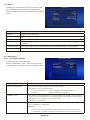
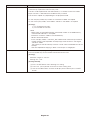
(5) When connecting the product to a computer for the first time, the security code will be displayed in
the standby screen on the display end. Enter this security code in the Intel® WiDi software and click
[Continue].
(6) At the end of the connection processing, the display screen of the computer will appear in the display.
(7) Click [Disconnect] in the Intel
®
WiDi software to stop the connection with the Intel
®
WiDi software.
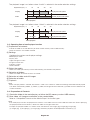
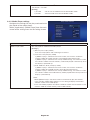
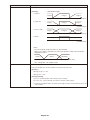
How to adjust the size of the computer image displayed in the display/projector
When black edges appear around the screen without the computer display screen appearing correctly
in the screen of the display/projector, the size of the image can be adjusted using the following method.
(1) Select [Settings]-[Picture and Sound] in the Intel
®
WiDi software.
(2) Click [Adjust cropping] in the [Settings - Picture and Sound] screen.
(3) Click the [+]/[-] icons in the [Setting – Adjust Edge Visibility] screen to adjust the image size.
La pagina si sta caricando...
La pagina si sta caricando...
La pagina si sta caricando...
La pagina si sta caricando...
La pagina si sta caricando...
La pagina si sta caricando...
La pagina si sta caricando...
La pagina si sta caricando...
La pagina si sta caricando...
La pagina si sta caricando...
La pagina si sta caricando...
La pagina si sta caricando...
La pagina si sta caricando...
La pagina si sta caricando...
La pagina si sta caricando...
La pagina si sta caricando...
La pagina si sta caricando...
La pagina si sta caricando...
La pagina si sta caricando...
-
 1
1
-
 2
2
-
 3
3
-
 4
4
-
 5
5
-
 6
6
-
 7
7
-
 8
8
-
 9
9
-
 10
10
-
 11
11
-
 12
12
-
 13
13
-
 14
14
-
 15
15
-
 16
16
-
 17
17
-
 18
18
-
 19
19
-
 20
20
-
 21
21
-
 22
22
-
 23
23
-
 24
24
-
 25
25
-
 26
26
-
 27
27
-
 28
28
-
 29
29
-
 30
30
-
 31
31
-
 32
32
-
 33
33
-
 34
34
-
 35
35
-
 36
36
-
 37
37
-
 38
38
-
 39
39


NEC Car Stereo System SB-06WC Manuale utente
- Categoria
- Proiettori
- Tipo
- Manuale utente
- Questo manuale è adatto anche per