
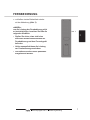
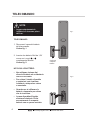
USER'S MANUAL
LCD TV RECEIVER
Please read this manual carefully before
using your television and keep this manual
In a good place for future reference.
MODEL:
L T19M1CW,LT19M2CW
L T22M1CW,LT26M2C
L T26M1C
Q41G2202672 2B

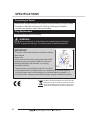
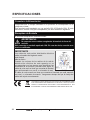
WARNING
• Misuse or modification of this appliance may result in breakdown or injury.
• To reduce the risk of fire or electric shock, do not expose this appliance to rain or moisture.
IMPORTANT INFORMATION
• The appliance is intended for household use only.
• The appliance should always be turned to OFF before plugging or unplugging from socket. Never
yank cord to disconnect from socket; instead, grasp plug and pull to disconnect.
• Check that the voltage on the rating plate of your product corresponds with your local electricity
supply which must be A.C. (Alternating Current).
• If the mains sockets in your home are not suitable for the plug supplied with this product, check
with a qualified electrician for replacement.
FOR OPTIMUM PERFORMANCE
• Do not use in environments which are extremely hot, cold, dusty or humid.
• Keep the unit free from dust and clean with a dry cloth.
• Do not use in areas exposed to direct sunlight or where it can become extremely hot.
•
Avoid placement where there is a lot of movement, vibration or on an unstable surface.
• To reduce the risk of fire or electric shock, the equipment shall not be exposed to rain or moisture
and objects filled with liquids, such as vases, shall be placed on the apparatus.
•
To avoid fire, no naked flame source, such as lit candles, should be placed on or around the unit.
• FFor ventilation, leave at least 10 cm free all around the TV. Do not place the TV on a carpet.
• The ventilation holes must be kept clear from obstructions.
• In case of smoke, or unusual noises or smells coming from the unit, switch it off, unplug it from
the wall socket and contact your dealer or service center.
• Place the TV in such a position that the screen is not exposed to direct sunlight. It is best to have
soft indirect lighting whilst watching TV. Avoid dark environments and screen reflection as these
may cause eye fatigue.
• When the TV has been moved from a cold place, it will need time for the moisture from inside to
evaporate.
•
The appliance coupler is used as the disconnect device of this apparatus, the disconnect device
shall remain readily operable.
IMPORTANT SAFETY INSTRUCTIONS
Read all instruction before use and keep for future reference.
• Keep away from sources of strong magnetism - such as speakers.
• The equipment shall not be exposed to dripping or splashing.
•
The apparatus must be connected to a mains socket outlet with a protected earthed connection.

CHILDREN
• Children do not always understand the dangers associated with operating electrical appliances.
Never allow children to use this appliance.
POWER SUPPLY
• If the unit uses a mains supply, ensure that the plug is securely inserted into the mains socket,
and it is easily accessible.
• Protect the power lead from sharp objects, excessive heat and damp or wet locations. Check
the power lead periodically, and replace if damaged.
• If the unit uses batteries, please ensure that they are inserted correctly - observing the polarity
(+/-).
• Do not mix new and used batteries.
• Please make sure that used batteries are disposed of correctly. Do not burn or incinerate.
• Check that the voltage on the rating plate of your product corresponds with your local electricity
supply which must be A.C. (Alternating Current).
• Any repairs should only be carried out by a fully qualified electrician or an authorised service agent.
LISTENING WITH EARPHONES
• Listen at moderate volumes to avoid hearing damage.
• If you hear no sound during playback, do not turn the volume up as the music may suddenly begin
at a high volume. Excessive sound pressure from earphones and headphones can cause hearing loss.
• To avoid damaging your ears, adjust the volume to the lowest level before playback, and turn up
to the desired level when playback has started.
IMPORTANT SAFETY INSTRUCTIONS
Read all instruction before use and keep for future reference.
CAUTION: TO REDUCE THE RISK OF ELECTRIC SHOCK DO NOT REMOVE COVER
(OR BACK), THERE ARE NO USER SERVICEABLE PARTS INSIDE, REFER SERVICING
TO QUALIFIED SERVICE PERSONNEL.
FOR SAFETY
DO NOT:
• Attempt to disassemble this unit or carry out repairs.
• Attempt to modify the unit in any way.
• Make sure that foreign objects do not get inside the unit.
• Place naked flame sources - such as lit candles on or near the unit.
• Place objects filled with liquids - such as vases, on or next to the unit.
• Cover the unit - allow the unit to be well ventilated.
• Drop the unit or subject it to strong shocks.
• Attempt to service this product yourself as opening or removing covers may expose you to
dangerous voltage or other hazards. Refer all servicing to qualified service personnel.
EN
1

Know Your Machine ......................................................................................... 3
Remote Control ................................................................................................ 6
Wall Mounting.................................................................................................... 8
Antenna Connection ......................................................................................... 10
Tuning Menu Options ...................................................................................... 11
Other Connections ............................................................................................ 13
Basic Operation ................................................................................................ 18
Menu Operation ................................................................................................ 22
Teletext .............................................................................................................. 32
Common Interface Module ............................................................................... 34
Troubleshooting ............................................................................................... 36
Specifications .................................................................................................. 37
CONTENTS
HD Ready Digital LCDTV User Manual
NOTE: This LCD cabinet drawing is a sample and may not depict
your actual LCD
cabinet design.
2

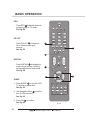
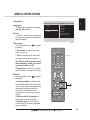
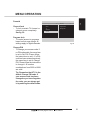
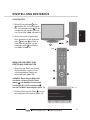
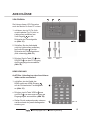
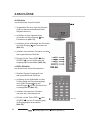
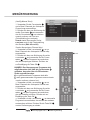
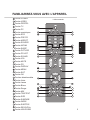
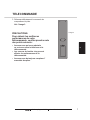
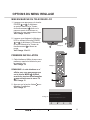
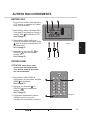
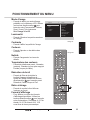
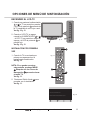
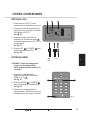
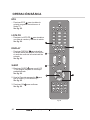
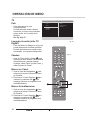
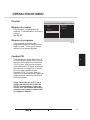
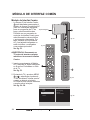
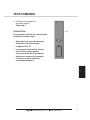
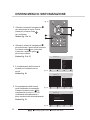
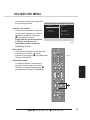
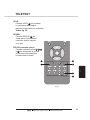
KNOW YOUR MACHINE
A
B
C
D
E
F
G
H
J
K
L
M
N
O
P
Q
R
S
T
U
V
X
Y
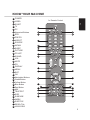
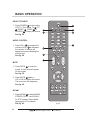
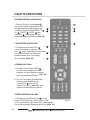
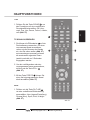
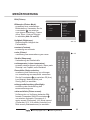
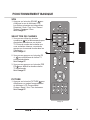
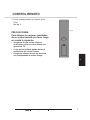
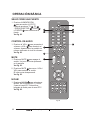
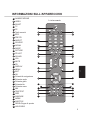
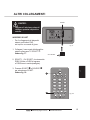
1 x Remote Control
POWER
VIDEO
SCART
TV
PC
Numerical Buttons
EPG
PRE PR
ASPECT
SOURCE
NICAM
SLEEP
PICTURE
PR LIST
SOUND
VOL
MUTE
PR
DISPLAY
MENU
EXIT
OK
Navigation Buttons
Green Button
Yellow Button
Blue Button
Red Button
MIX
TELETEXT
SIZE
SUBPAGE
INDEX
SUBTITLE
REVEL/Tick
HOLD/VIEW
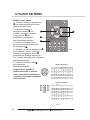
A
B
C E
D
F
G
H
K
J
M
L
N
P
O
Q
R
S
T
U
V
Y
X
a
b
d
g
f
m
n
k
h
p
q
q
a
b
d
e
g
h
k
m
n
p
e
f
EN
3

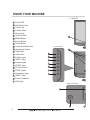
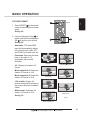
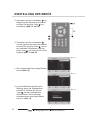
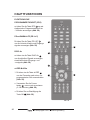
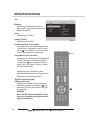
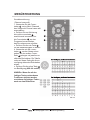
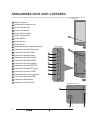
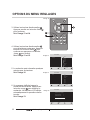
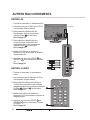
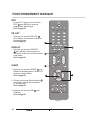
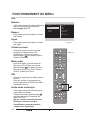
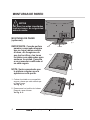
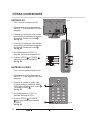
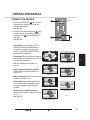
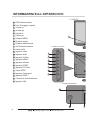
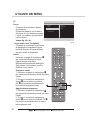
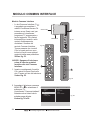
KNOW YOUR MACHINE
B
D
F
G
H
J
M
N
O
P
C
E
Power LED
Wall Mount Hole
Volume Up
Volume Down
Channel Up
Channel Down
MENU Button
Source Button
Power Button
Common Interface Slot
Headphone Output
Audio Input
Video Input
S-Video Input
HDMI 2 Input
Antenna Input
SCART Input
PC Audio Input
SPDIF Output
Component Input
HDMI 1 Input
Power Connector
VGA Input
K
L
Q
R
S
T
A
U
V
X
Y
HD Ready Digital LCDTV User Manual
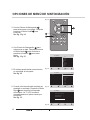
1 x LCD TV
Control Panel
Rear Connections
A
C
D
E
F
G
H
J
Y
B
V
X
4

KNOW YOUR MACHINEKNOW YOUR MACHINE
HD Ready Digital LCDTV User Manual
EN
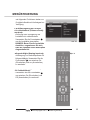
1 x AC Power Cord
Z
2 x AAA Battery
a
Front View
Side Connections
Rear View
K
L
N
O
QS RT
U
M
V
P
5

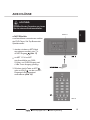
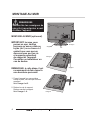
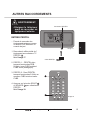
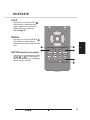
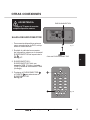
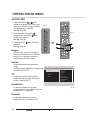
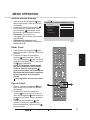
2. Insert two new 1.5V size AAA
Batteries with the and marks
correctly aligned.
See fig. 2.
NOTE ON BATTERIES:
• Do not mix different types of
batteries or an old battery with
a new one.
• To prevent the risk of leakage
or explosions, never recharge
the batteries, apply heat or take
them apart.
• When not using batteries,
remove them to prevent battery
drain.
• If liquid leaks from the batteries,
throw them away. Thoroughly
clean the battery compartment
with a dry cloth.
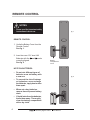
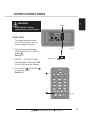
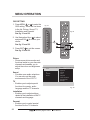
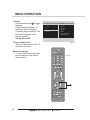
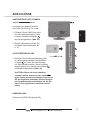
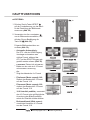
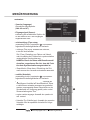
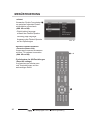
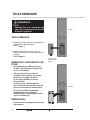
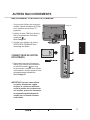
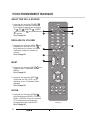
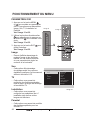
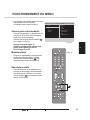
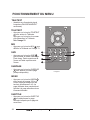
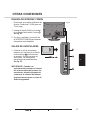
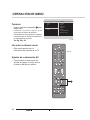
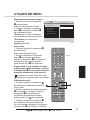
REMOTE CONTROL
1. Unclip the Battery Cover from the
Remote Control.
See fig. 1.
REMOTE CONTROL
NOTES:
- Please read the important safety
instructions before use.
fig. 1
Battery
Compartment
Cover
fig. 2
HD Ready Digital LCDTV User Manual
6

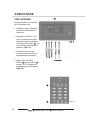
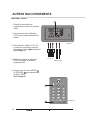
3. Carefully close the Battery Cover.
See fig. 3.
REMOTE CONTROL
fig. 3
PRECAUTIONS:
To obtain the best performance
from your remote control, please
consider the following:
• Ensure there is no obstruction
between remote control and
TV set.
• Bright sunlight may affect the
remote control performance.
• Always ensure that both
batteries are replaced at the
same time.
HD Ready Digital LCDTV User Manual
EN
7

IMPORTANT: When drilling into
walls always check that there
are no hidden wires or pipes etc.
Make sure that the screws and
wall plugs supplied are suitable
for supporting the unit. Consult
a qualified tradesperson if you
are not sure.
NOTE: It would be useful to ask
someone to help you at this
stage.
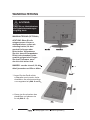
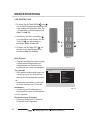
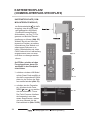
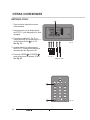
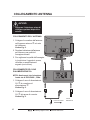
WALL MOUNTING
NOTES:
- Please read the important safety
instructions before use.
1. Put the unit face down on a safe,
flat surface that is covered by a
smooth cloth.
See fig. 4 and 5.
Stand
fig. 4
Screws
WALL MOUNTING (Optional)
fig. 6
fig. 5
Stand
2. Unscrew the screws of the stand.
Then remove the Stand.
See fig. 4 - 6.
HD Ready Digital LCDTV User Manual
8

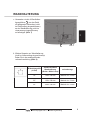
4. For the Wall Bracket - Refer to
the user instructions supplied
with the wall bracket (not
included).
See fig. 8.
3. Use 4 Wall Mount Holes B and
Screws (not included) to mount the
TV on the Bracket (not included).
See fig. 7.
WALL MOUNTING
fig. 7
fig. 8
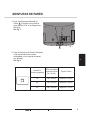
TV Screen
Size (inches)
VESA-Compatible
Wall bracket
(W x H mm)
Screw Type
W
H
19"
22"
26"
100 x 100 mm
100 x 100 mm
200 x 100 mm
Metric 4 x 10 mm
Metric 4 x 10 mm
Metric 4 x 10 mm
B
HD Ready Digital LCDTV User Manual
EN
9

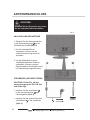
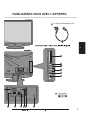
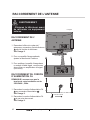
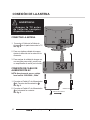
NOTE: Make sure your local
voltage is 230V/240V~, 50Hz.
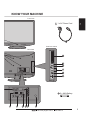
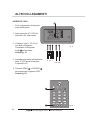
Z
Mains Socket
1. Connect the AC Power Cord Z
to the Power Connector X .
See fig. 9.
2. Connect the AC Power Cord Z
to the mains socket.
See fig. 9.
ANTENNA CONNECTION
Q
1. Connect the Antenna Plug to the
Antenna Input Q located at the
rear of the TV.
See fig. 9.
2. For optimum picture quality, adjust
the direction of the antenna.
3. To improve picture quality where
the signal is poor use a signal
amplifier (not included).
CONNECTING THE ANTENNA
Antenna Plug
fig. 9
X
WARNING:
- Switch off the TV before
connecting any external device.
AC POWER CORD CONNECTION
HD Ready Digital LCDTV User Manual
10

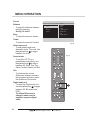
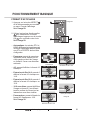
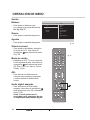
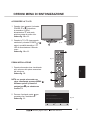
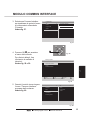
TUNING MENU OPTIONS
J
A
fig. 10
fig. 11
fig. 12
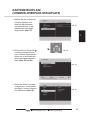
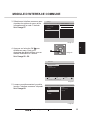
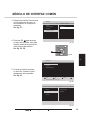
Thank you for your purchase of this TV.
Please proceed with the following steps to set-up your TV.
Next
A
TURN ON THE LCD-TV
1. When the POWER J or A is
pressed the TV will turn on and the
Power LED A on the front of the
TV will change from red to blue
See fig. 10 and 11.
2. When the LCD-TV is turned off
using the POWER J or A , the
LCD-TV will go into standby mode
and the Power LED A will turn
red.
See fig. 10 and 11.
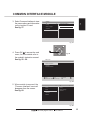
FIRST TIME INSTALLATION
1. This display will appear on the
screen when the TV is turned on
for the first time.
See fig. 12.
NOTE: If you can not find this
screen press MENU U . Then
use the Natvigation Keys Y to
select the TV menu.
See fig. 11.
2. Press the Green Button a to
proceed with the installation.
See fig. 11.
U
Y
a
HD Ready Digital LCDTV User Manual
EN
11

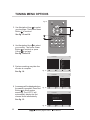
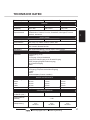
4. Use Navigation Keys Y to select
your country. Then press Green
Button a to continue or press
Yellow b to go back.
See fig. 13 and 15.
5. System searching may take few
minutes to complete.
See fig. 16.
6. A message will be displayed when
the search is complete. Press Red
Button e to finish system
searching. The LCD TV will
automatically display the first
channel found automatically.
See fig. 13.
TUNING MENU OPTIONS
fig. 13
fig. 14
fig. 15
fig. 16
Next
TV Installation
Exit
System searching. Please wait...
Analog channels found: 0
Digital channels found: 0
3/3
3. Use Navigation Keys Y to select
your language. Then press Green
Button a to continue.
See fig. 13 and 14.
e
a
b
Y
Next
Language
TV Installation
Previous
English
Français
Italiano
Nederlands
Svenska
Dansk
Deutsch
Espanol
1/3
Next
Country
TV Installation
Previous
2/3
Gemary
Ireland
Czech Republic
Denmark
Finland
France
Austria
Belgium
HD Ready Digital LCDTV User Manual
12

WARNING:
- Switch off the TV before
connecting any external device.
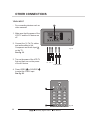
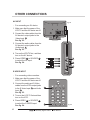
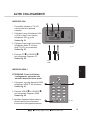
OTHER CONNECTIONS
R
fig. 17
SCART1
SCART Lead
fig. 18
SCART INPUT
1. Plug the scart lead from the
external device into TV SCART
Socket R .
See fig. 17.
2. SCART 1 - Full SCART, which
transmits RGB, S-Video and CVBS
in and CVBS tuner out (Analog).
3. Press SCART C or SOURCE K
to select the SCART.
See fig. 18.
- To connect external devices
such as DVD players, set top
boxes or games consoles.
C
K
HD Ready Digital LCDTV User Manual
EN
13

OTHER CONNECTIONS
U
fig. 19
Audio Cables
fig. 20
YPbPr INPUT
3. Turn on the power of the LCD-TV
first and then turn on the power
of the AV device.
2. Connect the (Y, Pb, Pr) cables
and audio cables to the
Component and Audio Input
on
the TV.
See fig. 19.
1. Make sure that the power of the
LCD-TV and the AV device are
off.
- For connecting devices such as
video cameras.
K
YPr Pb
4. Press VIDEO B or SOURCE K
to select the YPbPr input.
See fig. 20.
B
HD Ready Digital LCDTV User Manual
14
U
U

VGA INPUT
OTHER CONNECTIONS
Y
fig. 21
SV
fig. 22
- You can use your LCD-TV as a
monitor for your personal computer.
1. Connect the D type 15-pin VGA
interface cable (not supplied) to
VGA Input Y on the LCD-TV.
See fig. 21.
2. Connect the audio cable (not
supplied) to Audio Input S on the
back of the LCD-TV (if necessary).
See fig. 21.
3. Press PC E or SOURCE K to
select the PC input.
See fig. 22.
1. Connect the cable from the HDMI
devices to the TV HDMI Input V .
See fig. 21.
2. Press VIDEO B or SOURCE K
to select the HDMI input.
See fig. 22.
3. Operate the corresponding external
equipment. (Refer to external
equipment operating guide.)
HDMI 1 INPUT
CAUTION: You must ensure both
devices are switched off before
connection.
to PC
K
B E
HDMI
Cable
HD Ready Digital LCDTV User Manual
EN
15

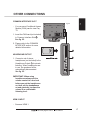
OTHER CONNECTIONS
O
fig. 23
fig. 24
M
N
AV INPUT
- For connecting an AV device.
1. Make sure that the power of the
LCD-TV and the AV device are off.
2. Connect the cables from the
AV device's output jacks to the
Audio
Input M .
See fig. 23.
3. Connect the cables from the
AV device's output jacks to the
Video
Input N .
See fig. 23.
turn on the AV device.
B or SOURCE K
to select the AV input.
See fig. 24.
K
B
S-Video Cable
S-VIDEO INPUT
- For connecting video recorders.
1. Make sure that the power of the
LCD-TV and the AV device are off.
2. Connect the audio and S-Video
cables from the VCR's output jacks
to the S-Video Input O and Audio
Input .
See fig. 23.
3. Turn on the LCD-TV first and then
turn on the VCR.
4. Press VIDEO B or SOURCE K
to select the S-VIDEO input.
See fig. 24.
N
video
audio
HD Ready Digital LCDTV User Manual
16
4. Turn on the LCD-TV first ; and then
5. Press VIDEO

OTHER CONNECTIONS
L
fig. 25
K
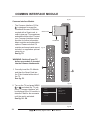
COMMON INTERFACE SLOT
HEADPHONE OUTPUT
1. Connect a set of stereo
headphones (not included) to the
Headphone Output L for private
listening. When headphones are
in use, the speakers will be
automatically disconnected.
See fig. 25.
IMPORTANT: When using
headphones always set the
volume control to a low level
before you put the headphones
on, then put the headphones
on and gradually increase the
volume to a comfortable
listening level.
P
HDMI 2 INPUT
- You can use a Conditional Access
Module (CAM) card to view Pay
TV.
1. Insert the CAM card (not included)
in Common Interface Slot K .
See fig. 25.
2. Please refer to the COMMON
INTERFACE section for more
detailed information.
- Same as HDMI 1.
HD Ready Digital LCDTV User Manual
EN
17

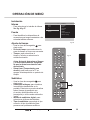
NICAM
1. Press NICAM L to select MONO,
STEREO, DUAL 1 and DUAL 2
for ATV channel. Select Audio
language for DTV channel.
See fig. 26.
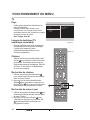
BASIC OPERATION
fig. 26
AUDIO CONTROL
1. Press VOL+ Q to increase the
volume or VOL- Q to decrease
the volume. A number will
appear on screen indicating the
volume level.
See fig. 26.
MUTE
1. Press MUTE R to mute the
sound. A mute icon will appear
on the screen.
See fig. 26.
2. Press MUTE R again or
VOL+/VOL-to restore the sound.
The mute icon will disappear.
See fig. 26.
A
SELECT SOURCE
1. Press POWER A to turn on the
LCD-TV. Then press TV D , PC
E , SCART C , VIDEO B or
SOURCE K to select the source.
See fig. 26.
D
E
B
C
K
Q
R
L
HD Ready Digital LCDTV User Manual
18
La pagina si sta caricando...
La pagina si sta caricando...
La pagina si sta caricando...
La pagina si sta caricando...
La pagina si sta caricando...
La pagina si sta caricando...
La pagina si sta caricando...
La pagina si sta caricando...
La pagina si sta caricando...
La pagina si sta caricando...
La pagina si sta caricando...
La pagina si sta caricando...
La pagina si sta caricando...
La pagina si sta caricando...
La pagina si sta caricando...
La pagina si sta caricando...
La pagina si sta caricando...
La pagina si sta caricando...
La pagina si sta caricando...
La pagina si sta caricando...
La pagina si sta caricando...
La pagina si sta caricando...
La pagina si sta caricando...
La pagina si sta caricando...
La pagina si sta caricando...
La pagina si sta caricando...
La pagina si sta caricando...
La pagina si sta caricando...
La pagina si sta caricando...
La pagina si sta caricando...
La pagina si sta caricando...
La pagina si sta caricando...
La pagina si sta caricando...
La pagina si sta caricando...
La pagina si sta caricando...
La pagina si sta caricando...
La pagina si sta caricando...
La pagina si sta caricando...
La pagina si sta caricando...
La pagina si sta caricando...
La pagina si sta caricando...
La pagina si sta caricando...
La pagina si sta caricando...
La pagina si sta caricando...
La pagina si sta caricando...
La pagina si sta caricando...
La pagina si sta caricando...
La pagina si sta caricando...
La pagina si sta caricando...
La pagina si sta caricando...
La pagina si sta caricando...
La pagina si sta caricando...
La pagina si sta caricando...
La pagina si sta caricando...
La pagina si sta caricando...
La pagina si sta caricando...
La pagina si sta caricando...
La pagina si sta caricando...
La pagina si sta caricando...
La pagina si sta caricando...
La pagina si sta caricando...
La pagina si sta caricando...
La pagina si sta caricando...
La pagina si sta caricando...
La pagina si sta caricando...
La pagina si sta caricando...
La pagina si sta caricando...
La pagina si sta caricando...
La pagina si sta caricando...
La pagina si sta caricando...
La pagina si sta caricando...
La pagina si sta caricando...
La pagina si sta caricando...
La pagina si sta caricando...
La pagina si sta caricando...
La pagina si sta caricando...
La pagina si sta caricando...
La pagina si sta caricando...
La pagina si sta caricando...
La pagina si sta caricando...
La pagina si sta caricando...
La pagina si sta caricando...
La pagina si sta caricando...
La pagina si sta caricando...
La pagina si sta caricando...
La pagina si sta caricando...
La pagina si sta caricando...
La pagina si sta caricando...
La pagina si sta caricando...
La pagina si sta caricando...
La pagina si sta caricando...
La pagina si sta caricando...
La pagina si sta caricando...
La pagina si sta caricando...
La pagina si sta caricando...
La pagina si sta caricando...
La pagina si sta caricando...
La pagina si sta caricando...
La pagina si sta caricando...
La pagina si sta caricando...
La pagina si sta caricando...
La pagina si sta caricando...
La pagina si sta caricando...
La pagina si sta caricando...
La pagina si sta caricando...
La pagina si sta caricando...
La pagina si sta caricando...
La pagina si sta caricando...
La pagina si sta caricando...
La pagina si sta caricando...
La pagina si sta caricando...
La pagina si sta caricando...
La pagina si sta caricando...
La pagina si sta caricando...
La pagina si sta caricando...
La pagina si sta caricando...
La pagina si sta caricando...
La pagina si sta caricando...
La pagina si sta caricando...
La pagina si sta caricando...
La pagina si sta caricando...
La pagina si sta caricando...
La pagina si sta caricando...
La pagina si sta caricando...
La pagina si sta caricando...
La pagina si sta caricando...
La pagina si sta caricando...
La pagina si sta caricando...
La pagina si sta caricando...
La pagina si sta caricando...
La pagina si sta caricando...
La pagina si sta caricando...
La pagina si sta caricando...
La pagina si sta caricando...
La pagina si sta caricando...
La pagina si sta caricando...
La pagina si sta caricando...
La pagina si sta caricando...
La pagina si sta caricando...
La pagina si sta caricando...
La pagina si sta caricando...
La pagina si sta caricando...
La pagina si sta caricando...
La pagina si sta caricando...
La pagina si sta caricando...
La pagina si sta caricando...
La pagina si sta caricando...
La pagina si sta caricando...
La pagina si sta caricando...
La pagina si sta caricando...
La pagina si sta caricando...
La pagina si sta caricando...
La pagina si sta caricando...
La pagina si sta caricando...
La pagina si sta caricando...
La pagina si sta caricando...
La pagina si sta caricando...
La pagina si sta caricando...
La pagina si sta caricando...
La pagina si sta caricando...
La pagina si sta caricando...
La pagina si sta caricando...
La pagina si sta caricando...
La pagina si sta caricando...
La pagina si sta caricando...
La pagina si sta caricando...
La pagina si sta caricando...
La pagina si sta caricando...
La pagina si sta caricando...
La pagina si sta caricando...
La pagina si sta caricando...
La pagina si sta caricando...
La pagina si sta caricando...
La pagina si sta caricando...
La pagina si sta caricando...
La pagina si sta caricando...
La pagina si sta caricando...
La pagina si sta caricando...
La pagina si sta caricando...
La pagina si sta caricando...
La pagina si sta caricando...
La pagina si sta caricando...
La pagina si sta caricando...
La pagina si sta caricando...
La pagina si sta caricando...
La pagina si sta caricando...
La pagina si sta caricando...
La pagina si sta caricando...
-
 1
1
-
 2
2
-
 3
3
-
 4
4
-
 5
5
-
 6
6
-
 7
7
-
 8
8
-
 9
9
-
 10
10
-
 11
11
-
 12
12
-
 13
13
-
 14
14
-
 15
15
-
 16
16
-
 17
17
-
 18
18
-
 19
19
-
 20
20
-
 21
21
-
 22
22
-
 23
23
-
 24
24
-
 25
25
-
 26
26
-
 27
27
-
 28
28
-
 29
29
-
 30
30
-
 31
31
-
 32
32
-
 33
33
-
 34
34
-
 35
35
-
 36
36
-
 37
37
-
 38
38
-
 39
39
-
 40
40
-
 41
41
-
 42
42
-
 43
43
-
 44
44
-
 45
45
-
 46
46
-
 47
47
-
 48
48
-
 49
49
-
 50
50
-
 51
51
-
 52
52
-
 53
53
-
 54
54
-
 55
55
-
 56
56
-
 57
57
-
 58
58
-
 59
59
-
 60
60
-
 61
61
-
 62
62
-
 63
63
-
 64
64
-
 65
65
-
 66
66
-
 67
67
-
 68
68
-
 69
69
-
 70
70
-
 71
71
-
 72
72
-
 73
73
-
 74
74
-
 75
75
-
 76
76
-
 77
77
-
 78
78
-
 79
79
-
 80
80
-
 81
81
-
 82
82
-
 83
83
-
 84
84
-
 85
85
-
 86
86
-
 87
87
-
 88
88
-
 89
89
-
 90
90
-
 91
91
-
 92
92
-
 93
93
-
 94
94
-
 95
95
-
 96
96
-
 97
97
-
 98
98
-
 99
99
-
 100
100
-
 101
101
-
 102
102
-
 103
103
-
 104
104
-
 105
105
-
 106
106
-
 107
107
-
 108
108
-
 109
109
-
 110
110
-
 111
111
-
 112
112
-
 113
113
-
 114
114
-
 115
115
-
 116
116
-
 117
117
-
 118
118
-
 119
119
-
 120
120
-
 121
121
-
 122
122
-
 123
123
-
 124
124
-
 125
125
-
 126
126
-
 127
127
-
 128
128
-
 129
129
-
 130
130
-
 131
131
-
 132
132
-
 133
133
-
 134
134
-
 135
135
-
 136
136
-
 137
137
-
 138
138
-
 139
139
-
 140
140
-
 141
141
-
 142
142
-
 143
143
-
 144
144
-
 145
145
-
 146
146
-
 147
147
-
 148
148
-
 149
149
-
 150
150
-
 151
151
-
 152
152
-
 153
153
-
 154
154
-
 155
155
-
 156
156
-
 157
157
-
 158
158
-
 159
159
-
 160
160
-
 161
161
-
 162
162
-
 163
163
-
 164
164
-
 165
165
-
 166
166
-
 167
167
-
 168
168
-
 169
169
-
 170
170
-
 171
171
-
 172
172
-
 173
173
-
 174
174
-
 175
175
-
 176
176
-
 177
177
-
 178
178
-
 179
179
-
 180
180
-
 181
181
-
 182
182
-
 183
183
-
 184
184
-
 185
185
-
 186
186
-
 187
187
-
 188
188
-
 189
189
-
 190
190
-
 191
191
-
 192
192
-
 193
193
-
 194
194
-
 195
195
-
 196
196
-
 197
197
-
 198
198
-
 199
199
-
 200
200
-
 201
201
-
 202
202
-
 203
203
-
 204
204
-
 205
205
-
 206
206
-
 207
207
-
 208
208


Haier LT22M1CW Manuale utente
- Categoria
- TV LED
- Tipo
- Manuale utente
in altre lingue
- français: Haier LT22M1CW Manuel utilisateur
- español: Haier LT22M1CW Manual de usuario
- Deutsch: Haier LT22M1CW Benutzerhandbuch
Documenti correlati
Altri documenti
-
Sharp Aquos LC-32LD171K Istruzioni per l'uso
-
Bowers & Wilkins Panorama 2 Manuale utente
-
 T'nB CPMF03 Scheda dati
-
Mirai DTL-532W100 Scheda dati
-
Blaupunkt DVB-T Manuale utente
-
Philips 58PFL9956T/12 Manuale utente
-
Philips Model Vehicle 40PFL9606 Manuale utente
-
-
Philips 46PFL9706T/12 Manuale utente
-
Thomson THT 82 Manuale utente
