Electrolux EPI12NLIWI Manuale utente
- Categoria
- Condizionatori d'aria a sistema split
- Tipo
- Manuale utente

EN
FR
EL
IT
ES
PT
8VHU0DQXDO
0$18(/'ಬ87,/,6$7,21
˃ˁ˔˃ˇˏˇ˂ˇˍ˔ˏ˅ːˑ˅
0$18$/(3(5/ಬ87(17(
0$18$/'(,16758&&,21(6
0$18$/'287,/,=$'25
(3O1/,:
(3O1/,:

1
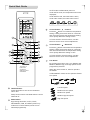
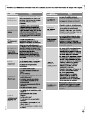
Table of Contents
Congratulations ...................................................................2
Safety Precautions ..............................................................
Product´s Description ..........................................................
Indoor Unit Display ..............................................................6
Remote Control ...................................................................6
Quick Start Guide ................................................................7
Remote Control Description ................................................8
Remote Control Display Indicators ......................................11
First Use ..............................................................................12
How to use the Remote Control ..........................................12
How to use the Indoor Unit ..................................................17
Emergency Operation ..........................................................19
Optimal Operation ...............................................................20
Cleaning and Maintenance ..................................................20
Operation Tips .....................................................................24
Troubleshooting ...................................................................
Product List ..........................................................................27
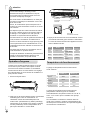
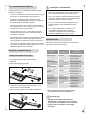
.HHSWKHUHPRWHFRQWUROZKHUHLWVVLJQDOFDQUHDFKWKH
UHFHLYHURIWKHLQGRRUXQLW
:KHQRSHUDWHWKHDLUFRQGLWLRQHUPDNHVXUHWKHUHPRWH
FRQWUROLVSRLQWLQJWRWKHVLJQDOUHFHLYHURIWKHLQGRRU
XQLW
:KHQWKHUHPRWHFRQWUROVHQGVRXWDVLJQDOWKHV\PERO
ZLOOEOLQNIRUDERXWVHFRQGRQWKHGLVSOD\RIWKH
UHPRWHFRQWURO
7KHLQGRRUXQLWZLOODFNQRZOHGJHWKHVLJQDOZLWKDEHHS
ZKHQLWUHFHLYHVWKHVLJQDOIURPWKHUHPRWHFRQWURO
3OHDVHSUHVVWKHEXWWRQRIWKHUHPRWHFRQWURODQG
UHVHQGWKHVLJQDOLI\RXGLGQRWKHDUDEHHSIURPWKH
LQGRRUXQLW
,PSRUWDQW5HPLQGHU

2
&RQJUDWXODWLRQV
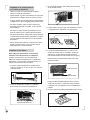
The air conditioner is not intended for use by
\RXQJFKLOGUHQRULQ¿UPHGSHUVRQVZLWKRXW
supervision.
Young children should be supervised to ensure
that they do not play with the air conditioner.
Contact an authorised installer for installation
of this air conditioner.
Contact an authorised service technician for
repair or maintenance of this unit.
If the power cord is to be replaced,
replacement work shall be performed by
authorised personnel only.
Installation work must be performed in
accordance with the national wiring Standards
by authorised personnel only.
Congratulations and thank you for choosing a split-
W\SHDLUFRQGLWLRQHU:HDUHVXUH\RXZLOO¿QG\RXU
new air conditioner a pleasure to use.
Before you use the air conditioner, we recommend
that you read through the entire user manual, which
provides the description of the air conditioner and
its functions.
To avoid the risks that are always present when
you use an electrical appliance, it is important that
the air conditioner is installed correctly and that
you read the safety instructions carefully to avoid
misuse and hazards.
We recommend that you keep this instruction
booklet for future reference and pass it on to any
future owners.
After unpacking the air conditioner please check
it is not damaged. If in doubt, do not use the air
conditioner but contact your local authorised
service centre.
&RQGLWLRQVRIXVH
This appliance is intended to be used in
household and similar applications such as:
6WDIINLWFKHQDUHDVLQVKRSVRI¿FHVDQGRWKHU
working environments.
Farm houses.
By clients in hotels, motels, and other
residential type environments.
Bed and breakfast type environments.
,PSRUWDQWQRWHV
Contact an authorised installer for installation of
this unit.
Contact an authorised service technician for
repair or maintenance of this unit.
The socket oultet required to supply power
must be connected and commissioned by a
licenced contractor.
This appliance is not intended for use by
persons (including children) with reduced
physical, sensory or mental capabilities,
or lack of experience and knowledge,
unless they have been given supervision or
instruction concerning use of the appliance
by a person responsible for their safety.
Young children should be supervised to
ensure that they do not play with the air
conditioner.
If the power cord is to be replaced,
replacement work shall be performed by
authorised personnel only.
Installation work must be performed
in accordance with the national wiring
standards and the electricity suppliers service
rules by authorised personnel only.
If the unit is to be moved to another location
RUGLVSRVHGRIRQO\DVXLWDEO\TXDOL¿HG
person is permitted to undertake such work.
7DNHFDUHQRWWRFDWFK¿QJHUVRQWKHIDQ
blade when adjusting vertical louvers.
This air conditioner uses R410A refrigerant
&RQ¿UPEHIRUHLQVWDOODWLRQ
Information on disposal for users
Most of the packing materials are recyclable.
Please dispose of those materials through
your local recycling depot or by placing them in
appropriate collection containers.
If you wish to discard this air conditioner, please
contact your local authorities and ask for the
correct method of disposal.
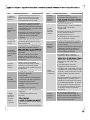
FDXWLRQ
HQYLURQPHQWDOWLS

If you notice an unusal situation, such
as a burning smell, please switch off
the power to the air conditioner and
contact an authorised service agent. If
this abnormal status continues the air
conditioner may be damaged or even
FDXVHHOHFWULFVKRFNRU¿UH
Do not operate the air conditioner with
wet hands. This may cause electric
shock.
Do not damage or cut off the power cord
or other wires. If this occurs, please have
it repaired or replaced by an accredited
technician
Do not connect this air conditioner to a
multi outlet powerboard.
Please switch off the power supply to
the air conditioner if it is not to be used
for an extended period. Otherwise, it will
DFFXPXODWHGXVWDQGPD\FDXVHD¿UH
Before cleaning the air conditioner,
please disconnect the power supply in
order to eliminate the possibility of electric
shock.
The power supply should be matched
with the air conditioner according to
the installation manual. Air conditioners
provided with a supply cord should be
connected directly to a power outlet with
a suitable safety switch.
Air conditioners that are hard wired must
be connected to a suitable safety circuit
breaker according to the installation
manual.
Please ensure that the power supply to
the air conditioner is stable and meets the
requirements set out in the installation
manual.
Always ensure the product is installed
with appropriate earthing/grounding.
For safety, be sure to turn off the
circuit breaker before performing any
maintenance or cleaning or when the
product is not used for an extended
period of time. Accumulated dust may
FDXVH¿UHRUHOHFWULFVKRFN
6DIHW\SUHFDXWLRQV
,QVLGHWKLVPDQXDO\RXZLOO¿QGPDQ\KHOSIXOKLQWV
on how to use and maintain your air conditioner
properly. Just a little preventive care on your part
can save you a great deal of time and money over
WKHOLIHRI\RXUDLUFRQGLWLRQHU<RX¶OO¿QGPDQ\
answers to common problems in the chart of
troubleshooting tips on page 20-21. If you review the
FKDUWRIWURXEOHVKRRWLQJWLSV¿UVW\RXPD\QRWQHHG
to call for service.
Meanings of symbols used in this manual are shown
below:
This indicates information concerning your personal
safetyand how to avoid damaging the appliance.
This symbol indicates tips and information about use
of the appliance.
This symbol indicates tips and information about
economical and ecological use of the appliance.
This symbol indicates never to do this.
Always do this.
,PSRUWDQWQRWHV
1 Do not operate unit with horizontal louvre inclosed
position.
2 'RQRWRSHUDWHXQLWZLWKRXWWKHDLU¿OWHU
FDXWLRQ
ZDUQLQJ
HQYLURQPHQWDOWLS
WLSVDQGLQIRUPDWLRQ

4
conditioner for an extended period of time could
be hazardous to your health.
Do not expose people, pets or plants to the
1
the power and circuit breaker are turned off.
2 Do not touch the metal parts of the unit
when handling sharp metal edges.
Do not use water to clean inside the air
conditioner. Exposure to water may lead to
possible electric shock.
For repair and maintenance, contact your
authorised service dealer.
1
installation.
2 Plug in the power plug properly.
Do not use a damaged or non-standard
power cord.
4 Do not share the same outlet with other
appliances.
Do not use an extension cord.
6 Do not start/stop operation by plugging /
unplugging the power cord.
Select the most appropriate temperature.
It can save electricity.
Do not keep windows and doors open for
a long time during operation. It will result
Do not block the air inlet or outlet.
and cause malfunctions.
Keep combustible materials away from
Do not step on the top of the outdoor unit
or place heavy things on it.
It may cause damage or injury.
Do not attempt to repair the air
conditioner by yourself. Incorrect repairs
contact your local authorised service
centre.
Do not insert your hands or objects into
the air inlet or outlet. It may cause injury.
Do not expose animals or plants directly
Do not use the unit for any other purpose,
such as preserving food or drying clothes.
Do not splash water on the air
conditioner. It may cause electric shock
or malfunction.
Refrigerant: R410A;
Refrigerant leakage contributes to climate change.
Refrigerant with lower global warming potential
(GWP) would contribute less to global warming
than a refrigerant with higher GWP, if leaked to the
atmosphere. This appliance contains a refrigerant
fluid with a GWP equal to 2087.5. This means that
if 1 kg of this refrigerant fluid would be leaked to
the atmosphere, the impact on global warming
would be 2087.5 times higher than 1 kg of CO2,
over a period of 100 years. Never try to interfere
with the refrigerant circuit yourself or disassemble
the product yourself and always ask a professional.
The product or equipment contains fluorinated
greenhouse gases, and the fluorinated greenhouse
gases are contained in hermetically sealed
equipment.
Refrigerant

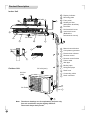
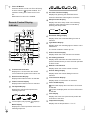
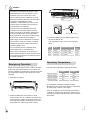
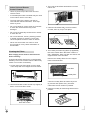
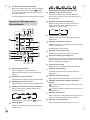
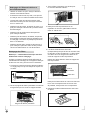
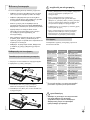
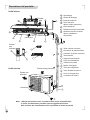
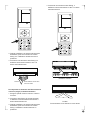
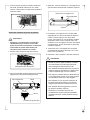
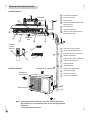
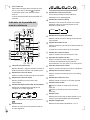
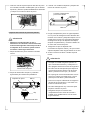
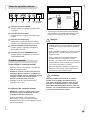
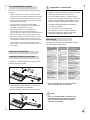
3URGXFW'HVFULSWLRQ
Air inlet
,QGRRU8QLW
Air Outlet
2XWGRRU8QLW
Air inlet (rear)
Air inlet
(side)
Air inlet
(side)
Air Outlet
7KHDERYHGUDZLQJVDUHIRUH[SODQDWLRQSXUSRVHRQO\
<RXUDLUFRQGLWLRQHUPD\EHVOLJKWO\GLIIHUHQW
7KHDFWXDOVKDSHVKDOOSUHYDLO
1RWH
Display indicator
Mounting plate
Front panel
+HDOWK\DLU¿OWHU
EHKLQGWKHGXVW¿OWHU
'XVW¿OWHU
Horizontal air louver
Vertical air louver
(Behind the
horizontal air louver)
Manual control button
Cold plasma generator
Plasma dust collector
Remote control
Remote control holder
Power cable
Wall pipe
Binding tape
Refrigerant pipe
Drain hose
Connecting cable
Drain connector

6
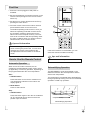
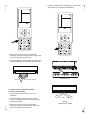
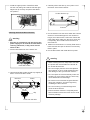
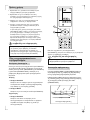
5HPRWH&RQWURO
The air conditioner will not operate if curtains,
doors or other materials block the signals from
the remote control to the indoor unit.
Prevent any liquid from falling into the remote
control. Do not expose the remote control to
direct sunlight or heat.
If the infrared signal receiver on the indoor
unit is exposed to direct sunlight, the air
conditioner may not function properly. Use
curtains to prevent the sunlight from falling on
the receiver.
If other electrical appliances react to the
remote control, either move these appliances
or consult your local dealer.
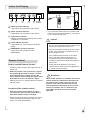
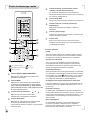
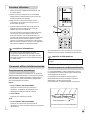
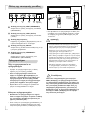
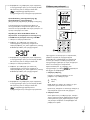
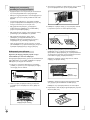
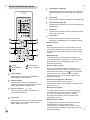
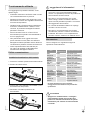
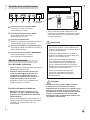
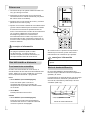
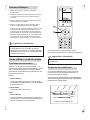
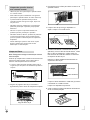
,QGRRU8QLW'LVSOD\
Signal
receiver
If you keep the remote control in a position that
hinders proper signal transmission, a time lag of
XSWRPLQXWHVPD\RFFXU
Temperature
sensor
window
Back view
:KHQ,)((/RSHUDWLRQLVDFWLYDWHGWKHUHPRWH
FRQWUROVHQGVWKHWHPSHUDWXUHLQIRUPDWLRQDW
LWVORFDWLRQWRWKHLQGRRUXQLWHYHU\WHQ
PLQXWHV,IWKHLQGRRUXQLWGRHVQRWUHFHLYH
VXFKWHPSHUDWXUHLQIRUPDWLRQIRUVXFFHVVLYH
HOHYHQPLQXWHVWKHDLUFRQGLWLRQHUZLOO
TXLW,)((/RSHUDWLRQDQGUHYHUWWRQRUPDO
RSHUDWLRQ
+($7RSHUDWLRQLQGLFDWRU
It lights when the operation mode is HEAT.
&22/RSHUDWLRQLQGLFDWRU
It lights when the operation mode is COOL.
7HPSHUDWXUHLQGLFDWRU
Displays the temperature settings when the air
conditioner is in operation.
3RZHU212))LQGLFDWRU
It lights when the unit connected with power
supply.
'(+80,',)<RSHUDWLRQLQGLFDWRU
It lights when the operation mode is
DEHUMIDIFY.
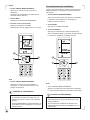
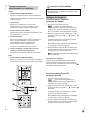
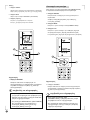
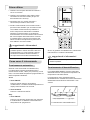
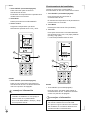
+RZWRXVHWKH5HPRWH&RQWURO
Point the remote control to the signal receiver of
indoor unit.
:KHQWKHUHPRWHFRQWUROVHQGVRXWDVLJQDO
WKHV\PERO
ZLOOEOLQNIRUDERXWVHFRQG
RQWKHGLVSOD\RIWKHUHPRWHFRQWURO7KH
LQGRRUXQLWZLOODFNQRZOHGJHWKHVLJQDOZLWKD
EHHSZKHQLWUHFHLYHVDQHIIHFWLYHVLJQDO
Make sure there is no obstacle that may interfere
with the signal.
/RFDWLRQRIWKHUHPRWHFRQWURO
.HHSWKHUHPRWHFRQWUROZKHUHLWVVLJQDO
FDQUHDFKWKHUHFHLYHURIWKHLQGRRUXQLWD
PD[LPXPGLVWDQFHRIPLVDOORZHG
When you select the timer operation, the remote
control automatically transmits a signal to the
LQGRRUXQLWDWWKHVSHFL¿HGWLPH
FDXWLRQ
5HPLQGHU

7
4XLFN6WDUW*XLGH
6ZLQJ9DQG6ZLQJ+%XWWRQV
The swing buttons will allow you to select
horizontal (H) or vertical (V) swing of the air
guding louvers.
6OHHS%XWWRQ
Pressing this button to select sleep mode.
7LPHU2Q7LPHU2II%XWWRQV
Press to set automatic start and stop of the
conditioner.
/LJKW%XWWRQ
Press to switch the indicating lights of the indoor
unit on or off.
7XUER%XWWRQ
Press to put the fan into the high speed to allow
for rapid cooling or heating.
6SHFLDOIXQFWLRQV
;)$1
After the unit is turned off the indoor fan will continue
operation for 10 minutes to remove the moisture
of the indoor unit to avoid the growth of mould and
bacteria.
$ERXW$872UXQ
In this mode the set temperature will not be displayed
on the remote control, and the unit will automatically
judge and select the suitable operation method to
make ambient comfortable.
5HPRWHORFN
Press Swing-V and ION-Filter buttons simultaneously
to lock or unlock the keyboard. If the remote control
is locked, the icon
will be displayed on it, in which
FDVHSUHVVDQ\EXWWRQWKHPDUNZLOOÀLFNHUWKUHH
times. If the keyboard is unlocked, the mark will
disappear.
6ZLWFKEHWZHHQ&HQWLJUDGHDQG)DKUHQKHLW
With the air conditioner switched off, press the
Swing-H and ION-Filter buttons simultaneously to
switch between °C and °F.
(QHUJ\VDYLQJ
In COOL mode, press ION-Filter and Clock buttons
simultaneously to start or stop energy saving
function. The remote control display will show “SE” in
temperature display area when it is active.
/RZKHDWPRGH
In HEAT mode, pressing ION-Filter and Clock buttons
simultaneously will put the air conditioner into a low
heat mode that will operate to a temperature of 8°C.
Repeat the operation to quit.
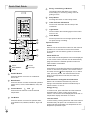
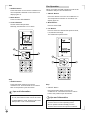
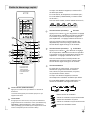
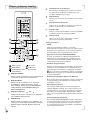
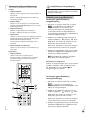
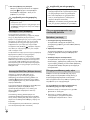
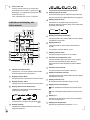
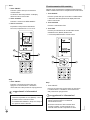
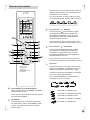
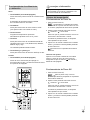
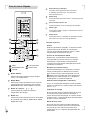
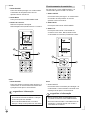
212))%XWWRQ
Press this button to turn the air conditioner
ON or OFF.
0RGH%XWWRQ
Press this button to select the desired operation
mode, AUTO, COOL, DEHUMIDIFY, FAN, and
HEAT.
&RQWURO%XWWRQ
DQG
Press these two buttons to set the desired
temperature.
)DQ%XWWRQ
Press this button to set the fan speed at Auto,
Low, Medium-low, Medium, Medium -high, and
High.
COOL Power
DEHUMIDIFY Set temp
HEAT

8
4XLFN6WDUW*XLGH
AUTO mode is default while power on.
Under AUTO mode, the temperature will not be
displayed;
Under HEAT mode, the initial value is 28°C;
8QGHURWKHUPRGHVWKHLQLWLDOYDOXHLV&
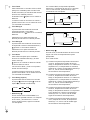
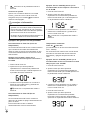
&RQWURO%XWWRQ
)RUZDUG
Press the
button to increase the temperature
setting. holding this button down for 2 seconds
and more will increase the temperature setting
PRUHTXLFNO\0D[LPXPVHWWLQJLV&
In Timer On/Off or Clock functions, use this
button to set the clock or timer adjustment.
&RQWURO%XWWRQ
%DFNZDUG
Press the
button to decrease the temperature
setting. holding this button down for 2 seconds
and more will decrease the temperature setting
more quickly. Maximum setting is 16°C.
In Timer On/Off or Clock functions, use this
button to set the clock or timer adjustment.
)DQ%XWWRQ
By pressing this button, Auto, Low, Medium-low,
Medium, Medium-high, and High speed can be
progressively selected.
When the unit is turned on, Auto fan speed is
the default.
,Q'(+80,',)<PRGHWKHIDQVSHHGLV¿[HGDW
Low speed.
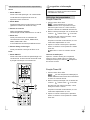
212))%XWWRQ
Press this button to turn the air conditioner
ON or OFF.
Sleep function will be cancelled while the unit is
switched off.
0RGH%XWWRQ
By pressing this button, AUTO, COOL,
DEHUMIDIFY, FAN, and HEAT (COOL only
model has no HEAT feature) mode can be
selected progressively.
Low fan speed
Medium-low fan speed
Medium fan speed
Medium-high fan speed
High fan speed
The lower 12
buttons are
revealed by
sliding the panel
downwards
AUTO DEHUMIDIFY COOL FAN HEAT

9
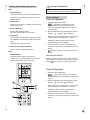
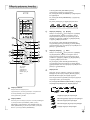
7XUER%XWWRQ
Press this button in COOL or HEAT mode to
put the fan into the high speed Turbo mode
and the air conditioner will work at maximum
power.
The Turbo symbol
will be displayed on the
remote control.
Turbo function will be cancelled if the Turbo
button is pressed again, or if the mode or fan
speed is changed.
6ZLQJ9%XWWRQ
Press this button, the horizontal louver will
swing up and down automatically, and
will
be displayed on the remote control.
Press again to cancel it and the louver will
stay at its last position.
6ZLQJ+%XWWRQ
Press this button, the vertical louver will
swing left to right automatically, and
will be
displayed on the remote control.
Press again to cancel it and the louver will
stay at its last position.
4XLHW%XWWRQ
Press this button the indoor fan operates at
ultra-low speed, the indoor noise is low.
symbol will be displayed on the remote
control once the Quiet function is activated.
Quiet function and Turbo function can not be
activated at the same time.
Quiet function will be cancelled if the Quiet
button is pressed again, or if the mode or fan
speed is changed.
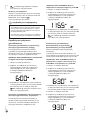
6OHHS%XWWRQ
Pressing this button to select sleep mode
,
sleep mode
, sleep mode and cancel the
Sleep mode.
STOP
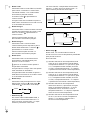
6OHHSPRGH
In COOL or DEHUMIDIFY mode, the set
temperature will increase 1°C after an hour,
and increase another 1°C after 2 hours, then
continue to run at this setting.
6OHHSPRGH
In this mode, the air conditioner will run according
to a preset sleep temperature curve.
In COOL mode
(1) When setting the initial temperature between
&DIWHUWXUQLQJRQWKH6OHHSIXQFWLRQ
the temperature will increase 1°C every hour,
DIWHU&WKHWHPSHUDWXUHZLOOEHPDLQWDLQHG
after 7 hours, the temperature will be
decreased a further 1°C, after that the unit will
keep running at this temperature;
(2) When setting the initial temperature between
24-27°C, after turning on the Sleep function,
the temperature will increase 1°C every hour,
after 2°C the temperature will be maintained,
after 7 hours, the temperature will be
decreased a further 1°C, after that the unit will
keep running at this temperature;
:KHQVHWWLQJWKHLQLWLDOWHPSHUDWXUHEHWZHHQ
28-29°C, after turning on the Sleep function,
WKHWHPSHUDWXUHZLOOLQFUHDVH&LQWKH¿UVW
hour, after 7 hours, the temperature will be
decreased a further 1°C, after that the unit will
keep running at this temperature;
(4) When setting the initial temperature to
&DIWHUKRXUVWKHWHPSHUDWXUHZLOOEH
decreased 1°C, after that the unit will keep
running at this temperature.
In HEAT mode, the set temperature will decrease
1°C after an hour, and decrease another 1°C after
2 hours, then continue to run at this setting.
Set
Temperature
1 hour
1 hour
1 hour
1 hour
Set
Temperature

10
In COOL or DEHUMIDIFY mode
(1) When the initial temperature is 16°C, the
air conditioner will continue to run at this
setting;
(2) When the initial temperature is set
between 17-20°C, the set temperature
ZLOOGHFUHDVH&DIWHUWKH¿UVWKRXUDQG
continue to run at this setting;
:KHQWKHLQLWLDOWHPSHUDWXUHLVVHW
between 21-27°C, the set temperature
will decrease 1°C in every hour, after two
hours the air conditioner will continue to
run at this setting;
(4) When the initial temperature is set
EHWZHHQ&WKHVHWWHPSHUDWXUH
will decrease 1°C in every hour, after
three hours the air conditioner will
continue to run at this setting;
6OHHSPRGH
In this mode the sleep temperature curve is
manually set.
(1) After selecting Sleep mode
, press and
hold the Turbo button until the remote
FRQWUROHQWHUVLQWRXVHUGH¿QHGVOHHS
setting status. The remote control will
display “1” hour, temperature display will
show the corresponding temperature of
last setting sleep curve and blink (the
original factory setting will display for the
¿UVWXVH
(2) Adjust the control buttons
and
to change the set temperature for the
¿UVWKRXURIVOHHS$IWHUVHWWLQJWKH
temperature, press the Turbo button for
FRQ¿UPDWLRQ
7KHKRXURIVOHHSPRGHZLOOEH
automatically increased on the remote
FRQWUROWRWKHQGUGKRXURIVOHHS
mode and so on with each press of the
Turbo button;
5HSHDWWKHDERYHVWHSRSHUDWLRQ
until 8 hours of sleep temperature setting
LV¿QLVKHG7KHUHPRWHFRQWUROZLOO
resume the original timer display and
the temperature display will return to the
original setting.
The sleep program can be checked by
selecting sleep mode
, pressing and
holding the Turbo button and then repeat
pressing the turbo button to review the sleep
program temperatures without pressing the
control button
or .
In this mode, if no button is pressed for 10
seconds, the display will revert to normal
operation.
,21)LOWHU%XWWRQ
Press this button to turn on and off the Cold
Plasma function and Plasma Dust Collector
function.
symbol will be displayed on the remote
control if Cold Plasma function and Plasma
Dust Collector function are selected.
,)HHO%XWWRQ
Press this button to turn on the I Feel
function and the symbol
will be displayed
on the remote control.
The remote control will send the temperature
information to the indoor unit every ten (10)
minutes. The air conditioner will operate to
reach the set temperature at the location of
the remote control.
Press again to cancel this function.
;)DQ%XWWRQ
Press this button in COOL or DEHUMIDIFY
mode to active X-Fan function. The symbol
will be displayed on the remote control.
After the unit is turned off the indoor fan will
continue operation at low fan speed for 10
minutes to dry the indoor unit prevent from
bacteria and mildew growing.
Presss again to cancel this function.
&ORFN%XWWRQ
Press this button and the Clock symbol
will blink. You can press Control buttons
and to set the time you want.
/LJKW%XWWRQ
Press this button to switch the indicating
lights of the indoor unit on or off.
The normal condition at start up is on.
7LPHU2Q%XWWRQ
Press the Timer On button to set the Timer
On or start time,
V\PEROZLOOÀDVKRQWKH
display. Press the control button
or to
adjust the start time.
Press this button again to cancel the Timer
On function, and
symbol will disappear.
&RQ¿UPWKH7LPHU2QVHWWLQJVE\SUHVVLQJ
7LPHU2QEXWWRQRUZDLWIRUVHFRQGVDIWHU
selecting the desired time and the
symbol
will display permanently.
Default time for timer on is 8:00AM.

11
5HPRWH&RQWURO'LVSOD\
,QGLFDWRU
7UDQVPLVVLRQ,QGLFDWRU
Displays for 1 second when the remote
control transmits signals to the indoor unit.
4XLHW)XQFWLRQ'LVSOD\
Displays when Quiet function is selected.
7XUER)XQFWLRQ'LVSOD\
Displays when Turbo function is selected.
)DQ6SHHG'LVSOD\
Displays the selected fan speed in the
following sequence:
In Auto speed, only symbol displays.
0RGH'LVSOD\
Displays the current operation mode in the
following sequence:
AUTO DEHUMIDIFY COOL FAN HEAT
,RQ)LOWHU)XQFWLRQ'LVSOD\
Displayed by pressing the ION-Filter button.
Press the ION-Filter button again to remove it.
6OHHS)XQFWLRQ'LVSOD\
Displays the three sleep mode in the following
sequence when Sleep function is selected by
pressing the Sleep button.
STOP
+RUL]RQWDO6ZLQJ'LVSOD\
Displays when the Horizontal Swing function is
selected.
/LJKW6WDWXV'LVSOD\
Displays when the indicating lights of indoor unit is
switched on.
The normal condition at start up is on.
;)DQ)XQFWLRQ'LVSOD\
Displays when the X-Fan function is activated.
&+HDWLQJ,QGLFDWRU
Displays when ION-Filter and Clock buttons are
pressed simultaneously to enter low heat operation
in HEAT mode.
5HPRWH/RFN,QGLFDWRU
Displays when the remote control is locked.
9HUWLFDO6ZLQJ'LVSOD\
Displays when the Vertical Swing function is
selected.
,)HHO)XQFWLRQ'LVSOD\
Displays when I Feel function is activated.
7LPHU2Q2II'LVSOD\
symbol will display when the Timer On function
is selected
symbol will display when the Timer Off function
is selected
7LPH'LVSOD\
Displays the Clock time (must be set) and/or the
on/off time of the timer.
7HPSHUDWXUH'LVSOD\
Displays the set temperature in °C or °F.
7LPHU2II%XWWRQ
Press this button to enter into Time Off setup,
in which case the
symbol will blink. The
method of setting is the same as for Time
On.
'HIDXOWWLPHIRUWLPHURIILV30

12
)LUVW8VH
In case of energy cut off or product shut down
when removing the power cord, or even when
changing the remote control batteries the
microprocessor will return back to the AUTO
mode.
$XWRPDWLF2SHUDWLRQ
+RZWR8VHWKH5HPRWH&RQWURO
,Q$872PRGHWKHWHPSHUDWXUHFDQQRWEHVHW
Fan
Fan
&RROLQJ
&RROLQJ
7LPH
Programmed temp.
'HKXPLGLI\LQJ2SHUDWLRQ
1 Ensure the unit is plugged in and power is
available.
2 Be sure the batteries are inserted correctly in the
remote control (the lights on the remote control
will be on).
6HWWKHWLPHE\&RQWUROEXWWRQVDQGFRQ¿UPE\
pressing the Clock button.
4 Point the remote control to the indoor unit and
press ON/OFF button to turn the unit on.
The default operating mode is AUTO. Once you
select the operating mode with remote control,
the operating conditions will be saved in the
indoor unit’s microcomputer memory. The next
time the air conditioner will start operating under
the same conditions when you simply push the
ON/OFF button of the remote control.
If the AUTO mode is uncomfortable, you can
select the desired conditions manually.
When the AUTO mode is selected, the air
conditioner will automatically select COOL, HEAT
(if applicable), or FAN only operation, depending on
the programmed and/or the room temperature.
6WDUW
1 212))%XWWRQ
Press this button to turn the air conditioner on.
The temperature indicator on the indoor unit
display lights on.
2 0RGH%XWWRQ
Press to select AUTO.
6WRS
1 212))%XWWRQ
Press this button again to turn the air conditioner
off. The horizontal louver returns back to the
position upon shut down.
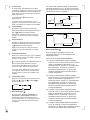
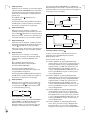
The DEHUMIDIFY mode works based on the
difference between the set temperature and the
actual room temperature.
The temperature is regulated while dehumidifying
through repeatedly turning on/off of the COOLING
operation or FAN only operation.
WLSVDQGLQIRUPDWLRQ
WLSVDQGLQIRUPDWLRQ
Dehumidifying Operation

,Q'(+80,',)<PRGHWKHIDQVSHHGLV¿[HG
at Low, and Turbo function cannot be used.
In DEHUMIDIFY mode, Sleep model 2 and
6OHHSPRGHFDQQRWEHDFWLYDWHG
)DQ2SHUDWLRQ
The temperature can not be set through the
remote control in FAN operating mode.
No fan speed indication disaplys on the
remote control if Auto fan speed is selected.
6WDUW
1 212))%XWWRQ
Press this button to turn the air conditioner on.
The temperature indicator on the indoor unit
display lights on.
2 0RGH%XWWRQ
Press to select DEHUMIDIFY.
&RQWURO%XWWRQV
Set the desired temperature.
Normally, set between 21ºC to 28ºC.
6WRS
1 ON/OFF Button
Press this button again to turn the air
conditioner off. The horizontal louver returns
back to the position upon shut down.
6WRS
1 212))%XWWRQ
Press this button again to turn the air
conditioner off. The horizontal louver returns
back to the position upon shut down.
When you select the FAN operating mode the air
conditioner will just vent the indoor air.
1 212))%XWWRQ
Press this button to turn the air conditioner on.
The temperature indicator on the indoor unit
display lights on.
2 0RGH%XWWRQ
Press to select FAN.
)DQ%XWWRQ
Press to select the desired fan speed at: Auto,
Low, Medium and High.
The default fan speed is Auto.
WLSVDQGLQIRUPDWLRQ
WLSVDQGLQIRUPDWLRQ

14
&RROLQJDQG+HDWLQJ2SHUDWLRQ
6WDUW
1 212))%XWWRQ
Press this button to turn the air conditioner on.
The temperature indicator on the indoor unit
display lights on.
2 0RGH%XWWRQ
Press to select COOL or HEAT (for Heat Pump
model only) mode.
&RQWURO%XWWRQV
Set the desired temperature.
Normally, set between 21ºC to 28ºC.
4 )DQ%XWWRQ
Press to select the desired fan speed at: Auto,
Low, Medium-low, Medium, Medium high and
High.
The default fan speed is Auto.
6ZLQJ9DQG6ZLQJ+%XWWRQV
3UHVVWRVHOHFWWKHDLUÀRZGLUHFWLRQ
6WRS
1 212))%XWWRQ
Press this button again to turn the air
conditioner off. The horizontal louver returns
back to the position upon shut down.
No fan speed indication disaplys on the
remote control if Auto fan speed is selected.
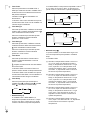
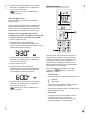
7LPHU6HWWLQJV
7LPHU2Q2SHUDWLRQ
1 Press the Timer-On button,
ZLOOÀDVKRQWKHGLVSOD\RIWKH
UHPRWHFRQWUROLQFDVHRIWKH¿UVWXVHRI
Timer-On operation. Otherwise, the last set
WLPHZLOOÀDVK
2 Set the desired time by pressing the Control
buttons:
Forward Backward
Each time you press the buttons, the time will
moves forward or backward by 1 minute.
Holding the button down will scroll more
rapidly through the time display.
Point the remote control to the indoor unit,
FRQ¿UPWKHVHWWLPHE\SUHVVLQJWKH7LPHU2Q
button.
symbol will stay on the remote control’s
display.
&DQFHOLQJWKH6HWWLQJV
Point the remote control to the indoor unit and
press again the Timer-On button. Make sure the
symbol
on the remote control is turned off.
7LPHU2II2SHUDWLRQ
1 Press the Timer-Off button,
IRUWKH¿UVWXVHRUWKHSUHYLRXV
VHWWLPHZLOOÀDVKRQWKHGLVSOD\RIWKHUHPRWH
control.
2 Set the desired time by pressing the Control
buttons:
Forward Backward
Each time you press the buttons, the time will
moves forward or backward by 1 minute.
Holding the button down will scroll more
rapidly through the time display.
Point the remote control to the indoor unit,
FRQ¿UPWKHVHWWLPHE\SUHVVLQJWKH7LPHU2II
button.
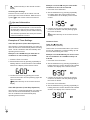
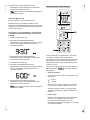
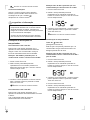
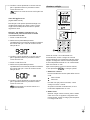
WLSVDQGLQIRUPDWLRQ

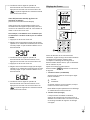
Example: It is 6:00 PM and you want the Air
Conditioner to turn off at 11:55 FM.
1 Press the Timer-Off button.
2 Set the desired time by pressing repeatedly
or holding down the Control buttons until
30VKRZVLQWKHGLVSOD\RIWKHUHPRWH
control.
&RQ¿UPWKHVHWWLPHE\SRLQWLQJWKHUHPRWH
control to the indoor unit and pressing again
the Timer Off button.
symbol will stay on the remote control’s
display.
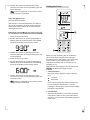
&RPELQHG7LPHU
7LPHU2Q
7LPHU2II
(Off-Start-Stop operation)
This function is recommended when you want to
turn the air conditioner on before waking up and
turn it off after leaving the house.
Example: It is 10:00 PM and you want to start
the air conditioner at 6:30 AM and stop it at
9:30 AM.
1 Press the Timer On button.
2 Set the desired time by pressing repeatedly or
KROGLQJGRZQWKH&RQWUROEXWWRQVXQWLO$0
shows in the display of the remote control.
&RQ¿UPWKHVHWWLPHE\SRLQWLQJWKHUHPRWH
control to the indoor unit and pressing again
the Timer On button.
4 Press the Timer Off button.
Set the desired time by pressing repeatedly or
KROGLQJGRZQWKH&RQWUROEXWWRQVXQWLO$0
shows in the display of the remote control.
The working time of the timer function set by
the remote control depends on the Clock time.
Check that the Clock on the remote control is
set correctly in order to prevent malfunctioning.
The effective operation time set by the remote
control is limited in 24 hours.
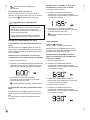
([DPSOHVRI7LPHU6HWWLQJV
7LPHU2Q2SHUDWLRQ7LPHU6WDUW2SHUDWLRQ
This function is recommended when you want the
unit to be turned on automatically before returning
home. The air conditioner will automatically start
operating at the set time.
Example: It is 8:00 AM and you want the air
conditioner to start working at 6:00 PM.
1 Press the Timer-On button.
2 Set the desired time by pressing repeatedly or
holding down the Control buttons until 6:00PM
shows in the display of the remote control.
&RQ¿UPWKHVHWWLPHE\SRLQWLQJWKHUHPRWH
control to the indoor unit and pressing again the
Timer On button.
symbol will stay on the remote control’s
display.
7LPHU2II2SHUDWLRQ7LPHU6WRS2SHUDWLRQ
This function is recommended when you want the
unit to be turned off automatically for bed time.
The air conditioner will automatically stop
operating at the set time.
WLSVDQGLQIRUPDWLRQ
symbol will stay on the remote control’s
display.
&DQFHOLQJWKH6HWWLQJV
Point the remote control to the indoor unit and
press again the Timer-Off button. Make sure the
symbol
on the remote control is turned off.

16
6 &RQ¿UPWKHVHWWLPHE\SRLQWLQJWKHUHPRWH
control to the indoor unit and pressing again the
Timer Off button.
symbol is displayed on the remote control
and the function is activated.
7LPHU2II
7LPHU2Q
(On-Stop-Start operation)
This function is recommended when you want to
turn the air conditioner off after going to bed and
start it again before waking up in the morning or
returning back home.
Example:It is 8:00 AM and you want to stop the
air conditioner at 9:30AM and restart at 6:00PM
1 Press the Timer Off button.
2 Set the desired time by pressing repeatedly or
KROGLQJGRZQWKH&RQWUROEXWWRQVXQWLO$0
shows in the display of the remote control.
&RQ¿UPWKHVHWWLPHE\SRLQWLQJWKHUHPRWH
control to the indoor unit and pressing again the
Timer-Off button.
4 Press the Timer On button.
Set the desired time by pressing repeatedly or
holding down the Control buttons until 6:00PM
shows in the display of the remote control.
6 &RQ¿UPWKHVHWWLPHE\SRLQWLQJWKHUHPRWH
control to the indoor unit and pressing again the
Timer On button.
symbol is displayed on the remote control
and the function is activated.
6HWWLQJWKH&ORFN
Before you start operating the air conditioner,
set the clock of the remote control using the
procedure given in this section. The clock panel
on the remote control will display the time
regardless of whether the air conditioner is in
operation or not.
After batteries are inserted in the remote control,
ZLOOGLVSOD\DQGEHJLQWRÀDVK
1 &RQWURO%XWWRQV
Press the Control buttons to set the desired
time.
Forward
Backward
Each time you press the buttons the time will
moves forward or backward by 1 minute.
Holding the button down will scroll more rapidly
through the time display.
2 &ORFN%XWWRQ
When the desired time is achieved, press the
&ORFNEXWWRQDJDLQRUDIWHUVHFRQGVZLWKQR
RSHUDWLRQWKHFORFNWLPHVWRSVÀDVKLQJDQGWKH
clock is set.

17
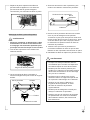
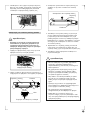
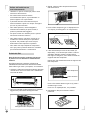
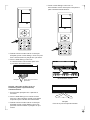
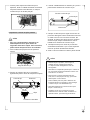
+RZWR8VHWKH,QGRRU8QLW
$GGLWLRQDO2SWLRQV
$LUÀRZ'LUHFWLRQ&RQWURO
1 6PDUW5HVWDUW)XQFWLRQ
The air conditioner resumes automatically with
the previous settings after a possible power
failure.
2 5HPRYDEOH3DQHO
The front panel of indoor unit can be easily
removed for cleaning and maintenance.
6HOI'LDJQRVHDQG$XWR3URWHFWLRQ
This air conditioner can detect the malfunctions,
showing the diagnosis on the display of the
indoor unit by means of an error code.
The air conditioner will change operation
automatically for self-protection.
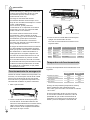
$GMXVWWKHDLUÀRZGLUHFWLRQSURSHUO\RWKHUZLVH
it might cause discomfort or uneven room
temperatures.
Both horizontal louver and vertical louver can be
adjusted with the remote control.
7RVHWWKHYHUWLFDOXSGRZQDLUÀRZGLUHFWLRQ
DXWRPDWLFDOO\
1 Perform this function while the unit is in
operation.
2 Press the Swing-V button on the remote control,
the horizontal louver will swing up and down
automatically.
The clock timer uses a 12 hour clock mode.
The default time for remote control is
12:00PM and it will revert to this when the
batteries are changed.
The default setting for remote control is ON
when the remote control is turned on.
It is not necessary to use this function when
the room air quality is good.
Clean the Plasma dust Collector every
three to six months depending on the
condition.
,)HHO2SHUDWLRQ
,21)LOWHU2SHUDWLRQ
The remote control works as a remote
thermostat, providing an accurate temperature
control and maximum comfort.
Point the remote control to the indoor unit and
press I Feel button, a beep from the indoor unit
LVWRFRQ¿UPWKDWWKLVIXQFWLRQLVDFWLYDWHG
The I Feel symbol
will stay on the display of
the remote control until I Feel button is pressed
again.
The air conditioner will operate to reach the set
temperature at the location of the remote control.
The remote control sends the temperature
information at its location to the indoor unit every
ten (10) minutes. The air conditioner will quit I
FEEL operation and revert to normal operation
if no temperature information is received from
the remote control for successive eleven (11)
minutes.
Press the ION-Filter button to active the Cold
Plasma and Plasma Dust Collector functions.
The symbol
will stay on the display of the
remote control until the ION-Filter button is
pressed again.
The Cold Plasma generator releases plasma
which can help to eliminate bacteria, viruses,
dusts and other harmful agents in the air.
The Plasma Dust Collector can trap various
¿QHSDUWLFXODWHPDWWHUVXFKDVGXVWVPRNHDQG
pollen from the air stream so as to keep the
room air clean.
This function is recommended when the indoor
air quality is poor.
WLSVDQGLQIRUPDWLRQ
WLSVDQGLQIRUPDWLRQ
5HVHWWKH&ORFN
Press the Clock button and the clock symbol
ZLOOVWDUWWRÀDVK
Follow step 1 and 2 to set the new time.

18
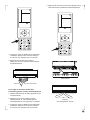
8SDQGGRZQDLUÀRZ
Vertical louver
Range
/HIWDQGULJKWDLUÀRZ
4 Press the Swing button again and the louver will
start swing up and down automatically.
7RVHWWKHYHUWLFDOXSGRZQDLUÀRZ
GLUHFWLRQDXWRPDWLFDOO\
1 Perform this function while the unit is in
operation.
2 Press the Swing-H button on the remote
control, the vertical louver will swing left and
right automatically.
When the louver moves to the desired
direction, press the Swing button again and
the louver will stay at where it is.
When the louver moves to the desired
direction, press the Swing-V button again and
the louver will stay at where it is.
4 Press the Swing-V button again and the louver
will start swinging up and down automatically.
Range

19
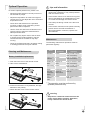
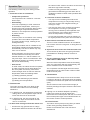
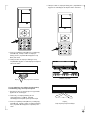
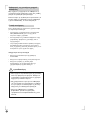
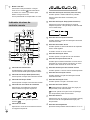
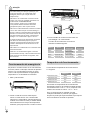
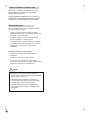
(PHUJHQF\2SHUDWLRQ
Manual control
button
Manual control button
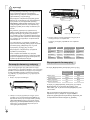
2SHUDWLQJ7HPSHUDWXUH
Press the Manual Control button again to turn
the air conditioner off.
The operation mode is seen in the following
table.
The operation temperature range (outdoor
temperature) for cooling only model is 16ºC~48ºC,
IRUKHDWSXPSPRGHOLV&a&
If the air conditioner is used outside of the above
conditions, certain safety protection features may
come into operation and cause the unit to function
abnormally.
When the remote control is lost or fails to operate,
please use the manual switch on the indoor unit.
The air conditioner will operate in AUTO mode and
the temperature setting or fan speed can not be
changed.
1 Open the front panel.
2 Press the Manual Control button to enter
AUTO mode. The air conditioner will select the
mode of COOL, HEAT (heat pump model only)
and FAN automatically according to the room
temperature for reaching the best comfort.
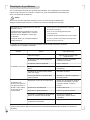
0RGH 0RGHO 7HPSHUDWXUHVHWWLQJ
Fan
6SHHG
AUTO Cooling &&22/)$1 AUTO
AUTO Heat pump &&22/)$1 AUTO
AUTO Heat pump 20°C (HEAT) AUTO
The operation temperature range is as below:
,QGRRU6LGH
'%:%&
2XWGRRU6LGH
'%:%&
Maximum Cooling
Minimum Cooling 21/–
Maximum Heating 27/– 24/18
Minimum Heating 20/–
The Swing-V and Swing-H buttons will be
disabled when the air conditioner is not in
operation (even if the Timer On is set).
Do not operate the air conditioner for long
WLPHZLWKWKHDLUÀRZGLUHFWLRQVHWGRZQZDUG
in COOL or DEHUMIDIFY mode.
Otherwise, condensate may occur on the
surface of the horizontal louver and drop
RQWRWKHÀRRURUIXUQLVKLQJV
Do not move the horizontal louver and
vertical louver manually. Always use the
Swing-V and Swing-H buttons. Moving the
louvers manually may cause malfunction
during operation. If the louver malfunctions,
stop the air conditioner and restart it.
Open angle of the horizontal louver should
not be set too small, as cooling or heating
performance may be impaired due to too
UHVWULFWHGDLUÀRZDUHD
Do not operate the air conditioner with
horizontal louver in closed position.
When the air conditioner is connected to
power (initial operation), the horizontal louver
may generate a sound for 10 seconds, this is
a normal operation.
FDXWLRQ
La pagina sta caricando ...
La pagina sta caricando ...
La pagina sta caricando ...
La pagina sta caricando ...
La pagina sta caricando ...
La pagina sta caricando ...
La pagina sta caricando ...
La pagina sta caricando ...
La pagina sta caricando ...
La pagina sta caricando ...
La pagina sta caricando ...
La pagina sta caricando ...
La pagina sta caricando ...
La pagina sta caricando ...
La pagina sta caricando ...
La pagina sta caricando ...
La pagina sta caricando ...
La pagina sta caricando ...
La pagina sta caricando ...
La pagina sta caricando ...
La pagina sta caricando ...
La pagina sta caricando ...
La pagina sta caricando ...
La pagina sta caricando ...
La pagina sta caricando ...
La pagina sta caricando ...
La pagina sta caricando ...
La pagina sta caricando ...
La pagina sta caricando ...
La pagina sta caricando ...
La pagina sta caricando ...
La pagina sta caricando ...
La pagina sta caricando ...
La pagina sta caricando ...
La pagina sta caricando ...
La pagina sta caricando ...
La pagina sta caricando ...
La pagina sta caricando ...
La pagina sta caricando ...
La pagina sta caricando ...
La pagina sta caricando ...
La pagina sta caricando ...
La pagina sta caricando ...
La pagina sta caricando ...
La pagina sta caricando ...
La pagina sta caricando ...
La pagina sta caricando ...
La pagina sta caricando ...
La pagina sta caricando ...
La pagina sta caricando ...
La pagina sta caricando ...
La pagina sta caricando ...
La pagina sta caricando ...
La pagina sta caricando ...
La pagina sta caricando ...
La pagina sta caricando ...
La pagina sta caricando ...
La pagina sta caricando ...
La pagina sta caricando ...
La pagina sta caricando ...
La pagina sta caricando ...
La pagina sta caricando ...
La pagina sta caricando ...
La pagina sta caricando ...
La pagina sta caricando ...
La pagina sta caricando ...
La pagina sta caricando ...
La pagina sta caricando ...
La pagina sta caricando ...
La pagina sta caricando ...
La pagina sta caricando ...
La pagina sta caricando ...
La pagina sta caricando ...
La pagina sta caricando ...
La pagina sta caricando ...
La pagina sta caricando ...
La pagina sta caricando ...
La pagina sta caricando ...
La pagina sta caricando ...
La pagina sta caricando ...
La pagina sta caricando ...
La pagina sta caricando ...
La pagina sta caricando ...
La pagina sta caricando ...
La pagina sta caricando ...
La pagina sta caricando ...
La pagina sta caricando ...
La pagina sta caricando ...
La pagina sta caricando ...
La pagina sta caricando ...
La pagina sta caricando ...
La pagina sta caricando ...
La pagina sta caricando ...
La pagina sta caricando ...
La pagina sta caricando ...
La pagina sta caricando ...
La pagina sta caricando ...
La pagina sta caricando ...
La pagina sta caricando ...
La pagina sta caricando ...
La pagina sta caricando ...
La pagina sta caricando ...
La pagina sta caricando ...
La pagina sta caricando ...
La pagina sta caricando ...
La pagina sta caricando ...
La pagina sta caricando ...
La pagina sta caricando ...
La pagina sta caricando ...
La pagina sta caricando ...
La pagina sta caricando ...
La pagina sta caricando ...
La pagina sta caricando ...
La pagina sta caricando ...
La pagina sta caricando ...
La pagina sta caricando ...
La pagina sta caricando ...
La pagina sta caricando ...
La pagina sta caricando ...
La pagina sta caricando ...
La pagina sta caricando ...
La pagina sta caricando ...
La pagina sta caricando ...
La pagina sta caricando ...
La pagina sta caricando ...
La pagina sta caricando ...
La pagina sta caricando ...
La pagina sta caricando ...
La pagina sta caricando ...
La pagina sta caricando ...
La pagina sta caricando ...
La pagina sta caricando ...
La pagina sta caricando ...
La pagina sta caricando ...
La pagina sta caricando ...
La pagina sta caricando ...
La pagina sta caricando ...
La pagina sta caricando ...
La pagina sta caricando ...
La pagina sta caricando ...
-
 1
1
-
 2
2
-
 3
3
-
 4
4
-
 5
5
-
 6
6
-
 7
7
-
 8
8
-
 9
9
-
 10
10
-
 11
11
-
 12
12
-
 13
13
-
 14
14
-
 15
15
-
 16
16
-
 17
17
-
 18
18
-
 19
19
-
 20
20
-
 21
21
-
 22
22
-
 23
23
-
 24
24
-
 25
25
-
 26
26
-
 27
27
-
 28
28
-
 29
29
-
 30
30
-
 31
31
-
 32
32
-
 33
33
-
 34
34
-
 35
35
-
 36
36
-
 37
37
-
 38
38
-
 39
39
-
 40
40
-
 41
41
-
 42
42
-
 43
43
-
 44
44
-
 45
45
-
 46
46
-
 47
47
-
 48
48
-
 49
49
-
 50
50
-
 51
51
-
 52
52
-
 53
53
-
 54
54
-
 55
55
-
 56
56
-
 57
57
-
 58
58
-
 59
59
-
 60
60
-
 61
61
-
 62
62
-
 63
63
-
 64
64
-
 65
65
-
 66
66
-
 67
67
-
 68
68
-
 69
69
-
 70
70
-
 71
71
-
 72
72
-
 73
73
-
 74
74
-
 75
75
-
 76
76
-
 77
77
-
 78
78
-
 79
79
-
 80
80
-
 81
81
-
 82
82
-
 83
83
-
 84
84
-
 85
85
-
 86
86
-
 87
87
-
 88
88
-
 89
89
-
 90
90
-
 91
91
-
 92
92
-
 93
93
-
 94
94
-
 95
95
-
 96
96
-
 97
97
-
 98
98
-
 99
99
-
 100
100
-
 101
101
-
 102
102
-
 103
103
-
 104
104
-
 105
105
-
 106
106
-
 107
107
-
 108
108
-
 109
109
-
 110
110
-
 111
111
-
 112
112
-
 113
113
-
 114
114
-
 115
115
-
 116
116
-
 117
117
-
 118
118
-
 119
119
-
 120
120
-
 121
121
-
 122
122
-
 123
123
-
 124
124
-
 125
125
-
 126
126
-
 127
127
-
 128
128
-
 129
129
-
 130
130
-
 131
131
-
 132
132
-
 133
133
-
 134
134
-
 135
135
-
 136
136
-
 137
137
-
 138
138
-
 139
139
-
 140
140
-
 141
141
-
 142
142
-
 143
143
-
 144
144
-
 145
145
-
 146
146
-
 147
147
-
 148
148
-
 149
149
-
 150
150
-
 151
151
-
 152
152
-
 153
153
-
 154
154
-
 155
155
-
 156
156
-
 157
157
-
 158
158
-
 159
159
-
 160
160


Electrolux EPI12NLIWI Manuale utente
- Categoria
- Condizionatori d'aria a sistema split
- Tipo
- Manuale utente
in altre lingue
- English: Electrolux EPI12NLIWI User manual
- español: Electrolux EPI12NLIWI Manual de usuario
- português: Electrolux EPI12NLIWI Manual do usuário
- Türkçe: Electrolux EPI12NLIWI Kullanım kılavuzu
- română: Electrolux EPI12NLIWI Manual de utilizare