Alpine ILX ILX-F903D Manuale del proprietario
- Categoria
- Ricevitori multimediali per auto
- Tipo
- Manuale del proprietario

68-34732Z77-A
EN
DE
IT
FR
ES
SE
NL
PL
RU
FOR CAR USE ONLY/NUR FÜR AUTOMOBIL GEBRAUCH/POUR APPLICATION AUTOMOBILE UNIQUEMENT/PARA USO
EN AUTOMÓVILES/SOLO PER L’UTILIZZO IN AUTOMOBILE/ENDAST FÖR BILBRUK/ALLEEN VOOR GEBRUIK IN DE
AUTO/ТОЛЬКО ДЛЯ ИСПОЛЬЗОВАНИЯ В АВТОМОБИЛЯХ/DO UŻYCIA TYLKO W SAMOCHODZIE
9-inch Digital Media Station
iLX-F903D
• OWNER’S MANUAL
Please read before using this equipment.
• ANVÄNDARHANDLEDNING
Innan du använder utrustningen bör du läsa
igenom denna användarhandledning.
• BEDIENUNGSANLEITUNG
Lesen Sie diese Bedienungsanleitung bitte vor
Gebrauch des Gerätes.
• GEBRUIKERSHANDLEIDING
Lees deze aanwijzingen aandachtig alvorens
dit toestel te gebruiken.
• MODE D’EMPLOI
Veuillez lire avant d’utiliser cet appareil.
•
.
• MANUAL DE OPERACIÓN
Léalo antes de utilizar este equipo.
• INSTRUKCJA OBSŁUGI
Prosimy zapoznać się z tą instrukcją przed
przystąpieniem do użytkowania urządzenia.
• ISTRUZIONI PER L’USO
Si prega di leggere prima di utilizzare il attrez-
zatura.
ALPINE ELECTRONICS MARKETING, INC.
1-7, Yukigaya-Otsukamachi, Ota-ku,
Tokyo 145-0067, JAPAN
Phone: 03-5499-4531
ALPINE ELECTRONICS OF AMERICA, INC.
19145 Gramercy Place, Torrance,
California 90501, U.S.A.
Phone 1-800-ALPINE-1 (1-800-257-4631)
ALPINE ELECTRONICS OF AUSTRALIA PTY. LTD.
161-165 Princes Highway, Hallam
Victoria 3803, Australia
Phone 03-8787-1200
ALPINE ELECTRONICS GmbH
Wilhelm-Wagenfeld-Str. 1-3, 80807 München, Germany
Phone 089-32 42 640
ALPINE ELECTRONICS OF U.K. LTD.
Alpine House
Fletchamstead Highway, Coventry CV4 9TW, U.K.
www.alpine.co.uk
ALPINE ELECTRONICS France S.A.R.L.
184 allée des Erables
CS 52016 – Villepinte
95 945 Roissy CDG cedex
FRANCE
Phone : + 33(0)1 48 63 89 89
ALPINE ITALIA S.p.A.
Viale Cristoforo Colombo 8,
20090 Trezzano sul Naviglio MI, Italy
Phone +39 02 484781
ALPINE ELECTRONICS DE ESPAÑA, S.A.
Portal de Gamarra 36, Pabellón, 32
01013 Vitoria (Alava)-APDO 133, Spain
Phone 945-283588


ENGLISH
3-EN
Contents
Operating Instructions
WARNING
Points to Observe for Safe Usage ........................6
WARNING ...................................................... 6
CAUTION ....................................................... 7
NOTICE .......................................................... 7
Features
Favourite Function ................................................ 9
About Swiping the Touch Screen ........................ 9
Switching the Audio Sources Screen to a
Dedicated Screen .............................................10
Getting Started
Location of Controls ...........................................11
Turning Power On or Off ..................................11
Turning the System On ......................................11
Initial System Start-Up .......................................12
Adjusting the Volume .........................................12
Lowering Volume Quickly .................................12
Touch Screen Operation ....................................12
Switching Sources ................................................13
Operating the Function Button on the
Audio/Video Main Screen ..............................13
About Basic Operation for List Screen .............14
About the Shortcut Setup Screen ......................14
Sound Setup Function .....................................15
About the Menu Screen ......................................16
Edit Menu .........................................................16
About the Indicator Display ..............................17
Opening screen Customisation .........................17
How to Input Characters and Numbers
(Keypad) ...........................................................18
Favourite Function
Using the Favourite Function ............................19
Editing the Favourite Screen ..............................19
Registering Items .............................................19
Changing Item Names ....................................20
Changing Icons (only the Shortcut Dialing
icons) ............................................................. 20
Changing the Layout ....................................... 20
Deleting Items .................................................. 21
Applying Alpine TuneIt App
Adjusting the sound via the Smartphone ........ 22
Facebook Notification Function .......................22
Setup
Setup Operation ..................................................24
Wireless (Bluetooth) Setup
Bluetooth Setup ................................................... 25
Displaying Bluetooth Information ................ 25
Registering the Bluetooth Device .................. 25
Hands-free Device Primary/Secondary
Setting ............................................................ 26
iPhone Auto Pairing Setting ..........................26
Phone Setup ......................................................... 26
Setting the Passcode ........................................ 26
Changing the Character Code of the Phone
Book ............................................................... 26
Selecting the Output Speaker ......................... 26
General Setup
Sounds Setup ........................................................ 27
Setting the Balance/Fader/Rear Speaker/
Subwoofer ..................................................... 28
Setting the Media Xpander (MX HD) .......... 28
Equalizer Presets .............................................. 29
Adjusting the Parametric Equalizer Curve
(Dual HD EQ) .............................................. 29
Adjusting the Crossover Settings
(X-OVER) ..................................................... 30
Adjusting the Time Correction (TCR) ......... 30
Setting Defeat ................................................... 30
Setting the Volume for Each Source ............. 31
Adjusting the Caller Level .............................. 31
Adjusting the Microphone Level ................... 31
Adjusting the Ring Tone Level ...................... 31
Volume Setting ................................................31
Auto Volume Setting ......................................31
Setting the Microphone Effect ....................... 31
Default Sound Settings ................................... 31
About the Crossover ........................................... 32
About Time Correction ......................................32
Language Setting .................................................33
Visual Setup .........................................................33

4-EN
Selecting the Visual EQ Mode
(Factory’s setting) ........................................ 33
Adjusting Brightness ....................................... 34
Adjusting Colour of Picture ........................... 34
Adjusting Tint of Picture ............................... 34
Adjusting Image Contrast .............................. 34
Adjusting Picture Quality .............................. 34
Saving and calling the adjusted picture
quality ............................................................ 34
Screen Setup ......................................................... 34
Screen/Lighting Customise ............................ 34
Switching the Display Colour ........................ 35
Setting the Text Scroll ..................................... 35
Switching the Artwork Position .................... 35
General Setup ....................................................... 35
Format settings ................................................ 35
Setting the Clock Display ............................... 35
Setting the Time ............................................... 36
Setting Security code ....................................... 36
About iLX-F903D ............................................ 36
Setting Demo mode to Off/On ...................... 36
Car Setup .............................................................. 37
Steering wheel Setting ..................................... 37
Installation Setup ............................................. 37
Sources Setup
Radio Setup .......................................................... 38
PI SEEK Setting ............................................... 38
Receiving RDS Regional (Local) Stations .... 38
Switching the Display Language of PTY
(Programme Type) ...................................... 38
Setting PTY31 (Emergency Broadcast)
Reception ...................................................... 38
Setting the TUNER (FM) Tone Quality
(Tuner Condition) ....................................... 38
DAB Setting ......................................................... 39
Setting Alarm (Emergency Broadcast)
Reception ...................................................... 39
Setting Announcement Reception ................ 39
Setting the FM Linking ON/OFF
(Service Following) ...................................... 39
Setting the DAB Antenna ON/OFF .............. 39
AUX Setup ........................................................... 40
Setting the Auxiliary (AUX) Name ............... 40
Switching the Visual Input Signal System ... 40
HDMI Setup ........................................................ 40
Apple CarPlay Setup ........................................... 40
System Setup
Camera Setup ....................................................... 41
Setting the Camera Input ............................... 41
Setting the Camera Signal Input ................... 41
Adjusting the Rear Camera Guide ................ 41
Camera Interrupt Setting (Power OFF
Mode) ............................................................ 42
CAN-I/F Setup .................................................... 42
Setting the Default Vehicle Screen ................ 42
Setting the Climate Interrupt Time .............. 42
Setting the Parking Sensor Interrupt
On/Off ........................................................... 43
Unit Setup ............................................................ 43
Setting the External AP ................................... 43
Application Setup ................................................ 43
Android Auto (Optional)
What is Android Auto ........................................ 44
Activate Android Auto ....................................... 44
Apple CarPlay (Optional)
Access to Apple CarPlay .................................... 44
Radio/RDS
Radio Basic Operation
Listening to the Radio ........................................ 46
Presetting Stations Manually ............................. 46
Presetting Stations Automatically ..................... 46
Tuning to Preset Stations ................................... 46
Inputting Frequency Directly and Receiving
the Radio Station ............................................. 47
RDS Operation
Turning AF (Alternative Frequencies)
On or Off .......................................................... 47
Interruption Function ........................................ 47
Receiving Traffic Announcement ................. 48
News Programme Interruption ..................... 48
Receiving Traffic Information Manually ......... 48
Selecting the Receivable PTY ............................ 48
Displaying Radio Text ........................................ 48
DAB/DAB+/DMB
Listening to DAB/DAB+/DMB ......................... 49
Presetting Service ................................................ 50
Tuning to Preset Service .................................... 50
Service Component/PTY Search Function ..... 50
Service Search Function ................................. 50
PTY Search Function ...................................... 50
Interruption Function ........................................ 51
Receiving Traffic Announcement ................. 51
News Programme Interruption ..................... 51

5-EN
Inputting Channel Number Directly and
Receiving the Broadcasts ................................ 51
Switching to Secondary Service
Components ..................................................... 51
Displaying DAB Text .......................................... 52
About DAB/DAB+/DMB .................................. 52
USB Flash drive (Optional)
Playback ................................................................ 54
Fast-forwarding/Fast-reversing
(USB Video only) ............................................ 54
Stopping Playback (USB Video only) .............. 54
Repeat Play ........................................................... 54
Random Play (USB Audio only) ....................... 54
Searching for a Desired Song ............................. 55
Switching Display Modes (During Video
File Play Back) .................................................. 55
About USB Video format ................................... 55
iPod/iPhone (Optional)
Playback ................................................................ 57
Searching for a Music File .................................. 57
Quick Search Mode ......................................... 57
Full Search Mode ............................................. 57
Alphabet Search Function ................................. 58
Repeat Play ........................................................... 58
Random Play (Shuffle) ....................................... 58
HDMI Device (Optional)
DVD Player Operation
HDMI Operation
Bluetooth Operation
Setup Before Using .............................................. 60
About Bluetooth .............................................. 60
About the Hands-free Phone ......................... 60
Before Using Bluetooth .................................. 60
Hands-free Phone Control
Answering a Call ................................................. 61
Hanging up the Telephone ................................ 61
Call Waiting Function ........................................ 61
Calling ................................................................... 62
Calling by Favourite Function ....................... 62
Making a phone call using the Phone
Menu ............................................................. 62
Using Voice Recognition function ................... 63
Using Siri .......................................................... 63
Voice Dial Function ........................................ 63
Operations During a Conversation .................. 64
Adjusting the Speech Volume ....................... 64
Changing the Voice Output ........................... 64
DTMF (Touch-Tone) Function .................... 64
Phone Book Function ......................................... 64
Synchronising the Phone Book ..................... 64
Adding the Phone Book ................................. 64
Deleting the Phone Book Entries .................. 65
Searching in the Phone Book ......................... 65
Bluetooth Audio
Playback ................................................................ 66
Repeat Play ........................................................... 66
Random Play ........................................................ 66
Search Function ................................................... 66
Connecting a Bluetooth Device ........................ 67
Disconnecting the Bluetooth Connection ... 67
Changing the connecting Bluetooth
Device ............................................................ 67
Auxiliary Device (Optional)
Operating Auxiliary Devices (Optional) .......... 68
Operating an AUX, AUX DVD or
GAME ........................................................... 68
Camera Operation (Optional)
Rear Camera Operation ..................................... 69
Displaying the Rear Camera Image from
the Menu screen ........................................... 69
Displaying the rear view video while
the car is in reverse ...................................... 69
Guide Display ON/OFF Setting .................... 69
Adjusting the Caution Display Location ...... 69
About the Rear Camera Guide .......................... 70
About Vehicle Interlock Function
Vehicle Info mode ............................................... 72
Function Screen Examples ................................. 72
Information
Product Software Update ................................... 73
About the Supported Formats ........................... 73
About MP3/WMA/AAC/FLAC .................... 73
In Case of Difficulty ............................................ 75
If this Message Appears ...................................... 75
Specifications ....................................................... 77

6-EN
Operating Instructions
Points to Observe for Safe Usage
• Read this manual carefully before using this disc and the system
components. They contain instructions on how to use this product
in a safe and effective manner. Alpine cannot be responsible for
problems resulting from failure to observe the instructions in this
manual.
• This manual uses various pictorial displays to show you how to use
this product safely and to alert you to potential dangers resulting
from improper connections and operation. Following are the
meanings of these pictorial displays. It is important to fully
understand the meanings of these pictorial displays in order to use
this manual and the system properly.
INSTALL THE PRODUCT CORRECTLY SO THAT THE DRIVER CANNOT WATCH
TV/VIDEO UNLESS THE VEHICLE IS STOPPED AND THE EMERGENCY
BRAKE IS APPLIED.
It is dangerous for the driver to watch TV/Video while driving a
vehicle. Installing this product incorrectly enables the driver to
watch TV/Video while driving. This may cause a distraction,
preventing the driver from looking ahead, thus causing an accident.
The driver or other people could be severely injured.
DO NOT WATCH VIDEO WHILE DRIVING.
Watching the video may distract the driver from looking ahead of
the vehicle and cause an accident.
DO NOT OPERATE ANY FUNCTION THAT TAKES YOUR ATTENTION AWAY
FROM SAFELY DRIVING YOUR VEHICLE.
Any function that requires your prolonged attention should only be
performed after coming to a complete stop. Always stop the vehicle
in a safe location before performing these functions. Failure to do so
may result in an accident.
DO NOT FOLLOW ROUTE SUGGESTIONS IF THE NAVIGATION SYSTEM
INSTRUCTS YOU TO PERFORM AN UNSAFE OR ILLEGAL MANEUVER, OR
PLACES YOU IN AN UNSAFE SITUATION OR AREA.
This product is not a substitute for your personal judgment. Any
route suggestions by this system should never supersede any local
traffic regulations or your personal judgement or knowledge of safe
driving practise.
KEEP THE VOLUME AT A LEVEL WHERE YOU CAN STILL HEAR OUTSIDE
NOISES WHILE DRIVING.
Excessive volume levels that obscure sounds such as emergency
vehicle sirens or road warning signals (train crossings, etc.) can be
dangerous and may result in an accident. LISTENING AT LOUD
VOLUME LEVELS IN A CAR MAY ALSO CAUSE HEARING
DAMAGE.
MINIMIZE DISPLAY VIEWING WHILE DRIVING.
Viewing the display may distract the driver from looking ahead of
the vehicle and cause an accident.
DO NOT DISASSEMBLE OR ALTER.
Doing so may result in an accident, fire or electric shock.
USE ONLY IN CARS WITH A 12 VOLT NEGATIVE GROUND.
(Check with your dealer if you are not sure.) Failure to do so may
result in fire, etc.
KEEP SMALL OBJECTS SUCH AS SCREWS OUT OF THE REACH OF
CHILDREN.
Swallowing them may result in serious injury. If swallowed, consult
a physician immediately.
USE THE CORRECT AMPERE RATING WHEN REPLACING FUSES.
Failure to do so may result in fire or electric shock.
DO NOT BLOCK VENTS OR RADIATOR PANELS.
Doing so may cause heat to build up inside and may result in fire.
USE THIS PRODUCT FOR MOBILE 12V APPLICATIONS.
Use for other than its designed application may result in fire,
electric shock or other injury.
MAKE THE CORRECT CONNECTIONS.
Failure to make the proper connections may result in fire or
product damage.
BEFORE WIRING, DISCONNECT THE CABLE FROM THE NEGATIVE BATTERY
TERMINAL.
Failure to do so may result in electric shock or injury due to
electrical shorts.
WARNING
WARNING
• Operation of the system while driving is dangerous. Users
should stop vehicle before operating the software.
• Road conditions and regulations take precedence over
information contained on the map display: observe actual
traffic restrictions and circumstances while driving.
• This software is designed for use exclusively in the unit. It
cannot and may not be used in conjunction with other
hardware.
WARNING
This symbol means important instructions. Failure
to heed them can result in serious injury or death.

7-EN
DO NOT ALLOW CABLES TO BECOME ENTANGLED IN SURROUNDING
OBJECTS.
Arrange wiring and cables in compliance with the manual to
prevent obstructions when driving. Cables or wiring that obstruct
or hang up on places such as the steering wheel, shift lever, brake
pedals, etc. can be extremely hazardous.
DO NOT SPLICE INTO ELECTRICAL CABLES.
Never cut away cable insulation to supply power to other
equipment. Doing so will exceed the current carrying capacity of
the wire and result in fire or electric shock.
DO NOT DAMAGE PIPE OR WIRING WHEN DRILLING HOLES.
When drilling holes in the chassis for installation, take precautions
so as not to contact, damage or obstruct pipes, fuel lines, tanks or
electrical wiring. Failure to take such precautions may result in fire.
DO NOT USE BOLTS OR NUTS IN THE BRAKE OR STEERING SYSTEMS TO
MAKE GROUND CONNECTIONS.
Bolts or nuts used for the brake or steering systems (or any other
safety-related system), or tanks should NEVER be used for
installations or ground connections. Using such parts could disable
control of the vehicle and cause fire etc.
DO NOT INSTALL IN LOCATIONS WHICH MIGHT HINDER VEHICLE
OPERATION, SUCH AS THE STEERING WHEEL OR SHIFT LEVER.
Doing so may obstruct forward vision or hamper movement etc.
and results in serious accident.
HALT USE IMMEDIATELY IF A PROBLEM APPEARS.
Failure to do so may cause personal injury or damage to the
product. Return it to your authorized Alpine dealer or the nearest
Alpine Service Centre for repairing.
HAVE THE WIRING AND INSTALLATION DONE BY EXPERTS.
The wiring and installation of this unit requires special technical
skill and experience. To ensure safety, always contact the dealer
where you purchased this product to have the work done.
USE SPECIFIED ACCESSORY PARTS AND INSTALL THEM SECURELY.
Be sure to use only the specified accessory parts. Use of other than
designated parts may damage this unit internally or may not
securely install the unit in place. This may cause parts to become
loose resulting in hazards or product failure.
ARRANGE THE WIRING SO IT IS NOT CRIMPED OR PINCHED BY A SHARP
METAL EDGE.
Route the cables and wiring away from moving parts (like the seat
rails) or sharp or pointed edges. This will prevent crimping and
damage to the wiring. If wiring passes through a hole in metal, use a
rubber grommet to prevent the wire’s insulation from being cut by
the metal edge of the hole.
DO NOT INSTALL IN LOCATIONS WITH HIGH MOISTURE OR DUST.
Avoid installing the unit in locations with high incidence of
moisture or dust. Moisture or dust that penetrates into this unit may
result in product failure.
NOTICE
Product Cleaning
Use a soft dry cloth for periodic cleaning of the product. For more
severe stains, please dampen the cloth with water only. Anything
else has the chance of dissolving the paint or damaging the plastic.
Temperature
Be sure the temperature inside the vehicle is between +45°C
(+113°F) and 0°C (+32°F) before turning your unit on.
Maintenance
If you have problems, do not attempt to repair the unit yourself.
Return it to your Alpine dealer or the nearest Alpine Service Station
for servicing.
Protecting the USB connector
• Only an iPod/iPhone, Android™ smartphone or USB flash drive
can be connected to the USB connector on this unit. Correct
performance using other USB products cannot be guaranteed.
• If the USB connector is used, be sure to use only the supplied
connector cable with the unit. A USB hub is not supported.
• Depending on the connected USB flash drive, the unit may not
function or some functions may not be performed.
• The audio file format that can be played back on the unit is
MP3/WMA/AAC/FLAC.
• Artist/song name, etc., can be displayed. Certain, special
characters may not be correctly displayed.
CAUTION
This symbol means important instructions. Failure
to heed them can result in injury or material
property damage.

8-EN
On Handling USB Flash drive
• This unit can control a memory storage device that supports the
USB Mass Storage Class (MSC) protocol. Playable audio file
formats are MP3, WMA, AAC and FLAC.
• USB Flash drive function is not guaranteed. Use USB flash drive
according to the terms of agreement. Read the USB flash drive
Owner’s Manual thoroughly.
• Avoid usage or storage in the following locations:
Anywhere in the car exposed to direct sunlight or high
temperatures.
Anywhere the possibility of high humidity or corrosive
substances are present.
• Fix the USB flash drive in a location where driver operation will
not be hindered.
• USB Flash drive may not function correctly at high or low
temperature.
• Use only certified USB flash drive. Note that even certified USB
flash drive, may not function correctly depending on its type or
state.
• Depending on the settings of the USB flash drive type, memory
state or encoding software, the unit may not play back or display
properly.
• USB Flash drive may take time to start playback. If there is a
particular file other than audio in the USB flash drive, it may take
considerable time before the file is played back or searched.
• The unit can play back “mp3,” “wma” or “m4a” file extensions.
• Do not add the above extensions to a file other than audio data.
This non-audio data will not be recognised. The resulting
playback may contain noise that can damage speakers and/or
amplifiers.
• It is recommended to back up important data on a personal
computer.
• Do not remove the USB device while playback is in progress.
Change SOURCE to something other than USB, then remove the
USB device to prevent possible damage to its memory.
• Windows Media, and the Windows logo are trademarks, or
registered trademarks of Microsoft Corporation in the United
States and/or other countries.
• Apple, iPhone, iPod, and iPod touch are trademarks of Apple Inc.,
registered in the U.S. and other countries. Apple CarPlay is a
trademark of Apple Inc.
• Use of the Apple CarPlay logo means that a vehicle user interface
meets Apple performance standards. Apple is not responsible for
the operation of this vehicle or its compliance with safety and
regulatory standards. Please note that the use of this product with
iPhone, or iPod may affect wireless performance.
• “Made for iPod,” and “Made for iPhone,” mean that an electronic
accessory has been designed to connect specifically to iPod, or
iPhone, respectively, and has been certified by the developer to meet
Apple performance standards. Apple is not responsible for the
operation of this device or its compliance with safety and
regulatory standards. Please note that the use of this accessory with
iPod, or iPhone may affect wireless performance.
• Google, Android, Android Auto, Google Play and other marks are
trademarks of Google LLC.
• The Bluetooth® word mark and logos are registered trademarks
owned by the Bluetooth SIG, Inc. and any use of such marks by
Alpine Electronics, Inc. is under licence.
• The terms HDMI and HDMI High-Definition Multimedia
Interface, and the HDMI Logo are trademarks or registered
trademarks of HDMI Licensing, LLC in the United States and other
countries.
• MPEG Layer-3 audio coding technology licensed from Fraunhofer
IIS and Thomson. Supply of this product only conveys a licence for
private,non-commercial use and does not convey a licence nor
imply any right to use this product in any commercial (i.e. revenue-
generation) real time broadcasting (terrestrial, satellite, cable and/
or any other media), broadcasting/streaming via internet, intranets
and/or other networks or in other electronic content distribution
systems, such as pay-audio or audio-on-demand applications. An
independent licence for such use is required. For details, please visit
http://www.mp3licensing.com
CAUTION
Alpine accepts no responsibility for lost data, etc., even if data, etc., is
lost while using this product.

9-EN
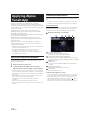
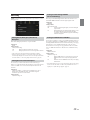
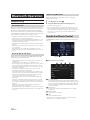
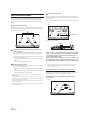
The following screen examples used in this manual are for reference only. They may differ from the actual screen displays.
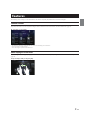
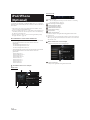
Favourite Function
Frequently used functions can be easily recalled. Register them to the Favourite screen. For details, see “Favourite Function” (page 19).
Favourite screen example
• Frequently used functions and useful functions can be customised for your convenience.
• You can register up to 54 functions.
• You cannot register a function more than once.
About Swiping the Touch Screen
You can change a screen or a page by swiping the touch screen vertically or horizontally with your finger. For details, see “Touch Screen Operation”
(page 12).
Swipe the display with your finger lightly.
Features

10-EN
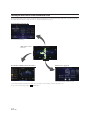
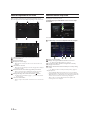
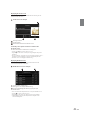
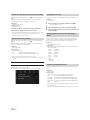
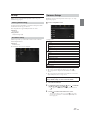
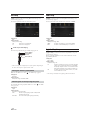
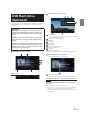
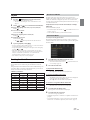
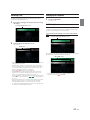
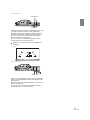
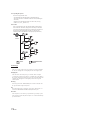
Switching the Audio Sources Screen to a Dedicated Screen
You can switch the Audio Sources screen to a dedicated screen by touching the icon on one of the three edges of the screen, or by swiping vertically or
horizontally. For details on how to swipe the screen, see “Touch Screen Operation” (page 12).
*1 The Search mode differs depending on the audio source. For details, see the operating instructions of the audio source.
*2 The screen also switches by pressing the (MENU) button.
Shortcut Setup Screen (page 14)
Preset button or Quick Search mode Screen
*
1
You can set the Sound Setup.
<Audio Sources Screen>
(USB Audio)
Menu Screen (page 16)
*
2
You can make settings on the Menu Screen.

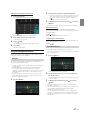
11-EN
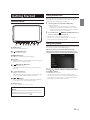
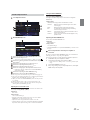
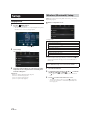
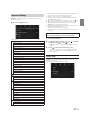
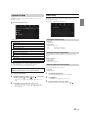
Location of Controls
RESET switch
The system of this unit is reset.
/ (DOWN/UP) button
Press to adjust the volume.
(MUTE) button
Press to activate/deactivate the mute mode.
button
Depending on the connected smartphone, press to recall Siri
function or voice recognition mode.
(MENU)/(Power Off) button
Recalls the Menu screen.
Press and hold this button for at least 5 seconds to turn the
power off.
(Favourite) button
Recall the Favourite screen.
Press and hold for at least 2 seconds to recall the Vehicle Info
mode screen. (CAN-I/F BOX should be connected.)
/ button
Press to seek up/down a station in radio mode or up/down a
track, chapter, etc., in other audio/visual sources.
Dimmer Sensor
Sense the brightness of the car interior.
Turning Power On or Off
Some of this unit’s functions cannot be performed while the vehicle is in
motion. Be sure to stop your vehicle in a safe location and apply the
parking brake, before attempting these operations.
1 Turn the ignition key to the ACC or ON position.
The system turns on.
• When turned on, the system displays the last screen that was
displayed before the ignition key was turned off. For example, if
the unit is in radio mode when ignition is turned off, it will remain
in radio mode when ignition is turned back on.
2 Press and hold the (MENU)/(Power Off) button for at
least 5 seconds to turn the power off.
• The unit can be turned on by pressing any button.
• The unit is a precision device. Careful handling of the unit should
provide you with years of trouble-free operation.
Turning the System On
With the Alpine system, when the ignition key is turned to ACC or ON,
the opening screen will be automatically displayed.
When the system is used for the first time, the language
selection menu is displayed. Swipe the Language list screen
vertically, then touch your choice from the list of 23 languages.
After selecting the language, the time setting screen is displayed.
Touch [ ] or [ ] of “Hour”, “Minute” to adjust the time, then
touch [OK] to confirm.
Touch [Reset] to reset the time.
• The GPS antenna should be connected before adjusting the time.
• Some of this unit’s functions cannot be performed while the vehicle is in
motion. Be sure to stop your vehicle in a safe location and apply the
parking brake before attempting these operations.
Getting Started
About the button descriptions used in this Owner’s
Manual
The buttons found on the face of the unit are expressed in bold
(e.g. MENU). The buttons found on the touch-screen display are
shown in bold within brackets, [ ] (e.g. []).

12-EN
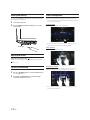
Initial System Start-Up
Be sure to press the RESET switch when using the unit for the first time,
after changing the car battery, etc.
1 Turn off the unit power.
2 Press the RESET switch with a ballpoint pen or similar
pointed object.
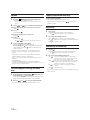
Adjusting the Volume
Adjust the volume by pressing / .
Volume decreases/increases continuously by pressing and holding
/.
Volume: 0 - 35
Lowering Volume Quickly
Audio Mute function instantly lowers the volume level to 0.
1 Press the (MUTE) button to activate the MUTE mode.
The audio level will be 0.
2 Pressing the (MUTE) button again will bring the
audio back to its previous level.
Touch Screen Operation
You can operate the system by using the touch panel on the screen.
• Be sure to touch the onscreen button lightly with the pad of your finger
to avoid scratching the display.
Touch operation
Touch a button or list item on the screen lightly.
• If you touch a button and there is no reaction, remove your finger.
• Onscreen buttons that cannot be operated are dimmed.
Swipe operation
Move your finger lightly with a swipe.
Drag & Drop operation
Touch and hold the desired item, then drag it to its new location by
moving your finger, then release your finger to place the item.
• It is not possible to narrow the screen with two fingers (pinch in) or
spread the screen (pinch out).
RESET switch

13-EN
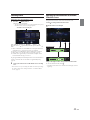
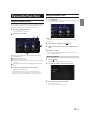
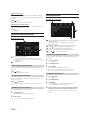
Switching Sources
Switching Sources from the Menu screen
1 Press the (MENU) button.
The menu screen is displayed.
• You can also display the menu screen by touching the lower part of
the Audio source screen or by swiping upward.
Radio DAB USB/iPod*
1
HDMI*
1, 2
AUX*
2, 3
Bluetooth Audio*
1
Apple CarPlay Music/Google Play Music*
4
Radio
*1 When no USB flash drive/iPod/HDMI device/Smartphone/Bluetooth
compatible device is connected, this option is not available.
*2 The name set for “HDMI Setup (page 40)/AUX Setup” is displayed.
*3 When AUX is set to “Off,” this option is not available. (page 40)
*4 Available when Apple CarPlay is used/Android smartphone which
installed Android Auto App is connected.
To play Apple CarPlay music shall impact iPod source when an iPhone 5
or later is connected and vice versa. Refer to “Apple CarPlay Setup”
(page 40).
2 Touch your desired source in the Audio source selecting
area.
• In the menu screen, you can change the Audio source directly or change
the order in which sources change. For details, see “About the Menu
Screen” (page 16).
Operating the Function Button on the Audio/
Video Main Screen
Using the Function button on the Audio/Visual main screen.
To uc h [] to change to the Function mode.
Radio main screen example
Swipe to the right or left to change to the Function mode.
To close the Function mode, touch [].
• Depending on the Audio source, the Function mode displays from the
beginning.
The Audio source selecting area
Function mode

14-EN
About Basic Operation for List Screen
Basic operations on the Setup list screen and the Search list screen.
How to display on the list screen differs depending on the selected item.
Switches to the menu screen or the previous screen.
Item select button
Closes the window.
Displays the next list page.
• When the next selection item does not exist, the list item is not
displayed.
Lists items for selection
• When there are more than five list items, the page can be changed
by swiping vertically.
Returns to the list screen of the page that you touched.
• The list screens that can be displayed are up to the 2 previous
pages. If you touch [], you can recall your desired page.
Changes the page of the Item select button above.
• “ ” indicates the total number of pages, “ ” indicates the location
of the current page.
List screen close button
• Touch or swipe to the left on the search screen, etc. to close the list
screen.
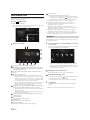
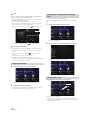
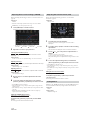
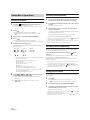
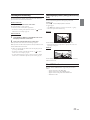
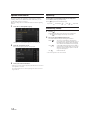
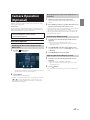
About the Shortcut Setup Screen
Displaying the Sound Setup screen.
Touch the upper part of the Audio source screen or swipe
downward.
The Sound Setup screen is displayed.
Sound Setup screen (Tone Adjustment mode) example
Button for Display Off *
Displays the registered Bluetooth Device List screen.
• See “Registering the Bluetooth Device” (page 25).
Touch this or swipe upward to change to the currently
playing source screen.
Displays the Hands-free Device Primary/Secondary setting
screen.
• See “Hands-free Device Primary/Secondary Setting” (page 26).
* Display Off mode
- To cancel Display Off mode, touch the screen or press any button.
- Display Off mode is cancelled when the power or ACC is turned off.
- When the gear lever is shifted to the reverse (R) position and the rear
camera is connected, the rear camera image is displayed.
- When a call is received on a Bluetooth-connected phone, the
incoming call screen is displayed.

15-EN
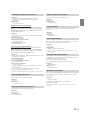
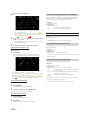
Tone Adjustment mode
BASS ENGINE SQ mode
Button for changing the BASS ENGINE SQ mode screen
Balance/Fader Image area*
1
• To reset to the initial settings (Balance: 0, Fader: 0), touch [].
Buttons for switching between Front/Rear when adjusting
Bass/Treble*
2
Buttons for adjusting Bass Level/Treble Level*
3, 4
Buttons for adjusting Media Xpander *
1, 3
Buttons for adjusting Subwoofer Level *
1, 3, 5
Button for changing the Tone Adjustment mode screen
• If changing to the Tone Adjustment mode, BASS ENGINE SQ
mode will be disabled.
Buttons for adjusting the BASS ENGINE Level*
4
Buttons for selecting the BASS ENGINE type *
4
*1 You can perform a more detailed set up in “Sounds Setup” (page 27).
*2 You cannot switch when Front/Rear Sync in “Adjusting the Parametric
Equalizer Curve (Dual HD EQ)” (page 29) is “On.”
*3 When you switch to the BASS ENGINE SQ mode, the value you have
set is ignored.
*4 When the Defeat setting is “On,” you cannot perform the set up.
*5 If the Subwoofer setting is “Off,” the setting cannot be changed. See
“Turning Subwoofer ON/OFF” (page 28).
Adjusting Bass Level/Treble Level
Bass Level and Treble Level can be set for each front seat and for each
rear seat by touching [Front] or [Rear].
Setting item:
Bass / Treble
Setting contents:
-14 to +14 (Initial setting: 0)
• When the Sound Setup of the Shortcut Setup is selected to “BASS
ENGINE SQ,” you cannot perform the set up.
• Adjustment cannot be performed when Defeat is set to “On.”
• The Bass adjusted setting value is interlinked with Band2 of Dual HD
EQ, and the Treble adjusted setting value is interlinked with Band8.
Setting the BASS ENGINE SQ
Setting the BASS ENGINE Type
Creating the ideal Bass impact for your musical taste using BASS
ENGINE SQ.
Setting contents:
Standard (Initial setting) / Punch / Rich / Mid Bass / Low Bass
Adjusting the BASS ENGINE Level
You can adjust the BASS ENGINE Level.
Setting item:
BASS ENGINE Level
Setting contents:
0 to 6 (Initial setting: 3)
• The BASS ENGINE Level 0 of the BASS ENGINE SQ is common to all
the types.
About setup when the external power amplifier is
connected
In order to optimise the BASS ENGINE SQ mode, we recommend the
following procedure to set up the power amplifier.
Use your favourite music to make the following amplifier adjustment.
1) Set GAIN of the power amplifier to “MIN.”
2) Set the Crossover Mode Sector switch to “OFF.”
• If the switch has no “OFF” position, set as near as possible to full
range.
3) Set the BASS ENGINE Level to “03.”
4) Play a song of the genre you frequently listen to, and adjust
GAIN of the power amplifier.
Sound Setup Function
Standard: Mild low-end boost with mid-range focus for front-
centre staging.
Punch: Mid-bass punched up with mid-range impact.
Rich: Accented highs and mid-bass giving outstanding
balance for all types of music.
Mid Bass: Strong high frequency emphasis with mid-bass boost
for more low-end attack.
Low Bass: Strong, low-bass boost with extended highs for a very
dynamic sound.

16-EN
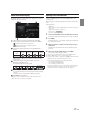
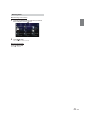
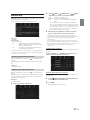
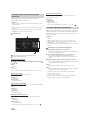
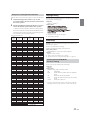
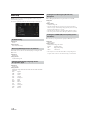
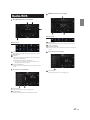
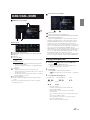
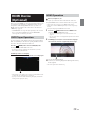
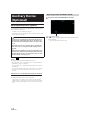
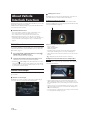
About the Menu Screen
In the menu screen, you can select the audio source and perform various
setups or operations on the unit.
Press the (MENU) button.
The menu screen is displayed.
• You can also display the menu screen by touching the lower part of the
Audio source screen or by swiping upward.
Menu screen example
Displays the currently playing audio source.
Displays the total number of the audio sources that can be
selected. Also displays the current position, counting from
the leftmost audio source.
Touch or swipe downward to return to the Audio source
screen.
Audio source select area
Touch your desired source icon to change the audio source.
• Swiping to the right or left in the Audio source select area, you can
change one audio source at a time. Moreover, swiping to the right
or left outside the Audio source select area (upper and lower sides),
you can change pages of the Audio source select area.
• The source icon displayed in the Audio source select area is the one
checked on the Edit menu screen. For details on how to display/
hide the source icon, see “Edit Menu” (page 16).
Displays Preset No, and information of the Search mode, etc.,
located in the middle of the Audio source select area.
• Touch the desired preset number or the Search mode to change the
audio source directly.
• The displayed information differs depending on the audio source.
Some sources are not displayed.
Touch to display more icons. (Displayed only when icons’
number over 5.)
Camera button*
1
Displays camera images. (page 69)
Setup button
Displays the Setup screen. (page 24)
Vehicle Info button
Displays the Vehicle Info mode screen. (page 72)
Phone button*
2
Displays the Phone menu screen. (page 60)
• Depending on the setting and connected devices, the displayed
icons and orders may differ. Touch to display more icons such
as [Notifications]
*
3
, [Android Auto]*
4
and [Apple CarPlay]*
5
.
*1 Displays when the Camera Select is set to “Rear.” (page 41)
*2 Displays when the Bluetooth setting is set to “On.” (page 25)
*3 Use to display the Facebook Notification List on the connected
smartphone via this unit. (page 23)
Displays when Alpine TuneIt App is set to “USB (iPhone)” or
“Bluetooth (Android),” and when a smartphone with Alpine TuneIt
App installed is connected. (page 22)
*4 Displays the Android Auto screen, displayed when an Android
Smartphone installed Android Auto App is connected. (page 44)
*5 Displays the Apple CarPlay screen, displayed when Apple CarPlay is
turned on and an iPhone 5 or later is connected. (page 44)
In the Edit Menu screen, you can change the audio source order or set
the display/hide settings.
1 Touch the desired source icon in the Menu screen for at
least 2 seconds.
A checkbox ( or ) is displayed on the upper left area of the
source icon and switches to the edit mode.
• The source icon displayed in the Edit Menu screen is displayed
only when usable setup and conditions of each Audio source are
fulfilled. For details on setup and conditions of each audio source,
see “Switching Sources” (page 13).
Changing the order of Audio source
Drag and drop the source icon to the desired location.
Hiding/Displaying Audio source
Place a check in the checkbox ( ) to display the Audio source
icon. Uncheck the checkbox ( ) to hide it.
• You cannot hide the icon of a source that is currently playing.
2 To uc h [Done].
The editing content is confirmed, and returns to the menu
screen.
• Editing here is reflected in the order of Audio source. (page 13)
Edit Menu

17-EN
About the Indicator Display
The Indicator Bar at the bottom of the screen displays various types of
information, like the current time.
Lights up when connected to a Bluetooth compatible
device. (Does not display when connection is set to OFF.)
: Bluetooth connection to audio device
: Bluetooth connection to Hands Free Phone
Blinks while reconnecting.
Indicates the battery level of the connected Bluetooth
device.
This may not be displayed depending on the connected
Bluetooth device. Whenever one battery level decreases, the
alarm sounds.
Indicates the signal strength level of the connected
Bluetooth compatible device.
Displayed when Bluetooth setting is ON.
The clock display
You can switch between the 12 hour display and 24 hour display
options.
For details, refer to “Setting the Clock Display” (page 35).
BLUETOOTH devices Name*
* When you connect two Hands-Free Phones, the information of the
Bluetooth device set to Primary is displayed.
Opening screen Customisation
You can set a BMP image that is stored on a USB flash drive as the
opening screen.
This setting requires the following image format, folder name and file
name.
Usable file format:
-BMP image
- Image size: 800 × 480 pixels (RGB 24 bit or less/number of colour bit:
24, 8, 1 bit)
- Compression format: non-compressed
-Folder name*
1
: OPENINGFILE
-File name*
2
: openingfile.bmp
1 Connect the USB flash drive to the USB extension cable.
A message confirming the opening screen change is displayed.
2 To uc h [OK].
An update indicator “ (Loading)” is displayed, and update for
the opening screen starts.
3 After the update is complete, the following message is
displayed.*
3
“Customisation succeeded. Please remove USB memory and
press OK.”
4 After removing the USB flash drive, touch [OK].
The opening screen setting is complete.
*1 Be sure to save the folder to the first layer of the USB flash drive.
*2 Only one BMP image can be set as the opening screen.
*3 If “Customisation failed,” is displayed, touch [OK] and then check that
the folder name, file name and file format are correct.
• Do not perform the following actions during the update.
- Do not turn off the ACC to the car.
- Do not unplug the USB flash drive.
- Do not turn off or operate the unit.
• To return the opening screen to its original image, you must Clear All
Settings. Be careful of this operation, as your other settings are also
initialised. For details, see “Initializing the System” (page 36).
Battery
Level
Level 3 Level 2 Level 1 No Battery
Icon
0123No Service

18-EN
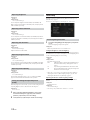
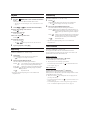
How to Input Characters and Numbers (Keypad)
The displayed screens and procedures may vary slightly depending on
the function used, but the basic input method is the same.
Input screen area.
Cursor position alteration switch
Cancel
Keypad mode finishes.
(Delete)
Returns to the previous character and erases it.
Touching here for more than 2 seconds will erase all input
characters.
Input number is confirmed.
Character keypad
Space
Special character selector switch
The Alphanumeric/Special characters/Symbols selection popup
is displayed.
Touch the desired character type.

19-EN
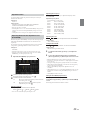
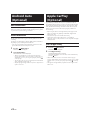
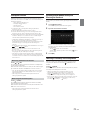
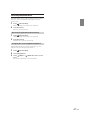
Using the Favourite Function
This unit enables you to recall functions easily by registering frequently
used items such as the Audio source, the Shortcut Dialing icons, etc. to
the Favourite screen. You can recall any of these items easily.
1 Press the (Favourite) button.
The Favourite screen is displayed.
Favourite screen example
Changes to the Edit screen used for registering items or
changing names.
Close the Favourite screen.
Favourite registration item
Swipe to the left and right to change the pages. You can add up
to 6 pages.
Indicates the location of the currently displayed Favourite
screen.
2 Touch your desired Favourite registered item.
The desired item is displayed.
• When making a phone call by choosing shortcut dialing, after the
message of confirmation of outgoing phone calls is displayed, touch
[Call]. For details, see “Calling by Favourite Function” (page 62).
Editing the Favourite Screen
1 To uc h [] (Edit).
A checkbox is displayed on the upper left area of the registration
icon and it changes to Edit mode.
Setting item:
Item registration / Item name change / Icon change / Layout change /
Item deletion
2 After editing is complete, touch [] (Save).
3 After the caption for the confirmation is displayed, touch
[Yes].
4 Editing is complete.
• If you touch [] (Cancel) while editing, the screen switches to the
previous Favourite Edit screen.
1 To uc h [ ] (Add).
The items to be added (categories) are displayed.
2 Touch the desired item to be added (category).
3 Choose the desired item to be added.
• You can add up to 54 items.
• You cannot register an item more than once.
Favourite Function
Registering Items

20-EN
Audio
[Radio]*
1
/ [DAB]*
2
/ [USB/iPod] / [HDMI/DVD] / [AUX] / [Bluetooth
Audio] / [Apple CarPlay]*
3
/ [Android Auto]*
3
*1 You can choose the frequency from Preset 1 - 12, registered into each
FM1/FM2/MW/LW band of Radio.
*2 You can choose a channel registered to Presets 1 - 18.
*3 You can register now playing Apple CarPlay Music or Google Play
Music depending on the connected Smartphone.
• You can also register directly by touching [] in the Audio source
screen.
However, if it is already registered, [] is not displayed.
Phone (Shortcut Dialing)*
4
You can register the user’s shortcut dialing stored in the Phone Book.
• If multiple phone numbers are stored, select a number you want to
register.
• You can register directly by touching [] of the Contacts list.
(page 60)
• You can change the icon you registered. (page 20)
*4 You can only select Phone when a Smartphone is connected.
For details on how to register a mobile phone and downloading Phone
Book, see “Bluetooth Operation” (page 60).
1 Touch the text area of the registered item.
The Input User Name screen (Keypad) is displayed.
2 Input the name and touch [OK].
• For details on how to input characters using the keypad, see “How to
Input Characters and Numbers (Keypad)” (page 18).
You can change the icons of Shortcut Dialing.
The following example explains how to change the Shortcut Dialing
icon.
1 Touch the icon that you want to change.
The icon list is displayed.
2 Touch the icon you want to change from the icon list.
The icon is changed to the selected icon.
Drag and drop the item to the desired location.
The item location is changed.
• When you move to other pages, switch pages, or when you make a new
page and move to another, drag to the end of the screen, and lift your
finger after the page changes.
Changing Item Names
Changing Icons (only the Shortcut Dialing
icons)
Changing the Layout
La pagina si sta caricando...
La pagina si sta caricando...
La pagina si sta caricando...
La pagina si sta caricando...
La pagina si sta caricando...
La pagina si sta caricando...
La pagina si sta caricando...
La pagina si sta caricando...
La pagina si sta caricando...
La pagina si sta caricando...
La pagina si sta caricando...
La pagina si sta caricando...
La pagina si sta caricando...
La pagina si sta caricando...
La pagina si sta caricando...
La pagina si sta caricando...
La pagina si sta caricando...
La pagina si sta caricando...
La pagina si sta caricando...
La pagina si sta caricando...
La pagina si sta caricando...
La pagina si sta caricando...
La pagina si sta caricando...
La pagina si sta caricando...
La pagina si sta caricando...
La pagina si sta caricando...
La pagina si sta caricando...
La pagina si sta caricando...
La pagina si sta caricando...
La pagina si sta caricando...
La pagina si sta caricando...
La pagina si sta caricando...
La pagina si sta caricando...
La pagina si sta caricando...
La pagina si sta caricando...
La pagina si sta caricando...
La pagina si sta caricando...
La pagina si sta caricando...
La pagina si sta caricando...
La pagina si sta caricando...
La pagina si sta caricando...
La pagina si sta caricando...
La pagina si sta caricando...
La pagina si sta caricando...
La pagina si sta caricando...
La pagina si sta caricando...
La pagina si sta caricando...
La pagina si sta caricando...
La pagina si sta caricando...
La pagina si sta caricando...
La pagina si sta caricando...
La pagina si sta caricando...
La pagina si sta caricando...
La pagina si sta caricando...
La pagina si sta caricando...
La pagina si sta caricando...
La pagina si sta caricando...
La pagina si sta caricando...
La pagina si sta caricando...
La pagina si sta caricando...
-
 1
1
-
 2
2
-
 3
3
-
 4
4
-
 5
5
-
 6
6
-
 7
7
-
 8
8
-
 9
9
-
 10
10
-
 11
11
-
 12
12
-
 13
13
-
 14
14
-
 15
15
-
 16
16
-
 17
17
-
 18
18
-
 19
19
-
 20
20
-
 21
21
-
 22
22
-
 23
23
-
 24
24
-
 25
25
-
 26
26
-
 27
27
-
 28
28
-
 29
29
-
 30
30
-
 31
31
-
 32
32
-
 33
33
-
 34
34
-
 35
35
-
 36
36
-
 37
37
-
 38
38
-
 39
39
-
 40
40
-
 41
41
-
 42
42
-
 43
43
-
 44
44
-
 45
45
-
 46
46
-
 47
47
-
 48
48
-
 49
49
-
 50
50
-
 51
51
-
 52
52
-
 53
53
-
 54
54
-
 55
55
-
 56
56
-
 57
57
-
 58
58
-
 59
59
-
 60
60
-
 61
61
-
 62
62
-
 63
63
-
 64
64
-
 65
65
-
 66
66
-
 67
67
-
 68
68
-
 69
69
-
 70
70
-
 71
71
-
 72
72
-
 73
73
-
 74
74
-
 75
75
-
 76
76
-
 77
77
-
 78
78
-
 79
79
-
 80
80


Alpine ILX ILX-F903D Manuale del proprietario
- Categoria
- Ricevitori multimediali per auto
- Tipo
- Manuale del proprietario
in altre lingue
- English: Alpine ILX ILX-F903D Owner's manual
Documenti correlati

Altri documenti
-
Sony XAV-AX1005DB Istruzioni per l'uso
-
Sony XAV-AX3005DB Manuale del proprietario
-
Sony XAV-AX205DB Manuale del proprietario
-
Sony XAV-AX200 Manuale del proprietario
-
Sony NV-U81T Manuale del proprietario
-
Fiat Ducato Manuale utente
-
Alpine iLX-F115S907 Guida di riferimento
-
ONKYO CS-375D Manuale utente
-
AudioSonic TXCD-1530 Manuale del proprietario
-
Alpine Electronics I902D-G7 Guida Rapida