
EN
DeVilbiss
®
Vacu-Aide
®
Compact Suction Unit
Instruction Guide
7310 Series
CAUTION–Federal (U.S.A.) law restricts this device to sale
by or on the order of a physician.
Assembled in the USA
Manual de instrucciones
de la unidad de succión
DeVilbiss
®
Vacu-Aide
®
Compact
Serie 7310
PRECAUCION–La legislación federal de los EE. UU.
restringe la venta de este dispositivo a médicos o por
prescripción médica.
Ensamblado en EE. UU.
Guide d’instructions de
l’Unité d’aspiration com-
pacte Vacu-Aide
®
DeVilbiss
®
Série 7310
ATTENTION-En vertu de la loi fédérale américaine, la
vente de cet appareil n’est autorisée que par un médecin
ou sur ordonnance de ce dernier.
Assemblé aux États-Unis
DE
DeVilbiss
®
Vacu-Aide
®
Kompaktes Absauggerät
Bedienungsanleitung
7310 Serie
VORSICHT – Laut US-Bundesgesetz darf dieses Gerät nur
von einem Arzt bzw. auf Anordnung eines Arztes verkauft
werden.
Gefertigt in den USA
Aspiratore compatto
DeVilbiss
®
Vacu-Aide
®
Guida dell’utente
Serie 7310
ATTENZIONE –La legge federale statunitense limita la
vendita di questo dispositivo ai medici o su loro
prescrizione.
Assemblato negli U.S.A.
Instructiehandleiding
DeVilbiss
®
Vacu-Aide
®
Compact afzuigeenheid
Model 7310
ATTENTIE– De federale wetgeving in de Verenigde Staten
schrijft voor dat dit apparaat uitsluitend mag worden
verkocht of voorgeschreven door een arts.
Gemonteerd in de Verenigde Staten
ES
FR
IT
NL
0044

EN - 2 A-7310
1
5
2
3
4
6
7
8
EN English ......................................................................................... EN-3
ES Español......................................................................................... ES-11
FR Français ....................................................................................... FR-20
DE Deutsch ........................................................................................ DE-29
IT Italiano ......................................................................................... IT-38
NL Nederlands ................................................................................... NL-47

EN - 3A-7310
TABLE OF CONTENTS
Figures ..................................................................................................................................................................... EN - 2
IEC Symbols ............................................................................................................................................................ EN - 3
Important Safeguards .............................................................................................................................................. EN - 3
International Travel .................................................................................................................................................. EN - 4
Introduction .............................................................................................................................................................. EN - 4
Important Parts ........................................................................................................................................................ EN - 4
Accessory/Replacement Items ................................................................................................................................ EN - 5
Set-Up ..................................................................................................................................................................... EN - 5
How to Operate Your Suction Unit .......................................................................................................................... EN - 5
Battery Charging .................................................................................................................................................... EN - 6
Battery Replacement ............................................................................................................................................... EN - 6
Cleaning Instructions ............................................................................................................................................... EN - 6
Maintenance ............................................................................................................................................................ EN - 7
Troubleshooting ....................................................................................................................................................... EN - 8
Specifications/Classifications .................................................................................................................................. EN - 8
Warranty .................................................................................................................................................................. EN - 9
DeVilbiss Guidance and Manufacturer’s Declaration .............................................................................................. EN - 9
IEC SYMBOLS
Attention, consult instruction guide Direct current
Consult instructions for use Alternating current
Standby - On/Off Type BF equipment-applied part
Center positive polarity indicator Manufacturer
IP12: Vertically falling water drops shall have no harmful effects when the enclosure is tilted at an angle
up to 15° on either side of the vertical.
This device contains electrical and/or electronic equipment that must be recycled per EU Directive
2012/19/EU- Waste Electrical and Electronic Equipment (WEEE)
IMPORTANT SAFEGUARDS
When using electrical products, especially when children are present, basic safety precautions should always be followed.
Read all instructions before using. Important information is highlighted by these terms:
DANGER–Urgent safety information for hazards that will cause serious injury or death.
WARNING–Important safety information for hazards that might cause serious injury.
CAUTION–Information for preventing damage to the product.
NOTE–Information to which you should pay special attention.
READ ALL INSTRUCTIONS BEFORE USING.
SAVE THESE INSTRUCTIONS
DANGER
To reduce the risk of electrocution:
1. Do not use while bathing.
2. Do not place or store product where it can fall or be pulled into a tub or sink.
3. Do not place in or drop into water or other liquid.
4. Do not reach for a product that has fallen into water. Unplug immediately.
WARNING
To reduce the risk of burns, electrocution, re or injury to persons:
1. Close supervision is necessary when this product is used by, on, or near children or physically incapacitated
individuals.
2. Use this product only for its intended use as described in this guide.

EN - 4 A-7310
3. Never operate this product if:
a. It has a damaged power cord or plug.
b. It is not working properly.
c. It has been dropped or damaged.
d. It has been dropped into water. Return the product to an authorized DeVilbiss service center for examination and
repair.
4. Keep the power cord away from heated surfaces.
5. Never use while drowsy or asleep.
INTERNATIONAL TRAVEL
The suction unit is equipped with an AC to DC Adapter/Charger allowing operation on any AC voltage (100-240 VAC, 47-63
Hz). However the correct power cord must be used to connect to adaptable wall power. Your unit is approved for use on
commercial aircraft; specic standards are listed in the Specications in this guide. Certicate is available upon request; if
needed, contact your provider for a copy of approval letter before travel.
NOTE-Check power cord for adaptability before using.
INTRODUCTION
Your DeVilbiss Suction Unit is a compact medical suctioning device which has been designed for reliable, portable
operation. Following the recommended operating and maintenance procedures outlined in this instruction guide will
maximize the life of this product.
Intended Use Statement
The device is to be used to remove uids from the airway or respiratory support system and infectious materials from
wounds. The device creates a negative pressure (vacuum) that draws uids through disposable tubing that is connected to
a collection container. The uids are trapped in the collection container for proper disposal. It is for use on the order of a
physician only.
Contraindications
The Vacu-Aide Compact Suction Unit should not be used for:
• thoracic drainage
• nasogastric suction
DANGER
The DeVilbiss Vacu-Aide is a vacuum suction device designed for the collection of nonammable uid materials in
medical applications only. Improper use during medical applications can cause injury or death. For all medical
applications:
1. All suctioning should be done in strict accordance with appropriate procedures that have been established by a
licensed medical authority.
2. Some attachments or accessories may not t the tubing supplied. All attachments or accessories should be checked
prior to use to assure proper t.
IMPORTANT PARTS
Inspect the suction unit and all parts before use.
1. Vacuum Regulator Knob (on side)
2. Bacteria Filter (non-sterile)
3. Vacuum Inlet Port (behind lter)
4. Display Panel (top of unit)
5. 725 ml Reusable Container with Lid/Elbow
Assembly
6. DC Power Input (on side)
7. Battery Door
8. Unit Carry Handle/Catheter Holder
9. 6’ (1.8m) Patient Tubing (not shown)
10. AC to DC Adapter/Charger (not shown)
11. 12V DC Power Cord (not shown)
12. High Capacity Rechargeable Battery (not
shown)
13. Carry Case with Shoulder Strap (not shown)
2
4
3
1
5
8
7
6

EN - 5A-7310
ACCESSORY/REPLACEMENT ITEMS
The following items can be purchased separately as accessories or replacement for your suction unit.
Description Part No. Description Part No.
Bacteria Filter (12 pack) 7305D-608 12V DC Power Cord 7304D-619
Battery Door 7310P-602 Line Cord - Hospital Grade USA 099HD-614
AC to DC Adapter/Charger 7305P-613 Line Cord USA 6710D-609
6’ Patient Tubing 6305D-611 Line Cord UK 7305P-630
Carrying Case w/Shoulder Strap 7310P-606 Line Cord EU 7305P-631
725 ml Reusable Container Pkg (Jar, Lid/
Elbow Assembly, Filter)
7310P-603
SET-UP
1. Your unit was shipped with the battery disconnected. Connect battery and charge before rst use. Refer to Battery
Replacement section for instructions.
2. Place clear side of lter labeled IN directly into container’s lid.
3. With lter attached to container, directly insert into the front port. Both the lter and the bottom support secure the
container to the unit (FIG. 1 & 2).
4. The 6’ (1.8m) patient tubing can now be connected to the container lid at the outlet labeled <Patient>.
5. Ensure that all connections are secure before use to prevent leaks.
6. Verify that the unit is at the desired suction level before beginning patient suctioning.
HOW TO OPERATE YOUR SUCTION UNIT
Control Panel Symbols
On/Off
External power: Supplied from AC or DC power cord. Illuminates in GREEN when power is supplied.
Battery charging: Illuminates in YELLOW. The light will go out when the battery is fully charged.
Low battery: illuminates in RED when battery reaches a discharge state.
mmHg
Suction level setting: Scale/strength illuminates in GREEN. This scale shows the level of suction strength
in mmHg.
Power Source Options
AC OPERATION - Plug the 90° power connector of AC to DC adapter/charger into DC power input (FIG 3) and attach the
line cord. Plug the other end of AC adapter into a grounded AC supply.
12V DC OPERATION - Plug the small 90° power connector of DC power cord into DC power input (FIG 3). Plug large end
of cord into 12V DC power receptacle of vehicle.
BATTERY OPERATION - Your unit is equipped with a high capacity rechargeable battery. For initial charge on new unit,
fully charge the battery for a minimum of 5 hours (see Battery Charging). To operate unit from the rechargeable battery,
ensure that no external power sources are plugged into the suction unit.
NOTE– During charging or operating, the power supply may become warm to touch; this is normal.
WARNING
If the unit does not receive external power or the battery has not been charged, the low battery indicator light will
remain on and the performance of the unit will drop rapidly. If Low Battery symbol lights, switch to another power
source to avoid an interrupted suction procedure.
How to adjust the vacuum level
1. Once power source is selected, turn the unit on by pressing the “On” button. The GREEN light, indicating external
power, will remain lit when external power is connected.
2. Occlude (block) the patient end of the tubing, then adjust vacuum level from 50-500 mmHG +/- 10% by turning the

EN - 6 A-7310
vacuum regulator knob clockwise to increase and counter-clockwise to decrease the vacuum (FIG 4). Release and
occlude once more to conrm setting. The desired level of vacuum can be viewed on the LED display.
NOTE–The LEDs have two brightness levels. As the vacuum level is adjusted, the LEDs will illuminate in progression.
When an LED is at half brightness, it indicates that the vacuum level is halfway between the previous fully lit LED and the
half brightness LED. EXAMPLE: If the 150 mmHg LED is fully illuminated and the 200 mmHg LED is at half brightness, the
suction level is 175 mmHg. When the 200 mmHg LED illuminates at full brightness, the unit has reached 200 mmHg.
3. Connect suction tip or catheter as appropriate.
NOTE– If the unit does not maintain vacuum, refer to Troubleshooting.
NOTE–Suctionceasesifliquidlevelreachesoatshut-offvalvelocatedonundersideofcontainerlid.
CAUTION–Further suctioning may cause damage to the vacuum pump and voids warranty. Equipment service is required
ifuidcontentisaspiratedbackintotheunit.
BATTERY CHARGING
The Vacu-Aide Compact series is equipped with a factory-installed high capacity rechargeable battery. Connect battery and
charge before rst use (refer to Battery Replacement).
1. Connect the unit to either an AC or DC power source.
2. The green external power light should illuminate; the yellow charge indicator will remain lit while the battery is
charging.
3. Ensure that the yellow charging light is illuminated when charging begins. As the battery nears a full charge, the
yellow battery charging light may ash for several minutes. This is normal. If your unit does not hold a charge, check
that the yellow light turns on when external power is applied with the power button “Off.” If problems persist, contact
your medical equipment provider.
NOTE–A fully discharged battery will require up to 5 hours (depending on depth of discharge) of charging to reach full
capacity.
If unit is not in use for extended periods, the battery should be recharged a minimum of every 6 months. A fully charged
battery will provide approximately 45-60 minutes of continuous operation at zero vacuum level (free ow).
CAUTION–Completely discharging the battery will shorten the battery life. Do not operate the unit for more than a few
minutes if the low battery indicator light is lit. Recharge the battery as soon as possible.
BATTERY REPLACEMENT
1. Using a coin or straight-blade screwdriver rotate latch to unlocked position (FIG. 5).
2. Remove door by pulling up on latch (FIG. 6).
3. Remove battery from compartment and unplug connector from circuit board (FIG. 7 & 8).
4. Install new battery by reversing the above steps.
5. Fully charge battery before using.
CLEANING INSTRUCTIONS
Collection Container:
NOTE–Elbow is permanently attached to the lid and cannot be removed.
1. Push power button to turn unit off. Wait for vacuum level to drop.
2. Disconnect external power source from input receptacle on unit (if applicable).
3. Remove container from unit by disconnecting the patient tubing and lter.
NOTE–The reusable collection container and lid are single-patient use and should be replaced every 1 to 2 months,
depending on use and cleaning method.
4. Collection containers and lids should be emptied and thoroughly cleaned after each use. Wash in a warm water/
dishwashing detergent solution and rinse with clean, warm tap water. Then soak with a commercial disinfectant or
one part vinegar (>=5% acetic acid concentration) to three parts warm water (131ºF-149ºF/55ºC-65ºC) solution for
60 minutes. Thoroughly rinse with warm tap water and air dry. NOTE: If using a commercial disinfectant, follow
manufacturer’s recommended instructions and dilution ratios carefully.
Suction Unit (single-patient use)
1. With the power “Off,” disconnect the unit from all external power sources.
2. Wipe the outside housing with a clean cloth dampened with commercial disinfectant/detergent (bacterial-germicidal).
CAUTION– Do not submerge suction unit in water; this will result in damage to vacuum pump.

EN - 7A-7310
Tubing (single-patient use)
1. Disconnect the tubing from the unit.
2. Rinse thoroughly by running warm tap water through it.
3. Follow by soaking in a solution of 1 part vinegar (>=5% acetic acid concentration) to 3 parts water
(131ºF-149ºF/55ºC-65ºC) for 60 minutes. Rinse with clean, warm water and air dry.
4. Keep the outer surface of the tubing clean by wiping with a clean, damp cloth.
Carrying Case (single-patient use)
1. Wipe the case using a clean cloth dampened with detergent and/or disinfectant.
NOTE– Disinfection information is based on AARC Clinical Practice Guideline Suctioning of the Patient in the Home.
Suction Unit (multi-patient use)
Device Cleaning and Disinfection When There is a Patient Change
When medical devices have already been used with a patient, contamination with human pathogenic germs should be
assumed (unless there is evidence to the contrary), and the next patient, user or third party should be protected by
appropriate handling and preparation. Therefore, when there is a patient change, people must be protected during the
transport and handling of the device and the device must be fully processed, i.e., cleaned and disinfected, by suitably
trained personnel before reuse to protect the next patient. The complete processing may only be done by the manufacturer
or by a qualied DeVilbiss provider/service technician.
NOTE – When the unit is used as per instructions under normal conditions the interior of the unit is protected from
exposuretopathogensbythein-linelteronthecollectioncontainer,hencenodisinfectionofinternalcomponentsis
necessary.
NOTE–Iftheunitisusedwithoutanin-linelterthentheinterioroftheunithasbeenexposedtopathogensandtheunit
cannot be disinfected.
NOTE–IfthefollowingprocessingoftheunitbyaqualiedDeVilbissprovider/technicianisnotpossible,theunitmustnot
be used by another patient!
DeVilbiss Healthcare recommends that at least the following procedures be carried out by the manufacturer or a qualied
third party between uses by different patients.
1. Dispose of all accessory components that are not suitable for reuse, i.e., collection container, lter, tubing and
carrying case.
2. With the power switch in the “Off” position, disconnect the DeVilbiss Suction Unit from all external power sources.
3. Visually inspect unit for any damage, missing parts, etc.
4. Wipe the housing with a clean cloth and a commercial (bacterial-germicidal) disinfectant that meets the requirements
listed in the NOTE below and is used as per the disinfectant manufacturer’s recommended dilution rates and
instructions.
CAUTION – Do not submerge in water as this will result in damage to the vacuum pump.
NOTE–Donotuseanycleanersordisinfectantsthatcontainammonia,benzeneand/oracetonetocleantheunit.
MAINTENANCE
Changing Filter & Replacing Container
1. Change the bacteria lter every 1 to 2 months OR immediately if overow occurs.
2. Remove the bacteria lter by disconnecting it from the suction unit and lid assembly.
3. Replace it with a new DeVilbiss bacteria lter # 7305D-608 (12 pack).
NOTE–Verifyclearsideofltermarked<In>facescontainer.
NOTE–UseonlythebacterialterprovidedbyDeVilbissHealthcareoroneofitsDistributors.Substitutionmayleadto
contaminationoftheunitand/orpoorperformanceandwillvoidwarranty.
4. Replace Collection Container every 1 to 2 months, depending on use and cleaning method.
NOTE– Use only DeVilbiss 725 ml reusable containers. Substitution may lead to poor performance and will void warranty.

EN - 8 A-7310
TROUBLESHOOTING
NOTE– Before you contact your equipment provider, follow Troubleshooting below:
DANGER
Electric shock hazard. Do not attempt to open or remove cabinet, there are no user-serviceable internal
components. If service is required, return the suction unit to a qualied DeVilbiss provider or authorized service
center. Opening or tampering with the unit will void the warranty.
NOTE– If problem is not resolved, contact your authorized equipment provider.
Problem Action
Unit does not power on. (Green external power
indicator should be illuminated when power is
applied.)
1. Check power sources and connections.
2. Ensure wall outlet is live by plugging in a lamp.
3. Check that battery is fully charged.
Pump runs, but no vacuum. 1. Check that all tubing is connected properly.
2. Check tubing connections for breaks, leaks, or occlusions.
3. Ensure that oat shut-off is not activated due to full container.
4. Check for leaks or cracks in container assembly.
Low vacuum. 1. Use vacuum adjustment knob to increase vacuum level.
2. Check system for leaks.
Battery will not hold a charge. 1. Conrm battery is connected (refer to Set-Up).
2. Verify that charge light turns on.
3. Check electrical connections during charging.
4. Ensure wall outlet is live by plugging in a lamp.
If problem continues, contact your equipment provider.
SPECIFICATIONS/CLASSIFICATIONS
Size...................................................7.25”H x 7.25”W x 6.75”D (18.4cm x 18.4cm x 17.1cm)
Weight ............................................................................ 3.375 lbs. (1.53 kg)
Electrical Requirements ..................................100-240 VAC 50/60 Hz 0.75 A max; 12 VDC, 33 W max
Vacuum Range...................................................................50-500 mmHG +/- 10%
Air Flow @ pump inlet:........................................................... 27 LPM (free flow) typical
(may be less when running from internal battery)
Collection Container Capacity .................................................................725 ml (cc)
Environmental Conditions
Operating Temperature Range.....................................................32°F (0°C) - 104°F (40°C)
Operating Relative Humidity.......................................................................0-95%
Operating Atmospheric Pressure ......................................... 10.2 Psi (70 kPA) - 15.4 Psi (106 kPA)
Storage & Transport Temperature Range ..........................................-40°F (-40°C) - 158°F (70°C)
Storage & Transport Relative Humidity ..............................................................0-95%
Storage & Transport Atmospheric Pressure.................................. 7.3 Psi (50 kPA) - 15.4 Psi (106 kPA)
Warranty
7310 Series ................................. Two-years limited, excluding internal battery and collection container
Internal Battery...............................................................................6 months
Approvals
IEC 601-1; IEC 68; CAN/CSA-C22.2 No. 601.1-M90; UL 2601-1, CE EN 60601-1-2, ISO10079-1:1999
Meets RTCA/DO-160E.....................................................DO-160E - section 21 Category M
(for battery operation only; commercial aircraft, airborne equipment)
Equipment Classifications
With respect to protection from electric shock ......................................Class I and internally powered
Degree of protection against electric shock..............................................Type BF Applied Parts
Degree of protection against ingress of liquids ...................................IP12 and ordinary power supply
Mode of Operation .........................................Intermittent Operation: 30 minutes on, 30 minutes off
Equipment not suitable for use in the presence of a ammable anesthetic mixture with air or with oxygen or nitrous
oxide.
ISO Classification
7310 Series - Electrically powered medical suction equipment for field and transport use according to ISO 10079-1 : 1999
High Flow/High Vacuum

EN - 9A-7310
TWO-YEAR LIMITED WARRANTY
The compressor portion of the DeVilbiss Vacu-Aide Compact Suction Unit 7310 Series (excluding internal rechargeable
battery and collection container) is warranted to be free from defective workmanship and materials for a period of two
years from date of purchase. Internal rechargeable batteries are warranted for 6 months. Any defective part(s) will be
repaired or replaced at DeVilbiss Healthcare’s option if the unit has not been tampered with or used improperly during that
period. Make certain that any malfunction is not due to inadequate cleaning or failure to follow the instructions. If repair is
necessary, contact your DeVilbiss Provider or DeVilbiss for instructions.
NOTE - Be sure to retain a dated proof of purchase document to verify unit is within 2-year warranty period.
NOTE - This warranty does not cover providing a loaner unit, compensating for costs incurred in rental while said unit is
under repair, or costs for labor incurred in repairing or replacing defective part(s).
THERE IS NO OTHER EXPRESS WARRANTY. IMPLIED WARRANTIES, INCLUDING THOSE OF MERCHANTABILITY
AND FITNESS FOR A PARTICULAR PURPOSE, ARE LIMITED TO THE DURATION OF THE EXPRESS LIMITED
WARRANTY AND TO THE EXTENT PERMITTED BY LAW. ANY AND ALL IMPLIED WARRANTIES ARE EXCLUDED.
THIS IS THE EXCLUSIVE REMEDY AND LIABILITY FOR CONSEQUENTIAL AND INCIDENTAL DAMAGES UNDER ANY
AND ALL WARRANTIES ARE EXCLUDED TO THE EXTENT EXCLUSION IS PERMITTED BY LAW. SOME STATES DO
NOT ALLOW LIMITATIONS ON HOW LONG AN IMPLIED WARRANTY LASTS, OR THE LIMITATION OR EXCLUSION
OF CONSEQUENTIAL OR INCIDENTAL DAMAGES, SO THE ABOVE LIMITATION OR EXCLUSION MAY NOT APPLY
TO YOU.
This warranty gives you specic legal rights, and you may also have other rights which vary from state to state.
Manufacturer’s Note
Thank you for choosing a DeVilbiss Vacu-Aide Compact Suction Unit. We want you to be a satised customer. If you have
any questions or comments, please send them to our address on the back cover.
For Service Call Your Authorized DeVilbiss Provider:
Phone ___________________________________________________________________
Purchase Date _____________________________________________________________
Serial # __________________________________________________________________
DEVILBISS GUIDANCE AND MANUFACTURER’S DECLARATION
WARNING
Medical Electrical Equipment needs special precautions regarding EMC and needs to be installed and put into
service according to the Electromagnetic Compatibility [EMC] information provided in the accompanying
documents.
Portable and Mobile RF Communications Equipment can affect Medical Electrical Equipment.
The equipment or system should not be used adjacent to or stacked with other equipment and that if adjacent or
stacked use is necessary, the equipment or system should be observed to verify normal operation in the
conguration in which it will be used.
NOTE– The EMC tables and other guidelines provide information to the customer or user that is essential in determining
the suitability of the Equipment or System for the Electromagnetic Environment of use, and in managing the
Electromagnetic Environment of use to permit the Equipment or System to perform its intended use without disturbing
other Equipment and Systems or non-medical electrical equipment.
Guidance and Manufacturer’s Declaration – Emissions All Equipment and Systems
This device is intended for use in the electromagnetic environment specied below. The customer or user of this device
should assure that it is used in such an environment.
Emissions Test Compliance Electromagnetic Enforcement – Guidance
RF Emissions
CISPR 11
Group 1
This device uses RF energy only for its internal function. Therefore, its RF
emissions are very low and are not likely to cause any interference in
nearby electronic equipment.
RF Emissions
CISPR 11
Class B
Radiated and Conducted
Emissions
This device is suitable for use in all establishments including domestic,
and those directly connected to the public low-voltage power supply
network that supplies buildings used for domestic purposes.
Harmonics
IEC 61000-3-2
Class A
Flicker
IEC 61000-3-3
Complies

EN - 10 A-7310
Immunity Test IEC 60601 Test Level Compliance Level Electromagnetic Environment - Guidance
Electrostatic
Discharge (ESD)
IEC 61000-4-2
±6kV contact
±8kV air
±6kV contact
±8kV air
Floors should be wood, concrete or ceramic
tile. If oors are synthetic, the relative humidity
should be at least 30%.
Electrical Fast
Transient/burst
IEC 61000-4-4
±2kV on AC Mains ±2kV on AC Mains
Mains power quality should be that of a typical
commercial or hospital environment.
Surge
IEC 61000-4-5
±1kV Differential
±2kV Common
±1kV Differential
±2kV Common
Mains power quality should be that of a typical
commercial or hospital environment.
Voltage dips, short
interruptions and
voltage variations
on power supply
input lines
IEC 61000-4-11
>95% Dip for 0.5 Cycle
60% Dip for 5 Cycles
30% Dip for 25 Cycles
>95% Dip for 5 Seconds
>95% Dip for 0.5 Cycle
60% Dip for 5 Cycles
30% Dip for 25 Cycles
>95% Dip for 5 Seconds
Mains power quality should be that of a typical
commercial or hospital environment. If the user
of this device requires continued operation
during power mains interruptions, it is
recommended that the device be powered from
an uninterruptible power supply or battery.
Power Frequency
50/60Hz Magnetic
Field
IEC 61000-4-8
3A/m 3A/m
Power frequency magnetic elds should be
that of a typical location in a typical commercial
or hospital environment.
Conducted RF
IEC 61000-4-6
3 Vrms from
150 kHz to 80 MHz
V1 = 3 Vrms
Portable and mobile RF communications
equipment should be separated from the
device by no less than the recommended
separation distances calculated/listed below:
D=(3.5/V1)√
P
Radiated RF
IEC 61000-4-3
3 V/m
80 MHz to 2.5 GHz
E1 = 3V/m
D=(3.5/E1)√
P
80 to 800 MHz
D=(7/E1)√
P
800 MHz to 2.5 GHz
Where P is the maximum power rating in watts
and D is the recommended separation distance
in meters.
Field strengths from xed transmitters, as
determined by an electromagnetic site survey,
should be less than the compliance levels (V1
and E1).
Interference may occur in the vicinity of
equipment containing a transmitter.
For transmitters rated at a maximum output power not listed above, the recommended separation distance D in meters
(m) can be estimated using the equation applicable to the frequency of the transmitter, where P is the maximum output
power rating of the transmitter in watts (W) according to the transmitter manufacturer.
Note 1: At 80 MHz and 800 MHz, the separation distance for the higher frequency range applies.
Note 2: These guidelines may not apply in all situations. Electromagnetic propagation is affected by absorption and
reection from structures, objects, and people.
Recommended Separation Distances Between Portable and Mobile RF Communications
Equipment and this device. This device and system are NOT Life-Supporting
This device is intended for use in the electromagnetic environment in which radiated disturbances are controlled. The
customer or user of this device can help prevent electromagnetic interference by maintaining a minimum distance
between portable and mobile RF Communications Equipment and the device as recommended below, according to the
maximum output power of the communications equipment.
Maximum Output
Power (Watts)
Recommended Separation Distances for the device (meters)
150 kHz to 80 MHz
D=(1.1667)√
80 to 800MHz
D=(1.1667)√
800 MHz to 2.5 GHz
D=(2.3333)√
0.01 0.11667 0.11667 0.23333
0.1 0.36894 0.36894 0.73785
1 1.1667 1.1667 2.3333
10 3.6894 3.6894 7.3785
100 11.667 11.667 23.333
For transmitters rated at a maximum output power not listed above, the recommended separation distance D in meters
(m) can be estimated using the equation applicable to the frequency of the transmitter, where P is the maximum output
power rating of the transmitter in watts (W) according to the transmitter manufacturer.
Note 1: At 80 MHz and 800 MHz, the separation distance for the higher frequency range applies.
Note 2: These guidelines may not apply in all situations. Electromagnetic propagation is affected by absorption and
reection from structures, objects, and people.
P P P

ES - 11A-7310
ÍNDICE
Figuras ..................................................................................................................................................................... EN - 2
Símbolos IEC .......................................................................................................................................................... ES - 11
Precauciones importantes ....................................................................................................................................... ES - 11
Viajes internacionales.............................................................................................................................................. ES - 12
Introducción ............................................................................................................................................................. ES - 12
Piezas importantes .................................................................................................................................................. ES - 13
Accesorios/Piezas de repuesto ............................................................................................................................... ES - 13
Instalación ............................................................................................................................................................... ES - 13
Cómo utilizar la unidad de succión ......................................................................................................................... ES - 13
Carga de la batería ................................................................................................................................................ ES - 14
Sustitución de la batería .......................................................................................................................................... ES - 14
Instrucciones de limpieza ........................................................................................................................................ ES - 15
Mantenimiento ......................................................................................................................................................... ES - 16
Resolución de problemas ........................................................................................................................................ ES - 16
Especificaciones/Clasificaciones ............................................................................................................................. ES - 17
Garantía ................................................................................................................................................................... ES - 17
Declaración del fabricante y guía de uso de DeVilbiss ........................................................................................... ES - 18
SÍMBOLOS IEC
Atención, consulte el manual de instrucciones Corriente alterna
Consulte las instrucciones de uso Corriente continua
En espera - Encendido / Apagado Utiliza piezas tipo BF
Indicador de polaridad positiva en el centro Fabricante
IP12: las gotas de agua que caigan sobre la carcasa verticalmente o con una inclinación de hasta 15º a
la derecha o a la izquierda respecto a la vertical no afectarán negativamente al equipo.
Este dispositivo contiene componentes eléctricos y/o electrónicos que se deben reciclar conforme a la
directiva de la EU 2012/19/EU relativa a residuos de aparatos eléctricos y electrónicos (RAEE).
PRECAUCIONES IMPORTANTES
Siempre que se utilicen aparatos eléctricos, especialmente en presencia de niños, se deben adoptar las medidas de
seguridad básicas. Lea todas las instrucciones antes de proceder al uso. La información importante se destaca mediante
estos términos:
PELIGRO: Información de seguridad urgente sobre situaciones peligrosas que pueden provocar lesiones
graves o incluso la muerte.
ADVERTENCIA: Información de seguridad importante sobre situaciones peligrosas que pueden provocar
lesiones graves
PRECAUCIÓN: Información para evitar ocasionar daños al producto
NOTA: Información a la que se debe prestar especial atención.
LEA TODAS LAS INSTRUCCIONES ANTES DE PROCEDER AL USO.
GUARDE ESTAS INSTRUCCIONES
PELIGRO
Para reducir el riesgo de electrocución:
1. No utilizar durante el baño.
2. No colocar ni guardar el producto en lugares en los que se pueda caer a una bañera o lavabo.
3. No colocar ni sumergir en agua ni ningún otro líquido.
4. No intentar recoger un producto que se haya caído al agua. Desenchufar inmediatamente.

ES - 12 A-7310
ADVERTENCIA
Para reducir el riesgo de quemaduras, electrocución, incendio o lesiones a las personas:
1. Une surveillance attentive est nécessaire lorsque ce produit est utilisé par, sur ou près d’enfants ou de personnes
handicapées.
2. Este producto sólo se debe utilizar para la función a la que está destinado y de la manera indicada en este manual.
3. No utilizar nunca el producto si:
a. El cable de alimentación o el enchufe están dañados.
b. No funciona correctamente.
c. Se ha caído o dañado.
d. Se ha caído al agua. Devuelva el producto a un centro de servicio autorizado por DeVilbiss para su examen y
reparación.
4. Mantenga el cable de alimentación alejado de supercies calientes.
5. No lo utilice nunca mientras duerme ni cuando tiene sueño.
VIAJES INTERNACIONALES
La unidad de succión está equipada con un adaptador/cargador de CA a CC que permite utilizarlo con cualquier voltaje de
CA (100-240 VCA, 47-63 Hz). No obstante, se debe utilizar un cable de alimentación adecuado para su conexión a un
enchufe. Su unidad ha sido aprobada para uso en aviones comerciales. Los estándares especícos se detallan en la
sección de especicaciones y declaración de este manual. Los certicados están disponibles para quien los solicite; si los
necesita, pida una copia de la carta de aprobación a su proveedor antes de viajar.
NOTA: Antes de proceder a su uso, compruebe si el cable de alimentación es el adecuado.
INTRODUCCION
La Unidad de succión DeVilbiss es un dispositivo médico de succión compacto, portátil y de gran abilidad. Siga los
procedimientos recomendados de mantenimiento y uso de esta guía de instrucciones para maximizar la vida útil de este
producto.
Uso para el que está destinado
El dispositivo se debe usar para eliminar uidos del sistema respiratorio y para eliminar materias infecciosas de heridas. El
dispositivo crea una presión negativa (vacío) que extrae los uidos a través de unos tubos desechables que están
conectados al contenedor de recolección. Los uidos quedan atrapados en el contenedor de recolección para una
eliminación adecuada. Se debe usar sólo bajo orden de un médico.
Contraindicaciones
La unidad de succión DeVilbiss Vacu-Aide Compact no se debe utilizar para:
• drenaje torácico
• succión nasogástrica
PELIGRO
La unidad de succión de DeVilbiss es un aparato de succión de vacío diseñado para recolectar uidos no
inamables en aplicaciones médicas solamente. El uso inapropiado durante las aplicaciones médicas puede
causar lesiones o incluso la muerte. Para todas las aplicaciones médicas:
1. Toda succión debe hacerse en apego estricto a los procedimientos apropiados que han sido establecidos por una
autoridad médica reconocida.
2. Algunos dispositivos o accesorios pueden no ser del tamaño del conducto provisto. Todos los dispositivos o
accesorios deben revisarse antes de usar para asegurar que se ajustan bien.

ES - 13A-7310
PIEZAS IMPORTANTES
Inspeccione la unidad de succión y todas las piezas antes del uso.
1. Botón de regulación de vacío (en el lateral)
2. Filtro antibacteriano (no estéril)
3. Toma de entrada de vacío (detrás del ltro)
4. Panel de visualización (parte superior de la
unidad)
5. Depósito reutilizable de 725 ml con conjunto
codo/tapa
6. Entrada de CC (en el lateral)
7. Tapa del compartimiento de la batería
8. Asa de transporte / soporte para catéter
9. Tubo para el paciente de 1,8 m (6 pies) (no
mostrado)
10. Adaptador/cargador de CA a CC (no mostrado)
11. Cable de alimentación de CC de 12V (no mostrado)
12. Batería recargable de gran capacidad (no mostrada)
13. Bolsa de transporte con correa para el hombro (no mostrada)
ACCESORIOS/PIEZAS DE REPUESTO
Las piezas siguientes de la unidad de succión se pueden adquirir por separado como accesorios o para sustitución.
Descripción Nº de ref. Descripción Nº de ref.
Filtro antibacteriano (paquete de 12) 7305D-608 Cable de alimentación de 12V CC 7304D-619
Tapa del compartimiento de la batería 7310P-602 Cable de corriente - Grado
hospitalario EE. UU.
099HD-614
Adaptador/cargador de CA a CC 7305P-613 Cable de corriente, EE. UU. 6710D-609
Tubo para el paciente de 1,8 m (6 pies) 6305D-611 Cable de corriente, Reino Unido 7305P-630
Maletín de transporte con correa para el hombro 7310P-606 Cable de corriente, UE 7305P-631
Paquete de depósito reutilizable de 725 ml
(Depósito, conjunto codo/tapa, ltro)
7310P-603
INSTALACIÓN
1. La unidad se envía con la batería desconectada. Antes del primer uso, conecte y cargue la batería. Consulte las
instrucciones de la sección Sustitución de la batería.
2. Coloque la parte transparente del ltro con la etiqueta IN directamente en la tapa del depósito.
3. Con el ltro conectado al depósito, insértelo directamente a la toma frontal. Tanto el ltro como el apoyo de la parte
inferior jan el depósito a la unidad (FIG. 1 y 2).
4. Seguidamente, se podrá conectar el tubo de 1,8 m (6 pies) a la salida de la tapa del depósito etiquetada <Patient>.
5. Compruebe que todas las conexiones estén bien aseguradas para evitar fugas.
6. Compruebe que la unidad esté ajustada al nivel de succión deseado antes de comenzar la succión con el paciente.
CÓMO UTILIZAR LA UNIDAD DE SUCCIÓN
Símbolos del panel de control
Encendido / Apagado
Alimentación externa: A través de un cable de alimentación de CA o CC. Al recibir corriente, se enciende
la luz verde.
Carga de la batería: Se enciende una luz AMARILLA. La luz se apagará cuando la batería esté
completamente cargada.
Batería baja: Se encenderá una luz ROJA cuando la batería esté descargada.
mmHg
Ajuste del nivel de succión: La escala/fuerza se ilumina en VERDE. Esta escala muestra el nivel de
succión en mmHg.
2
4
3
1
5
8
7
6

ES - 14 A-7310
Opciones de la fuente de alimentación
FUNCIONAMIENTO CON CA: Enchufe el conector de alimentación de 90° a la entrada de CC del adaptador/cargador de
CA a CC (FIG. 3) y conecte el cable de corriente. Conecte el otro extremo del adaptador de CA a un enchufe de CA con
toma de tierra.
FUNCIONAMIENTO CON 12V DE CC: Enchufe el conector pequeño de 90° de CC a la entrada de CC (FIG. 3). Enchufe
el extremo grande del cable a la toma de CC de 12V del vehículo.
FUNCIONAMIENTO CON BATERÍA: La unidad está equipada con una batería recargable de gran capacidad. En las
unidades nuevas, la batería se debe cargar completamente durante al menos 5 horas (consulte Carga de la batería). Para
utilizar la unidad con la batería recargable, asegúrese de que no se conecten fuentes de alimentación externas a la unidad
de succión.
NOTA: Durante la carga o el funcionamiento, la fuente de alimentación puede estar caliente al tacto; es normal.
ADVERTENCIA
Si la unidad no recibe alimentación externa o la batería no está cargada, el indicador luminoso de batería baja
permanecerá encendido y el rendimiento de la unidad se degradará rápidamente. Si el indicador luminoso de
batería baja se enciende, utilice otra fuente de alimentación para evitar que se interrumpa el proceso de succión.
Cómo ajustar el nivel de vacío
1. Una vez elegida la fuente de alimentación, pulse el botón de encendido para encender la unidad. El indicador
luminoso de alimentación externa VERDE permanecerá encendido mientras la alimentación externa esté conectada.
2. Obstruya (bloquee) el extremo del paciente del tubo y, a continuación, gire el botón de regulación de vacío para
ajustar el nivel entre 50-500 mmHG +/- 10%, en el sentido de las agujas de reloj para aumentar el nivel de vacío y
en el sentido contrario para reducirlo (FIG. 4). Libérelo y bloquéelo una vez más para conrmar el ajuste. El nivel de
vacío deseado se puede observar en los indicadores LED.
NOTA: Los indicadores LED tienen dos niveles de brillo. Al ajustar el nivel de vacío, los LED se encenderán en progresión.
Si un LED brilla con la mitad de intensidad, indica que el nivel de vacío está a la mitad entre éste y el LED anterior que
está iluminado por completo. EJEMPLO: Si el LED de 150 mmHg está iluminado por completo y el de 200 mmHg está a la
mitad, el nivel de succión será de 175 mmHg. Si el LED de 200 mmHg se ilumina por completo, la unidad habrá alcanzado
200 mmHg.
3. Conecte la punta de succión o el catéter, según corresponda.
NOTA: Si la unidad no mantiene el vacío, consulte la sección Resolución de problemas.
NOTA:Lasucciónseinterrumpesielniveldelíquidoalcanzalaválvuladedesconexiónotantesituadaenlaparte
inferior de la tapa del depósito.
PRECAUCIÓN: Sisesiguesuccionando,sepodrádañarlabombadevacíoyseanularálagarantía.Sieluidovuelvea
introducirse en la unidad, será necesario llevar el equipo al servicio técnico.
CARGA DE LA BATERÍA
La serie Vacu-Aide Compact está equipada con una batería recargable de gran capacidad instalada en fábrica. Antes del
primer uso, conecte y cargue la batería (consulte la sección Sustitución de la batería).
1. Conecte la unidad a una fuente de alimentación de CA o CC.
2. El indicador verde de alimentación externa debería encenderse; el indicador de carga amarillo seguirá encendido
mientras la batería se esté cargando.
3. Compruebe que la luz amarilla de carga esté encendida al comenzar la carga. Mientras la batería se aproxima a la
carga completa, la luz amarilla de carga de la batería puede encenderse intermitentemente durante varios minutos.
Es normal. Si la unidad no tiene carga, compruebe que el indicador luminoso amarillo se encienda al aplicar
alimentación externa con el botón de encendido/apagado en la posición de apagado. Si el problema persiste,
contacte con el proveedor del equipo médico.
NOTA: Para que una batería descargada por completo se cargue al máximo de su capacidad, se necesitan hasta 5 horas
(según el grado de descarga).
Si la unidad no se usa durante un largo período de tiempo, la batería se debe recargar al menos cada 6 meses. Una
batería completamente cargada permite un funcionamiento continuo durante aproximadamente 45-60 minutos con un nivel
de vacío de cero (ujo libre).
PRECAUCIÓN: Si la batería se descarga por completo, se reducirá su vida útil. Si el indicador luminoso de batería baja
está encendido, no utilice la unidad durante más de unos minutos. Recargue la batería lo antes posible.
SUSTITUCIÓN DE LA BATERÍA
1. Utilice una moneda o un destornillador de punta plana para girar la pestaña hasta la posición de desbloqueo (FIG. 5).
2. Tire hacia arriba de la pestaña para retirar la tapa (FIG. 6).
3. Extraiga la batería del compartimiento y desenchufe el conector de la placa de circuito (FIG. 7 y 8).
4. Para instalar la batería nueva, repita los pasos anteriores en el orden inverso.
5. Cargue por completo la batería antes del uso.

ES - 15A-7310
INSTRUCCIONES DE LIMPIEZA
Depósito de recolección
NOTA: El codo está permanentemente conectado a la tapa y no se puede retirar.
1. Pulse el botón de encendido/apagado para apagar la unidad. Espere a que descienda el nivel de vacío.
2. Desconecte la fuente de alimentación externa del receptáculo de entrada de la unidad (si procede).
3. Retire el depósito de la unidad, desconectando el tubo del paciente y el ltro.
NOTA: El depósito de recolección reutilizable y la tapa son para su uso por un único paciente, y se deben sustituir cada
1-2 meses, según el uso y el método de limpieza empleado.
4. Los depósitos de recolección y las tapas se deben vaciar y limpiar bien después de cada uso. Lávelos con una
solución de agua caliente jabonosa y aclárelos con agua caliente del grifo. A continuación, sumérjalos en un
desinfectante comercial o en una solución formada por de tres partes agua (55 °C-65 °C) caliente y una parte de
vinagre (concentración de ácido acético >=5%) durante 60 minutos. Enjuáguelos bien con agua caliente del grifo y
déjelos secar al aire. NOTA: Si utiliza un desinfectante comercial, siga cuidadosamente las instrucciones y las
proporciones de dilución recomendadas por el fabricante.
Unidad de succión (para uso de un solo paciente)
1. Apague la unidad y desconéctela de todas las fuentes de alimentación externas.
2. Limpie la carcasa exterior con un paño limpio humedecido en detergente/desinfectante comercial (bactericida-
germicida).
PRECAUCIÓN: No sumerja la unidad de succión en agua; si lo hace, dañará la bomba de vacío.
Tubos (para uso de un solo paciente)
1. Desconecte el conducto de la unidad.
2. Enjuague a fondo haciéndole pasar agua tibia del grifo.
3. A continuación, sumérjalo durante 60 minutos en una solución formada por una parte de vinagre (>=5%
concentración de ácido acético) y tres partes de agua (55 °C - 65 °C). Enjuáguelo con agua limpia y tibia y déjelo
secar al aire.
4. Mantenga la supercie exterior del conducto limpia usando un paño limpio y humedecido.
Estuche Portátil (para uso de un solo paciente)
1. Limpie el estuche portátil con un paño limpio humedecido con detergente y / o desinfectante.
NOTA: La información sobre desinfección está basada en la obra “AARC Clinical Practice Guideline Suctioning of the
Patient in the Home”.
Unidad de Succión (para uso de varios pacientes)
Limpieza y desinfección de la unidad cuando se realiza un cambio de un paciente a otro
Cuando ya se han utilizado dispositivos médicos con un paciente, se debe suponer que existe contaminación con
gérmenes patógenos (a menos que se pruebe lo contrario) y se debe proteger al próximo paciente, usuario o tercero a
través de una manipulación y una preparación adecuadas. Por lo tanto, cuando ocurra un cambio de pacientes se debe
proteger a las personas durante el traslado y la manipulación del dispositivo, y la unidad debe someterse a un proceso
completo de limpieza y desinfección, realizado por personal capacitado, antes de volver a utilizarlo con el n de proteger
al próximo paciente. El proceso completo debe ser realizado exclusivamente por el fabricante, un técnico de
mantenimiento o un proveedor de DeVilbiss capacitado.
NOTA – Si la unidad se utiliza conforme a las instrucciones en condiciones normales, el interior de la unidad está
protegidocontralaexposiciónaagentespatógenosporelltroenlíneadelrecipientederecolección,porlotanto,noes
necesario realizar una desinfección de los componentes internos.
NOTA–Silaunidadseutilizasinunltroenlínea,elinteriordelaunidadquedaexpuestoaagentespatógenosyla
unidad no puede desinfectarse.
NOTA – Si el siguiente proceso para la unidad no puede ser realizado por un técnico o un proveedor de DeVilbiss
calicado,launidadnodebeserutilizadaporotropaciente.
DeVilbiss Healthcare recomienda que al menos el siguiente procedimiento sea realizado por el fabricante o un tercero
calicado entre los usos por diferentes pacientes.
1. Deseche todos los accesorios que no sean aptos para volver a utilizar, en especial el recipiente de recolección, el
ltro, el tubo y el estuche para transporte.
2. Con el interruptor de corriente en la posición “Apagado”, desconecte la unidad de succión de DeVilbiss de todas las
fuentes de alimentación externas.
3. Inspeccione visualmente la unidad en busca de daños, piezas perdidas, etc.

ES - 16 A-7310
4. Limpie la cubierta con un paño limpio y un desinfectante comercial (antibacteriano-germicida) que cumpla con los
requisitos que se enumeran en la NOTA a continuación. Utilice el desinfectante conforme a las instrucciones y los
índices de dilución recomendados por el fabricante.
PRECAUCIÓN – No sumergir en agua, hacer esto dañará la bomba de vacío.
NOTA – No utilizar limpiadores ni desinfectantes que contengan amoníaco, bencina o acetona para limpiar la unidad.
MANTENIMIENTO
Limpieza del filtro y sustitución del depósito
1. Cambie el ltro antibacteriano cada 1 ó 2 meses O inmediatamente si se desborda.
2. Para extraer el ltro antibacteriano, desconéctelo de la unidad de succión y de la pieza de la tapa.
3. Sustitúyalo por un nuevo ltro antibacteriano DeVilbiss nº 7305D-608 (paquete de 12).
NOTA:Compruebequeelladotransparentedelltroconlamarca<In>estécolocadohaciaeldepósito.
NOTA:UtiliceúnicamenteltrosantibacterianosproporcionadosporDeVilbissHealthcareoporunodesusdistribuidores.
Siseutilizanotros,sepuedecontaminarlaunidady/odegradarelrendimiento,yseanularálagarantía.
4. Sustituya el depósito de recolección cada 1 ó 2 meses, en función del uso y del método de limpieza.
NOTA: Use solo recipientes reutilizables DeVilbiss de 725 ml. El uso de otros recipientes puede ocasionar un desempeño
decienteyanularlagarantía.
RESOLUCIÓN DE PROBLEMAS
NOTA: Antes de contactar con el proveedor del equipo, consulte los pasos para la resolución de problemas a
continuación:
PELIGRO
Peligro de de electrocución. No intente abrir ni extraer la caja, no contiene piezas cuya reparación o
mantenimiento pueda efectuar el usuario. Si fuese necesario efectuar alguna reparación, devuelva la unidad a un
proveedor o a un centro de servicio técnico autorizado por DeVilbiss. Si abre o altera la unidad, se anulará la
garantía.
NOTA: Si el problema no se resuelve, contacte con su proveedor de equipos autorizado.
Problema Acción
La unidad no se enciende. (El
indicador luminoso verde de
alimentación externa se debe
encender al aplicar corriente.)
1. Compruebe las conexiones y las fuentes de alimentación.
2. Enchufe una lámpara a la toma de la pared, para comprobar que haya corriente.
3. Compruebe que la batería esté completamente cargada.
La bomba funciona, pero no
hace vacío.
1. Compruebe que todos los tubos estén conectados correctamente.
2. Compruebe que las conexiones de los tubos no estén rotas ni tengan fugas u
obstrucciones.
3. Compruebe que la válvula de desconexión otante no se haya activado por estar
lleno el depósito.
4. Compruebe que no haya fugas ni grietas en las piezas del depósito.
Poco vacío. 1. Utilice le botón de ajuste de vacío para aumentar el nivel de vacío.
2. Compruebe si existen fugas en el sistema.
La batería no conserva la
carga.
1. Compruebe que la batería esté conectada (consulte la sección Instalación).
2. Compruebe que la luz de carga se encienda.
3. Compruebe las conexiones eléctricas durante la carga.
4. Enchufe una lámpara a la toma de la pared, para comprobar que haya corriente.
Si el problema continúa, contacte con el proveedor del equipo.

ES - 17A-7310
ESPECIFICACIONES/CLASIFICACIONES
Dimensiones.........................18,4 cm de alto x 18,4 cm de ancho x 17,1 cm de fondo (7,25” x 7,25” x 6,75”)
Peso ...............................................................................1,53 kg (3,375 lbs)
Requisitos eléctricos ................................... 100-240 VCA 50/60 Hz 0,75 A máx.; 12 VCC, 33 W máx.
Rango de vacío ................................................................de 50-500 mmHG +/- 10%
Flujo de aire en la entrada de la bomba:. ............................................27 LPM (flujo libre) normal
(puede ser menor si se utiliza con la batería interna)
Capacidad del depósito de recolección ..........................................................725 ml (cc)
Condiciones ambientales
Rango de temperatura de funcionamiento..........................................0 °C (32 °F) - 40 °C (104 °F)
Humedad relativa de funcionamiento................................................................0-95%
Presión atmosférica de funcionamiento.................................... 10,2 Psi (70 kPA) - 15,4 Psi (106 kPA)
Rango de temperatura para almacenamiento y transporte ..........................-40 °C (-40 °C) - 70 °C (158 °F)
Humedad relativa para almacenamiento y transporte ...................................................0-95%
Presión atmosférica para almacenamiento y transporte ........................ 7,3 Psi (50 kPA) - 15,4 Psi (106 kPA)
Garantía
7310 . . . . . . . . . . . . . . . . . . . . . . . . .Garantía limitada de 2 años, excluyendo la batería interna y el depósito de recolección
Batería interna ............................................................................... 6 meses
Aprobaciones
IEC 601-1; IEC 68; CAN/CSA-C22.2 No. 601.1-M90; UL 2601-1, CE EN 60601-1-2, ISO10079-1:1999
Cumple la norma RTCA/DO-160E...........................................DO-160E -Sección 21 Categoría M
(sólo para funcionamiento con batería; Equipo apto para uso en vuelo en aviones comerciales)
Clasificaciones del equipo
Relativas a la protección contra descargas eléctricas................................ Clase I y alimentación interna
Grado de protección contra descargas eléctricas ..........................................Utiliza piezas tipo BF
Grado de protección contra la entrada de líquidos ............................IP12 y fuente de alimentación normal
Modo de funcionamiento ...................Funcionamiento intermitente: 30 minutos encendido, 30 minutos apagado
Este equipo no resulta adecuado para ser utilizado en presencia de una mezcla anestésica inflamable con aire, con oxíge-
no o con óxido nitroso.
Clasificación ISO
Serie 7310 - Equipo de succión eléctrico para uso en lugares fijos y medios de transporte, conforme a la norma ISO
10079-1: 1999
Flujo y vacío elevados
GARANTÍA LIMITADA DE DOS AÑOS
La parte del compresor de la unidad de succión DeVilbiss Vacu-Aide Compact Serie 7310 (excluyendo la batería
recargable y el depósito de recolección) está garantizada frente a defectos de fabricación y materiales durante un período
de dos años a partir de la fecha de compra. El período de garantía de las baterías recargables internas es de 6 meses.
Todas las piezas defectuosas se repararán o reemplazarán (a elección de DeVilbiss Healthcare) si la unidad no ha sido
modicada ni se ha utilizado inadecuadamente durante dicho período. Asegúrese de que el funcionamiento incorrecto del
dispositivo no se deba a una limpieza inadecuada ni al incumplimiento de las instrucciones. Si fuese necesario reparar el
dispositivo, contacte con el proveedor de DeVilbiss o con el departamento de atención al cliente de DeVilbiss y solicite
instrucciones.
NOTA:Conserveundocumentodepruebadecompraquepermitavericarqueseencuentradentrodelperíodode
garantía de 2 años.
NOTA: Esta garantía no incluye el préstamo de otra unidad, ni la compensación de los costes en que se incurra por el
alquiler de otra unidad mientras la suya esté en reparación, ni los costes de mano de obra derivados de la reparación o la
sustitución de las piezas defectuosas.
NO EXISTE NINGUNA OTRA GARANTÍA EXPRESA. LAS GARANTÍAS IMPLÍCITAS, INCLUYENDO LAS DE
COMERCIABILIDAD Y ADECUACIÓN A UN FIN CONCRETO, ESTÁN LIMITADAS A LA DURACIÓN DE LA GARANTÍA
LIMITADA EXPRESA Y, EN LA MEDIDA EN QUE LA LEY LO PERMITA, TODAS Y CADA UNA DE LAS GARANTÍAS
IMPLÍCITAS QUEDAN EXCLUIDAS. ÉSTA ES LA ÚNICA GARANTÍA EXISTENTE Y LA ÚNICA RESPONSABILIDAD
QUE SE ASUMIRÁ POR DAÑOS INDIRECTOS O INCIDENTALES. TODAS LAS GARANTÍAS QUEDAN EXCLUIDAS EN
LA MEDIDA EN QUE LA LEY LO PERMITA. ALGUNOS ESTADOS NO PERMITEN LIMITACIONES A LA DURACIÓN DE
LA GARANTÍA IMPLÍCITA, NI LA LIMITACIÓN O EXCLUSIÓN DE DAÑOS INDIRECTOS O INCIDENTALES, POR LO
QUE ES POSIBLE QUE LA LIMITACIÓN O EXCLUSIÓN ANTERIOR NO SEA APLICABLE EN SU CASO.
Esta garantía le otorga derechos legales especícos. Puede disponer también de otros derechos según la legislación
local.

ES - 18 A-7310
Nota del fabricante
Gracias por elegir una unidad de succión DeVilbiss Vacu-Aide Compact. Queremos que usted sea un cliente satisfecho.
Si desea hacer alguna pregunta o comentario, envíenoslo a la dirección indicada en la cubierta posterior.
Para reparaciones, llame a su proveedor autorizado de DeVilbiss:
Teléfono_________________________________________________________
Fecha de compra___________________________________________________
Nº de serie________________________________________________________
DECLARACIÓN DEL FABRICANTE Y GUÍA DE USO DE DEVILBISS
ADVERTENCIA
Este equipo eléctrico médico exige el cumplimiento de unas medidas de precaución especiales de compatibilidad
electromagnética, y se debe instalar y reparar según la información de compatibilidad electromagnética
especicada en los documentos anexos.
Los equipos de comunicación de radiofrecuencia móviles y portátiles pueden afectar a los equipos eléctricos
médicos.
Este equipo o sistema no se debe utilizar junto o sobre otros equipos y, si fuera necesario hacerlo, se deberá
observar para comprobar que funciona con normalidad en la conguración con la que se esté utilizando.
NOTA: Tanto las tablas de compatibilidad electromagnética como el resto de instrucciones proporcionan una información
esencial al cliente o usuario que permitirá determinar la idoneidad del equipo o sistema en el entorno electromagnético
actual y adaptar este entorno electromagnético para permitir al equipo o sistema realizar la función a la que está destinado
sin alterar el funcionamiento de otros equipos y sistemas o de otros equipos eléctricos no médicos.
Declaración del fabricante y guía de uso: emisiones de todos los equipos y sistemas
Este dispositivo se ha diseñado para su uso en los entornos electromagnéticos especicados a continuación. Antes de
utilizar el dispositivo, el cliente o usuario debe comprobar que el entorno sea adecuado.
Prueba de emisiones Cumplimiento Cumplimiento electromagnético - Guía de uso
Emisiones RF
CISPR 11
Grupo 1
Este dispositivo utiliza energía de radiofrecuencia sólo para su
funcionamiento interno. Por tanto, sus emisiones de radiofrecuencia
son muy bajas y no es probable que cause interferencias en los
equipos electrónicos próximos.
Emisiones RF
CISPR 11
Clase B
Emisiones radiadas y
conducidas
Este dispositivo es apto para su uso en todo tipo de emplazamientos,
incluidas viviendas particulares y otros emplazamientos conectados
directamente con la red de suministro eléctrico de bajo voltaje
utilizada con nes domésticos.
Harmónicos
IEC 61000-3-2
Clase A
Parpadeo
IEC 61000-3-3
Cumple
Prueba de inmunidad
Nivel de prueba
IEC 60601
Nivel de
cumplimiento Entorno electromagnético - Guía de uso
Descarga
electroestática
IEC 61000-4-2
±6kV contacto
±8kV aire
±6kV contacto
±8kV aire
El suelo debe ser de madera, cemento o
azulejos. Si el suelo es sintético, la humedad
relativa debe ser de al menos el 30%.
Transitorios eléctricos
rápidos en ráfagas
IEC 61000-4-4
±2kV en CC ±2kV en CC
La calidad de la red eléctrica debe ser la típica
de un entorno hospitalario o comercial.
Sobretensión
IEC 61000-4-5
±1kV diferencial
±2kV común
±1kV diferencial
±2kV común
La calidad de la red eléctrica debe ser la típica
de un entorno hospitalario o comercial.
Caídas de voltaje,
breves interrupciones
y variaciones de
voltaje en líneas de
alimentación eléctrica
IEC 61000-4-11
>95% de caída
durante 0,5 ciclos
60% de caída
durante 5 ciclos
30% de caída
durante 25 ciclos
>95% de caída
durante 5 segundos
>95% de caída
durante 0,5 ciclos
60% de caída
durante 5 ciclos
30% de caída
durante 25 ciclos
>95% de caída
durante 5 segundos
La calidad de la red eléctrica debe ser la
habitual de un entorno hospitalario o
comercial. Si el usuario de este dispositivo
requiere un funcionamiento continuo durante
las interrupciones del suministro eléctrico, se
recomienda conectar el dispositivo a una
batería o una fuente de alimentación continua.

ES - 19A-7310
Prueba de inmunidad
Nivel de prueba
IEC 60601
Nivel de
cumplimiento Entorno electromagnético - Guía de uso
Campo magnético de
50/60 Hz de
frecuencia eléctrica
IEC 61000-4-8
3A/m 3A/m
Los campos magnéticos de frecuencia
eléctrica deben ser los habituales de un
entorno hospitalario o comercial.
RF conducida
IEC 61000-4-6
3 Vrms desde
150 kHz hasta 80 MHz
V1 = 3 Vrms
Los equipos de comunicación de
radiofrecuencia móviles y portátiles deben
mantenerse alejados del dispositivo a una
distancia no inferior a las distancias
recomendadas en la siguiente lista:
D=(3,5/V1)√
P
RF radiada
IEC 61000-4-3
3 V/m
Entre 80 MHz y 2,5 GHz
E1 = 3V/m
D=(3.5/E1)√
P
Entre 80 y 800 MHz
D=(7/E1)√
P
Entre 800 MHz y 2,5 GHz
Donde P es la potencia de salida máxima en
vatios y D la distancia de separación
recomendada en metros.
Las fuerzas de los campos de los
transmisores jos, como se determina en un
estudio de características electromagnéticas,
no debe ser inferior a los niveles de
cumplimiento (V1 y E1).
Se pueden producir interferencias en la
proximidad de equipos que contengan un
transmisor.
Para los transmisores con una potencia de salida máxima no incluidos anteriormente, la distancia de separación
recomendada (D) en metros (m) se puede estimar mediante la ecuación aplicable a la frecuencia del transmisor, donde
P es la potencia de salida máxima del transmisor en vatios (W), según el fabricante del transmisor.
Nota 1: a 80 MHz y 800 MHz, se aplica la distancia de separación para los intervalos de frecuencia más elevados.
Nota 2: es posible que estas pautas no se apliquen en todas las situaciones. La propagación electromagnética se ve
afectada por la absorción y reexión de estructuras, objetos y personas.
Distancias de separación recomendadas entre equipos de comunicación de radio-
frecuencia móviles y portátiles y este dispositivo. Este dispositivo y su sistema
NO están destinados a su uso como aplicaciones de soporte vital.
Este dispositivo está destinado a su uso en entornos electromagnéticos en los que las perturbaciones radiadas estén
controladas. Para evitar las interferencias electromagnéticas, el cliente o el usuario de este dispositivo pueden mantener
una distancia mínima entre equipos de comunicación de radiofrecuencia móviles y portátiles y el dispositivo según las
siguientes recomendaciones, según la potencia de salida máxima del equipo de comunicación.
Potencia de salida
máxima (vatios)
Distancias de separación recomendadas para el dispositivo (metros)
Entre 150 kHz y 80 MHz
D=(1,1667)√
P
Entre 80 y 800 MHz
D=(1,1667)√
P
Entre 800 MHz y 2,5 GHz
D=(2,3333)√
P
0.01 0,11667 0,11667 0,23333
0.1 0,36894 0,36894 0,73785
1 1,1667 1,1667 2,3333
10 3,6894 3,6894 7,3785
100 11,667 11,667 23,333
Para los transmisores con una potencia de salida máxima no incluidos anteriormente, la distancia de separación
recomendada (D) en metros (m) se puede estimar mediante la ecuación aplicable a la frecuencia del transmisor, donde
P es la potencia de salida máxima del transmisor en vatios (W), según el fabricante del transmisor.
Nota 1: a 80 MHz y 800 MHz, se aplica la distancia de separación para los intervalos de frecuencia más elevados.
Nota 2: es posible que estas pautas no se apliquen en todas las situaciones. La propagación electromagnética se ve
afectada por la absorción y reexión de estructuras, objetos y personas.

FR - 20 A-7310
TABLE DES MATIÈRES
Figures......................................................................................................... ............................................................ EN - 2
Symboles CEI .......................................................................................................................................................... FR - 20
Consignes de sécurité importantes ......................................................................................................................... FR - 20
Utilisation de l’appareil à l’étranger................................................ ......................................................................... FR - 21
Introduction .............................................................................................................................................................. FR - 21
Pièces principales ................................................................................................................................................... FR - 22
Accessoires et pièces de rechange ........................................................................................................................ FR - 22
Installation ............................................................................................................................................................... FR - 22
Mode d’emploi de l’unité d’aspiration ...................................................................................................................... FR - 22
Chargement de la batterie ....................................................................................................................................... FR - 23
Remplacement de la batterie .................................................................................................................................. FR - 24
Instructions de nettoyage ........................................................................................................................................ FR - 24
Entretien .................................................................................................................................................................. FR - 25
Guide de dépannage ............................................................................................................................................... FR - 25
Spécifications et classifications ............................................................................................................................... FR - 26
Garantie ................................................................................................................................................................... FR - 26
Recommandations et déclaration du fabricant pour DeVilbiss ............................................................................... FR - 27
SYMBOLES CEI
Attention, reportez-vous au guide
d’instructions
Courant continu
Consultez les instructions d’utilisation Courant alternatif
Veille - Marche/Arrêt Pièce appliquée de type BF
Voyant de polarité positive au centre Fabricant
IP12: Les chutes verticales de gouttes d’eau n’ont aucun effet nuisible pour une inclinaison de l’enceinte
jusqu’à 15° par rapport à la verticale.
Cet appareil contient des équipements électriques et/ou électroniques qui doivent être recyclés d’après la
directive 2012/19/EU relative aux déchets d’équipements électriques et électroniques (DEEE)
CONSIGNES DE SÉCURITÉ
IMPORTANTES
Lors de l’utilisation d’appareils électriques, respectez toujours les consignes de sécurité élémentaires, surtout en présence
d’enfants. Lisez toutes les instructions avant d’utiliser l’appareil. Les informations importantes sont signalées par les
mentions suivantes :
DANGER– Consigne de sécurité très importante sur un danger pouvant entraîner des blessures graves,
voire mortelles.
AVERTISSEMENT – Consigne de sécurité importante sur un danger pouvant entraîner des blessures graves.
ATTENTION – Précautions à prendre pour éviter d’endommager le produit.
REMARQUE – Informations auxquelles il convient de prêter une attention particulière.
LISEZ TOUTES LES INSTRUCTIONS AVANT D’UTILISER L’APPAREIL.
CONSERVEZ CES INSTRUCTIONS.
DANGER
Pour réduire les risques d’électrocution :
1. N’utilisez pas l’appareil en prenant un bain.
2. Ne le placez pas et ne l’entreposez pas dans un endroit où il pourrait tomber ou basculer dans une baignoire ou un
lavabo.
La pagina si sta caricando...
La pagina si sta caricando...
La pagina si sta caricando...
La pagina si sta caricando...
La pagina si sta caricando...
La pagina si sta caricando...
La pagina si sta caricando...
La pagina si sta caricando...
La pagina si sta caricando...
La pagina si sta caricando...
La pagina si sta caricando...
La pagina si sta caricando...
La pagina si sta caricando...
La pagina si sta caricando...
La pagina si sta caricando...
La pagina si sta caricando...
La pagina si sta caricando...
La pagina si sta caricando...
La pagina si sta caricando...
La pagina si sta caricando...
La pagina si sta caricando...
La pagina si sta caricando...
La pagina si sta caricando...
La pagina si sta caricando...
La pagina si sta caricando...
La pagina si sta caricando...
La pagina si sta caricando...
La pagina si sta caricando...
La pagina si sta caricando...
La pagina si sta caricando...
La pagina si sta caricando...
La pagina si sta caricando...
La pagina si sta caricando...
La pagina si sta caricando...
La pagina si sta caricando...
La pagina si sta caricando...
-
 1
1
-
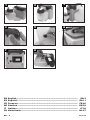 2
2
-
 3
3
-
 4
4
-
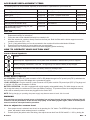 5
5
-
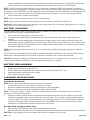 6
6
-
 7
7
-
 8
8
-
 9
9
-
 10
10
-
 11
11
-
 12
12
-
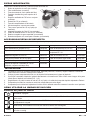 13
13
-
 14
14
-
 15
15
-
 16
16
-
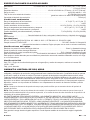 17
17
-
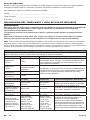 18
18
-
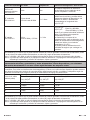 19
19
-
 20
20
-
 21
21
-
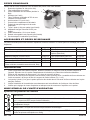 22
22
-
 23
23
-
 24
24
-
 25
25
-
 26
26
-
 27
27
-
 28
28
-
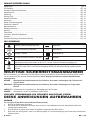 29
29
-
 30
30
-
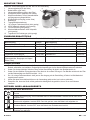 31
31
-
 32
32
-
 33
33
-
 34
34
-
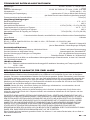 35
35
-
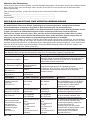 36
36
-
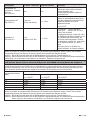 37
37
-
 38
38
-
 39
39
-
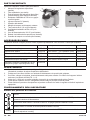 40
40
-
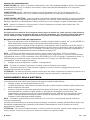 41
41
-
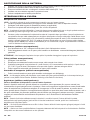 42
42
-
 43
43
-
 44
44
-
 45
45
-
 46
46
-
 47
47
-
 48
48
-
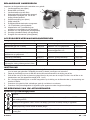 49
49
-
 50
50
-
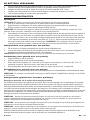 51
51
-
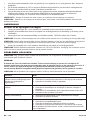 52
52
-
 53
53
-
 54
54
-
 55
55
-
 56
56


Drive Vacu-Aide Compact Suction Unit Manuale del proprietario
- Tipo
- Manuale del proprietario
- Questo manuale è adatto anche per
in altre lingue
Documenti correlati
Altri documenti
-
Drive DeVilbiss H86366 Manuale utente
-
 Restwell M84895 Istruzioni per l'uso
-
Apex Digital VACPRO Manuale utente
-
Sunrise Medical 7305 Manuale utente
-
 Nederman 160E Series Manuale utente
-
Drive Medical DeVilbiss Traveler Portable Compressor Nebulizer System Manuale del proprietario
-
 DeVilbiss IFILL PD1000A Istruzioni per l'uso
-
Gima 28118 Manuale del proprietario
-
-


