
TRM691E
a
e
z
i
y
LED
In1
In2
L
TRM691E
3,5
max
10A
bN?;:
a
Emetteur /récepteur radio 2
entrées + 1 sortie variable 200W
e
Netzstromgespeister
Funksender / -empfänger
2 Eingänge + 1 Dimmer 200W
z
Radio transmitter/receiver.
2 inputs + 1 dimmer 200W
i
Radiozender /-ontvanger
2 ingangen + 1 uitgang 200W
y
Emittente / ricevitore radio
2 ingressi + 1 variatore 200W
TRM691E
200
W AC1 230
V 50Hz
868,3 MHz 45°C RF1.M EC/EP
cfg
fct
LED
L
A
- Appareil à installer uniquement par un
installateur électricien selon les normes
d’installation en vigueur dans le pays.
- Lors du raccordement des entrées ou
avant toute intervention sur celles-ci,
couper l’alimentation 230V du produit.
- Ne pas retirer les manchons isolants sur
les ls d’entrées non utilisés.
Le produit TRM691E est un émetteur /récepteur radio,
alimenté en série avec la charge. Il permet la variation
de charges incandescentes, halogènes BT et TBT et
de LEDs dimmables.
Il comprend:
- 2 entrées pour le raccordement de poussoirs,
d’interrupteurs ou autres contacts d’automatisme,
- une sortie variable (max. 200W).
Les entrées raccordées au produit sont librement
programmables. Elles peuvent commander la sortie
locale ou d’autres sorties.
Les produits quicklinkL sont congurables entre eux
et sont exploités au sein d’une même installation radio.
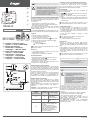
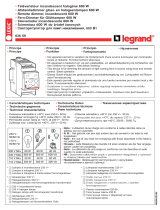
Légende
1 Bouton poussoir ou interrupteur
2 Fils de raccordement des 2 entrées
pour interrupteur ou poussoir
3 Bouton poussoir et LED fonction T de la sortie
4 Bouton poussoir et LED de conguration R
5 Bornier de raccordement :
- L : Phase 230 V
- : Sortie variation 230V
O
Ne pas couper les ls des entrées même si ils ne
sont pas utilisés.
Fonctions
• 1 voie indépendante commandée par la radio KNX
(sortie 200W AC1 230V).
• 2 entrées pour contact libre de potentiel.
En fonctionnement :
• Possibilité de commande manuelle de la sortie à
partir du bouton poussoir T
• Visualisation de l’état de la sortie sur la LED fct
(allumé rouge = sortie active).
Les fonctions précises du produit dépendent de la
conguration et du paramétrage.
Apprentissage du type de charge
Lors de la 1ère mise sous tension, le produit effectue
un apprentissage automatique du type de lampe
raccordée. Un bref scintillement peut être observée
durant cette phase (durée 2 à 3s) puis le type de lampe
est mémorisé dans le produit.
Après une coupure de courant ou un changement de
lampe, le variateur relance une nouvelle détection.
Si l’utilisateur constate un fonctionnement non
satisfaisant, il peut modier le réglage manuellement.
Réglage manuel de la charge
Faire 5 appuis courts consécutifs avec le bouton
poussoir de variation, jusqu’à obtenir un clignotement
de la lampe. Le variateur est maintenant dans le mode
réglage manuel.
Appuyer brièvement le poussoir de variation pour
sélectionner le réglage souhaité: (voir tableau ci
dessous)
Attention : Sortie automatique du mode manuel et
validation du réglage après 10s d’inaction.
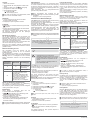
Poussoir
variation
Nb. d'appuis brefs
Nb. de
clignotements
Type de réglage
1x 1x
Mode de détection
automatique
(valeur par défaut)
2x 2x
Mode type de
LED
3x
La lampe s'allume au niveau
minimum = mode réglage seuil
mini. actif.
De nouveaux appuis sur le
bouton de variation permettent
de tester d'autres niveaux (faire
le test dans la pénombre).
Sauvegarde du seuil minimum
après 10s d'inaction.
6LE001275B
Protection contre la surchauffe et les surcharges
Le produit est protégé automatiquement contre les
surcharges, les courts-circuits et les surchauffes.
En cas de surchauffe ou surcharge, la puissance
disponible est automatiquement réduite.
Conguration
Cet émetteur/récepteur peut être conguré de
3 façons différentes :
• : conguration sans outil, voir notice de
conguration quicklink.
• Tebis TX : Conguration «easy» par le congurateur
Hager
• ETS4 ou > via Coupleur de média : base de données
et descriptif du logiciel d’application disponible chez
le constructeur.
O
Pour changer de mode de conguration, il faut
obligatoirement faire un “retour usine” du produit.
Paramétrage d’usine
Par défaut, l’entrée 1 est paramétrée pour recevoir
un bouton poussoir et commander la sortie locale
en variation (appui bref = ON / OFF; appui maintenu
= croissance/décroissance avec inversion de sens à
chaque nouvel appui).
Ce lien peut être modié ou effacé en mode
conguration.
O
Un retour usine du produit ré-installe ce lien
(paramétrage d’usine).
L’entrée 2 n’est pas pré-programmée.
Retour usine
Appuyer et maintenir le poussoir R jusqu’au
clignotement de la LED cfg (>10s) puis relâcher. La n
du retour usine est signalée par l’extinction de la LED
cfg.
Cette opération provoque l’effacement complet de
la conguration du produit, quel que soit le mode de
conguration. Après une mise sous tension ou un
retour usine, attendre 15s avant de procéder à une
conguration.
O
Ce mode d’emploi fait partie intégrante du produit
et doit être conservé par l’utilisateur nal.
Utilisable partout en Europe å et en Suisse
Par la présente Hager Controls déclare que l‘émetteur/récepteur
radio est conforme à la directive RED 2014/53/UE.
La déclaration CE peut être consultée sur le site :
www.hagergroup.net
E
- Einbau und Montage dürfen nur durch
eine Elektrofachkraft gemäß den
einschlägigen Installationsnormen des
Landes erfolgen.
- Bei Anschluss der Eingänge oder vor
jeglichem Eingriff an einem der Eingänge
ist die 230V-Speisung des Gerätes zu
unterbrechen.
- Die Isolierung der nicht verwendeten
Eingangsadern nicht entfernen.
Das Produkt TRM691E ist ein Funksender/-empfänger,
der in Serie mit der Last gespeist wird. Er ermöglicht
das Dimmen von Glühlampen, Niederspannungs- und
Kleinspannungs-Halogenlampen und dimmbaren LEDs.
Er besitzt:
- 2 Eingänge zum Anschluss von Tastern, Schaltern
anderen anderen Kontakten von Automatiken.
- Einen dimmbaren Ausgang (max. 200 W).
Die belegten Eingänge des Produkts sind frei
programmierbar. Sie können den lokalen Ausgang
oder andere Ausgänge ansteuern.
Die quicklinkL Produkte sind untereinander
kongurierbar und werden innerhalb derselben
Funkanlage betrieben.
6LE001275B1

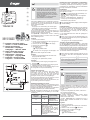
Legende
1 Taster oder Schalter
2 Anschlussleiter der 2 Eingänge für Schalter oder
Taster
3 Funktions-Taster und -LED T des Ausgangs
4 Kongurations-Taster und -LED R
5 Anschlussklemmenleiste :
- L : Phase 230 V
- : Dimmausgang 230 V
O
Die Leiter der Eingänge nicht abschneiden, selbst
wenn sie nicht verwendet werden.
Funktionen
• 1 Kanal, Ansteuerung über KNX-Funk-Gerät
(Ausgang 200W AC1 230V).
• 2 Eingänge für spannungsfreien Kontakt.
Im Betrieb :
• Möglichkeit zur manuellen Ansteuerung über Taster
T gegeben.
• Anzeige des Ausgangszustandes über die LED fct
(rot leuchtend = Ausgang aktiv).
Die genauen Funktionen dieser Geräte hängen von
der jeweiligen Konguration und den jeweiligen
Parametereinstellungen ab.
Erkennung des Lasttyps
Bei der Erstinbetriebnahme führt das Produkt eine
automatische Erkennung des Lampentyps durch.
Während dieser Phase kann ein kurzzeitiges Flackern
beobachtet werden (Dauer: 2 bis 3 s), danach wird der
Lampentyp im Produkt gespeichert.
Nach einem Stromausfall oder Lampenwechsel führt
der Dimmer die Erkennung erneut durch.
Wird eine nicht zufrieden stellende Funktionsweise
festgestellt, kann die Einstellung vom Benutzer manuell
geändert werden.
Manuelle Einstellung der Last
Den Dimmtaster 5-mal kurz drücken, bis die
Lampe blinkt. Der Dimmer ist nun im manuellen
Einstellungsmodus.
Den Dimmtaster kurz drücken, um die gewünschte
Einstellung auszuwählen: (siehe nachstehende Tabelle)
Achtung: Nach 10 s Untätigkeit wird der manuelle
Modus automatisch verlassen und die Einstellung
bestätigt
Dimmtaster
Anzahl kurzer
Tastendrücke
Blinkanzahl Einstellungstyp
1x 1x
Automatischer
Erkennungsmodus
(Standardwert)
2x 2x Modus Typ LED
3x
Die Lampe leuchtet minimal
= Einstellungsmodus untere
Schwelle aktiv.
Nochmalige Tastendrücke des
Dimmtasters ermöglichen das
Testen weiterer Stufen (den Test
im Halbdunkel durchführen).
Speicherung der unteren
Schwelle nach 10 s Untätigkeit.
Schutz vor Überhitzung und Überlastung
Das Produkt wird automatisch vor Überlastung,
Kurzschlüssen und Überhitzung geschützt.
Bei Überhitzung oder Überlastung wird die verfügbare
Leistung automatisch verringert.
Einstellungen
Dieser Sender / Empfänger lässt sich auf
3 unterschiedliche Arten kongurieren :
• : konguration ohne Werkzeug, siehe
quicklink Kongurationsanleitung
• Tebis TX : Konguration «easy» ber
Verknüpfungsgerät von Hager
• ETS4 oder > via Medienkoppler : Datenbank und
Beschreibung der Anwendungssoftware beim
Hersteller erhältlich.
O
Um den Kongurationsmodus zu ändern, ist das Gerät
zwingend auf «Werkseinstellungen» zurckzusetzen.
Werkeinstellung
Standardmäßig ist Eingang 1 so parametriert, dass
ein Taster empfangen wird und der lokale Ausgang
als Dimmer gesteuert wird (kurzer Druck = EIN/AUS;
langer Druck = heller/dunkler, mit Richtungsumkehr bei
jedem neuen Drücken).
Diese Verbindung kann im Kongurationsmodus
geändert oder gelöscht werden.
O
Beim Zurücksetzen des Produkts auf die
Werkseinstellungen wird diese Verbindung wieder
hergestellt.
Eingang 2 ist nicht vorprogrammiert.
Zurücksetzen auf Werkseinstellungen
Taste R drücken und gedrückt halten, bis die LED cfg
blinkt (>10 Sekunden), dann loslassen.
Die Rücksetzung auf Werkseinstellungen wird durch
das Erlöschen der LED cfg.
angezeigt. Bei dieser Operation wird die komplette
Konguration des Gerätes gelöscht, unabhängig vom
Kongurationsmodus. Nach dem Einschalten oder
einer Rücksetzung auf Werkseinstellungen ist
eineWartezeit von 15 Sekunden abzuwarten, bevor die
Konguration vorgenommen werden kann.
O
Diese Gebrauchsanweisung ist integraler Bestandteil
des Produkts und muss vom Endbenutzer aufbewahrt
werden..
Verwendbar in ganz Europa å und in der Schweiz
Hiermit erklärt Hager Controls, dass der Funksender/-
Empfänger der 2014/53/UE Richtlinie entspricht.
Die CE-Konformitätserklärung ist auf der Webseite :
www.hagergroup.net zugänglich.
Z
- This unit is to be installed by a qualied
professional only according to the
installation standard in force in the country.
- Cut off 230V power supply to the product
before connection of or operation on the
inputs.
- Do not remove the insulating sleeves on
the unused input wires.
The TRM691E is a radio transmitter/receiver, powered in
series with the load. It is used for dimming incandescent,
LV and ULV halogen, and dimmable LED loads.
It includes:
- 2 inputs for connection of pushbuttons, switches or
other automatic control contacts.
- A dimming output (max. 200W ).
The inputs connected to the product are freely
programmable. They can control the local output or
other outputs.
QuicklinkL products can be congured together and
operated within the same radio installation.
Caption
1 Pushbutton or switch
2 Connecting wires of the 2 inputs for a switch or
pushbutton
3 Pushbutton and feature LED T of output
4 Pushbutton and conguration LED R
5 Connector block :
- L : Phase 230 V
- : Dimming output 230 V
O
Do not cut the input wires, even if they are not
used.
Features
• 1 independent channel controlled by KNX radio.
(output 200W AC1 230V).
• 2 inputs for contact free of potential.
In operation :
• Availability of output manual control by pushbutton
T
• Display of output state on LED fct (red light ON =
active output).
The specic features of each product depend on
conguration and set-up.
Learning the load type
The rst time it is turned on, the product undertakes
automatic learning of the connected lamp type. A brief
icker may be observed during this phase (duration
2 to 3 s) after which the lamp type is stored in the
product.
After a power outage or change of lamp, the dimmer
starts a new detection.
If the user notices unsatisfactory operation, the setting
can be edited manually.
Manual setting of the load
Make 5 consecutive short presses on the dimmer
pushbutton, until the lamp is observed to ash. The
dimmer is now in manual setting mode.
Briey press the dimmer pushbutton to select the
desired setting: (see table below)
Note: Automatic departure from manual mode and
setting validation occur after 10 s inactivity.
Dimming
pushbutton
No. of short
presses
No. of blinks
Setting type
1x 1x
Automatic
detection mode
(default value)
2x 2x
Standard LED
mode
3x
The lamp is lit at the minimum
level = minimum threshold setting
mode active.
Further presses of the dimming
pushbutton are used to test other
levels (to perform the test in the
dark).
Saving of the minimum threshold
after 10 s inactivity
Protection against overheating and overload
The product is automatically protected against
overloads, short circuits and overheating. In the event
of overheating or overload, the available power is
automatically reduced.
Conguration
This transmitter/receiver can be congured in
3 different ways:
• : Conguration without tool, see
Quicklink conguration instructions
• Tebis TX : Conguration»easy» with the Hager
connection device
• ETS4 or > via Media coupler : Database and
description of software application available from
the Manufacturer.
O
In order to change the conguration mode, a
product «factory reset» is required.
Factory set-up
By default, input 1 is congured to receive a pushbutton
and to control the local dimming output (short press =
ON/OFF; maintained push = increase/decrease with
the direction changing following each new press).
This link can be edited or deleted in conguration
mode.
O
A factory reset of the product reinstalls this link
(factory settings).
Input 2 is not pre-programmed.
Factory Reset
Maintain R pushbutton down until LED cfg ickers
(>10s), then release. cfg LED turns OFF to signal
Factory Reset end. This operation removes the entire
product conguration in any conguration mode.
After power switch-On or Factory Reset, wait for 15s
before to do a new conguration.
O
These instructions for use form an integral part of
the product and must be retained by the end user.
Usable in all Europe å and in Switzerland
Hager Controls hereby declares that the radio transmitter/
receiver complies with the 2014/53/UE directive.
The CE declaration can be consulted on the site :
www.hagergroup.net
6LE001275B
2

TRM691E
I
- De installatie van het toestel mag
uitsluitend door een elektro-installateur
worden verricht, conform de installatie-
normen die van kracht zijn in het land.
- Alvorens de ingangen aan te sluiten of
een ingreep erop uit te voeren, moet de
230V stroomvoorziening van het product
worden afgesloten.
- De isoleerbussen op de niet-gebruikte
ingangsdraden niet verwijderen.
Het product TRM691E is een radiozender/-ontvanger,
in serie gevoed met de last. Hiermee kan de last van
gloeilampen, LS en ZLS halogeenlampen en dimbare
LED’s gevarieerd worden.
Het omvat:
- 2 ingangen voor de verbinding van drukknoppen,
schakelaars of andere contacten voor automaten.
- een variabele uitgang (max. 200W).
De op het product aangesloten ingangen kunnen vrij
geprogrammeerd worden. Zij kunnen de plaatselijke
uitgang of andere uitgangen besturen.
De quicklinkL radioproducten kunnen onderling
gecongureerd worden en worden binnen een zelfde
radio-installatie gebruikt.
Legende
1 Drukknop of schakelaar
2 Draden voor het aansluiten van de 2 ingangen voor
een schakelaar of drukknop
3 Drukknop en LED functie T van de uitgang
4 Drukknop en conguratie R
5 Aansluitklemmen :
- L : Fase 230 V
- : Uitgang variatie 230V
O
De draden van de ingangen niet afknippen, ook
wanneer deze niet gebruikt worden
Functies
• 1 autonoom kanaal bediend door de KNX-radio
(Uitgang 200W AC1 230V)
• 2 uitgangen voor potentiaalvrij contact.
In functie :
• Handbediening van de uitgang is mogelijk via de
drukknop T
• Visualisering van de toestand van de uitgang op de
LED fct (rode LED = actieve uitgang).
De specieke functies van het product hangen af van
de conguratie en de parameterinstelling.
Inlezen van het type last
Tijdens de eerste inschakeling leest het product
automatisch het type van de aangesloten lamp
uit. Tijdens deze fase kan een korte schittering
plaatsvinden (2 tot 3s), waarna het type lamp in het
geheugen van het product wordt opgeslagen.
Na een stroomonderbreking of het vervangen van de
lamp start de dimmer een nieuwe detectie.
Als de werking niet naar de zin van de gebruiker is, kan
hij de instelling met de hand wijzigen.
Handmatige instelling van de last
Druk 5 maal achter elkaar kort op de drukknop van de
dimmer, totdat de lamp begint te knipperen. De dimmer
staat nu in de handmatige instellingsmodus.
Druk kort op de drukknop van de dimmer om de gewenste
instelling te selecteren: (zie onderstaande tabel)
Let op: Automatische afsluiting van de handmatige
modus en validering van de instelling na 10s zonder
handelingen.
Drukknop dimmer
Aant. korte
drukken
Aant. keren
knipperen
Type instelling
1x 1x
Automatische
detectiemodus
(standaard waarde)
2x 2x Modus type LED
3x
De lamp gaat branden op het
laagste niveau = modus instelling
laagste drempel actief.
Door nogmaals op de dimmer-
knop te drukken kunnen andere
niveaus getest worden (doe de
test in de schemer).
Back-up van de laagste
drempelwaarde na 10s zonder
handelingen.
Bescherming tegen oververhitting en overbelasting
Het product wordt automatisch beschermd tegen
overbelasting, kortsluiting en oververhitting. In geval van
oververhitting of overbelasting wordt het beschikbare
vermogen automatisch verminderd.
Conguratie
Deze zender/ontvanger kan op 3 verschillende wijzen
gecongureerd worden :
• : Conguratie zonder gereedschap, zie
conguratiehandleiding quicklink
• Tebis TX : «Easy» conguratie door de congurator
van Hager
• ETS4 of > via Mediakoppelaar : Database en
omschrijving van de toepassingsoftware zijn
beschikbaar bij de producent.
O
Om de conguratiemodus te wijzigen, moet u terugkeren
«fabrieksinstelling».
Fabrieksinstelling
De ingang 1 is standaard ingesteld voor een drukknop
en voor het besturen van de plaatselijke uitgang als
dimmer (korte druk = ON / OFF; ingedrukt houden =
toename/afname met omkering van de richting bij
iedere nieuwe druk).
In de conguratiemodus kan deze link gewijzigd of
gewist worden.
O
Door terug te gaan naar de fabrieksinstelling van
het product wordt deze link opnieuw geïnstalleerd
(fabrieksinstelling).
De ingang 2 is niet voorgeprogrammeerd
Terugkerr naar de Fabrieksinstelling
De drukknop R pushbutton indrukken (> 10s) totdat
de LED cfg knippert en dan loslaten. Het einde van de
fabrieksinstelling is gesignaleerd door de gedoofde LED
cfg. Deze operatie heeft de totale verwijdering van de
conguratie tot gevolg, ongeacht de conguratiemodus.
Na het op spanning of het terug zetten op
fabrieksinstelling,
15s wachten vooraleer te congureren.
O
Deze werkwijze maakt integrerend deel uit van het
product en moet door de eindgebruiker bewaard
worden.
Te gebruiken in geheel Europa å en in Zwitzerland
Hiermee verklaart Hager Controls dat de radiozender/ontvanger
conform is aan richtlijn 2014/53/UE.
De CE verklaring van Hager kan worden gedownload via de
website: www.hagergroup.net
Y
- L’apparecchio va installato solo da un
installatore elettricista secondo le norme
d’installazione vigenti nel paese.
- In fase di collegamento delle entrate o
prima di qualsiasi intervento su di esse,
interrompere l’alimentazione 230V del
prodotto.
- Non rimuovere i manicotti isolanti sui li di
ingresso non utilizzati.
Il prodotto TRM691E è un trasmettitore/ricevitore radio
alimentato in serie con il carico. Consente la variazione
di carichi incandescenti, alogeni BT e TBT e di LED a
luce attenuabile.
Include:
- 2 ingressi di collegamento di pulsanti, interruttori o
altri contatti di automatismo,
- un’uscita variabile (max. 200 W).
Gli ingressi collegati al prodotto possono essere
programmati liberamente. Possono comandare
l’uscita locale o altre uscite.
I prodotti quicklinkL sono congurabili tra loro e
possono essere utilizzati nell’ambito di uno stesso
impianto radio.
Legenda
1 Pulsante o interruttore
2 Fili di collegamento dei 2 ingressi per l’interruttore
o pulsante
3 Pulsante e LED di funzione T dell’uscita
4 Pulsante e LED di congurazione R
5 Morsettiera di raccordo :
- L : Fase 230 V
- : Uscita variazione 230 V
bN?;:
LED
In1
In2
L
TRM691E
3,5
max
10A
a
Emetteur /récepteur radio 2
entrées + 1 sortie variable 200W
e
Netzstromgespeister
Funksender / -empfänger
2 Eingänge + 1 Dimmer 200W
z
Radio transmitter/receiver.
2 inputs + 1 dimmer 200W
i
Radiozender /-ontvanger
2 ingangen + 1 uitgang 200W
y
Emittente / ricevitore radio
2 ingressi + 1 variatore 200W
a
e
z
i
y
TRM691E
200
W AC1 230
V 50Hz
868,3 MHz 45°C RF1.M EC/EP
cfg
fct
LED
L
6LE001275B
6LE001275B3

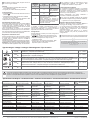
Spécications techniques / Technische Daten / Technical characteristics / Technische kenmerken / Caratteristiche tecniche
Alimentation Versorgungsspannung Supply voltage Voedingsspanning Tensione di alimentazione
230 V +10 %-15% 50 Hz
240 V +6%/-6% 50 Hz
Consommation produit Verbrauch des Produkts Product consumption Verbruik product Consumo prodotto
100mW
Protection en amont :
disjoncteur
Vorsicherung:
Schutzschalter
Upstream protection:
circuit breaker
Beveiligin : Installatieautomaat
van maximaal
Protezione a monte:
interruttore
10A
Fréquence /Puissance
d’émission
Sendefrequenz/
Sendeleistung
Transmission frequency/
Emission power
Zendfrequentie/
Zendvermogen
Frequenza portante/
Potenza di trasmissione
868-870 MHz 25 mW
Encombrement Abmessungen Dimensions Afmeting Ingombro
40 x 40 x 18 mm
Distance maximum
de raccordement
Leitungslänge
Max. connection
distance per input
Max. aansluitafstand per
ingang
Dist. massima tra contatto
e ingresso
< 10 m
Durée min.
fermeture contact
Minimale Schliessdauer
Minimum contacts
closing time
Mini. sluitingsduur van de
contacten
Durata mini. di chiusura
dei contatti
50 ms
Indice de protection Schutzart Degree of protection Beschermingsgraad Grado di protezione
IP 20
Altitude de
fonctionnement
Höhe im Betrieb Operating altitude Werkingshoogte Altitudine di esercizio
≤ 2000 m
Degré de pollution Störgrad Pollution degree Verontreinigingsgraad Grado di inquinamento
2
Catégorie de surtension Überspannungskategorie Overvoltage category Overbelastingscategorie Categoria di sovratensione
III
T° de fonctionnement Betriebstemperatur Operating temperature Bedirijfstemperatuur Ta di funzionamento
-15 °C —> + 45 °C
T° de stockage Lagertemperatur Storage temperature Opslagtemperatuur Ta di stoccaggio
- 20 °C —> + 70 °C
Receiver category 2 / Transmitter duty cycle 0,1%
Raccordement / Anschlusskapazität / Electric connection / Aansluiting / Collegamenti : 0,5 mm
2
—> 1,5 mm
2
0,5 mm
2
—> 2,5 mm
2
Type de charges / Lasttyp / Load type / Belastingsoort / Tipo de carico
230 V
Lampes Incandescentes / Glühlampen / Incandescent lamps /
Gloeilampen / Lampade ad incandescenza
10 ... 200 W
230 V
Lampes halogènes / Halogenlampen / halogen lamps /
Halogeenlampen / Lampade ad alogene
10 ... 200 W
230 V
Halogène TBT (12 ou 24 V) via transformateur ferromagnétique / Kleinspannungs-Halogenleuchten
über ferrogmagnetischen Trafo / Halogen ELV (12 or 24 V) via ferromagnetic transformer / Halogeenlampen
ZLS via ferromagnetische transformator / Lampade ad alogene via trasformatore ferromagnetico
10 ... 175 VA
230 V
Halogène TBT (12 ou 24 V) via transformateur électronique / Kleinspannungs-Halogenleuchten über
elektronischen Trafo / Halogen ELV (12 or 24V) via electronic transformer / Halogeenlampen ZLS via
elektronische transformator / Lampade ad alogene via trasformatore electtronico
10 ... 175 VA
LED
230 V
LEDs dimmables / Dimmbare LEDs / Dimmable LEDs / Dimbare LED’s / LED a luce attenuabile 3 ... 50 W
Les lampes uocompactes et les LED non dimmables ne sont pas compatibles avec ce produit / Kompaktleuchtstofampen und nicht dimmbare LEDs
sind nicht mit diesem Produkt kompatibel / Non-dimmable LED and compact uorescent lamps are not compatible with this product. / Compacte TL-
lampen en niet dimbare LED’s zijn niet geschikt voor dit product / Les lampes uocompactes et les LED non dimmables ne sont pas compatibles avec ce
produit / Le lampade uorescenti compatte e i LED non a luce attenuabile non sono compatibili con questo prodotto.
O
Non tagliare i li degli ingressi, neppure nel caso in
cui non vengano utilizzati.
Funzioni
• 1 via indipendente comandata dalla radio KNX
(uscita 200W AC1 230V).
• 2 ingressi per contatto esente da potenziale.
In funzionamento :
• Possibilità di comando manuale dell’uscita tramite il
pulsante T
• Visualizzazione dello stato dell’uscita sul LED fct
(acceso rosso = uscita attiva).
Le funzioni precise dello strumento dipendono dalla
congurazione e dalla parametrizzazione.
Apprendimento del tipo di carico
Al momento della prima accensione il prodotto effettua
un apprendimento automatico del tipo di lampada.
Durante tale fase è possibile osservare un breve
scintillio (della durata di 2/3 s), quindi il tipo di lampada
viene memorizzato nel prodotto.
Dopo un’interruzione di corrente o una sostituzione
della lampada il variatore riavvia un nuovo rilevamento.
Se l’utente constata un funzionamento non soddisfacente
può modi care manualmente la regolazione.
Regolazione manuale del carico
Premere brevemente per 5 volte di seguito il pulsante
di variazione no a quando la lampada non lampeggia.
A questo punto il variatore si trova in modalità di
regolazione manuale.
Premere brevemente il pulsante di variazione per selezio-
nare la regolazione desiderata (vedere la tabella in basso):
Attenzione : uscita automatica della modalità manuale e
convalidazione della regolazione dopo 10 s di inattività.
Pulsante
variazione
N° di
pressioni brevi
N° de
lampeggiamenti
Tipo di
regolazione
1x 1x
Modalità di rileva-
mento automatico
(valore predenito)
2x 2x
Modalità tipo di
LED
3x
La lampada si accende alla
soglia minima = regolazione della
sogliaminima attiva.
Nuove pressioni sul pulsante di
variazione permettono di testare gli
altri quattro livelli (fare il test al buio).
La so
glia minima viene salvata
dopo10s di inattività.
Protezione contro il surriscaldamento e i sovraccarichi
Il prodotto è protetto automaticamente contro i
sovraccarichi, i cortocircuiti e i surriscaldamenti. In
caso di surriscaldamento o sovraccarico la potenza
disponibile viene automaticamente ridotta.
Congurazione
Questa emittente /ricevente può venire congurata in
3 maniere diverse :
• : Congurazione senza attrezzi; fare
riferimento al manuale di congurazione quicklink
• Tebis TX : Congurazione «easy» tramite il
conguratore Hager
• ETS4 oppure > via supporti accoppiatore : Base
di dati e descrizione del software applicativo
disponibile presso il costruttore.
O
Per cambiare il modo di congurazione, occorre
tassativamente effettuare un “ripristino delle
congurazioni di fabbrica” del prodotto.
Parametrizzazione di fabbrica
Per impostazione predenita l’ingresso 1 è impostato
per ricevere un pulsante e controllare l’uscita locale
in variazione (pressione breve = ON/OFF; pressione
prolungata = crescita/diminuzione con inversione di
senso a ogni nuova pressione).
Questo collegamento può essere modicato o
cancellato in modalità congurazione.
O
Un ritorno alla modalità di fabbrica del prodotto
reinstalla il collegamento (impostazione di fabbrica).
L’ingresso 2 non è pre-programmato.
Ripristino delle impostazioni di fabbrica
Premere e mantenere premuto il pulsante R no al
lampeggio del LED cfg (>10s) poi rilasciare.
La ne del ripristino è segnalata dallo spegnimento
del LED cfg. L’operazione provoca la cancellazione
completa della congurazione dello strumento,
qualunque essa sia.
Dopo una messa sotto tensione o un ripristino
fabbrica attendere 15s prima di procedere ad una
congurazione.
O
Queste istruzioni per l‘uso sono parte integrante del
prodotto e devono restare in possesso dell‘utilizzatore nale.
Usato in Tutta Europa å e in Svizzera
Con la presente Hager Controls dichiara che il ricetrasmettitore
radio è conforme alla direttiva 2014/53/UE.
La dichiarazione CE può essere trovato sul sito web :
www.hagergroup.net
4
Hager 01.17 - 6LE001275BHager Controls S.A.S., 33 rue Saint-Nicolas, B.P. 10140, 67703 SAVERNE CEDEX, France - www.hager.com
-
 1
1
-
 2
2
-
 3
3
-
 4
4


in altre lingue
- English: Hager TRM691E User manual
- français: Hager TRM691E Manuel utilisateur
- Deutsch: Hager TRM691E Benutzerhandbuch
- Nederlands: Hager TRM691E Handleiding
Documenti correlati
Altri documenti
-
Berker 85105100 Manuale utente
-
Thermaltake 3.5" Protection BOX Manuale utente
-
Berker KNX-RF Switch Actuator for Plug Manuale utente
-
Berker KNX-RF Binary input 2-gang 230 V Flush-mounted Manuale utente
-
Berker 85265100 Manuale utente
-
Berker KNX-RF Switch Actuator Surface Istruzioni per l'uso
-
THEBEN DM 8-2 T KNX Istruzioni per l'uso
-
 SCS Sentinel 3245060036591 Manuale del proprietario
-
Trust TRANSMITTER AWRT-1000 Wireless Rotary Dimmer Manuale utente
-
Bticino HS4411 Istruzioni per l'uso
