Candy GVSF H8A3TCEX-S Manuale utente
- Categoria
- Asciugatrici elettriche
- Tipo
- Manuale utente
Questo manuale è adatto anche per

ENFRDEITNLPTES

2
Index
Please read and follow these nstructons
carefully a n d o p e r a t e the m a c h n e
accordngly. Ths booklet provdes mportant
gudelnes for safe use, nstallaton,
mantenance and some useful advce for best
results when using your machine.
Keep all documentation in a safe place for
future reference or for any future owners.
Please check that the followng tems are
delvered wth the applance:
● Instruction manual
● Guarantee card
● Energy label
By placng the mark on ths product,
we are confrmng complance to all relevant
European safety, health and envronmental
requrements whch are applcable n
legslaton for ths product.
Check that no damage has occurred to
the machine during transit. If it has, call for
service by GIAS. Failure to comply with the
above can compromise the safety of the
appliance. You may be charged for a service
call if a problem with your machine is caused
by misuse.
1. SAFETY REMINDERS
2. DRAIN HOSE KIT: FITTING
INSTRUCTIONS
3. PREPARING THE LOAD
4. CLEANING AND ROUTINE
MAINTENANCE
5. WATER CONTAINER
6. DOOR AND FILTER AND CONDENSER
7. CONTROLS AND INDICATORS
8. SELECTING THE PROGRAMME AND
SET THE FUNCTION
9. TROUBLESHOOTING CUSTOMER
SERVICE

1.
SAFETY REMINDS
Ths applance can be used by
chldren aged from 8 years and
above and persons wth
reduced physcal,sensory or
mental capabltes or lack of
experence and knowledge f they
have been gven supervson or
nstructon concernng use of the
applance n a safe way and
und er st a nd the h a za rd s
nvolved.Chldren shall not play
wth the applance. Cleanng and
user mantenance should not be
made by chldren wthout
supervson.Chldren of less than
3 years should be kept away
unless contnuously supervsed.
WARNING Misuse of a tumble
dryer may create a fire hazard.
Ths applances s ntended to be
used n household and smlar
applcatons such as:
- Staff ktchen areas n shops ,
offces and other workng
envronments;
- Farm houses
- By clents n hotels, motels and
o t h e r r e s d e n t a l t y p e
envronments;
- Bed and breakfast type
envronments" A dfferent use of
ths applance from house hold
envronment or from typcal
housekeepng functons,as
commercal use by expert or
traned users, s excluded even n
the above applcatons.
If the applance s used n a
manner nconsstent wth ths t
may reduce the lfe of the
applance and may vod the
manufacturer’s warranty.
Any damage to the applance
or other damage or loss
arsng through use that s not
consstent wth domestc or
household use ( even f
located n a domestc or
household envronment)
shall not be accepted by the
manufacturer to the fullest
extent permtted by law.
This machine should only be
used for its intended purpose
as described in this manual.
Ensure that the nstructons
for nstallaton and use are
fully understood before
operatng the applance.
Do not touch the appliance
when hands or feet are damp
or wet.
Do not lean on the door when
loading the machine or use
the door to lift or move the
machne.
Do not allow children to play
with the machine or its
controls.
3
●
●
●
●
●
●
●
EN

WA RN ING Do no t u se the
product if the fluff filter is not in
position or is damaged; fluff
could be gnted.
WARNING Where the hot
surface symbol is located
the temperature rise durng
operaton of the tumble dryer
may be n excess of 60 degrees
C.
Remove the plug from the
electricity supply. Always
remove the plug before cleanng
the applance.
Do not continue to use this
machine if it appears to be faulty.
Lint and fluff must not be
allowed to collect on the floor
around the outside of the
machne.
The fnal part of a tumble dryer
cycle occurs wthout heat (cool
down cycle) to ensure that the
tems are left at a temperature
that ensures that the tems wll
not be damaged.
The tumble dryer s not to be
used f ndustral chemcals have
been used for cleanng.
WARNING: Never stop a tumble
dryer before the end of the
dryng cycle unless all tems are
quckly removed and spread out
so that the heat s dsspated.
Maximum load drying weight:
see energy label.
Installaton
Do not use adapters, multiple
connectors and/or extensions.
Never install the dryer against
curtains and be sure to prevent
items from falling or collecting
behind the dryer.
The appliance must not be
installed behind a lockable door,
a sliding door or a door with a
hinge on the opposite side to
that of the tumble dryer.
4
●
●
●
●
●
●
●
●
●
●
●
●
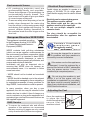
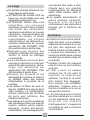
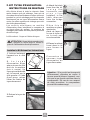
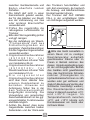
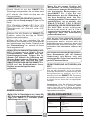
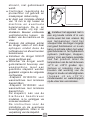
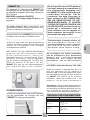
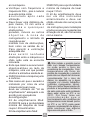
Important: Durng transport
ensure that the dryer s n an
uprght poston, f t's necessary
you can only flp n the sde shown;
Cauton: If the product s n
dfferent sde, wat at least 4 hours
before swtchng on so that the ol
c a n f l o w b a c k n t o t h e
compressor. Falure to do ths
could result n damage to the
compressor.

5
Do not dry unwashed items in
the tumble dryer.
WARNING Do not tumble dry
fabrics treated with dry cleaning
fluids.
WA R NI N G F o am r u bb e r
materials can, under certain
circumstances, when heated
b e c o m e g n t e d b y
spontaneous combuston.
Items such as foam rubber
(latex foam), shower caps,
waterproof textles, rubber
backed artcles and clothes or
pllows ftted wth foam rubber
pads MUST NOT be dred n the
tumble dryer.
Always refer to the laundry care
lab el s f or d ir ect io ns o n
suitability for drying.
Clothes should be spin dried or
thoroughly wrung before they
are put into the tumble dryer.
Clothes that are drppng wet
should not be put nto the dryer.
Lighters and matches must not
be left in pockets and NEVER
use flammable lquds near the
machne.
Glass fibre curtains should
NEVER be put in this machine.
Skin irritation may occur f other
garments are contamnated
wth the glass fbres.
Items that have been soiled
with s ub stances su ch as
cooking oil, acetone, alcohol,
p e t r o l , k e r o s e n e , s p o t
removers, turpentne, waxes
and wax removers should be
The Laundry
washed n hot water wth an
extra amount of detergent
before beng dred n the
tumble dryer.
Fabric softeners, or similar
products, should be used as
specified by the fabric
softener nstructons.
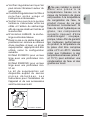
Ventlaton
Adequate ventlaton must be
provded n the room where
the tumble dryer s located to
p r e v e n t g a s e s f r o m
applances burnng other
fuels, ncludng open fres,
beng drawn nto the room
durng operaton of the
tumble dryer.
Installng the rear of the
applance close to a wall or
vertcal surface.
There should be a gap of at
least 12 mm between the
m a c h n e a n d a n y
obstrubtons.The nlet and
outlet should be kept clear of
o bs t r u ct o n.To e n su r e
adequate ventlaton the
space between the bottom of
the machne and the floor
must not be obstructed.
Check regularly that the ar
flowng through the dryer s
not restrcted.
Check frequently the fluff
flter after use, and clean, f
necessary.
Prevent tems from fallng or
collectng behnd the dryer as
●
●
●
●
●
●
●
●
●
●
●
●
●
●
●
EN

Do not nstall the product n a
low temperature room or n a
room where there s a rsk of frost
occurrng. At temperature around
freezng pont the product may
not be able to operate properly:
there s a rsk of damage f the
water s allowed to freeze n the
hydraulc crcut (valves, hoses,
pumps). For a better product
performance the ambent room
temperature must be between
5-35°C. Please note that
operatng n cold condton
(between +2 and +5°C) mght
smply some water condensaton
and water drops on floor.
6
these may obstruct the ar nlet
and outlet
NEVER nstall the dryer up
aganst curtans.
In cases where the dryer s
nstalled on top of a washng
machne, a sutable stackng kt
must be used accordng to the
follow confguraton.
- Stackng kt Mod 35100019:
for mnmum washng machne
depth 49 cm
- Stackng kt Mod 35900120:
for mnmum washng machne
depth 51 cm
The stackng kt shall be one of
that above, obtanable from our
spare servce.
The nstructons for nstallaton
and any fxng attachments, are
provded wth the stakng kt.
●
●
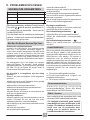
Ar Outlets n the Base

Envronmental Issues
All packaging materials used are
environmentally-friendly and recyclable.
Please help dispose of the packaging via
environmentally-friendly means. Your
local council will be able to give you details
of current means of disposal.
To ensure safety when disposing of an old
tumble dryer disconnect the mains plug
from the socket, cut the mains power cable
and destroy this together with the plug. To
prevent children shutting themselves in
the machine break the door hinges or the
door lock.
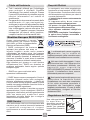
European Directive 2012/19/EU
Ths applance s marked accordng
to the European drectve 2012/19/EU
on Waste Electrcal and Electronc
Equpment (WEEE).
WEEE contans both pollutng substances
(whch can cause negatve consequences for
the envronment) and basc components (whch
can be re-used). It s mportant to have WEEE
subjected to specfc treatments, n order to
remove and dspose properly all pollutants, and
recover and recycle all materals.
Indvduals can play an mportant role n
ensurng that WEEE does not become an
envronmental ssue; t s essental to follow
some basc rules:
- WEEE should not be treated as household
waste.
- WEEE should be handed over to the relevant
collecton ponts managed by the muncpalty or
by regstered companes. In many countres, for
large WEEE, home collecton could be present.
In many countres, when you buy a new
applance, the old one may be returned to the
retaler who has to collect t free of charge on a
one-to-one bass, as long as the equpment s of
equvalent type and has the same functons as
the suppled equpment.
GIAS Servce
To ensure the continued safe and efficient
operation of this appliance we recommend
that any servicing or repairs are only carried
out by an authorised GIAS service engineer.
7
●
●
●
EN
Electrcal Requrements
Tumble dryers are suppled to operate at a
voltage of 220-240V, 50 Hz sngle phase.
Check that the supply crcut s rated to at least
6 A.
Electricity can be extremely dangerous.
This appliance must be earthed.
The socket outlet and the plug on the
appliance must be of the same type.
Do not use multiple adapters and/or
extension leads.
The plug should be accessible for
disconnection after the appliance has
been installed.
You may be charged for a service
call if a problem with your machine is
caused by incorrect installation.
If the mains cord on this appliance
is damaged, it must be replaced by a
special cord which is ONLY obtainable
from the spares service. It must be
installed by a competent person.
Do not plug the machine in and
switch it on at the mains until the
installation is completed.For your safety,
this dryer must be correctly installed. If
there is any doubt about installation, call
GIAS Service for advice.
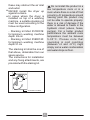
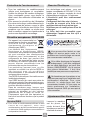
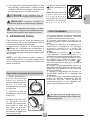
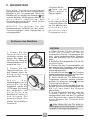
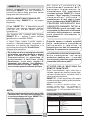
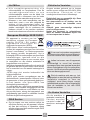
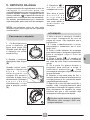
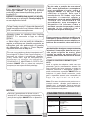
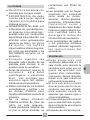
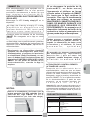
Adjustng the Feet
Once the machine is
in place the feet
should be adjusted to
e n s u r e t h a t t h e
machine is level.
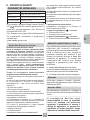
C o n t a n s f l u o r n a t e d
g r e e n h o u s e g a s e s .
Hermetcally sealed.
GWP1430
300
429

8
1
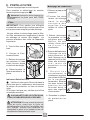
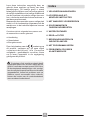
2.
DRAIN HOSE : FITTING
INSTRUCTIONS
To avod emptyng the water contaner after
each dryng cycle, the water can be dscharged
drectly to a waste water dran ppe (the same
dranage system as household snks). Water
Bye-Laws prohbt connecton to a surface
water dran. The waste water dran ppe should
be located adjacent to the tumble dryer.
The kt conssts of:1 hose and 1 tap.
WARNING! Switch off and remove the
tumble dryer plug from the electricity supply
before carrying out any work.
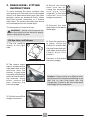
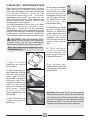
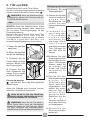
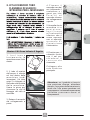
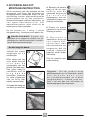
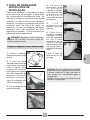
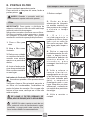
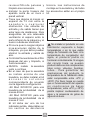
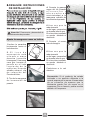
Fit the Hose as Follows:
1. Flp the machne
slowly to the rght
sde.
2. The waste water
ppe is situated at the
right-hand side of the
machine (see the
pcture). A grey hose
connects to the bridge
at the left hand sde of
the machne. Using
pliers, remove the
pipe retaining clip
from the bridge.
3. Pull the hose off the
bridge connection.
4. Attach the black
hose from the kit,
(using the connector
a n d p i p e c l i p s
supplied), to the hose
removed from the
bridge connection.
5. Connect the new
drain hose to the waste
Water pipe.
6. Once the machne s
n place, check the
bottom to ensure that
the new hose does not
kink when pushing the
tum b l e d r y er i nt o
position.
Connect to the mains
electricity supply.
2
3
4
5
6
Cauton: If the product s n dfferent sde,
wat at least 4 hours before swtchng on so
that the ol can flow back nto the
compressor. Falure to do ths could result
n damage to the compressor.

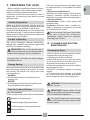
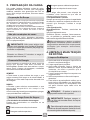
3.
PREPARING THE LOAD
Before usng the tumble dryer for the frst tme:
● Please read this instruction book thoroughly.
● Remove all items packed inside drum.
● Wipe the inside of the drum and door with a
damp cloth to remove any dust whch may have
settled n transt.
Make sure that the laundry you are going to
dry is suitable for drying in a tumble dryer, as
shown by the care symbols on each item.
Check that all fastenings are closed and that
pockets are empty. Turn the articles inside out.
Place clothes loosely in the drum to make sure
that they don't get tangled.
Clothes Preparaton
Do Not Tumble Dry:
Silk, nylon stockings, delicate embroidery,
fabrics with metallic decorations, garments
with PVC or leather trimmings.
IMPORTANT: Do not dry articles which
have been treated with a dry cleaning fluid or
rubber clothes (danger of fire or explosion).
During the last 15 minutes the load is always
tumbled in cool air.
Only put into the tumble dryer laundry which has
been thoroughly wrung or spin-dried. The drier
the laundry the shorter the drying time thus
saving electricity.
ALWAYS
● Check that the filter is clean before every
drying cycle.
NEVER
● Put dripping wet items into the tumble dryer,
this may damage the appliance.
Energy Savng
. .
.
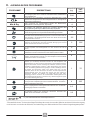
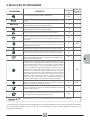
● By care symbols
These can be found on the collar or inside seam:
Suitable for tumble drying.
Tumble drying at high temperature.
Tumble drying at low temperature only.
Do not tumble dry.
Sort the Load as Follows
Do not overload the drum, large tems
wh e n wet e xcee d the m a xmu m
admssble clothes load (for example:
sleepng bags, duvets).
If the item does not have a care label it must
be assumed that it is not suitable for tumble
drying.
● By amount and thickness
Whenever the load is bigger than the dryer
capacity, separate clothes according to
thickness (e.g. towels from thin underwear).
● By type of fabric
Cottons/lnen: Towels, cotton jersey, bed
and table linen.
Synthetcs: Blouses, shirts, overalls, etc.
made of polyester or polyamid, as well as
for cotton/synthetic mixes.
4.
CLEANING AND ROUTINE
MAINTENANCE
WARNING! The Drum, door and load
may be very hot.
IMPORTANT Always switch off and
remove the plug from the electricity supply
before cleaning this appliance.
For electrical data refer to the rating
label on the front of the dryer cabinet (with
the door open).
Cleanng the Dryer
● Clean the filter and empty the water
contaner after every dryng cycle.
● Regularly clean the condenser.
● After each period of use, wipe the inside
of the drum and leave the door open for a
whle to allow crculaton of ar to dry t.
● Wipe the outside of the machine and the
door wth a soft cloth.
● DO NOT use abrasive pads or cleaning
agents.
● To prevent the door sticking or the build
up of fluff clean the nner door and gasket
wth a damp cloth after every dryng cycle.
9
EN

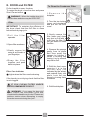
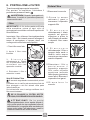
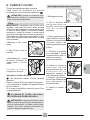
5.
WATER CONTAINER
The water removed from the laundry durng
the dryng cycle s collected n a contaner
nsde the door of the dryer. When the
contaner s full the ndcator on the
control panel wll lght, and the contaner
MUST be empted. However, we recommend
that the contaner s empted after each
dryng cycle.
NOTE: Very little water will collect during the
first few cycles of a new machine as an
internal reservoir is filled first.
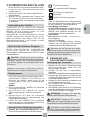
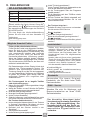
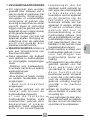
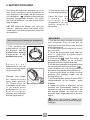
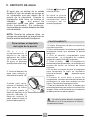
To remove the contaner
tank n door drawer
1. Gently pull out the
water contaner holdng
the handle. (A)
When t s full the
water contaner wll
wegh about 6 kg.
2. T l t t h e w a t e r
contaner to empty the
water out through the
spout. (B)
When empty, replace
the water contaner
back as shown; (C) first
insert the base of the
container into position
as s h o wn (1) then
gentle push the top into
position (2).
3. Press Button to
restart the cycle.
A
B
1
C
10
NOTE: If you have
the opton of dranage
near to the dryer you
c a n u s e t h e
d s c h a r g e k t t o
provde a permanent
dranage for the water
c o l l e c t e d n t h e
contaner of the dryer.
Ths means that you
don't have to empty
the water container.
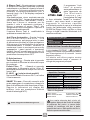
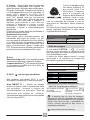
OPERATION
1. Open the door and load the drum
with laundry. Ensure that garments do
not hinder closure of the door.
2. Gently close the door pushing it
slowly until you hear the door 'click'
shut.
3. Turn the Programme Selector dial to
select the required drying programme
(see Programme Guide).
4. Press the button. The dryer will
start automatically and the indicator
above the button will be continuously
lit.
5. If the door is opened during the
programme to check the laundry, it is
necessary to press to recommence
drying after the door has been closed.
6. W h e n t h e c y c l e i s n e a r i n g
completion the machine will enter the
cool down phase, the clothes will be
tumbled in cool air allowing the load to
cool down.
7. Following the completion of the
cycle the drum will rotate intermittently
to m in i m i ze c r e a si n g . Th i s w i ll
continue until the machine is switched
OFF or the door is opened.
8.When the programme is complete
the END indicator will light.
Do not open the door durng the automatc
programs n order to obtan a proper dryng.

6.
DOOR and FILTER
Pull on handle to open the door.
To restart the dryer, close the door and press
Start / Pause button.
WARNING! When the tumble dryer is in
use the drum and door may be VERY HOT.
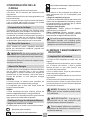
Flter
IMPORTANT: To mantan the effcency of
the dryer check that the fluff flter s clean
before each dryng cycle.
1. P u l l t h e f i l t e r
upwards.
2. Open filter as shown.
3. Gently remove lint
using a soft brush or
your fingertips.
4. S n a p t h e f i l t e r
together and push
back into place.
1
2
Flter Care Indcator
Lghts when the flter needs cleanng.
If the laundry is not drying check that the filter
is not clogged.
IF YOU CLEAN FILTER UNDER
WATER, REMEMBER TO DRY IT.
WARNING! If you open the door mid
cycle, before the cool-down cycle has
completed,the handle may be hot. Please use
extreme caution when attempting to empty
the water reservoir during the cycle.
11
EN
To Clean the Condenser Flter
1. R e m o v e t h e
kickplate.
2. Turn the two locking
levers anti-clockwise
and pull out the front
cover.
3. Gently remove the
flter frame and clean
any dust or fluff with a
cloth from the flter. Do
not use water to clean
the flter.
4. Remove the sponge
gently from ts place
and then wash the
sponge by holding it
under a running tap
turning it so to remove
any dust or fluff.
5. Refit the front cover
ensuring it is in the
c o r r e c t w a y ( a s
indicated by the arrow)
and pushed firmly into
place. Lock the two
levers by turning them
clockwise
6. Refit the kickplate.
1
2
3
4
5

12
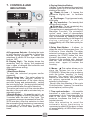
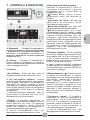
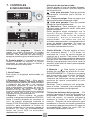
7.
CONTROLS AND
INDICATORS
B
E
C
D
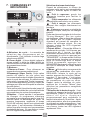
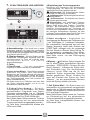
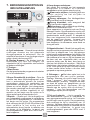
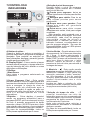
A-Programme Selector - Rotatng the knob
n both drectons t's possble to select the
desred dryng program. To cancel the
selectons or swtch off the dryer rotate the
knob on OFF.
B- Dsplay Dgt - The dsplay shows the
remanng tme for dryng, the postponed
tme n case of delayed start selecton and
other notfcatons settng.
C-Buttons -
1.Start/Pause Button
To start the selected program and/or
suspend t.
2.Super Easy Iron - Ths opton allows to
reduce folds and tangles, thanks to
alternatng movements of the drum durng
and after dryng and automatcally, settng
the ron dryng level (the dryng level settng
can be modfed after the opton selecton)
The opton ca be set up to fve mnutes after
the start of the cycle and s actvated only on
automatc cycles.
3.Rapds Button - It's possble swtch an
automatc program to RAPID program, up to
3 mnutes after the start of the cycle. The
progressve pressure ncreases the tme (30-
45-59 mnutes). After ths selecton to reset
the automatc dyng functonng s necessary
to s w tch off t h e d ryer I n c a se of
ncompatblty, all LEDs flash quckly for 3
tmes.
12
2
3
4
5
6
8
7
A
1
30'
30'
45'
45'
59'
59'
Time Remaining
Time Remaining
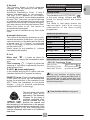
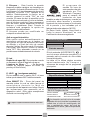
4.Dryng Selecton Button
It allows to set the desred dryness level
edtable opton up to 5 mnutes after the
startng of the cycle:
- Ready to Iron : It leaves the
garments slghtly wet to facltate
ronng.
- Dry Hanger : To get garment ready
to be hang
- Dry wardrobe : For laundry that
can be drectly stored
-Extra-dry : To get completely dry
garments, deal for full load.
Ths applances s equpped wth Dryng
Manager Functon. On automatc
cycles, each level of ntermedate
dryng, pror to the reachng the selected
one, s ndcated by flashng the lght
ndcator correspondng to the degree of
d r y n g r e a c h e d I n c a s e o f
ncompatblty, all LEDs flash quckly for
3 tmes.
5.Delay Start Button - It allows to
delay the start of the program from 1 to
24 hours n 1-hour ntervals. The delay
selected s shown on the dsplay. After
pressng the START button the tme
showed decrease hour after hour.
Openng of the porthole wth delayed
start set, after re-closng the porthole,
press start agan to resume the
countng.
6. Memo - Ths opton allows you to
store the optons set on a cycle.
STORAGE > When the cycle s runnng
push the button "memory" for three
seconds. The control lght "memory"
flashes for three tmes and stores the
set optons connected to the cycle
selected n the flange. .
Recall: After the selecton of the cucle
Push the button "memory" for recall the
stored optons (not the cycle)
7.Tme cycle selecton - It's possble
transform a cycle from automatc to
programmed, up to 3 mnutes after the
start of the cycle. The progressve
pressure ncreases the tme n 10-
mnute ntervals.
After ths selecton to reset the
automatc dy n g f u n c t o n n g s
necessary to swtch off the dryer In case
of ncompatblty, all LEDs flash quckly
for 3 tmes.

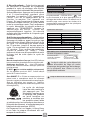
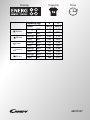
Dryng Gude
The standard cycle COTTON DRY ( )
s the most energy effcent and best
suted for dryng normal wet cotton
laundry.
The table n last page shows the
a p p r o x m a t e t m e a n d e n e r g y
consumpton of the man dryng
programmes.
Technical Specifications
Drum capacty 115
Maxmum load See energy label
Heght 85 cm
Wdth 60 cm
Depth 60 cm
Energy class See energy label
EN 61121 Programme To Use
-DRY COTTON
- COTTON OR
-COTTON OR WHITES
-DELICATES OR SYNTHETIC
-IRON DRY COTTON
-EASY-CARE TEXTILE
Informaton for Test Laboratory
13
Max.capacty declared
Max.4 Kg
Maxmum Dryng Weght
Cottons
Synthetcs or Delcates
The real duraton of dryng cycle
depends by the startng humdty level of
the laundry due to spn speed, type and
amount of load, cleanlness of flters and
ambent temperature.
EN
Power consumpton of off-mode 0,40 W
Power consumpton of on-mode 0,80 W
D- Led
Water tank - It lghts up when t's
necessary to empty the condensate water
tank.
Flter cleanng - It lghts up when the
cleanng of the flters s requested (the door
and the lower flter.)
E- WI-FI (some models only)
In the models with the Wi-Fi option, the icon
indicates that the Wi-Fi system is working.
SMART F+ area - There s an apposte place
n the bezel on whch lay the smartphone
durng the enrollment of the machne to the
APP. Follow the ndcatons on the phone
dsplay. ( only for Androd smartphone
equpped wth NFC technology)
The wool dryng cycle of ths
m a c h n e h a s b e e n
approved by The Woolmark
Company for the dryng of
machne washable wool
products provded that the
products are washed and
dred accordng to the nstructons on the garment
label and those ssues by the manufacturer of ths
machne. M1530. In UK, Ere, Hong Kong and
Inda the Woolmark trade mark s a Certfcaton
trade mark.
8. Keylock
Ths functon allows to block unwanted
changes of the set optons on the bezel ,
durng dryng phase.
Actvaton/ Inactvaton: Push 4 and 5
buttons smultaneously for two seconds .
The sgn "LOC" appears on the dsplay.
Unlockng the opton, on the dsplay appears
the sgn "Unl", only once. In case of openng
of 'porthole' wth actvated key lock, the cycle
stops but the lock s kept: to restart the cycle,
you must remove the lock and restore Start.
When the dryer s off, the opton s
automatcally nactvated.
Key lock can be modfed at any tme of the
cycle.
Automatc Ant crease
Ths opton automatcally actvates an ant-
creases movement of the drum, pre cycle n
case of actvaton of the delay and at the end
of dryng cycle for 6 hours. It s actvated
every 10 mnutes. To stop the movements
set the knob to OFF
Useful when t's not possble to remove
mmedately the laundry.
Clean the flters before every cycle

14
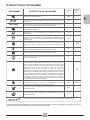
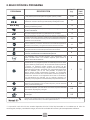
8.
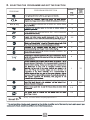
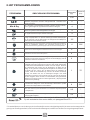
SELECTING THE PROGRAMME AND SET THE FUNCTION
PROGRAM
PROGRAM DESCRIPTION
6
Full
4
4
2.5
4
4
4
4
1
4
6
2.5
2.5
*
*
*
*
*
*
*
*
*
70’
220’
220’
*
*
Mx & Dry
Poston that you have to select when you want to enable remote control through the App (va
W-F). For more detals, see paragraph Smart F +

15
EN
SMART Fi+
Ths applance s equpped wth SMART Fi+
technology that allows you to control t
remotely va App, thanks to W-F functon.
MACHINE ENROLLMENT (ON APP)
●Download the Candy simply-Fi App on
your devce.
Using an Android smartphone equipped
with NFC technology (Near Field
Communication), the enrollment
process is simplified (Easy Enrollment);
in this case, follow the instructions on
the phone display, PLACE AND KEEP IT
NEAR the SMART Fi+ logo on the
machine dashboard, when requested to
do so by the App.
NOTES:
If you do not know the position of
your NFC antenna, slightly move the
smartphone in a circular motion
over the SMART Fi+ logo until the
App confirms the connection. In
order for the data transfer to be
successful, it is essential TO KEEP
T H E S M A R TP H O N E O N T H E
DASHBOARD DURING THESE THE
F E W S E C O N D S O F T H E
PROCEDURE; a message on the
device will inform about the correct
outcome of the operation and advise
you when it is possible to move the
smartphone away.
Thick cases or metallic stickers on
your smartphone could affect or
prevent the transmission of data
between machine and telephone. If
necessary, remove them.
T h e r e p l a c e m e n t o f s o m e
components of the smartphone (e.g.
back cover, battery, etc...) with non-
original ones, could result in the NFC
antenna removal.
ENABLE REMOTE CONTROL (VIA
APP)
After the machine enrollment, every time
you want to manage it remotely through the
App, firstly you have to load the laundry, the
detergent, close the door and select the
SMART FI+ position on the machine. From
that moment on you can manage it through
the App commands.
The Candy simply-Fi App s avalable for
devces runnng both Androd and OS, both
for tablets and for smartphones.
Get all the details of the SMART Fi+
functions by browsing the App in
DEMO mode.
● Open the App, create the user profle and
enroll the applance followng the nstructons
on the devce dsplay or the "Quick Guide"
attached on the machne.
Place your smartphone so that the NFC
antenna on its back matches the
position of the SMART Fi+ logo on the
appliance (as illustred below).
WIRELESS PARAMETERS
Wreless Standard
802.11 b/g/n
Frequency range
Max Trasmt Power
2,412 GHz. - 2,484 GHz
Parameter
Specfcatons
Mnmum Recevng Senstvty
802.11b (11Mbps) +18,5 ± 2 dBm
802.11g (54Mbps)
+16 ± 2 dBm
802.11n (HT20, MCS7)
+14 ± 2 dBm
802.11b (11Mbps)
-93 dBm
802.11g (54Mbps)
-85 dBm
802.11n (HT20, MCS7)
82 dBm
Note: In case of door openng wth remote
controll on, to restore the connecton wth the
App, close the porthole and press start. The
cycle wll resume from where t stopped.

16
9.
TROUBLESHOOTING
The dryer s nosy…
● Switch off the dryer and contact GIAS
Service for advice.
The Indcator s on…
● Does the filter need cleaning?
The Indcator s on…
● Does the water container need
emptying?
CUSTOMER SERVICE
Should there stll be a problem wth your
d r y e r a f te r c om p l e t n g a ll t h e
recommended checks, please call
servce for advce.
They may be able to assst you over the
telephone or arrange for a sutable
appontment for an engneer to call under
the terms of your guarantee. However, a
charge may be made f any of the
followng apples to your machne:
● Is found to be in working order.
● Has not been installed in accordance
with the nstallaton nstructons.
● Has been used incorrectly.
Spares
Servce
Always use genuine spares, available
direct from service.
For service and repairs call your local
service engineer.
The manufa cturer decli nes all
responsibility in the event of any
printing mistakes in this booklet. The
manufacturer also reserves the right
to make appropriate modifications to
its products without changing the
essential characteristics.
● Is there a power failure?
● Has the fuse blown?
● Is the door fully closed?
● Is the dryer switched on, both at the mains
supply and at the machine?
● Has the drying time or the programme
been selected?
● Has the machine been switched on again
after opening the door?
What Mght be the Cause of...
Defects you can remedy yourself
Before callng servce for techncal advce please
run through the followng checklst. A charge wll
be made f the machne s found to be workng or
has been nstalled ncorrectly or used ncorrectly.
If the problem perssts after completng the
recommended checks, please call Servce, they
may be able to assst you over the telephone.
Tme dsplay to end could change durng
dryng cycle. The tme to end s contnuously
checked durng the dryng cycle and the tme
s adjusted to gve the best estmaton tme.
The dsplayed tme may ncrease or decrease
durng the cycle and ths s normal.
Dryng tme s too long/clothes are not dry
enough…
● Have you selected the correct drying
time/programme?
● Were the clothes too wet? Were the clothes
thoroughly wrung or spindried?
● Does the filter need cleaning?
● Is the dryer overloaded?
The dryer does not operate…
● Is there a working electricity supply to the
dryer? Check using another appliance such as a
table lamp.
● Is the plug properly connected to the mains
supply?
WIRELESS PARAMETERS
Wth ths the Candy Hoover Group Srl,
declares that ths applance marked wth
comples wth the essental requrements of
the Drectve 2014/53/EU.
To receve a copy of the declaraton of
c o n f o r m t y, p l e a s e c o n t a c t t h e
manufacturer at: www.candy-group.com
Wreless Standard
ISO/IEC 14443 Type A and NFC Forum Type 4
Frequency band
Magnetc feld lmt
13,553-13,567 MHz (centre frequency 13,560 MHz)
< 42dBμA/m (at 10 meters)
Parameter
Specfcatons

17
Index
Veullez lre et suvre ces nstructons avec
son et utlser la machne en conséquence.
Ce lvret content des nstructons mportantes
sur la sécurté d'utlsaton, l'nstallaton et
l'entreten de la machne, ans que des
consels utles pour obtenr les melleurs
résultats possbles lors de son utlsaton.
Conservez toute la documentation dans un
endroit sûr pour pouvoir vous y reporter à une
date ultérieure ou la transmettre aux
prochains propriétaires
Vérifiez que les articles suivants ont bien été
livrés avec l’appareil :
● Manuel d'utilisation
● Carte de garantie
● Étiquette d'énergie
En utlsant le symbole sur ce produt,
n o u s d é c l a r o n s s u r n o t r e p r o pr e
responsablté que ce produt est conforme à
toutes les normes européennes relatves à la
sécurté, la santé et à l'envronnement.
Vérifiez que la machine ne s'est pas
détériorée en transit. Si c'est le cas, contactez
GIAS pour une opération de dépannage. Le
non-respect de ces instructions peut
compromettre la sécurité de votre appareil. Un
appel de service peut vous être facturé si la
défaillance de votre appareil est causée par
une mauvaise utilisation.
1. RAPPELS DE SÉCURITÉ
2. KIT TUYAU D'ÉVACUATION:
INSTRUCTIONS DE MONTAGE
3. PRÉPARATION DE LA CHARGE
4. NETTOYAGE ET ENTRETIEN DE
ROUTINE
5. RÉSERVOIR D’EAU
6. PORTE ET FILTRE
7. COMMANDES ET INDICATEURS
8. SÉLECTION DU PROGRAMME
9. DÉPISTAGE DE PANNES & SERVICE
CLIENTÈLE
FR

1.
RAPPELS DE SÉCURITÉ
Cet apparel peut être utlsé par
des enfants âgés de 8 ans et
pl us, o u d es p er so nn es
p ré s en t an t u n han d c a p
physque, moteur ou mental, et
manquant de connassance sur
l’utlsaton de l’apparel, s elles
sont sous la survellance d’une
p e r s o n n e , d o n n a n t d e s
nstructons pour une utlsaton
en toute sécurté de l’apparel.
Les enfants ne dovent pas
jouer avec l'apparel.
Le nettoyage et l’entreten de
l’apparel ne dot pas être fat
p a r d e s e n f a n t s s a n s
survellance d’un adulte.
ATTENTION La mauvaise
utilisation d’un sèche-linge
risque de causer un incendie.
Le produt est conçu pour être
u t l s é d a n s u n f o y e r
domestque, comme - Le con
cusne dans des magasns ou
des leux de traval,
- Employés et clents dans un
hôtel, un motel ou résdence de
ce type,
- Dans des bed and breakfast,
- Servce de stock ou smlare,
mas pas pour de la vente au
détal.
La durée de ve de l’apparel
peut être rédute ou la garante
d u f a b r c a nt a n n u l é e s
l’apparel n’est pas utlsé
correctement.
Tou t d om mag e o u p er te
résultant d'un usage qu n'est
pas conforme à un usage
domestque (même s'ls sont
s t u é s d a n s u n
envronnement domestque
ou un ménage) ne sera pas
acceptée par le fabrcant
d an s to u t e l a m e s ur e
permse par la lo.
Cette machine est conçue
uni qu em en t p ou r usa ge
domestique, à savoir pour
sécher le linge domestque
et les vêtements.
Cette machine ne doit être
utilisée que pour l’emploi
auquel elle est destinée et
qu i e st dé cr t d an s c e
manuel.
Assurez-vous d'avor ben
comprs les nstructons
d'nstallaton et d'utlsaton
avant de fare fonctonner la
machne.
Ne touchez pas la machine
si vous avez les mains ou les
pieds mouillés ou humides.
Ne vous appuyez pas sur la
porte lorsque vous chargez
la machine et n'utilisez pas la
porte pour soulever ou
déplacer la machne.
Ne laissez pas des enfants
jouer avec la machine ou
avec ses commandes.
ATTENTION N’utilisez pas
cette machine si le filtre à
peluches n’est pas en place
ou s’il est endommagé ; les
peluches rsquent en effet de
s'enflammer.
18
●
●
●
●
●
●
●
●
●

ATTENTION L’augmentation de
t e m pér a t u r e p e n d a n t l e
fonctionnement du sèche-lnge
peut être supéreure à 60°C là
où se trouve le symbole de
surface chaude .
Débranchez le courant du
secteur. Retirez toujours la prise
avant de nettoyer la machine.
Cessez d’utiliser la machine si
elle semble défectueuse.
Veillez à ce que les peluches ne
puissent pas s’accumuler sur le
sol, à l’extérieur de la machne.
Il se peut que l’intérieur du
tambour soit très chaud. Veillez
à ce que le sèche-linge termine
son cycle de refroidissement
avant d’en sortir le linge.
La dernière partie du cycle
s'effectue à frod (cycle de
refrodssement)pour garantr la
préservaton des textles.
AVERTISSEMENT: Le sèche-
lnge ne dot pas être utlsé s le
lavage a été effectué avec des
produts chmques.
AVERTISSEMENT: Ne jamas
arrêter le sèche-lnge avant la fn
du cycle de séchage à condton
que les éléments sont retirés
rapdement et réparts de telle
sorte que la chaleur pusse se
dssper.
Installez l'arrère de l'apparel
près d'un mur ou d'une surface
vertcale.
Charge maxmum pour le
séchage:Se reporter à l'étquette
énergétque.
Installation
●N'utilisez pas d'adaptateurs,
de multi-prises et/ou de
rallonges.
●Veillez à ne pas installer le
sèche-linge contre des rideaux
et assurez-vous que rien ne
puisse tomber ou s’accumuler
derrière le sèche-linge.
●Cet appareil ne doit pas être
installé derrière une porte
verrouillable, une porte
coulissante ou une porté
munie de gonds placée en
face de la porte du sèche-
linge.
19
●
●
●
●
●
●
●
●
●
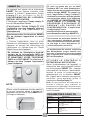
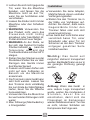
Im por tan t : P end ant l e
transport, l’apparel dot être
stocké dans sa poston
normale d’utls aton. S
nécessare, l’apparel peut être
nclné comme montré c-
dessous.
Attenton : S le produt est
transporté dfféremment,
attendez au mons 4 heures
avant d’allumer l’apparel, cec
afn que le gaz lqude retourne
dans le compresseur. En cas
de non respect de cette
procédure, le compresseur
pourrat être endommagé
FR

20
Ne séchez pas des vêtements non
lavés dans le sèche-linge.
ATTENTION NE séchez PAS les
tissus qui ont été traités avec des
liquides de nettoyage à sec.
ATTENTION Quand elles sont
c h a u f f é e s , l e s m o u s s e s
alvéolaires peuvent dans certains
cas brûler par combuston
spontanée Les artcles en mousse
caoutchouc (mousse de latex), les
bonnets de douche, le textle
m p e r m éable, les artcles
caoutchoutés et les vêtements ou
coussns rembourrés de mousse
caoutchouc NE DOIVENT PAS
être séchés dans le sèche-lnge.
Reportez-vous toujours aux
étiquettes d’entretien du linge pour
vérifier le mode de séchage
recommandé.
Le s vêtemen ts doiven t être
essorés en machine ou à la main
avant d’être placés dans le sèche-
ln ge . L es vê te me nt s q u
dégoulnent NE DOIVENT PAS
être ms dans le sèche-lnge.
Enlevez les briquets et les
allumettes des poches et veillez à
ne JAMAIS utiliser des liquides
nflammables à proxmté de la
machne.
Les rideaux en fibres de verre ne
doivent JAMAIS être placés dans
cette machine. La contamnaton
d’autres vêtements par les fbres
de verre peut entraîner des
rrtatons de la peau.
Les articles qui ont été souillés par
des substances telles que huile de
cuisson, acétone, alcool, pétrole,
kérosène, produt ant-taches,
térébenthne, cre et décapant pour
Le Linge
cre dovent être lavés à l'eau
chaude avec une quantté
supplémentare de détergent
avant d'être séchés dans le
sèche-lnge.
Les agents adoucissants, et
autres produits similaires,
d o i v e n t ê t r e u t i l i s é s
conformément aux nstructons
fournes par le fabrcant du
produt.
Ventlaton
La pièce où se trouve le sèche-
linge doit avoir une ventilation
adéquate de manière à ce que
les gaz des appareils qui
brûlent d’autres combustibles,
y compris les cheminées, ne
soient pas attirés dans la pièce
pendant que le sèche-linge est
en marche
Installez l'arrère de l'apparel
près d'un mur ou d'une surface
vertcale.
Il dot y avor un espace
mnmum de 12 mm entre la
ma c h n e e t q u e l conque
obstacle. L'entrée et la sorte
d'ar dovent être dégagées.
Pour assurer une ventlaton
adéquate, l'espace entre le
bas de la machne et le sol ne
dot pas être obstrué.
L’air d’échappement ne doit
pas être évacué par un condut
qu est également utlsé pour
é v a c u e r l e s f u m é e s
d’échappement d’apparels
qu brûlent du gaz ou d’autres
combustbles.
●
●
●
●
●
●
●
●
●
●
●
●
●
La pagina si sta caricando...
La pagina si sta caricando...
La pagina si sta caricando...
La pagina si sta caricando...
La pagina si sta caricando...
La pagina si sta caricando...
La pagina si sta caricando...
La pagina si sta caricando...
La pagina si sta caricando...
La pagina si sta caricando...
La pagina si sta caricando...
La pagina si sta caricando...
La pagina si sta caricando...
La pagina si sta caricando...
La pagina si sta caricando...
La pagina si sta caricando...
La pagina si sta caricando...
La pagina si sta caricando...
La pagina si sta caricando...
La pagina si sta caricando...
La pagina si sta caricando...
La pagina si sta caricando...
La pagina si sta caricando...
La pagina si sta caricando...
La pagina si sta caricando...
La pagina si sta caricando...
La pagina si sta caricando...
La pagina si sta caricando...
La pagina si sta caricando...
La pagina si sta caricando...
La pagina si sta caricando...
La pagina si sta caricando...
La pagina si sta caricando...
La pagina si sta caricando...
La pagina si sta caricando...
La pagina si sta caricando...
La pagina si sta caricando...
La pagina si sta caricando...
La pagina si sta caricando...
La pagina si sta caricando...
La pagina si sta caricando...
La pagina si sta caricando...
La pagina si sta caricando...
La pagina si sta caricando...
La pagina si sta caricando...
La pagina si sta caricando...
La pagina si sta caricando...
La pagina si sta caricando...
La pagina si sta caricando...
La pagina si sta caricando...
La pagina si sta caricando...
La pagina si sta caricando...
La pagina si sta caricando...
La pagina si sta caricando...
La pagina si sta caricando...
La pagina si sta caricando...
La pagina si sta caricando...
La pagina si sta caricando...
La pagina si sta caricando...
La pagina si sta caricando...
La pagina si sta caricando...
La pagina si sta caricando...
La pagina si sta caricando...
La pagina si sta caricando...
La pagina si sta caricando...
La pagina si sta caricando...
La pagina si sta caricando...
La pagina si sta caricando...
La pagina si sta caricando...
La pagina si sta caricando...
La pagina si sta caricando...
La pagina si sta caricando...
La pagina si sta caricando...
La pagina si sta caricando...
La pagina si sta caricando...
La pagina si sta caricando...
La pagina si sta caricando...
La pagina si sta caricando...
La pagina si sta caricando...
La pagina si sta caricando...
La pagina si sta caricando...
La pagina si sta caricando...
La pagina si sta caricando...
La pagina si sta caricando...
La pagina si sta caricando...
La pagina si sta caricando...
La pagina si sta caricando...
-
 1
1
-
 2
2
-
 3
3
-
 4
4
-
 5
5
-
 6
6
-
 7
7
-
 8
8
-
 9
9
-
 10
10
-
 11
11
-
 12
12
-
 13
13
-
 14
14
-
 15
15
-
 16
16
-
 17
17
-
 18
18
-
 19
19
-
 20
20
-
 21
21
-
 22
22
-
 23
23
-
 24
24
-
 25
25
-
 26
26
-
 27
27
-
 28
28
-
 29
29
-
 30
30
-
 31
31
-
 32
32
-
 33
33
-
 34
34
-
 35
35
-
 36
36
-
 37
37
-
 38
38
-
 39
39
-
 40
40
-
 41
41
-
 42
42
-
 43
43
-
 44
44
-
 45
45
-
 46
46
-
 47
47
-
 48
48
-
 49
49
-
 50
50
-
 51
51
-
 52
52
-
 53
53
-
 54
54
-
 55
55
-
 56
56
-
 57
57
-
 58
58
-
 59
59
-
 60
60
-
 61
61
-
 62
62
-
 63
63
-
 64
64
-
 65
65
-
 66
66
-
 67
67
-
 68
68
-
 69
69
-
 70
70
-
 71
71
-
 72
72
-
 73
73
-
 74
74
-
 75
75
-
 76
76
-
 77
77
-
 78
78
-
 79
79
-
 80
80
-
 81
81
-
 82
82
-
 83
83
-
 84
84
-
 85
85
-
 86
86
-
 87
87
-
 88
88
-
 89
89
-
 90
90
-
 91
91
-
 92
92
-
 93
93
-
 94
94
-
 95
95
-
 96
96
-
 97
97
-
 98
98
-
 99
99
-
 100
100
-
 101
101
-
 102
102
-
 103
103
-
 104
104
-
 105
105
-
 106
106
-
 107
107


Candy GVSF H8A3TCEX-S Manuale utente
- Categoria
- Asciugatrici elettriche
- Tipo
- Manuale utente
- Questo manuale è adatto anche per
Documenti correlati
Altri documenti
-
Hoover DX C10DCE-EGY Manuale utente
-
Arlo Essential Outdoor Camera 2nd Gen 2K (VMC3050) Guida Rapida
-
-
Samsung DV50K8600EW/A3 Guida utente
-
Electrolux TWGL4E200 Manuale utente
-
Electrolux TW5457F Manuale utente
-
-
Siemens WT7YH709ES/17 Manuale utente
-
Bosch WTYH6790GB Manuale utente
-