Xerox VersaLink C7020/C7025/C7030 Guida utente
- Tipo
- Guida utente
La pagina si sta caricando...

2
www.xerox.com/office/
VLC
70xxsupport
FR
IT
DE
NL
EN
FR
EN
Contents
Sommaire
Sommario
Inhalt
Inhoud
Printer Basics ............................................................... 3
Fonctions standard de l’imprimante
Informazioni di base sulla stampante
Druckergrundlagen
Basisbeginselen van de printer
FR
EN
Copying.......................................................................12
Copie
Copia
Kopieren
Kopiëren
FR
EN
Printing......................................................................... 8
Impression
Stampa
Drucken
Afdrukken
Printer Tour...................................................................3
Tour d’horizon de l’imprimante
Panoramica della stampante
Drucker im Überblick
Printerrondleiding
FR
EN
Control Panel................................................................4
Panneau de commande
Pannello comandi
Steuerpult
Bedieningspaneel
FR
EN
Embedded Web Server...............................................5
Serveur Web intégré
Server web integrato
Integrierter Webserver
Interne webserver
FR
EN
Customizing Your Workflow......................................6
Personnalisation de votre flux de travail
Personalizzazione del flusso di lavoro
Anpassen des Workflows
Uw werkstroom aanpassen
FR
EN
Supported Papers........................................................8
Papier pris en charge
Carta supportata
Unterstütztes Material
Ondersteund papier
FR
EN
Basic Printing .............................................................. 9
Impression standard
Stampa di base
Einfacher Druckbetrieb
Afdrukken - Basis
FR
EN
Printing from a USB Flash Drive............................10
Impression depuis une clé USB
Stampa da un unità flash USB
Drucken von USB-Datenträger
Afdrukken vanaf een USB-stick
FR
EN
Basic Copying............................................................12
Copie standard
Copia di base
Einfacher Kopierbetrieb
Kopiëren - Basis
FR
EN
FR
EN
Scanning.....................................................................13
Numérisation
Scansione
Scannen
Scannen
FR
ES
PT
EN
FR
EN
Faxing..........................................................................18
Télécopie
Fax
Faxen
Faxen
FR
EN
Troubleshooting........................................................20
Dépannage
Problemi e soluzioni
Fehlerbehebung
Problemen oplossen
Paper Jams.................................................................20
Incidents papier
Inceppamenti carta
Materialstaus
Papierstoringen
FR
EN
FR
EN
More Information: Back cover
Informations supplémentaires – Couverture fin
Ulteriori informazioni: copertina posteriore
Weitere Informationen – Rückseite
Meer informatie - achteromslag
Using the Scan To App ............................................14
Utilisation de l’application Numérisation
Utilizzo dell'app Scansione su
Verwenden der Scanausgabe-App
Gebruik van de app Scannen naar
FR
EN
Scanning to Email....................................................16
Numérisation courriel
Scansione su e-mail
Scanausgabe: E-Mail
Scannen naar e-mail
FR
EN
Scanning to a Default Folder..................................17
Numérisation vers un dossier par défaut
Scansione in una cartella predefinita
Scanausgabe in Standardordner
Scannen naar een standaardmap
FR
EN
Scanning to a USB Flash Drive...............................15
Numérisation depuis une clé USB
Scansione su un'unita flash USB
Scanausgabe an USB-Datenträger
Scannen naar een USB-stick
Basic Faxing...............................................................19
Télécopie standard
Funzioni fax di base
Einfacher Faxbetrieb
Faxen - Basis
FR
EN
Printing Jobs Stored on the Printer.......................11
Impression de travaux stockés sur l’imprimante
Stampa di lavori memorizzati sulla stampante
Drucken gespeicherter Aufträge
Op de printer opgeslagen opdrachten afdrukken
FR
EN
IT
DE
IT
DE
IT
DE
IT
DE
IT
DE
IT
DE
IT
DE
IT
DE
IT
DE
IT
DE
IT
DE
IT
DE
IT
DE
IT
DE
IT
DE
IT
DE
IT
DE
IT
DE
IT
DE
IT
DE
IT
DE
NL
NL
NL
NL
NL
NL
NL
NL
NL
NL
NL
NL
NL
FR
IT
DE
NL
EN
NL
NL
NL
NL
NL
NL
NL
NL

3
www.xerox.com/office/
VLC
70xxsupport
3ULQWHU%DVLFV
6
2
1
2
3
3
4
4
1
2
1
2
1
2
1
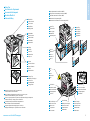
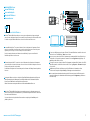
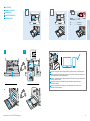
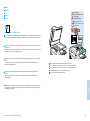
Waste Cartridge
Bac de récupération
Contenitore residui
Sammelbehälter
Afvalcontainer
EN
FR
IT
DE
Transfer Belt
Courroie de transfert
Cinghia di trasferimento
Übertragungsband
Afdrukband
EN
FR
IT
DE
Printer Tour
Tour d’horizon de l’imprimante
Panoramica della stampante
Drucker im Überblick
Printerrondleiding
FR
EN
IT
DE
NL
Work Surface
Surface de travail
Piano di lavoro
Ablagefläche
Werkoppervlak
EN
FR
Booklet Maker
Plieuse/brocheuse
Stazione libretto
Booklet Maker
Katernmodule
EN
FR
USB Port
Port USB
Porta USB
USB-Anschluss
USB-poort
EN
FR
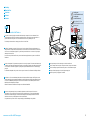
Optional accessories may be part of your printer setup.
See the User Guide for more information.
Votre configuration d'imprimante peut inclure des accessoires en option.
Consultez le Guide de l'utilisateur pour plus d'informations.
Gli accessori opzionali potrebbero fare parte della configurazione della propria stampante.
Consultare la Guida per l'utente per ulteriori informazioni.
Der Drucker kann mit optionalem Zubehör ausgestattet sein.
Weitere Informationen siehe Benutzerhandbuch.
Uw printerconfiguratie bevat mogelijk optionele accessoires.
Raadpleeg de Handleiding voor de gebruiker voor meer informatie.
EN
FR
Finishers
Modules de finition
Stazioni di finitura
Finisher
Afwerkeenheden
EN
FR
Envelope Tray
Magasin pour enveloppes
Vassoio buste
Umschlagbehälter
Enveloppenlade
EN
FR
IT
DE
IT
DE
IT
DE
IT
DE
IT
DE
IT
DE
NL
NL
NL
NL
NL
NL
Reversing Automatic Document Feeder (RADF)
Chargeur-inverseur automatique de documents (RADF)
Alimentatore automatico fronte/retro (DADF)
Automatischer Vorlageneinzug (AVE)
Automatische documentinvoer met omkeerrichting (AODO)
EN
FR
IT
DE
NL
Output Trays
Bacs récepteurs
Vassoi di uscita
Ausgabefächer
Opvangbakken
EN
FR
Bypass Tray
Départ manuel
Vassoio bypass
Zusatzzufuhr
Handmatige invoer
EN
FR
IT
DE
IT
DE
NL
NL
Trays 1–6
Magasins 1-6
Vassoi 1–6
Behälter 1–6
Lade 1–6
EN
FR
IT
DE
NL
Fuser
Four
Fusore
Fixieranlage
Fuser
EN
FR
IT
DE
NL
Transfer Roller
Rouleau de transfert
Rullo di trasferimento
Übertragungswalze
Transferrol
EN
FR
IT
DE
NL
Toner Cartridges
Cartouches de toner
Cartucce toner
Tonerpatronen
Tonercassettes
EN
FR
IT
DE
NL
Drum Cartridges
Modules photorécepteurs
Cartucce fotoricettore
Trommeleinheiten
Afdrukmodules
EN
FR
IT
DE
NL
NL
NL

4
www.xerox.com/office/VLC70xxsupport
3ULQWHU%DVLFV
1 2 3
4
6
7
5
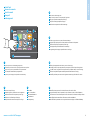
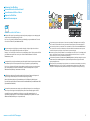
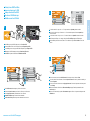
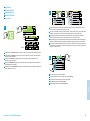
Control Panel
Panneau de commande
Pannello comandi
Steuerpult
Bedieningspaneel
FR
EN
IT
DE
NL
1
Log in for special access and customizing your experience.
Connectez-vous pour obtenir un accès spécial et personnaliser votre expérience.
Login per accesso speciale e personalizzazione dell'esperienza utente.
Für Sonderzugriff und individuelle Anpassung anmelden.
Log in voor speciale toegang en het personaliseren van uw ervaring.
EN
FR
IT
DE
NL
3
Power/Wake
Mise sous tension/Réveil
Alimentazione/Riattivazione
Betrieb/Aktivieren
Voeding/activering
EN
FR
2
Reset clears settings for all apps.
Réinitialiser supprime les paramètres de toutes les applications.
Annulla la cancellazione delle impostazioni per tutte le app.
„Zurücksetzen“ löscht Einstellungen für alle Apps.
Met Opnieuw instellen wist u alle instellingen voor alle apps.
EN
FR
IT
DE
IT
DE
NL NL
NL
7
Status LED indicates printer status. For detailed information, refer to the User Guide.
Le voyant d’état indique l’état de l’imprimante. Pour plus informations, consultez le Guide de l’utilisateur.
Il LED di stato indica lo stato della stampante. Per ulteriori informazioni, fare riferimento alla Guida per l'utente.
Status-LED gibt Druckerstatus an. Weitere Informationen siehe Benutzerhandbuch.
Status-LED duidt de printerstatus aan. Voor uitgebreide informatie raadpleegt u de Gebruikershandleiding.
EN
FR
4
Home returns to the main app screen.
Page d’accueil pour revenir sur l’écran principal de l’application.
Home page riporta alla schermata principale dell'app.
Mit „Home“ wird das App-Hauptfenster angezeigt.
Met Home keert u terug naar het hoofdscherm van de app.
EN
FR
5
The Device app provides access to printer information and settings.
L’application du périphérique donne accès aux paramètres et informations de l’imprimante.
Annulla la cancellazione delle impostazioni per tutte le app.
Geräte-App bietet Zugriff auf Druckerdaten und -einstellungen.
De apparaat-app biedt toegang tot printerinformatie en -instellingen.
EN
FR
6
NFC Area allows pairing with a mobile device to print or scan from an app.
La zone NFC permet de coupler un appareil mobile pour imprimer ou numériser à partir d’une application.
L'area NFC consente l'accoppiamento a un dispositivo mobile per effettuare stampe o scansioni da un'app.
NFC-Bereich ermöglicht Paarung mit einem Mobilgerät zum Drucken/Scannen aus einer App.
In het NFC-gebied kunt u paren met een mobiel apparaat om vanuit een app af te drukken of te scannen.
EN
FR
IT
DE
IT
DE
IT
DE
IT
DE
NL
NL
NL

5
www.xerox.com/office/
VLC
70xxsupport
3ULQWHU%DVLFV
www.xerox.com/office/VLC70xxdocs
3
http://xxx.xxx.xxx.xxx
1 2
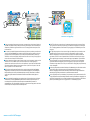
Embedded Web Server
Serveur Web intégré
Server web integrato
Integrierter Webserver
Interne webserver
FR
EN
IT
NL
DE
EN
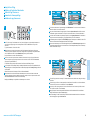
The Xerox
®
Embedded Web Server enables you to access printer configuration details, paper and supplies
status, job status, and diagnostic functions over a network. You can also manage fax, email, and address books.
For details on using the Embedded Web Server, refer to the User Guide located on Xerox.com.
FR
Le serveur Web intégré Xerox
®
vous permet d’obtenir les détails de configuration de l’imprimante, l’état du
papier, des consommables, et des travaux, ainsi que des fonctions de diagnostic sur un réseau. Vous pouvez
également gérer les télécopies, le courrier électronique et les carnets d’adresses.
Pour de plus amples informations sur l’utilisation du serveur Web intégré, reportez-vous au Guide de
l’utilisateur disponible sur le site Xerox.com.
IT
Il Server web integratodi Xerox
®
consente di accedere alle informazioni di configurazione della stampante,
allo stato della carta e dei materiali di consumo, allo stato dei lavori e alle funzioni di diagnostica su una rete.
È inoltre possibile gestire fax, e-mail e rubriche.
Per informazioni dettagliate su sul Server web integrato, fare riferimento alla Guida per l'utente disponibile su
Xerox.com.
DE
Der integrierte Webserver von Xerox
®
ermöglicht den Zugriff auf Druckerkonfigurationsdetails, Papier- und
Verbrauchsmaterialstand, und Auftragsstatus sowie Diagnosefunktionen über ein Netzwerk. Außerdem
können Fax- und E-Mail-Betrieb sowie Adressbücher verwaltet werden.
Weitere Informationen zum integrierten Webserver siehe Benutzerhandbuch auf Xerox.com.
NL
Met de Xerox
®
Embedded Web Server krijgt u via een netwerk toegang tot de configuratiegegevens van de
printer, de status van papier en verbruiksartikelen, de opdrachtstatus en diagnostische functies. U kunt tevens
fax, e-mail en adresboeken beheren.
Voor meer informatie over het gebruik van de Interne webserver raadpleegt u de Handleiding voor de
gebruiker op Xerox.com.
EN
FR
To connect, in a Web browser, type the printer IP address. The network IPv4 address is available on the control
panel touch screen. Touch Device app > About, then scroll down.
Pour vous connecter, saisissez l’adresse IP de l’imprimante dans un navigateur Web. L’adresse IPv4 du réseau
est disponible sur l’écran tactile du panneau de commande. Sélectionnez Application du périphérique > À
propos de, puis faites défiler vers le bas.
Per eseguire la connessione, digitare l'indirizzo IP della stampante in un browser Web. L'indirizzo di rete IPv4 è
disponibile sul pannello comandi dello schermo sensibile. Toccare l'app Dispositivo > Informazioni su, quindi
scorrere in basso.
Im Webbrowser die IP-Adresse des Druckers eingeben. Die IPv4-Adresse des Netzwerks ist auf dem
Touchscreen des Steuerpults verfügbar. Geräte-App > Info antippen und nach unten blättern.
Als u in een webbrowser verbinding wilt maken, typt u het IP-adres van de printer. Het IPv4-adres van het
netwerk is beschikbaar op het aanraakscherm van het bedieningspaneel. Raak Apparaat app > Info aan en
blader dan omlaag.
IT
DE
NL

6
www.xerox.com/office/
VLC
70xxsupport
3ULQWHU%DVLFV
www.xerox.com/office/VLC70xxdocs
XYZ
1
2
3
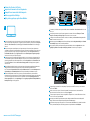
Customizing Your Workflow
Personnalisation de votre flux de travail
Personalizzazione del flusso di lavoro
Anpassen des Workflows
Uw werkstroom aanpassen
FR
EN
IT
NL
DE
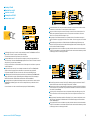
EN
The printer offers options for personalizing your experience by saving settings presets, customizing app and
setting list layout, and expanding your app collection.
Note: access to login and personalization features may be limited by your system administrator. For details,
refer to the User Guide and System Administrator Guide.
FR
Vous pouvez enregistrer des préréglages, personnaliser des applis, configurer la disposition des listes et
étendre votre collection d'applis afin de personnaliser votre expérience.
Remarque : l'accès aux fonctions de connexion et de personnalisation peut faire l'objet de restrictions définies
par l'administrateur système. Pour en savoir plus, consultez le Guide de l'utilisateur et le Guide de
l'administrateur système.
IT
La stampante offre opzioni di personalizzazione grazie alla capacità di salvare le impostazioni preselezionate,
personalizzare il layout dell'elenco impostazioni e delle app, e di espandere la propria gamma di app.
Nota: l'accesso al sistema ed alle funzioni di personalizzazione potrebbe essere sottoposto a limitazioni da
parte dell'amministratore del sistema. Per informazioni, consultare la Guida per l'utente e la System
Administrator Guide (Guida per l'amministratore del sistema).
DE
Der Drucker bietet Optionen zur Personalisierung durch das Speichern von Festwerten, das Anpassen des
Layouts von App- und Einstellungslisten sowie die Erweiterung der App-Sammlung.
Hinweis: Möglicherweise kann nur der Systemadministrator auf die Funktionen für Anmeldung und
Personalisierung zugreifen. Weitere Informationen siehe Benutzerhandbuch und System Administrator Guide
(Systemadministratorhandbuch).
NL
De printer biedt opties waarmee u uw ervaring een persoonlijk tintje kunt geven door voorinstellingen op te
slaan, de lay-out van de app en de instellingenlijst aan te passen en uw verzameling apps uit te breiden.
Opmerking: De toegang tot aanmelding en de functies voor persoonlijke aanpassing kan door de
systeembeheerder zijn beperkt. Zie voor meer informatie de Handleiding voor de gebruiker en de System
Administrator Guide (Handleiding voor de systeembeheerder).
FR
EN
To begin creating your personalized experience, first create a login identity. Touch Login, then touch + (add). Type
your user name, then touch OK. You are now logged in and can start saving presets and customizing app layout.
Pour démarrer la procédure de personnalisation, créez une identité de connexion. Sélectionnez Ouvrir une session,
puis + (ajouter). Saisissez votre nom d'utilisateur, puis sélectionnez OK. Vous êtes maintenant connecté et pouvez
commencer à enregistrer des préréglages et à personnaliser l'agencement des applis.
Per iniziare la propria esperienza personalizzata occorre innanzitutto creare un ID di accesso. Toccare Login, quindi il
simbolo + (più). Digitare il proprio nome utente e selezionare OK. Eseguito in tal modo l'accesso, è ora possibile
iniziare a salvare le preselezioni e personalizzare il layout delle app.
Zur Personalisierung zunächst eine Identität erstellen. Anmeldung und dann + (Hinzufügen) antippen. Den eigenen
Benutzernamen eingeben und OK antippen. Nach erfolgter Anmeldung können Festwerte gespeichert und das
App-Layout angepasst werden.
Als u uw ervaring en persoonlijk tintje wilt geven, dan moet u eerst een identiteit voor aanmelding creëren. Druk op
Aanmelden en druk vervolgens op + (Toevoegen). Typ uw gebruikersnaam en druk vervolgens op OK. U bent nu
aangemeld en u kunt beginnen met het opslaan van voorstellingen en het aanpassen van de lay-out van de app.
IT
DE
NL

7
www.xerox.com/office/
VLC
70xxsupport
3ULQWHU%DVLFV
www.xerox.com/appgallery
XYZ
3
2
1
FR
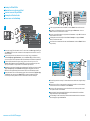
EN
To save your commonly used feature settings in an app, enter your settings, then scroll to the bottom of the list and
touch Save. Save as New Preset adds your settings as a Preset (top of the settings list). Save as Default changes the
default settings. For New Preset, type a name and choose an icon. To manage your feature list and presets, touch
the Customize menu.
Pour enregistrer les paramètres fréquemment utilisés dans une appli, définissez ces paramètres, puis accédez au bas
de la liste et sélectionnez Enregistrer. Enreg. en tant que nouveau préréglage ajoute vos paramètres sous forme de
préréglage (en haut de la liste de paramètres). Enreg. en tant que valeur par défaut modifie les paramètres par
défaut. Dans le cas d'un nouveau préréglage, indiquez un nom et choisissez une icône. Pour gérer vos préréglages et
votre liste de fonctions, sélectionnez le menu Personnaliser.
Per salvare le impostazioni delle funzioni usate di frequente in una app, inserire le impostazioni e quindi scorrere fino
alla fine dell'elenco e toccare Salva. L'opzione Salva come nuova preselezione consente di aggiungere le
impostazioni come una Preselezione (in cima all'elenco delle impostazioni). L'opzione Salva come default modifica
le impostazioni predefinite. In Nuova preselezione, digitare un nome e scegliere un'icona. Per gestire l'elenco delle
funzioni e le preselezioni, toccare il menu Personalizza.
Zum Speichern von häufig verwendeten Einstellungen diese eingeben und dann unterhalb der Liste Speichern
antippen. Mit „Als neuen Festwert speichern“ wird ein neuer Festwert hinzugefügt (oben in der Einstellungsliste).
Mit „Standardwerte speichern“ werden die Standardeinstellungen ersetzt. Unter „Neuer Festwert“ einen Namen
eingeben und ein Symbol auswählen. Zum Verwalten der Funktionsliste und Festwerte das Menü „Anpassen“
antippen.
Als u de meest gebruikte functie-instellingen in een app wilt opslaan, geef deze instellingen dan op, schuif naar de
onderkant van de lijst en druk op Opslaan. Met Opslaan als nieuwe voorinstelling voegt u instellingen toe als
voorinstelling (bovenaan de lijst met instellingen). Met Opslaan als standaardinstelling verandert u de
standaardinstellingen. Typ een naam bij Nieuwe voorinstelling en selecteer daarna een pictogram. Voor het beheren
van uw functielijst en voorstellingen raakt u het menu Aanpassen aan.
IT
DE
NL
FR
EN
The Xerox
®
App Gallery has a growing collection of productvity apps that you can install on your printer. Find the
app on your home screen and create your login directly, or go to www.xerox.com/appgallery to log in and add your
device. To simplify app installation, use the same name for your app gallery login credentials that you used for the
printer login.
Xerox
®
App Gallery comprend une collection croissante d'applis de productivité que vous pouvez installer sur votre
imprimante. Recherchez l'appli sur votre écran d'accueil et créez directement votre connexion ou accédez à
www.xerox.com/appgallery pour vous connecter et ajouter votre périphérique. Pour simplifier l'installation des
applis, utilisez votre nom de connexion à l'imprimante dans vos informations de connexion à la galerie d'applis.
La Xerox
®
App Gallery contiene una sempre crescente raccolta di app per la produttività che è possibile installare
sulla propria stampante. Trovare l'app sulla schermata principale e creare il proprio ID di accesso direttamente,
oppure andare su www.xerox.com/appgallery per accedere e aggiungere il proprio dispositivo. Per semplificare
l'installazione delle app, utilizzare lo stesso nome per le credenziali di accesso alla app gallery di quello utilizzato per
accedere alla stampante.
Die Xerox
®
App Gallery umfasst eine wachsende Sammlung von Produktivitäts-Apps, die auf dem Drucker installiert
werden können. Die App auf der Startseite suchen und eine Anmeldung direkt erstellen oder unter
www.xerox.com/appgallery anmelden und das Gerät hinzufügen. Zum Vereinfachen der App-Installation für die
Anmeldung bei der App Gallery und beim Drucker den gleichen Benutzernamen verwenden.
De Xerox
®
App Gallery bevat een groeiend aantal apps voor productiviteit die u op uw printer kunt installeren. Zoek
de app op uw beginscherm, breng uw aanmelding rechtstreeks tot stand of ga naar www.xerox.com/appgallery om u
aan te melden en uw apparaat toe te voegen. U kunt de installatie van apps vereenvoudigen door dezelfde naam te
gebruiken bij de aanmeldingsgegevens voor de app-galerie als die voor de aanmelding bij de printer.
IT
DE
NL

8
www.xerox.com/office/
VLC
70xxsupport
3ULQWLQJ
6
2
1
2
1
2
1
2
3
4
1
3
4
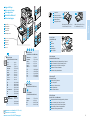
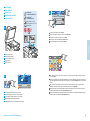
60–256 g/m
2
(16 lb. Bond – 140 lb Index)
Statement...................5.5 x 8.5 in.
Executive.....................7.25 x 10.5 in.
Letter............................8.5 x 11 in.
8.5 x 13........................8.5 x 13 in.
Legal.............................8.5 x 14 in.
Tabloid...........................11 x 17 in.
A5..................................148 x 210 mm
B5 ..................................182 x 257 mm
A4..................................210 x 297 mm
B4 ..................................257 x 364 mm
A3..................................297 x 420 mm
Executive.....................7.25 x 10.5 in.
Letter............................8.5 x 11 in.
B5 ..................................182 x 257 mm
A4..................................210 x 297 mm
4
60–216 g/m
2
(16 lb. Bond–80 lb. Cover)
1 2
3 4
3
6
60–169 g/m
2
(16 lb. Bond–63 lb. Cover)
www.xerox.com/rmlna (U.S./Canada)
www.xerox.com/rmleu
60–216 g/m
2
(16 lb. Bond – 80 lb. Cover)
4 x 6 ..............................4 x 6 in.
5 x 7 ..............................5 x 7 in.
Statement...................5.5 x 8.5 in.
Executive.....................7.25 x 10.5 in.
8 x 10............................8 x 10 in.
Letter............................8.5 x 11 in.
8.5 x 13........................8.5 x 13 in.
Legal.............................8.5 x 14 in.
11 x 15........................... 11 x 15 in.
Tabloid...........................11 x 17 in.
A6..................................105 x 148 mm
A5..................................148 x 210 mm
B5 ..................................182 x 257 mm
A4..................................210 x 297 mm
215 x 315 mm
.............215 x 315 mm
B4 ..................................257 x 364 mm
A3..................................297 x 420 mm
Monarch......................3.9 x 7.5 in.
Commercial #10........4.1 x 9.5 in.
DL ..................................110 x 220 mm
C5 ..................................162 x 229 mm
W: 140–297 mm (5.5–11.7 in.)
L: 182–432 mm (7.2–17 in.)
W: 89–297 mm (3.5–11.7 in.)
L: 98–483 mm (3.9–19 in.)
1
2
XX
YY
LL
WW
LL
WW
60–105 g/m
2
(16–28 lb. Bond)
106–169 g/m
2
(28 lb. Bond–63 lb. Cover)
Lightweight Cardstock / Lightweight Glossy Cardstock
Support cartonné fin / Support cartonné glacé fin
Cartoncino leggero / Cartoncino lucido leggero
Leichtkarton / Leichter Glanzkarton
Licht karton / Licht glanzend karton
EN
FR
IT
DE
170–216 g/m
2
(63–80 lb. Cover)
Cardstock / Glossy Cardstock
Carte / Carte glacée
Cartoncino / Cartoncino lucido
Karton / Glanzkarton
Karton / Glanzend karton
EN
FR
IT
DE
NL
217–256 g/m
2
(80 lb. Cover – 140 lb Index)
Heavyweight Cardstock / Heavyweight Glossy Cardstock
Support cartonné épais / Carte glacée épaisse
Cartoncino pesante / Cartoncino lucido pesante
Schwerer Karton / Schwerer Hochglanzkarton
Zwaar karton / Zwaar glanzend karton
EN
FR
IT
DE
Supported Paper
Papier pris en charge
Carta supportata
Unterstütztes Material
Ondersteund papier
FR
EN
IT
DE
NL
Custom Size
Format personnalisé
Formato personalizzato
Benutzerdefiniert
Aangepast formaat
EN
FR
IT
DE
NL
Plain
Standard
Standard
Normalpapier
Gewoon papier
EN
FR
IT
DE
NL
Bypass Tray
Départ manuel
Vassoio bypass
Zusatzzufuhr
Handmatige invoer
EN
FR
IT
DE
NL
Trays 1–6
Magasins 1-6
Vassoi 1–6
Behälter 1–6
Lade 1–6
EN
FR
IT
DE
NL
NL
NL

9
www.xerox.com/office/
VLC
70xxsupport
3ULQWLQJ
1 2
Monarch......................3.9 x 7.5 in.
Commercial #10........4.1 x 9.5 in.
DL ..................................110 x 220 mm
C5 ..................................162 x 229 mm
Basic Printing
Impression standard
Stampa di base
Einfacher Druckbetrieb
Afdrukken - Basis
FR
EN
IT
DE
NL
EN
FR
At the printer control panel, change size and type settings. In the Xerox
®
print driver, select printing options.
Modifiez les paramètres du format et du type dans le panneau de commande de l'imprimant. Sélectionnez les
options d’impression dans le pilote d’imprimante Xerox
®
.
Sul pannello comandi della stampante, cambiare le impostazioni di formato e tipo. Nel driver di stampa Xerox,
selezionare le opzioni di stampa.
Am Steuerpult des Druckers die Einstellungen für Format und Art ändern. Im Xerox-Druckertreiber
Druckoptionen auswählen.
Verander de instellingen van het formaat en type op het bedieningspaneel van de printer. Selecteer
afdrukopties in de Xerox-printerdriver.
IT
DE
NL
La pagina si sta caricando...
La pagina si sta caricando...
La pagina si sta caricando...

13
www.xerox.com/office/
VLC
70xxsupport
6FDQQLQJ
www.xerox.com/office/VLC70xxdocs
38–128 g/m
2
(26 lb. Text–34 lb. Bond)
50–128 g/m
2
(20 lb.–34 lb. Bond)
X: 85–432 mm (5.5–17 in.)
Y: 125–297 mm (8.26–11.69 in.)
≤110 (80 g/m
2
)
X
Y
A5
Scanning
Numérisation
Scansione
Scannen
Scannen
FR
EN
IT
DE
NL
En général, l’imprimante est connectée à un réseau non à un seul ordinateur. Sélectionnez une destination pour
l’image numérisée sur l’imprimante. Certaines méthodes sont accessibles à tous. D’autres méthodes nécessitent un
accès réseau ou des destinations préparées. Ce guide décrit plusieurs méthodes et se concentre sur les principaux
avantages de chacune d’elles.
Pour obtenir une procédure détaillée et des options de numérisation supplémentaires, reportez-vous au Guide de
l’utilisateur.
FR
The printer is connected typically to a network rather than a single computer. You select a destination for the
scanned image at the printer. Some methods are available to anyone. Other methods require network access or
prepared destinations. This guide covers several methods and focuses on key advantages of each.
For detailed procedures and more scanning options, refer to the User Guide.
EN
Di norma, la stampante è collegata a una rete piuttosto che a un singolo computer. Selezionare una destinazione per
le immagini scansionate sulla stampante. Alcuni metodi sono disponibili per qualsiasi utente. Altri metodi richiedono
l'accesso alla rete o destinazioni preparate. In questa guida, vengono trattati diversi metodi e i relativi vantaggi
principali.
Per informazioni dettagliate sulle procedure e ulteriori opzioni di scansione, fare riferimento alla Guida per l'utente.
IT
Der Drucker ist i. d. R. mit einem Netzwerk verbunden und nicht mit einem Einzelcomputer. Der Zielspeicherort des
Scanbilds wird am Drucker ausgewählt. Einige Methoden sind für alle Benutzer verfügbar. Andere Methoden setzen
voraus, dass der Netzwerkzugriff möglich ist oder Ziele vorbereitet wurden. In dieser Anleitung werden mehrere
Methoden und deren Hauptvorteile erläutert.
Weitere Informationen zu Verfahren und Scanoptionen siehe Benutzerhandbuch.
DE
De printer is doorgaans aangesloten op een netwerk in plaats van een enkele computer. U selecteert een
bestemming voor het gescande beeld op de printer. Sommige methoden zijn voor iedereen beschikbaar. Andere
methoden vereisen netwerktoegang of voorbereide bestemmingen. Deze handleiding behandelt verschillende
methoden en richt zich op de belangrijkste voordelen van elke methode.
Voor gedetailleerde procedures en meer scanopties raadpleegt u de Handleiding voor de gebruiker.
NL
Load original images on the document glass or in the document feeder.
Placez les images initiales sur la glace d’exposition ou dans le chargeur de documents.
Caricare le immagini originali sulla lastra di esposizione o nell'alimentatore originali.
Vorlagen auf das Vorlagenglas oder in den Vorlageneinzug legen.
Plaats de originelen op de glasplaat of in de AOD.
EN
FR
IT
DE
NL
La pagina si sta caricando...
La pagina si sta caricando...
La pagina si sta caricando...
La pagina si sta caricando...

18
www.xerox.com/office/
VLC
70xxsupport
)D[LQJ
www.xerox.com/office/VLC70xxdocs
38–128 g/m
2
(26 lb. Text–34 lb. Bond)
50–128 g/m
2
(20 lb.–34 lb. Bond)
X: 85–432 mm (5.5–17 in.)
Y: 125–297 mm (8.26–11.69 in.)
≤110 (80 g/m
2
)
X
Y
A5
Faxing
Télécopie
Fax
Faxen
Faxen
FR
EN
IT
DE
NL
Vous pouvez entrer des numéros de fax manuellement et les enregistrer dans le carnet d’adresses ou les sélectionner
à partir de celui-ci.
Pour de plus amples informations sur les paramètres de télécopie et la gestion des numéros de fax enregistrés dans le
carnet d’adresses, reportez-vous au Guide de l’utilisateur..
FR
EN
You can enter fax numbers manually and store them in the address book, or select fax numbers from the address book.
For information about fax settings and managing stored fax numbers in the address book, refer to the User Guide.
I numeri di fax possono essere immessi manualmente e memorizzati nella rubrica oppure essere selezionati dalla
rubrica.
Per informazioni sulle impostazioni del fax e sulla gestione dei numeri di fax memorizzati nella rubrica, fare
riferimento alla Guida per l'utente.
IT
DE
Faxnummern entweder manuell eingegeben und im Adressbuch speichern oder Faxnummern im Adressbuch
auswählen.
Weitere Informationen über Faxeinstellungen und die Verwaltung von Faxnummern im Adressbuch siehe
Benutzerhandbuch
U kunt faxnummers handmatig invoeren en opslaan in het adresboek of faxnummers in het adresboek selecteren.
Voor informatie over faxinstellingen en het beheren van opgeslagen faxnummers in het adresboek raadpleegt u de
Handleiding voor de gebruiker.
NL
Load original images on the document glass or in the document feeder.
Placez les images initiales sur la glace d’exposition ou dans le chargeur de documents.
Caricare le immagini originali sulla lastra di esposizione o nell'alimentatore originali.
Vorlagen auf das Vorlagenglas oder in den Vorlageneinzug legen.
Plaats de originelen op de glasplaat of in de AOD.
EN
FR
IT
DE
NL
La pagina si sta caricando...

20
www.xerox.com/office/
VLC
70xxsupport
7URXEOHVKRRWLQJ
EN
When a jam occurs, the control panel displays graphics showing how to clear the jam.
For tips on avoiding paper jams, refer to the User Guide.
www.xerox.com/office/
VLC
70xxdocs
Paper Jams
Incidents papier
Inceppamenti carta
Materialstaus
Papierstoringen
FR
EN
IT
DE
NL
FR
Lorsqu’un incident se produit, le panneau de commande affiche un schéma indiquant comment résoudre
l’incident.
Reportez-vous au Guide de l’utilisateur pour savoir comment éviter les incidents papier.
IT
Quando si verifica un inceppamento di carta, sul pannello comandi viene visualizzata un'immagine su come
eliminare l'inceppamento.
Per suggerimenti su come evitare gli inceppamenti, fare riferimento alla Guida per l'utente.
DE
Bei einem Stau werden am Steuerpult Grafiken angezeigt, die die Staubeseitigung erläutern.
Tipps zur Vermeidung von Papierstaus siehe Benutzerhandbuch.
NL
Als er een storing optreedt, verschijnen en afbeeldingen op het bedieningspaneel waarin staat hoe u de
storing kunt oplossen.
Voor tips over het vermijden van papierstoringen raadpleegt u de Handleiding voor de gebruiker.
EN
CAUTION: To avoid damage, remove misfed media gently and avoid tearing it. Try to remove the media
in the direction that it would normally feed. Any pieces left in the printer can cause further misfeeds.
Do not reload media that has misfed.
The printed side may smudge, and toner may stick to your hands. Avoid spills, and wash off any toner with
cool water and soap. Do not use hot water.
ATTENTION : pour éviter tout dommage, retirez délicatement le support coincé, sans le déchirer. Essayez
d'extraire le support dans le sens normal d'alimentation. Tout morceau de papier présent dans l'imprimante
peut entraîner d'autres faux départs. Ne rechargez pas le support à l'origine du faux départ.
Des bavures peuvent apparaître sur la face imprimée et le toner peut rester collé à vos mains. Évitez de
répandre du toner et enlevez les résidus de toner avec de l'eau froide et du savon. N'utilisez pas d'eau chaude.
FR
DE
ACHTUNG: Zum Vermeiden von Schäden fehleingezogenes Druckmaterial vorsichtig entfernen und nicht
zerreißen. Dabei der normalen Zufuhrrichtung folgen. Im Drucker verbliebene Druckmaterialreste können
weitere Fehleinzüge verursachen. Fehleingezogenes Druckmaterial nicht erneut zuführen.
Möglicherweise ist die bedruckte Seite verschmiert und Toner haftet an den Händen. Verschütten von Toner
vermeiden und Toner mit kaltem Wasser und Seife abwaschen. Kein warmes Wasser verwenden.
ATTENZIONE: Per evitare danni, rimuovere il supporto inceppato con delicatezza, facendo attenzione a non
strapparlo. Tentare di rimuovere il supporto nella sua naturale direzione di uscita. Eventuali residui rimasti
nella stampante potrebbero causare ulteriori inceppamenti. Non ricaricare supporti rimasti precedentemente
inceppati.
Il lato stampato potrebbe macchiare e il toner potrebbe sporcare le mani. Evitare fuoriuscite di toner. e lavare
eventuali macchie di toner con acqua fredda e sapone. Non usare acqua calda.
IT
NL
VOORZICHTIG: Verwijder verkeerd ingevoerd papier altijd voorzichtig, zonder scheuren, uit het apparaat om
schade te voorkomen. Probeer het papier te verwijderen in de richting waarin het normaal gesproken wordt
ingevoerd. Papierresten die in de printer achterblijven kunnen later papierstoringen veroorzaken. Plaats
vastgelopen papier niet opnieuw.
De bedrukte zijde kan vlekken vertonen en er kan toner aan uw handen blijven plakken. Zorg dat u geen toner
morst en verwijder eventueel gemorste toner met koud water en zeep. Gebruik geen warm water.
-
 1
1
-
 2
2
-
 3
3
-
 4
4
-
 5
5
-
 6
6
-
 7
7
-
 8
8
-
 9
9
-
 10
10
-
 11
11
-
 12
12
-
 13
13
-
 14
14
-
 15
15
-
 16
16
-
 17
17
-
 18
18
-
 19
19
-
 20
20


Xerox VersaLink C7020/C7025/C7030 Guida utente
- Tipo
- Guida utente
in altre lingue
Documenti correlati
-
Xerox VersaLink Guida utente
-
Xerox VersaLink B7025/B7030/B7035 Guida utente
-
Xerox VersaLink B415 Guida utente
-
-
Xerox VersaLink C605 Guida utente
-
-
-
Xerox VersaLink B400 Guida utente
-
Xerox VersaLink C415 Guida utente
-