
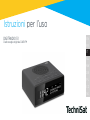
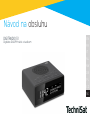
DIGITRADIO 51
DAB/FM digital clock radio

2
CONTENTS
ENGLISH ...........................................................................................6-22
FRANÇAIS .....................................................................................23-42
ITALIANO ....................................................................................... 43-62
NEDERLANDS .............................................................................. 63-82
NORSK .......................................................................................... 83-102
DANSK ........................................................................................ 103-122
POLSKE ...................................................................................... 123-142
ČEŠTINA ..................................................................................... 143-162
SLOVENSKÉ .............................................................................. 163-182

EN
FR
IT
NL
NW
DK
PL
CZ
SK
Instruction Manual
DIGITRADIO 51
DAB/FM digital clock radio

4
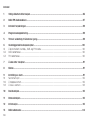
Content
1 Important safety information ...................................................................................................................................... 6
2 Your DAB/FM clock radio ...............................................................................................................................................7
3 Packing list ........................................................................................................................................................................ 9
4 Soware update .............................................................................................................................................................. 9
5 Steps guide to geing started .................................................................................................................................... 9
6 Basic operation .............................................................................................................................................................. 10
6.1 Switching between Standby, DAB and FM mode .....................................................................................................................10
6.2 DAB radio mode .......................................................................................................................................................................................10
6.3 FM radio mode .......................................................................................................................................................................................... 10
7 Scanning ........................................................................................................................................................................... 11
8 Clock ................................................................................................................................................................................... 11
9 Alarm seing ................................................................................................................................................................... 11
9.1 Snooze function ........................................................................................................................................................................................ 12
9.2 Stop alarm ................................................................................................................................................................................................... 12
9.3 Switch alarm o ........................................................................................................................................................................................13
10 Sleep ..................................................................................................................................................................................13
11 Dimmer function ............................................................................................................................................................13
12 Info .....................................................................................................................................................................................13
13 DAB radio mode .............................................................................................................................................................12

5
EN
FR
IT
NL
NW
DK
PL
CZ
SK
14 FM radio mode ............................................................................................................................................................... 14
15 Radio presets ................................................................................................................................................................. 14
15.1 Store a station to the preset list .......................................................................................................................................................15
15.2 Recall a station from the preset list ................................................................................................................................................ 15
16 Advance seings ............................................................................................................................................................15
16.1 DAB radio mode .......................................................................................................................................................................................15
16.2 FM radio mode .......................................................................................................................................................................................... 19
17 Troubleshooting ............................................................................................................................................................20
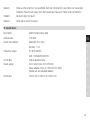
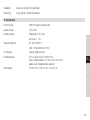
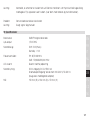
18 Specifications ..................................................................................................................................................................21

6
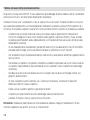
1 Important safety information
Thank you for purchasing this DAB/FM radio. Please read the instructions and warnings carefully before use, to
ensure safe and satisfactory operation of this product.
It is most important this instruction leaflet be retained with the product for future reference. These warnings
have been provided in the interest of safety. You MUST read them carefully before using the appliance. If you
are unsure of the meanings of these warnings contact the retailer from which you purchased the appliance.
- This appliance is not intended for use by persons (including children) with reduced physical, sensory or
knowledge, unless they have been given supervision or instruction concerning use of the appliance by a
person responsible for their safety.
- To protect against fire, electric shock and injury to persons DO NOT IMMERSE CORD, plug or base unit in
water or other liquids.
- Unplug from the mains when not in use, before puing on taking o parts and before cleaning.
- Do not operate any appliance with damaged cord or plug, or aer the appliance malfunctions or has
been damaged in any manner. Return the appliance to the nearest retailer.
- Do not let power cord hang over edge of table or counter, or touch hot surface.
- In the event of a fault, contact your nearest retailer. No repair should be aempted by the consumer.
- Do not use the appliance for anything other than intended use.
- For household use only, do not use outdoors.
- Save these instructions for future reference.
Warning: Polythene bags over the product or packaging may be dangerous. To avoid danger of suocation,
keep away from babies and children.

7
EN
FR
IT
NL
NW
DK
PL
CZ
SK
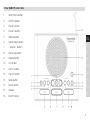
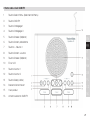
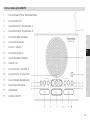
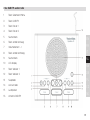
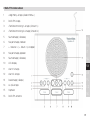
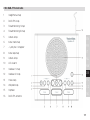
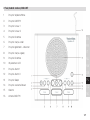
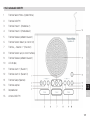
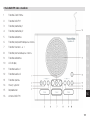
2 Your DAB/FM clock radio
1 Select/Menu buon
2 DAB/FM buon
3 Preset 1 buon
4 Preset 2 buon
5 Snooze buon
6 Station down buon
7 - Volume + buons
8 Station up buon
9 Snooze buon
10 LCD display
11 Alarm 1 buon
12 Alarm 2 buon
13 Sleep buon
14 Power buon
15 Speaker
16 DAB/FM aerial

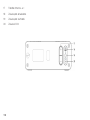
8
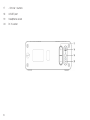
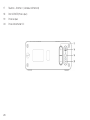
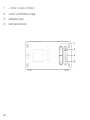
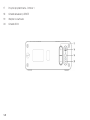
17 - Dimmer + buons
18 UPDATE port
19 Headphone socket
20 DC IN socket

9
EN
FR
IT
NL
NW
DK
PL
CZ
SK
3 Packing list
DAB/FM digital radio x 1
AC Power adapter x 1
Instruction manual x 1
4 Soware update
The ‘UPDATE’ port on the rear of radio is for service professional only.
5 Steps guide to geing started
Press ’ ’ buon to turn radio on.
For DAB
1 Press ‘DAB/FM’ buon to select DAB.
2 If this is the first time you use, it will automatically start scanning.
3 Press ‘ < ’ or ‘ > ’ buon to find desired station and then press ‘Select/Menu’ buon to confirm.
4 Your radio will automatically tune.
5 Adjust volume using ‘- Volume +’ buons, press ‘Volume –‘ to decrease volume and press ‘Volume +’ to
increase volume.
For FM
1 Press ‘DAB/FM’ buon to select FM.
2 To scan for station, press and hold ‘ < ’ or ‘ > ’ buon to scan backwards or forwards.

10
3 Manual tune stations by pressing ‘ < ’ or ‘ > ’ buon to find desired station.
Note: In FM mode you can also tune the station manually by pressing ‘ < ’ or ‘ > ’ buon to adjust the FM
frequencies with 0.05MHz up or down respectively.
4 Your radio will automatically tune.
5 Adjust volume using ‘- Volume +’ buons, press ‘Volume –‘ to decrease volume and press ‘Volume +’ to
increase volume.
Note: During the scanning, the sound will muted automatically.
6 Basic operation
6.1 Switching between Standby, DAB and FM mode
Connect the power adapter to DC IN socket of the radio, it will then turn on.
Press ‘DAB/FM’ buon to switch between DAB and FM mode.
Press ’ ’ buon to switch radio go to standby mode.
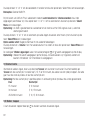
6.2 DAB radio mode
DAB mode receives DAB digital radio and displays information about the station and program/track as
broadcast.
6.3 FM radio mode
FM mode receives analogue radio from the FM wave band and displays RDS (Radio Data System) information
about the station and show (where broadcast). While FM is playing, the LCD displays its frequency or, if RDS
information is available, station name and any further ‘RADIO TEXT’ information. If no information is available,
just the frequency and a ‘NO RADIO TEXT’ message are shown.

11
EN
FR
IT
NL
NW
DK
PL
CZ
SK
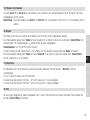
7 Scanning
Once a scan is complete the radio returns to playing the previously selected station or first station on the
station list. You may need to repeat this occasionally for the following reasons:
- New stations may become available from time to time.
- Stations closed or can no longer be received.
- If reception was not good for the original scan (for example the antenna was not up), this may result in
an empty or incomplete list of available stations.
- If you have poor reception of some stations causing the audio to break up, you may wish to list only
stations with good signal strength.
8 Clock
When you power up the unit (or aer factory reset), the clock will set to “00:00”.
In general, the radio automatically synchronises the clock from the DAB station aer scanning.
To set the clock manually, please refer to 16.1.5.1.
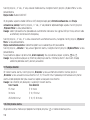
9 Alarm seing
Your radio includes dual alarms. You can set alarm in the DAB mode or FM mode. Set alarm, making sure set
clock at first.
To set Alarm1, press and hold ‘Alarm 1’ buon. To set Alarm 2, press and hold ‘Alarm 2’ buon. The alarm icon ‘
‘ or ‘ ‘ will flash.
Press ‘ < ’ or ‘ > ’ buon to set alarm state ‘On’, and then press ‘Select/Menu’ buon to confirm.
Press ‘ < ’ or ‘ > ’ buon to set hour part of alarm time, and then press ‘Select/Menu’ buon to confirm.
Press ‘ < ’ or ‘ > ’ buon to set minute part of alarm time, and then press ‘Select/Menu’ buon to confirm.
Press ‘ < ’ or ‘ > ’ buon to set alarm duration time, and then press ‘Select/Menu’ buon to confirm.
Duration options: 15/30/45/60/90Mins

12
Press ‘ < ’ or ‘ > ’ buon to set alarm source, and then press ‘Select/Menu’ buon to confirm.
Source options: Buzzer/DAB/FM.
When choosing DAB and FM for alarm source, Last listened and Preset stations you have stored are available.
Press ‘ < ’ or ‘ > ’ buon to select and press ‘Select/Menu’ buon to confirm.
Note: If selected DAB for alarm source and the DAB signal strength is low, the buzzer alarm will be triggered
instead.
Press ‘ < ’ or ‘ > ’ buon to select which days the alarm will be active, and then press ‘Select/Menu’ buon to
confirm.
Alarm active options: Daily/Once/ Weekends/Weekdays
Press ‘- Volume +’ buons to adjust alarm volume, and then press ‘Select/Menu’ buon to confirm.
The radio will display ‘Alarm Saved’. The alarm icon ‘ ‘ or ‘ ‘ will show on the display.
Note: Alarm info will show on the display. Alarm 1 info and Alarm 2 info shows in turn if both alarms are set.
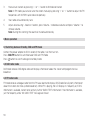
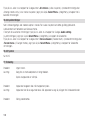
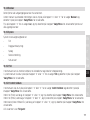
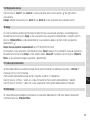
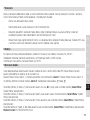
9.1 Snooze function
When alarm sounds, press ‘Snooze’ buon to activate snooze. Press ‘Snooze’ buon repeatedly to set snooze
time to 5, 10, 15 or 30 minutes, then the alarm will temporary stop. The radio will go to standby mode and
show snooze time.
Note: With the snooze time particular options are relative to the alarm duration time you selected.
Duration Snooze time
15 minutes 5, 10 minutes
30 minutes 5, 10, 15 minutes
45/60/90 minutes 5, 10, 15, 30 minutes
9.2 Stop alarm
You can stop the alarm by pressing ’ ’ buon when alarm sounds.

13
EN
FR
IT
NL
NW
DK
PL
CZ
SK
9.3 Switch alarm o
Press ‘Alarm 1’ or ‘Alarm 2’ buon to switch alarm o. The alarm icon ‘ ‘ or ‘ ‘ will disappear from display.
Note: Repeatedly press ‘Alarm 1’ or ‘Alarm 2’ buon will switch alarm between on and o.
10 Sleep
This enables your radio to switch to standby mode by itself aer a set sleep time
Press ‘Sleep’ buon repeatedly to select a sleep time, and then press ‘Select/Menu’ buon to confirm. The
sleep icon ‘ ‘ will show on the display.
Sleep time options: o/15/30/45/60/90 minutes
Aer set the sleep time, you can view the sleep time countdown by pressing ‘Sleep’ buon.
Press ‘Sleep’ buon repeatedly to select ‘Sleep o’, and then press ‘Select/Menu’ buon will turn o sleep
timer.
11 Dimmer function
The brightness of the display can be adjusted manually with the ‘- Dimmer +’ buons on the rear panel.
There are a total of 9 levels of light intensity.
Press ‘Dimmer –‘ buon once to decrease the level by 1 step.
Press ‘Dimmer +‘ buon once to increase the level by 1 step.
12 Info
While a program is playing, you can view further information on the display by pressing ‘Select/Menu’ buon
repeatedly.

14
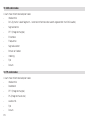
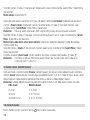
13 DAB radio mode
You can view further information including:
- Alarm info
- DLS (Dynamic Label Segment – short text information broadcast with DAB audio)
- Signal strength
- PTY (Programme Type)
- Ensemble
- Frequency
- Signal quality
- Bitrate and Codec
- Format
- Time
- Date
14 FM radio mode
You can view further information including:
- Alarm info
- Radio text
- PTY (Program Type)
- PS (Program Service)
- Audio info
- Time
- Date

15
EN
FR
IT
NL
NW
DK
PL
CZ
SK
15 Radio presets
The system can store 2 DAB stations and 2 FM stations to the preset list.
15.1 Store a station to the preset list
To store a station, select your desired radio station, then press and hold ‘Preset 1’ or ‘Preset 2’ buon until the
LCD displays ‘Preset stored’.
15.2 Recall a station from the preset list
To recall a preset station, press ‘DAB/FM’ buon to select your desired mode, and then press ‘Preset 1’ or
‘Preset 2’ buon to select the preset station.
Note: If you choose a preset that hasn’t been allocated a station, then ‘No Preset # set’ will be displayed.
16 Advance seings
The advance seings allow you to tailor the DAB/FM radio with a variety of options to suit you. In order to
access advance seings, from DAB or FM mode, press and hold ‘Select/Menu’ buon to enter the menu.
16.1 DAB radio mode
Under the advance seings menu, press ‘ < ’ or ‘ > ’ buon to scroll through the menu options. Then stop at
your preferred option and press ‘Select/Menu’ buon to confirm. The advance seings menu options are:
- Full scan
- Manual tune
- DRC
- Prune
- System

16
16.1.1 Full scan
Under the advance seings menu, press ‘ < ’ or ‘ > ’ buon to select ‘Full scan’, and then press ‘Select/Menu’
buon to confirm.
Full scan starts automatically. Once a scan is complete, the radio returns to playing the previously selected
station or first station on the list.
Note: If no radio station found, it shows ‘NO DAB STATION’. For a beer reception, adjust the antenna or do the
full scan again in another location.
16.1.2 Manual tune
As well as the normal method of scanning, you can also manually tune to a particular channel/frequency. This
can be useful for adjusting your antenna to achieve the best possible reception and scanning a particular
channel to update the stations list.
Under advance seings menu, press ‘ < ’ or ‘ > ’ buon to select ‘Manual tune’, and then press ‘Select/Menu’
buon to confirm.
Press ‘ < ’ or ‘ > ’ buon to select particular channel/frequency and then press ‘Select/Menu’ buon to confirm.
Note: The display shows a live indication of the received signal strength on the selected frequency.
Adjustments to your antenna will aect the received signal strength displayed. The new stations will be
added to station list automatically.
To play the found station, first press and hold ‘Select/Menu’ buon to exit manual tune
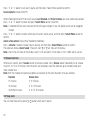
16.1.3 DRC
If you are listening to music with high dynamic range in a noisy environment (for example classical music while
cooking), you may wish to compress the audio dynamic range. This makes quiet sounds louder and loud sounds
quieter.
Under advance seings menu, press ‘ < ’ or ‘ > ’ buon to select ‘DRC’, and then press ‘Select/Menu’ buon to
confirm.
Press ‘ < ’ or ‘ > ’ buon to select ‘DRC o’(default), ‘DRC high‘ or ‚DRC low‘, and then press ‘Select/Menu’
buon to confirm seing.

17
EN
FR
IT
NL
NW
DK
PL
CZ
SK
16.1.4 Prune
This removes all unavailable stations from the station list.
Under advance seings menu, press ‘ < ’ or ‘ > ’ buon to select ‘Prune’, and then press ‘Select/Menu’ buon to
confirm.
Press ‘ > ’ buon to choose <Yes>, and then press ‘Select/Menu’ buon to confirm removing all invalid stations.
16.1.5 System
The system menu options are:
- Time
- Backlight
- Language
- Factory Reset
- SW version
16.1.5.1 Time
In the time menu, you can set the time/date, time/date format and source for the time update.
In the system menu, press ‘ < ’ or ‘ > ’ buon to select ‘Time’, and then press ‘Select/Menu’ buon to confirm.
16.1.5.1.1 Set Time/Date
In the time menu, press ‘ < ’ or ‘ > ’ buon to select ‘Set Time/Date’, and then press ‘Select/Menu’ buon to
confirm.
Set time (Hour) by using ‘ < ’ or ‘ > ’ buon and then press ‘Select/Menu’ buon to confirm.
Set time (Minute) by using ‘ < ’ or ‘ > ’ buon and then press ‘Select/Menu’ buon to confirm.
Set date (Date/ Month/ Year) by using ‘ < ’ or ‘ > ’ buon and then press ‘Select/Menu’ buon to confirm.
The LCD displays ‘Time Saved’.

18
16.1.5.1.2 Auto update
In the time menu, press ‘ < ’ or ‘ > ’ buon to select ‘Auto update’, and then press ‘Select/Menu’ buon to
confirm.
Press ‘ < ’ or ‘ > ’ buon to select the source for time update, and then press ‘Select/Menu’ buon to confirm.
Source for time update: Update from Any (default)/Update from DAB/Update from FM/No update.
16.1.5.1.3 Set 12/24 hour
In the time menu, press ‘ < ’ or ‘ > ’ buon to select ‘set 12/24 hour’, and then press ‘Select/Menu’ buon to
confirm.
Press ‘ < ’ or ‘ > ’ buon to select the time format ‘Set 24 hour’(default) or ‘Set 12 hour’, and then press
‘Select/Menu’ buon to confirm.
16.1.5.1.4 Set date format
In the time menu, press ‘ < ’ or ‘ > ’ buon to select ‘Set date format’, and then press ‘Select/Menu’ buon to
confirm.
Press ‘ < ’ or ‘ > ’ buon to select the date format ‘DD-MM-YYYY’(default) or ‘MM-DD-YYYY’, and then press
‘Select/Menu’ buon to confirm.
16.1.5.2 Backlight
This radio display has a backlight with adjustable timeout (this is the time delay, in seconds, aer which the
display switched o).
In the backlight menu, press ‘ < ’ or ‘ > ’ buon to select ‘Timeout’, and then press ‘Select/Menu’ buon to
confirm.
Press ‘ < ’ or ‘ > ’ buon to select a particular option, and then press ‘Select/Menu’ buon to confirm the
seing.
Timeout options: NO Timeout (default) / 5 sec/10 sec/30 sec/1 Mins/2 Mins/3 Mins
You can adjust brightness level by pressing ‘- Dimmer +’ buons (please refer to 11).

19
EN
FR
IT
NL
NW
DK
PL
CZ
SK
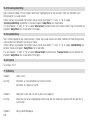
16.1.5.3 Language
The default menu language is German. You can change to your desired language.
There are six languages available: German/English/French/Spanish/Italian/Danish
In system menu, press ‘ < ’ or ‘ > ’ buon to select ‘Language’, and then press ‘Select/Menu’ buon to confirm.
Press ‘ < ’ or ‘ > ’ buon to select your language, and then press ‘Select/Menu’ buon to confirm.
16.1.5.4 Factory Reset
A factory reset clears all user defined seing, replacing them with the original default values, so time/date, DAB
station list and preset stations are all lost.
In system menu, press ‘ < ’ or ‘ > ’ buon to select ‘Factory Reset’, and then press ‘Select/Menu’ buon to
confirm.
Press ‘ > ’ buon to choose <Yes>, and then press ‘Select/Menu’ buon to confirm.
16.1.5.5 SW version
This displays the current soware version.
In system menu, press ‘ < ’ or ‘ > ’ buon to select ‘SW version’, and then press ‘Select/Menu’ buon to
confirm. The LCD will display the soware version.
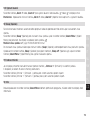
16.2 FM radio mode
Under the advance seings menu, press ‘ < ’ or ‘ > ’ buon to scroll through the menu options. Then stop at
your preferred option and press ‘Select/Menu’ buon to confirm. The advance seings menu options are:
- Scan seing
- Audio seing
- System (please refer to 16.1.5)
16.2.1 Scan seing
By default, FM scans stop at any available station (all stations). This may result in a poor quality audio from
weak stations.

20
Under advance seings menu, press ‘ < ’ or ‘ > ’ buon to select ‘Scan seing’, and then press ‘Select/Menu’
buon to confirm.
Press ‘ < ’ or ‘ > ’ buon to select ‘All stations‘ (default) or ‚Strong stations only’, and then press ‘Select/Menu’
buon to confirm seing.
16.2.2 Audio seing
By default, all stereo stations are reproduced in stereo. For weak stations, this may result in a poor quality audio.
The audio quality can be improved using mono.
Under advance seings menu, press ‘ < ’ or ‘ > ’ buon to select ‘Audio seing’, and then press ‘Select/Menu’
buon to confirm.
Press ‘ < ’ or ‘ > ’ buon to select ‘Stereo allowed’(default) or ‘Forced mono’, and then press ‘Select/Menu’
buon to confirm seing.
16.2.3 System
Please refer to 16.1.5.
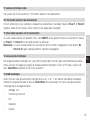
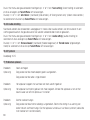
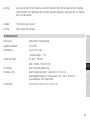
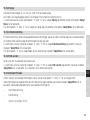
17 Troubleshooting
Problem: No Power.
Solution: Ensure the power adapter is properly connected.
Make sure that the radio is turned on.
Problem: The unit does not respond when pressing any buons.
Solution: The unit may become unresponsive during use. Switch the unit o and then on again to reset it.
Problem: Poor radio reception.
La pagina si sta caricando...
La pagina si sta caricando...
La pagina si sta caricando...
La pagina si sta caricando...
La pagina si sta caricando...
La pagina si sta caricando...
La pagina si sta caricando...
La pagina si sta caricando...
La pagina si sta caricando...
La pagina si sta caricando...
La pagina si sta caricando...
La pagina si sta caricando...
La pagina si sta caricando...
La pagina si sta caricando...
La pagina si sta caricando...
La pagina si sta caricando...
La pagina si sta caricando...
La pagina si sta caricando...
La pagina si sta caricando...
La pagina si sta caricando...
La pagina si sta caricando...
La pagina si sta caricando...
La pagina si sta caricando...
La pagina si sta caricando...
La pagina si sta caricando...
La pagina si sta caricando...
La pagina si sta caricando...
La pagina si sta caricando...
La pagina si sta caricando...
La pagina si sta caricando...
La pagina si sta caricando...
La pagina si sta caricando...
La pagina si sta caricando...
La pagina si sta caricando...
La pagina si sta caricando...
La pagina si sta caricando...
La pagina si sta caricando...
La pagina si sta caricando...
La pagina si sta caricando...
La pagina si sta caricando...
La pagina si sta caricando...
La pagina si sta caricando...
La pagina si sta caricando...
La pagina si sta caricando...
La pagina si sta caricando...
La pagina si sta caricando...
La pagina si sta caricando...
La pagina si sta caricando...
La pagina si sta caricando...
La pagina si sta caricando...
La pagina si sta caricando...
La pagina si sta caricando...
La pagina si sta caricando...
La pagina si sta caricando...
La pagina si sta caricando...
La pagina si sta caricando...
La pagina si sta caricando...
La pagina si sta caricando...
La pagina si sta caricando...
La pagina si sta caricando...
La pagina si sta caricando...
La pagina si sta caricando...
La pagina si sta caricando...
La pagina si sta caricando...
La pagina si sta caricando...
La pagina si sta caricando...
La pagina si sta caricando...
La pagina si sta caricando...
La pagina si sta caricando...
La pagina si sta caricando...
La pagina si sta caricando...
La pagina si sta caricando...
La pagina si sta caricando...
La pagina si sta caricando...
La pagina si sta caricando...
La pagina si sta caricando...
La pagina si sta caricando...
La pagina si sta caricando...
La pagina si sta caricando...
La pagina si sta caricando...
La pagina si sta caricando...
La pagina si sta caricando...
La pagina si sta caricando...
La pagina si sta caricando...
La pagina si sta caricando...
La pagina si sta caricando...
La pagina si sta caricando...
La pagina si sta caricando...
La pagina si sta caricando...
La pagina si sta caricando...
La pagina si sta caricando...
La pagina si sta caricando...
La pagina si sta caricando...
La pagina si sta caricando...
La pagina si sta caricando...
La pagina si sta caricando...
La pagina si sta caricando...
La pagina si sta caricando...
La pagina si sta caricando...
La pagina si sta caricando...
La pagina si sta caricando...
La pagina si sta caricando...
La pagina si sta caricando...
La pagina si sta caricando...
La pagina si sta caricando...
La pagina si sta caricando...
La pagina si sta caricando...
La pagina si sta caricando...
La pagina si sta caricando...
La pagina si sta caricando...
La pagina si sta caricando...
La pagina si sta caricando...
La pagina si sta caricando...
La pagina si sta caricando...
La pagina si sta caricando...
La pagina si sta caricando...
La pagina si sta caricando...
La pagina si sta caricando...
La pagina si sta caricando...
La pagina si sta caricando...
La pagina si sta caricando...
La pagina si sta caricando...
La pagina si sta caricando...
La pagina si sta caricando...
La pagina si sta caricando...
La pagina si sta caricando...
La pagina si sta caricando...
La pagina si sta caricando...
La pagina si sta caricando...
La pagina si sta caricando...
La pagina si sta caricando...
La pagina si sta caricando...
La pagina si sta caricando...
La pagina si sta caricando...
La pagina si sta caricando...
La pagina si sta caricando...
La pagina si sta caricando...
La pagina si sta caricando...
La pagina si sta caricando...
La pagina si sta caricando...
La pagina si sta caricando...
La pagina si sta caricando...
La pagina si sta caricando...
La pagina si sta caricando...
La pagina si sta caricando...
La pagina si sta caricando...
La pagina si sta caricando...
La pagina si sta caricando...
La pagina si sta caricando...
La pagina si sta caricando...
La pagina si sta caricando...
La pagina si sta caricando...
La pagina si sta caricando...
La pagina si sta caricando...
La pagina si sta caricando...
La pagina si sta caricando...
La pagina si sta caricando...
La pagina si sta caricando...
La pagina si sta caricando...
La pagina si sta caricando...
La pagina si sta caricando...
La pagina si sta caricando...
La pagina si sta caricando...
La pagina si sta caricando...
-
 1
1
-
 2
2
-
 3
3
-
 4
4
-
 5
5
-
 6
6
-
 7
7
-
 8
8
-
 9
9
-
 10
10
-
 11
11
-
 12
12
-
 13
13
-
 14
14
-
 15
15
-
 16
16
-
 17
17
-
 18
18
-
 19
19
-
 20
20
-
 21
21
-
 22
22
-
 23
23
-
 24
24
-
 25
25
-
 26
26
-
 27
27
-
 28
28
-
 29
29
-
 30
30
-
 31
31
-
 32
32
-
 33
33
-
 34
34
-
 35
35
-
 36
36
-
 37
37
-
 38
38
-
 39
39
-
 40
40
-
 41
41
-
 42
42
-
 43
43
-
 44
44
-
 45
45
-
 46
46
-
 47
47
-
 48
48
-
 49
49
-
 50
50
-
 51
51
-
 52
52
-
 53
53
-
 54
54
-
 55
55
-
 56
56
-
 57
57
-
 58
58
-
 59
59
-
 60
60
-
 61
61
-
 62
62
-
 63
63
-
 64
64
-
 65
65
-
 66
66
-
 67
67
-
 68
68
-
 69
69
-
 70
70
-
 71
71
-
 72
72
-
 73
73
-
 74
74
-
 75
75
-
 76
76
-
 77
77
-
 78
78
-
 79
79
-
 80
80
-
 81
81
-
 82
82
-
 83
83
-
 84
84
-
 85
85
-
 86
86
-
 87
87
-
 88
88
-
 89
89
-
 90
90
-
 91
91
-
 92
92
-
 93
93
-
 94
94
-
 95
95
-
 96
96
-
 97
97
-
 98
98
-
 99
99
-
 100
100
-
 101
101
-
 102
102
-
 103
103
-
 104
104
-
 105
105
-
 106
106
-
 107
107
-
 108
108
-
 109
109
-
 110
110
-
 111
111
-
 112
112
-
 113
113
-
 114
114
-
 115
115
-
 116
116
-
 117
117
-
 118
118
-
 119
119
-
 120
120
-
 121
121
-
 122
122
-
 123
123
-
 124
124
-
 125
125
-
 126
126
-
 127
127
-
 128
128
-
 129
129
-
 130
130
-
 131
131
-
 132
132
-
 133
133
-
 134
134
-
 135
135
-
 136
136
-
 137
137
-
 138
138
-
 139
139
-
 140
140
-
 141
141
-
 142
142
-
 143
143
-
 144
144
-
 145
145
-
 146
146
-
 147
147
-
 148
148
-
 149
149
-
 150
150
-
 151
151
-
 152
152
-
 153
153
-
 154
154
-
 155
155
-
 156
156
-
 157
157
-
 158
158
-
 159
159
-
 160
160
-
 161
161
-
 162
162
-
 163
163
-
 164
164
-
 165
165
-
 166
166
-
 167
167
-
 168
168
-
 169
169
-
 170
170
-
 171
171
-
 172
172
-
 173
173
-
 174
174
-
 175
175
-
 176
176
-
 177
177
-
 178
178
-
 179
179
-
 180
180
-
 181
181
-
 182
182
-
 183
183
-
 184
184


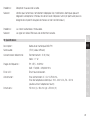
TechniSat DIGITRADIO 51 BLACK Manuale del proprietario
- Tipo
- Manuale del proprietario
- Questo manuale è adatto anche per
in altre lingue
Documenti correlati
Altri documenti
-
Schwaiger DAB 400 Operating And Safety Instructions Manual
-
Muse M-197 CDB Manuale del proprietario
-
Albrecht DR 53 Manuale del proprietario
-
Revo K2 Manuale del proprietario
-
-
Schwaiger DAB 650 Manuale utente
-
AEG SR 4380 Manuale utente
-
-
ECG R 111 Manuale utente