Moneual ME670 Series Manuale utente
- Categoria
- Aspirapolvere robotici
- Tipo
- Manuale utente

Ver 1.0
ME670 Series
Thank you for purchasing the ME670 series robot cleaner.
Before using the product, please read this User Manual carefully, and keep it for future reference.
Depending on your model, some contents of this User Manual may dier from the actual product.
The contents of this User Manual are subject to change without notice.
User Manual
Robot Cleaner


ME670 Series
Robot Cleaner
User Manual

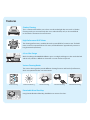
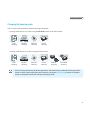
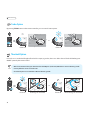
Features
Shadow Cleaning
This is a function that enables you to clean area where the light does not reach. In Shadow
Cleaning mode, you can intensively clean areas under the bed, sofa, etc. that are dicult
to clean with a conventional vacuum cleaner.
High Performance BLDC Motor
The cleaning performance is excellent due to the powerful BLDC (suction) motor. The BLDC
motor is 30% more powerful than a DC motor, and the lifetime is approximately 10 times as
long (estimated: 5,000 hours).
8.2cm
8.2 cm Slim Design
With a slim design, the MONEUAL ME670 is just 8.2 cm high, enabling it to clean under the bed
and the sofa, where it is dicult to clean with a vacuum cleaner or by hand.
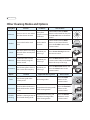
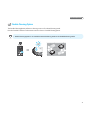
Various Cleaning Modes
The various cleaning modes provide dierent cleaning functions and levels of performance,
which are optimized for the user environment.
Auto Cleaning Manual Cleaning Scheduled CleaningCorner CleaningIntensive Cleaning
Detachable Micro ber Mop
Using Detachable Micro ber Mop, the ME670 can remove ne dusts.

Twin Side Brushes
Twin side brushes, installed on the left and right sides of the bottom, completely clean the
corners that are dicult to clean with the vacuum suction system alone.
Eco-friendly Lithium Iron Phospate Battery
The MONEUAL ME670 uses an eco-friendly battery that does not contain any heavy metals or
acids that are harmful to the human body. The Lithium Iron Phospate Battery has a lifetime that
is approximately three times longer (1,000 cycles) than standard lithium-based or nickel-based
batteries. It provides higher levels of operational safety due to high resistance to heat and
explosion.
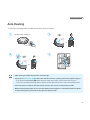
Auto Charging
After it is nished cleaning or when it detects that the battery is low, the robot cleaner auto-
matically returns to the charger and starts charging.
Obstacle Avoidance and Fall Protection
The obstacle detection sensors in the bumper help the MONEUAL ME670 avoid obstacles and
walls, and the cli detection sensors in the bottom detect height dierences and prevent it
from falling down stairs.

Contents
Before Use
Features
02
Safety Information
05
What’s in the Box
10
Overview
11
Installing
Installing the Charger
14
Installing the Side Brushes
15
Remote Control
16
Charging
17
Installing the Mop
18
Product
Operation
Before You Start
19
Starting & Stopping Cleaning
20
How to Recharge the Battery
22
Auto Cleaning
23
Other Cleaning Modes and Options
24
Maintenance
Language Setting
32
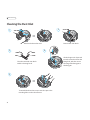
Cleaning the Dust Bin
33
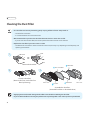
Cleaning the Dust Filter
34
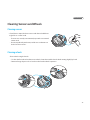
Cleaning Sensors and Wheels
35
Cleaning the Dust Inlet
36
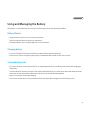
Using and Managing the Battery
37
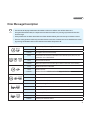
Voice Guidance
40
Error Message Description
41
Customer
Support
Troubleshooting
43
Specications
44
Product Warranty
45

5
Before Use
Safety Information
Please read and follow the instructions in this manual to ensure your safety and the safe use of your robot cleaner.
Safety symbols
In this manual, various Warnings, Cautions and Notes are provided to help you to avoid potential hazards that can hurt
you and/or damage your robot vacuum cleaner.
You may be killed or seriously injured
if you do not follow this instruction.
You may be injured or your appliance
may be damaged if you do not follow
this instruction.
You should refer to this
note when using your
robot cleaner.
Warning Caution Note
Before you use
Do not install or use the robot cleaner in a place where it will be exposed to direct sunlight.
Þ
If the power adapter becomes overheated during charging it may cause a re, short circuit, or electrical shock.
Þ
The robot cleaner may become discolored and deformed.
Do not install the charger on an inclined oor, and do not apply impact to the charger.
Þ
The charger may become damaged or broken.
Do not use the product in a room with an unattended child or an elderly person.
Þ
There is a risk that the child or elderly person may become frightened or injured.
This robot cleaner is not intended for use by children, or by persons with reduced physical, sensory or mental capabilities, unless
they have given supervision or instruction concerning the use of the robot cleaner by a person responsible for their safety.
Þ
This may cause injury or damage the robot cleaner.
Before you use the robot cleaner, remove any small objects, clothes, and fragile objects from the oor to be cleaned.
Þ
This may cause damage to the robot cleaner and obstruct the movement of the robot cleaner.
Þ
Make sure to remove fragile objects (glass, china, owerpot, etc.).
Þ
Small cloths, power cords, belts, towels, pads, and telephone cords can become entangled in the wheels or brushes.
Remove obstacles on the oor before cleaning.
Þ
The robot cleaner will not be able to move beyond obstacles of a certain height.

6
Robot Cleaner
Install the charger in a location that can be easily accessed by the robot cleaner.
Þ
If you install the charger in a corner or if there are many obstacles around the charger, it may prevent the robot cleaner
from automatically charging.
Make sure that the charger is always plugged into a power source.
Þ
If no power is supplied to the charger, you will not be able to use the automatic charge function.
When you use
Do not use the power adaptor with another appliance.
Þ
This may cause damage to the appliance and re by overheating.
Ensure that clothes or any part of the body (hair, nger, foot, etc.) do not get entangled in the brushes or wheels.
Þ
This may cause injury.
Do not use or store the robot cleaner near ammable materials (alcohol, gasoline, kerosene, thinner, etc.) or heating
sources (cigarettes, candles, stove, etc.).
Þ
This may cause re and damage to the robot cleaner.
If you notice smoke or a burning smell coming from the robot cleaner, immediately turn the power switch o and
contact your service center.
Do not stand or sit on the robot cleaner.
Þ
Movement of the robot cleaner may cause injury or the robot cleaner may be damaged.
Do not use the robot cleaner on a narrow high place such as a desk, table, etc.
Þ
The robot cleaner may fall o which could cause injury or damage to the product.
Do not let the robot cleaner pass over or sweep up liquids, oil, pet droppings, etc.
Þ
This may cause malfunction of the robot cleaner and damage.
Þ
Liquid on the wheels may cause stains in other places.
If the robot cleaner sucks a plastic bag in while operating, immediately remove it.
Þ
If you run the robot cleaner for a long time with the dust inlet covered with a plastic bag, the motor will be overheated
and the robot cleaner will be damaged.
Do not press strongly or impact the bumper.
Þ
This may cause damage to bumper sensors and malfunction.

7
Before Use
Do not use the robot cleaner in a place where the temperature is too low or too high (lower than -5°C and higher than 35°C).
Þ
This may cause damage to the product.
Do not use the robot cleaner when the dust bin is completely lled up.
Þ
This may reduce the suction power.
Never use the robot cleaner without the lters.
Þ
Doing so may cause a malfunction of the robot cleaner.
Remove objects (such as loose clothing, towels, cloths, belts, or hairs) scattered on the oor before cleaning.
Keep objects away from brushes and wheels to prevent entanglement.
Þ
This may cause noise, reduce the suction power, and damage the robot cleaner.
Do not use the robot cleaner in a place where the oor or wall is made of glass or mirrors.
Þ
The robot cleaner detect obstacles by using an IR sensor, so it may not detect glass and mirrors as obstacle.
Do not use the robot cleaner in a utility room, on a wet oor, on stairs, on a table or shelf, in an underground room, in
a warehouse, in a commercial building, or outdoors.
If you have dropped or given an impact to the robot cleaner, contact your service center.
Electrical instructions
Please use the power source and socket with the correct voltage and current.
Þ
If you use a power source or socket that does not t the power specications, there is the risk of re, electrical shock,
and damage to the robot cleaner.
Make sure the power cord is not bent or crushed by heavy objects.
Þ
A damaged power cord may cause re or electrical shock.
Þ
To repair or replace a damaged power cord, contact a qualied service agent to ensure your safety.
When plugging in or removing the power plug, always plug it in or remove it by holding the plug, not the cable.
Þ
Stress on the cable will damage the power cord, which may cause re or electrical shock.
Do not use a damaged power cord! To repair or replace a damaged power cord, contact a qualied service agent to
ensure safety.
Þ
If a non-qualied person repairs the power cord, there is a risk of re or electrical shock.

8
Robot Cleaner
Do not touch the plug or wall socket with wet hands.
Þ
Doing so may cause electric shock.
If you spill water into the robot cleaner, unplug the power cord and allow the unit to dry completely before use.
Þ
Water can bring the risk of re and electrical shock.
Þ
Immediately remove the power cord from the outlet and contact your service center.
Do not use chargers other than the charger that came with your robot cleaner.
Þ
Overvoltage brings the risk of re and electrical shock.
Do not install the charger in a location that is damp or wet, dusty, or near water.
Þ
This may cause a re or an electrical shock and damage to the unit.
Do not touch the terminal of the charger with any metallic object (such as a clip, pin, etc.).
Þ
This creates the risk of re and electrical shock.
If you do not plan to use the robot cleaner for an extended period of time, turn o the power switch at the bottom of
the back.
Þ
The battery may be discharged if you leave it switched on.
Management
To ensure safety, only a qualied service agent should repair or disassemble the product.
Þ
Repair by unqualied personnel may damage the robot cleaner, and brings the risk of re and electrical shock.
Dispose of the battery properly.
Þ
If you throw the battery into re or expose it to direct sunlight, there is the risk of re and explosion.
Þ
Dispose of your old batteries according to the local laws and regulations of your region.
Clean the obstacle and bottom sensors periodically.
Þ
If the sensor becomes covered by lint and dust, the robot cleaner may malfunction.
Please use the specied lter.
Þ
Use of a dierent lter will void your warranty.

9
Before Use
Please clean the robot cleaner after turning it o.
Þ
If you clean it when the power is on or it is operating, it may cause injury.
Clean the main brush, dust bin, dust lter, and dust inlet periodically.
Þ
If you use the robot cleaner for a long time without cleaning it, there is the risk of malfunction and damage.
Copyright and instructions
Þ
Copyright © 2014 MONEUAL Inc. All rights reserved.
Þ
Published March 5, 2014.
Þ
MONEUAL, MONCASO, MiNEW, RYDIS, and SONAMU are the trademarks or registered trademarks of MONEUAL Inc.
in the Republic of Korea and/or other countries.
Þ
This publication is protected by copyright and all rights are reserved. No part of it may be reproduced or transmitted by
any means or in any form, without the prior written consent of MONEUAL.
Þ
Depending on the model and type of your appliance, some of the contents in this manual may dier from your actual
product.
Þ
MONEUAL Inc. assumes no responsibility for technical or editorial errors or omissions contained herein, nor for any
incidental or consequential damages and failures of the appliance caused by not following the precautions and
instructions.
Þ
MONEUAL Inc. assumes no responsibility for damages resulting from the use of the product that is not approved by
the company.

10
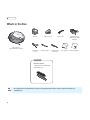
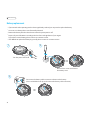
Robot Cleaner
Screwdriver for
Side brush
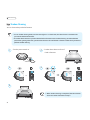
What’s in the Box
Robot cleaner
(1400mA built-in battery)
Charger Remote control
(included two AAA
batteries)
Power cordPower adaptor
Side brushes
(1 set)
User manual Quick start guideCleaning brush
V
er 1.0
R
obot
C
leaner
Q
uick
S
ta
r
t
Gu
id
e
ME685 Series
Ě
The appearance and specications may be changed without notice in order to improve functions or
performance.
Mop kits
Microber Mop Kit
1. Mop plate for a microber mop
2. Microber mop

11
Before Use
2
3
4
1
8
7
6
5
10
11
9
11
15
9
12
13
11
14
9
12
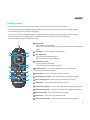
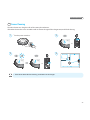
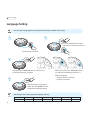
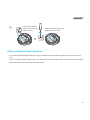
Overview
Robot cleaner
ǘ
Top
ǘ
ǘ
Rear
ǘ
ǘ
Bottom
ǘ
1
Control buttons and indicators
2
Dust bin cover
3
Bumper
4
Obstacle and signal detection
sensors
5
Air outlet
6
Adaptor jack
7
Power switch
8
Signal receiving sensor
9
Cli detection sensors
10
Charging terminals
11
Wheels
12
Side brush installation pins
13
Dust inlet
14
Main brush
15
Mop plate installation holes

12
Robot Cleaner
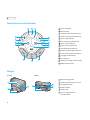
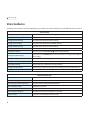
Control buttons and indicators
1
Start/stop button
2
Power button
3
Cleaning mode selection button
4
Shadow cleaning mode indicator
5
Turbo mode indicator
6
Auto cleaning mode indicator
7
Timer (1 hour) indicator
8
Timer (every day) indicator
9
Threshold option indicator
10
Double Cleaning option indicator
11
Corner Cleaning option indicator
12
Charging mode indicator
13
Error indicator
14
Intensive Cleaning mode indicator
15
Battery level indicator
8
13
12
14
15
2
1 3
11 10 9
5
4
6
7
1
Power/charging lamp
2
Guide signal transmission sensor
3
Charging terminals
4
Adaptor holder
5
Adaptor jack
6
Sensor’s signal distance
selection switch
Charger
ǘ
Front
ǘǘ
Back
ǘ
5
6
4
2
3
1

13
Before Use
1
Power button
Þ
Press to turn the power on/o.
Þ
Press to return the robot cleaner to operation mode when it has stopped due to
failure.
2
Mode button
Þ
Press to select the cleaning mode.
3
Start/Stop button
Þ
Press to start the selected operation.
Þ
Press to start/stop cleaning and driving.
4
Select/Manual button
Þ
Press to conrm your selection.
Þ
Press to start manual cleaning (see page 28).
5
Direction buttons
Þ
Press to drive the robot cleaner in manual mode
(forward, backward, left, and right).
6
Charge button
Þ
Press to move robot cleaner to charger.
7
Intensive cleaning button
Þ
Press to start intensive cleaning (see page 25).
8
Corner cleaning button
Þ
Press to start corner cleaning (see page 27).
9
Turbo button
Þ
Press to select Turbo option (see page 30).
10
Shadow cleaning button
Þ
Press to start under furniture cleaning (see page 26).
11
Double cleaning button
Þ
Press to select Double cleaning option (see page 31).
12
Reservation button
Þ
Press to set the timer (see page 29).
13
Mute button
Þ
Press to turn voice guidance on/o.
14
Threshold option button
Þ
Press to select Threshold option (see page 30).
Remote control
You can conveniently access the various functions of the robot cleaner with your remote control.
Þ
Functions that can be controlled through the control panel on the robot cleaner: Auto cleaning, Shadow cleaning,
Intensive cleaning, Corner cleaning, and Charging.
Þ
Functions that can be controlled through the remote control: Auto cleaning, Shadow cleaning, Intensive cleaning,
Corner cleaning, Double cleaning option, Threshold option, Manual cleaning, Charging, Turbo option,
Reservation cleaning, Mute, and Manual moving.
2
6
9
12
13
1
3
5
8
7
11
14
10
4

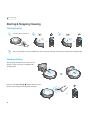
14
Robot Cleaner
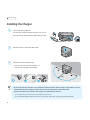
Installing the Charger
2
1
Þ
Connect the power adaptor.
Þ
Set the robot cleaner detection distance (5 m or 8 m).
Þ
Place the power adaptor in the holder of the charger.
Þ
Check the power connection (blue lamp).
3
Þ
Check the location of the charger.
Clear all obstacles in the area within 1 m
in front, left, and right of the charger
Ě
If you install the robot cleaner in a place where it will be exposed to direct sunlight, the heat of the sun may
interfere with the auto charging, and the robot cleaner may become discolored over time.
Ě
If your robot cleaner can’t return to the charger, reset the detection distance.
In a narrow area, set it to 5 m, and in a wide area, set it to 8 m.
If you set the detection distance to 8 m in a narrow area, the auto charging may be interfered with.

15
Installing
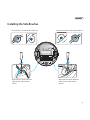
Installing the Side Brushes
Þ
Check for the L mark under the side brush.
Þ
Align with the L mark under the
robot cleaner and install the
L brush.
Þ
Check for the R mark under the side brush.
Þ
Align with the R mark under the
robot cleaner and install the
R brush.

16
Robot Cleaner
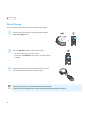
Remote Control
Install the battery into the remote control.
Inserting batteries into the remote control
1
Þ
Remove the battery cover.
2
Þ
Insert the two AAA batteries that came with your robot cleaner.
Ě
Make sure to properly orient the + and – poles of the batteries when inserting the battery.
Ě
If you insert batteries incorrectly, there is a risk of re or damage to the remote control.
Be careful if you use non-standard 1.5V batteries, as this may cause damage to the product and its function.
If your battery has had a leakage, immediately replace it.
Dispose of batteries according to the local laws and regulations of your region.
3
Þ
Replace the battery cover.

17
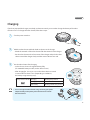
Installing
Charging
If you have prepared the charger, main body, and remote control, you must then charge the battery of the robot
cleaner to use it. To charge the robot cleaner, follow these steps:
1
Þ
Turn the power switch on.
2
Þ
Hold the robot cleaner with both hands and put it on the charger.
Match the terminals of the robot cleaner with the terminals of the charger.
Put the robot cleaner in the front center of the charger and push the robot
cleaner toward the charger slowly until the status indicator turns red.
3
Þ
Use the robot cleaner after charging.
It takes about 1 hour to charge the battery fully.
(For 2800mAh battery models, it takes about 2 hours.)
After charging for 1 hour, you can use the robot cleaner in normal
suction mode for about 1 hour. (Depending on conditions,
the battery usage time may vary.)
Battery status indicator
Charging Blinking every second
Charging completed On
Low battery Blinking 4 times every second
Ě
You can charge the robot cleaner using connecting the power
adaptor directly to the power jack on the lower-rear side of
the robot cleaner.

18
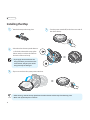
Robot Cleaner
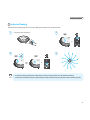
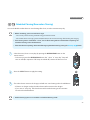
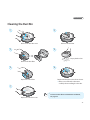
Installing the Mop
4
Þ
Flip it over and turn the system power switch on.
1
Þ
Attach the mop to the mop plate.
2
Þ
Turn the power switch o (on the lower rear side of
the robot cleaner).
3
Þ
Place the robot cleaner upside down on
a soft cloth and attach the mop plate.
Please attach it so that it ts well into
the holes of the main body.
Ě
After cleaning, remove the mop plate from the robot cleaner and the mop from the mop plate.
Ě
Wash and dry the mop for its next use.
Ě
If you apply excessive force to the
mop plate when you install it on the
robot cleaner, the joint parts of the
mop plate may be damaged.
La pagina si sta caricando...
La pagina si sta caricando...
La pagina si sta caricando...
La pagina si sta caricando...
La pagina si sta caricando...
La pagina si sta caricando...
La pagina si sta caricando...
La pagina si sta caricando...
La pagina si sta caricando...
La pagina si sta caricando...
La pagina si sta caricando...
La pagina si sta caricando...
La pagina si sta caricando...
La pagina si sta caricando...
La pagina si sta caricando...
La pagina si sta caricando...
La pagina si sta caricando...
La pagina si sta caricando...
La pagina si sta caricando...
La pagina si sta caricando...
La pagina si sta caricando...
La pagina si sta caricando...
La pagina si sta caricando...
La pagina si sta caricando...
La pagina si sta caricando...
La pagina si sta caricando...
La pagina si sta caricando...
La pagina si sta caricando...
-
 1
1
-
 2
2
-
 3
3
-
 4
4
-
 5
5
-
 6
6
-
 7
7
-
 8
8
-
 9
9
-
 10
10
-
 11
11
-
 12
12
-
 13
13
-
 14
14
-
 15
15
-
 16
16
-
 17
17
-
 18
18
-
 19
19
-
 20
20
-
 21
21
-
 22
22
-
 23
23
-
 24
24
-
 25
25
-
 26
26
-
 27
27
-
 28
28
-
 29
29
-
 30
30
-
 31
31
-
 32
32
-
 33
33
-
 34
34
-
 35
35
-
 36
36
-
 37
37
-
 38
38
-
 39
39
-
 40
40
-
 41
41
-
 42
42
-
 43
43
-
 44
44
-
 45
45
-
 46
46
-
 47
47
-
 48
48


Moneual ME670 Series Manuale utente
- Categoria
- Aspirapolvere robotici
- Tipo
- Manuale utente
in altre lingue
- English: Moneual ME670 Series User manual
Documenti correlati
Altri documenti
-
Samsung VCR8874T3B Manuale utente
-
Samsung VCR8894L3R Manuale utente
-
Samsung SR8895 Manuale utente
-
-
Samsung SR8898 Manuale utente
-
Hoover HGO320H 011 Manuale utente
-
Beko VRR Manuale utente
-
Palson Diábolo Plus Istruzioni per l'uso
-
-
GOCLEVER NEO CLEANER Guida Rapida