
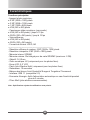
English

FCC Compliance Statement:
This device complies with Part 15 of the FCC Rules. Operation is
subjected to the following two conditions: (1) this device may not cause
harmful interference, and (2) this device must accept any interference
received, including interference that may cause undesired operation.
This equipment has been tested and found to comply with limits for a
Class B digital device, pursuant to Part 15 of the FCC rules. These limits
are designed to provide reasonable protection against harmful interference in residential
installations. This equipment generates, uses, and can radiate radio frequency energy, and if
not installed and used in accordance with the instructions, may cause harmful interference to
radio communications.
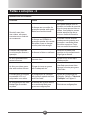
However, there is no guarantee that interference will not occur in a particular installation. If this
equipment does cause interference to radio or television equipment reception, which can be
determined by turning the equipment off and on, the user is encouraged to try to correct the
interference by one or more of the following measures:
-Reorient or relocate the receiving antenna.
-Move the equipment away from the receiver.
-Plug the equipment into an outlet on a circuit different from that to which the receiver is
connected.
-Consult the dealer or an experienced radio/television technician for additional suggestions.
You are cautioned that any change or modications to the equipment not expressly approved
by the party responsible for compliance could void Your authority to operate such equipment.
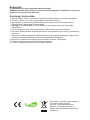
Do not throw the appliance away with
the normal houselhold waste at the end
of its life, but hand it in at an ofcial
collection point for recycling. By doing
this you will help to preserve the
environment.
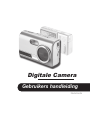
Welcome:
Dear user, thanks for purchasing this product.
Much investment in time and effort has gone into its development, and it is our hope
that it will give you many years of trouble-free service.
Safety Notice:
1. Do not drop, puncture or disassemble the camera; otherwise the warranty will be voided.
2. Avoid all contact with water, and dry hands before using.
3. Do not expose the camera to high temperature or leave it in direct sunlight. Doing so may
damage the camera.
4. Use the camera with care. Avoid pressing hard on the camera body.
5. For your own safety, avoid using the camera when there is a storm or lightning.
6. Do not use batteries of different specications. Doing so may lead to the potential for serious
damage.
7. Remove the battery during long periods between usage, as a deteriorated battery may affect
the functionality of the camera.
8. Remove the battery if it shows signs of leaking or distortion.
9. Use only the accessories supplied by the manufacturer.
10. Keep the camera out of the reach of infants.

1
Getting Started
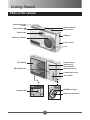
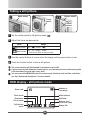
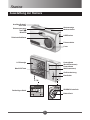
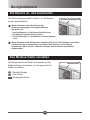
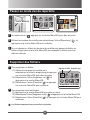
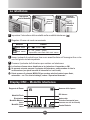
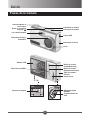
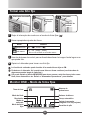
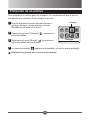
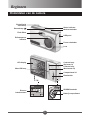
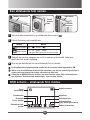
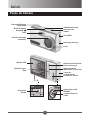
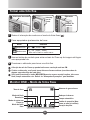
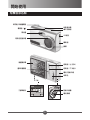
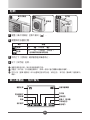
Parts of the camera
Status indicator
LCD display
Shutter/Quick-exit
button
Power button ( )
Mode switch
USB port
Focus switch
Flash strobe
Lens
Control button
(Up/Zoom in)
Compartment cover
Menu/OK button
Strap holder
SD/MMC card slot
Battery compartment
Tripod socket
Control button
(Down/Zoom out)
Self-timer indicator

2
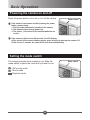
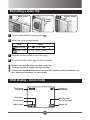
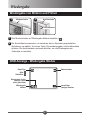
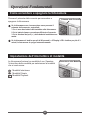
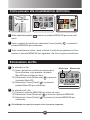
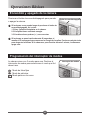
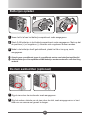
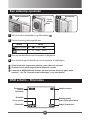
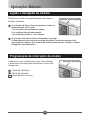
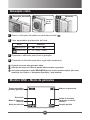
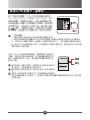
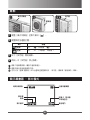
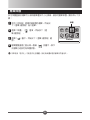
Loading batteries
1
Slide the battery compartment cover open as indicated.
2
Insert 2 AA batteries into the battery compartment as indicated. Note that the
positive(+) and negative(-) ends cannot be reversed.
3
After installing the batteries, close the cover as indicated.
Do not use different types or brands of batteries at the same time.
Alkaline batteries or rechargeable NiMH batteries are recommended for high
performance.
1 2 3
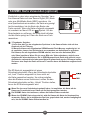
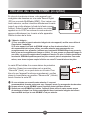
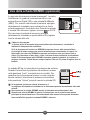
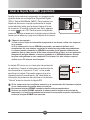
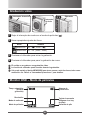
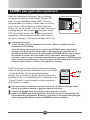
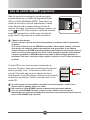
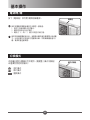
In addition to the internal built-in memory*, your
camera can store data on a Secure Digital (SD) card
or a MultiMedia card (MMC). To insert a memory card,
gently push the card as indicated until the card reaches
the bottom of the slot. When the card is successfully
inserted, a icon will appear on the LCD. To remove
the memory card, gently push the card and it will pop
up. Then pull the card out of the slot.
* Built-in memory:
1) About the type of memory built in your camera, please refer to the package printing.
2) If your camera comes with built-in SDRAM instead of ash memory, you are
recommended to always use a memory card to store your recordings. The camera using
only built-in SDRAM can save just one recording (picture or video) in it. If you take
a new picture or video, the new recording will replace the old one. Moreover, the le
stored in SDRAM will be gone when the batteries run out of power or are being replaced.
Therefore you should always copy the le to your PC prior to taking out the batteries.
The SD card comes with a write-protect switch. When the
write-protect switch is set to the “Lock” position, the card
will become non-writable. To ensure that the camera can
operate normally, you should set the write-protect switch
to the “Unlock” position before inserting the SD card.
If you purchase a new memory card, you are
recommended to format the card with the camera before storing data into the card.
Do not remove the SD/MMC card while the camera is processing data.
When a SD/MMC card is inserted, the camera will use the card as the main storage
medium. Files stored in the built-in memory will become inaccessible until the SD/MMC
card is removed.
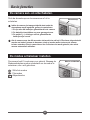
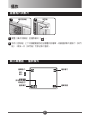
1
Thread the strap through the strap holder as indicated.
2
Thread the other end of the strap through the loop as indicated, and you are
ready to carry your camera with ease.
Attaching the strap (optional)
1 2

3
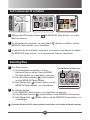
In addition to the internal built-in memory*, your
camera can store data on a Secure Digital (SD) card
or a MultiMedia card (MMC). To insert a memory card,
gently push the card as indicated until the card reaches
the bottom of the slot. When the card is successfully
inserted, a icon will appear on the LCD. To remove
the memory card, gently push the card and it will pop
up. Then pull the card out of the slot.
* Built-in memory:
1) About the type of memory built in your camera, please refer to the package printing.
2) If your camera comes with built-in SDRAM instead of ash memory, you are
recommended to always use a memory card to store your recordings. The camera using
only built-in SDRAM can save just one recording (picture or video) in it. Moreover, the
le stored in SDRAM will be gone when the batteries run out of power or are being
replaced. Therefore you should always copy the le to your PC prior to taking out the
batteries.
The SD card comes with a write-protect switch. When the
write-protect switch is set to the “Lock” position, the card
will become non-writable. To ensure that the camera can
operate normally, you should set the write-protect switch
to the “Unlock” position before inserting the SD card.
If you purchase a new memory card, you are
recommended to format the card with the camera before storing data into the card.
Do not remove the SD/MMC card while the camera is processing data.
When a SD/MMC card is inserted, the camera will use the card as the main storage
medium. Files stored in the built-in memory will become inaccessible until the SD/MMC
card is removed.
Using SD/MMC card (optional)

4
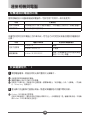
Basic Operations
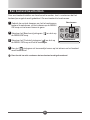
Powering the camera on and off
Press the power button to turn on or turn off the camera.
If the camera is not turned on after pressing the power
button, please check:
1. There are two AA batteries installed in the camera.
2. The batteries have enough power left.
3. The polar(+ -) directions of the installed batteries are
correct.
If the camera is idle for over 60 seconds, the LCD display
will be turned off to conserve battery power; press any key to wake up the camera. If it
is idle for over 3 minutes, the camera will shut down automatically.
Power button
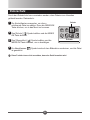
Setting the mode switch
The camera provides three modes to use. Slide the
mode switch to select the mode that you want to use:
: Still picture mode
: Movie mode
: Playback mode
Mode switch
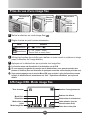
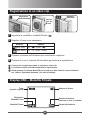
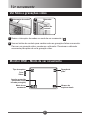
1
Set the mode switch to still picture mode ( ).
2
Adjust the focus as appropriate:
Mode Range
Micro mode
24” ~ ( 60cm ~ )
Macro mode
12” ~ 24” ( 30cm ~ 60cm )
* Cannot use ash in macro mode.
3
Use the control buttons to zoom in/out the image until a proper picture is set.
4
Press the shutter button to take a still picture.
The zoom function will be disabled if resolution is set to 5M.
If you press and hold down the shutter button, you can take pictures continuously (with
a few seconds of interval after every shot).
You can press the MENU/OK button to access more functions such as ash, self-timer...
etc. See “Advanced Operations” for more details.

5
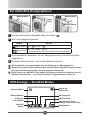
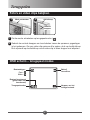
Taking a still picture
1
Set the mode switch to still picture mode ( ).
2
Adjust the focus as appropriate:
Mode Range
Micro mode
59” ~ ( 150cm ~ )
Macro mode
16” ~ 24” ( 40cm ~ 60cm )
* Cannot use ash in macro mode.
3
Use the control buttons to zoom in/out the image until a proper picture is set.
4
Press the shutter button to take a still picture.
The zoom function will be disabled if resolution is set to 5M.
If you press and hold down the shutter button, you can take pictures continuously (with
a few seconds of interval after every shot).
You can press the MENU/OK button to access more functions such as ash, self-timer...
etc. See “Advanced Operations” for more details.
Mode switch
1
Focus
switch
2
Shutter button
Control
buttons
3 4
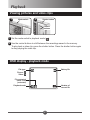
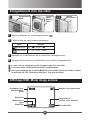
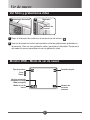
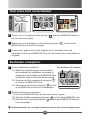
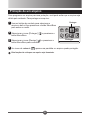
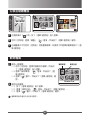
Still picture
mode
Battery life
Memory card
(none if no card)
Self-timer
White balance
Number of
recordings
Focus mode
Resolution
Flash mode
Zoom ratio
OSD display - still picture mode

6
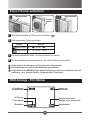
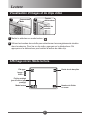
Recording a video clip
1
Set the mode switch to movie mode ( ).
2
Adjust the focus as appropriate:
Mode Range
Micro mode
59” ~ ( 150cm ~ )
Macro mode
16” ~ 24” ( 40cm ~ 60cm )
3
Press the shutter button to start recording.
4
Press the shutter button again to stop recording.
Sound is not recorded when recording a video clip.
The zoom function is disabled during recording.
You can press the MENU/OK button to access more functions such as resolution...etc.
See “Advanced Operations” for more details.
Mode switch
1
Focus
switch
2
Shutter button
3 4
OSD display - movie mode
Movie mode
Battery life
Memory card
(none if no card)
Number of
recordings
Focus mode
Resolution
Timer (when
recording)
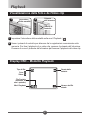
1
Set the mode switch to playback mode ( ).
2
Use the control buttons to shift between the recordings saved in the memory.
To play back a video clip, press the shutter button. Press the shutter button again
to stop playing the video clip.

7
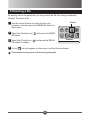
Viewing pictures and video clips
1
Set the mode switch to playback mode ( ).
2
Use the control buttons to shift between the recordings saved in the memory.
To play back a video clip, press the shutter button. Press the shutter button again
to stop playing the video clip.
Mode switch
1
Shutter button
Control
buttons
2
Playback mode
Number of
current le
Battery life
File protected
(none if not
protected)
File type:
Picture:
Video:
Playback
OSD display - playback mode

8
Switching to index view
1
While in playback mode ( ), press the MENU/OK button to enter menu.
2
Use the control buttons to select the [Index] icon ( ), and press the MENU/OK
button to conrm.
3
In index view, use the control buttons to shift between les and press the MENU/
OK button to enlarge the le you want to view.
Menu/OK button
1
Index
2
3
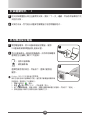
Deleting les
1
To delete one le:
1.1) Use the control buttons to select the le to be
deleted, and then press the MENU/OK button
to enter menu.
1.2) Select the [Delete one] icon ( ) and press the
MENU/OK button.
1.3) Select the [Check] icon ( ) and press the
MENU/OK button to conrm.
2
To delete all les:
1.1) Press the MENU/OK button to enter menu.
1.2) Select the [Delete all] icon ( ) and press the MENU/OK button.
1.3) Select the [Check] icon ( ) and press the MENU/OK button to conrm.
Deleted les are gone forever and cannot be recovered.
Delete One
Delete one
Delete all
By setting a le to be protected, you can prevent the le from being accidentally
deleted. To protect a le:
1
Use the control buttons to select the le to be
protected, and then press the MENU/OK button to
enter menu.
2
Select the [Protect] icon ( ) and press the MENU/
OK button.
3
Select the [Check] icon ( ) and press the MENU/
OK button to conrm.
4
A lock ( ) icon will appear on the screen, and the le is protected.
This function cannot prevent a le from being formatted.

9
Protecting a le
By setting a le to be protected, you can prevent the le from being accidentally
deleted. To protect a le:
1
Use the control buttons to select the le to be
protected, and then press the MENU/OK button to
enter menu.
2
Select the [Protect] icon ( ) and press the MENU/
OK button.
3
Select the [Check] icon ( ) and press the MENU/
OK button to conrm.
4
A lock ( ) icon will appear on the screen, and the le is protected.
This function cannot prevent a le from being formatted.
Protect
Protect

10
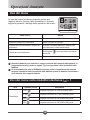
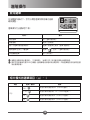
Advanced Operations
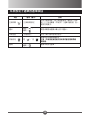
Using menu
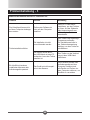
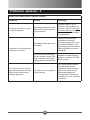
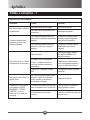
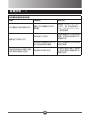
How to... Action
Bring up the menu Press the MENU/OK button.
Move the highlight bar Use the control buttons.
Conrm an item/action; enter sub-menu
Press the MENU/OK button (when a menu
item is being selected).
Exit menu/sub-menu
Select the icon and press the MENU/OK
button.
Quick exit menu Press the shutter button.
When the batteries run out of power or are removed from the battery compartment, the
[time setting] (see page 13) will be restored to factory defaults.
If your camera has built-in SDRAM only, all system settings will be restored to
factory defaults when the batteries run out of power or are removed from the battery
compartment.
Delete One
The menu items provide several options for you to
ne-tune your camera functions. The following table
gives details on menu operations:
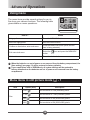
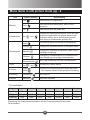
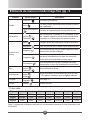
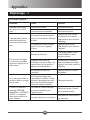
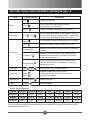
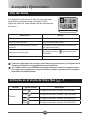
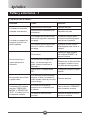
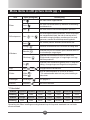
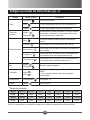
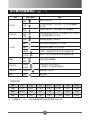
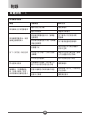
Menu items in still picture mode ( ) - 1
Item Option (Icon) Description
Size
VGA ( )
Set resolution to VGA (640x480) pixels.
1.3M ( )
Set resolution to 1.3M (1280x960) pixels.
3M ( )
Set resolution to 3M (2048x1536) pixels.
5M ( )
Set resolution to 5M (2560x1920) pixels.
Item Option (Icon) Description
Strobe
Off ( )
The strobe is disabled.
Auto ( )
The ash automatically res when the lighting is
insufcient.
Force on ( )
The ash is forced to re in every shot.
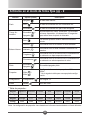
Self-timer
On ( ) / Off ( )
Enable/Disable the self-timer. If the self-timer is
turned on, the camera will have ten seconds delay
before shooting when the shutter button is pressed.
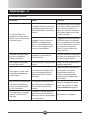
White balance
Auto ( )
The camera automatically adjusts white balance.
Sunny ( )
Suitable for outdoor shooting in sunny weather.
Cloudy ( )
Suitable for shooting in cloudy weather or shady
environments.
Tungsten ( )
Suitable for indoor shooting with incandescent lamp
lighting, or environments with low color temperature.
Fluorescent ( )
Suitable for indoor shooting with uorescent lamp
lighting, or environments with high color tempera-
ture.
Beep
On ( ) / Off ( )
Enable/Disable beep sound.
Flicker
50Hz ( ) /
60Hz ( )
Set icker frequency to 50Hz or 60Hz*.
* See table below to select a proper setting.
Setting
Setting ( )
See page 13.
Exit
Exit ( )
Exit the menu.
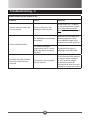
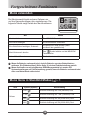
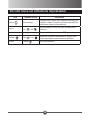
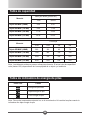
* Flicker table:
Region England Germany France Italy Spain
Netherlands
Russia
Setting 50Hz 50Hz 50Hz 50Hz 50Hz 50Hz 50Hz
Region Portugal America Taiwan China Japan Korea Thailand
Setting 50Hz 60Hz 60Hz 50Hz 50/60Hz 60Hz 50Hz
Note: The icker setting is based on the frequency standard of your local power supply.

11
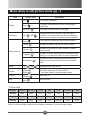
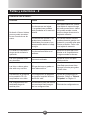
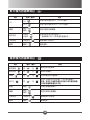
Menu items in still picture mode ( ) - 2
Item Option (Icon) Description
Strobe
Off ( )
The strobe is disabled.
Auto ( )
The ash automatically res when the lighting is
insufcient.
Force on ( )
The ash is forced to re in every shot.
Self-timer
On ( ) / Off ( )
Enable/Disable the self-timer. If the self-timer is
turned on, the camera will have ten seconds delay
before shooting when the shutter button is pressed.
White balance
Auto ( )
The camera automatically adjusts white balance.
Sunny ( )
Suitable for outdoor shooting in sunny weather.
Cloudy ( )
Suitable for shooting in cloudy weather or shady
environments.
Tungsten ( )
Suitable for indoor shooting with incandescent lamp
lighting, or environments with low color temperature.
Fluorescent ( )
Suitable for indoor shooting with uorescent lamp
lighting, or environments with high color tempera-
ture.
Beep
On ( ) / Off ( )
Enable/Disable beep sound.
Flicker
50Hz ( ) /
60Hz ( )
Set icker frequency to 50Hz or 60Hz*.
* See table below to select a proper setting.
Setting
Setting ( )
See page 13.
Exit
Exit ( )
Exit the menu.
* Flicker table:
Region England Germany France Italy Spain
Netherlands
Russia
Setting 50Hz 50Hz 50Hz 50Hz 50Hz 50Hz 50Hz
Region Portugal America Taiwan China Japan Korea Thailand
Setting 50Hz 60Hz 60Hz 50Hz 50/60Hz 60Hz 50Hz
Note: The icker setting is based on the frequency standard of your local power supply.

12
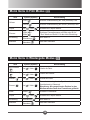
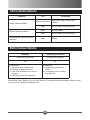
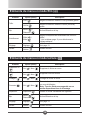
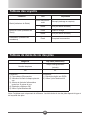
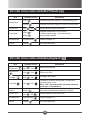
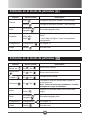
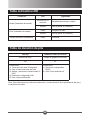
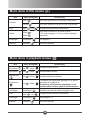
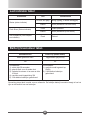
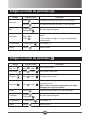
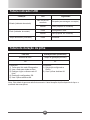
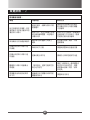
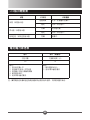
Menu items in movie mode ( )
Item Option (Icon) Description
Size
VGA ( )
Set video resolution to VGA (640x480) pixels.
QVGA ( )
Set video resolution to QVGA (320x240) pixels.
Beep
On ( ) / Off ( )
Enable/Disable beep sound.
Flicker
50Hz ( ) /
60Hz ( )
Set icker frequency to 50Hz or 60Hz*.
* See table on page 11 to select a proper setting.
Setting
Setting ( )
See page 13.
Exit
Exit ( )
Exit the menu.
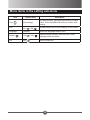
Menu items in playback mode ( )
Item Option (Icon) Description
Delete one ( ) Yes ( ) / No ( )
Delete current le.
Delete all ( ) Yes ( ) / No ( )
Delete all les.
Protect ( ) Yes ( ) / No ( )
Protect current le.
Format ( ) Yes ( ) / No ( )
Format the built-in memory or memory card that is
in use.
Note: All les stored in the medium will be gone
after formatting.
Index
Index ( )
Switch to index thumbnail view.
Beep
On ( ) / Off ( )
Enable/Disable beep sound.
Setting
Setting ( )
See page 13.
Exit
Exit ( )
Exit the menu.
Item Option (Icon) Description
Time ( )
[time setting]
Set date and time. Use the control buttons to adjust
value. Press the MENU/OK button to conrm each
setting.
Icon
On ( ) / Off ( )
Enable/Disable OSD icons to display on the screen.
Language [various] Select the language used for OSD.
Default ( ) Yes ( ) / No ( )
Restore factory defaults. Note that your current
settings will be overridden.
Exit
Exit ( )
Exit the sub-menu.

13
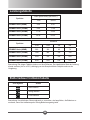
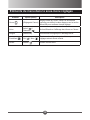
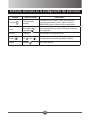
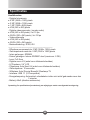
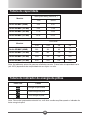
Menu items in the setting sub-menu
Item Option (Icon) Description
Time ( )
[time setting]
Set date and time. Use the control buttons to adjust
value. Press the MENU/OK button to conrm each
setting.
Icon
On ( ) / Off ( )
Enable/Disable OSD icons to display on the screen.
Language [various] Select the language used for OSD.
Default ( ) Yes ( ) / No ( )
Restore factory defaults. Note that your current
settings will be overridden.
Exit
Exit ( )
Exit the sub-menu.

14
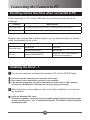
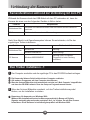
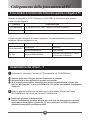
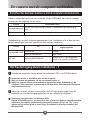
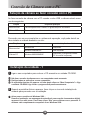
Connecting the Camera to PC
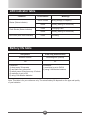
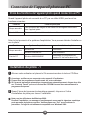
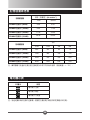
Deciding camera functions when connected to PC
When connected to a PC via the USB cable, the camera can act as one of the
followings:
Function Main purpose
Removable disk For retrieving pictures and videos, or saving les into the camera.
PC cam For video conference or monitoring.
Based on your purpose and operation system, you can decide whether you should
install the accessory driver or not:
Function OS Driver installation
Removable disk
Windows 98 Required
Windows 2000/ME/XP Not required
PC cam Windows 98/2000/ME/XP
Required (The PC cam program is
included in the package.)
Installing the driver - 1
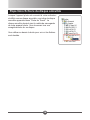
1
Turn on your computer and place the accessory CD into the CD-ROM drive.
Do not connect the camera to your computer at this stage.
Shut down all other applications running on your computer.
If the autorun screen does not appear automatically, double-click on “My Computer”
and then the CD-ROM drive. Then start the Setup.exe program manually.
2
When the autorun screen appears, click on the driver installation icon to launch
the installation.
Notice for Windows 2000 users:
During the installation, a warning message regarding digital signature may appear twice
or more. Please click on “Yes” to continue the process. The software is fully compatible
with Windows 2000.
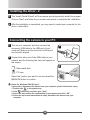
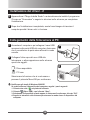
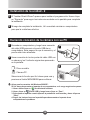
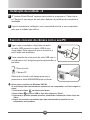
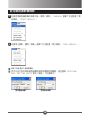
1
Turn on your computer, and then connect the
accessory USB cable to the USB port of your
computer. Make sure the connector and the port
are correctly aligned.
2
Connect the other end of the USB cable to your
camera, and the following two items will appear on
the screen:
: Removable disk.
: PC cam.
Select the function you want to use and press the
MENU/OK button to conrm.
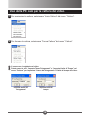
Notice for Windows 2000/XP users:
If you want to disconnect the device from your computer, please follow these steps:
1. Double-click in the system tray.
2. Click (USB Disk), and then click “Stop”.
3. Select the device when the conrmation screen appears and click “OK”.
4. Follow the on-screen instructions to safely disconnect the device from your
computer.
3
The “Install Shield Wizard” will then appear and automatically install the program.
Click on “Next” and follow the on-screen instructions to complete the installation.
4
After the installation is completed, you may need to restart your computer for the
driver to take effect.

15
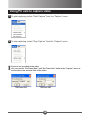
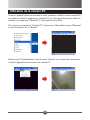
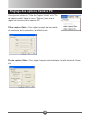
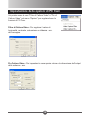
1
Turn on your computer, and then connect the
accessory USB cable to the USB port of your
computer. Make sure the connector and the port
are correctly aligned.
2
Connect the other end of the USB cable to your
camera, and the following two items will appear on
the screen:
: Removable disk.
: PC cam.
Select the function you want to use and press the
MENU/OK button to conrm.
Notice for Windows 2000/XP users:
If you want to disconnect the device from your computer, please follow these steps:
1. Double-click
in the system tray.
2. Click
(USB Disk), and then click “Stop”.
3. Select the device when the conrmation screen appears and click “OK”.
4. Follow the on-screen instructions to safely disconnect the device from your
computer.
Installing the driver - 2
3
The “Install Shield Wizard” will then appear and automatically install the program.
Click on “Next” and follow the on-screen instructions to complete the installation.
4
After the installation is completed, you may need to restart your computer for the
driver to take effect.
1
2
Connecting the camera to your PC

16
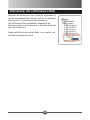
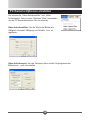
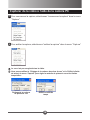
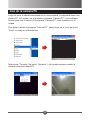
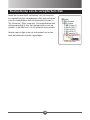
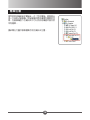
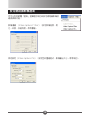
File folder of the removable disk
After the camera is connected to your computer and
set as a removable disk, a removable disk icon will
appear in “My Computer”. The removable disk actually
represents the storage medium of your camera. In the
disk you can nd all of your recordings.
Refer to the gure on the right to see where the les
are stored.

17
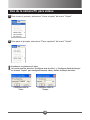
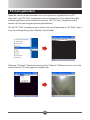
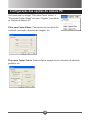
After the camera is connected to your computer and set as a PC cam, you can use
the accessory “PC Cam” program or other favorite software to utilize the camera.
The “PC Cam” program is installed along with the driver.
To launch the “PC Cam” program, click the icon in the “Start” menu or the shortcut on
the “Desktop”.
Using PC cam
Select “Preview” from the “Options” menu, and you can start to use the camera as a
PC cam.

18
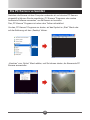
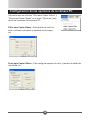
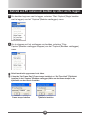
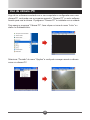
Using PC cam to capture video
1
To start capturing, select “Start Capture” from the “Capture” menu.
2
To stop capturing, select “Stop Capture” from the “Capture” menu.
Sound is not recorded in the video.
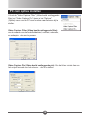
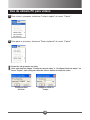
You can use the “Set Frame Rate” and “Set Time Limit” items in the “Capture” menu to
set the frame rate and time limit of the video:
Set frame rate
Set time limit
La pagina si sta caricando...
La pagina si sta caricando...
La pagina si sta caricando...
La pagina si sta caricando...
La pagina si sta caricando...
La pagina si sta caricando...
La pagina si sta caricando...
La pagina si sta caricando...
La pagina si sta caricando...
La pagina si sta caricando...
La pagina si sta caricando...
La pagina si sta caricando...
La pagina si sta caricando...
La pagina si sta caricando...
La pagina si sta caricando...
La pagina si sta caricando...
La pagina si sta caricando...
La pagina si sta caricando...
La pagina si sta caricando...
La pagina si sta caricando...
La pagina si sta caricando...
La pagina si sta caricando...
La pagina si sta caricando...
La pagina si sta caricando...
La pagina si sta caricando...
La pagina si sta caricando...
La pagina si sta caricando...
La pagina si sta caricando...
La pagina si sta caricando...
La pagina si sta caricando...
La pagina si sta caricando...
La pagina si sta caricando...
La pagina si sta caricando...
La pagina si sta caricando...
La pagina si sta caricando...
La pagina si sta caricando...
La pagina si sta caricando...
La pagina si sta caricando...
La pagina si sta caricando...
La pagina si sta caricando...
La pagina si sta caricando...
La pagina si sta caricando...
La pagina si sta caricando...
La pagina si sta caricando...
La pagina si sta caricando...
La pagina si sta caricando...
La pagina si sta caricando...
La pagina si sta caricando...
La pagina si sta caricando...
La pagina si sta caricando...
La pagina si sta caricando...
La pagina si sta caricando...
La pagina si sta caricando...
La pagina si sta caricando...
La pagina si sta caricando...
La pagina si sta caricando...
La pagina si sta caricando...
La pagina si sta caricando...
La pagina si sta caricando...
La pagina si sta caricando...
La pagina si sta caricando...
La pagina si sta caricando...
La pagina si sta caricando...
La pagina si sta caricando...
La pagina si sta caricando...
La pagina si sta caricando...
La pagina si sta caricando...
La pagina si sta caricando...
La pagina si sta caricando...
La pagina si sta caricando...
La pagina si sta caricando...
La pagina si sta caricando...
La pagina si sta caricando...
La pagina si sta caricando...
La pagina si sta caricando...
La pagina si sta caricando...
La pagina si sta caricando...
La pagina si sta caricando...
La pagina si sta caricando...
La pagina si sta caricando...
La pagina si sta caricando...
La pagina si sta caricando...
La pagina si sta caricando...
La pagina si sta caricando...
La pagina si sta caricando...
La pagina si sta caricando...
La pagina si sta caricando...
La pagina si sta caricando...
La pagina si sta caricando...
La pagina si sta caricando...
La pagina si sta caricando...
La pagina si sta caricando...
La pagina si sta caricando...
La pagina si sta caricando...
La pagina si sta caricando...
La pagina si sta caricando...
La pagina si sta caricando...
La pagina si sta caricando...
La pagina si sta caricando...
La pagina si sta caricando...
La pagina si sta caricando...
La pagina si sta caricando...
La pagina si sta caricando...
La pagina si sta caricando...
La pagina si sta caricando...
La pagina si sta caricando...
La pagina si sta caricando...
La pagina si sta caricando...
La pagina si sta caricando...
La pagina si sta caricando...
La pagina si sta caricando...
La pagina si sta caricando...
La pagina si sta caricando...
La pagina si sta caricando...
La pagina si sta caricando...
La pagina si sta caricando...
La pagina si sta caricando...
La pagina si sta caricando...
La pagina si sta caricando...
La pagina si sta caricando...
La pagina si sta caricando...
La pagina si sta caricando...
La pagina si sta caricando...
La pagina si sta caricando...
La pagina si sta caricando...
La pagina si sta caricando...
La pagina si sta caricando...
La pagina si sta caricando...
La pagina si sta caricando...
La pagina si sta caricando...
La pagina si sta caricando...
La pagina si sta caricando...
La pagina si sta caricando...
La pagina si sta caricando...
La pagina si sta caricando...
La pagina si sta caricando...
La pagina si sta caricando...
La pagina si sta caricando...
La pagina si sta caricando...
La pagina si sta caricando...
La pagina si sta caricando...
La pagina si sta caricando...
La pagina si sta caricando...
La pagina si sta caricando...
La pagina si sta caricando...
La pagina si sta caricando...
La pagina si sta caricando...
La pagina si sta caricando...
La pagina si sta caricando...
La pagina si sta caricando...
La pagina si sta caricando...
La pagina si sta caricando...
La pagina si sta caricando...
La pagina si sta caricando...
La pagina si sta caricando...
La pagina si sta caricando...
La pagina si sta caricando...
La pagina si sta caricando...
La pagina si sta caricando...
La pagina si sta caricando...
La pagina si sta caricando...
La pagina si sta caricando...
La pagina si sta caricando...
La pagina si sta caricando...
La pagina si sta caricando...
La pagina si sta caricando...
La pagina si sta caricando...
La pagina si sta caricando...
La pagina si sta caricando...
La pagina si sta caricando...
La pagina si sta caricando...
La pagina si sta caricando...
La pagina si sta caricando...
La pagina si sta caricando...
La pagina si sta caricando...
La pagina si sta caricando...
La pagina si sta caricando...
La pagina si sta caricando...
La pagina si sta caricando...
La pagina si sta caricando...
La pagina si sta caricando...
La pagina si sta caricando...
La pagina si sta caricando...
La pagina si sta caricando...
La pagina si sta caricando...
La pagina si sta caricando...
La pagina si sta caricando...
La pagina si sta caricando...
La pagina si sta caricando...
La pagina si sta caricando...
La pagina si sta caricando...
La pagina si sta caricando...
La pagina si sta caricando...
La pagina si sta caricando...
La pagina si sta caricando...
La pagina si sta caricando...
La pagina si sta caricando...
-
 1
1
-
 2
2
-
 3
3
-
 4
4
-
 5
5
-
 6
6
-
 7
7
-
 8
8
-
 9
9
-
 10
10
-
 11
11
-
 12
12
-
 13
13
-
 14
14
-
 15
15
-
 16
16
-
 17
17
-
 18
18
-
 19
19
-
 20
20
-
 21
21
-
 22
22
-
 23
23
-
 24
24
-
 25
25
-
 26
26
-
 27
27
-
 28
28
-
 29
29
-
 30
30
-
 31
31
-
 32
32
-
 33
33
-
 34
34
-
 35
35
-
 36
36
-
 37
37
-
 38
38
-
 39
39
-
 40
40
-
 41
41
-
 42
42
-
 43
43
-
 44
44
-
 45
45
-
 46
46
-
 47
47
-
 48
48
-
 49
49
-
 50
50
-
 51
51
-
 52
52
-
 53
53
-
 54
54
-
 55
55
-
 56
56
-
 57
57
-
 58
58
-
 59
59
-
 60
60
-
 61
61
-
 62
62
-
 63
63
-
 64
64
-
 65
65
-
 66
66
-
 67
67
-
 68
68
-
 69
69
-
 70
70
-
 71
71
-
 72
72
-
 73
73
-
 74
74
-
 75
75
-
 76
76
-
 77
77
-
 78
78
-
 79
79
-
 80
80
-
 81
81
-
 82
82
-
 83
83
-
 84
84
-
 85
85
-
 86
86
-
 87
87
-
 88
88
-
 89
89
-
 90
90
-
 91
91
-
 92
92
-
 93
93
-
 94
94
-
 95
95
-
 96
96
-
 97
97
-
 98
98
-
 99
99
-
 100
100
-
 101
101
-
 102
102
-
 103
103
-
 104
104
-
 105
105
-
 106
106
-
 107
107
-
 108
108
-
 109
109
-
 110
110
-
 111
111
-
 112
112
-
 113
113
-
 114
114
-
 115
115
-
 116
116
-
 117
117
-
 118
118
-
 119
119
-
 120
120
-
 121
121
-
 122
122
-
 123
123
-
 124
124
-
 125
125
-
 126
126
-
 127
127
-
 128
128
-
 129
129
-
 130
130
-
 131
131
-
 132
132
-
 133
133
-
 134
134
-
 135
135
-
 136
136
-
 137
137
-
 138
138
-
 139
139
-
 140
140
-
 141
141
-
 142
142
-
 143
143
-
 144
144
-
 145
145
-
 146
146
-
 147
147
-
 148
148
-
 149
149
-
 150
150
-
 151
151
-
 152
152
-
 153
153
-
 154
154
-
 155
155
-
 156
156
-
 157
157
-
 158
158
-
 159
159
-
 160
160
-
 161
161
-
 162
162
-
 163
163
-
 164
164
-
 165
165
-
 166
166
-
 167
167
-
 168
168
-
 169
169
-
 170
170
-
 171
171
-
 172
172
-
 173
173
-
 174
174
-
 175
175
-
 176
176
-
 177
177
-
 178
178
-
 179
179
-
 180
180
-
 181
181
-
 182
182
-
 183
183
-
 184
184
-
 185
185
-
 186
186
-
 187
187
-
 188
188
-
 189
189
-
 190
190
-
 191
191
-
 192
192
-
 193
193
-
 194
194
-
 195
195
-
 196
196
-
 197
197
-
 198
198
-
 199
199
-
 200
200
-
 201
201
-
 202
202
-
 203
203
-
 204
204
-
 205
205
-
 206
206
-
 207
207
-
 208
208
-
 209
209
-
 210
210
-
 211
211
-
 212
212
-
 213
213
-
 214
214
-
 215
215
-
 216
216
-
 217
217


in altre lingue
- English: Megxon X34 User manual
- français: Megxon X34 Manuel utilisateur
- español: Megxon X34 Manual de usuario
- Deutsch: Megxon X34 Benutzerhandbuch
- Nederlands: Megxon X34 Handleiding
- português: Megxon X34 Manual do usuário
Documenti correlati
Altri documenti
-
Medion DIGITAL CAMERA MD 41084 Manuale del proprietario
-
Mercury CyperPix S330 Manuale utente
-
AIPTEK pocket dv 6800 le Manuale del proprietario
-
-
-
Easypix SD III Guida utente
-
-
-
-
CONCORD 3045 Manuale utente