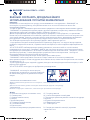
Jan Baby Side Travel Cribs Manuale utente
- Tipo
- Manuale utente

6804 BABYSIDE IM 1860,05 CUNA ins_ar.indd 1 4:31:58 2021/11/3 PM
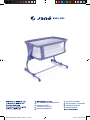
Baby Side
HASZNÁLATI UTASÍTÁS
GEBRUIKSAANWIJZING
UPUTE ZA UPOTREBU
ƱƶƺƻƹƼƳƿƱLjưƩƼƸƷƻƹƮƪƩ
192'1$328ľ,7,(
ŬšŤŠŦŢůųŮŤůŤů
AR
ES
FR
DE
IT
ƱƶƺƻƹƼƳƿƱLjƸƷƸƹƱƵƮƶƮƶƱLJ
192'.328ľ,7
PT


3
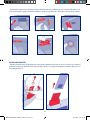
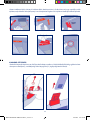
MINI CUNA COLECHO “BABYSIDE”
IMPORTANTE. CONSERVAR PARA FUTURAS CONSULTAS.
LEER ATENTAMENTE
ADVERTENCIAS
-ADVERTENCIA -
No utilice este producto sin antes leer las instrucciones de uso.
por ejemplo, cuerdas, cordones de cortinas o persianas, etc.
-ADVERTENCIA - Deje de utilizar el producto en el momento en que el niño pueda sentarse, levantarse o ponerse de rodillas
solo.
-ADVERTENCIA -
-ADVERTENCIA -
soltar los tornillos o elementos de unión, podrían generar atrapamientos en el bebé o partes de su ropa como: cintas de chu-
pete, enganches, collares y pendientes generando un posible riesgo de estrangulación.
-La mini cuna colecho debe estar siempre situada sobre un suelo horizontal.
-No debe permitir a niños jugar sin vigilancia en las proximidades de la mini cuna colecho.
-Cuando el niño permanezca en la
mini cuna
sin vigilancia, asegurarse que la barrera esté siempre elevada, correcta-
y las cremalleras totalmente cerradas, al igual que las ruedas completamente bloqueadas.
-NO utilizar la mini cuna - colecho si alguna de sus piezas está rota, deteriorada o falta. Contactar con JANÉ S.A. para la susti-
tución de las piezas e instrucciones extra de ser necesarias. NO substituya las piezas por usted mismo.
-Asegurarse que todos los dispositivos de montaje estén siempre convenientemente ajustados así como los mecanismos de
bloqueo.
-No utilizar nunca el tapizado sin la estructura metálica.
-ADVERTENCIA - No utilice más de un colchón en el producto.
-ADVERTENCIA-Para evitar riesgo de incendios: tener presente el riesgo de situar la mini cuna cerca del fuego o de otras
fuentes de calor, tales como aparatos de calefacción eléctricos, de calefacción a gas, etc.
-No utilice accesorios que no estén aprobados por el fabricante.
-ADVERTENCIA - Utilice únicamente el colchón incluido
en la mini cuna. Para evitar riesgo de a xia, no añada un
segundo colchón.
-MANTENIMIENTO Y LIMPIEZA
Mantener las piezas metálicas limpias y bien secas para evitar la oxidación.
Para limpiar las piezas de plástico, use solo detergente suave y agua templada.
-LAVADO DEL TAPIZADO
Lavarlo a mano ó a máquina y dejarlo secar a temperatura ambiente.
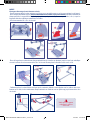
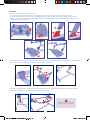
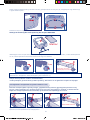
COMPONENTES
A Conjunto estructura y vestimenta textil
B Marco inferior
C Barra inferior extraíble
D Colchón
A1 Barra frontal extraíble
A2 Cremalleras ventana
A3 Ventana bebé
A4 Botón bloqueo sistema regulable de altura
A5 Regulador de altura
A6 Botón bloqueo marco inferior
A8 Ruedas
A9 Freno bloqueo ruedas
A10 Patas retráctiles
A11 Bloqueo pata
B1 Soportes para barra extraíble (A1) en modo colecho
1
6
2
3
1
6
2
3
NO
OK
6804 BABYSIDE IM 1860,05 CUNA ins_ar.indd 3 4:31:58 2021/11/3 PM
ES

44
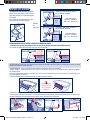
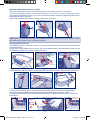
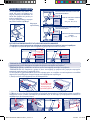
INSTRUCCIONES DE USO
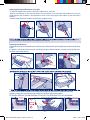
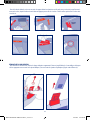
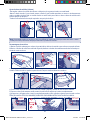
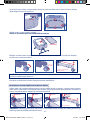
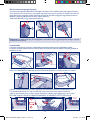
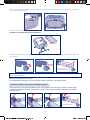
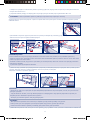
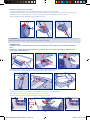
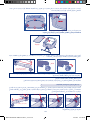
Montaje y desmontaje de la mini cuna colecho
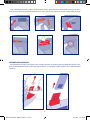
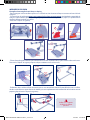
· Para el montaje colocar el marco superior con el tapizado encima de una mesa limpia o una cama como se indica en la gura 2.
· Colocar cada una de las patas laterales siempre con la numeración de las alturas en la parte externa, debe introducir el
extremo de cada pata en el soporte lateral del plástico hasta conseguir que el pin metálico sobresalga por el oricio (“click”) y
las patillas laterales de plástico queden encajadas en los oricios.
· Debe oír los clics de seguridad.
· Colocar la barra larga introduciendo cada extremo en los encajes de plástico hasta ver que el pin metálico sobresalga de nuevo.
Debe oír los “clics” de seguridad. Después colocar la estructura con las ruedas en el suelo.
· Finalmente situar el marco inferior de manera que sus extremos laterales queden alineados con los oricios situados a media
altura en los laterales de la mini cuna, insertar completamente cada extremo hacia el interior con un pequeño golpe hasta oir
los clicks de seguridad.
Vericar que los 2 soportes
de plástico A y B queden
hacia arriba
PIN OK
CLIP OK
2
A
A
“CLICK”
“CLICK”
AB
“CLICK”
“CLICK”
“CLICK”
6804 BABYSIDE IM 1860,05 CUNA ins_ar.indd 4 3/11/2021 4:31:58 PM

55
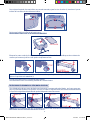
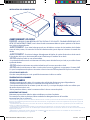
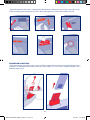
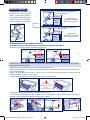
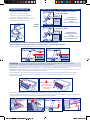
DESMONTAJE DE LA MINI CUNA:
· Para el desmontaje de la mini cuna seguir los pasos indicados anteriores de manera inversa hasta nalmente liberar los 3 blo-
queos de cada lateral presionando con una mano el pin metálico (1) y con la otra las 2 patillas de plástico (2, 3) y nalmente retirar
la pata (4).
· Coger la banda lateral de tejido y cubrir el soporte lateral de aluminio dando la vuelta por detrás hasta encontrar el otro velcro
desde el interior de la mini cuna presionar para unir los 2 velcros. Unir el velcro superior con el velcro situado debajo del tejido.
VELCRO
INSIDE
6804 BABYSIDE IM 1860,05 CUNA ins_ar.indd 5 3/11/2021 4:31:58 PM

66
“click”
OK
STOP
1
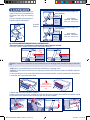
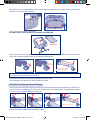
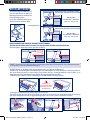
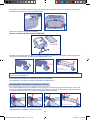
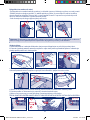
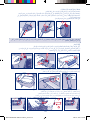
Uso como Moisés
(Posición más extendida)
Para sujetar el tapizado al marco inferior una vez esté montado, ajuste las tiras de velcro (4) situadas en la parte
inferior de la vestidura al tubo del marco inferior.
Posicionar el colchón en el fondo de la mini cuna.
Nunca utilizar la mini cuna sin el colchón del BABYSIDE.
Bloquear las cuatro ruedas de la mini cuna colecho bajando las palancas de freno para bloquear el movimiento de
manera que la marca roja de las ruedas quede completamente vista.
(*) IMPORTANTE: Para el uso como Mini cuna-Moises vericar que las patas telescópicas SIEMPRE estén desple-
gadas en la posición más extendida (1)
La mini cuna está lista para su uso desde este momento.
Para desmontar la mini cuna colecho, proceder de la manera inversa.
DESPLEGADO Y PLEGADO DE LA PATA (MODO COLECHO)
Con el dedo pulgar de una mano deslizar la tapa hacia atrás y mantener pulsado el botón, con la otra mano em-
pujar la pata hacia el interior para ajustarla a la cama. Al soltarla o separarla de la cama volverá automáticamente
a su posición original desplegada donde quedará bloqueada automáticamente.
*Nota: Para una instalación más ágil, se recomienda colocar la mini cuna cerca de la cama de los
adultos y pos-
teriormente acercarla mediante la tensión de las correas.
2
1
3
2
1
3
6
COLCHÓN
VELCRO
“click”
OK
STOP
1
Uso como Moisés
(Posición más extendida)
1
3
2
1
12 2
“DESLIZAR” “PULSAR” “PULSAR” “PULSAR”
6804 BABYSIDE IM 1860,05 CUNA ins_ar.indd 6 3/11/2021 4:31:59 PM

77
1
4
3
1
6
3
2
1
2
1
2 2
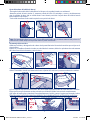
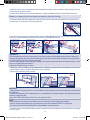
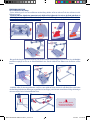
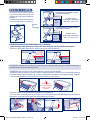
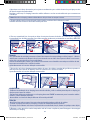
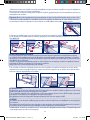
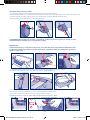
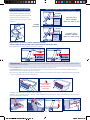
Ajuste de la altura del colchón (6 alturas)
-Para regular la altura del colchón debe liberar los bloqueos de seguridad situados en cada lateral.
-Mantener pulsado el botón circular (1), mantener pulsado el botón (2) hacia abajo o centro y simultáneamente
girar el regulador de altura 180º en sentido horario o anti horario para subir o bajar la altura del colchón hasta la
próxima posición de bloqueo…
-Cada media circunferencia de rotación equivale a una posición de altura.
*Nota: Está permitido inclinar la
mini cuna
con una diferencia máxima de 2 posiciones entre un lado y el otro.
La
cabeza del niño debe siempre estar posicionada en la parte más elevada.
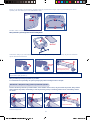
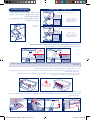
Desmontaje de la vestidura
a)Retirar el colchón y desenganchar los velcros de la parte inferior de la base de la vestidura que se jan en el
marco inferior.
b)Abrir las 2 cremalleras frontales situadas en cada lado de la ventana, deslizar los pulsadores de cada extremo
de la
barra frontal hacia el exterior y retirar la barra.
c)Desenganchar los velcros de las dos fundas laterales que cubren los tubos verticales.
d)Abrir la cremallera situada en el exterior del marco superior de la mini cuna y extraer totalmente la vestidura.
e)Con el tapizado separado de la estructura, abrir con el dedo el pequeño oricio de salida de la barra metálica.
f)Empujar la barra por el extremo oculto y extraerla por el lado del oricio hasta retirarla completamente.
g)
Al acabar el lavado volver a introducirla completamente por el oricio y cerrar el agujero presionando el velcro.
ATENCIÓN: NUNCA UTILIZAR LA MINICUNA BABYSIDE SIN LA BARRA METÁLICA INSTALADA EN LA VENTANA
1
4
1
6
3
2
3
1
2
1º
2º
ABRIR CERRAR
6804 BABYSIDE IM 1860,05 CUNA ins_ar.indd 7 3/11/2021 4:31:59 PM

88
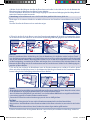
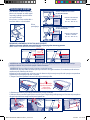
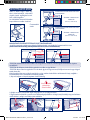
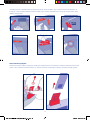
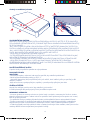
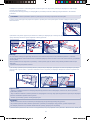
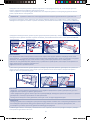
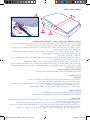
MODO COLECHO
Para tener mayor proximidad con el
bebé durante la noche, es posible
acoplar la
mini cuna
a la cama de los
padres mediante unas correas de
jación.
A través de la ventana lateral tendrá
contacto directo con su bebé.
RECOMENDACIONES Y ADVERTENCIAS MODO COLECHO
-El colchón de los padres siempre debe estar por encima del borde superior de la ventana abierta.
(El colchón del bebé siempre quedará por debajo del de los padres).
-ADVERTENCIA: Utilizar la
mini cuna
con la baranda frontal superior bajada solo en modo colecho perfectamente
anclada a la cama de los adultos.
-ADVERTENCIA: No instalar la
mini cuna
en modo colecho en el pie de la cama.
-ADVERTENCIA: No está permitido usar el modo colecho con camas y/o colchones redondos, colchones inables,
así como colchones de agua.
Únicamente es posible utilizar este modo si la cama donde se vaya a acoplar cumple con todas las especicaciones
del montaje que se describe a continuación.
1) Abrir completamente las 2 cremalleras hasta llegar al tope interior.
2) Desbloquear cada extremo de la barra frontal para poder liberarla:
3) Con una mano deslizar el pulsador hacia el exterior y con la otra separar el extremo de la barra hacia arriba, repetir
la operación en el lado opuesto para poder abrir la ventana hacia el exterior.
1
2
1
3
6
1
6
2
3
Min. 42 cm - Max. 58 cm
ALTURA
MINIMA
COLCHÓN BEBÉ
1
6
2
3
Min. 42 cm - Max. 58 cm
COLCHÓN
PADRES
EL COLCHÓN DE
LOS PADRES A
COLCHÓN BEBÉ
SIEMPRE POR
ENCIMA DE LA
BARANDA B
B
A
COLCHÓN
PADRES
1
2 2
1
6
2
3
Min. 42 cm - Max. 58 cm
OPEN OPEN
Esquema
de
montaje
ALTURA TOTAL
BASE CAMA + COLCHÓN
(Min. 52,5 - Max 65 cm)
ALTURA TOTAL
BASE CAMA + COLCHÓN
(Min. 52,5 - Max 65 cm)
EL COLCHÓN DEBE QUEDAR POR ENCIMA
DE LA VENTANA ABIERTA
EL COLCHÓN DEBE QUEDAR POR ENCIMA
DE LA VENTANA ABIERTA
COLECHO - TABLA DE COMPATIBILIDAD
COLCHÓN
COLCHÓN
BASE
CAMA
BASE
CAMA
Altura Máx.
42,5 cm
6
1
6
1
Nunca utilizar la
mini cuna-colecho
sin las
2 barras metálicas
6804 BABYSIDE IM 1860,05 CUNA ins_ar.indd 8 3/11/2021 4:32:00 PM

99
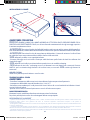
4) Acercar la mini cuna a la cama de los padres y ajustar su altura hasta que el colchón de la cama de los padres
quede por encima del borde superior de la ventana abierta.
Para jar la
mini cuna
colecho a la cama de adultos se utilizarán las dos correas adicionales que se adjuntan con la
mini cuna
.
* Nota: En modo colecho la altura seleccionada en las dos patas siempre debe ser la misma.
5) Enganchar la hebilla negra de la correa adicional a la hebilla situada en el marco inferior debajo del tapizado.
Las hebillas rojas de la correa deben quedar mirando hacia arriba.
6) Pasar el extremo libre la correa por debajo de la estructura de la cama de adultos (A) y rodearla para enganchar
al extremo libre de la hebilla roja con la hebilla roja situada más próxima a la
mini cuna
BABYSIDE.
CANAPÉS:
Si las patas retráctiles de la mini cuna tocan con el lateral de la estructura de la cama que llega al suelo (canapé…)
habrá que desbloquear el mecanismo de bloqueo de las patas presionando con un dedo sobre el punto indicado y
con la otra mano introducir la pata para ajustarla a la nueva longitud.
Presionar el desbloqueo, ocultar la pata y ponerla en contacto con el lateral de la cama hasta que el colchón de la mini
cuna entre en contacto con el colchón del adulto.
Ajustar rmemente las 2 correas de sujeción a esta medida.
7) En el caso de que las patas del colecho entren debajo de la cama de los adultos proceder de igual manera, acercar
la mini cuna hasta que el colchón de la mini cuna entre en contacto con el colchón del adulto.
Ajustar rmemente las 2 correas de sujeción a esta medida.
1
5
2
NO
1
5
2
OK
COLCHÓN COLCHÓN
ADVERTENCIAS:
-Vericar la correcta sujeción del colecho con la cama de adultos, se puede vericar tirando del colecho en dirección
opuesta de la cama de adultos.
-Para prevenir asxias por atrapamiento, el colecho SIEMPRE debe estar correctamente anclado a la cama de adultos
usan do el sistema de sujeción suministrado.
-Nunca utilizar un sistema de anclaje diferente al suministrado por JANÉ.
ATENCIÓN:
-Nunca debe quedar ningún espacio libre entre la barrera lateral de la ventana y el colchón de los adultos.
-Si existe un espacio libre entre el colecho y la cama de adultos NO utilice el producto.
-Los espacios libres sobrantes no deben ser rellenados con almohadas, sábanas, mantas o cualquier otro objeto.
8) Bloquear las ruedas mediante los frenos incorporados en ellas tal y como se explica en el punto ‘Montaje y
desmontaje de la
mini cuna
colecho’.
“click”
*
CLICK
A A
1
2
“DESLIZAR” “PULSAR”
3
4
2
1
“PULSAR”
STOP
6804 BABYSIDE IM 1860,05 CUNA ins_ar.indd 9 3/11/2021 4:32:00 PM

1010
INSTALACIÓN EN CANAPÉ
ADVERTENCIAS COLECHO
PELIGRO: CUANDO LA MINI CUNA NO ESTÉ ANCLADA A LA CAMA DE LOS ADULTOS, VERIFICAR QUE SIEMPRE LA VENTA
NA
ESTÉ PERFECTAMENTE CERRADA, con la barra frontal correctamente jada en los anclajes superiores y las cremalleras total-
mente cerradas.
-ADVERTENCIA!: Para evitar el peligro de que el cuello del bebé quede atrapado en el lado exterior de la ventana junto a
la cama del adulto, la altura de la barra de la ventana nunca debe superar la altura del colchón del adulto.
-ADVERTENCIA!: Para evitar riesgo de estrangulamiento del bebé, el sistema de unión del colecho con la cama de adultos
ha de estar siempre fuera de acceso tanto dentro como fuera del colecho.
-NO utilizar el producto en una supercie inclinada.
-El sistema de jación entre la mini cuna y la cama de adulto ha de ser el proporcionado por JANÉ, no utilizar otro sistema de
jación.
-NO utilizar la mini cuna en posición inclinada cuando se encuentre en modo colecho.
-NO utilizar la mini cuna - colecho si alguna de sus piezas está rota, deteriorada o falta. Contactar con JANÉ S.A. para la susti-
tución de las piezas e instrucciones extra de ser necesarias. NO substituya las piezas por usted mismo.
USO DEL COJIN
Consultar con su pediatra cuando debe empezar a utilizar el cojín.
TEMPERATURA DE LA HABITACIÓN
ADVERTENCIAS
-Vericar la temperatura de la habitación donde utilice el edredón para prevenir la hipertermia.
-La temperatura ideal de la habitación de su bebé es de 18 a 22 °C.
-La edad mínima recomendada para el uso de edredones es de 9 meses, existe riesgo de asxia si se utilizan con niños
menores de 4 meses
-Cuando empieza el calor, retirar el edredón y usar solo la funda como manta.
MANTENIMIENTO Y LIMPIEZA
Mantener las piezas metálicas limpias y bien secas para evitar la oxidación.
Para limpiar las piezas de plástico, use solo detergente suave y agua templada.
INFORMACIÓN SOBRE LA GARANTIA
Este artículo dispone de garantía según lo estipulado en la ley R.D. Legislativo 1/2007 de 16 de noviembre. Conservar la
factura de compra, es imprescindible su presentación en la tienda donde adquirió el producto para justicar su validez
ante cualquier reclamación.
Quedan excluídos de la presente garantía aquellos defectos o averías producidas por un uso inadecuado del artículo o el
incumplimiento de las normas de seguridad y mantenimiento descritas en las hojas de instrucciones y en las etiquetas
de lavado.
1
5
3
4
“CLICK”
2
1
5
3
4
“CLICK”
2
CORREAS “click”
6804 BABYSIDE IM 1860,05 CUNA ins_ar.indd 10 3/11/2021 4:32:00 PM
INFORMACIÓN SOBRE LA GARANTÍA
- Este artículo dispone de garantía contra defectos de fabricación según lo estipulado en las Directivas y/o Normativas legales vigentes
sobre garantías de bienes de consumo aplicables a la Unión Europea y propias del país de comercialización.
- Es imprescindible presentar la factura o tiquet de compra para poder tramitar la garantía a través del vendedor del artículo o, en su
defecto, a través del fabricante.
- La garantía excluye anomalías o averías producidas por un uso inadecuado, por incumplimiento de las normas de seguridad e
instrucciones de uso y mantenimiento proporcionadas, o a causa del desgaste por uso y manejo normal periódico del artículo.
- La etiqueta que contiene el número de serie de su modelo no debe ser arrancada bajo ningún concepto ya que contiene información
relevante para la garantía.

1111
“BABYSIDE” MINI COT - COBED
IMPORTANT. KEEP FOR FUTURE REFERENCE.
READ CAREFULLY
WARNINGS
-WARNING: Do not use this product without reading the instructions rst.
-WARNING: Do not use this mini cot once the child can sit up, kneel or stand up unaided.
-WARNING: Placing additional items in this product may cause suocation.
-WARNING: Do not place the product near other products that could cause a danger of suocation or strangulation, for
example: strings, curtains, cords, etc.
-The assembly parts should be rmly secured and checked to make sure that the fastening screws or connection points have
not come loose, and the baby cannot get caught on them or get parts of his clothes tangled in them such as: dummy cords,
hooks, collars or earrings causing a possible risk of strangulation.
-The co-sleeping mini cot should always be placed on a horizontal oor.
-Do not let children play unsupervised near the co-sleeping mini cot.
-When the child is in the mini cot unsupervised, make sure that the rail is always up, correctly fastened in place and
that the zips are
fully closed, and that the wheels are fully locked in place.
-DO NOT use the co-sleeping mini cot if any of the parts are broken, worn out or missing. Contact JANÉ S.A. to get
replace-
ment parts and extra instructions if necessary. DO NOT replace the parts yourself.
-Make sure that all the fastening devices are fully secure as well as the locking devices.
-Never use the cover without the metal structure.
-WARNING: Do not use more than once mattress in the mini cot.
-WARNING: To prevent the risk of re: be aware of the risk of placing the mini cot near a re or other sources of heat, such
as electric or gas heaters, etc.
-To prevent the risk of falls and suocation, never use two or more mattresses to make the child more comfortable.
-DO NOT use accessories that have not been approved by the manufacturer.
-WARNING: Only use the mattress that comes with
the mini cot. To prevent the risk of suocation, do not
add a second mattress.
-MAINTENANCE AND CLEANING
Keep the metal parts clean and dry to prevent them from rusting.
To clean the plastic parts, just use mild detergent and warm water.
-WASHING THE COVER
Wash it by hand and leave it to dry at room temperature.
PARTS
A Set of structure and fabric cover
B Base frame
C Detachable lower bar
D Mattress
E Fastening straps
A1 Removable front bar
A2 Window zips
A3 Baby’s window
A4 Height adjustment locking button
A5 Height adjuster
A6 Base frame locking button
A7 Clasp to secure the fastening straps to the main structure
A8 Wheels
A9 Wheel lock brake
A10 Retractable legs
A11 Leg lock
B1 Supports for detachable bar (A1) in co-sleeping mode
1
6
2
3
1
6
2
3
NO
OK
6804 BABYSIDE IM 1860,05 CUNA ins_ar.indd 11 3/11/2021 4:32:00 PM

1212
INSTRUCTIONS
Assembling and dismantling the co-sleeping mini cot:
· To assemble the cot place the upper frame with the upholstery on a clean table or on a bed as shown in diagram 2.
· Position each of the side legs always with the height numeration on the external side, and insert the end of each leg
into the side support of the plastic until the metal pin pops out through the hole (it will click) and the plastic side legs are
slotted into the holes.
· You should hear the safety clicks.
· Fit the long bar by inserting each end into the plastic slots until the metal pin pops out again. You should hear the safety
clicks. Then place the structure with the wheels on the oor.
· Lastly, position the lower frame so that the side ends are aligned with the holes halfway up the sides of the mini cot, and
then fully insert each end inwards with a gentle tap until you hear the safety clicks.
Check that the 2 plastic
supports A and B face
upwards
AB
PIN OK
CLIP OK
2
A
A
“CLICK”
“CLICK”
“CLICK”
“CLICK”
“CLICK”
6804 BABYSIDE IM 1860,05 CUNA ins_ar.indd 12 3/11/2021 4:32:00 PM

1313
DESMANTLING THE MINI COT:
· To dismantle the mini cot follow the steps above in reverse until you have released the 3 blocks of each side by using one hand
to press the metal pin (1) and the other hand to press the 2 plastic legs (2, 3) and then remove the leg (4).
· Take the side fabric band and cover the aluminium side support turning the band over to nd the other Velcro part, from inside
the mini cot press together to join the 2 Velcro parts. Fasten the upper Velcro with the Velcro found underneath the fabric.
VELCRO
INSIDE
6804 BABYSIDE IM 1860,05 CUNA ins_ar.indd 13 3/11/2021 4:32:00 PM

1414
“click”
OK
STOP
1
Uso como Moisés
(Posición más extendida)
1
MATTRESS
Once the base frame is assembled t the upholstery by fastening the Velcro strips (4) found on the underneath
of the upholstery (4) to the base frame tube.
Place the mattress on the bottom of the mini cot.
Never use the mini cot without BABYSIDE mattress.
Lock all four wheels of the co-sleeping mini cot, lowering the levers to lock them so that the red mark is fully
visible
on the wheels.
(*) IMPORTANT: For use as a Mini Cot-Cradle, check that the telescopic legs are ALWAYS unfolded and in the
most extended position (1)
The mini cot is now ready for use.
To dismantle the co-sleeping mini cot, follow the same steps in reverse.
UNFOLDING AND FOLDING THE LEG (CO-SLEEPING MODE)
Use your thumb to slide the cover back and keep the button pressed down, push the leg inwards with your other
hand to t it to the bed. When you release it or separate it from the bed, it will automatically return to its original
unfolded position where it will lock into place automatically.
*Note: For quicker installation, it is advisable to place the mini cot near the adult bed and then bring it closer
by tightening the straps
.
“click”
OK
STOP
1
Uso como Moisés
(Posición más extendida)
VELCRO
2
1
3
2
1
3
6
Use as a Cradle
(The most extended position)
Co-sleeping mode
3
2
1
12 2
“SLIDE” “PRESS” “PRESS” “PRESS”
6804 BABYSIDE IM 1860,05 CUNA ins_ar.indd 14 3/11/2021 4:32:01 PM

1515
Adjusting the height of the mattress (6 heights)
-To adjust the height of the mattress, release the safety locks on each side.
-Keep the round button (1) pressed, keep button (2) pressed down or to the centre and simultaneously turn the
height adjuster 180º clockwise or anti-clockwise to raise or lower the height of the mattress to the next locking
position…
-Each half circumference of the dial is equivalent to a height position.
*Note:
other.
The baby’s head should always be in the highest part of the cot.
Removing the upholstery
a) Remove the mattress and unfasten the Velcro strips on the bottom of the upholstery attached to the base
frame.
b) Open the 2 front zips found on each side of the window, slide the buttons on each end of the front bar
outwards and remove the bar.
c) Unfasten the Velcro strips of the two side sleeves covering the vertical tubes.
e)
f) Push the bar from the covered end and take it out through the hole until it is completely removed.
g) After washing, reinsert it fully through the hole and fasten it again with the Velcro.
ATTENTION: NEVER USE THE BABYSIDE MINI COT WITHOUT THE METAL BAR FITTED IN THE WINDOW.
1
4
3
1
6
3
2
1
١
٢ ٢
1
4
1
6
3
2
3
1
2
1º
2º
OPEN CLOSE
6804 BABYSIDE IM 1860,05 CUNA ins_ar.indd 15 4:32:01 2021/11/3 PM

1616
CO-SLEEPING MODE RECOMMENDATIONS AND WARNINGS
-The parents’ mattress should always be above the top edge of the open window.
(The baby’s mattress should always be below the parent’s mattress).
WARNING: Use the mini cot with the front bar lowered only in co-sleeping mode, attached securely to the adult
bed.
-WARNING: Do not attach the mini cot to the foot of the bed in co-sleeping mode.
-WARNING: The mini cot must not be used in co-sleeping mode with round beds and/or mattresses, inatable mattresses
or water beds.
It is only possible to use this mode if the adult bed used complies with the assembly specications listed below.
1) Fully open the 2 zips to the interior limit.
2) Unlock each end of the front bar to release it:
3) With one hand slide the button outwards and with the other hand separate the end of the bar upwards, repeat
the operation on the opposite side to be able to open the window outwards.
1
2
1
3
6
1
2 2
1
6
2
3
Min. 42 cm - Max. 58 cm
OPEN OPEN
CO-SLEEPING MODE
To keep the baby closer during the
night, the mini cot can be attached to
the parents’ bed using the fastening
straps.
You can have direct contact with your
baby through the side window.
Assembly
diagram
TOTAL HEIGHT
BED BASE + MATTRESS
(Min. 52.5 - Max 65 cm)
TOTAL HEIGHT
BED BASE + MATTRESS
(Min. 52.5 - Max 65 cm)
THE MATTRESS SHOULD BE ABOVE THE
OPEN WINDOW
THE MATTRESS SHOULD BE ABOVE THE
OPEN WINDOW
CO-SLEEPING – COMPATIBILITY TABLE
MATTRESS
MATTRESS
BED
BASE
BED
BASE
Max. height
42,5 cm
Never use the
co-sleeping mini cot
without the 2 metal
bars
1
6
2
3
Min. 42 cm - Max. 58 cm
MINIMUM
HEIGHT
MATTRESS BABY
1
6
2
3
Min. 42 cm - Max. 58 cm
PARENTS’
MATTRESS
PARENTS’ MATTRESS
A
ALWAYS ABOVE THE
RAIL B
MATTRESS BABY
B
A
PARENTS’
MATTRESS
6
1
6
1
6804 BABYSIDE IM 1860,05 CUNA ins_ar.indd 16 3/11/2021 4:32:02 PM

1717
1
5
2
NO
1
5
2
OK
MATTRESS MATTRESS
“click”
4) Bring the mini cot closer to the parents’ bed and adjust the height so that the mattress of the adult bed is above
the top edge of the open window.
To attach the co-sleeping mini cot to the adult bed, used the two additional straps provided with the mini cot.
* Note: In co-sleeping mode the same height must always be selected for both legs.
5) Fasten the black clasp of the additional strap to the clasp found on the lower part of the frame under the cover.
The red clasps
on the strap should be facing upwards.
6) Pass the free end of the strap underneath the structure of the adult bed (A) and wrap it round to fasten the free
end of the red clasp with the red clasp positioned closest to the BABYSIDE mini cot.
DIVAN BEDS:
If the retractable legs of the mini cot touch the side of the structure of the bed that reaches the oor (divan bed…)
the leg locking device will need to be released by pressing the point indicated with one nger and using the other
hand to insert the leg to adjust it to the new length.
Press the unlocking point, conceal the leg and bring it into contact with the side of the bed until the mattress of the
mini cot is touching the adult mattress.
Tighten the 2 fastening straps securely.
7) If the legs of the co-sleeping cot go underneath the adult bed, proceed as before and bring the mini cot closer
until the mattress in the cot touches the mattress on the adult bed.
Tightening the 2 fastening straps securely.
WARNINGS:
-Check that the co-sleeping mini cot is securely attached to the adult bed, do this by pulling the mini cot away from
the
adult bed.
-To prevent suocation, the co-sleeping mini cot must ALWAYS be correctly attached to the adult bed using the
fastening system provided.
-Never use a dierent fastening system to the one supplied by Jané.
NOTE:
-There should never be any free space between the side bar of the window and the adult mattress.
-If there is any free space between the co-sleeping mini cot and the adult bed DO NOT use the product.
-Free spaces should not be lled with pillows, sheets, blankets or any other items.
8) Lock the wheels using the brakes tted on them as explained in the ‘Assembling and dismantling the co-sleeping
mini cot’ section.
*
CLICK
A A
1
2
“SLIDE” “PRESS”
3
4
2
1
“PRESS”
STOP
6804 BABYSIDE IM 1860,05 CUNA ins_ar.indd 17 3/11/2021 4:32:02 PM

1818
FITTING TO A DIVAN BED
CO-SLEEPING COT WARNINGS
DANGER: WHEN THE MINI COT IS NOT ATTACHED TO THE ADULT BED, MAKE SURE THAT THE WINDOW IS ALWAYS
FULLY CLOSED, with the front bar correctly secured to the upper fastening points and with the zips fully closed.
-WARNING!: To prevent the risk of the baby’s neck getting caught in the outer side of the window next
to the adult bed, the height of the window bar must never be above the height of the adult mattress.
-WARNING!: To prevent the risk of strangulation, the system for fastening the co-sleeping cot to the adult bed
must always be inaccessible, both inside and outside the cot.
-DO NOT use the product on a tilted surface.
-The fastening system used to attach the mini cot to the adult bed must be the one supplied by Jané, do not use
any other fastening system.
-DO NOT use the mini cot in an inclined position when using it in co-sleeping mode.
-DO NOT use the mini cot – co-sleeping cot if any of the parts are broken, worn out or missing. Contact JANÉ S.A.
to get replacement parts and extra instructions if necessary. DO NOT replace the parts yourself.
USING THE CUSHION INSERT
Consult your paediatrician about when to start using the cushion insert.
ROOM TEMPERATURE
WARNINGS
-Check the temperature of the room where the duvet is used to prevent hyperthermia.
-The ideal temperature for your baby’s room is 18 - 22 °C.
-The minimum recommended age for using duvets is 9 months, there is a risk of suocation is duvets are used
with children under 4 months old.
-When it starts to get hot, take the duvet lling out and just use the cover as a blanket.
MAINTENANCE AND CLEANING
Keep the metal parts clean and dry to prevent them from rusting.
To clean the plastic parts, just use mild detergent and warm water.
GUARANTEE INFORMATION
This article is guaranteed in accordance with R.D. 1/2007 of 16th November. Keep your receipt as proof of
purchase, you need to show it at the store where you purchased the product to prove validity in the event of
any type of claim.
This guarantee does not cover any faults or breakages caused by misuse of the article or by not following the
safety and maintenance information listed in the instructions and on the care labels.
1
5
3
4
“CLICK”
2
1
5
3
4
“CLICK”
2
STRAPS “click”
6804 BABYSIDE IM 1860,05 CUNA ins_ar.indd 18 3/11/2021 4:32:02 PM
GUARANTEE INFORMATION
- This item is guaranteed against manufacturing defects as stipulated in the legal Directives and/or regulations in force on guarantees for consumer goods
applicable to the European Union and those of the country in which it is marketed.
- It is essential to present the purchase invoice or receipt in order to process the guarantee through the seller of the item or, failing that, through the manufacturer.
- The guarantee excludes anomalies or faults caused by misuse, non-compliance with the safety regulations and instructions for use and maintenance provided, or
due to wear and tear caused by normal use and regular handling of the item.
- The label containing the serial number of your model must not be torn off under any circumstances as it contains information relevant to the guarantee.

1919
MINI-BERCEAU CO-DODO “BABYSIDE”
IMPORTANT. CONSERVER POUR DE FUTURES
CONSULTATIONS. LIRE ATTENTIVEMENT
AVERTISSEMENTS
-AVERTISSEMENT : Ne pas utiliser le produit sans avoir lu les instructions préalablement.
-AVERTISSEMENT :
Si l’enfant peut s’asseoir, s’agenouiller ou se lever seul, ce mini lit ne devra plus être utilisé par l’enfant.
-AVERTISSEMENT : L’installation d’éléments supplémentaires pourrait provoquer des asphyxies.
-AVERTISSEMENT : Ne pas placer le produit près d’autres produits pouvant entraîner des risques d’asphyxie ou étrangle-
ment, par exemple : cordes, rideaux, lacets, etc.
-Les éléments de montage devront toujours être bien xés et vériés an d’éviter que les vis ou autres éléments de xation ne
se démontent, provoquent des coincements sur le bébé ou accrochent ses vêtements, tels que : cordons de sucette, attaches,
colliers et boucles d’oreille entraînant un risque d’étranglement.
-Le mini-berceau Co-dodo doit toujours être installé sur un sol horizontal.
-Ne pas laisser les enfants jouer sans surveillance à proximité du mini-berceau co-dodo.
-Lorsque l’enfant est dans le mini-berceau sans surveillance, s’assurer que la barrière est toujours relevée, correcte-
ment xée et les fermetures-éclair
entièrement fermées, ainsi que les roues complètement bloquées.
-NE PAS utiliser le mini-berceau co-dodo si une des pièces est cassée, détériorée ou manquante. Contacter JANÉ S.A. pour le
remplacement de pièces et instructions extra si nécessaire. NE remplacez PAS les pièces vous-même.
-S’assurer que tous les dispositifs de montage sont toujours correctement ajustés ainsi que les mécanismes de blocage.
-Ne jamais utiliser la housse sans la structure métallique.
-AVERTISSEMENT : Ne pas utiliser plus d’un matelas dans le mini-berceau.
-AVERTISSEMENT : Pour éviter les risques d’incendie : ne pas placer le mini-berceau près du feu ou d’autres sources de
chaleur, tels que radiateurs électriques, chauages à gaz, etc.…
-Pour éviter le risque de chute et asphyxie, ne jamais superposer de matelas pour que l’enfant soit plus à l’aise.
-Ne pas utiliser d’accessoires non approuvés par le fabricant.
-MISE EN GARDE : utilisez uniquement le matelas
qui est fourni avec le mini-berceau. Afin d’éviter tout
risque d’étouement, n’ajoutez pas de deuxième matelas.
-ENTRETIEN ET NETTOYAGE
Maintenez propres et bien sèches les pièces métalliques pour éviter l’oxydation.
Pour nettoyer les pièces en plastique, utilisez seulement un détergent neutre et de l’eau tiède.
-LAVAGE DE L’ASSISE
Laver à la main et laisser sécher à température ambiante.
COMPOSANTS
A Ensemble structure et revêtement textile
B Cadre inférieur
C Barre inférieure amovible
D Matelas
E Courroies xation
A1 Barre frontale amovible
A2 Fermetures-éclair fenêtre
A3 Fenêtre bébé
A4 Bouton blocage système réglable en hauteur
A4 Bouton blocage système réglable en hauteur
A5 Régulateur de hauteur
A6 Bouton blocage cadre inférieur
A7 Boucle pour xation sangles de xation à la structure principale
A8 Roues
A9 Frein blocage roues
A10 Pieds rétractiles
A11 Blocage pied
B1 Supports pour barre amovible (A1) en mode co-dodo
1
6
2
3
1
6
2
3
NO
OK
6804 BABYSIDE IM 1860,05 CUNA ins_ar.indd 19 3/11/2021 4:32:02 PM
FR

2020
NOTICE
Montage et démontage du mini-berceau co-dodo
· Pour le montage placer le cadre supérieur avec la housse sur une table propre ou un lit comme indiqué sur la gure 2.
· Placer chaque pied latéral toujours avec la numérotation de la hauteur sur la partie externe. Introduire l’extrémité de
chaque pied dans le support latéral du plastique jusqu’à ce que le pin métallique ressorte par l’orice (« clic ») et que les
languettes latérales en plastique entrent dans les orices.
· Vous devez entendre les « clics » de sécurité.
· Placer la longue barre en introduisant chaque extrémité dans les encoches en plastique jusqu’à ce que le pin métallique
ressorte à nouveau. Vous devez entendre les “clics” dé sécurité. Ensuite placer la structure avec les roues au sol.
· Finalement placer le cadre inférieur de façon que les extrémités latérales soient alignées avec les orices situés à mi-
hauteur sur les côtés, insérer entièrement chaque extrémité vers l’intérieur avec un petit coup jusqu’à entendre les clics
de sécurité.
Vérier que les 2 supports
en plastique A et B sont
vers le haut
AB
PIN OK
CLIP OK
2
A
A
“CLICK”
“CLICK”
“CLICK”
“CLICK”
“CLICK”
6804 BABYSIDE IM 1860,05 CUNA ins_ar.indd 20 3/11/2021 4:32:02 PM
La pagina si sta caricando...
La pagina si sta caricando...
La pagina si sta caricando...
La pagina si sta caricando...
La pagina si sta caricando...
La pagina si sta caricando...
La pagina si sta caricando...
La pagina si sta caricando...
La pagina si sta caricando...
La pagina si sta caricando...
La pagina si sta caricando...
La pagina si sta caricando...
La pagina si sta caricando...
La pagina si sta caricando...
La pagina si sta caricando...
La pagina si sta caricando...
La pagina si sta caricando...
La pagina si sta caricando...
La pagina si sta caricando...
La pagina si sta caricando...
La pagina si sta caricando...
La pagina si sta caricando...
La pagina si sta caricando...
La pagina si sta caricando...
La pagina si sta caricando...
La pagina si sta caricando...
La pagina si sta caricando...
La pagina si sta caricando...
La pagina si sta caricando...
La pagina si sta caricando...
La pagina si sta caricando...
La pagina si sta caricando...
La pagina si sta caricando...
La pagina si sta caricando...
La pagina si sta caricando...
La pagina si sta caricando...
La pagina si sta caricando...
La pagina si sta caricando...
La pagina si sta caricando...
La pagina si sta caricando...
La pagina si sta caricando...
La pagina si sta caricando...
La pagina si sta caricando...
La pagina si sta caricando...
La pagina si sta caricando...
La pagina si sta caricando...
La pagina si sta caricando...
La pagina si sta caricando...
La pagina si sta caricando...
La pagina si sta caricando...
La pagina si sta caricando...
La pagina si sta caricando...
La pagina si sta caricando...
La pagina si sta caricando...
La pagina si sta caricando...
La pagina si sta caricando...
La pagina si sta caricando...
La pagina si sta caricando...
La pagina si sta caricando...
La pagina si sta caricando...
La pagina si sta caricando...
La pagina si sta caricando...
La pagina si sta caricando...
La pagina si sta caricando...
La pagina si sta caricando...
La pagina si sta caricando...
La pagina si sta caricando...
La pagina si sta caricando...
La pagina si sta caricando...
La pagina si sta caricando...
La pagina si sta caricando...
La pagina si sta caricando...
La pagina si sta caricando...
La pagina si sta caricando...
La pagina si sta caricando...
La pagina si sta caricando...
La pagina si sta caricando...
La pagina si sta caricando...
La pagina si sta caricando...
La pagina si sta caricando...
La pagina si sta caricando...
La pagina si sta caricando...
La pagina si sta caricando...
La pagina si sta caricando...
La pagina si sta caricando...
La pagina si sta caricando...
La pagina si sta caricando...
La pagina si sta caricando...
La pagina si sta caricando...
La pagina si sta caricando...
La pagina si sta caricando...
La pagina si sta caricando...
La pagina si sta caricando...
La pagina si sta caricando...
La pagina si sta caricando...
La pagina si sta caricando...
La pagina si sta caricando...
La pagina si sta caricando...
La pagina si sta caricando...
La pagina si sta caricando...
La pagina si sta caricando...
La pagina si sta caricando...
La pagina si sta caricando...
-
 1
1
-
 2
2
-
 3
3
-
 4
4
-
 5
5
-
 6
6
-
 7
7
-
 8
8
-
 9
9
-
 10
10
-
 11
11
-
 12
12
-
 13
13
-
 14
14
-
 15
15
-
 16
16
-
 17
17
-
 18
18
-
 19
19
-
 20
20
-
 21
21
-
 22
22
-
 23
23
-
 24
24
-
 25
25
-
 26
26
-
 27
27
-
 28
28
-
 29
29
-
 30
30
-
 31
31
-
 32
32
-
 33
33
-
 34
34
-
 35
35
-
 36
36
-
 37
37
-
 38
38
-
 39
39
-
 40
40
-
 41
41
-
 42
42
-
 43
43
-
 44
44
-
 45
45
-
 46
46
-
 47
47
-
 48
48
-
 49
49
-
 50
50
-
 51
51
-
 52
52
-
 53
53
-
 54
54
-
 55
55
-
 56
56
-
 57
57
-
 58
58
-
 59
59
-
 60
60
-
 61
61
-
 62
62
-
 63
63
-
 64
64
-
 65
65
-
 66
66
-
 67
67
-
 68
68
-
 69
69
-
 70
70
-
 71
71
-
 72
72
-
 73
73
-
 74
74
-
 75
75
-
 76
76
-
 77
77
-
 78
78
-
 79
79
-
 80
80
-
 81
81
-
 82
82
-
 83
83
-
 84
84
-
 85
85
-
 86
86
-
 87
87
-
 88
88
-
 89
89
-
 90
90
-
 91
91
-
 92
92
-
 93
93
-
 94
94
-
 95
95
-
 96
96
-
 97
97
-
 98
98
-
 99
99
-
 100
100
-
 101
101
-
 102
102
-
 103
103
-
 104
104
-
 105
105
-
 106
106
-
 107
107
-
 108
108
-
 109
109
-
 110
110
-
 111
111
-
 112
112
-
 113
113
-
 114
114
-
 115
115
-
 116
116
-
 117
117
-
 118
118
-
 119
119
-
 120
120
-
 121
121
-
 122
122
-
 123
123


Jan Baby Side Travel Cribs Manuale utente
- Tipo
- Manuale utente
in altre lingue
Altri documenti
-
Jane BABYSIDE Use And Assembly Instructions
-
Joie ROOMIE GLIDE DLX S S GREY FLOWER Manuale utente
-
Joie Roomie Glide Bedside Crib Manuale utente
-
Chicco NeXt 2 me Air Sleeping Crib Manuale utente
-
ingenuity FoldAway Rocking Bassinet – Fletcher Manuale del proprietario
-
CANGAROO Baby crib 2 in 1 Day`n`Night Istruzioni per l'uso
-
mothercare Kinderkraft NESTE UP Lit bébé cododo Manuale utente
-
Kinderkraft NESTE UP Manuale utente
-
-