Braun 5377 Manuale utente
- Categoria
- Rasoi da uomo
- Tipo
- Manuale utente
Questo manuale è adatto anche per

Type 5377
www.braun.com
®
7
Silk
•
épil
®
Legs & Body
7281 WD
Legs, Body
& Face
7681plus WD
7681 WD
0
I
I
I
0
I
I
I
7
97167071_SE7681_7281_MN_S1.indd 197167071_SE7681_7281_MN_S1.indd 1 25.08.14 15:5625.08.14 15:56
Stapled booklet, 130 x 155 mm, 80 p (incl. 8 p cover), 1/1c = black
CSS APPROVED Effective Date 22Sep2014 GMT - Printed 30Oct2014 Page 1 of 80

Braun Infolines
DE / AT 00 800 27 28 64 63
00 800 BRAUNINFOLINE
CH 08 44 - 88 40 10
UK 0800 783 7010
IE 1 800 509 448
FR 0 800 944 802
BE 0 800 14 592
ES 901 11 61 84
IT 800 440 017
NL 0 800-445 53 88
DK 70 15 00 13
NO 22 63 00 93
SE 020 - 21 33 21
FI 020 377 877
GR 210-9478700
RSA 0860 112 188
(Sharecall charged at local rates)
www.service.braun.com
Deutsch 6
English 13
Français 22
Español 29
Italiano 36
Nederlands 42
Dansk 49
Norsk 55
Svenska 61
Suomi 67
∂ÏÏËÓÈο 73
Braun GmbH
Frankfurter Straße 145
61476 Kronberg/Germany
www.braun.com
97167071/IX-14
DE/UK/FR/ES/IT/NL/DK/NO/SE/FI/GR
97167071_SE7681_7281_MN_S2.indd 197167071_SE7681_7281_MN_S2.indd 1 10.09.14 12:0510.09.14 12:05
CSS APPROVED Effective Date 22Sep2014 GMT - Printed 30Oct2014 Page 2 of 80

0
I
I
I
0
I
I
I
7
1
9
10
8
7
5a
5b
4a
4
3
2
release
6
1
2
6
1a
1b
11
only with model 7681plus, 7681
only with model 7681plus
3
97167071_SE7681_7281_MN_S3.indd 197167071_SE7681_7281_MN_S3.indd 1 25.08.14 15:5825.08.14 15:58
CSS APPROVED Effective Date 22Sep2014 GMT - Printed 30Oct2014 Page 3 of 80

2
90°
3
90°
0
I
I
I
A
5
4
0
I
I
I
0
I
I
I
1
release
release
release
6a
6b
O
I
I
I
O
I
I
I
4
97167071_SE7681_7281_MN_S4.indd 197167071_SE7681_7281_MN_S4.indd 1 25.08.14 15:5925.08.14 15:59
CSS APPROVED Effective Date 22Sep2014 GMT - Printed 30Oct2014 Page 4 of 80

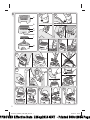
1.
2.
3.
a
b
c
d
e
f
g
1
1
2
1
2
1
A
B
C1
C2
D1
D2
E
F
G1 G2
trim
B
O
I
I
I
5
97167071_SE7681_7281_MN_S5.indd 197167071_SE7681_7281_MN_S5.indd 1 25.08.14 15:5925.08.14 15:59
CSS APPROVED Effective Date 22Sep2014 GMT - Printed 30Oct2014 Page 5 of 80

6
Deutsch
Unsere Produkte werden hergestellt, um
höchste Ansprüche an Qualität, Funktionalität
und Design zu erfüllen. Wir wünschen Ihnen
mit Ihrem neuen Braun Silk·épil 7 viel Freude.
Bitte lesen Sie vor Gebrauch des Gerätes die
Gebrauchsanweisung sorgfältig durch und
bewahren Sie sie auf.
Braun Silk·épil 7 wurde entwickelt, um die
Entfernung unerwünschter Härchen so
gründlich, behutsam und leicht wie möglich
zu machen. Das bewährte Silk·épil Epilier-
system entfernt das Haar an der Wurzel und
hält die Haut wochenlang glatt. Da die nach-
wachsenden Härchen zart und weich sind,
entstehen keine Stoppeln mehr.
Achtung
•
Aus hygienischen Gründen sollten
Sie das Gerät nicht gemeinsam
mit anderen Personen benutzen.
•
Dieses Gerät ist mit einem Spezial-
kabel mit integriertem Netzteil für
Sicherheitskleinspannung ausge-
stattet. Es dürfen weder Teile aus-
getauscht noch Veränderungen
vorgenommen werden, da sonst
Stromschlaggefahr besteht.
•
Dieses Gerät ist geeignet
für die Verwendung in der
Badewanne und in der Dusche.
Aus Sicherheitsgründen kann es
nur kabellos verwendet werden.
•
Dieses Gerät kann von Kindern ab
8 Jahren und von Personen mit
reduzierten physischen, sensori-
schen oder mentalen Fähigkeiten
oder Mangel an Erfahrung und/
oder Wissen benutzt werden, wenn
sie beaufsichtigt oder bezüglich
des sicheren Gebrauchs des
Gerätes unterwiesen wurden und
die daraus resultierenden Gefahren
verstanden haben. Kinder dürfen
nicht mit dem Gerät spielen.
Reinigung und Benutzer-Wartung
dürfen nicht durch Kinder durch-
geführt werden, es sei denn, sie
sind älter als 8 Jahre und beauf-
sichtigt.
•
Das laufende Gerät sollte nicht mit
anderen Hautpartien (z. B. Wim-
pern, Kopfhaaren usw.), Kleidern
und Schnüren in Kontakt kommen,
um jede Verletzungsgefahr, ein
Blockieren oder ein Beschädigen
des Gerätes zu vermeiden.
•
Verwenden Sie den Epilierkopf (2)
nie ohne Aufsatz.
Informationen zur Epilation
Bei allen Formen der Haarentfernung an
der Wurzel kann es zum Einwachsen von
Haaren oder zu Hautreizungen (z. B. Brennen,
Rötungen, Jucken) kommen, abhängig auch
von Ihrem jeweiligen Haut- und Haartyp. Das
sind normale Reaktionen, die auch rasch
wieder abklingen. Sie können jedoch stärker
auftreten, wenn Sie zum ersten Mal epilieren
oder wenn Sie empfindliche Haut haben.
97167071_SE7681_7281_MN_S6-80.indd 697167071_SE7681_7281_MN_S6-80.indd 6 10.09.14 12:0410.09.14 12:04
CSS APPROVED Effective Date 22Sep2014 GMT - Printed 30Oct2014 Page 6 of 80

7
Falls diese Hautreaktionen nach 36 Stunden
noch anhalten, sollten Sie Ihren Arzt um
Rat fragen. In aller Regel nehmen die Haut-
reaktionen und das Schmerz empfinden nach
mehrmaliger Anwendung deutlich ab.
Es kann vorkommen, dass sich die Haut
durch das Eindringen von Bakterien ent-
zündet (z. B. wenn das Gerät über die Haut
gleitet). Eine gründliche Reinigung des
Epilierkopfes vor jeder Anwendung reduziert
weitestgehend dieses Infektionsrisiko.
Falls Sie Zweifel haben, ob Sie dieses Gerät
benutzen sollen, fragen Sie bitte Ihren Arzt.
In folgenden Fällen sollten Sie das Gerät nur
nach ärztlichem Rat anwenden:
– bei Ekzemen, Wunden, entzündeten
Hautreaktionen wie Follikulitiden
(Eiterknötchen) und Krampfadern
– im Bereich von Muttermalen
– bei Schwächung der Abwehrkräfte Ihrer
Haut, die auftreten kann bei Diabetes,
Schwangerschaft, bei Vorliegen des
Raynaud Syndroms, bei Blutern, Candida
oder Immunschwäche.
Einige praktische Tipps
Wenn Sie bisher noch kein Epiliergerät ver-
wendet haben, oder wenn Sie längere Zeit
nicht epiliert haben, kann es eine kurze Zeit
dauern, bis sich Ihre Haut an die Epilation
gewöhnt hat. Der zunächst stärker empfun-
dene Zupfschmerz wird bei wiederholter
Anwendung deutlich geringer, denn die Zahl
der zu entfernenden Haare nimmt ab und die
Haut gewöhnt sich an die Epilation.
Die Epilation ist leichter und angenehmer,
wenn die Haare die optimale Länge von 2 bis
5 mm haben. Sind die Haare länger, emp-
fehlen wir, zunächst zu rasieren und nach
1-2 Wochen die kürzeren, nachwachsenden
Haare zu epilieren.
Am besten epilieren Sie beim ersten Mal
am Abend, damit eventuelle Hautrötungen
über Nacht abklingen können. Um die Haut
zu entspannen, empfehlen wir die Verwen-
dung einer Feuchtigkeitscreme nach der
Epilation.
Es kann vorkommen, dass dünn nachwach-
sende Härchen nicht an die Hautoberfläche
gelangen. Die regelmäßige Verwendung
eines Massageschwammes (z. B. nach dem
Duschen) oder eines Körper-Peelings hilft,
das Einwachsen von Härchen zu verhindern.
Damit wird die obere Hautschicht entfernt
und feine Haare können an die Oberfläche
gelangen.
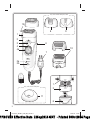
Gerätebeschreibung
1a HochfrequenzMassage-Aufsatz
1b EffizienzPro-Aufsatz
2 Epilierkopf
3 «smartlight»
4 Schalter mit Freigabetasten (4a)
5a Ladekontrollleuchte
5b Restkapazitätsleuchte
6 Entriegelungstaste
7 Spezialkabel
8 Epilieraufsatz für die Achsel (nicht bei
allen Modellen)
9 Epilieraufsatz für Gesichtshärchen (nicht
bei allen Modellen
10 Rasieraufsatz mit OptiTrim-Kamm
11 Ladestation (nur bei Modell 7681plus)
Aufladen
• Bitte laden Sie das Gerät vor dem
Gebrauch auf. Für optimale Leistung
empfehlen wir, das Gerät immer im vollge-
ladenen Zustand zu benutzen.
• Schließen Sie das ausgeschaltete Gerät
über das Spezialkabel ans Netz an und
laden Sie es ca. eine Stunde.
97167071_SE7681_7281_MN_S6-80.indd 797167071_SE7681_7281_MN_S6-80.indd 7 10.09.14 12:0410.09.14 12:04
CSS APPROVED Effective Date 22Sep2014 GMT - Printed 30Oct2014 Page 7 of 80

8
• Nur bei Modell 7681plus: Schließen Sie
die Ladestation (11) über das Spezialkabel
ans Netz an und stellen Sie das Gerät zum
Laden in die Ladestation.
• Die grüne Ladekontrollleuchte (5a) zeigt
durch Blinken an, dass das Gerät geladen
wird. Nach Vollladung leuchtet die Lade-
kontrollleuchte permanent. Sie können das
Gerät nun kabellos verwenden.
• Sobald die rote Restkapazitätsleuchte (5b)
blinkt, sollten Sie das Gerät über das
Spezialkabel ans Netz anschließen, um es
wieder aufzuladen.
• Eine Akkuladung reicht für ca. 40 Minuten
kabellosen Betrieb.
• Durch die Nass-Anwendung kann sich die
Betriebszeit verringern. Wir empfehlen,
nach jeder Anwendung nachzuladen.
• Die ideale Umgebungstemperatur für das
Laden, die Benutzung und Aufbewahrung
des Gerätes liegt zwischen 15 °C und 35 °C.
Bei erheblichen Temperaturabweichungen
kann sich die Ladezeit verlängern oder die
Akku-Kapazität verringern.
Vorbereitende Schritte …
… für das Epilieren unter trockenen
Bedingungen
Ihre Haut muss trocken und fettfrei sein.
… für das Nass-Epilieren
Das Gerät kann auch auf nasser Haut und
unter fließendem Wasser verwendet werden.
Damit das Gerät optimal über die Haut
gleiten kann, ist es wichtig, dass die Haut
wirklich feucht ist.
• Nach jeder Nassanwendung sollte das
Gerät unter fließendem Wasser abgespült
werden.
• Stellen Sie stets sicher, dass der Epilier-
kopf (2) sauber und mit einem Aufsatz
versehen ist.
• Um einen Aufsatz zu wechseln, drücken
Sie die seitlichen Rippen und ziehen ihn
ab.
• Um den Epilierkopf abzunehmen, drücken
Sie die Entriegelungstaste (6).
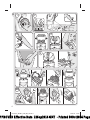
A So epilieren Sie
Der Epilierkopf (2) sorgt mit seiner neuen
Close-Grip Technologie für noch mehr
Gründlichkeit speziell bei kurzen Haaren.
Die 40 Pinzetten halten permanent engen
Kontakt zur Haut und entfernen sogar
Härchen, die nicht größer als ein Sandkorn
sind. Das Schwenkelement der Aufsätze
(1a, 1b) passt sich perfekt der Körperkontur
an und sorgt damit für maximale Gründlich-
keit.
Der Hochfrequenz-Massage-Aufsatz (1a) übt
eine beruhigende Wirkung auf die Haut aus
und macht die Epilation ultra sanft.
Der EffizienzPro-Aufsatz (1b) ermöglicht
eine besonders schnelle Epilation, da das
Schwenkelement für optimalen Hautkontakt
und die ideale Anwendungsposition sorgt.
1 Einschalten
• Drücken Sie eine der Freigabetasten (4a)
und drehen den Schalter (4) auf Ihre
bevorzugte Geschwindigkeitsstufe:
«I» = extra sanft
«II» = besonders gründlich
• Die «smartlight»-Funktion (3) sorgt für
ideale Lichtverhältnisse: Solange das
Gerät eingeschaltet ist, leuchtet das
Licht und hilft Ihnen, auch feinste
Härchen zu entdecken und gründlich zu
entfernen.
2 So führen Sie das Gerät über die Haut
• Die Haut mit der freien Hand straffen, so
dass sich die Haare aufstellen.
97167071_SE7681_7281_MN_S6-80.indd 897167071_SE7681_7281_MN_S6-80.indd 8 10.09.14 12:0410.09.14 12:04
CSS APPROVED Effective Date 22Sep2014 GMT - Printed 30Oct2014 Page 8 of 80

9
• Achten Sie darauf, dass die Epilierwalze
zwischen den Massage-Rollen des
Aufsatzes (1a) immer Hautkontakt hat.
Das Schwenkelement passt sich auto-
matisch der Hautkontur an.
• Führen Sie das Gerät langsam, gleich-
mäßig und ohne Druck mit der Schalter-
seite entgegen der Haarwuchsrichtung.
Da die Haare nicht immer in eine einheit-
liche Richtung wachsen, kann es hilf-
reich sein, das Gerät in verschiedenen
Richtungen über die Haut zu führen, um
ein optimales Ergebnis zu erzielen.
Die Massage-Rollen stimulieren und ent-
spannen die Haut mit ihren pulsierenden
Bewegungen. Das macht die Epilation
angenehmer.
• Wenn Sie bereits mit dem Epilieren ver-
traut sind und eine schnellere, effizien-
tere Methode bevorzugen, tauschen
Sie den Massage-Aufsatz (1a) gegen
den Effizienz-Aufsatz (1b).
3 Epilation der Beine
Epilieren Sie die Beine von unten nach
oben. Bei der Anwendung an den Knie-
kehlen muss das Bein immer gestreckt
sein.
4 Epilation im Achselbereich und in der
Bikinizone
Speziell für diese Anwendung wurde der
Epilieraufsatz für die Achsel (8) entwickelt,
der alternativ zu den Aufsätzen (1a, 1b) auf
den Epilierkopf (2) gesetzt wird.
Wenn die Haut noch nicht an die Epilation
gewöhnt ist, sind diese Körperzonen
besonders schmerzempfindlich. Daher
empfehlen wir für die ersten Anwendungen
die Geschwindigkeitsstufe «I».
Bei wiederholter Anwendung wird das
Schmerzempfinden nachlassen.
Die Epilation ist leichter und angenehmer,
wenn die Haare die optimale Länge von
2-5 mm haben. Vor dem Epilieren sollten
Sie den entsprechenden Bereich gründlich
reinigen, um Rückstände zu entfernen
(z.
B. Deodorant). Bei der Anwendung im
Achselbereich sollten Sie den Arm nach
oben strecken, so dass die Haut gestrafft
ist, und das Gerät in verschiedene Richtun-
gen führen. Da die Haut in diesem Bereich
nach der Epilation besonders empfind-
lich ist, sollten Sie keine hautreizenden
Substanzen, wie z.
B. alkoholhaltige Deo-
dorants, verwenden.
5 Epilation im Gesicht
Der Epilieraufsatz für Gesichtshärchen (9)
wurde speziell für die Entfernung uner-
wünschter Härchen rund um Mund, Kinn
und in anderen empfindlichen Körperbe-
reichen entwickelt. Er kann optional auf
den Epilierkopf (2) gesetzt werden. Damit
Sie sich an die Epilation in empfindlichen
Bereich gewöhnen, empfehlen wir für die
ersten Anwendungen die Geschwindig-
keitsstufe «I».
Vor dem Epilieren empfehlen wir aus
hygienischen Gründen eine sorgfältige
Reinigung der entsprechenden Hautbe-
reiche mit Alkohol.
Straffen Sie die Haut mit der freien Hand.
Um eine optimale Epilation zu gewähr-
leisten, halten Sie das Gerät senkrecht
(90°-Winkel) zur Haut.
Führen Sie es langsam, gleichmäßig und
ohne Druck mit der Schalterseite gegen
den Haarwuchs.
Überhitzungsschutz
Um das Gerät vor Überhitzung zu schützen,
kann es vorkommen, dass die Restkapazitäts-
leuchte (5b) für 8 Sekunden leuchtet und das
97167071_SE7681_7281_MN_S6-80.indd 997167071_SE7681_7281_MN_S6-80.indd 9 10.09.14 12:0410.09.14 12:04
CSS APPROVED Effective Date 22Sep2014 GMT - Printed 30Oct2014 Page 9 of 80

10
Gerät sich dann automatisch ausschaltet.
Drehen Sie in diesem Fall den Schalter auf
die Position «0» zurück und lassen Sie das
Gerät abkühlen.
6 Reinigung des Epilierkopfes
Reinigen Sie das Gerät regelmäßig, um
seine Leistung zu erhalten.
a Reinigen mit der Bürste:
Nehmen Sie den Aufsatz ab und bürsten
Sie ihn aus.
Für die Reinigung der Pinzettenwalze
empfehlen wir, die Bürste mit Alkohol zu
benetzen. Bürsten Sie die Pinzettenwalze
von hinten aus, während Sie sie von Hand
drehen. Dadurch erreichen Sie eine hygie-
nische Reinigung des Epilierkopfes.
b Reinigen mit Wasser:
Nach jeder Nassanwendung sollte das
Gerät unter fließendem Wasser abgespült
werden.
Nehmen Sie den Aufsatz ab. Halten Sie
das Gerät unter fließendes Wasser. Danach
die Entriegelungstaste (6) drücken und den
Epilierkopf (2) abnehmen. Schütteln Sie
den abgenommenen Kopf und das Gerät
kräftig aus und lassen Sie beides trocknen.
Epilierkopf nur im trockenen Zustand
wieder aufsetzen.
B So verwenden Sie den
Rasieraufsatz
a OptiTrim-Kamm
b Scherfolie
c Langhaarschneider
d Entriegelungstasten
e Trim/shave Schalter
f Klingenblock
g Scherkopf-Unterteil
Rasieren
• Rasieraufsatz (10) aufsetzen und einrasten
lassen.
• Drücken Sie eine der Freigabetasten und
drehen Sie den Schalter im Uhrzeigersinn
auf Stufe «II».
• Stellen Sie sicher, dass sich der trim/shave
Schalter (e) auf der Position «
» befindet.
• Wenden Sie den Rasieraufsatz (10) nur auf
trockener Haut an.
• Für beste Rasierergebnisse führen Sie das
Schersystem so, dass die Scherfolie (b)
und der Langhaarschneider (c) auf der
Haut aufliegen (A). Halten Sie die Haut
gestrafft (B) und führen Sie das Gerät lang-
sam gegen die Haarwuchsrichtung. Der
Langhaarschneider richtet die längeren
Haare auf und schneidet sie ab. Dann folgt
die flexible Scherfolie und entfernt alle
noch verbliebenen Härchen.
• Um Verletzungen zu vermeiden, sollten Sie
vor allem bei der Rasur von empfindlichen
Bereichen darauf achten, dass die Haut
immer gestrafft ist.
Konturentrimmen
Für das Trimmen exakter Linien und Konturen
schieben Sie den trim/shave Schalter (e) auf
die Position « » (C1).
Vorkürzen der Haare für die Epilation
Wenn Sie die Haare auf die ideale Länge für
die Epilation vorkürzen wollen, setzen Sie
den OptiTrim-Kamm (a) auf den Rasierkopf.
Den trim/shave Schalter auf Position « »
schieben.
Halten Sie das Gerät mit dem OptiTrim-
Kamm so, dass die Kammfläche immer flach
auf der Haut aufliegt. Führen Sie das Gerät
mit den Kammspitzen gegen den Haarwuchs
wie in Abbildung C2 dargestellt.
Hinweis: Durch unterschiedliche Wuchsrich-
tungen lassen sich manche Haare nur schwer
97167071_SE7681_7281_MN_S6-80.indd 1097167071_SE7681_7281_MN_S6-80.indd 10 10.09.14 12:0410.09.14 12:04
CSS APPROVED Effective Date 22Sep2014 GMT - Printed 30Oct2014 Page 10 of 80

11
schneiden. Führen Sie das Gerät in diesem
Fall leicht schräg oder quer zum Haarwuchs.
Reinigung des Rasierkopfes
Regelmäßiges Reinigen verbessert die
Rasierleistung.
Reinigen mit der Bürste
• Entriegelungstasten (d) drücken und den
Rasierkopf abnehmen (D1). Die Unterseite
des Scherkopfes leicht ausklopfen (Folie
befindet sich oben).
• Mit der Bürste den Klingenblock und die
Scherkopf-Innenseite reinigen. Die Scher-
folie darf nicht mit der Bürste gereinigt
werden, da dieses zu Beschädigungen
führen könnte.
Reinigen mit Wasser
Entriegelungstasten (d) drücken und den
Scherkopf abnehmen. Scherkopf und
Klingenblock separat unter fließendem
Wasser reinigen (D2). Beide Teile separat
trocknen lassen, bevor der Scherkopf wieder
aufgesetzt werden kann.
So halten Sie den Rasieraufsatz in Bestform
• Die Scherteile sollten regelmäßig etwa alle
3 Monate geölt werden (E). Wenn Sie den
Scherkopf unter Wasser reinigen, sollten
die Scherteile nach jeder Reinigung geölt
werden.
• Verteilen Sie etwas Leichtmaschinenöl
oder Vaseline auf der Scherfolie und dem
Langhaarschneider. Nehmen Sie dann den
Scherkopf ab und tragen Sie auch etwas
Vaseline auf das Klingenblocklager auf (E).
• Scherfolie und Klingenblock sind Präzi-
sionsteile, die mit der Zeit verschleißen.
Um eine optimale Rasierleistung zu er-
halten, sollten Sie Scherfolie und Klingen-
block wechseln, sobald sie Verschleißer-
scheinungen zeigen.
• Verwenden Sie den Rasieraufsatz nicht mit
beschädigter Scherfolie oder defektem
Spezialkabel.
Scherteilewechsel
Scherfolie:
Drücken Sie die Entriegelungs-
tasten (d), um den Scherfolienrahmen zu
lösen. Ersetzen Sie ihn durch einen neuen
.
Klingenblock: Um den Klingenblock abzuneh-
men, drücken und drehen Sie ihn um 90° (G1).
Beim Aufsetzen des neuen Klingenblocks
wieder drücken und um 90° drehen (G2).
• Zubehörteile (Rasierfolie, Klingenblock)
sind beim Händler oder Braun Kunden-
dienst erhältlich.
Elektrische Angaben siehe Bedruckung auf
dem Spezialkabel. Das Spezialkabel sorgt für
eine automatische Spannungsanpassung
zwischen 100 und 240 Volt.
Umweltschutz
Dieses Gerät enthält Akkus. Im Sinne
des Umweltschutzes darf dieses Gerät
am Ende seiner Lebensdauer nicht mit
dem Hausmüll entsorgt werden.
Die Entsorgung kann über den Braun
Kundendienst oder lokal verfügbare
Rückgabe- und Sammelsysteme erfolgen.
Änderungen vorbehalten.
Garantie
Als Hersteller übernehmen wir für dieses
Gerät – nach Wahl des Käufers zusätzlich zu
den gesetzlichen Gewährleistungsansprü-
chen gegen den Verkäufer – eine Garantie
von 2 Jahren ab Kaufdatum. Innerhalb dieser
97167071_SE7681_7281_MN_S6-80.indd 1197167071_SE7681_7281_MN_S6-80.indd 11 10.09.14 12:0410.09.14 12:04
CSS APPROVED Effective Date 22Sep2014 GMT - Printed 30Oct2014 Page 11 of 80

12
Garantiezeit beseitigen wir nach unserer Wahl
durch Reparatur oder Austausch des Gerätes
unentgeltlich alle Mängel, die auf Material-
oder Herstellungsfehlern beruhen. Die
Garantie kann in allen Ländern in Anspruch
genommen werden, in denen dieses Braun
Gerät von uns autorisiert verkauft wird.
Von der Garantie sind ausgenommen:
Schäden durch unsachgemäßen Gebrauch,
normaler Verschleiß und Verbrauch sowie
Mängel, die den Wert oder die Gebrauchs-
tauglichkeit des Gerätes nur unerheblich
beeinflussen. Bei Eingriffen durch nicht von
uns autorisierte Braun Kundendienstpartner
sowie bei Verwendung anderer als Original
Braun Ersatzteile erlischt die Garantie.
Im Garantiefall senden Sie das Gerät mit
Kaufbeleg bitte an einen autorisierten Braun
Kundendienstpartner. Die Anschrift finden Sie
unter www.service.braun.com oder können
Sie kostenlos unter 00800/27 28 64 63
erfragen.
97167071_SE7681_7281_MN_S6-80.indd 1297167071_SE7681_7281_MN_S6-80.indd 12 10.09.14 12:0410.09.14 12:04
CSS APPROVED Effective Date 22Sep2014 GMT - Printed 30Oct2014 Page 12 of 80

Our products are engineered to meet the
highest standards of quality, functionality and
design. We hope you thoroughly enjoy using
your Braun Silk·épil 7
Please read the use instructions carefully
before using the appliance and keep them
for future reference.
Braun Silk·épil 7 has been designed to make
the removal of unwanted hair as efficient,
gentle and easy as possible. Its proven
epilation system removes hair at the root,
leaving your skin smooth for weeks. As the
hair re-growth is fine and soft, there will be
no more stubble.
Important
•
For hygienic reasons, do not
share this appliance with other
persons.
•
This appliance is provided with a
special cord set with an integrated
Safety Extra Low Voltage power
supply. Do not exchange or manip-
ulate
any part of it. Otherwise
there is risk of electric shock.
For electric specifications, please
see printing on the special cord
set. The special cord set auto-
matically adapts to any world-
wide AC voltage.
•
This appliance is suitable
for use in a bathtub or
shower. For safety reasons, it can
only be operated cordless.
•
This appliance can be used by
children aged from 8 years and
above and persons with reduced
physical, sensory or mental
capabilities or lack of experience
and knowledge if they have been
given super vision or instruction
concerning the safe use of the
appliance and understand the
hazards involved. Children should
not play with the appliance.
Cleaning and user maintenance
should not be made by children
unless they are older than 8 years
and supervised.
•
When switched on, the appliance
must never come in contact with
the hair on your head, eyelashes,
ribbons, etc. to prevent any dan-
ger of injury as well as to prevent
blockage or damage to the appli-
ance.
•
Never use the epilation head
without cap.
General information on epilation
All methods of hair removal at the root can
lead to in-growing hair and irritation (e.g.
itching, discomfort and reddening of the skin)
depending on the condition of the skin and
hair. This is a normal reaction and should
quickly disappear, but may be stronger when
you are removing hair at the root for the first
few times or if you have sensitive skin.
English
13
97167071_SE7681_7281_MN_S6-80.indd 1397167071_SE7681_7281_MN_S6-80.indd 13 10.09.14 12:0410.09.14 12:04
CSS APPROVED Effective Date 22Sep2014 GMT - Printed 30Oct2014 Page 13 of 80

14
If, after 36 hours, the skin still shows
irritation, we recommend that you contact
your physician. In general, the skin reaction
and the sensation of pain tend to diminish
considerably with the repeated use of
Silk·épil.
In some cases inflammation of the skin could
occur when bacteria penetrate the skin (e.g.
when sliding the appliance over the skin).
Thorough cleaning of the epilation head
before each use will minimise the risk of
infection.
If you have any doubts about using this
appliance, please consult your physician. In
the following cases, this appliance should
only be used after prior consultation with a
physician:
– eczema, wounds, inflamed skin reactions
such as folliculitis (purulent hair follicles)
and varicose veins,
– around moles,
– reduced immunity of the skin, e.g. diabetes
mellitus, during pregnancy, Raynaud’s
disease, haemophilia, candida or immune
deficiency.
Some useful tips
If you have not used an epilator before, or
if you have not epilated for a longer period
of time, it may take a short time for your
skin to adapt to epilation. The discomfort
experienced in the beginning will decrease
considerably with repeated use as the skin
adapts to the process.
Epilation is easier and more comfortable
when the hair is at the optimum length of
2-5 mm. If hairs are longer, we recommend
that you shave first and epilate the shorter,
re-growing hairs after 1 or 2 weeks.
When epilating for the first time, it is
advisable to epilate in the evening, so that
any possible reddening can disappear
overnight. To relax the skin we recommend
applying a moisture cream after epilation.
Fine hair which re-grows might not grow
up to the skin surface. The regular use of
massage sponges (e.g. after showering)
or exfoliation peelings helps to prevent
in-growing hair as the gentle scrubbing
action removes the upper skin layer and fine
hair can get through to the skin surface.
Description
1a High Frequency Massage System
1b EfficiencyPro cap
2 Epilation head
3 «smartlight»
4 Switch with lock keys (4a)
5a Charging light
5b Low charge light
6 Release button
7 Special cord set
8 Underarm cap (not with all models)
9 Precision cap (not with all models)
10 Shaver head attachment with OptiTrim
comb
11 Charging stand (only with model 7681plus)
Charging
• Before use, charge the appliance. For best
performance, we recommend that you
always use a fully charged appliance.
Using the special cord set, connect the
appliance to an electrical outlet with the
motor switched off. Charging time is
approximately 1 hour.
• Model 7681plus only: Using the special
cord set, connect the charging stand to an
electrical outlet and place the appliance
onto the stand for charging.
• The green charging light (5a) flashes to
show that the epilator is being charged.
97167071_SE7681_7281_MN_S6-80.indd 1497167071_SE7681_7281_MN_S6-80.indd 14 10.09.14 12:0410.09.14 12:04
CSS APPROVED Effective Date 22Sep2014 GMT - Printed 30Oct2014 Page 14 of 80

15
When the battery is fully charged, the
charging light shines permanently. Once
fully charged, use the appliance without
cord.
• When the red low-charge light (5b) flashes,
reconnect the appliance to an electrical
outlet via the special cord set to recharge.
• A full charge provides up to 40 minutes of
cordless operation time.
• Wet usage might reduce the operation
time. We recommend that you recharge the
appliance after each use.
• The best temperature range for charging,
using and storing the appliance is between
15 °C and 35 °C. In case the temperature
is far beyond this range, the charging time
might be longer whereas the cordless
operation time might be reduced.
Getting prepared for …
… dry usage
Your skin must be dry and free from grease or
cream.
… wet usage
The appliance can be used on wet skin, even
under running water. Make sure that the skin
is very moist in order to achieve optimum
gliding conditions for the appliance.
• After each wet usage, clean the appliance
under running water.
• Before use, always make sure that epilation
head (2) is clean and provided with a cap.
• To change caps, press their lateral ribs and
pull off.
• To change heads, press the release button
(6).
A How to epilate
The epilation head (2) features the new
Close-Grip Technology to ensure extra
efficiency especially with short hairs:
The 40 tweezers always keep close contact
to the skin to remove hairs as short as grain
of sand. Thanks to its pivoting feature, it
perfectly adapts to the body contours, for
maximum thoroughness.
The High-Frequency Massage System (1a)
soothes your skin effectively for an ultra
gentle epilation.
The EfficiencyPro cap (1b) for fast epilation
ensures maximum skin contact, positioning the
tweezers at the optimum position at all times.
1 Turning on
• Press one of the lock keys and turn
the switch (4) clockwise to select your
preferred speed setting:
«I»
= extra gentle
«II» = extra efficient
• The «smartlight» (3) comes on instantly
and shines as long as the appliance is
switched on. It reproduces an almost
daylight condition, thus revealing even
the finest hair and giving you a better
control for improved epilation efficiency.
2 How to guide the appliance
• Always stretch your skin when epilating.
• Always make sure that the epilation area
between the massaging rollers is in
contact with your skin.
• The pivoting caps automatically adapt to
the contour of your skin.
• Guide the appliance in a slow, continuous
movement without pressure against the
hair growth, in the direction of the switch.
As hair can grow in different directions, it
may also be helpful to guide the appliance
in different directions to achieve optimum
results. The pulsating movement of the
massaging rollers stimulate and relax the
skin for a gentler epilation.
97167071_SE7681_7281_MN_S6-80.indd 1597167071_SE7681_7281_MN_S6-80.indd 15 10.09.14 12:0410.09.14 12:04
CSS APPROVED Effective Date 22Sep2014 GMT - Printed 30Oct2014 Page 15 of 80

16
• If you are used to the sensation of
epilation and prefer a faster way of
removing hair, attach the EfficiencyPro cap
(1b) replacing the Massage System (1a).
3 Leg epilation
Epilate your legs from the lower leg in an
upward direction. When epilating behind
the knee, keep the leg stretched out
straight.
4 Underarm and bikini line epilation
For this specific application, the underarm
cap (8) has been developed as an optional
attachment to be placed on the epilation
head (2).
Please be aware that especially at the
beginning, these areas are particularly
sensitive to pain. Therefore, we recom-
mend that you select speed setting «I» for
the first few epilation processes. With
repeated usage the pain sensation will
diminish. For more comfort, ensure that the
hair is at the optimum length of 2–5 mm.
Before epilating, thoroughly clean the
respective area to remove residues (like
deodorant). When epilating the underarm,
keep your arm raised up so that the skin
is stretched and guide the appliance in
different directions. As skin may be more
sensitive directly after epilation, avoid
using irritating substances such as deo-
dorants with alcohol.
5 Facial epilation
For removing any unwanted hair from
the face or other sensitive areas, use the
precision cap (9) as an optional attachment
to be placed on the epilation head (2).
For the first few usages, we recommend
that you select speed setting «I» in order to
get used to the epilation sensation in those
sensitive areas.
Prior to epilation, we recommend cleaning
the skin with alcohol to promote good
hygiene.
When epilating the face, stretch the skin
with one hand and slowly guide the
epilator with your other hand the direction
of the switch.
Overheating protection
As a safety feature to avoid the unlikely
event of the appliance overheating, it may
happen that the red low charge light shines
permanently for 8 seconds and then the
appliance turns off automatically. In this case,
turn the switch back to the position «0» and
let the appliance cool down.
6 Cleaning the epilation head
Regular cleaning ensures better perform-
ance.
a Brush cleaning:
Remove the cap and brush it out.
Thoroughly clean the tweezers from the
rear side of the epilator head with the
brush dipped into alcohol. While doing so,
turn the tweezer element manually. This
cleaning method ensures best hygienic
conditions for the epilation head.
b Cleaning under running water:
After each wet usage, clean the appliance
under running water.
Remove the cap. Hold the appliance with
the epilation head under hot running water.
Then press the release button (6) to remove
the epilation head.
Thoroughly shake both, the epilation
head and the appliance to make sure that
remaining water can drip out. Leave both
parts to dry. Before reattaching, make sure
that they are completely dry.
97167071_SE7681_7281_MN_S6-80.indd 1697167071_SE7681_7281_MN_S6-80.indd 16 10.09.14 12:0410.09.14 12:04
CSS APPROVED Effective Date 22Sep2014 GMT - Printed 30Oct2014 Page 16 of 80

17
B Using the shaver head
attachment
a OptiTrim comb
b Shaver foil
c Trimmer
d Release buttons
e Trim/shave selector
f Cutter block
g Shaver head base
Shaving
• Put on the shaver head attachment (10) by
clicking it in.
• Pressing one of the lock keys, turn the
switch clockwise to setting «II».
• Make sure the trim/shave selector (e) is in
the « » position.
• Use the shaver head attachment on dry
skin only.
• For best results, always make sure that
both, the shaver foil (b) and the trimmer (c)
are in contact with the skin (A). Keeping
your skin stretched (B), slowly move the
appliance against the direction of hair
growth. The trimmer first raises all long
hairs and cuts them off. Then the flexible
foil follows to smooth away any stubble.
• When shaving or trimming in sensitive
areas, make sure that you always keep
your skin stretched to avoid injuries.
Contour trimming
For trimming precise line and contours, lock
the long hair trimmer by sliding the trim/
shave selector (e) to the position « » (C1).
Pre-cutting hair for epilation
If you choose to pre-cut your hair to the ideal
length for epilation, place the OptiTrim comb
(a) onto the shaver head. Slide the trim/shave
selector to the « » position.
Hold the appliance with the OptiTrim comb
lying flat on the skin. Guide it with the comb
tips against the hair growth as shown in
illustration C2.
N.B. As hair does not always grow in the
same direction, also guide the appliance
slightly diagonally or in different directions in
order to achieve best results.
Cleaning the shaver head
After each use, unplug the appliance.
Brush cleaning
• Press the release buttons (d) to remove the
shaver head (D1). Tap the bottom of the
shaver head gently on a flat surface (not on
the foil).
• Brush out the cutter block and the inside
of the shaver head. However, do not clean
the shaver foil with the brush as this may
damage the foil.
Cleaning with water
Press the release buttons (d) to remove the
shaver head. Rinse the shaver head and the
cutter block separately under running water
(D2). Leave the cutter block and the foil frame
to dry separately before reattaching them.
Keeping your shaver head attachment in
top shape
• The shaving parts need to be lubricated
regularly every 3 months (E). If you clean
the shaver head under running water,
please lubricate it after every cleaning.
• Apply some light machine oil or vaseline to
the shaver foil and the metal parts of the
long hair trimmer. Then remove the shaver
head and also apply a tiny amount of
vaseline as shown in picture section (E).
• The shaver foil and the cutter block are
precision parts that wear out with time.
To maintain optimum shaving performance,
97167071_SE7681_7281_MN_S6-80.indd 1797167071_SE7681_7281_MN_S6-80.indd 17 10.09.14 12:0410.09.14 12:04
CSS APPROVED Effective Date 22Sep2014 GMT - Printed 30Oct2014 Page 17 of 80

18
replace your foil and cutter block when you
notice a reduced shaving performance.
• Do not shave with a damaged foil or cord.
How to replace the shaving parts
Shaver foil: Press the release buttons (d) to
remove the foil frame and replace it with a
new one.
Cutter block: To remove the cutter block,
press and turn it 90° (G1), then take it off.
To put on a new cutter block, press it onto
the cutter block holder and turn 90° (G2).
• Replacements parts (shaver foil, cutter
block) can be obtained from your retailer
or Braun Customer Service Centres.
For electric specifications, please see printing
on the special cord set. The special cord set
automatically adapts to any worldwide AC
voltage.
Environmental notice
This product contains rechargeable
batteries. In the interest of protecting
the environment, please do not
dispose of the product in the house-
hold waste at the end of its useful life.
Disposal can take place at a Braun Service
Centre or at appropriate collection points
provided in your country.
Subject to change without notice.
Guarantee
We grant a 2 year guarantee on the product
commencing on the date of purchase. Within
the guarantee period we will eliminate any
defects in the appliance resulting from faults
in materials or workmanship, free of charge
either by repairing or replacing the complete
appliance at our discretion.
This guarantee extends to every country
where this appliance is supplied by Braun or
its appointed distributor.
This guarantee does not cover: damage due
to improper use, normal wear or use as well
as defects that have a negligible effect on the
value or operation of the appliance. The
guarantee becomes void if repairs are
undertaken by unauthorised persons and if
original Braun parts are not used.
To obtain service within the guarantee period,
hand in or send the complete appliance with
your sales receipt to an authorised Braun
Customer Service Centre.
For UK only:
This guarantee in no way affects your rights
under statutory law.
For Australia & New Zealand only:
Warranty
In Australia, our goods come with
guarantees that cannot be excluded under
the Australian Consumer Law. You are
entitled to a replacement or refund for a
major failure and for compensation for any
other reasonably foreseeable loss or
damage. You are also entitled to have the
goods repaired or replaced if the goods fail
to be of acceptable quality and the failure
does not amount to a major failure.
The benefi ts given by this warranty are in
addition to other rights and remedies of the
consumer law.
97167071_SE7681_7281_MN_S6-80.indd 1897167071_SE7681_7281_MN_S6-80.indd 18 10.09.14 12:0410.09.14 12:04
CSS APPROVED Effective Date 22Sep2014 GMT - Printed 30Oct2014 Page 18 of 80

19
For Claims in Australia please contact:
Procter & Gamble Australia Pty Ltd
1 Innovation Road, Macquarie Park
NSW 2113
Telephone: +612 8864 5000
Facsimile: +612 8864 5574
Email: [email protected]
For claims in New Zealand please contact:
Procter & Gamble Distributing New Zealand
Limited
Unit 3, Building I, 5 Orbit Drive
Rosedale, North Shore City 0632
Auckland, New Zealand
Telephone: +649 477 6400
Facsimile: +649 477 6399
Email: [email protected]
Our Warranty
This appliance is also covered by a 24 Month
Replacement Warranty commencing on the
date of purchase (Our Warranty).
Our Warranty applies in all States and
Territories of Australia and in New Zealand
and is in addition to any mandatory
statutory obligations imposed on Procter &
Gamble Australia Pty. Ltd., its distributors
and its manufacturer. Our Warranty does
not purport to exclude, restrict or modify
any such mandatory statutory obligations.
Our Warranty only covers defects in the
appliance resulting from faults in workmanship
or materials. Therefore, if your appliance
becomes faulty as a result of faults in
workmanship or materials, it will be exchanged
by your retailer, on presentation of proof of
purchase.
Our Warranty only applies to domestic or
household use of this appliance and the
warranty will only apply if the correct
operating instructions included with this
product have been followed. For any
appliance replaced under this warranty, Our
Warranty ends on the expiry of the warranty
period that applied to the original appliance.
Our Warranty does not cover:
A. Damage arising from improper use or
operation on incorrect voltages.
B. Breakages to shaver foils, glass jars, etc.
C. Normal wear due to moving parts.
D. Repairs undertaken by unauthorised
service personnel or use of non genuine
parts.
E. Appliances that are outside the warranty
period or are not faulty.
This appliance is not intended for use by
young children or infi rm persons without
supervision. Young children should be
supervised to ensure that they do not play
with the appliance.
If the appliance is powered by a cord
extension set or electrical portable outlet
device these should be positioned so they
are not subject to splashing or ingress of
moisture.
To the extent permitted by the laws of the
Commonwealth of Australia and New Zealand
and applicable laws of a State or Territory of
Australia, and without affecting any mandatory
statutory obligations imposed by law, Our
Warranty is given in exchange for any other
rights you may have against Procter & Gamble
Australia Pty. Ltd. or its distributors or
manufacturer, whether at law, in tort (including
negligence), in equity or under statute.
Please retain proof of purchase of this
appliance. If you have any questions in
relation to Our Warranty, please call our
Consumer Service line (see below for
numbers).
If you intend to make a claim please telephone
our Customer Service line on the numbers set
97167071_SE7681_7281_MN_S6-80.indd 1997167071_SE7681_7281_MN_S6-80.indd 19 10.09.14 12:0410.09.14 12:04
CSS APPROVED Effective Date 22Sep2014 GMT - Printed 30Oct2014 Page 19 of 80

20
out below to obtain information about your
claim and any costs associated with claiming
under Our Warranty. You will bear the cost of
returning your product to us.
Repairs and service
If you are sending your appliance for repair
under Our Warranty, please pack the
appliance adequately and send it to your
nearest Service Agent, at your expense.
For service or replacement parts refer to the
authorised Service Agents listed overleaf.
Local Service Agents may change from time
to time – in that event please contact the
Consumer Service free call number below for
updated local service agent details.
Australian Consumer Service
(free call): 1 800 641 820
New Zealand Consumer Service
(free call): 0 800 108 909
Australian & New Zealand Service Agents
VICTORIA & TASMANIA
Statewide Services Pty Ltd trading
as J A Appliances
17-19 Hossack Avenue
Coburg North, VIC 3058
Tel. (03) 8371 9100
Fax. (03) 9355 8644
Email: jaappliances@statewideservices.
com.au
QUEENSLAND
Walters Import trading as Brisbane Appliance
Service Centre
449 Beaudesert Road
Moorooka QLD 4105
Tel. (07) 3277 0360
Fax. (07) 3274 2909
Email: [email protected]
WESTERN AUSTRALIA
Mark 1 Appliances
Unit 1, 46 Abernethy Road
Belmont, WA 6104
Tel. (08) 9475 0911
Fax. (08) 9475 0922
Email: [email protected]
NEW SOUTH WALES & ACT
Faulder Appliance Services Pty Ltd
Shop 4,
9 Evans Road,
Rooty Hill, NSW 2766
Tel. (02) 9625 3064
Fax. (02) 9625 3037
Email: [email protected]
SOUTH AUSTRALIA & NT
Adelaide Service Centre
Shop B2,
Parkholme Shopping Centre
319 Oaklands Road, Parkholme
Adelaide, SA 5043
Tel. (08) 8357 5800
Fax. (08) 8357 5833
Email: [email protected]
97167071_SE7681_7281_MN_S6-80.indd 2097167071_SE7681_7281_MN_S6-80.indd 20 10.09.14 12:0410.09.14 12:04
CSS APPROVED Effective Date 22Sep2014 GMT - Printed 30Oct2014 Page 20 of 80
La pagina si sta caricando...
La pagina si sta caricando...
La pagina si sta caricando...
La pagina si sta caricando...
La pagina si sta caricando...
La pagina si sta caricando...
La pagina si sta caricando...
La pagina si sta caricando...
La pagina si sta caricando...
La pagina si sta caricando...
La pagina si sta caricando...
La pagina si sta caricando...
La pagina si sta caricando...
La pagina si sta caricando...
La pagina si sta caricando...
La pagina si sta caricando...
La pagina si sta caricando...
La pagina si sta caricando...
La pagina si sta caricando...
La pagina si sta caricando...
La pagina si sta caricando...
La pagina si sta caricando...
La pagina si sta caricando...
La pagina si sta caricando...
La pagina si sta caricando...
La pagina si sta caricando...
La pagina si sta caricando...
La pagina si sta caricando...
La pagina si sta caricando...
La pagina si sta caricando...
La pagina si sta caricando...
La pagina si sta caricando...
La pagina si sta caricando...
La pagina si sta caricando...
La pagina si sta caricando...
La pagina si sta caricando...
La pagina si sta caricando...
La pagina si sta caricando...
La pagina si sta caricando...
La pagina si sta caricando...
La pagina si sta caricando...
La pagina si sta caricando...
La pagina si sta caricando...
La pagina si sta caricando...
La pagina si sta caricando...
La pagina si sta caricando...
La pagina si sta caricando...
La pagina si sta caricando...
La pagina si sta caricando...
La pagina si sta caricando...
La pagina si sta caricando...
La pagina si sta caricando...
La pagina si sta caricando...
La pagina si sta caricando...
La pagina si sta caricando...
La pagina si sta caricando...
La pagina si sta caricando...
La pagina si sta caricando...
La pagina si sta caricando...
-
 1
1
-
 2
2
-
 3
3
-
 4
4
-
 5
5
-
 6
6
-
 7
7
-
 8
8
-
 9
9
-
 10
10
-
 11
11
-
 12
12
-
 13
13
-
 14
14
-
 15
15
-
 16
16
-
 17
17
-
 18
18
-
 19
19
-
 20
20
-
 21
21
-
 22
22
-
 23
23
-
 24
24
-
 25
25
-
 26
26
-
 27
27
-
 28
28
-
 29
29
-
 30
30
-
 31
31
-
 32
32
-
 33
33
-
 34
34
-
 35
35
-
 36
36
-
 37
37
-
 38
38
-
 39
39
-
 40
40
-
 41
41
-
 42
42
-
 43
43
-
 44
44
-
 45
45
-
 46
46
-
 47
47
-
 48
48
-
 49
49
-
 50
50
-
 51
51
-
 52
52
-
 53
53
-
 54
54
-
 55
55
-
 56
56
-
 57
57
-
 58
58
-
 59
59
-
 60
60
-
 61
61
-
 62
62
-
 63
63
-
 64
64
-
 65
65
-
 66
66
-
 67
67
-
 68
68
-
 69
69
-
 70
70
-
 71
71
-
 72
72
-
 73
73
-
 74
74
-
 75
75
-
 76
76
-
 77
77
-
 78
78
-
 79
79


Braun 5377 Manuale utente
- Categoria
- Rasoi da uomo
- Tipo
- Manuale utente
- Questo manuale è adatto anche per
in altre lingue
- français: Braun 5377 Manuel utilisateur
- Deutsch: Braun 5377 Benutzerhandbuch
- Nederlands: Braun 5377 Handleiding
- dansk: Braun 5377 Brugermanual
- svenska: Braun 5377 Användarmanual
Documenti correlati
-
Braun SKIL EPIL 5-547 WET & DRY GIFT EDITION Manuale utente
-
Braun Silk-épil 7 Manuale utente
-
-
Braun Silk-épil Xpressive Manuale utente
-
-
-
Braun Silk epil 5 5780 Manuale utente
-
-
-