Gaggia RI8263/01 Manuale utente
- Categoria
- Accessori per la preparazione del caffè
- Tipo
- Manuale utente
Questo manuale è adatto anche per

Type RI8263, SUP047RG
GAGGIA
VELASCA PRESTIGE
USER MANUAL
BENUTZERHANDBUCH
MANUALE UTENTE


ESP RESS O
CA PPU CCIN O
ESP RESS O LUN GO
MIL K FR OTH
CA RA FE QU ICK CLEA N
MEN U
A
R
O
M
A
S
T
R
E
N
G
T
H
S
P
E
C
I
A
L
D
R
I
N
K
S
1
2
29
30
4
13
14
15
16
28 27
17 18
21
22
20
19
23 24
26
25
3
8
9
6
5
10
11
7
12


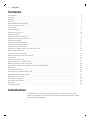
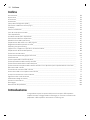
Contents
Introduction ______________________________________________________________________ 4
Important ________________________________________________________________________ 5
Warning_________________________________________________________________________ 5
Caution__________________________________________________________________________ 6
Electromagnetic fields (EMF)________________________________________________________ 7
Machine overview (Fig. 1)___________________________________________________________ 7
The display ______________________________________________________________________ 7
First installation ___________________________________________________________________ 8
Manual rinsing cycle _______________________________________________________________ 10
AquaClean filter __________________________________________________________________ 11
AquaClean filter installation _________________________________________________________ 11
Replacing the AquaClean filter ______________________________________________________ 12
Using the machine ________________________________________________________________ 12
Brewing coffee with beans__________________________________________________________ 12
Adjusting the coffee quantity ________________________________________________________ 13
Adjusting the grind setting__________________________________________________________ 13
Cappuccino, baby cappuccino and milk froth __________________________________________ 13
Brewing special drinks______________________________________________________________ 14
Cleaning and maintenance _________________________________________________________ 14
Weekly cleaning of the brew group___________________________________________________ 14
Lubrication ______________________________________________________________________ 16
Milk carafe quick clean _____________________________________________________________ 17
Daily cleaning of the milk carafe _____________________________________________________ 17
Weekly cleaning of the milk carafe ___________________________________________________ 18
Monthly full milk carafe cleaning with milk circuit cleaner ________________________________ 20
Descaling ________________________________________________________________________ 20
Descaling procedure ______________________________________________________________ 20
Interruption of the descaling cycle ___________________________________________________ 22
Warning icons and error codes ______________________________________________________ 22
Meaning of error codes_____________________________________________________________ 23
Ordering accessories_______________________________________________________________ 24
Guarantee and support ____________________________________________________________ 24
Recycling________________________________________________________________________ 25
Troubleshooting___________________________________________________________________ 25
Introduction
Congratulations on buying this Gaggia Velasca Prestige full automatic
espresso machine! The machine is suitable for preparing espresso coffee
using whole coffee beans.
4
English

Important
Warning
-
Connect the machine to a wall socket with a voltage matching the
technical specifications of the machine.
-
Connect the machine to an earthed wall socket.
-
Do not let the power cord hang over the edge of a table or
counter, or touch hot surfaces.
-
Never immerse the machine, mains plug or power cord in water
(danger of electrical shock).
-
Do not pour liquids on the power cord connector.
-
Never direct the hot water jet towards body parts: danger of burns.
-
Do not touch hot surfaces. Use handles and knobs.
-
Switch off the machine with the main switch located on the back
and remove the mains plug from the socket:
-
If a malfunction occurs.
-
If the machine will not be used for a long time.
-
Before cleaning the machine.
-
Pull on the plug, not on the power cord.
-
Do not touch the mains plug with wet hands.
-
Do not use the machine if the mains plug, the power cord or the
machine itself is damaged.
-
Do not make any modifications to the machine or its power cord.
-
Only have repairs carried out by a service center authorized by
old.
-
This machine can be used by children aged from 8 years and
above and by persons with reduced physical, sensory or mental
capabilities or lack of experience and knowledge if they have been
given supervision or instruction concerning use of the machine in a
safe way and if they understand the hazards involved.
5
English
Gaggia to avoid a hazard.
-
The machine should not be used by children younger than 8 years

-
Cleaning and user maintenance shall not be made by children
unless they are older than 8 and supervised.
-
Keep the machine and its cord out of the reach of children aged
less than 8 years.
-
Children should be supervised to ensure that they do not play with
the machine.
-
Never insert fingers or other objects in the coffee grinder.
-
The machine shall not be placed in a cabinet when in use.
Caution
-
This machine is intended for normal household use only. It is not
intended for use in environments such as staff kitchens of shops,
offices, farms or other work environments.
-
Always put the machine on a flat and stable surface. Keep it in
upright position, also during transport.
-
Do not place the machine on a hotplate or directly next to a hot
oven, heater or similar source of heat.
-
Only put roasted coffee beans in the bean hopper. If ground
coffee, instant coffee, raw coffee beans or any other substance is
put in the coffee bean hopper, it may cause damage to the
machine.
-
Let the machine cool down before inserting or removing any parts.
The heating surfaces may retain residual heat after use.
-
Never fill the water tank with warm, hot or sparkling water, as this
may cause damage to the water tank and the machine.
-
Never use souring pads, abrasive cleaning agents or aggressive
liquids such as petrol or acetone to clean the machine. Simply use
a soft cloth dampened with water.
-
Descale your machine regularly. The machine indicates when
descaling is needed. Not doing this will make your appliance stop
working properly. In this case repair is not covered under your
guarantee.
-
Do not keep the machine at temperatures below 0°C.Water left in
the heating system may freeze and cause damage.
6
English

-
Do not leave water in the water tank when the machine is not used
over a long period of time. The water can be contaminated. Use
fresh water every time you use the machine.
Electromagnetic fields (EMF)
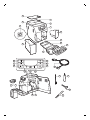
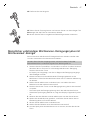
Machine overview (Fig. 1)
1 Lid of the bean hopper
2 Coffee bean hopper
3 Socket for cord
4 Water tank
5 Pre-ground coffee compartment
6 Grinder adjustment knob
7 Control panel
8 Coffee grounds container
9 Coffee dispensing spout
10 Drip tray
11 Drip tray cover
12 Drip tray full indicator
13 ESPRESSO button
14 ESPRESSO LUNGO button
15 AROMA STRENGTH button
16 CARAFE QUICK CLEAN button
17 Standby button
18 MENU button
19 SPECIAL DRINKS button
20 MILK FROTH button
21 CAPPUCCINO button
22 Cord
23 Cleaning brush (for specific types only)
24 Grease (for specific types only)
25 Pre-ground coffee measuring spoon
26 Water hardness tester
27 Coffee residues drawer
28 Brew group
29 Milk carafe
30 Hot water dispensing spout
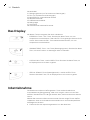
The display
Use these buttons to navigate through the menus:
ESPRESSO
-
ESPRESSO button = ESC button: press this button to return to the main
menu. The ESC button takes you back one level. You may have to press
the ESC button several times to get back to the main menu.
7
English
This Gaggia appliance complies with all applicable standards and
regulations regarding exposure to electromagnetic fields.

A
R
O
M
A
S
T
R
E
N
G
T
H
-
AROMA STRENGTH button = OK button: press this button to select,
confirm or stop a function.
CAPPUCCINO
-
CAPPUCCINO button = UP button: press this button to scroll up through
the display menu.
S
P
E
C
I
A
L
D
R
I
N
K
S
-
SPECIAL DRINKS button = DOWN button: press this button to scroll down
through the display menu.
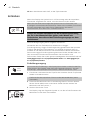
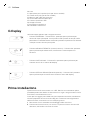
First installation
This machine has been tested with coffee. Although it has been carefully
cleaned, there may be some coffee residues left. We guarantee, however,
that the machine is absolutely new.
Like with most full-automatic machines, you first need to brew some coffees
to enable the machine to complete its self-adjustment and get the best
tasting coffee.
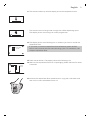
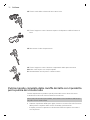
1 Remove all packaging material from the machine.
2 Place the machine on a table or worktop away from the tap, the sink and
heat sources.
Note: Leave at least 15 cm of free space above, behind and on both sides
of the machine.
3 Slide the drip tray with drip tray cover into the machine.
4 Remove the water tank.
5 Fill the water tank with fresh water to the MAX level indication.
6 Open the lid of the bean hopper. Fill the bean hopper with coffee beans
and close the lid.
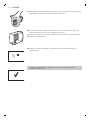
7 Insert mains plug into a wall socket (1) and insert the small plug into the
socket located on the back of the machine (2).
8 Place a container under the hot water and coffee dispensing spouts.
Check if the hot water dispensing spout is installed correctly.
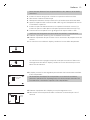
9 Press the standby button to switch on the machine.
10 Press the OK button to start the automatic circuit priming cycle.
8
English

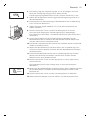
11 The machine heats up and the display shows the temperature icon.
-
The machine starts rinsing water through the coffee dispensing spout.
The display shows the rinsing icon and a progress bar.
AQUA
CL EAN
AQUACLEAN
FILTER?
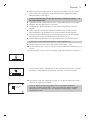
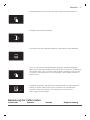
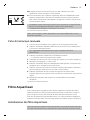
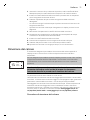
12 The display shows the following icon to indicate you have to install the
AquaClean filter.
If you want to install the AquaClean filter afterwards, press the ESC
button and continue with the manual rinsing cycle. For installation, see
chapter ‘AquaClean filter’.
AQUA
CL EAN
INSTALL
FILTER
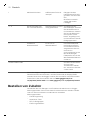
13 Press the OK button. The display shows the following icon.
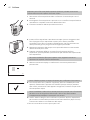
14 Remove the AquaClean filter from its packaging. Shake the filter for about
5 seconds.
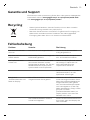
15 Immerse the AquaClean filter upside down in a jug with cold water and
wait until no more air bubbles come out.
9
English

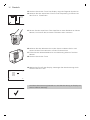
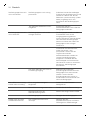
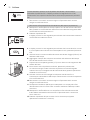
16 Remove the water tank from the machine, empty it and insert the filter
vertically onto the filter connection.
17 Fill the water tank with fresh water to the MAX level indication.
18 Press the OK button.
A Q U A
CL EAN
0/8
ON
OFF
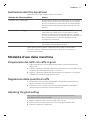
19 Select ON on the display and confirm the activation by pressing the OK
button
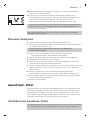
When activation is finished, the display shows a tick to confirm activation.
AQUA
CL EAN
100%
20The display shows the filter ready icon to indicate the AquaClean filter
has been installed correctly.
21 To rinse the filter, press the SPECIAL DRINKS button and select the HOT
WATER option and press the OK button twice. Water flows out from the
hot water dispensing spout. Discard this water.
It can take a while until water comes out of the hot water dispensing
spout. The filter needs to be fully filled and rinsed with water.
The machine is ready for use.
After installing the AquaClean filter, you do not have to perform the manual
rinsing cycle.
Manual rinsing cycle
1 Place a container under the coffee dispensing spout.
2 Press the AROMA STRENGTH button and select the pre-ground coffee
brewing function.
Do not add pre-ground coffee in the pre-ground coffee compartment.
3 Press the ESPRESSO or ESPRESSO LUNGO button.
-
The machine starts dispensing hot water.
4 Wait until the machine stops dispensing water and empty the container.
10
English

5 Repeat steps 1-3 twice.
6 Press the SPECIAL DRINKS button. Place a container under the hot water
dispensing spout.
7 Press the UP/DOWN buttons to scroll through the options of the display.
Press the OK button to select ‘hot water’.
8 Press the OK button to start hot water dispensing.
-
Dispense water until the display shows the no water icon.
9 Fill the water tank with fresh water up to the MAX level and remove the
container.
The machine is ready for use.
AquaClean filter
The AquaClean filter is designed to reduce limescale deposits in your coffee
machine and provide filtered water to preserve the aroma and flavor of each
cup of coffee. If you use a series of 8 Aquaclean filters as indicated in this
user manual, you don't have to descale your machine for 5000 cups (with a
capacity of 100 ml).
AquaClean filter installation
Your machine has to be completely limescale-free before you start to use
the AquaClean filter. If you did not activate the filter upon first use and
brewed more than 50 cups (with 100 ml capacity), you need to descale the
machine before you activate the filter.
1 Remove the AquaClean filter from its packaging. Shake the filter for about
5 seconds.
2 Immerse the AquaClean filter upside down in a jug with cold water and
wait until no more air bubbles come out.
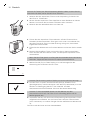
3 Remove the water tank from the machine.
4 Insert the AquaClean filter vertically onto the filter connection. Push the
AquaClean filter to the lowest possible point. Make sure that the filter fits
tightly and the seal is in the right position, to guarantee the best
performance.
5 Fill the water tank with fresh water and slide it back into the machine.
6 Press the MENU button and scroll to the AquaClean filter option. Then
press the OK button to select the AquaClean filter option.
If you are installing the filter at first time use, follow the steps in chapter
‘First installation’.
11
English

A Q U A
CL EAN
0/8
ON
OFF
7 Select ON on the display and confirm the activation by pressing the OK
button.
Note: The display shows a tick icon to confirm the activation.
8 To rinse the filter, press the SPECIAL DRINKS button, select the HOT
WATER option and press the OK button twice. Water flows out from the
hot water dispensing spout. Discard this water.
Note: It can take a while until water comes out of the hot water
dispensing spout. The filter needs to be fully filled and rinsed with water.
9 Use the sticker attached to the plastic packaging of the AquaClean filter
to write down the date of the next filter replacement (after 3 months).
Place the sticker on the water tank.
The filter and machine are now ready for use.
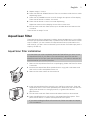
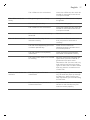
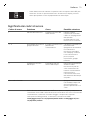
Replacing the AquaClean filter
Replace the filter every 3 months or at machine request.
Display icon AquaClean filter
What to do
10% + icon flashes The performance of this filter is decreasing. It is
recommended to remove the old filter and place the
new filter as described in section 'AquaClean filter
installation’ to retain proper filter performance.
0% + icon flashes Remove the old filter immediately and place the new
filter as described in section ‘AquaClean filter
installation’. When you activate a new filter, the display
shows the word NEW. Press the OK button to confirm
the activation.
0% and icon disappears from display You first need to descale the machine before you can
place and activate a new filter.
After 8 filter replacements you need to descale the machine chapter
‘Descaling’, section ‘Descaling procedure’.
Using the machine
Brewing coffee with beans
1 Adjust the coffee dispensing spout to suit the size of your cup.
2 Press the AROMA STRENGTH button to select the desired coffee
strength from 1-5 beans.
3 Press the ESPRESSO button to brew an espresso or press the ESPRESSO
LUNGO button to brew a coffee.
12
English

Adjusting the coffee quantity
1 Press and hold the ESPRESSO button or ESPRESSO LUNGO button until
the display shows the word MEMO.
2 When the cup contains the desired amount of coffee, press the OK
button to save the selected quantity.
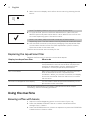
Adjusting the grind setting
Note: You can only adjust the grinder settings when the machine is grinding
coffee beans.
1 Open the lid of the bean hopper.
2 Place a cup under the coffee dispensing spout.
3 Press the ESPRESSO button.
4 While the machine grinds the coffee, place the end of the measuring
spoon handle on the grinder adjustment knob in the coffee bean hopper.
Use the spoon to press and turn the knob to the left or to the right one
notch a time.
5 There are 10 different grinding degree settings you can choose from. The
smaller the dot, the stronger the coffee.
-
Coarse grind: lighter taste, for dark roasted coffee blends.
-
Fine grind: bolder taste, for light roasted coffee blends.
6 Brew 2-3 coffees to taste the difference.
Cappuccino, baby cappuccino and milk froth
Note: You can adjust the cappuccino and milk froth quantity.
1 Remove the hot water dispensing spout.
2 Remove the milk carafe lid.
3 Fill the milk carafe with milk between the MIN and MAX level indications.
4 Place back the milk carafe lid.
5 Turn the dispensing spout on the milk carafe to ‘I’.
13
English

6 Insert the milk carafe into the machine. Make sure the carafe is inserted
properly.
7 Place a cup under the coffee and milk dispensing spouts.
8 Choose your milk-based beverage.
-
Press the CAPPUCCINO button to brew a cappuccino.
-
Press the LATTE MACCHIATO button to brew a latte macchiato.
-
Press the SPECIAL DRINKS button and select baby cappuccino to brew a
baby cappuccino.
The machine first dispenses a preset quantity of frothed milk into the cup or
glass and then dispenses a preset quantity of coffee.
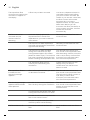
Brewing special drinks
In the special drinks menu you can select hot water and baby cappuccino.
1 Press the SPECIAL DRINKS button to enter the menu. The display shows
the options for special drinks.
2 Press the UP/DOWN buttons to scroll through the options on the menu.
3 Press the OK button to confirm the desired beverage.
4 When you select HOT WATER, insert the hot water dispensing spout into
the machine and lock it into place. When you select cappuccino, milk
froth or baby cappuccino, insert the milk carafe into the machine.
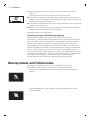
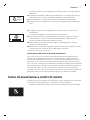
Cleaning and maintenance
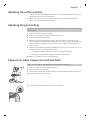
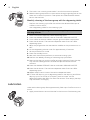
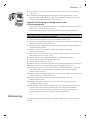
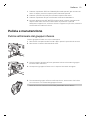
Weekly cleaning of the brew group
Clean the brew group once per week.
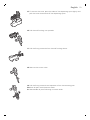
1 Remove the coffee grounds container and open the service door.
2 Remove the coffee residues drawer.
1
2
3 To remove the brew group, press the lever and pull the brew group out of
the machine.
4 Rinse the brew group with fresh water and let it air dry.
14
English

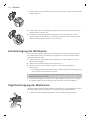
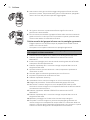
5 To place the brew group back, make sure that the lever is in contact with
the base of the brewing unit.
Note: If it is not in contact with the base, push it down.
6 Make sure the locking hook of the brew group is in the correct position.
To position the hook correctly, push it upwards until it is in uppermost
position.
15
English

7 The hook is not correctly positioned if it is still in bottommost position.
8 Slide the brew group back into the machine along the guiding rails on the
sides until it clicks into position. Then place the coffee residues drawer
back in the machine.
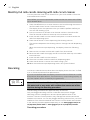
Monthly cleaning of the brew group with the degreasing tablet
-
Perform this cleaning cycle after the machine has brewed 500 cups of
coffee or once a month.
-
Use a degreasing tablet for this cleaning cycle.
Caution: Only use degreasing tablets for cleaning. They do not have a
descaling function.
1 Place a container under the coffee dispensing spout.
2 Press the AROMA STRENGTH button and select GROUND COFFEE.
3 Put a coffee oil remover tablet in the pre-ground coffee compartment.
4 Press the OK button. The machine dispenses water from the coffee
dispensing spout.
5 When the progress bar has reached the middle, set the power button to
OFF.
6 Let the degreasing solution work for approximately 15 minutes.
7 Set the power button to ON.
8 Press the standby button.
9 Wait until the machine performs an automatic rinsing cycle.
10 Perform the 'Weekly cleaning of the brew group' procedure.
11 Remove the drip tray with the coffee grounds container. Empty the drip
tray and the coffee grounds container and place them back in the
machine.
12 Press the AROMA STRENGTH button and select GROUND COFFEE.
13 Press the OK button. The machine dispenses water from the coffee
dispensing spout.
14 Repeat steps 12 and 13 twice. Discard the dispensed water.
15 To clean the drip tray, put a degreasing tablet in the drip tray and fill the
drip tray up to two-thirds of its capacity with hot water. Let the
degreasing tablet take effect for about 30 minutes. Then empty the drip
tray and rinse it thoroughly.
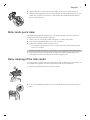
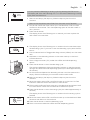
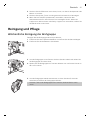
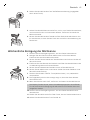
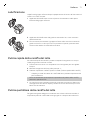
Lubrication
Lubricate the brew group after approximately 500 cups of coffee or once a
month.
1 Apply some lubricant around the shaft in the bottom of the brewing unit.
16
English

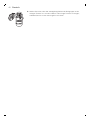
2 Apply lubricant to the rails on both sides, as shown in the illustration.
3 Slide the brew group back into the machine along the guiding rails on the
sides until it clicks into position. Then place the coffee residues drawer
back in the machine.
Milk carafe quick clean
Between brewing milk varieties you can rinse the spout with hot water to
make sure every milk recipe is optimal.
1 Place a cup or container under the spout to collect the water.
2 Turn the milk dispensing spout to the ‘I’ position.
3 Press the CARAFE QUICK CLEAN button.
-
The display reminds you have to insert the milk carafe, press the OK
button to confirm.
Note: Press the ESC button if you want to interrupt the milk carafe clean.
1 The machine starts rinsing water through the coffee dispensing spout.
The display shows the rinsing icon and a progress bar.
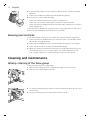
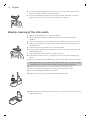
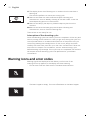
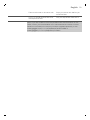
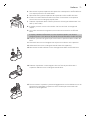
Daily cleaning of the milk carafe
It is important to clean the milk carafe every day or after you have used it, as
this preserves hygiene and ensures perfect milk froth consistency.
1
1
2
1 Press the release buttons to remove the lid.
2 Turn the milk dispensing spout up to the reference mark (indicated by a
dot).
17
English

3 Lift the milk carafe dispenser to remove it from the lid and wash it with
lukewarm water. Remove all milk residues.
4 Put the milk dispensing spout back onto the milk carafe lid. To insert it,
align the dot on the spout with the indication on the lid.
Weekly cleaning of the milk carafe
1 Press the release buttons to remove the lid.
2 Rinse the lid and the milk carafe with fresh water. Remove all milk
residues.
3 Place the lid back onto the milk carafe and make sure it locks into place.
4 Remove the top of the lid and fill the milk carafe with fresh water up to
the MAX level.
5 Place the top of the lid back onto the milk carafe.
6 Insert the milk carafe into the machine. Place a container under the milk
dispensing spout.
7 Press the MILK FROTH button to select hot milk.
8 The display shows the icon to indicate that the machine is dispensing
water.
9 When the machine stops dispensing, remove and empty the milk carafe.
The display will ask you to perform a quick clean cycle, you do not need
to perform this cycle during the weekly cleaning of the milk carafe.
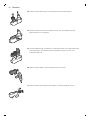
10 Press the release buttons to remove the lid of the milk carafe.
11 Turn the milk dispensing spout to the dot indicated on the lid.
12 Lift the milk dispensing spout off the lid.
13 Remove the ring from the milk carafe dispensing spout.
14 Press the button indicated with the arrow to unlock the cover of the milk
dispensing spout.
18
English

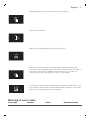
15 To remove the cover, press the sides of the dispensing spout lightly and
pull the cover downwards off the dispensing spout.
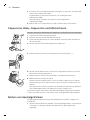
16 Pull the milk frothing unit upwards.
17 Pull the fitting outwards from the milk frothing device.
18 Remove the suction tube.
19 Pull the fitting outwards and separate it from the remaining part.
20Clean all parts with lukewarm water.
21 Reassemble all parts following in reverse order.
19
English
La pagina sta caricando ...
La pagina sta caricando ...
La pagina sta caricando ...
La pagina sta caricando ...
La pagina sta caricando ...
La pagina sta caricando ...
La pagina sta caricando ...
La pagina sta caricando ...
La pagina sta caricando ...
La pagina sta caricando ...
La pagina sta caricando ...
La pagina sta caricando ...
La pagina sta caricando ...
La pagina sta caricando ...
La pagina sta caricando ...
La pagina sta caricando ...
La pagina sta caricando ...
La pagina sta caricando ...
La pagina sta caricando ...
La pagina sta caricando ...
La pagina sta caricando ...
La pagina sta caricando ...
La pagina sta caricando ...
La pagina sta caricando ...
La pagina sta caricando ...
La pagina sta caricando ...
La pagina sta caricando ...
La pagina sta caricando ...
La pagina sta caricando ...
La pagina sta caricando ...
La pagina sta caricando ...
La pagina sta caricando ...
La pagina sta caricando ...
La pagina sta caricando ...
La pagina sta caricando ...
La pagina sta caricando ...
La pagina sta caricando ...
La pagina sta caricando ...
La pagina sta caricando ...
La pagina sta caricando ...
La pagina sta caricando ...
La pagina sta caricando ...
La pagina sta caricando ...
La pagina sta caricando ...
La pagina sta caricando ...
La pagina sta caricando ...
La pagina sta caricando ...
La pagina sta caricando ...
La pagina sta caricando ...
La pagina sta caricando ...
La pagina sta caricando ...
La pagina sta caricando ...
La pagina sta caricando ...
La pagina sta caricando ...
La pagina sta caricando ...
La pagina sta caricando ...
La pagina sta caricando ...
La pagina sta caricando ...
La pagina sta caricando ...
La pagina sta caricando ...
La pagina sta caricando ...
La pagina sta caricando ...
La pagina sta caricando ...
La pagina sta caricando ...
La pagina sta caricando ...
La pagina sta caricando ...
La pagina sta caricando ...
La pagina sta caricando ...
-
 1
1
-
 2
2
-
 3
3
-
 4
4
-
 5
5
-
 6
6
-
 7
7
-
 8
8
-
 9
9
-
 10
10
-
 11
11
-
 12
12
-
 13
13
-
 14
14
-
 15
15
-
 16
16
-
 17
17
-
 18
18
-
 19
19
-
 20
20
-
 21
21
-
 22
22
-
 23
23
-
 24
24
-
 25
25
-
 26
26
-
 27
27
-
 28
28
-
 29
29
-
 30
30
-
 31
31
-
 32
32
-
 33
33
-
 34
34
-
 35
35
-
 36
36
-
 37
37
-
 38
38
-
 39
39
-
 40
40
-
 41
41
-
 42
42
-
 43
43
-
 44
44
-
 45
45
-
 46
46
-
 47
47
-
 48
48
-
 49
49
-
 50
50
-
 51
51
-
 52
52
-
 53
53
-
 54
54
-
 55
55
-
 56
56
-
 57
57
-
 58
58
-
 59
59
-
 60
60
-
 61
61
-
 62
62
-
 63
63
-
 64
64
-
 65
65
-
 66
66
-
 67
67
-
 68
68
-
 69
69
-
 70
70
-
 71
71
-
 72
72
-
 73
73
-
 74
74
-
 75
75
-
 76
76
-
 77
77
-
 78
78
-
 79
79
-
 80
80
-
 81
81
-
 82
82
-
 83
83
-
 84
84
-
 85
85
-
 86
86
-
 87
87
-
 88
88


Gaggia RI8263/01 Manuale utente
- Categoria
- Accessori per la preparazione del caffè
- Tipo
- Manuale utente
- Questo manuale è adatto anche per
in altre lingue
- English: Gaggia RI8263/01 User manual
- Deutsch: Gaggia RI8263/01 Benutzerhandbuch
Documenti correlati
Altri documenti
-
Philips EP1200/00 Manuale utente
-
Philips Saeco INCANTO HD8921 Manuale utente
-
Philips-Saeco SM5460 Manuale utente
-
Saeco PICOBARISTO HD8927 Manuale utente
-
-
Saeco HD8925/01 Manuale utente
-
Grundig GKI1120 Manuale utente
-
-
-