Atlantis A05-15AX-C03 Manuale utente
- Categoria
- TV
- Tipo
- Manuale utente
Questo manuale è adatto anche per

LCD Monitor multi-language manual
I-See S series
A05-15AX-C03
A05-17AM-C04
A05-19AM-C05


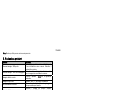
INDEX
ENGLISH
IMPORTANT SAFETY INSTRUCTIONS................................................................................................1
1. Introduction..........................................................................................................................................2
1.1 General information ...................................................................................................................... 2
1.2 Features........................................................................................................................................ 2
1.3 Check List ..................................................................................................................................... 3
2. Installation ...........................................................................................................................................3
2.1 Install the base.............................................................................................................................. 3
2.2 Install the monitor.......................................................................................................................... 4
2.3 Self test pattern............................................................................................................................. 5
2.4 Adjust picture ................................................................................................................................ 5
3. Operations of the monitor....................................................................................................................5
3.1 Power on/off switch....................................................................................................................... 5
3.2 Power LED indicator ..................................................................................................................... 5
3.3 OSD control keys.......................................................................................................................... 6
3.3.1 Auto key ................................................................................................................................. 6
3.3.2 +/- key..................................................................................................................................... 6
3.3.3 Enter key ................................................................................................................................ 6
3.3.4 OSD menu.............................................................................................................................. 6
3.3.5 Function table......................................................................................................................... 7
3.3.6 Special functions .................................................................................................................... 9

3.4 Safety mode................................................................................................................................ 11
3.5 Timing guide ............................................................................................................................... 11
3.6 Plug & Play ................................................................................................................................. 12
3.7 Power management.................................................................................................................... 12
3.8 Volume adjust ............................................................................................................................. 14
4. Specification ......................................................................................................................................14
5. Simple troubleshooting......................................................................................................................16
ITALIANO
ISTRUZIONI IMPORTANTI PER LA SICUREZZA ...............................................................................17
1. Introduzione.......................................................................................................................................18
1.1 Informazioni generali .................................................................................................................. 18
1.2 Carattristiche principali ............................................................................................................... 18
1.3 Check List ................................................................................................................................... 19
2. Installazione ......................................................................................................................................19
2.1 Installare la base......................................................................................................................... 19
2.2 Installazione del monitor ............................................................................................................. 20
2.3 Pattern di auto test...................................................................................................................... 21
2.4 Regolazione dell’ immagine........................................................................................................ 21
3. Funzionalità del monitor ....................................................................................................................22
3.1 Pulsante on/off............................................................................................................................ 22
3.2 LED frontale................................................................................................................................ 22
3.3 Tasti di controllo OSD................................................................................................................. 22

3.3.1 Tasto Auto............................................................................................................................ 22
3.3.2 Tasti +/- ................................................................................................................................ 22
3.3.3 Tasto Enter........................................................................................................................... 22
3.3.4 Menù OSD............................................................................................................................ 23
3.3.5 Tabella delle funzioni ........................................................................................................... 24
3.3.6 Funzioni speciali................................................................................................................... 25
3.4 Safety mode................................................................................................................................ 27
3.5 Guida al timing............................................................................................................................ 28
3.6 Plug & Play ................................................................................................................................. 29
3.7 Risparmio energetico.................................................................................................................. 29
3.8 Regolazione volume ................................................................................................................... 30
4. Specifiche..........................................................................................................................................30
5. Risoluzione problemi.........................................................................................................................32
FRANCAIS
IMPORTANT INSTRUCTIONS DE SECURITE....................................................................................33
1. Introduction........................................................................................................................................34
1.1 Informations générales ............................................................................................................... 34
1.2 Caractéristiques .......................................................................................................................... 34
1.3 Déballage.................................................................................................................................... 35
2. Installation .........................................................................................................................................35
2.1 Installation de la base ................................................................................................................. 35
2.2 Installation du moniteur............................................................................................................... 36

2.3 Auto test...................................................................................................................................... 37
2.4 Ajuster l’affichage........................................................................................................................ 37
3. Opérations.........................................................................................................................................37
3.1 Bouton Marche/Arrêt................................................................................................................... 37
3.2 Diode LED................................................................................................................................... 37
3.3 Touches de contrôle OSD .......................................................................................................... 38
3.3.1 Touche auto ......................................................................................................................... 38
3.3.2 Touches +/- .......................................................................................................................... 38
3.3.3 Touche entrée ...................................................................................................................... 38
3.3.4 Menu OSD............................................................................................................................ 38
3.3.5 Table des fonctions .............................................................................................................. 39
3.3.6 Fonctions spéciales.............................................................................................................. 41
3.4 Mode Sécurité............................................................................................................................. 43
3.5 Modes supportés ........................................................................................................................ 43
3.6 Plug & Play ................................................................................................................................. 44
3.7 Consommations .......................................................................................................................... 44
3.8 Réglage du volume sonore......................................................................................................... 45
4. Spécifications ....................................................................................................................................46
5. Disfonctionnement.............................................................................................................................48

Copyright
The Atlantis Land logo is a registered trademark of Atlantis Land SpA. All other names mentioned mat be trademarks or
registered trademarks of their respective owners. Subject to change without notice. No liability for technical errors and/or
omissions.
CE Mark Warning
This is a Class B product. In a domestic environment, this product may cause radio interference, in which case the user
may be required to take adequate measures.
Important Note
The antenna(s) used for this equipment must be installed to provide a separation distance of at least 30 cm from all
persons.
FCC Warning
This equipment has been tested and found to comply with the regulations for a Class B digital device, pursuant to Part 15
of the FCC Rules. These limits are designed to provide reasonable protection against harmful interference when the
equipment is operated in a commercial environment. This equipment generates, uses, and can radiate radio frequency
energy and, if not installed and used in accordance with this user’s guide, may cause harmful interference to radio
communications. Operation of this equipment in a residential area is likely to cause harmful interference, in which case
the user will be required to correct the interference at his own expense.

ENGLISH
A05-1XAX-C0X_MX02 1
ENGLISH
IMPORTANT SAFETY INSTRUCTIONS
1. Read these instructions carefully
2. Save this manual for later use
3. Unplug the monitor from the power source when you clean the monitor. Don’t use liquid cleaners or aerosol cleaners.
Use a cloth to clean it. If it doesn’t do, please use LCD screen cleaners
4. Don’t use attachment not recommended as they may cause hazards.
5. Please grasp the plug to unplug the connector from the wall outlet. Do not pull the power cord to unplug it.
6. Don’t place anything on the power cord or step on it
7. Do not place the monitor near water source such as bathtub, washbowl, sink, laundry tub, swimming pool etc.
8. The slots are designed for ventilation, simultaneously to keep the machinery workable and protect it from overheating.
For the same reason, please do not place the monitor on a bed, sofa, carpets or other similar surface. Do not place
the monitor near or over heat source or place in a built-in installation.
9. Keep 2 inches (or 5 cm) away from the wall or other goods.
10. This monitor can only use the power source indicated on the label. If you have questions, please consult your dealer.
11. As safety measure, this monitor is equipped with a three-wire ground style plug. If you can not insert the plug into
outlet, contact your electrician to replace your outlet. Do not defeat the safety purpose of the grounding-type plug.
12. Please make sure that the outlet and power cord can afford the total electricity of the products.
13. Place the monitor in safe place where the cord will not be abused by persons working on it.
14. Follow all the warnings and instructions illustrated on the manual.
15. Don’t overload the wall outlets and extend cords as this can result in fire or electric shocks.
16. Do not remove or open the cover to service this monitor yourself. It may expose you to dangerous voltage or other
hazards before all servicing to qualified service personnel.

ENGLISH
A05-1XAX-C0X_MX02 2
17. Unplug this monitor from the outlet and refer servicing to qualified service personnel under the following conditions.
a. The power cord is frayed or damaged.
b. The monitor has been dropped or the cabinet has been damaged
c. When the monitor displays a distinct change in performance, this indicates a need for service.
18. The power cord is the main device to disconnect the power.
19. Unplug the power cord when you do not use it for a long time.
20. Place the monitor in good ventilation and protect it from strong light, overheating and damp environment.
21. This monitor must be stored in temperature –20°C ~ +55°C. Otherwise, it may cause permanent damage.
1. Introduction
1.1 General information
This monitor is a high-performance intelligent multi-scanning color monitor adopting active matrix TFT LCD display that
uses amorphous silicon TFT as a switching devices. With very low radiation, anti-glary surface treatment and occupying
small place , it is very suitable for home and office applications.
1.2 Features
• LCD TFT monitor
• Built-in multimedia speakers
• Multi-language OSD interface
• Image auto regulation
• White and black reference voltage auto-calibration
• Compliant with EPA energy star, VESA DPMS
• Plug & Play

ENGLISH
A05-1XAX-C0X_MX02 3
1.3 Check List
Check the list before operating this monitor, please make sure that all of the following items are included.
1. LCD monitor
2. Base + mounting screw
3. AC adapter
4. Power cord
5. Signal cable
6. Audio cable
7. User’s manual
8. Warranty certification
If any of above listed items is missing, please contact your dealer for technical support or customer service.
2. Installation
The following chapters explain how to install the base and connect the monitor to your personal computer.
2.1 Install the base
Follow these steps to install the base:
1. Turn the monitor down.
2. Assembly the base to the arm with screw.
3. Tie the screw with a coin.

ENGLISH
A05-1XAX-C0X_MX02 4
2.2 Install the monitor
Make sure that the computer and monitor’s power are both turned off, before start installation. Please follow the steps to
install your LCD monitor:
1. Signal cable connection: firstly lock the base and knighthead, then Plug one end of the signal cable into computer and
lock the two bolts to ensure firmly grounding. Then plug the other into the monitor and lock the two bolts.
2. Power cord connection: connect the AC adapter and AC power source with power cord. then connect the AC adapter
output to the power input of the monitor.
3. Audio cable connection: Insert one end of the audio cable to the audio output of the PC audio card and the another to
the audio input of LCD monitor.
4. Power on: turn on both of the monitor and computer. After the monitor is power on, the LED lights up green or blue, If
the LED become red and flashing, please check the video signal cable. If LED is off, please press power on switch.

ENGLISH
A05-1XAX-C0X_MX02 5
2.3 Self test pattern
If there is no horizontal or vertical sync. signals, your monitor will display the self test
pattern to indicate no signal input. After a few seconds, the monitor will enter into
waiting and saving power mode. The LED will be red and flashing. Once the monitor
receives the video signal, it will return to normal mode.
2.4 Adjust picture
In order to obtain the best visual display, you must adjust it, please refer to chapter 3 “Operation of the monitor”.
3. Operations of the monitor
3.1 Power on/off switch
This is a slight-touch digital-control key. It is used to turn the monitor on or off.
3.2 Power LED indicator
When the monitor is working, the power LED is green. If the monitor is in saving power mode, the power LED will be red
and flashing. If you turn off the computer, the power LED is off. When the LED is off, the monitor is off, but the power
adapter is on. For the purpose of security, you should turn off adapter power when you don’t use the monitor.

ENGLISH
A05-1XAX-C0X_MX02 6
3.3 OSD control keys
3.3.1 Auto key
This key is used to complete auto adjusting function.
3.3.2 +/- key
These two keys will complete the left (increase) or right (decrease) adjustment and choose the menu function. The
contrast and the brightness can be set by +/- key directly.
3.3.3 Enter key
Confirmation key, to display the OSD menu and complete the confirmation function.
3.3.4 OSD menu
The function list of the menu:
1. Auto adjustment
2. Brightness
3. Contrast
4. H-position
5. V-position
6. Clock
7. Phase
8. Sharpness
9. Color adjustment

ENGLISH
A05-1XAX-C0X_MX02 7
10. Volume
11. OSD menu display time
12. OSD horizontal/ vertical/position and
transparency adjustment
13. Recall
14. Languages
15. Exit
16. Selected function name
17. Resolution
18. H-frequency
19. V-frequency
20. Progressive bar of adjustment
21. Percentage of adjustment
22. Title
3.3.5 Function table
Display contents Function
AUTO ADJUSTMENT Automatically adjust to obtain the best setting
BRIGHTNESS Adjust the brightness
CONTRAST Adjust the contrast
H-POSITION Move the screen toward left or right

ENGLISH
A05-1XAX-C0X_MX02 8
V-POSITION Move the screen upward or downward
CLOCK Adjust the frequency of pixel
PHASE Adjust the phase of pixel clock
SHARPNESS Adjust the sharpness of the picture
COLOR Adjust the colors of the picture
9300K COLOR TEMPERATURE Set 9300k color temperature
7800K COLOR TEMPERATURE Set 7800k color temperature
6500K COLOR TEMPERATURE Set 6500k color temperature
USER MODE Set user mode
AUTO COLOR BALANCE Auto color balance
VOLUME Adjust the volume
OSD DISPLAY TIME Adjust the OSD display time
OSD ADJUSTMENT Adjust the parameter of OSD
OSD H-POSITION Move the menu toward left or right
OSD V-POSITION Move the menu upward or downward

ENGLISH
A05-1XAX-C0X_MX02 9
OSD TRANSPARENCY OSD transparency setting
RECALL Reset factory setting
LANGUAGE Language selection
EXIT Exit the menu
3.3.6 Special functions
Auto Adjustment ( )
When you choose this function, the monitor will enter into automatical adjustment mode. After a few seconds, the monitor
will be in the best visual display mode.
Color adjustment ( ):
when the function is selected, the monitor will come into the sub-menu, there are five functions that can be selected:
9300k, 7800k, 6500k, USER,W-B. Selecting USER you will enter user mode and you can make adjustment to R/G/B
obtain your satisfying color. Selecting W-B the monitor will adjust the white-black color reference voltage optimal color
balance.

ENGLISH
A05-1XAX-C0X_MX02 10
R/G/B adjustment ( ):
When in “User’s mode”, the monitor will automatically enter into R/G/B adjustment mode, push the ENTER key ,the
relative options will flash, then adjust it by pressing “+/-“ key. push ENTER again to exit.
Language ( ).
There are six language to select:
ENG.: English
FRE.: Frech
DEU.: German
ITA.: Italian
ESP.: Spanish
PYC.: Russian (TUR.:Turkish or POR.: Portuguese)
Position of OSD menu (
):
When you select the item, you can adjust H-position and
V-position of OSD menu and transparence.

ENGLISH
A05-1XAX-C0X_MX02 11
Sharpness adjustment ( ):
Adjust the sharpness of the picture on the screen.
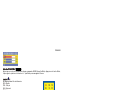
3.4 Safety mode
When the video signal exceeds the frequency range of the monitor , the monitor
MCU will stop horizontal and vertical scanning in order to protect the monitor the
following image will be displayed on the screen. After a few seconds, the monitor
will enter turn-off mode. You must restart the computer and reset the frequency
range.
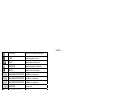
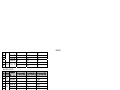
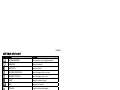
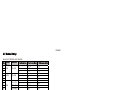
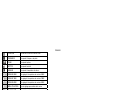
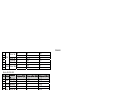
3.5 Timing guide
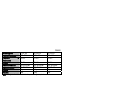
Models A05-17AM-C04 and A05-19AM-C05
No. Mode Resolution V-Frequency (Hz) Pixel Clock (MHz) H-Frequency (KHz)
1 60 25.175 31.5
2 72 31.5 37.9
3
VGA 640 x 480
75 31.5 37.5
4 60 40 37.9
5 72 50 48.1
6
SVGA 800 x 600
75 49.5 46.9
7 XGA 1024 x 768 60 65 48.4

ENGLISH
A05-1XAX-C0X_MX02 12
8 70 75 56.5
9 1024 x 768 75 78.75 60
10 1152 x 864 75 108 67.5
11 1280 x 960 60 108 60
12 60 108 64
13
SXGA 1280 x 1024
75 135 80
Model A05-15AX-C03
No. Mode
Resolutio
n
V-Frequency (Hz) Pixel Clock (MHz) H-Frequency (KHz)
1 720 x 400 70 28.322 31.468
2
VGA
640 x 480 60 25.175 31.469
3 SVGA 800 x 600 60.3 40 37.879
4 1024 x 768 60 65 48.363
5 1024 x 768 70 75 56.476
6
XGA
1024 x 768 75 78.75 60.023
3.6 Plug & Play
This monitor meets the standard of VESA DDC. When using video card with VESA DDC1/2B, it will auto-scan video
frequency, output power , function and other data to PC when computer is on. It will go to proper connector mode and
proper resolution frequency.
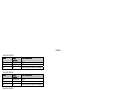
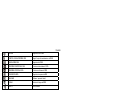
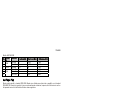
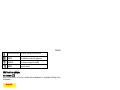
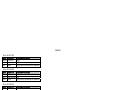
3.7 Power management
This monitor complies with EPA energy star requirement and meets VESA DPMS standard. The following is the
description of the power indicator for the power saving mode.

ENGLISH
A05-1XAX-C0X_MX02 13
Model A05-15AX-C03
Mode Power
indicator
Power consumption
On Green or blue <30 W
Stand by/suspend Red flashing <5 W
Off Off <3 W (include power adapter’s consumption)
Model A05-17AM-C04
Mode Power
indicator
Power consumption
On Green or blue <40 W
Stand by/suspend Red flashing <5 W
Off Off <3 W (include power adapter’s consumption)
Model A05-19AM-C05
Mode Power
indicator
Power consumption
On Green or blue <45 W
Stand by/suspend Red flashing <5 W
Off Off <3 W (include power adapter’s consumption)
La pagina si sta caricando...
La pagina si sta caricando...
La pagina si sta caricando...
La pagina si sta caricando...
La pagina si sta caricando...
La pagina si sta caricando...
La pagina si sta caricando...
La pagina si sta caricando...
La pagina si sta caricando...
La pagina si sta caricando...
La pagina si sta caricando...
La pagina si sta caricando...
La pagina si sta caricando...
La pagina si sta caricando...
La pagina si sta caricando...
La pagina si sta caricando...
La pagina si sta caricando...
La pagina si sta caricando...
La pagina si sta caricando...
La pagina si sta caricando...
La pagina si sta caricando...
La pagina si sta caricando...
La pagina si sta caricando...
La pagina si sta caricando...
La pagina si sta caricando...
La pagina si sta caricando...
La pagina si sta caricando...
La pagina si sta caricando...
La pagina si sta caricando...
La pagina si sta caricando...
La pagina si sta caricando...
La pagina si sta caricando...
La pagina si sta caricando...
La pagina si sta caricando...
La pagina si sta caricando...
La pagina si sta caricando...
La pagina si sta caricando...
-
 1
1
-
 2
2
-
 3
3
-
 4
4
-
 5
5
-
 6
6
-
 7
7
-
 8
8
-
 9
9
-
 10
10
-
 11
11
-
 12
12
-
 13
13
-
 14
14
-
 15
15
-
 16
16
-
 17
17
-
 18
18
-
 19
19
-
 20
20
-
 21
21
-
 22
22
-
 23
23
-
 24
24
-
 25
25
-
 26
26
-
 27
27
-
 28
28
-
 29
29
-
 30
30
-
 31
31
-
 32
32
-
 33
33
-
 34
34
-
 35
35
-
 36
36
-
 37
37
-
 38
38
-
 39
39
-
 40
40
-
 41
41
-
 42
42
-
 43
43
-
 44
44
-
 45
45
-
 46
46
-
 47
47
-
 48
48
-
 49
49
-
 50
50
-
 51
51
-
 52
52
-
 53
53
-
 54
54
-
 55
55
-
 56
56
-
 57
57


Atlantis A05-15AX-C03 Manuale utente
- Categoria
- TV
- Tipo
- Manuale utente
- Questo manuale è adatto anche per
in altre lingue
- English: Atlantis A05-15AX-C03 User manual
- français: Atlantis A05-15AX-C03 Manuel utilisateur


