SECOMP AG 05452219 Screenint Leinwand Canaletto 250×140 16:9 Manuale utente
- Categoria
- Schermi per proiezioni
- Tipo
- Manuale utente

Il presente documento è di proprietà riservata della Euroscreen S.r.l. E’ vietata la produzione senza autorizzazione
This document is property of Euroscreen Srl. Any distribution, reproduction, copying or publication of this document is prohibited.
Dieses Dokument ist Eigentum von Euroscreen S.r.l. Jeden Verteilung, Reproduktion, Abschrift oder Veröentlichung von diesem Dokument ist verboten.
RELEASE ER2022_02_02
MANUALE DI INSTALLAZIONE
INSTALLATION MANUAL
INSTALLATIONSANLEITUNG
CANALETTO WRAP AROUND
ISTRUZIONI ORIGINALI
IN ITALIANO
ORIGINAL INSTRUCTIONS IN
ITALIAN LANGUAGE
Translation into English language
URSPRÜNGLICHE ANLEITUNGEN
AUF ITALIENISCH
Übersetzung auf Deutsch

CANALETTO WRAP AROUND
Il presente documento è di proprietà riservata della Euroscreen S.r.l. E’ vietata la produzione senza autorizzazione
This document is property of Euroscreen Srl. Any distribution, reproduction, copying or publication of this document is prohibited.
Dieses Dokument ist Eigentum von Euroscreen S.r.l. Jeden Verteilung, Reproduktion, Abschrift oder Veröentlichung von diesem Dokument ist verboten.
RELEASE ER2022_02_02
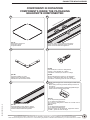
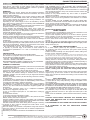
COMPONENTI IN DOTAZIONE
COMPONENTS INSIDE THE PACKAGING
GELIEFERTE KOMPONENTEN
C
D E
Staffe di ancoraggio nero scorrevoli già montate nella
cornice.
Black sliding anchoring brackets already mounted on
the frames.
Schwarzes Verschiebbare Verankerungshalterungen
bereits auf den Rahmen aufgestellt.
Superiore/Upper/Obere
Inferiore/Lower/Untere
B
pz. 08
Angolari metallici con grani
Metal corners with clamp screws
Metallecken mit Klemmschrauben
pz. 03
pz. 02 Superiore/Upper/Obere
pz. 01 Inferiore/Lower/Untere
no a 300 cm. di larghezza - till 300 cm of width - bis zu
300 cm Länge
pz. 01
Supercie di proiezione
Projection surface
Projektionsäche
A
*
*
*
*
pz. 02
Segmenti della cornice superiore ed inferiore
Upper and lower aluminium frame segments
Obere und untere Rahmensegmente
pz. 03
Viti+tasselli (no a 300 cm. di larghezza)
Screws + plugs (till 300 cm of width)
Schrauben + Stecker (bis zu 300 cm Länge)
pz. 04
Viti+tasselli (maggiore di 300 cm. di larghezza)
Screws + plugs (larger than 300 cm of width)
Schrauben + Stecker (größer als 300 cm Länge)
pz. 02
Segmenti della cornice destra e sinistra
Left and right aluminium frame segments
Rechte und linke Rhamensegmente
pz. 04
pz. 03 Superiore/Upper/Obere
pz. 01 Inferiore/Lower/Untere
maggiore di 300 cm. di larghezza - larger than 300 cm
of width - größer als 300 cm Länge

CANALETTO WRAP AROUND
Il presente documento è di proprietà riservata della Euroscreen S.r.l. E’ vietata la produzione senza autorizzazione
This document is property of Euroscreen Srl. Any distribution, reproduction, copying or publication of this document is prohibited.
Dieses Dokument ist Eigentum von Euroscreen S.r.l. Jeden Verteilung, Reproduktion, Abschrift oder Veröentlichung von diesem Dokument ist verboten.
RELEASE ER2022_02_02
INTRODUZIONE
Grazie per avere acquistato uno schermo a cornice della serie
Canaletto Wrap Around. Questo articolo è interamente prodotto
in Italia con materiali di ottima qualità e tele per proiezione che
garantiscono al vostro sistema performance qualitativamente
eccellenti.
AVVERTENZE
Prima di assemblare ed installare lo schermo a cornice leggere
attentamente le istruzioni di montaggio. Si prega, inoltre, di
conservare sempre le presenti istruzioni di montaggio in modo tale
da poterle consultare ogniqualvolta ve ne sia la necessità.
In fase di apertura dell’imballo dello schermo, UTILIZZARE
CON MOLTA CAUTELA ATTREZZI TAGLIENTI che possano
danneggiare il contenuto dello stesso. Durante l’apertura dell’imballo
e l’installazione del prodotto, si raccomanda di indossare guanti da
lavoro.
In base al peso del prodotto, esso va maneggiato da almeno due o
tre o più persone secondo il rapporto KG/PERSONA: MASCHIO 25
kg. – FEMMINA 15 kg.
Dopo aver assemblato lo schermo, potrebbero permanere delle
pieghe sulla supercie di proiezione, causate dall’imballo e dal
trasporto.
Tali pieghe spariranno nell’arco di 48/72 ore, a condizione che
lo schermo sia installato in un ambiente in cui la temperatura si
attesti intorno ai 20°C. Nel caso in cui la temperatura ambientale
sia superiore, le pieghe spariranno in minor tempo. Nel caso che le
pieghe persistano o qualora vi sia la necessità di rimuoverle in un
breve lasso di tempo, suggeriamo l’utilizzo di un asciugacapelli.
Attenzione: utilizzare l’asciugacapelli ad almeno 40 cm. di distanza
dal telo di proiezione, muovendolo costantemente e uniformemente
lungo la supercie di PVC. Qualora questo non venga rispettato, si
potrebbero causare danni permanenti alla tela di proiezione.
Nel caso durante il montaggio della tela alla cornice, essa risultasse
apparentemente troppo piccola, lasciarla 24 ore in una stanza ad una
temperatura tra 20°-25°C. In tal modo, la tela risulterà più elastica
e più facile da montare alla cornice. Il produttore non si assume
responsabilità per qualsiasi danno subito da persone o cose nel caso
il prodotto sia utilizzato per usi impropri al di fuori delle speciche
tecniche o in caso di installazione errata.
Il produttore non si assume responsabilità in caso di errato montaggio
dello schermo.
CERTIFICAZIONI DEL PRODOTTO
Gli schermi a cornice Canaletto Wrap Around sono conformi alle
direttive CE. Le tele per proiezione utilizzate non presentano cadmio
e sono certicate ignifughe come segue:
• classe M1 – MICROPERFORATED,
• classe M2 – WHITE, LUMI-GREY, LUMI GREY
MICROPERFORATED, BRIGHT CONTRAST 3D 0.8, FOLDAWAY
• classe B1 – WHITE, BRIGHT CONTRAST 3D 0.8
GARANZIA DEL PRODOTTO
Lo schermo per videoproiezione è garantito 2 anni dalla data di
acquisto per difetti di fabbricazione. La responsabilità è limitata alla
riparazione o alla sostituzione dei componenti riconosciuti difettosi,
senza altri oneri di sorta.
La garanzia è sospesa d’ufcio se (l’elenco è indicativo e non
esaustivo):
1) difetti non dovuti a problemi su materiali o manodopera;
2) modiche, alterazioni, riparazioni o smontaggio del prodotto non
preventivamente autorizzate per iscritto da Screenint;
3) installazione, utilizzo o manutenzione del prodotto non conformi
alle istruzioni di come dal presente Manuale d’uso o in altri documenti
tecnici allegati al prodotto;
4) in caso di impropria e/o non conforme installazione, manutenzione,
negligenza, uso improprio del prodotto;
5) utilizzo di componenti non originali o non autorizzate per iscritto
da Screenint;
6) normale usura;
7) il prodotto è stato danneggiato durante il trasporto;
8)vengono alterate, cancellate, rimosse o risultano impossibili da
leggere le etichette riguardanti il numero di serie del prodotto.
Sono da considerarsi esclusi dalla garanzia le componenti che
presentano usura normale o causata da particolari situazioni
ambientali o di installazione. NON installare lo schermo vicino o
sopra fonti di calore o di condizionamento dell’aria, poiché il PVC è
un materiale plastico che si dilata e si danneggia irrimediabilmente
se sottoposto a calore e/o aria fredda anche se il usso di aria non
arriva direttamente al telo.
NON montare lo schermo davanti o in prossimità di nestre, anche
se da tali nestre non proviene luce diretta, in quanto il PVC
potrebbe danneggiarsi irrimediabilmente a causa del calore radiante
proveniente dal vetro della nestra.
NON esporre lo schermo alla luce diretta del sole, poiché la tela in
PVC potrebbe rovinarsi e creare onde per le stesse motivazioni di
cui sopra. La tela in PVC è molto sensibile alle escursioni termiche.
Effettuare il montaggio del telo ad una temperatura ambientale di
20°-25°C. Nel caso in cui esso sia passato da un luogo esterno ad
uno interno, subendo in tal modo uno sbalzo termico, ATTENDERE
3 ORE PRIMA DI MONTARE LO SCHERMO. LO SCHERMO
DEVE ESSERE SEMPRE IMMAGAZZINATO O TRASPORTATO IN
POSIZIONE ORIZZONTALE, altrimenti potrebbero vericarsi onde
sul telo alla prima apertura.
NON tentare di LAVARE in alcun modo la supercie del TELO né
con detergenti, né con alcool, solventi o prodotti per la pulizia della
casa. Spolverare di tanto in tanto la supercie con un panno asciutto
e pulito. Usare la massima cautela con lo schermo in quanto le
macchie di qualsiasi tipo sulla tela sono indelebili.
NON APPENDERSI allo schermo e NON APPENDERVI OGGETTI.
Assicurarsi che bambini non giochino con lo schermo in quanto
potrebbero procurarsi delle lesioni anche gravi.
NON VERRANNO ACCETTATI resi di schermi senza previa
autorizzazione di rientro data specicatamente dal produttore
(numero RMA) e senza idoneo imballaggio.
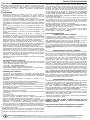
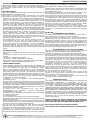
ISTRUZIONI DI MONTAGGIO
1. ASSEMBLAGGIO DELLA CORNICE
Il prodotto deve essere installato e utilizzato in conformità alle
normative vigenti nel paese dove esso è ubicato.
Appoggiate i segmenti della cornice (B e C) sul pavimento con il lato
delle scanalature rivolto verso l’alto. Per non grafare la cornice è
consigliabile appoggiarla sopra a un telo morbido e pulito.
Inserire in ogni angolo due angolari metallici con grani (D) come in
Fig. 1. Dopo aver inserito tutti gli angolari metallici nei 4 segmenti di
cornice, posizionare quest’ultima in modo tale che le due diagonali
abbiamo la stessa misura. A questo punto, stringere fermamente i
grani (Fig. 2).
2. MONTAGGIO DEL TELO SULLA CORNICE
Su una supercie perfettamente pulita, stendere il telo di proiezione
(A) con il lato di proiezione (vedi etichetta di colore verde “Projection
side”) rivolto verso il pavimento. Appoggiarvi sopra delicatamente
la cornice poc’anzi montata, con il lato delle scanalature rivolto
verso l’alto (Fig. 3). Nel caso vi sia una saldatura sulla supercie
di proiezione, montare la tela sulla cornice in modo tale che la
saldatura risulti nella parte superiore dello schermo. Procedere
con l’ancoraggio della tela tramite le strisce di velcro già ssate
su telo e cornice, iniziando da un lato verticale facendo particolare
attenzione a posizionare le linguette agli estremi (vedi Fig. 4) in
modo tale che risultino perfettamente combacianti con gli angoli della
cornice. Successivamente ripetere le operazioni sopra descritte per
l’altro lato verticale, prestando attenzione a tendere bene il telo per
poi ssarlo al velcro presente sulla cornice (vedi Fig. 5). A questo
punto, piegare uno dei due lati orizzontali del telo partendo dal
centro e muovendosi dal centro verso le due estremità. Prima di
chiudere l’angolo destro e sinistro, piegare le linguette verso il lato
lungo della cornice (Fig. 6) e ripetere queste operazioni per l’altro
lato orizzontale, prestando attenzione a tendere bene il telo per poi
ssarlo al velcro presente sulla cornice (Fig. 7).
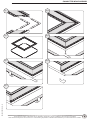
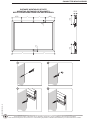
3. POSIZIONAMENTO A PARETE
I Canaletto Wrap Around sono dotati di apposite staffe di ancoraggio
(*) scorrevoli che permettono un facile posizionamento dello stesso
alla parete, utilizzando le viti ed i tasselli forniti a corredo (E).
TUTTI GLI SCHERMI A CORNICE SONO DOTATI DI STAFFA
SUL LATO ORIZZONTALE INFERIORE DELLO SCHERMO AL
FINE DI GARANTIRNE LA FORMA RETTANGOLARE E LA NON
ACCIDENTALE CADUTA IN CASO DI SOLLEVAMENTO.
Il produttore garantisce che la cornice dello schermo mantenga,
dopo l’installazione, una forma rettangolare, solo se essa è ancorata
direttamente al muro tramite tutte le staffe di ancoraggio montate
sulla parte di cornice superiore ed inferiore.
Al termine del montaggio, vericare che lo schermo sia perfettamente
orizzontale utilizzando una livella.
CONTROLLARE OGNI 6 MESI I FISSAGGI DELLE VITI, DEI
TASSELLI E DELLE STAFFE AL FINE DI VERIFICARNE LA
PERFETTA TENUTA.
NON SOSTARE NEL RAGGIO D’AZIONE DELLO SCHERMO.
E’ VIETATO L’UTILIZZO DELLO SCHERMO ALL’APERTO.
ITALIANO

CANALETTO WRAP AROUND
Il presente documento è di proprietà riservata della Euroscreen S.r.l. E’ vietata la produzione senza autorizzazione
This document is property of Euroscreen Srl. Any distribution, reproduction, copying or publication of this document is prohibited.
Dieses Dokument ist Eigentum von Euroscreen S.r.l. Jeden Verteilung, Reproduktion, Abschrift oder Veröentlichung von diesem Dokument ist verboten.
RELEASE ER2022_02_02
I
NTRODUCTION
Thank you for purchasing a frame screen among the range Canaletto
Wrap Around. This screen is made entirely in Italy with rst-class
materials, including a high quality projection surface to guarantee
excellent performance for your installation.
WARNINGS
Before installing the screen, please read the following instructions
carefully. We would recommend that these instructions are stored
safely for future reference.
When opening the packaging of the screen, please DO NOT USE
CUTTERS or OTHER SHARP TOOLS that can damage the screen
inside. During opening the packaging and during installation, it is
reccomended to use work gloves.
Depending on the screen weight, it has to be handled by at least
two or three persons taking care to the following ratio KG/PERSON:
MALE 25 kg. – FEMALE 15 kg.
After assembling the screen, there could result some wrinkles on the
projection surface, due to packaging and transport.
These wrinkles will disappear within 48/72 hours, under the
condition that the screen is installed inside a room with at least 20°C
temperature. In case the room temperature is higher than 20°C, the
wrinkles will disappear quicker.
In case of persistant wrinkles or if you need to remove the wrinkles in
a very short time, we suggest to use an hairdryer.
Warning: use the hairdryer at least 40 cm. from the projection surface
and move it constantly and evenly across the projection cloth.
If this warning is not respected, the surface could be damaged
permanently.
In case during assembling of the projection cloth on the frame, the
surface results apparently too small, please leave it 24 hrs in a room
with 20-25°C temperature. After this, the cloth will be more elastic
and it will be easier to mount it onto the frame.
The manufacturer does not take responsibility for any damage
to property or personal injury if the screen is used outside of
recommended specications or in case of incorrect/poor quality
installation.
CERTIFICATIONS
rame screens Canaletto Wrap Around are CE certied.
The surfaces for projection used on the products are cadmium-free
and are re-proof certied as follows:
• class M1 – MICROPERFORATED,
• class M2 – WHITE, LUMI-GREY, LUMI GREY
MICROPERFORATED, BRIGHT CONTRAST 3D 0.8, FOLDAWAY
• class B1 – WHITE, BRIGHT CONTRAST 3D 0.8
WARRANTY CONDITIONS
This projection screen is guaranteed 2 years from the purchase date
for manufacturing defects.
Responsibility is limited to repairing or substitution of the defected
components and without any other charge at our expense.
Warranty is ofcially voided if the screen has been dismantled or
it is returned with collision damage or defective due to incorrect
installation. Repairs must be carried out by an Approved ScreenInt
Certied Engineer.
Warranty is ofcially voided if (all the following cases are including
but not limited):
1) defects not due to deciencies in the material or workmanship;
2) amendments, alterations, repairs or disassembling of the Product
not previously authorized in writing by Screenint;
3) installation, use or maintenance of the Product not in compliance
with Screenint ‘s instructions as set forth in this Installation Manual
and/or in any other technical documentation supplied together with
the Product;
4) bad and/or improper and/or not in compliance installation,
maintenance, negligence, improper use;
5) use of non-original spare parts or not authorized in writing by
Screenint;
6) normal wear and tear;
7) the screen has been damaged in transit;
8) the sticker regarding the serial number of the product has been
altered, deleted, removed or tampered.
DO NOT install this screen nearby or over heating or air conditioning
systems, because PVC is a plastic material which dilates and remains
damaged if it is subjected to heat and/or cool air.
DO NOT install this screen either facing direct sun light or blocking
a window as PVC could be damaged and make waves for the
explanations given above.
The PVC cloth is very sensitive to temperature range. We advise to
mount the screen in environments with an ambient temperature in
the range of 20°-25°C.
We advise you to WAIT 3 HOURS for the SCREEN to ACCLIMATISE
BEFORE MOUNTING the screen after delivery, especially if screen
arrives from a cold temperature.
THE SCREEN HAS TO BE STOCKED AND TRANSPORTED
ALWAYS IN HORIZONTAL POSITION, otherwise there could appear
waves on the projection cloth.
DO NOT WASH the projection surface with alcohol or solvent nor
with commercial cleaners. Every now and then dust the surface with
a dry and clean duster.
Please, be very careful because any kind of stain on projection
surfaces is inerasable.
When the screen is not completely rolled down (as by factory setting),
atness of the cloth is NOT guaranteed and therefore not covered
by warranty.
DO NOT HANG TO THE SCREEN and DO NOT HANG ANY
OBJECT to it. Please take care that children DO NOT PLAY with the
screen as they can get severely injured.
The manufacturer will not accept returns of screens for repair without
manufacturer’s authorization (RMA number) and without a suitable
packaging.
INSTALLATION INSTRUCTIONS
1. FRAME ASSEMBLY
The product has to be installed and used conform to the laws in force
within the country where the product is used.
Lay the frame segments (B and C) on the oor with the grooves
facing upwards. In order to avoid scratches to the frame we advise
you to lay the frame on a soft and clean cloth.
Insert in each corner the two metal corners with clamp screws (D),
see Fig. 1.
After the four corners are assembled, align the frame taking care that
the two diagonals have the same lenght. Now screw tightly all the
clamp screws (Fig. 2).
2. PROJECTION SURFACE ASSEMBLY
On a clean surface, please lay the projection surface (A) with
the reecting side facing downwards (see green sticker quoting
“Projection Side”).
Position the frame carefully onto the projection surface, taking care
that the grooves’ side faces upwards.
In case there is a seam in the viewing area of the projection cloth,
please take care to mount the projection cloth onto the frame so that
the seam will result on the upper (higher) part of the screen.
Now proceed with xing the cloth to the frame using the Velcro strips
already placed on the cloth and on the frame, starting from one
vertical side, taking care to position the tabs on each side (see Fig. 4)
perfectly aligned with the corner of the frame.
Successively, repeat the same operations for the other vertical side,
paying attention to stretch the surface before xing it onto the Velcro
strip on the frame (see Fig. 5 and 6).
Now, bend one of the two horizontal sides of the projection
surface, starting from the centre and moving along the two
sides.
Before closing right and left corners, bend the tabs to the long frame
segment (Fig. 7) and x the surface to the horizontal frame part,
taking care to stretch the surface before xing it onto the Velcro strip
on the frame.
3. WALL ANCHORING
Canaletto Wrap Around is provided with sliding anchoring brackets
(*) which allow an easy wall positioning, using the supplied screws
and wall plugs (E).
ALL FRAME SCREENS ARE SUPPLIED WITH AN ANCHORING
BRACKET ON THE HORIZONTAL BOTTOM PART OF THE FRAME
IN ORDER TO GUARANTEE THE SQUARENESS OF THE FRAME
AND TO AVOID FALLING DOWN IN CASE OF LIFTING.
The manufacturer guarantees the squareness of the frame after
the installation, only if the frame is hanged to the wall with all the
anchoring brackets mounted on the upper and bottom part of the
frame.
At the end of the installation, please check that the frame is perfectly
levelled.
CAUTION: CHECK EVERY 6 MONTHS THAT SCREWS, WALL
PLUGS AND BRACKETS ARE IN GOOD CONDITIONS AND
WELL TIGHTENED.
IT IS FORBIDDEN TO STAY UNDER THE PROJECTION SCREEN.
IT IS FORBIDDEN TO USE THE PROJECTION SCREEN
OUTDOOR.
ENGLISH

CANALETTO WRAP AROUND
Il presente documento è di proprietà riservata della Euroscreen S.r.l. E’ vietata la produzione senza autorizzazione
This document is property of Euroscreen Srl. Any distribution, reproduction, copying or publication of this document is prohibited.
Dieses Dokument ist Eigentum von Euroscreen S.r.l. Jeden Verteilung, Reproduktion, Abschrift oder Veröentlichung von diesem Dokument ist verboten.
RELEASE ER2022_02_02
EINFÜHRUNG
Danke für den Kauf einer Rahmenleinwand Canaletto Wrap Around.
Diese Artikel wurden in Italien mit hervorragender Qualität und
hochwertigen Projektionstüchern für eine sehr gute Performance
produziert.
AUFMERKSAMKEIT
Bevor Sie die Rahmenleinwand zusammenbauen, lesen Sie bitte die
Montage Bedienungsanleitungen auf.
Zum Öffnen der Verpackung keine Teppichmesser oder spitzen
Gegenstände verwenden. Beim Öffnen der Verpackung, sowie bei
Installation und Handling des Produktes immer Schutzhandschuhe
tragen. Das Produkt muss je nach Gewicht von mindestens zwei,
drei oder vier Personen befördert werden (Richtwerte für die Last
pro Person 25 kg Männer – 15 kg Frauen). Nach der Montage der
Leinwand besteht die Möglichkeit, dass sich Falten in dem Tuch
festhalten. Diese Falten glätten sich im Laufe von 48/72 Stunden,
sofern die Leinwand in einem Raum mit Temperaturen von
mindestens 20°C installiert wird. Ja höher die Raumtemperatur, desto
schneller glätten sich die Falten bis sie dann endgültig verschwinden.
Bei besonders hartnäckigen Fällen bzw. sofern der Bedarf besteht,
die Falten binnen kurzer Zeit zu glätten, ist die Verwendung eines
Föhns empfehlenswert. Achtung: Bei Missachtung folgender
Hinweise kann die Leinwand durch die Verwendung eines Föhns
unwiderruich beschädigt werden. Der Abstand zwischen Fön und
Leinwand darf NICHT unter 40/50 cm liegen. Der Föhn muss ständig
über die gesamte Faltenäche bewegt werden.
Das Projektionstuch muss in den Rahmen gespannt werden. Je
nach Temperatur kann das Tuch den Anschein machen zu klein
zu sein. Ggf. das Tuch 24 Stunden in einem temperierten Raum
liegen lassen (20-25°C). Der Produzent ist nicht verantwortlich
für Personenschaden oder Sachschaden, wenn das Produkt für
unpassende Aktionen eingesetzt oder falsch installiert wurde. Der
Produzent ist nicht verantwortlich, wenn die Leinwand falsch installiert
wurde.
ZERTIFIZIERUNGEN
Die Leinwände Canaletto Wrap Around entsprechen nach den CE
Normen.
Die Projektion Tuchen die wir benutzen sind kadmiumfreiem und
feuerfest:
• Gruppe M1 – MICROPERFORATED,
• Gruppe M2 – WHITE, LUMI-GREY, LUMI GREY
MICROPERFORATED, BRIGHT CONTRAST 3D 0.8, FOLDAWAY
• Gruppe B1 – WHITE, BRIGHT CONTRAST 3D 0.8
GARANTIEBEDINGUNGEN
Gegen Herstellungsfehlern dieser Leinwand wird ab Kaufsdatum für
2 Jahre Garantie gegeben.Der Hersteller garantiert nur die Reparatur
oder den Austausch der Teile, ohne die Verpichtung weitere
Kosten zu tragen.Dieser Garantie erstreckt sich nicht auf Schäden
aufgrund von Reparaturen oder Anpassungen durch zur Reparatur
nicht befugte Firmen oder Personen, oder Montage nicht gemacht
wie beschrieben in unsere Anleitung. Reparaturen müssen von einem
ScreenInt zugelassenen zertizierten Ingenieur durchgeführt werden
Dieser Garantie erstreckt sich nicht auf (alle folgenden Fälle sind
einschließlich, aber nicht beschränkt) :
1) Mängel, die nicht auf Material- oder Verarbeitungsfehler
zurückzuführen sind;
2) Ergänzungen, Änderungen, Reparaturen oder Demontagen des
Produkts, die zuvor nicht schriftlich von Screenint genehmigt wurden;
3) Installation, Verwendung oder Wartung des Produkts, die nicht den
Anweisungen von Screenint gemäß diesem Betriebsanleitung und /
oder anderen technischen Unterlagen entsprechen, die zusammen
mit dem Produkt geliefert werden;
4) Schlecht und / oder unsachgemäß und / oder nicht in
Übereinstimmung mit Installation, Wartung, Fahrlässigkeit,
unsachgemäßer Verwendung;
5) Verwendung von nicht originalen Ersatzteilen oder nicht schriftlich
von Screenint genehmigt;
6) normale Abnutzung;
7) Der Leinwand wurde während des Transports beschädigt;
8) Veränderungen, Unleserlichkeit oder Entfernung der Seriennummer
Etikette auf dem Produkt.
Die Leinwand darf nicht oben oder in der Nähe einer Hitzequelle oder
Kühlung installiert werden, da in diesem Fall Wellen in dem PVC Tuch
entstehen und dass Tuch bleibend beschädigt wird.
Auf oder hinter das Leinwandtuch darf nicht direktes Sonnenlicht
scheinen, da in diesem Fall Wellen in dem PVC Tuch entstehen
und dass Tuch bleibend beschädigt wird. Das PVC Tuch ist sehr
empndlich auf Temperatur-Schwankungen. Im Fall, dass die
Leinwand aus einer kalten Umgebung kommt, bitte warten Sie drei
Stunden bevor Sie mit der Montage anfangen. Es ist wichtig, dass das
Leinwandtuch auf Zimmertemperatur ist.
DER LEINWAND MUSS IMMER IN HORIZONTALER POSITION
AUF LAGER UND TRANSPORTIERT WERDEN.
Das PVC TUCH darf NICHT mit Waschmitteln, Lösungsmitteln oder
Alkohol gereinigt werden. Man darf nur das Tuch abstauben mit ein
trocken Baumwollen Tuch.
Vermeiden Sie das Beecken von der Projektions- Leinwand, da es
fast nicht möglich ist Flecken aus dem PVC Tuch zu reinigen.
Die Leinwand muss bis zum Anschlag herunter gelassen werden (das
ist entsprechend der Maß angegeben auf der Verpackung), da sich
sonst Wellen bilden. Leinwände sind stets so konzipiert, dass diese
ganz ausgefahren werden. Eine Leinwand regelmäßig nur teilweise
auszufahren, kann die Planlage negativ beeinussen. Entsprechende
Schäden unterliegen nicht der Garantie. Hängen Sie sich nicht an die
Leinwand, und hängen Sie keine Objekte an die Leinwand. Stellen
Sie sicher, dass kleine Kinder nicht mit der Leinwand spielen.
Wir akzeptieren nur Rucksendungen von Ware, die eine gute
Verpackung haben und auf die Verpackung unsere RMA Nummer
geschrieben ist. Die RMA Nummer musst vorab bei uns angefragt
werden.
ANLEITUNG
1. ZUSAMMENBAU DES RAHMENS
Das Produkt muss gemäß den geltenden Gesetzen des Landes, in
dem es gelegen wird, installiert und verwendet werden.
Legen Sie die Teile des Rahmens (B und C) mit den beweglichen
Befestigungen nach oben auf den Boden. Um den Rahmen nicht zu
beschädigen, empfehlen wir Ihnen, diesen auf einen weichen und
sauberen Stoff zu legen. Fügen Sie in jede Ecke zwei Metallecken mit
Klemmschrauben (D) ein (Fig. 1). Nachdem Sie alle Metallwinkel in
die 4 Rahmensegmente eingefügt haben, positionieren Sie diese so,
dass die beiden Diagonalen die gleiche Größe haben. Ziehen Sie an
diesem Punkt die Klemmschrauben fest an (Fig. 2).
2. AUFBRINGEN DES TUCHS AUF DEN RAHMEN
Legen Sie die Projektionsäche (A) mit der reektierenden Seite nach
unten auf eine saubere Oberäche (siehe grüner Aufkleber).
Legen Sie den Rahmen vorsichtig mit der Nut nach oben (Fig. 3).
Wenn sich auf dem Bildschirm eine Schweißnaht bendet, montieren
Sie den Bildschirm so auf dem Rahmen, dass sich die Schweißnaht
oben auf dem Bildschirm bendet. Fahren Sie nun mit der Verankerung
des Tuches durch die bereits an Tuch und Rahmen Klettbandstreifen
befestigt fort. Beginnen Sie von einer vertikalen Seite. Achten Sie
dabei besonders darauf, dass die Laschen an den Enden (Fig. 4)
so positioniert sind, dass sie perfekt zu den Ecken des Rahmens
entsprechen. Wiederholen Sie dann die oben beschriebenen
Vorgänge für die andere vertikale Seite, achten Sie darauf, so das
Tuch zu spannen und befestigen Sie es dann am Klettverschluss am
Rahmen (siehe Fig. 5 und 6). Falten Sie an diesem Punkt eine der
beiden horizontalen Seiten des Tuchs von der Mitte aus und bewegen
Sie sich von der Mitte zu den beiden Enden.
Vor dem Schließen der rechten und linken Ecken, biegen Sie die
Laschen an der langen Seite des Rahmens und wiederholen Sie
diese Schritte für die andere horizontale Seite.
Achten Sie darauf, so die Oberäche zu spannen, bevor Sie sie auf
dem Klettverschluss am Rahmen befestigen.
3. WANDBEFESTIGUNG
Die Canaletto Wrap Around Rahmenbildschirme sind mit passenden
verschiebbaren Ankerbügeln (*) ausgestattet, die mit den
mitgelieferten Schrauben und Dübeln (E) eine einfache Positionierung
an der Wand ermöglichen. ALLE RAHMENBILDSCHIRME SIND
MIT EINER VERANKERUNGSBÜGEL AUF DER UNTEREN
HORIZONTALEN SEITE DES BILDSCHIRM AUSGESTATTET, UM
DIE RECHTECKIGE FORM ZU GARANTIEREN UND EIN ABFALLEN
BEIM ANHEBEN ZU VERMEIDEN. Der Hersteller garantiert, dass
der Rahmen des Bildschirms nach der Anlage eine rechteckige Form
beibehält, nur wenn er durch alle die Verankerungsbügel am oberen
und unteren Teilen des Rahmens direkt an der Wand verankert ist.
Vergewissern Sie sich am Ende der Montage, dass der Rahmen
perfekt ausgerichtet ist.
KONTROLLIEREN SIE JEDES 6 MONATEN DIE SCHRAUBEN,
DÜBEL UND DECKEN BEFESTIGUNGEN AN DER LEINWAND
UND ZIEHEN SIE DIE SCHRAUBEN GEGENEBENFALLS AN.
NICHT IM REICHWEITE DER LEINWAND BLEIBEN.
ES IST VERBOTEN DIE LEINWAND IM FREIEN ZU VERMENEDEN.
DEUTSCH

CANALETTO WRAP AROUND
Il presente documento è di proprietà riservata della Euroscreen S.r.l. E’ vietata la produzione senza autorizzazione
This document is property of Euroscreen Srl. Any distribution, reproduction, copying or publication of this document is prohibited.
Dieses Dokument ist Eigentum von Euroscreen S.r.l. Jeden Verteilung, Reproduktion, Abschrift oder Veröentlichung von diesem Dokument ist verboten.
RELEASE ER2022_02_02
Fig.1
Fig.3
Fig.2
Fig.4
Fig.6Fig.5
Fig.7

CANALETTO WRAP AROUND
Il presente documento è di proprietà riservata della Euroscreen S.r.l. E’ vietata la produzione senza autorizzazione
This document is property of Euroscreen Srl. Any distribution, reproduction, copying or publication of this document is prohibited.
Dieses Dokument ist Eigentum von Euroscreen S.r.l. Jeden Verteilung, Reproduktion, Abschrift oder Veröentlichung von diesem Dokument ist verboten.
RELEASE ER2022_02_02
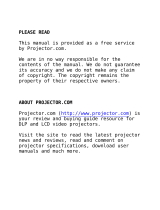
~72~72
20,5
400 400= =
= =
~72
~72
1 2
43
DISTANZE MONTAGGIO STAFFE
MOUNTING DISTANCES OF BRACKETS
BEFESTIGUNGSABSTÄNDE DER HALTERUNGEN
-
 1
1
-
 2
2
-
 3
3
-
 4
4
-
 5
5
-
 6
6
-
 7
7
-
 8
8


SECOMP AG 05452219 Screenint Leinwand Canaletto 250×140 16:9 Manuale utente
- Categoria
- Schermi per proiezioni
- Tipo
- Manuale utente
in altre lingue
Altri documenti
-
Celexon aufblasbare Outdoor-Leinwand INF200 Manuale del proprietario
-
-
 Ligra Transound Screen Manuale utente
-
Epson V12H002S3Y Guida utente
-
 Proxima UltraLight X350 Manuale utente
-
 Proxima UltraLight X350 Manuale utente
-
Ask M3 Manuale utente
-
Sony VPL-HW50ES Manuale del proprietario
-
Yamaha DPX-1 Manuale del proprietario
-
agape EMEM323_M Assembly Instructions


