
EN User's Manual
IT Manuale d’istruzione 2X1 USB HDMI 2.0
KVM SWITCH 4KX2K
WWW.TECHLY.COM
This product is marked with this symbol. It means that used electrical and
electronic products should not be mixed with general household waste.
There is a separate collections system for these products in compliance
with EU Directive WEEE.
With the CE sign, Techly® ensures that theproduct is conformed to the
basic European standards and directives.
All rights reserved. All trademarks and trade names are those of their
respective owners. TECHLY® - Viale Europa 33 - 33077 Sacile (PN) - Italy
EN
K. Power Jack: connect to the included power adapter
L. HDMI Output: connect to HDMI Display
M. HDMI Input: connect to source device's HDMI
N. USB Port: connect to PC's USB port
HARDWARE INSTALLATION
1. Power off all devices you plan to connect to the 2×1 USB HDMI
KVM Switch 4Kx2K.
2. Connect a monitor/display to HDMI OUTPUT of the switch
by an HDMI cable.
3. Connect a USB keyboard and a USB mouse to USB keyboard
and Mouse Ports of the switch.
4. Connect the computer's HDMI connector to the switch's INPUT
1 connector using the HDMI cable.
5. Connect the computer's USB port to the switch's PC1 connector
(USB Type B) using the included USB cable.
6. For the second computer, follow steps 4 to 5 to connect
the preferred system/device to INPUT 2 and PC2.
7. Optional: Connect other USB peripherals you wish to share
between the connected computers/devices to the extra USB
ports on the switch.
8. Connect the power adapter into the switch's Power Jack.
9. Power up the first computer/device and wait until it is fully
booted up. Make sure the keyboard and mouse work properly.
10. Once the first computer system is successfully setup, press the
Switch button and power up the second computer/device to
verify the setup properly; proceeding in the same way also for
next computers.
11. The installation is complete and the 2x1 USB HDMI KVM
Switch is ready for use.
HOTKEY
Follow the hotkey command listed below for selected operating
functions:
HDMI
Sink PC1 PC2
5V/DC 2A
HDMI USB HDMI USB
INTRODUCTION
The 2×1 USB HDMI KVM Switch 4Kx2K shares one HDMI display
between four HDMI sources.
FEATURES
• Share an HDTV or display, USB keyboard& mouse, and
microphone between 2 USB/HDMI computers and devices
• Provides an additional USB 2.0 sharing port with over-current
detection and protection
• Switch between devices via front push buttons or hotkeys
• Supports 4K@60Hz and PC's UXGA 1920×1200 resolutions
• Supports Dolby True HD and DTS HD Master Audio formats
• HDMI 2.0 & HDCP compliant
• All 2 input ports and 1 output port support HDMI2.0
data rate up to 6Gb/s
• Metal housing for better RF shielding
PACKAGE CONTENTS
• 1 x 2×1 USB HDMI 2.0 KVM SWITCH 4KX2K
• 1 x Power Adapter
• 1 × User Manual
COMPATIBILITY
• Windows, Mac, Linux computers
• Game consoles, Blu-Ray DVD players,
and other electronic devices
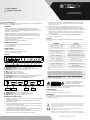
LAYOUT
A. USB Mouse Port: connect to USB mouse devices
B. USB Keyboard Port: connect to USB keyboard devices
C. USB Port: connect to other USB devices
D. MIC: connect to microphone
E. Audio out: connect to earphone
F. Audio LED: audio ON/OFF Indication
G. Audio Switch:
switch to enable/disable the MIC/Audio out function
H-I. Port LED: indicate which HDMI source is selected
J. Port Select: switch between the HDMI sources
Power Jack HDMI Output HDMI Input USB Port
K L M N
SAFETY PRECAUTIONS To reduce risk of electric shock,
this product should ONLY be
opened by an authorized
technician when service is required. Disconnect the product from
mains and other equipment if a problem should occur. Do not
expose the product to water or moisture.
MAINTENANCE:
Clean only with a dry cloth.
Do not use cleaning solvents or abrasives.
WARRANTY:
No guarantee or liability can be accepted for any changes and
modifications of the product or damage caused due to incorrect
use of this product.
ATTENZIONE
RISCHIO DI SCOSSE ELETTRICHE
NON APRIRE
PC2
Audio ON/OFF PC1 Select
USB Mouse
Port
USB Keyboard
Port
MIC Audio
out
Audio
LED
Port
LED
Port
Select
Audio
Switch
A B C D E F G H I J
Console Source
USB Port
COMMAND FUNCTION
[Scroll] ++ [Scroll] + [1/2][*1] Switch to PC1/PC2
[Scroll] ++ [Scroll] + [or]PC Switch to next PC
[Scroll] ++ [Scroll] + [or] PC Switch to previous PC
[Scroll] ++ [Scroll] + [B] Turn the beep sound on or off
[Scroll] ++ [Scroll] + [S] Auto-scan mode every 5 seconds
([Esc] switch to regular key code)
[Scroll] ++ [Scroll] + [K] Turn hotkey on or off
[Scroll] ++ [Scroll] + [ESC] Restore Factory Default
[Scroll] ++ [Scroll] + [T] Turn Auto-Detection on or off
[Scroll] ++ [Scroll] + [F12] Enable/disable
mouse cursor across screen
Note:
[*1] : “++” means quickly and continuously press the Scroll key 2 times,
[Scroll] ++ [Scroll] + [1] means quickly and continuously press the Scroll
key 2 times, Press the numeric “1” key again, and the detection timeout
between each hotkey code is 2 seconds. If the Scroll key is pressed for the
hotkey combination is invalid.

WWW.TECHLY.COM
In conformità alla normativa RAEE le apparecchiature elettriche ed
elettroniche non devono essere smaltite con i rifiuti domestici.
Il presente prodotto deve essere consegnato ai punti di raccolta preposti
allo smaltimento e riciclo delle apparecchiature elettriche
ed elettroniche. Contattate le autorità locali competenti per ottenere
informazioni in merito allo smaltimento corretto della presente
apparecchiatura.
Con il marchio CE, Techly® garantisce che il prodotto è conforme alle
norme e direttive europee richieste.
All rights reserved. All trademarks and trade names are those of their
respective owners. TECHLY® - Viale Europa 33 - 33077 Sacile (PN) - Italy
IT INTRODUZIONE
Il KVM Switch HDMI 2x1 4Kx2K permette di condividere uno
schermo HDMI tra 4 sorgenti HDMI.
CARATTERISTICHE
• Permette di condividere un HDTV o un monitor, una tastiera,
un mouse USB e un microfono tra 2 computer con USB e HDMI
• Fornisce un’ulteriore porta condivisa USB2.0 con rilevamento
e protezione da sovra-corrente
• Switch tra le periferiche attraverso pulsanti sul dispositivo
o tramite hotkey
• Supporta risoluzione 4K@60Hz e risoluzione PC UXGA
1920×1200
• Supporta formati audio Dolby True HD e DTS HD Master Audio
• Compatibile con HDMI v2.0 & HDCP
• Tutte le 2 porte di ingresso e 1 porta di uscita supportano
una velocità di trasmissione dati HDMI2.0 fino a 6 Gb/s
• Alloggiamento in metallo per una migliore schermatura RF
CONTENUTO DELLA CONFEZIONE
• 1 x 2×1 USB HDMI 2.0 KVM SWITCH 4KX2K
• 1 x Alimentatore
• 1 × Istruzioni di utilizzo
COMPATIBILITÀ
• Computer Windows, Mac, Linux
• Console di gioco, lettori DVD Blu-Ray e altri dispositivi elettronici
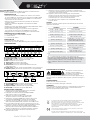
CONFIGURAZIONE
A. Porta mouse USB: collegare un mouse USB
B. Porta tastiera USB: collegare una tastiera USB
C. Porta USB: collegare altri dispositivi USB
D. MIC: connettere un microfono
E. Uscita audio: connettere alla cuffia
F. LED audio: indicazione audio ON/OFF
G.
Switch audio: switch per abilitare/disabilitare funzione
MIC/uscita audio
H-I. LED porta: indicano quale sorgente HDMI è stata selezionata
J. Selettore porta: permette di commutare tra le sorgenti HDMI
K. Jack alimentazione: connettere all’alimentatore incluso
L. Uscita HDMI: connettere allo schermo HDMI
M. Ingresso HDMI: connettere alla sorgente HDMI
N. Porta USB: connettere alla porta USB del PC
INSTALLAZIONE HARDWARE
1. Spegnere tutte le apparecchiature che si prevedere
di collegare allo switch KVM USB 2x1.
2. Collegare un monitor/schermo all’USCITA HDMI
dello switch tramite un cavo HDMI.
3. Collegare una tastiera USB e un mouse USB
alle porta tastiera e mouse USB dello switch.
4. Collegare il connettore HDMI del computer allo switch
sul connettore INGRESSO 1 usando un cavo HDMI.
5. Collegare una porta USB del computer al connettore
dello switch PC1 (USB tipo B) usando il cavo USB incluso.
6. Per il secondo computer, seguire i passaggi da 4 a 5 per
collegare il sistema / dispositivo preferito a INPUT 2 e PC2.
7. Opzionale: connettere alla porta USB supplementare
presente sullo switch le altre apparecchiature USB che si
desidera condividere tra i computer/dispositivi collegati.
8. Collegare l’alimentatore alla presa di alimentazione
presente sullo switch.
9. Alimentare il primo computer/ dispositivo e attendere fino
a quando è completamente avviato. Assicurarsi che la tastiera e
il mouse lavorino correttamente.
10. Appena il primo sistema è configurato correttamente,
premere il tasto di commutazione e alimentare il secondo
computer/dispositivo per verificare la configurazione;
continuare poi con i successivi due dispositivi.
11. L’installazione è ora completa e lo switch KVM USB 2x1
è pronto all’uso.
HOTKEY
Seguire i comandi di scelta rapida sotto elencati per le funzioni
operative selezionate:
PRECAUZIONI DI SICUREZZA Per ridurre il rischio di shock
elettrico, questo prodotto
dovrebbe essere aperto SOLO
da un tecnico autorizzato quando è necessario ripararlo.
Scollegare il prodotto dall’alimentazione e da altri apparecchi se
dovesse esserci un problema. Non esporre il prodotto ad acqua o
umidità.
MANUTENZIONE:
Pulire solo con un panno asciutto.
Non utilizzare solventi detergenti o abrasivi.
GARANZIA:
Non sarà accettata alcuna garanzia o responsabilità in relazione a
cambiamenti e modifiche del prodotto o a danni determinati
dall’uso improprio del prodotto stesso.
ATTENZIONE
RISCHIO DI SCOSSE ELETTRICHE
NON APRIRE
PC2
Audio ON/OFF PC1 Select
Porta Mouse
USB
Porta Tastiera
USB
MIC Uscita
Audio
LED
Audio
Porta
LED
Porta
selettore
Switch
Audio
A B C D E F G H I J
Console Source
Porta
USB
HDMI
Sink PC1 PC2
5V/DC 2A
HDMI USB HDMI USB
Jack
alimentatore
Uscita
HDMI
Ingresso
HDMI
Porte
USB
K L M N
COMANDO FUNZIONE
[Scroll] ++ [Scroll] + [1/2][*1] Passa a PC1/PC2
[Scroll] ++ [Scroll] + [or]PC passa al successivo PC
[Scroll] ++ [Scroll] + [or] PC passa al precedente PC
[Scroll] ++ [Scroll] + [B] Attiva / Disattiva l’audio
[Scroll] ++ [Scroll] + [S]
Modalità Auto-scan ogni 5 secondi
([Esc] interrompe la scansione
e ritorna alla modalità normale)
[Scroll] ++ [Scroll] + [K] Attiva / Disattiva tasto di scelta rapida
[Scroll] ++ [Scroll] + [ESC] Ripristina impostazioni di fabbrica
[Scroll] ++ [Scroll] + [T] Attiva / Disattiva il rilevamento
automatico
[Scroll] ++ [Scroll] + [F12] Abilita / Disabilita il cursore
del mouse sullo schermo
Note:
[*1] : “++” indica che il tasto Scroll deve essere premuto due volte
consecutive, successivamente premere 1 volta il tasto relativo alla funzione
desiderata, il tempo di risposta della funzione chiamata è di 2 secondi circa.
Se il tasto Scroll viene premuto 2 volte con tempo superiore a 2 secondi,
questa combinazione di tasti di scelta rapida non è valida causa tempo
scaduto.
-
 1
1
-
 2
2


in altre lingue
- English: Techly 4KX2K User manual
Documenti correlati
Altri documenti
-
TECH 4×1 USB HDMI 2.0 KVM Switch 4KX2K Manuale utente
-
Digitus DS-12874 Guida Rapida
-
Lindy 32797 Manuale utente
-
-
-
Lindy 32925 Manuale utente
-
-
Manhattan 153522 Manuale utente
-
ATEN CS1792 Guida Rapida
-