Hoover HWB 280-30S Manuale utente
- Categoria
- Lavatrici
- Tipo
- Manuale utente
Questo manuale è adatto anche per

HWB 280
Istruzioni per l’uso
Bedienungsanleitung
Instruções de Utilização
Gebruiksaanwijzing
User instructions
IT
DE
PT
NL
EN
®

2
DE
HERZLICHEN
GLÜCKWUNSCH!
Mit dem Kauf dieses Hoover
Elektrogerätes haben Sie
bewiesen,daß Sie stets nur
das Beste wählen - ohne
Kompromisse.
Hoover freut sich,Ihnen
diese neue Waschmaschine
anbieten zu können.Sie ist
das Ergebnis jahrelanger
Forschung und einer
Markterfahrung,die im
ständigen direkten Kontakt
mit dem Verbraucher gereift
ist.Sie haben mit diesem
Gerät Qualität,lange
Lebensdauer und einen
hohen Leistungsstandard
gewählt.
Hoover bietet Ihnen darüber
hinaus eine breite Palette
weiterer elektrischer
Haushaltsgeräte:
Waschmaschinen,
Geschirrspüler,
Wäschetrockner,
Elektroherde,
Mikrowellenherde,Backöfen
und Kochfelder,Kühl - und
Gefrierschränke.
Fragen Sie Ihren
Fachhändlernach dem
kompletten Hoover Katalog.
Lesen Sie bitte aufmerksam
die Anweisungen,die Sie in
diesem Heft finden.Sie
finden dort wichtige
Hinweise zur sicheren
Installation,zur Bedienung,
zur Pflege und zur optimalen
Verwendung der
Waschmaschine.
Bewahren Sie das Heft für
eine spätere Nutzung gut
auf.
Geben Sie bitte in allen
Mitteilungen an Hoover oder
an Ihre zuständige
Kundendienststelle stets das
Modell,die Nummer und die
G-Nummer (falls
vorhanden),- also praktisch
alle Angaben des
Typenschildes -,an.
PT EN
P
ARABÉNS!
Ao adquirir este
electrodoméstico Hoover,
demonstrou não estar
disposta a contentar-se com
qualquer coisa: você quer o
melhor!
A Hoover alegra-se de lhe
poder oferecer esta nova
máquina de lavar roupa,
resultado de anos de
investigação e de
experiência de mercado,
em contacto directo com
os nossos clientes.Ao
escolher esta máquina,está
a escolher a qualidade,a
durabilidade e as
características excepcionais
que ela tem para oferecer.
Mas a Hoover orgulha-se
ainda da vasta gama de
electrodomésticos que
coloca à disposição dos
seus clientes: máquinas de
lavar roupa,máquinas de
lavar loiça,máquinas de
lavar e de secar,fogões,
micro-ondas,fornos e
placas de fogão,frigoríficos
e congeladore
Peça ao seu agente da
especialidade que lhe dê o
catálogo dos
electrodomésticos Hoover.
Leia este livro de instruções
atentamente.Ele contém
não só informações
importantes sobre a
instalação,a utilização e a
manutenção seguras da
sua máquina,mas também
conselhos úteis sobre como
tirar o melhor proveito da
sua máquina.
Preserve este livro
cuidadosamente,
mantendo-o à mão para
futuras consultas.
Quando contactar o seu
agente Hoover ou os
Serviços de Assistência
Técnica refira sempre o
modelo.
OUR COMPLIMENTS
With the purchase of this
Hoover household
appliance,you have shown
that you will not accept
compromises: you want only
the best.
Hoover is happy to present
their new washing machine,
the result of years of research
and market experience
through direct contact with
Consumers.You have chosen
the quality,durability and
high performance that this
washing machine offers.
Hoover is also able to offer a
vast range of other
household appliances:
washing machines,
dishwashers,washer-dryers,
cookers,microwave ovens.
Traditional ovens and hobs,
refrigerators and freezers.
Ask your local retailer for the
complete catalogue of
Hoover products.
Please read this booklet
carefully as it provides
important guide lines for safe
installation,use and
maintenance and some
useful advise for best results
when using your washing
machine.
Keep this booklet in a safe
place for further consultation.
When contacting Hoover
or a Customer Services
Centre always refer to the
Model.
3
IT
COMPLIMENTI
Con l’acquisto di questo
elettrodomestico Hoover;
Lei ha dimostrato di non
accettare compromessi:
Lei vuole il meglio.
Hoover é lieta di proporLe
questa nuova lavatrice
frutto di anni di ricerche e di
esperienze maturate sul
mercato,a contatto diretto
con i Consumatori.Lei ha
scelto la qualità,la durata e
le elevate prestazioni che
questa lavatrice Le offre.
Hoover Le propone inoltre
una vasta gamma di
elettrodomestici: lavatrici,
lavastoviglie,lavasciuga,
cucine,forni a microonde,
forni e piani di cottura,
frigoriferi e congelatori.
Chieda al Suo Rivenditore
il catalogo completo dei
prodotti Hoover
La preghiamo di leggere
attentamente le avvertenze
contenute nel presente
libretto in quanto forniscono
importanti indicazioni
riguardanti la sicurezza di
installazione,d’uso,di
manutenzione e alcuni utili
consigli per il migliore utilizzo
della lavatrice.
Conservi con cura questo
libretto per ogni ulteriore
consultazione.
Quando comunica con la
Hoover o con i suoi centri di
assistenza citi sempre il
Modello,il n° e il numero G
(se c’è).Praticamente tutto
ciò che é citato nel
riquadro.
NL
ONZE COMPLIMENTEN
Met de aankoop van dit
Hoover huishoudelijk
apparaat hebt u laten zien
dat u geen genoegen
neemt met
tussenoplossingen en dat u
alleen het allerbeste wilt.
Het is voor Hoover een ge-
noegen u een nieuwe
wasautomaat aan te
bieden die het resultaat is
van jarenlang onderzoek en
ervaring opgedaan door
een direct contact met de
gebruiker.U hebt gekozen
voor de kwaliteit,de
duurzaamheid en de
uitstekende prestatie die
deze wasmachine levert.
Hoover kan u ook een
uitgebreid assortiment van
ander huishoudelijke
apparaten en stofzuigers
bieden.Kijk hiervoor op de
lokale website van Hoover.
Een uitgebreide catalogus
van Hoover apparaten kunt
u bij uw winkelier krijgen.
Wij verzoeken u dit boekje
aandachtig door te lezen,
want het geeft u belangrijke
richtlijnen omtrent het veilig
installeren,het gebruik en
het onderhoud en bruikbare
tips om met uw
wasautomaat de beste
resultaten te verkrijgen.
Bewaar dit boekje op een
goede plaats zodat u het
kunt raadplegen.
Vermeld altijd het type,
nummer en G-nummer
(indien van toepassing) van
het apparaat (staat op het
paneel) als u contact
opneemt met Hoover of de
Klantenservice.

CCAAPPIITTOOLLOO
KAPITEL
CAPÍTULO
HOOFDSTUK
CHAPTER
1
2
3
4
5
6
7
8
9
10
11
12
13
4 5
EN
INDEX
Introduction
General points on delivery
Guarantee
Safety Measures
Technical Data
Setting up and Installation
Control Description
Table of Programmes
Selection
Detergent drawer
The Product
Washing
Cleaning and routine
maintenance
Faults Search
PT
INDICE
Introdução
Verificações a efectuar
quando a máquina lhe for
entregue
Garantia
Instruções de segurança
Dados técnicos
Instalação
Descrição dos comandos
Tabela de programas de
lavagem
Selecção dos programas
Colocação do detergente
Separação das peças de
roupa
Lavagem
Limpeza e manutenção da
máquina
Eliminação de avarias
DE
INHAL
T
Einleitung
Allgemeine Hinweise zur
Lieferung
Garantie
Sicherheitsvorschriften
Technische Daten
Inbetriebnahme,Installation
Bedienungsanleitung
Waschmittelbehälter
Programm/Temperaturwahl
Das Produkt
Programmtabelle
Waschen
Reinigung und allgemeine
Wartung
Fehlersuche
IT
INDICE
Prefazione
Note generali alla consegna
Garanzia
Prescrizioni di sicurezza
Dati tecnici
Messa in opera,installazione
Descrizione comandi
Tabella programmi
Selezione
Cassetto detersivo
Il prodotto
Lavaggio
Pulizia e manutenzione
ordinaria
Ricerca guasti
NL
INHOUDSOPGA
VE
Inleiding
Algemene aanwijzingen bij
levering
Garantie
Veiligheidsmaatregelen
Technische gegevens
In elkaar zetten en
installeren
Bedieningspaneel
Overzicht van programma’s
Kiezen van het programma
Wasmiddelbakje
De weefsels
Het wassen
Schoonmaken en normaal
onderhoud
Storingzoeker

6
DE
KAPITEL 1
ALLGEMEINE
HINWEISE ZUR
LIEFERUNG
Kontrollieren Sie bei
Anlieferung des Gerätes,ob
das folgende Zubehör
mitgeliefert wurde:
A) BEDIENUNGSANLEI-
TUNG
B) VERZEICHNIS DER
KUNDENDIENST-
STELLEN
C)GARANTIESCHEIN
D)STÖPSEL
E) ROHRBOGEN FÜR
ABLAUFSCHLAUCH
F) EINSATZ FÜR
FLÜSSIGWASCHMITTEL
BZW.BLEICHMITTEL
BITTE GUT AUFBEWAHREN
Gerät bei Lieferung auf
eventuelle
Transportschäden
untersuchen und
gegebenenfalls beim
Händler reklamieren.
7
PT
CAPÍTULO 1
VERIFIC
AÇÕES A
EFECTUAR
QUANDO A
MAQUINA LHE FOR
ENTREGUE
Ao receber a máquina,
verifique se os seguintes
componentes,que deverá
manter num local seguro e
à mão,lhe foram entregues
juntamente com a
máquina:
A) MANUAL DE
INSTRUÇÕES
C) CERTIFICADO DE
GARANTIA
D) TAMPÖES
E) CURVA PARA O TUBO
DE ESGOTO
F) COMPARTIMENTO DE
DETERGENTE LÍQUIDO
OU BRANQUEADOR
LÍQUIDO
GUARDE ESTES
COMPONENTES BEM.
Verifique igualmente se a
máquina não sofreu
quaisquer danos durante o
transporte.Caso a máquina
esteja danificada entre
imediatamente em
contacto com o Centro de
Assistência Técnica mais
próximo.
EN
CHAPTER 1
GENERAL POINTS
ON DELIVERY
On delivery,check that the
following are included with
the machine:
A) INSTRUCTION MANUAL
B) CUSTOMER SERVICE
ADDRESSES
C)GUARANTEE
CERTIFICATES
D) CAP
E) BEND FOR OUTLET TUBE
F) LIQUID DETERGENT OR
LIQUID BLEACH
COMPARTMENT
(CONTAINER)
KEEP THEM IN A SAFE
PLACE
Check that the machine has
not incurred damage during
transport.If this is the case,
contact your nearest
Technical Assistance Centre.
NL
HOOFDSTUK 1
ALGEMENE
AANWIJZINGEN BIJ
DE LEVERING
Controleer bij de levering of
met de machine het
volgende is bijgeleverd:
A) HANDLEIDING
B) ADRESSEN KLANTEN-
SERVICE
C)GARANTIEBEWIJZEN
D) AFSLUITDOPJE
E) AFVOERSLANGGELEI-
DER
F) WASMIDDELENBAKJE
BEWAAR DEZE GOED
Controleer ook of de
machine gedurende het
transport niet beschadigd is.
Mocht dat wel het geval
zijn,neemt u dan contact
met uw Hoover leverancier
IT
CAPITOLO 1
NO
TE GENERALI
ALLA CONSEGNA
Alla consegna controlli che
con la macchina ci siano:
A) MANUALE
D’ISTRUZIONE
B) INDIRIZZI DI ASSISTENZA
C)CERTIFICATI DI
GARANZIA
D) TAPPO
E) CURVA PER TUBO
SCARICO
F) BACINELLA DETERSIVO
LIQUIDO O
CANDEGGIANTE
CONSERVATELI
e controlli che non abbia
subito danni durante il
trasporto,in caso contrario
chiami il centro Hoover più
vicino.
C
A
E
F
D

EN
CHAPTER 2
GU
ARANTEE
The appliance is supplied
with a guarantee certificate.
Please retain your purchase
receipt.
This should be kept in a safe
place and presented to the
engineer if a service call is
required.
8 9
IT
CAPITOLO 2
GARANZIA
L’ a pparecchio é
corredatoda un certificato
di garanzia che Le permette
di usufruire gratuitamente
del Servizio di Assistenza
Tecnica.
GIAS SERVICE
199.123.123
0848.780.780
01805-625562
0820.220.224
☎
IT
CH
DE
A
NL
HOOFDSTUK 2
GARANTIE
De machine staat onder
garantie,waardoor u tijdens
de garantieperiode gratis
gebruik kunt maken van de
Gias Service,behalve de
prijs van het telefoontje.
Vergeet niet om binnen 10
dagen na de
aankoopdatum het
garantiecertificaat op te
sturen.
Bewaar het ontvangstbewijs
van de winkelier waar u de
machine gekocht heeft om
dit aan de reparateur te
tonen,mocht hij het bewijs
nodig hebben.
Als uw machine defect is of
niet juist functioneert,dan
raden wij u aan om eerst
het hoofdstuk ‘Problemen’
door te lezen,voordat u
contact op neemt met Gias
Service.
Als het probleem zich na
alle aanbevolen controles
nog steeds voordoet,dan
kunt u bellen met Gias
Service.
U betaalt voor het
telefoontje en u wordt direct
verbonden met Gias
Service.Het is belangrijk dat
u de adviseur het
modelnummer en het
serienummer van uw
machine doorgeeft,die u
op de kenplaat aan de
voorkant van de
wasmachine (bij de deur)
kunt vinden (16 tekens,
beginnend met het nummer
3).Hierdoor kunnen wij u
beter van dienst zijn.
GIAS SERVICE
0900-9999109 NL
0903-99109 BE
☎
DE
KAPITEL 2
GARANTIE
Der beiliegende
Garantieschein und die
Original-Kaufrechnung
ermöglicht die kostenlose
Inanspruchnahme des
technischen Kundendienstes.
Die Garantiezeit beträgt zwei
Jahre ab Kaufdatum.
IM SERVICEFALL WENDEN
SIE SICH BITTE AN UNSEREN
AUTORISIERTEN
WERKSKUNDENDIENST. BITTE
WÄHLEN
SIE FÜR DEUTSCHLAND AUS
DEM FESTNETZ DIE
BUNDESWEIT EINHEITLICHE
SERVICENUMMER
01805 - 625562 (12 CT./
MIN), DIE SIE AUTOMATISCH
MIT DEM ZUSTÄNDIGEN
GIAS-WERKSKUNDENDIENST
IN IHRER NÄHE VERBINDET.
GIAS SERVICE
0820.220.224
0848.780.780
☎
A
CH
PT
CAPÍTULO 2
GARANTIA
CONDIÇÕES DE
GARANTIA
Este electrodoméstico está
abrangido por uma Garantia.
Para beneficiar desta garantia
deverá apresentar o certificado
de “Garantia Internacional” ,
devidamente preenchido com o
nome e morada do consumidor
final,modelo e número de série
do aparelho e data de compra,
além de devidamente
autenticado pelo lojista.Este
documento ficará sempre na
posse do consumidor.
Durante o período de Garantia
os Serviços de Assistência
Técnica efectuarão a reparação
de qualquer deficiência no
funcionamento do aparelho
resultante de defeito de fabrico.
A Garantia não inclui
deslocações a casa do cliente,
que serão debitadas de acordo
com a taxa de deslocação em
vigor a cada momento.
Exceptua-se a 1a deslocação se
se efectuar no primeiro mês de
vigência da Garantia,que será
gratuita.
A Garantia não inclui:
– Anomalias ocasionadas por
mau trato,negligência ou
manipulação contrária às
instruções contidas no manual,
modificação ou incorporação
de peças de procedência
diferente da do aparelho,
aplicadas por serviços técnicos
não autorizados.
– Defeitos provocados por curto-
-circuito ou injúria mecânica.
– Qualquer serviço de instalação
ou explicação do
funcionamento do aparelho em
casa do cliente.
– Indemnizações por danos
pessoais ou materiais causados
directa ou indirectamente.
– Troca do aparelho.
Serviço Pós-Venda
Com o objectivo de satisfazer
cada vez mais o consumidor
final,colocamos à vossa
disposição a nossa Rede
Nacional de Assistência Técnica,
com pessoal técnico
devidamente especializado.

CHAPTER 3
SAFETY MEASURES
IMPORTANT:
FOR ALL CLEANING
AND MAINTENANCE
WORK
● Remove the plug
● Turn off the water inlet tap.
● All Hoover appliances are
earthed.Ensure that the
main electricity circuit is
earthed.Contact a qualified
electrician if this is not the
case.
This appliance
complies with Directives
89/336/EEC,73/23/EEC and
following changes.
● Do not touch the
appliance with wet or damp
hands or feet.
● Do not use the appliance
when bare-footed.
● Extreme care should be
taken if extension leads are
used in bathrooms or shower
rooms.Avoid this where
possible.
WARNING: DURING THE
WASHING CYCLE,THE
WATER CAN REACH A
TEMPERATURE OF 90°C.
● Before opening the
washing machine door,
ensure that there is no water
in the drum.
CAPÍTULO 3
INSTRUÇÕES DE
SEGURANÇA
IMPORTANTE:
ESTAS INSTRUÇÕES SÃO
EXTREMAMENTE
IMPORTANTES PARA
TODAS AS OPERAÇÕES
DE LIMPEZA E DE
MANUTENÇÃO.
●
Deslige o aparelho da
corrente,retirando a ficha do
respectivo cabo de alimentação
da tomada.
●
Feche a torneira de
alimentação de água.
●
Todos os electrodomésticos
Hoover têm ligação à terra.
Assegure-se de que a instalação
eléctrica a que a máquina está
ligada se encontra devidamente
ligada à terra.Se tiver dúvidas ou
a instalação eléctrica não estiver
devidamente ligada à terra,
peça a um electricista
qualificado que proceda à
verificação e eventualmente à
ligação da instalação à terra.
Este aparelho está em
conformidade com as directivas
europeias 89/336/CEE,
73/23/CEE e respectivas
alterações posteriores
●
Nunca toque no equipamento
com as mãos ou os pés
molhados ou húmidos.
●
Não utilize os seus
electrodomésticos quando
estiver descalça.
●
Evite usar cabos de extensão
em compartimentos com
banheira ou chuveiro; se,
eventualmente,tiver de optar
por essa solução,faça-o com o
maior cuidado.
ATENÇÃO:
DURANTE O CICLO
DE LAVAGEM A ÁGUA
PODE ATINGIR UMA
TEMPERATURA DE 90°C.
●
Antes de abrir a porta da
máquina de lavar roupa
certifique-se de que o tambor já
não tem água.
KAPITEL 3
SICHERHEITS-
VORSCHRIFTEN
ZUR BEACHTUNG:
BEI REINIGUNG UND
WARTUNG DES
GERÄTES
●
Netzstecker ziehen.
●
Wasserzufuhr sperren.
●
Bei ungewöhnlich starker
Vibration des Gerätes oder
Wasserverlust usw.STOP-Taste
drücken.
●
Alle Hoover Geräte sind
geerdet.
●
Versichern Sie sich,daß Ihr
Stromnetz geerdet ist.Sollte
dies nicht der Fall sein,rufen
Sie einen Fachmann.
Das Gerät entspricht
den europäischen
Richtlinien 89/336/ECC,
73/23/ECC und deren
nachträglichen Änderungen.
●
Benutzen Sie nach
Mögkichkeit keine
Verlängerungskabel in
Feuchträumen.
ACHTUNG:
JE NACH
WASCHPROGRAMM
KANN SICH DAS
WASSER BIS AUF 90° C
AUFHEIZEN.
●
Vor dem Öffnen des
Bullauges sicherstellen,daß
kein Wasser mehr in der
Trommel steht.
DE PT EN
10 11
IT
CAPITOLO 3
PRESCRIZIONI DI
SICUREZZA
ATTENZIONE:
PER QUALSIASI
INTERVENTO DI PULIZIA
E MANUTENZIONE
DELLA LAVATRICE
●
Tolga la spina.
●
Chiuda il rubinetto
dell’acqua.
●
La Hoover correda tutte le
sue macchine di messa a
terra.
Si assicuri che l’impianto
elettrico sia provvisto di
messa a terra in caso
contrario richieda
l’intervento di personale
qualificato.
Apparecchio
conforme alle Direttive
Europee 89/336/CEE,
73/23/CEE e successive
modifiche.
●
Non tocchi l’apparecchio
con mani,piedi bagnati o
umidi.
●
Non usi l’apparecchio a
piedi nudi.
●
Non usi,se non con
particolare cautela,
prolunghe in locali adibiti a
bagno o doccia.
ATTENZIONE:
DURANTE IL LAVAGGIO
L’ACQUA PUO’ ANDARE
A 90°C.
●
Prima di aprire l’oblò si
assicuri che non vi sia
acqua nel cestello.
NL
HOOFDSTUK 3
VEILIGHEIDSMAAT
-
REGELEN
BELANGRIJK:
VOOR HET
SCHOONMAKEN EN
ONDERHOUD
●
Haal de stekker uit het
stopcontact.
●
Draai de
watertoevoerkraan dicht.
●
Alle Hoover apparaten zijn
geaard.Controleer of het
hoofdnet wel geaard is.Als
dat niet het geval is dient u
contact op te nemen met
een erkend elektricien.
Dit apparaat voldoet
aan de EEC richtlijnen
89/336,73/23 en eventuele
wijzigingen.
●
Raak het apparaat niet
aan met natte of vochtige
handen of voeten.
●
Gebruik het apparaat niet
blootsvoets.
●
Als er verlengsnoeren in
de badkamer of
doucheruimte worden
gebruikt moet u extra
voorzichtig zijn.Vermijd dat,
als dat mogelijk is.
WAARSCHUWING:
TIJDENS HET
WASPROGRAMMA
KAN DE TEMPERATUUR
VAN HET WATER
OPLOPEN TOT 90° C.
●
Controleer voordat u de
deur van de wasautomaat
openmaakt of er geen water
in de trommel zit.

DE EN
●
Gerät nicht an Adapter
oder Mehrfachsteckdosen
anschließen.
●
Achten sie darauf,daß
Kinder nicht unbeaufsichtigt
am Gerät hantieren.
●
Ziehen Sie den Stecker
immer am Stecker selbst aus
der Steckdose.
●
Setzen Sie das Gerät
keinen Witterungseinflüssen
(Regen,Sonne usw.) aus.
●
Das Gerät niemals an den
Schaltknöpfen oder am
Waschmittelbehälter
anheben.
●
Während des Transportes
mit einer Sackkarre das
Gerät nicht auf das Bullauge
lehnen.
●
Stets,wie auf der
Zeichnung dargestellt,zu
zweit anheben.
Wichtig!
Falls Sie das Gerät auf einen
Teppich oder Teppichboden
aufstellen,achten Sie
darauf,daß die Lufteinlässe
am Boden des Gerätes nicht
verstopft werden.
●
Bei eventuellen Defekten
und Fehlfunktionen das
Gerät abschalten,die
Wasserzufuhr unterbrechen
und die Waschmaschine
nicht gewaltsam öffnen.Bei
anfallenden Reparaturen
wenden Sie sich bitte
ausschließlich an die
Kundendienststelle der Firma
Hoover und bestehen Sie
auf die Verwendung von
Originalersatzteilen.Die
Nichtbeachtung der o.a.
Vorschriften kann zur
Beeinträchtigung der
Geräte sicherheit führen.
●
Wenn das Gerät einmal
ausgedient hat,entsorgen
Sie es bitte ordnungsgemäß
über Ihren Fachhändler oder
die kommunalen
Entsorgungseinrichtungen.
●
Sollte das Netzkabel
beschädigt sein,muß dieses
mit dem speziellen
Netzkabel ersetzt werden,
das vom
Hoover Kundendienst zur
Verfügung gestellt werden
kann.
● Do not use adaptors or
multiple plugs.
● Do not allow the appliance
to be used by children or the
incompetent without due
supervision.
● Do not pull the mains lead
or the appliance itself to
remove the plug from the
socket.
● Do not leave the
appliance exposed to
atmospheric agents (rain,sun
etc.)
● In the case of removal,
never lift the appliance by
the knobs or detersive
drawer.
● During transportation
do not lean the door against
the trolley.
Important!
When the appliance location
is on carpet floors,attention
must be paid so as to ensure
that there is no obstruction to
the bottom vents.
● Lift the appliance in pairs
as illustrated in the diagram.
● In the case of failure
and/or incorrect operation,
turn the washing machine off,
close the water inlet tap and
do not tamper with the
appliance.Contact a
Technical Assistance Centre
for any repairs and ask for
origina spare parts.
Avoidance of these norms
may compromise the safety
of the appliance.
● Should the supply cord
(mains cable) be demaged,
this is to be replaced by a
specific cable available from
the after sales service centre.
12 13
PT
●
Não utilize adaptadores ou
fichas múltiplas.
●
Não deixe que crianças
(ou adultos incapazes de
operarem com
electrodomésticos) usem os
equipamentos sem
supervisão.
●
Nunca puxe pelo cabo ou
pelo próprio
electrodoméstico para retirar
a ficha do electrodoméstico
da tomada.
●
Proteja o seu
electrodoméstico dos
elementos (chuva,sol,etc.).
●
Se tiver de deslocar a sua
máquina ou de a mudar de
lugar,nunca pegue nela
pelos botões ou pela gaveta
para detergente.
●
Durante o transporte
nunca deite a máquina
sobre o lado da porta.
Atenção: Se o
electrodoméstico for
instalado num local
alcatifado,deverá assegurar-
se de que as aberturas de
ventilação inferiores não
fiquem tapadas ou
obstruídas.
●
Tal como a figura ilustra,a
máquina deverá ser sempre
erguida por duas (2)
pessoas.
●
Se a sua máquina se
avariar ou deixar de
trabalhar correctamente,
desligue-a,feche a
alimentação de água e não
tente repará-la.Qualquer
trabalho de reparação
deverá ser sempre feito por
um técnico autorizado,
devendo sempre ser
instaladas peças
sobressalentes originais.O
incumprimento desta norma
poderá acarretar sérias
consequências para a
segurança dos
equipamentos.
●
Se o cabo de alimentação
de energia,a ser ligado à
rede,estiver danificado,
deverá ser substituido por um
cabo específico,que poderá
adquirir directamente aos
serviços de Assistência
Técnica
IT
●
Non usi adattatori o spine
multiple
●
Non permetta che
l’apparecchio sia usato dai
bambini o da incapaci,
senza sorveglianza.
●
Non tiri il cavo di
alimentazione,o
l’apparecchio stesso,per
staccare la spina dalla presa
di corrente.
●
Non lasci esposto
l’apparecchio ad agenti
atmosferici (pioggia,sole,
ecc...).
●
In caso di trasloco non la
sollevi mai dalle manopole o
dal cassetto del detersivo.
●
Durante il trasporto non
appoggi mai l’oblò al
carrello.
Importante!
Nel caso si installi
l’apparecchio su un
pavimento ricoperto da
tappeti o con moquette,si
deve fare attenzione che le
aperture di ventilazione alla
base dell’apparecchio non
vengano ostruite.
●
Sollevarla in due persone
come illustrato in figura.
●
In caso di guasto e/o di
cattivo funzionamento
dell’apparecchio,lo spenga,
chiuda il rubinetto
dell’acqua e non
manometta
l’elettrodomestico.Per
l’eventuale riparazione si
rivolga solamente a un
centro di Assistenza Tecnica
Hoover e richieda l’utilizzo di
ricambi originali.
Il mancato rispetto di quanto
sopra può compromettere la
sicurezza dell’apparecchio.
●
Se il cavo di alimentazione
risultasse danneggiato,dovrà
essere sostituito da un cavo
speciale disponibile presso il
servizio di Assistenza Tecnica.
NL
●
Gebruik geen
verdeelstekkers of
meervoudige contactdozen.
●
Laat de apparaten niet
zonder adequaat toezicht
gebruiken door kinderen of
door iemand die daar niet
bekwaam genoeg voor is.
●
Trek niet aan de
elektriciteitsdraad of aan het
apparaat zelf om de stekker
uit het stopcontact te halen.
●
Stel het apparaat niet
bloot aan atmosferische
invloeden (regen,zon,etc.)
●
Als u het apparaat wilt
verplaatsen til het dan nooit
op aan de knoppen of aan
de wasmiddellade.
●
Laat tijdens het
verplaatsen de vuldeur niet
tegen de steekwagen
steunen.
●
Als u het apparaat op een
ondergrond met een hoog
polig tapijt zet,controleer
dan of de opening aan de
onderkant vrij blijft.
●
Til het apparaat op zoals in
de schets is aangegeven.
●
Ingeval van storing en/of
niet goed functioneren: zet
de wasautomaat uit,draai
de watertoevoerkraan dicht
en kom verder niet aan het
apparaat.U hoeft alleen
maar contact op te nemen
met een Gias Service Center
voor eventuele reparaties en
vraag om originele Hoover
onderdelen.Als deze regels
niet worden opgevolgd zou
de veiligheid van het
apparaat in gevaar
gebracht kunnen worden.
● Als de (hoofd)
aanvoerslang beschadigd is,
moet deze worden
vervangen door een
speciale kabel die
verkrijgbaar is bij de after
sales afdeling van Hoover
(Gias Service).

14
EN
CHAPTER 4
15
MAXIMUM WASH
LOAD DRY
NORMAL WATER LEVEL
POWER INPUT
ENERGY CONSUMPTION
(PROG.90°C)
POWER CURRENT FUSE
AMP
SPIN
r.p.m.
WATER PRESSURE
SUPPLY VOLTAGE
TECHNICAL DATA
kg
6÷15
2150
1,8
10
230
l
W
kWh
A
MPa
V
PT
CAPÍTULO 4
CARGA MÁXIMA
(ROPA SECA)
NÍVEL DE ÁGUA NORMAL
POTÊNCIA ABSORVIDA
CONSUMO DE ENERGIA
(PROG.90°)
FUSÍVEL
VELOCIDADE
DE ROTAÇÃO (r.p.m.)
PRESSÃO DO SISTEMA
HIDRÃULICO
TENSÃO
DADOS TÉCNICOS
82 cm
60 cm
54 cm
6
1400
WASSERDRUCK
DE
KAPITEL 4
FASSUNGSVERMÖGEN
TROCKENWÄSCHE
WASSERSTAND NORMAL.
GESAMTANSCHLUßWERT
ENERGIEVERBRAUCH
(PROGR.90°C)
ABSICHERUNG
SCHLEUDERDREHZAHL
(U/min.)
SPANNUNG
TECHNISCHE DATEN
r.p.m.
min. 0,05
max. 0,8
IT
CAPITOLO 4
CAPACITA’DI BIANCHERIA
ASCIUTTA
ACQUA LIVELLO NORMALE
POTENZA
ASSORBITA
CONSUMO DI ENERGIA
(PROG.90°C)
AMPERE DEL
FUSIBILE DELLA RETE
GIRI DI
CENTRIFUGA
PRESSIONE NELL’IMPIANTO
IDRAULICO
TENSIONE
DATI TECNICI
NL
HOOFDSTUK 4
CAPACITEIT DROOG
WASGOED
NORMAAL WATER NIVEAU
AANSLUITWAARDE
ENERGIEVER BRUIK
(PROGRAMMA 90°C)
STROOMSTERKTE VAN DE
ZEKERING
CENTRIFUGE
(t/min.)
DRUK HYDRAULISCHE POMP
NETSPANNING
TECHNISCHE GEGEVENS

16 17
IT
CAPITOLO 5
MESSA IN OPERA
INSTALLAZIONE
Porti la macchina vicino al
luogo di utilizzo senza il
basamento dell’imballo.
Tagli le fascette fermatubo
Svitare la vite centrale (A);
svitare le 4 viti laterali (B) e
rimuovere la traversa (C).
Inclinare la macchina in
avanti e sfilare i sacchetti in
plastica che contengono i
due blocchetti in polistirolo
posti sui 2 lati tirando verso il
basso.
Richiudere il foro utilizzando
il tappo contenuto nella
busta istruzioni.
ATTENZIONE:
NON LASCI ALLA
PORTATA DI BAMBINI
GLI ELEMENTI
DELL’IMBALLAGGIO IN
QUANTO POTENZIALI
FONTI DI PERICOLO.
EN
CHAPTER 5
SETTING UP
INSTALLATION
Move the machine near its
permanent position without
the packaging base.
Cut tube-holding straps.
Unscrew the central screw
(A); unscrew the 4 lateral
screws (B) and remove the
cross piece (C).
Lean the machine forward
and remove the plastic
bags containing the two
polystyrene blocks at the
sides,pulling downwards.
Press the plug (to be found
in the envelope with the
instructions) into the hole.
WARNING:
DO NOT LEAVE THE
PACKAGING IN THE
REACH OF CHILDREN
AS IT IS A POTENTIAL
SOURCE OF DANGER.
NL
HOOFDSTUK 5
INST
ALLATIE
Breng de machine (zonder
de onderkant van de
verpakking) dicht bij de
plaats waar hij komt te
staan.
Knip het ringetje waarmee
de slang en de snoer vast zit
door.
Draai de middelste schroef
(A) los; draai de vier
schroeven aan de zijkant (B)
los en verwijder het
dwarsstuk (C).
Houd het apparaat schuin
naar voren,verwijder de
plastic zakken en haal
voorzichtig de twee
polystyreen blokken aan de
zijkanten eraf door ze naar
beneden te trekken.
Stop de afsluitdopjes in de
gaatjes (deze bevinden zich
in de bijgeleverde
enveloppe).
WAARSCHUWING:
ZORG ERVOOR DAT HET
VERPAKKINGSMATERI-
AAL BUITEN HET BEREIK
VAN KINDEREN BLIJFT
OMDAT DAT GEVAAR
KAN OPLEVEREN.
PT
CAPÍTULO 5
INSTALAÇÃO
Coloque a máquina,sem a
base da embalagem,perto
do local onde vai ficar
permanentemente
instalada.
Corte a tira que prende os
tubos e o cabo eléctrico.
Desaperte o parafuso
central (A); desaperte os
quatro parafusos laterais (B)
e retire a barra (C).
Com a ajuda de outra
pessoa incline o aparelho
para a frente e solte os
sacos de plástico contendo
os dois blocos de esferovite
de ambos os lados,
puxando-os para baixo.
Tape a abertura com o
bujão (fornecido
juntamente com a
máquina,no envelope que
contém o manual de
instruçóes).
ATENÇÃO:
NÃO DEIXE A
EMBALAGEM DA
MÁQUINA OU OS SEUS
COMPONENTES AO
ALCANCE DE
CRIANÇAS: ELA É UMA
POTENCIAL FONTE DE
PERIGO.
DE
KAPITEL 5
INBETRIEBNAHME
INSTALLATION
Gerät ohne
Ver packungsunterteil in die
Nähe des Aufstellungsortes
bringen.
Lösen Sie die Klammern der
Schlauchbefestigung.
Schrauben Sie die
Mittelschraube (A) und die 4
Seitenschrauben (B) ab und
entfernen Sie die
Transportquerstrebe (C).
Neigen Sie das Gerät nach
vorne.Ziehen Sie die
Plastiktüten,die 2 Styropor-
Stangen enthalten,nach
unten heraus.
Schließen Sie die Öffnung mit
Hilfe des Stöpsels (der im
Beipack mitgeliefert wird).
ACHTUNG:
DIE VERPACKUNG IST IN
DEN HÄNDEN VON
KINDERN EINE
GEFAHRENQUELLE. BITTE
ENTSORGEN SIE DAS
VERPACKUNGS-
MATERIAL
ORDNUNGSGEMÄß.

18
min 50 cm
max 85 cm
+2,6 mt max
max 100 cm
min 4 cm
min 50 cm
max 85 cm
+2,6 mt max
max 100 cm
min 4 cm
19
EN
Fix the sheet of corrugated
material on the bottom as
shown in picture.
Connect the fill hose
to the tap.
The appliance must be
connected to the water
mains using new hose-sets.
The old hose-sets should not
be reused.
IMPORTANT:
DO NOT TURN THE TAP
ON AT THIS TIME.
Position the washing
machine next to the wall.
Hook the outlet tube to the
edge of the bath tub,
paying attention that there
are no bends or
contractions along the tube.
It is better to connect the
discharge hose to a fixed
outlet of a diameter greater
than that of the outlet tube
and at a height of min.50
cm.If is necessary to use the
plastic sleeve supplied.
PT
Fixe a placa de material
ondulado no fundo da
mãquina,da forma indicada
na figura.
Ligue a mangueira de
admissão de água à torneira
de alimentação.
Os acessórios devem estar
ligados à torneira da água,
usando mangueiras novas.
As mangueiras não devem
ser reutilizadas.
ATENÇÃO:
NÃO ABRA A TORNEIRA!
Encoste a máquina à parede.
Prenda o fim da mangueira
de esgoto por cima da borda
da bacia ou do tubo de
descarga,assegurando-se de
que não esteja torcida ou
dobrada.
Sempre que possível,utilize um
tubo de esgoto fixo com um
diâmetro superior ao da
mangueira de esgoto da
máquina de lavar,a fim de
permitir a saída do ar.
O topo da mangueira de
esgoto deverá estar a uma
altura mínima de 50 cm.
Se necessário use a curva
rígida fornecida juntamente
com a máquina.
DE
Befestigen Sie die gewellte
Bodenplatte wie in der
Abbildung dargestellt.
Den Zulaufschlauch an den
Wasserhahn anschließen.
Das Gerät muß an die
Wasserversorgung mit neuen
Schläuchen angeschlossen
werden.
Alte Schläuche dürfen nicht
wiederverwendet werden.
ACHTUNG:
WASSERHAHN NOCH NICHT
ÖFFNEN.
Die Waschmaschine an die
Wand rücken,darauf achten,
daß dabei der Schlauch nicht
verkrümmt oder eingeengt
wird.
Ablaufschlauch am
Wannenrand
befestigen,oder an einem
festen Abfluß von mindestens
50 cm Höhe anbringen,
dessen Durchmesser größer ist
als der des
Waschmaschinenschlauchs.
Falls erforderlich den
mitgelieferten starren
Rohrbogen benutzen.
IT
Applichi il foglio di polionda
sul fondo come mostrato in
figura.
Allacci il tubo dell’acqua al
rubinetto.
L’ a pparecchio deve essere
connesso alla rete idrica
solo con i nuovi tubi di
carico forniti in dotazione.I
vecchi tubi di carico non
devono essere riutilizzati.
ATTENZIONE:
NON APRA IL RUBINETTO
Accosti la lavatrice al muro
facendo attenzione che
non vi siano curve o
strozzature,allacci il tubo di
scarico al bordo della
vasca.
o meglio a uno scarico fisso;
altezza minima 50 cm,di
diametro superiore al tubo
della lavatrice.
In caso di necessità utilizzare
la curva rigida in dotazione.
NL
Bevestig de dempplaat op
de bodem,(zie tekening).
Verbind de
watertoevoerslang met de
waterkraan.
Het apparaat moet
aangesloten worden aan
de waterkraan met behulp
van de watertoevoerslang.
Maak gebruik van de
nieuwe watertoevoerslang,
gebruik niet de oude!
BELANGRIJK:
DRAAI DE WATERKRAAN
NIET OPEN
Zet de wasmachine dicht
tegen de muur aan.
Let er op dat er geen
bochten of vernauwingen in
de buis zitten.
Het is het beste om de
afvoerslang aan te sluiten
op een vaste afvoer met
een doorsnee die groter is
dan die van de afvoerslang
en op een hoogte van
minstens 50 cm.
Gebruik zonodig de
bligeleverde slanggeleider.

20
21
A
B
C
IT
Livelli la macchina con i 4
piedini:
a) Girare in senso orario il
dado per sbloccare la vite
del piedino.
b) Ruotare il piedino e farlo
scendere o salire fino ad
ottenere la perfetta
aderenza al suolo.
c) Bloccare infine il piedino
riavvitando il dado in senso
antiorario,fino a farlo
aderire al fondo della
lavatrice.
Si assicuri che la manopola
sia in posizione “OFF”e
l’oblò sia chiuso.
Inserisca la spina.
L’ a pparecchio deve essere
posto in modo che la spina
sia accessibile ad
installazione avvenuta.
NL
Zet de machine waterpas
door middel van de
voorvoetjes.
a) Kontra moer losdraaien
b) Apparaat waterpas zetten
m.b.v.verstelbare voeten
(maak eventueel gebruik
van een waterpas)
c) Kontra moer weer
vastdraaien.
Controleer of alle knoppen
op “OFF”staan en of de
vuldeur gesloten is.
Steek de stekker in het
stopcontact.
Na installatie,plaatst u het
apparaat zo,het
stopcontact makkelijk
toegangbaar is.
DE
Richten Sie das Gerät mit
den 4 Verstellfüßen
waagerecht aus:
a) Kontermuttern im
Uhrzeigersinn lösen.
b) Standfuß einregulieren,bis
das Gerät genau
ausgerichtet ist (möglichst
mit der Wasserwaage
justieren!).
c) Kontermuttern (gegen
den Uhrzeigersinn) festziehen.
Wichtig: Sollte das Gerät auf
einen Sockel aufgestellt
werden,ist es durch eine
Sockelbefestigung zu sichern.
Erkundigen Sie sich bitte
hierfür im Fachhandel.
Der Hersteller haftet nicht für
unsachgemäße Aufstellung
und Installation.
Sicherstellen,daß der
Schalter auf “OFF”steht,und
das Bullauge geschlossen ist.
Stecker einstecken.
Nach der Installation muß der
Anschluß zugänglich sein.
EN
Use the 4 feet to level the
machine with the floor:
a) Turn the nut clockwise to
release the screw adjuster of
the foot.
b) Rotate foot to raise or
lower it until it stands firmly
on the ground.
c) Lock the foot in position
by turning the nut anti-
clockwise until it comes up
against the bottom of the
machine.
Ensure that the knob is on
the “OFF”position and the
load door is closed
Insert the plug.
After installation,the
appliance must be
positioned so that the plug is
accessible.
PT
Use os 4 pés para nivelar a
máquina com o chão:
a) Rode a porca no sentido
dos ponteiros do relógio
para soltar a rosca de
fixação do pé.
b) Rode a pé para o erguer
ou baixar até estar
firmemente assente no
chão.
c) Fixe o pé nessa posição
rodando a porca no sentido
contrário co dos ponteiros
do relógio até embater no
fundo da máquina.
Assegure-se que o botão
está em posição de
desligado (OFF) e a porta
está fechada.
Ligue a máquina à corrente,
inserindo a ficha do
respectivo cabo de
alimentação na tomada.
Depois da instalação,os
acessórios devem estar
posicionados,pelo que a
tomada deve estar num
local acessível.

22
23
A
B
C
D
E
F
G
H
I
L
M
N
P
EN
CHAPTER 6
CONTROLS
Door open button
Door locked indicator light
Start button
Start Delay button
Prewash button
Extra rinse button
Crease guard button
Spin speed control Knob
Temperature selector
Time countdown system
Buttons indicator light
Timer knob for wash
programmes with OFF position
Detergent drawer
PT
CAPÍTULO 6
DESCRIÇÃO
DOS COMANDOS
Tecla de abertura da porta
Indicador de fecho de porta
Botão início (START)
Botão de início de
funcionamento retardado
Botão pré-lavagem
Botão extra enxaguamento
Botão para roupa engomar
fácil
Regulador de velocidade
Botão de selecção da
temperatura de lavagem
Indicador luminoso do tempo
remanescente
Luzes das teclas
Botão de selecção do programa
de lavagem com a posição OFF
Gaveta para detergente
KAPITEL 6
BEDIENUNGSELEMENTE
Taste zum Öffnen des
Bullauges
Leuchtanzeige Tür
geschlossen
Start/Pause Taste
Taste Startzeitvorwahl
Taste Vorwäsche
Taste Extra Spülen
Taste Leichtbügeln
Schleuder-Einstellung
Drehknopf
Temperatureinstellung
Restzeitanzeige
Tastenanzeige
Waschprogrammwahl-
schalter mit OFF
Waschmittelbehälter
DE
C
D
E
P
I
G
F
N
B
A
H
L
M
CAPITOLO 6
COMANDI
Tasto apertura oblò
Spia porta bloccata
Tasto Avvio/pausa
Tasto partenza differita
Tasto prelavaggio
Tasto Super Risciacquo
Tasto stiro facile
Regolatore di velocità
Manopola temperatura
lavaggio
Spie tempo restante
Spie tasti
Manopola programmi di
lavaggio con OFF
Cassetto detersivo
IT
NL
HOOFDSTUK 6
BEDIENINGSPANEEL
Toets openen vuldeur
Deurvergrendeling - indicatie
Knop Start/Pauze
Knop voor Uitgestelde Start
Voorwas-Knop
Knop Extra spoelen
Knop Snel strijken
Knop regeling centrifugesnelheid
Knop instellen temperatuur
Wasprogramma
Resttijd systeem
Indicatielampjes bij de knoppen
Programmaknop wassen
Met OFF
Wasmiddelbakje

2524
A
2 min.
B
DESCRIPTION OF
CONTROL
DOOR OPEN BUTTON
IMPORTANT:
A SPECIAL SAFETY
DEVICE PREVENTS THE
DOOR FROM OPENING
AT THE END OF THE
WASH/SPIN CYCLE.AT
THE END OF THE SPIN
PHASE WAIT UP TO 2
MINUTES BEFORE
OPENING THE DOOR.
DOOR LOCKED INDICATOR
The “Door Locked” indicator
light is illuminated when the
door is fully closed and the
machine is ON.
When START is pressed on
the machine with the door
closed the indicator will flash
momentarily and then
illuminate.
If the door is not closed the
indicator will continue to
flash.
A special safety device
prevents the door from
being opened immediately
after the end of the cycle.
Wait for 2 minutes after the
wash cycle has finished and
the Door Locked light has
gone out before opening
the door.At the end of cycle
turn the programme
selector to OFF .
EN
DESCRIÇÃO DOS
COMANDOS
TECLA DE ABERTURA
DA PORTA
ATENÇÃO:
UM DISPOSITIVO
DE SEGURANÇA
ESPECIAL IMPEDE
A ABERTURA DA PORTA
NO FIM DO CICLO DE
LAVAGEM.
UMA VEZ CONCLUÍDO
O CICLO DE
CENTRIFUGAÇÃO
DEVERÁ ESPERAR 2
MINUTOS PARA PODER
ABRIR A PORTA.
INDICADOR DE FECHO DE
PORTA
O indicador luminoso de
“fecho de porta”acende
quando a porta está
totalmente fechada e a
máquina está pronta para
começar.
Quando o botão de
“INÍCIO”é pressionado com
a porta da máquina
fechada,o indicador
luminoso piscará
momentâneamente e
depois ficará ligado.
Se a porta não estiver
fechada, o indicador
luminoso continuará a
piscar.
Um dispositivo especial de
segurança previne que a
porta abra de imediato ao
fim do ciclo de lavagem.
Espere 2 minutos depois do
ciclo de lavagem ter
terminado,e a luz de fecho
de porta desligar-se-á antes
da porta se abrir.No fim do
ciclo de lavagem,rode o
selector de programas para
a posição “OFF”.
PT
DE
BESCHREIBUNG DER
BEDIENELEMENTE
TASTE ZUM ÖFFNEN DES
BULLAUGES
ACHTUNG:
DIE SICHERHEITSTÜR-
VERRIEGELUNG VERHINDERT
DAS SOFORTIGE ÖFFNEN
DES BULLAUGES NACH
BEENDIGUNG DES WASCH-
PROGRAMMS. WARTEN SIE
DAHER NACH DEM LETZTEN
SCHLEUDERN CA. ZWEI
MINUTEN, BEVOR SIE DIE TÜR
ÖFFNEN.
LEUCHTANZEIGE TÜR
GESCHLOSSEN
Die Anzeige leuchtet,wenn die
Tür korrekt geschlossen ist und
das Gerät eingeschaltet ist.
Nach Drücken der Taste
START/PAUSE blinkt die Taste
zuerst,dann leuchtet sie
permanent bis zum
Programmende.
Wenn das Bullauge nicht korrekt
geschlossen wurde,blinkt die
Leuchtanzeige weiter.
Eine spezielle
Sicherheitsvorrichtung
verhindert,dass das Bullauge
unmittelbar nach dem
Programmende geöffnet
werden kann.Warten Sie ca.2
Minuten,bis die Leuchtanzeige
ausgeht und schalten Sie dann
das Gerät durch Drehen des
Programmwahlschalters auf die
Position AUS ab.
IT
DESCRIZIONE
COMANDI
TASTO APERTURA OBLÒ
ATTENZIONE:
UNO SPECIALE
DISPOSITIVO DI SICUREZZA
IMPEDISCE L’IMMEDIATA
APERTURA DELL’OBLO”
ALLA FINE DEL LAVAGGIO.
AL TERMINE DELLA FASE DI
CENTRIFUGA ATTENDA 2
MINUTI PRIMA DI APRIRE
L’OBLÒ.
SPIA PORTA BLOCCATA
La spia è illuminata quando
l’oblò è chiuso correttamente
e la macchina è accesa.
Dopo aver premuto il tasto
AVVIO/PAUSA inizialmente la
spia lampeggia per poi
diventare fissa sino alla fine
del lavaggio.
Nel caso in cui l’oblò non sia
chiuso correttamente la spia
continuerà a lampeggiare.
Uno speciale dispositivo di
sicurezza impedisce che l’oblò
possa venire aperto
immediatamente dopo la fine
di un ciclo di lavaggio,
attendere 2 minuti che la spia
si spenga e quindi spegnere la
macchina portando la
manopola programmi in
posizione di OFF.
NL
BEDIENINGSPANEEL
TOETS OPENEN VULDEUR
BELANGRIJK:
EEN SPECIALE
VEILIGHEIDSVERGREN-
DELING ZORGT ERVOOR
DAT DE VULDEUR NA
AFLOOP VAN HET
WASPROGRAMMA NIET
OPEN KAN. WACHT NA
HET CENTRIFUGEREN
NOG 2 MINUTEN VOOR U
DE VULDEUR OPENT.
DEURVERGRENDELING-
INDICATIE
Het indicatielampje voor de
“deurvergrendeling”licht op
als de deur goed dichtzit en
wanneer de wasmachine
AAN staat.
Wanneer u op START drukt als
de deur dicht is,zal het
indicatielampje eventjes
knipperen en vervolgens
blijven branden.
Als de deur niet dicht is, zal
het indicatielampje blijven
knipperen.
Een speciale beveiliging zorgt
ervoor dat u de deur niet
meteen kunt openen na
afloop van een wascyclus.
Wacht na afloop van de
wascyclus 2 minuten tot het
lampje van de
deurvergrendeling is
gedoofd voordat u de deur
probeert te openen.Zet na
afloop van de wascyclus de
programmaknop op UIT
(OFF).

2726
C
START BUTTON
When a programme is
selecting, wait for the “STOP”
indicator light to flash before
pressing the START button.
Press to start the selected
cycle (according to the
selected cycle one
indicator lights will go on) .
NOTE: WHEN THE START
BUTTON HAS BEEN
PRESSED,THE APPLIANCE
CAN TAKE FEW SECONDS
BEFORE STARTS
WORKING.
CHANGING THE SETTINGS
AFTER THE PROGRAMMES
HAS STARTED (PAUSE)
The programme may be
paused at any time during
the wash cycle by holding
down the "Start/Pause"
button for about two
seconds.When the machine
is in the paused mode,the
indicator light "Time
countdown" and option
buttons will flash.
To restart the programme,
press the START button once
again.
If you wish to add or remove
items during washing,wait 2
minutes until the safety
device unlocks the door.
When you have carried out
the manoeuvre,close the
door,press START button and
the appliance will continue
working where it left off.
CANCELLING THE
PROGRAMME
To cancel the programme
the programme selector
should be rotated to the
OFF position.
EN
PT
BOTÃO INÍCIO (START)
Antes de iniciar o programa,
espere que o indicador
luminoso “STOP” acenda,
pressionando o botão
“START”.
Pressione para começar o
ciclo seleccionado (ao
seleccionar um ciclo,um
indicador luminoso
acenderá).
NOTA: DEPOIS DE
ACCIONAR O BOTÃO
DE INÍCIO, ESTE,
DEMORARÁ ALGUNS
SEGUNDOS PARA
COMEÇAR A
TRABALHAR.
Alterar a programação após
o início do programa
(PAUSA)
O programa pode ser
colocado no modo PAUSA a
qualquer momento durante
o ciclo de lavagem,
pressionando a tecla
“Start/Pause”durante dois
segundos.Quando a
máquina está no modo
pausa,os indicadores
luminosos “Tempo
Remanescente”e teclas de
opções piscarão.
Para recomeçar o
programa,pressione
novamente o botão “INÍCIO
/ PAUSA”.
Se desejar alargar ou anular
a duração de lavagem,
espere 2 minutos até abrir a
porta em segurança.
Após ter feito essa escolha,
feche a porta,pressione o
botão de Início,e este
continuará a funcionar até
ao fim.
CANCELANDO O
PROGRAMA
Para cancelar o programa,
deverá rodar o selector de
programas para a posição
“OFF”.
DE
START/PAUSE TASTE
Nachdem Sie das gewünschte
Waschprogramm eingestellt
haben, warten Sie, bis die
STOP-Anzeige anfängt zu
blinken, bevor Sie die START-
Taste drücken.
Drücken Sie diese Taste,um das
Programm zu starten,die mit
dem Programmwahlschalter
gewählt wurde (je nach
eingestelltem Programm wird
eine der Leuchtanzeigen
aufleuchten).
ANMERKUNG: NACH DER
BETÄTIGUNG DER START-
TASTE DAUERT ES EINIGE
SEKUNDEN, BIS DAS
GERÄT ANFÄNGT ZU
ARBEITEN.
EINSTELLUNGEN NACH DEM
PROGRAMMSTART ÄNDERN
(PAUSE)
Nachdem das Programm
gestartet wurde,können nur die
Programmoptionen und die
Zusatzfunktionen mit den
Funktionstasten verändert
werden.
Drücken Sie und halten Sie die
Taste START für ca.2 Sekunden
gedrückt.
Das Blinken der Anzeigen der
Optionstasten und einer der
Restzeitanzeigen zeigt an,dass
das Gerät sich in einer
Betriebspause befindet.Sie
können die Einstellungen nach
Wunsch verändern und das
Gerät durch Drücken der START-
Taste wieder in Betrieb setzen.
Die Anzeigen hören auf zu
blinken.
Wenn Sie während des
Programmablaufs Wäsche
entnehmen bzw.hinzufügen
wollen,warten Sie ZWEI Minuten,
damit der
Türverriegelungsmechanismus
die Tür entriegelt.
Nachdem Sie die Wäsche
entnommen bzw.hinzugefügt
haben,schließen Sie die Tür und
drücken Sie die START-Taste.Das
Gerät fängt wieder dort an zu
arbeiten,wo es aufgehört hatte.
EINGESTELLTES PROGRAMM
LÖSCHEN
Sie können jederzeit das
Programm löschen,indem Sie
den Programmwahlschalter auf
die Position AUS drehen.
IT
TASTO AVVIO/PAUSA
Dopo avere selezionato un
programma attendere che la
spia “STOP” inizi a
lampeggiare prima di premere
il tasto AVVIO
Premere per avviare il ciclo
impostato con la manopola
programmi (a seconda del
ciclo impostato si illuminerà
una delle spie).
NOTA: DOPO AVERE
AVVIATO LA
LAVABIANCHERIA CON IL
TASTO START SI DOVRÀ
ATTENDERE ALCUNI
SECONDI AFFINCHÉ LA
MACCHINA INIZI IL
PROGRAMMA.
MODIFICARE IMPOSTAZIONI
DOPO AVVIO DEL
PROGRAMMA (PAUSA)
Dopo l’avvio del programma
possono essere modificate solo
le regolazioni e le opzioni
tramite i tasti opzione (ad
esclusione del tasto
prelavaggio).Tenere il tasto
AVVIO/PAUSA premuto per
circa 2 secondi,Il lampeggio
delle spie dei tasti funzione e di
una spia del tempo residuo
indica che la macchina è in
pausa,modificate quanto
desiderato e premete
nuovamente il tasto
AVVIO/PAUSA annullando
l’intermittenza.
Se si desidera aggiungere o
togliere capi durante il
lavaggio,attendere DUE minuti
affinché il dispositivo di
sicurezza liberi il blocco
dell’oblò.
Effettuata la manovra,dopo
aver richiuso l’oblò e premuto
il tasto AVVIO/PAUSA,la
macchina ripartirà dal punto
in cui era stata fermata.
CANCELLAZIONE PROGRAMMA
IMPOSTATO
E’possibile cancellare in
qualsiasi momento il
programma portando il
selettore in posizione di OFF.
NL
START/PAUZE KNOP
Wacht na het instellen van
een programma tot het
“STOP”-lampje gaat
knipperen voordat u op de
START-knop drukt.
Druk op start voor het
selecteren van een
wascyclus (afhankelijk van
de geselecteerde wascyclus
gaat een lampje van de
indicator branden).
LET OP: WANNEER DE START
KNOP IS INGEDRUKT, DUURT
HET ENIGE SECONDE
VOORDAT HET
PROGRAMMA WORDT
GESTART.
Instellingen veranderen nadat
een programma is gestart
(PAUZE).
Houd de "Start/Pauze"-knop
circa twee seconden lang
ingedrukt om het programma
te onderbreken tijdens de
wascyclus.Als de wasmachine
op pauze staat,zullen het
“Rest Tijd”-indicatielampje en
de optieknoppen
indicatielampjes knipperen.
Druk nogmaals op de
START/PAUZE-knop om het
wasprogramma te hervatten.
Indien u kledingstukken toe
wil voegen of wil verwijderen
uit de trommel tijdens het
wassen: wacht twee minuten
totdat het veiligheidsslot van
de deur is.
Wanneer de handeling is
uitgevoerd,sluit de deur,druk
op de START knop en de
wasautomaat gaat verder
met het programma.
HET WASPROGRAMMA
VOORTIJDIG BEËINDIGEN
Draai de programmaknop
naar UIT (OFF) om het
wasprogramma voortijdig te
beëindigen.

The option buttons should
be selected before pressing
the START button
START DELAY BUTTON
Appliance start time can be
set with this button,delaying
the star by 3,6 or 9 hours.
Proceed as follow to set a
delayed start:
Select a programme
(“STOP”indicator light
blinks)
Press Start Delay button
(each time the button is
pressed the start will be
delayed by 3,6 or 9 hours
respectively and the
corresponding light will
blink).
Press START to commence
the Start Delay operation
(the indicator light
associated with the
selected Start Delay time
stops blinking and remains
ON).
At the end of the required
time delay the programme
will start.
To cancel the Start Delay
function :
press the Start Delay button
until the indicator lights will
be off (The STOP light blinks)
and the programme can
be started manually using
the START button or switch
off the appliance by turning
the programme selector to
off position.
28
EN
29
D
PT
A opção do botão deverá
ser seleccionada antes de
pressionar o botão “START”.
BOTÃO DE INÍCIO DE
FUNCIONAMENTO
RETARDADO
Esta opção pode ser obtida
pelo botão de início de
funcionamento retardado,
atrasando o início de
lavagem 3,6 ou 9 horas.
Para atrasar o início de
funcionamento,proceda
da seguinte forma:
Seleccione o programa
(“STOP”– indicador
luminoso);
Pressione o botão de início
de funcionamento
retardado (cada vez que
pressionar o botão,o início
atrasará 3,6 ou 9 horas
respectivamente e a luz
correspondente irá piscar).
Pressione o botão “START”
para dar início à operação
de início de funcionamento
retardado (o indicador
luminoso associado a essa
função,deixará de piscar e
permanecerá na função
“ON”.
No fim do tempo de atraso
seleccionado,o programa
iniciar-se-á.
Para cancelar a função
Início de Funcionamento
Retardado:
Pressione o respectivo
botão dessa função até o
indicador luminoso se
desligar,nessa altura o
programa poderá iniciar-se
manualmente,utilizando o
botão “START”ou rodando o
selector de programas para
a posição “OFF”.
DE
Die Optionstasten müssen
VOR der Betätigung der
START-Taste gedrückt
werden.
TASTE STARTZEITVORWAHL
Diese Taste ermöglicht Ihnen,
das Waschprogramm mit
einer Zeitverzögerung von 3,
6 oder 9 Stunden zu starten.
Um die Startzeitvorwahl
einzustellen,gehen Sie wie
folgt vor:
Wählen Sie das gewünschte
Waschprogramm (die STOP-
Leuchte fängt an zu
blinken).
Drücken Sie die Taste
STARTZEITVORWAHL.Bei
jedem Drücken stellt sich die
Startverzögerung auf 3,6
oder 9 Stunden ein,und die
entsprechende Zeitanzeige
fängt an zu blinken.
Drücken Sie die START Taste:
die Zeitanzeige der
gewählten Starverzögerung
bleibt permanent an,und
die eingestellte Zeit fängt
abzulaufen.Am Ende der
Zeit wird das Programm
automatisch starten.
Sie können die
Startzeitvorwahl
folgendermaßen löschen:
Drücken Sie mehrmals die
Taste STARTZEITVORWAHL,um
alle Anzeigen zu löschen.Zur
Bestätigung,dass die
Zeitvorwahl annulliert wurde,
fängt die STOP-Leuchte an
zu blinken.
Jetzt können Sie das vorher
gewählte Programm mit der
START-Taste manuell starten,
oder das Programm löschen,
indem Sie den
Programmwahlschalter auf
die Position AUS drehen,und
ein neues Programm
einstellen.
IT
I tasti opzione devono
essere selezionati prima di
premere il tasto AVVIO.
TASTO PARTENZA DIFFERITA
Questo tasto permette di
programmare l’avvio del
ciclo di lavaggio con un
ritardo di 3,6 o 9 ore.
Per impostare la partenza
ritardata procedere nel
seguente modo:
Impostare il programma
scelto (la spia STOP inizia a
lampeggiare)
Premere il pulsante
PARTENZA DIFFERITA (ad
ogni pressione si potrà
impostare una partenza
ritardata rispettivamente di
3,6 o 9 ore e la spia
corrispondente al tempo
scelto inizierà a
lampeggiare)
Premere il tasto START ( La
spia corrispondente al
tempo scelto rimarrà
accesa) per iniziare il
conteggio alla fine del
quale il programma inizierà
automaticamente.
E’possibile annullare la
partenza ritardata agendo
come segue:
premere ripetutamente il
tasto PARTENZA DIFFERITA
per spegnere le spie ( a
conferma che la partenza
ritardata è stata annullata
la spia STOP inizierà a
lampeggiare) .
A questo punto è possibile
iniziare il programma scelto
in precedenza premendo il
tasto START o annullare
l’operazione portando il
selettore in posizione di OFF
e successivamente
selezionare un altro
programma.
NL
U moet de optieknoppen
gebruiken voordat u op de
START-knop drukt
KNOP VOOR UITGESTELDE
START
Met deze knop bepaalt u of
de wasmachine na een
wachttijd van 3,6 of 9 uur
moet beginnen met
wassen.
Handel als volgt om een
uitgestelde start in te
stellen:
Stel het gewenste
programma in (het “STOP”-
indicatielampje zal gaan
knipperen)
Druk één of meer keren op
de startuitstel-knop (hierbij
zal de startuitstel-periode
achtereenvolgens
verspringen naar 3,6 en 9
uur en licht het
bijbehorende lampje op).
Druk op START om de
uitgestelde start te
activeren (het
indicatielampje van de
ingestelde periode stopt
met knipperen en blijft
AAN).
Na afloop van de
startuitstelperiode zal het
wasprogramma starten.
Uitgestelde start opheffen:
Druk net zolang op de
startuitstel-knop button tot
alle indicatielampjes uit zijn
(het STOP-lampje knippert).
U kunt nu het programma
handmatig starten met de
START-knop,of u kunt de
wasmachine uitschakelen
door de programmaknop
naar UIT (OFF) te draaien.

30
31
PT
BOTÃO PRÉ-LAVAGEM
Esta opção é
particularmente utilizada
para a lavagem de roupas
muito sujas e só pode ser
utilizada em apenas alguns
programas,como poderá
vêr no painel de programas.
Colocar o detergente no
compartimento da gaveta,
assinalado “I”(para
melhores detalhes ver
informações contidas na
secção Gaveta do
detergente deste manual).
Aconselha-se a usar
somente 20% da
quantidade indicada no
contentor do detergente e
não utilizar amaciador.
BOTÃO EXTRA
ENXAGUAMENTO
Graças ao novo sistema
electrónico accionando o
botão,é possível obter um
ciclo especial de lavagem.
A adição de uma maior
quantidade de água,e a
acção combinada com o
ciclo de rotação do tambor
de carga e descarga de
água,permite um perfeito
enxaguamento da roupa.
Esta função foi pensada para
pessoas com peles sensíveis e
delicadas,pois contém uma
menor quantidade de resíduos
no detergente que poderão
causar irritações ou alergias.
Dessa forma,é
aconselhada para roupas
de crianças,em caso de
lavagem de
roupas muito sujas,ou ainda
em caso de lavagem de
atoalhados com fibra
que tendencialmente
requerem uma maior
quantidade de detergente.
Esta opção não está
disponível nos programas
especiais excluindo o
programa para roupa
desportiva.
EN
PRE-WASH BUTTON
This option is particularly
useful for heavily soiled
loads and can be used only
on some programmes as
shown in the programmes
table.
Detergent for this
programme should be
added to the compartment
of the soap drawer labelled
“I”(Please refer to
Detergent Drawer Section
of manual).We recommend
you use only 20% of the
recommended quantities
shown on the detergent
pack and fabric conditioner
should not be used for this
programme.
EXTRA RINSE BUTTON
Thanks to the new
electronic system ,acting
on the button is possible to
effect a new special rinse
cycle.The addition of a lot
of more water and the new
action combined of cycles
of rotation of the drum with
load and unloading of
water,allow to get laundry
perfectly rinsed.
This function has been
studied for the people with
delicate and sensitive skin,
for which also a least
residue of detergent can
cause irritations or allergies.
It advises to also use this
function for the children
items and in case of
washings of very dirty items,
for which it is due to use a
lot of detergent,or in the
washing of towelling items
whose fibers mostly have
the tendency to hold the
detergent.
This option is not available
on SPECIALS programmes
excluding the SPORTS
programme.
F
E
DE
TASTE VORWÄSCHE
Diese Option ist besonders
empfehlenswert bei stark
verschmutzter Wäsche.Sie
kann nur bei bestimmten
Programmen gewählt
werden (s hierzu
Programmtabelle).
Für dieses Programm füllen
Sie das Waschmittel in die
Kammer „I“ des
Waschmitteilbehälters ein
(für nähere Informationen
schauen Sie bitte im Kapitel
über den
Waschmittelbehälter in
diesem Heft nach).Es ist
anzuraten,nur 20% der auf
der Waschmittelpackung
empfohlenen Menge
einzusetzen.
TASTE EXTRA SPÜLEN
Dank des neuen
elektronisch gesteuerten
Systems wird durch Drücken
dieser Taste ein neuer,
spezieller Spülgang
durchgeführt.Durch
Verwendung von erheblich
mehr Wasser und durch das
abgestimmte
Zusammenwirken von
Trommeldrehungen mit
Wasserzulauf- und -
abpumpphasen werden
perfekte Spülergebisse
erzielt.
Diese Funktion ist besonders
wichtig für Personen mit
empfindlicher Haut,bei
denen die kleinsten
Waschmittelrückständen zu
Allergien führen können.
Wir empfehlen diese
Funktion auch für
Kinderwäsche und für stark
verschmutzte Wäsche,für
die größere Mengen
Waschmittel eingesetzt
werden müssen,sowie für
stark saugfähige Gewebe
(Frottee u.Ä.),die das
Waschmittel stärker in ihren
Fasern aufnehmen.
Mit Ausnahme des
Programms Sportwäsche,ist
diese Funktion für die
Spezialprogramme NICHT
verfügbar.
IT
TASTO PRE LAVAGGIO
Questa opzione è utile in
particolare per la
biancheria molto sporca e
può essere utilizzata solo in
alcuni programmi come
riportato nella tabella
programmi.
Aggiungere il detersivo per
questo programma nello
scompartimento del
cassetto contrassegnato
con “I”(per maggiori
informazioni vedere la
sezione Cassetto del
detersivo in questo
manuale).Si consiglia di
utilizzare solo il 20% della
quantità consigliata sul
contenitore del detersivo.
TASTO SUPER RISCIACQUO
Grazie al nuovo sistema
elettronico agendo sul
tasto è possibile effettuare
un nuovo speciale ciclo di
risciacquo.L’aggiunta di
molta più acqua e la nuova
azione combinata di cicli di
rotazione del cesto con
carico e scarico d’acqua,
permette di ottenere capi
perfettamente risciacquati.
Questa funzione è stata
studiata appositamente per
le persone con pelle
delicata e sensibile,per le
quali anche un minimo
residuo di detersivo può
causare irritazioni o allergie.
Si consiglia di utilizzare
questa funzione anche per i
capi dei bambini e in caso
di lavaggi di tessuti molto
sporchi,per i quali si è
dovuto impiegare molto
detersivo,oppure nel
lavaggio di capi di spugna
le cui fibre tendono
maggiormente a trattenere
il detersivo.
Questo tasto non è
disponibile nei programmi
speciali ad esclusione del
programma SPORTS.
NL
VOORWAS-KNOP
Deze optie is vooral handig
voor ernstig vervuild
wasgoed,maar kan alleen
in combinatie met
bepaalde wasprogramma's
worden gebruikt (zie de
programmatabel).De zeep
voor dit programma moet
in het vakje van de
zeeplade,met de ‘I’,
geplaatst worden (Lees het
hoofdstuk Zeeplade van
deze gebruiksaanwijzing).
Aanbevolen wordt om
slechts 20% van de
aanbevolen hoeveelheid
zeep op de
zeepverpakking te
gebruiken en voor dit
programma wordt geen
wasverzachter gebruikt.
“EXTRA SPOELEN” KNOP
Dankzij het nieuwe
elektronische systeem is
een druk op de knop
genoeg om het nieuwe
spoelprogramma te
activeren.Toevoeging van
extra water en afgewisselde
trommelrotaties tijdens de
inspuiting en het afpompen
van het water resulteren in
een perfect uitgespoelde
was.
Deze functie is speciaal
ontwikkeld voor mensen
met een gevoelige huid; bij
wie achterblijvende
zeepresten kunnen leiden
tot huidirritaties.
Er wordt geadviseerd deze
functie ook te gebruiken bij
het wassen van
kinderkleding,sterk
vervuilde kleding waarvoor
veel wasmiddel nodig is of
kleding van vezels die als
eigenschap hebben
makkelijk zeepresten vast te
houden.
Deze optie is niet
beschikbaar voor de
SPECIALE programma's,
behalve voor het SPORT-
programma.

32
33
G
IT
TASTO STIRO FACILE
Attivando questa funzione è
possibile ridurre al minimo la
formazione di pieghe
personalizzando ulteriormente
il ciclo di lavaggio in base al
programma scelto ed al tipo
di biancheria da lavare.
In modo particolare per i
tessuti misti e sintetici l’azione
combinata di una fase di
raffreddamento graduale
dell’acqua,l’assenza di
rotazione del cesto durante
gli scarichi dell’acqua ed una
centrifuga delicata a bassa
velocità assicura la massima
distensione dei capi.
Per i tessuti delicati,vengono
svolte le fasi già descritte
sopra per i tessuti misti ad
eccezione del
raffreddamento graduale
dell’acqua ma con
l’aggiunta di una fase di
fermo acqua in vasca con
stop dopo l’ultimo risciacquo.
Nei programmi lana e seta
questo tasto ha la sola
funzione di lasciare i capi
immersi nell’acqua alla fine
dell’ultimo risciacquo al fine di
distendere perfettamente le
fibre.
Durante la fase di fermo
acqua in vasca la spia del
tasto lampeggia ad indicare
che la macchina è in pausa.
Per terminare il ciclo dei
tessuti delicati, della lana e
della seta le operazioni
possono essere:
- rilasciare il tasto per
terminare il ciclo.
Nel caso in cui si voglia
effettuare solo lo scarico:
- portare la manopola
programmi prima in posizione
di OFF;
- selezionare il programma
solo scarico ;
- riavviare la macchina
premendo nuovamente il
pulsante AVVIO/PAUSA.
DE
TASTE LEICHTBÜGELN
Diese Funktion reduziert die
Knitterbildung durch die
individuelle Wahl der
Programme und der
Wäscheart.
Im Besonderen für
Mischgewebe sorgt die
Kombination der langsamen
Abkühlphase verbunden mit
dem Stillstand der Wäsche
während des Abpumpens
und einem Schonschleudern
für die optimale Schonung
der Wäsche.
Für die Feinwäsche,mit
Ausnahme der Wolle,sind
die Phasen wie bei
Mischgewebe beschrieben,
mit Ausnahme der
Abkühlphase unter
Hinzunahme des
Wasserstopps nach dem
letzten Spülgang.
Für die Programme
Woolmark (Wolle) und Seide
dient diese Taste
ausschließlich als Spülstopp,
um die Fasern zu glätten.
In der Spülstopp-Phase
blinkt die Leuchtanzeige der
Taste, um anzuzeigen, dass
das Gerät sich in Pause
befindet.
Um die Feinwäsche bzw.das
Woll- oder Seide- Programm
zu beenden,können Sie wie
folgt vorgehen:
- Drücken Sie die Taste
Leichtbügeln zurück,um das
Programm mit Abpumpen
und Schleudern zu beenden
Wenn Sie nur abpumpen
wollen:
- drehen Sie den
Programmwahlschalter auf
die Position AUS
- wählen Sie das Programm
Abpumpen
- schalten Sie das Gerät
durch erneutes Drücken der
Taste START/PAUSE ein
NL
“SNEL STRIJKEN” KNOP
Dit programma is bedoeld
om het kreuken van uw
wasgoed te beperken.U kunt
een wasprogramma
selecteren dat past bij het te
wassen wasgoed,dit is
afhankelijk van de weefsels
en van de graad van
vervuiling.
Bij gemengde weefsels
(SYNTHETISCH) neemt de
watertemperatuur tijdens het
wassen geleidelijk af.
De trommel stopt met
draaien als het water
afgepompt wordt en het
programma eindigt met
centrifugeren met een laag
toerental.
Voor fijne was (DELICAAT)
worden dezelfde fases
doorlopen als bij gemengde
weefsels.Er zijn echter wel
twee verschillen: de fase
waarbij het water geleidelijk
wordt afgekoeld ontbreekt
en er wordt een andere fase
aan toegevoegd: na de
laatste spoeling blijft de kuip
vol met water.
Voor de programma's wol en
zijde na de laatste keer
spoelen blijft het wasgoed in
het spoelwater staan tot u de
wasmachine leeghaalt (het
indicatielampje in de knop
knippert).
Wilt u de wasmachine
uitladen,druk dan op de
Snelstrijk-knop.Hiermee
pompt u het water weg en
wordt een laatste keer
gecentrifugeerd.
Handel als volgt als u niet wilt
centrifugeren en alleen het
water wilt wegpompen:
- Zet de programmaknop in
de UIT-stand (OFF)
- Draai de programmaknop
naar de wegpomp-stand
- Druk op de START-knop om
de wasmachine in te
schakelen.
PT
BOTÃO PARA ROUPA
ENGOMAR FÁCIL
Ao activar esta função,é
possível reduzir ao mínimo a
formação de rugas,
personalizando ainda mais o
ciclo de lavagem com base
no programa seleccionado e
no tipo de roupa a lavar.
Para os tecidos mistos,em
especial,a acção
combinada de uma fase de
arrefecimento gradual da
água,a ausência de
rotação da cuba durante as
descargas da água e uma
centrifugação delicada,a
baixa velocidade,permite
alisar a roupa ao máximo.
Para os tecidos delicados
são usadas as fases acima
descritas para os tecidos
mistos,com a excepção do
arrefecimento gradual da
água,mas com uma fase
adicional de água parada
na cuba,com stop depois
do último enxaguamento.
Para programas de lãs e
sedas, depois do
enxaguamento final,os
tecidos permanecem em
água até chegar a altura de
ser descarregada (indicador
luminoso irá piscar).
Quando estiver preparada
para descarregar a
máquina,pressione o botão
“engomar fácil”e ela
escoará a água e fará a
centrifugação.
Se não quiser que a roupa
seja centrifugada:
- Rode o selector de
programas para a posição
“OFF”
- Seleccione apenas a
opção de escoamento
- Altere novamente,
pressionando o botão
“INÍCIO”.
EN
CREASE GUARD BUTTON
The Crease Guard function
minimizes creases as much
as possible with a uniquely
designed anti-crease system
that is tailored to specific
fabrics.
MIXED FABRICS - the water is
gradually cooled throughout
the final two rinses with no
spinning and then a delicate
spin assures the maximum
relaxation of the fabrics.
DELICATE FABRICS – final two
rinses with no spinning and
then the fabrics are left in
water until it is time to
unload.When you are ready
to unload,press the Crease
Guard button – this will drain.
For programmes wollens and
silk after the final rinse the
fabrics are left in water until it
is time to unload and the
button indicator blinking.
When you are ready to
unload,press the Crease
guard button ,this will drain
and spin ready for emptying.
If you do not want to spin the
clothes and activate drain
only:
- Turn the programme
selector to the OFF position
- Select programme drain
only
- Switch on the appliance
again by pressing the START
button.

34
35
H
REGOLATORE DI VELOCITÀ
PUÒ RUOTARE NEI DUE
SENSI
La fase di centrifuga è molto
importante per la
preparazione ad una buona
asciugatura ed il vostro
modello è dotato della
massima flessibilità per ogni
vostra esigenza.
Agendo sulla manopola è
possibile ridurre la velocità
massima fino alla completa
eliminazione della
centrifuga (posizione ).
NOTA:
IL MODELLO È DOTATO
DI UN PARTICOLARE
DISPOSITIVO
ELETTRONICO CHE
IMPEDISCE LA
PARTENZA DELLA
CENTRIFUGA CON
CARICHI
PARTICOLARMENTE
SBILANCIATI.
QUESTO SERVE A
MIGLIORARE LE
VIBRAZIONI, LA
SILENZIOSITÀ E LA
DURATA DELLA
LAVABIANCHERIA.
IT
NL
KNOP REGELING
CENTRIFUGESNELHEID
DRAAIT IN BEIDE
RICHTINGEN
Het toerental bij het
centrifugeren is belangrijk
omdat daardoor bepaald
wordt hoeveel water uit het
wasgoed verwijderd wordt,
zonder dit te beschadigen.
U kunt op uw machine het
toerental zelf instellen naar
wens.U kunt ook de
centrifugegang helemaal
uitschakelen door de stand
te kiezen.
Bij programma’s voor
gevoelige weefsels wordt
automatisch met een lager
toerental gecentrifugeerd
(400 r.p.m.).
OPMERKING:
DE MACHINE IS
UITGEVOERD MET EEN
SPECIALE SENSOR DIE
SIGNALEERD ALS HET
WASGOED NIET GOED
VERDEELD IS IN DE
TROMMEL. DIT
ONBALANSSYSTEEM
REDUCEERD GELUID EN
TRILLINGEN EN
VERLENGD DE
LEVENSDUUR VAN DE
WASMACHINE.
PT
REGULADOR DE VELOCIDADE
PODE SER RODADO EM
AMBOS OS SENTIDOS
A fase de centrifugação é
muito importante para que
a roupa saia o mais seca
possível,sem,no entanto,
danificá-la.A velocidade
de centrifugação pode ser
ajustada conforme as suas
necessidades.Ao ajustar o
controlo é possível reduzir a
velocidade máxima,ou até
mesmo parar totalmente o
cíclo de centrifugação .
NOTA:
O MODELO ESTÁ
EQUIPADO COM UM
DISPOSITIVO
ELECTRÓNICO ESPECIAL
QUE IMPEDE O CÍCLO
DE CENTRIFUGAÇÃO
CASO AS CARGAS
FOREM
DESEQUILIBRADAS.TAL
CONDUZ A UMA
REDUÇÃO DE RUIDOS E
DE VIBRAÇÕES,
CONTRIBUINDO PARA
UM MAIOR SILÊNCIO E
UMA MAIOR DURAÇÃO
DA MÁQUINA DE LAVAR.
SCHLEUDER-EINSTELLUNG
KANN IN BEIDE
RICHTUNGEN GEDREHT
WERDEN.
Der Schleudergang ist sehr
wichtig,damit so viel Wasser
wie möglich aus den
Wäschestücken entfernt wird,
ohne jedoch die Gewebe zu
beschädigen.Die
Schleudergeschwindigkeit der
Maschine kann den
persönlichen Bedürfnissen
angepaßt werden.Durch
Einstellen des Bedienungs-
knopfes kann die maximale
Geschwindigkeit herabgesetzt
werden.Es ist sogar möglich,
den Schleudergang
vollkommen auszuschalten .
ANMERKUNG:
DAS MODELL IST MIT EINER
ELEKTRONISCHEN
VORRICHTUNG
AUSGESTATTET, DIE
VERHINDERT, DAß DER
SCHLEUDERGANG MIT
FÜLLMENGEN, DEREN
GEWICHT
UNGLEICHMÄßIG VERTEILT
SIND,STARTET. DIES TRÄGT
ZU EINER REDUZIERUNG
DER VIBRATIONEN, DER
GERÄUSCHENTWICKLUNG
UND ZU EINER
VERLÄNGERUNG DER
LEBENSDAUER DER
WASCHMASCHINE BEI.
DE
EN
SPIN SPEED CONTROL
ROTATES IN BOTH
DIRECTIONS
The spin cycle is very
important to remove as
much water as possible from
the laundry without
damaging the fabrics.You
can adjust the spin speed of
the machine to suit your
needs.By adjusting the
control,it is possible to
reduce the maximum
speed,and if you wish,the
spin cycle can be
cancelled altogether-
position .
NOTE:
THE MACHINE IS FITTED
WITH A SPECIAL
ELECTRONIC DEVICE,
WHICH PREVENTS THE
SPIN CYCLE SHOULD
THE LOAD BE
UNBALANCED.
THIS REDUCES THE
NOISE AND VIBRATION
IN THE MACHINE AND
SO PROLONGS THE LIFE
OF YOUR MACHINE.

36
L
EN
TEMPERATURE SELECTOR
ROTATES IN BOTH
DIRECTIONS
The washing machine is
equipped with a
temperature selector knob
to set the temperature
you require.We recommend
that the temperature shown
on wash care garments
should never be exceeded.
In the case where the
temperature has been
accidentally set higher than
that of the chosen
programme,(see
Programme Guide table),
the machine will lower the
temperature automatically
to protect the fabrics.
TIME COUNTDOWN SYSTEM
INDICATOR LIGHTS
In order to better manage
your time,this washing
machine features an
indicator light system that
keeps you constantly
informed on the remaining
cycle time.
Indicator light START:
Remaining time above 60
minutes
Indicator light 60:
Remaining time less than 60
minutes
Indicator light 30:
Remaining time less than 30
minutes
Indicator light 15:
Remaining time less than 15
minutes
Indicator light Stop:
End of the programme.
BUTTONS INDICATOR LIGHT
The indicator light around
the option buttons will light
when specific options
are selected
37
PT
BOTÃO DE SELECÇÃO DA
TEMPERATURA DE LAVAGEM
ESTE BOTÃO RODA EM
AMBAS AS DIRECÇõES
Este botão permite seleccionar
a temperatura desejada para
a lavagem pretendida.
A tabela dos programas de
lavagem indica sempre a
temperatura máxima
recomendada para cada tipo
de lavagem.
Atenção:
esta temperatura nunca
deverá ser excedida.
INDICADOR LUMINOSO DO
TEMPO REMANESCENTE
Para gerir melhor o seu tempo,
as características desta
máquina tem um sistema de
indicador luminoso que o
mantém constantemente
informado do tempo
remanescente do ciclo.
Indicador luminoso START:
Tempo remanescente superior
a 60 minutos;
Indicador luminoso 60:
Tempo remanescente até 60
minutos;
Indicador luminoso 30:
Tempo remanescente até 30
minutos;
Indicador luminoso 15:
Tempo remanescente até 30
minutos;
Indicador luminoso “STOP”:
Fim do programa.
LUZES DAS TECLAS
Acendem-se quando as
respectivas teclas são
premidas.
DE
DREHKNOPF
TEMPERATUREINSTELLUNG
KANN IN BEIDE
RICHTUNGEN
GEDREHT WERDEN.
Sie können mit diesem
Drehknopf die gewünschte
Waschtemperatur für das
Waschprogramm einstellen.Es
wird empfohlen,die im
Wäscheetikett angegebene
Höchsttemperatur nicht zu
übersteigen.Im Kapitel über die
Programmtabelle sind die
geeigneten Temperaturen und
Waschprogramme für die
unterschiedlichen
Gewebearten angegeben.
Falls Sie mit dem
Temperaturregler eine höhere
Temperatur einstellen,als das
gewählte Programm vorsieht
(siehe hierzu die
Programmtabelle),reduziert das
Gerät automatisch die
Temperatur dementsprechend,
um die Gewebe vor
Beschädigung zu schützen.
RESTZEITANZEIGE
Die Restzeitanzeigen geben
Ihnen ständig Auskunft über
die verbleibende zeit zum
Programmende.
Leuchtanzeige “START”:
Restzeit über 60 Minuten
Leuchtanzeige 60:
Restzeit weniger als 60 Minuten
Leuchtanzeige 30:
Restzeit weniger als 30 Minuten
Leuchtanzeige 15:
Restzeit weniger als 15 Minuten
Leuchtanzeige STOP:
Programmende
TASTENANZEIGE
Die Anzeigen bestätigen die
gewählte Funktion.
M
NL
KNOP INSTELLEN
TEMPERATUUR
WASPROGRAMMA
DRAAIT IN BEIDE
RICHTINGEN
De wasautomaat is voorzien
van een temperatuur
keuzeknop om de gewenste
temperatuur in te stellen.
Wij adviseren de
temperatuur niet hoger in te
stellen dan staat
aangegeven op het
wasvoorschrift.
Indien de temperatuur per
abuis hoger wordt ingesteld
dan dat het gekozen
programma toelaat (zie de
tabel met het
wasprogramma overzicht),
zal de machine de
wastemperatuur
automatisch verlagen ter
bescherming van het
wasgoed.
RESTTIJD SYSTEEM
Om uw tijd beter te kunnen
afstemmen op het
wasprogramma,is deze
wasautomaat uitgerust met
een indicator die u continu
informeert over de
resterende tijd van de
wascyclus.
Indicator op START:
Gereed in meer dan 60
minuten
Indicator op 60:
Gereed binnen 60 minuten
Indicator op 30:
Gereed binnen 30 minuten
Indicator op 15:
Gereed binnen 15 minuten
Indicator op STOP:
Gereed,eind van het
programma
INDICATIELAMPJES BIJ DE
KNOPPEN
De indicatielampjes boven
de keuzeknoppen lichten
op wanneer speciale
functies geselecteerd
worden.
IT
MANOPOLA TEMPERATURA
LAVAGGIO
PUÒ RUOTARLA NEI DUE
SENSI.
Questa lavatrice è dotata di
questo dispositivo per
impostare la temperatura di
lavaggio desiderata.Si
consiglia di non superare mai
la temperatura indicata
nell’etichetta posta all’interno
dei capi.
Nel capitolo riguardante la
tabella programmi sono
indicate le temperature e i
cicli più adatti per ciascun
tipo di tessuto.
Per la salvaguardia dei tessuti,
nel caso con il termostato
regolabile si impostino
accidentalmente
temperature più alte da
quelle previste per ciascun
programma (vedi tabella
programmi),la macchina
ridurrà automaticamente la
temperatura.
SPIE TEMPO RESTANTE
Per gestire meglio il tuo
tempo,il sistema di
segnalazione a led consente
di essere costantemente
aggiornati sul tempo residuo
alla fine del ciclo.
Spia START:
tempo residuo superiore a 60’
Spia 60:
tempo residuo inferiore a 60’
Spia 30:
tempo residuo inferiore a 30’
Spia 15:
tempo residuo inferiore a 15’
Spia STOP:
fine programma
SPIE TASTI
Si accendono quando i
rispettivi tasti vengono
premuti.
I

38
EN
PROGRAMME SELECTOR WITH
OFF POSITION
ROTATES IN BOTH
DIRECTIONS.
THE MACHINE IS
TURNED ON BY
SELECTING A
PROGRAMME VIA THE
PROGRAMME
SELECTOR.
THIS STATUS WILL BE
INDICATED BY THE STOP
INDICATOR LIGHT
FLASHING,THIS LIGHT
WILL CONTINUE TO
FLASH UNTIL THE
MACHINE HAS STARTED
OR THE MACHINE IS
RETURNED TO THE OFF
POSITION.
Press the "Start/Pause"
button to start the selected
cycle.
The programme carries out
with the programme
selector stationary on the
selected programme till
cycle ends.
Switch off the washing
machine by turning the
selector to OFF.
NOTE:
THE PROGRAMME
SELECTOR MUST BE
RETURN TO THE OFF
POSITION AT THE END
OF EACH CYCLE OR
WHEN STARTING A
SUBSEQUENT WASH
CYCLE PRIOR TO THE
NEXT PROGRAMME
BEING SELECTED AND
STARTED.
39
N
PT
PROGRAMA SELECTOR COM
A POSIÇÃO "OFF".
ROTAÇÃO EM AMBAS
AS DIRECÇÕES
COLOQUE A MÁQUINA
EM “ON”,
SELECCIONANDO ESSA
OPÇÃO ATRAVÉS DO
SELECTOR DE
PROGRAMAS.
ESSA OPÇÃO SERÁ
INDICADA PELO
INDICADOR LUMINOSO
“STOP” QUE IRÁ PISCAR,
E CONTINUARÁ A
PISCAR ATÉ A
MÁQUINA TER
COMEÇADO OU TER
RETOMADO A POSIÇÃO
“OFF”.
Pressione a tecla
“Start/Pause” para iniciar o
ciclo seleccionado.
O botão mantém-se intacto,
mesmo quando o programa
está a decorrer.
No fim do programa desligue
a máquina de lavar rodando
o selector para a posição
“OFF”.
NOTA:
O SELECTOR DE
PROGRAMAS DEVERÁ
SER DODADO ATÉ À
POSIÇÃO “OFF” NO FIM
DE CADA CICLO DE
LAVAGEM OU QUANDO
RECOMEÇAR UM OUTRO
CICLO, OU OUTRO
PROGRAMA.
DE
PROGRAMMWAHLSCHALTER MIT
OFF
KANN IN BEIDE
RICHTUNGEN GEDREHT
WERDEN EINIGE
SEKUNDEN, NACHDEM
SIE EIN
WASCHPROGRAMM
GEWÄHLT HABEN, FÄNGT
DIE STOP-ANZEIGE AN
ZU BLINKEN.
HINWEIS: UM DIE STOP-
ANZEIGE
AUSZUSCHALTEN,
DREHEN SIE DEN
PROGRAMMWAHLSCHA
LTER AUF DIE POSITION
AUS.
Drücken Sie die START-Taste,
um das Programm zu starten.
Während des Waschgangs
bleibt der
Programmwahlschalter bis
zum Ende des Programmes
auf dem gewählten
Programm stehen.
Am Ende des
Waschprogrammes schalten
Sie das Gerät ab durch
Drehen des Wahlschalters auf
die Position OFF
HINWEIS:
DREHEN SIE IMMER
NACH BEENDIGUNG DES
PROGRAMMS, UND
BEVOR SIE EIN NEUES
PROGRAMM EINSTELLEN,
DEN
PROGRAMMWAHLSCHA
LTER AUF DIE POSITION
AUS.
IT
MANOPOLA PROGRAMMI
CON OFF
PUO RUOTARLA NEI DUE
SENSI.
QUANDO SI SELEZIONA
UN PROGRAMMA, DOPO
ALCUNI SECONDI, LA
SEGNALAZIONE
LUMINOSA “STOP” INIZIA
A LAMPEGGIARE.
N.B. PER SPEGNERE LA
SEGNALAZIONE
LUMINOSA STOP
RUOTARE LA MANOPOLA
PROGRAMMI SULLA
POSIZIONE OFF.
Premere il tasto "Avvio/Pausa"
per iniziare il ciclo di lavaggio
Il ciclo di lavaggio avverrà
con la manopola programmi
ferma sul programma
selezionato sino alla fine del
lavaggio.
A fine ciclo spegnere la
lavabiancheria portando la
manopola programmi in
posizione "OFF".
NOTA:
LA MANOPOLA
PROGRAMMI DEVE
ESSERE SEMPRE PORTATA
IN POSIZIONE DI OFF
ALLA FINE DI UN
LAVAGGIO E PRIMA DI
SELEZIONARNE UNO
NUOVO.
NL
TIMER MET OFF
ROTATIES IN BEIDE
RICHTINGEN.
U ZET DE WASMACHINE
AAN DOOR MET DE
PROGRAMMAKNOP EEN
PROGRAMMA TE
SELECTEREN.
VERVOLGENS GAAT HET
STOP-INDICATIELAMPJE
KNIPPEREN, EN DIT
LAMPJE BLIJFT
KNIPPEREN TOT U DE
WASMACHINE START OF
TOT U DE
PROGRAMMAKNOP
WEER OP UIT (OFF) ZET.
Druk op de "Start/Pauze"-
knop om het geselecteerde
programma te starten.
Het programma draait met
de programmaknop
gepositioneerd op het
gekozen programma totdat
het programma eindigt.
Schakel de machine bij het
einde van het programma uit
door de knop in de “OFF”
positie te draaien.
LET OP:
ZET NA AFLOOP VAN EEN
WASCYCLUS DE
PROGRAMMAKNOP
ALTIJD EERST WEER OP
UIT (OFF) VOORDAT U
EEN VERVOLG-
PROGRAMMA OF EEN
NIEUW PROGRAMMA
INSTELT EN START.
La pagina si sta caricando...
La pagina si sta caricando...
La pagina si sta caricando...
La pagina si sta caricando...
La pagina si sta caricando...
La pagina si sta caricando...
La pagina si sta caricando...
La pagina si sta caricando...
La pagina si sta caricando...
La pagina si sta caricando...
La pagina si sta caricando...
La pagina si sta caricando...
La pagina si sta caricando...
La pagina si sta caricando...
La pagina si sta caricando...
La pagina si sta caricando...
La pagina si sta caricando...
La pagina si sta caricando...
La pagina si sta caricando...
La pagina si sta caricando...
La pagina si sta caricando...
-
 1
1
-
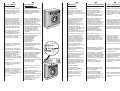 2
2
-
 3
3
-
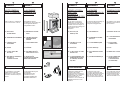 4
4
-
 5
5
-
 6
6
-
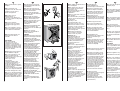 7
7
-
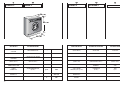 8
8
-
 9
9
-
 10
10
-
 11
11
-
 12
12
-
 13
13
-
 14
14
-
 15
15
-
 16
16
-
 17
17
-
 18
18
-
 19
19
-
 20
20
-
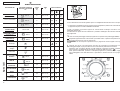 21
21
-
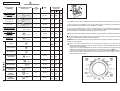 22
22
-
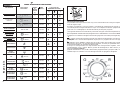 23
23
-
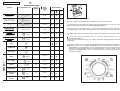 24
24
-
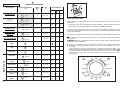 25
25
-
 26
26
-
 27
27
-
 28
28
-
 29
29
-
 30
30
-
 31
31
-
 32
32
-
 33
33
-
 34
34
-
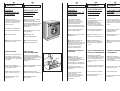 35
35
-
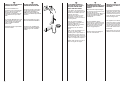 36
36
-
 37
37
-
 38
38
-
 39
39
-
 40
40
-
 41
41


Hoover HWB 280-30S Manuale utente
- Categoria
- Lavatrici
- Tipo
- Manuale utente
- Questo manuale è adatto anche per
Documenti correlati
-
Hoover HWB 814D-80S Manuale utente
-
-
-
-
-
-
-
-
Hoover HWB 814DN1 Manuale utente
-