Custom Inwall
CCM636
Owner’s Manual
and Warranty
La pagina si sta caricando...

Figure 10
La pagina si sta caricando...

English
Limited Warranty
Dear customer, welcome to B&W.
This product has been designed and
manufactured to the highest quality
standards. However, if something does go
wrong with this product, B&W
Loudspeakers and its national distributors
warrant free of charge labour (exclusion
may apply) and replacement parts in any
country served by an official B&W
distributor.
This limited warranty is valid for a period of
five years from the date of purchase or two
years for electronics including amplified
loudspeakers.
Terms and Conditions
1 The warranty is limited to the repair of
the equipment. Neither transportation,
nor any other costs, nor any risk for
removal, transportation and installation
of products is covered by this warranty.
2 This warranty is only valid for the
original owner. It is not transferable.
3 This warranty will not be applicable in
cases other than defects in materials
and/or workmanship at the time of
purchase and will not be applicable:
a. for damages caused by incorrect
installation, connection or packing,
b. for damages caused by any use other
than correct use described in the user
manual, negligence, modifications, or
use of parts that are not made or
authorised by B&W,
c. for damages caused by faulty or
unsuitable ancillary equipment,
d. for damages caused by accidents,
lightning, water, fire heat, war, public
disturbances or any other cause
beyond the reasonable control of B&W
and its appointed distributors,
e. for products whose serial number has
been altered, deleted, removed or
made illegible,
f. if repairs or modifications have been
executed by an unauthorised person.
4 This guarantee complements any
national/regional law obligations of
dealers or national distributors and
does not affect your statutory rights as
a customer.
How to claim repairs under
warranty
Should service be required, please follow
the following procedure:
1 If the equipment is being used in the
country of purchase, you should
contact the B&W authorised dealer
from whom the equipment was
purchased.
2 If the equipment is being used outside
the country of purchase, you should
contact B&W national distributor in the
country of residence who will advise
where the equipment can be serviced.
You can call B&W in the UK or visit our
web site to get the contact details of
your local distributor.
To validate your warranty, you will need to
produce this warranty booklet completed
and stamped by your dealer on the date of
purchase. Alternatively, you will need the
original sales invoice or other proof of
ownership and date of purchase.
Owner’s manual
Introduction
Thank you for purchasing Bowers and
Wilkins CCM speakers.
Since its foundation in 1966, the continuing
philosophy of B&W has been the quest for
perfect sound reproduction. Inspired by the
company’s founder, the late John Bowers,
this quest has entailed not only high
investment in audio technology and
innovation but also an abiding appreciation
of music and movies to ensure that the
technology is put to maximum effect.
These CCM speakers are intended for in-
ceiling applications. They feature
adjustment for tweeter angle and output
level so that their performance may be
tailored to a wide variety of practical
conditions.
However, no matter how good the speakers
themselves, they will not deliver their full
potential unless properly installed. Please
read through this manual fully. It will help you
optimise the performance of the system.
B&W distributes to over 60 countries
worldwide and maintains a network of
dedicated distributors who will be able to
help should you have any problems your
dealer cannot resolve.
Check the contents
This pack should contain:
2x Frame/baffle with drivers and crossover
2x Grille
2x Paint mask
2x Mounting template
Choosing the position
Check that there is no conflict with other
installations (pipe work, air conditioning,
power cabling etc.). In existing drywall
construction, use a stud-finding tool to
map the construction accurately and a pipe
detector to scan the proposed installation
position.
Ensure that there is enough clearance
behind the plasterboard (sheetrock) for the
clamps to swing out fully.
Avoid installing the speakers in the same
cavity as flimsy ducting, which may be
induced to rattle.
The speakers are designed to operate
satisfactorily in a wide range of cavity
volumes, ideally above 10 litres (0.4 cu ft),
so make sure the volume is not too
restricted.
The speakers are balanced for half-space
mounting (ie flush in a ceiling or soffit).
Placement near a wall/ceiling junction or in
a corner may give rise to too much bass
and a boomy quality to the sound. Try to
keep the speakers at least 0.5m (20in) from
wall/ceiling edges.
The following sections give guidance on
optimum positioning, but this may be
modified in line with domestic constraints.
WARNING: The speakers produce a static
magnetic field. They should not be placed
within 0.5m (20in) of equipment that may
be affected by such a field (eg Cathode
Ray Tubes in TVs and Personal
Computers).
Front speakers for audio or home
theatre
Best imaging for 2-channel is obtained
when the speakers are mounted in the
ceiling, making an angle between 40º and
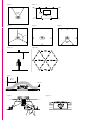
60º at the centre of the listening position.
(figure 1)
For multi-channel home theatre the left and
right speakers should be approximately
0.5m (20 in) to the left and right of the
screen and about 0.5m (20 in) from the
plane of the screen or from the front wall in
the case of an audio-only installation.
(figure 2)
Surround speakers
The speakers should be positioned in the
ceiling about 0.5m (20 in) away from the
wall.
5.1 channel
The horizontal angle to the centre of the
listening position should be approximately
120º round from the centre of the screen.
(figure 3)
6.1 channel
Position two speakers to the sides in line
with the centre of the listening area and
one centrally behind the listeners (figure 4)
7.1 channel
Position two speakers to the sides in line
with the centre of the listening area and
two behind the listeners, subtending an
angle of approximately 40º. (figure 5)
Distributed audio
To maintain clarity and speech intelligibility,
it's important that listeners are never too far
off axis of the nearest speaker. The speaker
spacing will depend on the height of the
ceiling and the level of sound required.
More speakers played at a lower level will
give better clarity. We recommend that the
distance between adjacent speakers is no
more then 3 times the distance between
average ear height and the ceiling. For any
given spacing, there will be fewer weak
spots with a triangular grid than a
rectangular one. (figure 6)
PREPARING THE LOCATION
Choosing cable
Excessive resistance in the speaker cable
wastes power and alters the frequency
response of the speaker. Always try to keep
2
La pagina si sta caricando...
La pagina si sta caricando...
La pagina si sta caricando...
La pagina si sta caricando...
La pagina si sta caricando...
La pagina si sta caricando...
La pagina si sta caricando...
La pagina si sta caricando...
La pagina si sta caricando...

I diffusori sono progettati per operare in
modo soddisfacente in una vasta gamma di
spazi, idealmente in volumi maggiore di
10 L, perciò assicuratevi che il volume non
sia troppo basso.
I diffusori sono bilanciati per un montaggio
a mezza altezza (es.: a livello sul soffitto).
Il posizionamento vicino ad una giunzione
parete/soffitto o in un angolo è da evitarsi
in quanto potrebbe dare origine a un
qualità sonora troppo bassa e
rimbombante. Se possibile mantenete i
diffusori a più di 0.5m dai bordi del
muro/soffitto.
La sezione seguente contiene indicazioni
per il posizionamento ottimale, che
comunque possono essere adeguate alle
caratteristiche del vostro ambiente.
ATTENZIONE: I diffusori producono un
campo magnetico statico. Perciò vi
raccomandiamo di posizionarli ad almeno
0.5m da qualsiasi apparecchio che
potrebbe esserne disturbato (ad es. il tubo
catodico di un TV o uno schermo di un
PC).
Diffusori frontali per applicazioni
audio o home theatre
Per sistemi 2-canali, i diffusori dovrebbero
essere installati a soffitto orientati tra 40° e
60° verso il centro della posizione di
ascolto. (figura 1)
Per sistemi home theatre, i diffusori destro
e sinistro dovrebbero essere a circa 0.5m
dal bordo dello schermo, ed a circa 0.5m
dal piano dello schermo, o dal muro
frontale in caso di applicazione solo audio
2 canali. (figura 2)
Diffusori surround
I diffusori dovrebbero essere posizionati a
soffitto a circa 0.5m dal muro.
5.1 canali
L’angolo di orientamento orizzontale verso il
centro della posizione di ascolto, dovrebbe
essere compreso tra circa 120° dal centro
dello schermo. (figura 3)
6.1 canali
Posizionate i due diffusori laterali in linea
con il centro della posizione di ascolto, ed
uno al centro dietro gli ascoltatori. (figura 4)
7.1 canali
Posizionate i due diffusori laterali in linea
con il centro della posizione di ascolto, e
due dietro gli ascoltatori, con una
angolazione di circa 40°. (figura 5)
Ottimizzazione della diffusione
del suono
Per garantire un ascolto ottimale è
importante che l’ascoltatore non sia mai
troppo lontano dall’asse del diffusore più
vicino. La spazialità del diffusore dipende
dall’altezza del soffitto e dal livello sonoro
richiesto. Più diffusori che suonano ad un
volume basso daranno maggiore chiarezza
al suono. La distanza tra i diffusori, non
dovrebbe mai essere superiore a più di
3 volte la distanza tra l’altezza media della
posizione dell’orecchio dell’ascoltatore ed il
soffitto. In una installazione realizzata
secondo queste indicazioni, ci saranno
meno “zone morte” nella riproduzione del
suono. (figura 6)
PREPARAZIONE
DELL’INSTALLAZIONE
Scelta dei cavi
Un cavo di collegamento dei diffusori con
una resistenza eccessiva potrebbe causare
una dispersione di potenza ed alterare la
risposta in frequenza dei diffusori. Cercate
sempre di mantenere la resistenza più
bassa possibile, con una resistenza di loop
entro 0.5ohms in nomali sistemi, e per
ottenere i migliori risultati, entro 0.2ohms.
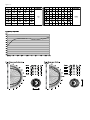
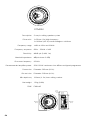
Utilizzate la tabella della figura 10 per
calcolare il tipo di cavo necessario.
Pareti in cartongesso esistenti
Segnate sul muro il punto centrale
corrispondente alla posizione desiderata del
diffusore; posizionate la dima centrando il
punto sul muro attraverso il foro al
centrodella dima.
Tracciate una linea seguendo i contorni
esterni della dima e praticate una apertura
all’interno della linea disegnata.
Per migliorare la tenuta meccanica e per
diminuire la possibilità di vibrazioni, vi
consigliamo di applicare della colla tra il
telaio del diffusore ed il telaio del muro.
Fate passare i cavi di connessione
attraverso l’apertura, considerando di
lasciarli ad una lunghezza tale da potere
collegare i diffusori, ma non troppo lunghi
da potere vibrare o interferire con la
struttura.
Pareti in cartongesso nuove
Il diffusore può essere installato dopo che il
soffitto è stato completato, come indicato
sopra, ma è più facile praticare l’apertura
nel pannello utilizzando il kit di pre-
montaggio opzionale prima di installare il
pannello.
Fissate il PMK al telaio del muro come
descritto nelle istruzioni nel kit. Posizionate
i cavi ed assicurateli al PMK, lasciandoli
abbastanza lunghi da potere collegare i
diffusori, ma non troppo lunghi da potere
vibrare o interferire con la struttura.
La resa del diffusore deriva da quanto bene
sia stato fissato al telaio del muro: vi
raccomandiamo inoltre di rinforzare con
colla o chiodi il fissaggio dei pannelli vicino
al diffusore.
Una volta posizionato il PMK, la flangia
interna dello stesso può essere utilizzato
come guida per il seghetto.
Riempimento dell’intercapedine
Inserite l’isolante dietro al diffusore e
riempite la zona circostante il diffusore fino
ad almeno 30cm. (figura 7)
IMPORTANTE: Assicuratevi di utilizzare
materiali conformi alle norme antincendio e
di sicurezza in vigore nel vostro paese.
Fissaggio del diffusore
Tutti i collegamenti dovrebbero essere
effettuati con gli apparecchi spenti.
Collegate i cavi osservando le polarità.
Posizionate il pannello nella cavità, senza le
griglie, ed avvitate le 4 viti visibili sulla parte
anteriore; i ganci che bloccano il telaio sulla
superficie di montaggio si posizionano
automaticamente. Assicuratevi comunque
che siano nella corretta posizione prima di
serrare le viti. Una certo gioco è tollerato
per recuperare eventuali difformità della
superficie su cui è montato, ma se le viti
vengono serrate troppo forte potrebbe
piegarsi il telaio e la griglia potrebbe non
aderirvi perfettamente.
Regolazione del diffusore
È possibile regolare l’angolazione del
tweeter; questo, assieme alla possibilità di
ruotare l’intero diffusore, vi permette di
ottimizzare la dispersione sonora in
relazione all’area di ascolto. (figura 8)
Orientate il tweeter verso l’area di ascolto
per ottimizzare la definizione alle alte
frequenze e l’immagine sonora, se il
diffusore è installato non in asse.
Al contrario, in applicazioni surround,
potrebbe essere preferibile orientare il
tweeter non direttamente verso l’area di
ascolto per creare un campo sonoro più
diffuso.
Il commutatore sulla parte frontale del
diffusore permette di aumentare o diminuire
il livello di uscita delle alte frequenze, per
migliorare la percezione del suono se la
posizione degli ascoltatori è disassata
rispetto al diffusore (aumentando); o se la
stanza è molto grande ed il suono riflesso
disturba l’ascolto (diminuendo). (figura 9)
Personalizzazione
Il telaio e la griglia hanno una finitura semi
opaca bianca verniciabile, pronta per
essere verniciata, se necessario. Inserite la
maschera verniciabile prima della finitura.
Non dipingete gli altoparlanti o la zona del
pannello dietro la griglia. Utilizzate la
maschera di verniciatura fornita in
dotazione. Evitate di toccare gli altoparlanti
perché potreste danneggiarli.
Prima di verniciare la griglia, rimuovete il
tessuto dalla parte posteriore, altrimenti i
pori saranno occlusi ed il suono ne verrà
penalizzato. Se il tessuto, quando andrete
a riposizionarlo, non rimane attaccato sulla
parte posteriore della griglia, spruzzate su
quest’ultima (NON sul tessuto) un sottile
strato di colla spray del tipo 3M
SprayMount o simile.
12

Nederlands
Beperkte garantie
Geachte cliënt,
Welkom bij B&W.
Dit product is volgens de hoogste
kwaliteitsnormen ontworpen en
vervaardigd. Mocht er toch iets defect zijn
aan dit product dan kunt u aanspraak
maken op gratis vervanging van onderdelen
via de nationale distributeur van B&W
Loudspeakers (er zijn uitzonderingen) in elk
land waar een officiële B&W distributeur
gevestigd is.
Deze beperkte garantie is geldig voor een
periode van vijf jaar vanaf de
aankoopdatum en twee jaar voor de
elektronica, waaronder actieve luidsprekers.
Voorwaarden
1 De garantie is beperkt tot de reparatie
van de apparatuur. Transport- en
andere kosten, eventueel risico voor
het verwijderen, vervoeren en
installeren van producten vallen niet
onder deze garantie.
2 De garantie geldt alleen voor de eerste
eigenaar en is niet overdraagbaar.
3 Deze garantie is niet van toepassing in
andere gevallen dan defecten van
materialen en/of fabricage ten tijde van
aankoop en is niet van toepassing:
a. voor schade die veroorzaakt is door
onjuiste installatie, aansluiting of
verpakking;
b. voor schade die veroorzaakt is door
onjuist gebruik, anders dan beschreven
in de handleiding, nalatigheid,
modificatie, of gebruik van onderdelen
die niet door B&W goedgekeurd of
gemaakt zijn;
c. voor schade veroorzaakt door defecte
of ongeschikte aanvullende apparatuur;
d. voor schade veroorzaakt door ongeval,
onweer, water, brand, hitte, oorlog,
openbaar geweld of een andere
oorzaak buiten controle van B&W en
haar distributeurs;
e. voor producten waarvan het
serienummer gewijzigd, verwijderd,
gewist of onleesbaar gemaakt is;
f. indien reparaties of modificaties
uitgevoerd zijn door een onbevoegd
persoon.
4. Deze garantie vult eventuele nationale /
regionale wettelijke verplichtingen voor
dealers of nationale distributeurs aan
en heeft geen invloed op uw wettelijke
rechten als consument.
Garantieclaims
Wanneer u aanspraak wilt maken op
garantie handel dan als volgt:
1 Indien de apparatuur gebruikt wordt in
het land van aankoop, neem dan
contact op met de erkende B&W
dealer waar de apparatuur gekocht is.
2 Indien de apparatuur niet het land van
aankoop wordt gebruikt, neem dan
contact op met de nationale
distributeur van B&W in het land waar
u verblijft. Deze zal u informeren hoe te
handelen.
U kunt contact opnemen met B&W in
Groot-Brittannië of onze website bezoeken
voor het adres van uw plaatselijke
distributeur. Om aanspraak te maken op
garantie, dient u uw koopbon te
overleggen.
Handleiding
Inleiding
Dank u voor de aanschaf van de Bowers &
Wilkins CCM luidsprekers.
Sinds de oprichting in 1966 heeft B&W als
uitgangspunt het streven naar perfecte
geluidsweergave. Geïnspireerd door de
oprichter van het bedrijf, wijlen John
Bowers, heeft dit streven niet alleen grote
investeringen in audio technologie en
innovatie gebracht, maar vooral ook de
blijvende waardering van muziek en film
zorgen ervoor dat de technologie optimaal
tot zijn recht komt.
Deze CCM luidsprekers zijn bedoeld voor
inbouw in het plafond. De hoek waaronder
de tweeter staat en het niveau kunnen
ingesteld worden zodat de weergave kan
worden aangepast aan de meest
uiteenlopende omstandigheden.
Hoe goed de luidsprekers zelf ook zijn, zij
komen alleen volledig tot hun recht
wanneer ze optimaal geïnstalleerd zijn. Lees
daarom eerst deze handleiding in zijn
geheel door. Het zal u helpen de maximale
prestaties uit uw systeem te halen.
B&W wordt verkocht in meer dan 60 landen
over de gehele wereld en heeft een netwerk
van speciale distributeurs die u bij kunnen
staan in het geval u een probleem heeft dat
uw handelaar niet kan oplossen.
Controleer de inhoud
De doos dient te bevatten:
2 Frames/baffles met de
luidsprekereenheden en het wisselfilter
2 Grilles
2 Verfmallen
2 Montagemallen
Kiezen van de juiste positie
Controleer eerst of er geen problemen
kunnen ontstaan met andere installaties
(waterleiding, airco, lichtnet enz.). In
bestaande constructies zoekt u met
speciaal gereedschap steunbalken en
leidingen op om de optimale
montagepositie te bepalen.
Controleer of er voldoende ruimte achter
het plaatwerk (gips b.v.) is om de
bevestigingsklampen geheel te openen.
Vermijd montage van de luidsprekers in
dezelfde open ruimte als lichte buizen en
dergelijke, daar deze kunnen gaan
rammelen.
De luidsprekers zijn ontwikkeld voor goede
prestaties in een holle ruimte van liefst meer
dan 10 liter; let er dus op dat de ruimte niet
te klein is.
De luidsprekers zijn afgestemd op montage
gelijk met de wand of het plafond,
verzonken dus. Kiest u daarvoor een plaats
in de nabijheid van een hoek van wanden
of wand/plafond, dan kan het resultaat
teveel laag bevatten en zelfs boemerig
klinken. Probeer de luidsprekers minimaal
0,5 m uit de hoek en van vloer of plafond te
houden.
De volgende paragrafen geven informatie
over de optimale opstelling, die uiteraard
door de omstandigheden kan worden
beïnvloed.
WAARSCHUWING: deze luidsprekers
bezitten een statisch magnetisch veld en
dienen daarom minimaal 0,5 m verwijderd
te blijven van magnetisch gevoelige
apparatuur zoals beeldbuizen in TV’s en
computers.
Front luidsprekers voor audio of
home theater
Het beste ruimtebeeld voor tweekanaals
audio krijgt u wanneer de luidsprekers in
het plafond zijn gemonteerd met de
tweeters onder een hoek van 40° tot 60°
op het centrum van het luistergebied
gericht (afbeelding 1).
Voor meerkanaals home theater dienen de
linker en rechter luidsprekers ongeveer
0,5 m van de zijkant van het beeldscherm
te blijven en ca. 0,5 m van het scherm of
de voorste wand in het geval van een
systeem voor alleen audio (afbeelding 2).
Surround luidsprekers
Monteer de luidsprekers in het plafond ca.
0,5 m uit de wand.
5.1 Kanalen
In het horizontale vlak dient een hoek van
ongeveer 120° vanuit het centrum van het
beeldscherm naar het luistergebied
aangehouden te worden (afbeelding 3).
6.1 Kanalen
Plaats twee luidsprekers aan de zijkant in
lijn met het centrum van het luistergebied
en één in het midden achter de luisteraars
(afbeelding 4).
7.1 Kanalen
Plaats twee luidsprekers aan de zijkant in
lijn met het centrum van het luistergebied
en twee achter de luisteraars, onder een
onderlinge hoek van ca. 40° (afbeelding 5).
Geluidsspreiding
Om een heldere en verstaanbare weergave
te krijgen is het belangrijk dat de luisteraars
nooit te ver van een luidspreker af zijn. De
onderlinge afstand van de luidsprekers
wordt bepaald door de hoogte van het
plafond en het gewenste geluidsniveau.
Meer luidsprekers op een lager niveau
geven meer helderheid. Wij bevelen aan de
onderlinge afstand tussen de luidsprekers
niet groter te maken dan driemaal de
afstand tussen de gemiddelde oorhoogte
en het plafond. Bij elke onderlinge afstand
zijn er minder dode plekken wanneer de
luidsprekers in een driehoekige opstelling
13
La pagina si sta caricando...
La pagina si sta caricando...
La pagina si sta caricando...
La pagina si sta caricando...
La pagina si sta caricando...
La pagina si sta caricando...
La pagina si sta caricando...
La pagina si sta caricando...
La pagina si sta caricando...
La pagina si sta caricando...
La pagina si sta caricando...
La pagina si sta caricando...
La pagina si sta caricando...
La pagina si sta caricando...
La pagina si sta caricando...

Copyright © B&W Group Ltd. E & OE
Printed in China.
II09936 Issue 1
B&W Group (UK Sales)
T +44 1903 221 500
B&W Group North America
T +1 978 664 2870
B&W Group (Asia) Ltd
T +852 2 869 9916
B&W Group Ltd
Dale Road
Worthing West Sussex
BN11 2BH England
T +44 (0) 1903 221800
F +44 (0) 1903 221801
www.bwgroup.com
-
 1
1
-
 2
2
-
 3
3
-
 4
4
-
 5
5
-
 6
6
-
 7
7
-
 8
8
-
 9
9
-
 10
10
-
 11
11
-
 12
12
-
 13
13
-
 14
14
-
 15
15
-
 16
16
-
 17
17
-
 18
18
-
 19
19
-
 20
20
-
 21
21
-
 22
22
-
 23
23
-
 24
24
-
 25
25
-
 26
26
-
 27
27
-
 28
28
-
 29
29
-
 30
30
-
 31
31
-
 32
32


B&W CCM 636 Manuale del proprietario
- Tipo
- Manuale del proprietario
- Questo manuale è adatto anche per
in altre lingue
- English: B&W CCM 636 Owner's manual
- français: B&W CCM 636 Le manuel du propriétaire
- español: B&W CCM 636 El manual del propietario
- Deutsch: B&W CCM 636 Bedienungsanleitung
- русский: B&W CCM 636 Инструкция по применению
- Nederlands: B&W CCM 636 de handleiding
- português: B&W CCM 636 Manual do proprietário
- čeština: B&W CCM 636 Návod k obsluze
- polski: B&W CCM 636 Instrukcja obsługi
Documenti correlati
-
 Bowers & Wilkins CCM817 Manuale utente
-
 Bowers & Wilkins CCM-646S Manuale del proprietario
-
 Bowers & Wilkins CCM746S Manuale utente
-
B&W CWM-LCR8 Manuale utente
-
 Bowers & Wilkins CWM DS8 Manuale utente
-
Bowers & Wilkins LCR 60 Manuale del proprietario
-
 Bowers & Wilkins LCR3 Manuale utente
-
 Bowers & Wilkins CWM CINEMA 6 Manuale del proprietario
-
 Bowers & Wilkins CCM20 Manuale utente
-
 Bowers & Wilkins Signature 7SE Manuale utente