
getting started guide
• Windows: Install the printer software first.
Only connect the USB or parallel cable when
prompted.
• Mac OS: Connect the printer before installing
the printer software.
Leitfaden zur Inbetriebnahme
• Windows: Installieren sie zuerst die
Druckersoftware. Schließen Sie das
USB-Kabel bzw. Parallelkabel erst an, wenn
die entsprechende Anweisung angezeigt wird.
• Mac OS: Schließen Sie vor der Installation
der Druckersoftware den Drucker an.
guide de mise en marche
• Windows : Commencez par installer le logiciel
de l’imprimante. Ne branchez le câble USB ou
parallèle que lorsque vous y serez convié(e).
• Mac OS : Branchez l’imprimante avant
d’installer le logiciel de l’imprimante.
beknopte handleiding
• Windows: Installeer eerst de printersoftware.
Sluit de USB-kabel of parallelle kabel alleen
aan wanneer u dit gevraagd wordt.
• Mac OS: Sluit de printer aan voordat u de
printersoftware installeert.
guida introduttiva
• Windows: Installare prima il software della
stampante. Collegare il cavo USB o parallelo
solo quando richiesto.
• Mac OS: Collegare la stampante prima di
installare il software della stampante.
guía de instalación inicial
• Windows: Instale el software de la impresora
primero. Sólo conecte el cable USB o paralelo
cuando se le solicite.
• Mac OS: Conecte la impresora antes de
instalar el software de la impresora.
Crystal_UGFDISA.book Page 1 Monday, July 7, 2003 3:04 PM
π𫫨¨°°ûûààddGG AAóóHH ππ««ddOO
●
π𫫨¨°°ûûJJ ΩΩÉɶ¶ff ≈≈∏∏YY
Windowsâ«ÑãàH ºb :
πHÉc π°U .k’hCG á©HÉ£dG èeÉfôH USBhCG
.∂dP Ö∏£àj ÉeóæY §≤a …RGƒàªdG
●
π𫫨¨°°ûûJJ ΩΩÉɶ¶ff ≈≈∏∏YY
OSMACπÑb á©HÉ£dG π°Uh :
.á©HÉ£dG èeGôH â«ÑãJ

1
Copyright Information
© 2003 Copyright Hewlett-Packard Development
Company, L.P.
Reproduction, adaptation or translation without prior written
permission is prohibited, except as allowed under the
copyright laws.
The information contained herein is subject to change
without notice.
The only warranties for HP products and services are set
forth in the express warranty statements accompanying
such products and services. Nothing herein should be
construed as constituting an additional warranty. HP shall
not be liable for technical or editorial errors or omissions
contained herein.
1, 9/2003
Trademark Credits
HP ZoomSmart Scaling Technology is a trademark of
Hewlett-Packard Company.
Microsoft, MS-DOS, MS Windows, Windows, Windows NT,
Windows CE, and Microsoft Pocket PC Software are either
registered trademarks or trademarks of Microsoft
Corporation in the United States and/or other countries/
regions.
Pentium is a U.S. registered trademark of Intel Corporation.
Mac, Macintosh, Mac OS, PowerBook, and Power
Macintosh are trademarks of Apple Computer, Inc.,
registered in the U.S. and other countries/regions.
TrueType is a U.S. trademark of Apple Computer, Inc.
Bluetooth and the Bluetooth logos are trademarks
owned by Bluetooth SIG, Inc., U.S.A. and licensed to
Hewlett-Packard.
Informations relatives aux droits d’auteur
© 2003 Copyright Hewlett-Packard Development
Company, L.P.
Il est interdit de reproduire, adapter ou traduire ce manuel
sans autorisation expresse par écrit, sauf dans les cas
permis par les lois régissant les droits d’auteur.
Les informations contenues dans ce document sont
sujettes à modification sans préavis.
Les seules garanties concernant les produits et services
HP sont énoncées dans la garantie qui accompagne ces
produits et services. Rien en ceci ne devra être interprété
comme constituant une garantie supplémentaire. HP ne
pourra être tenue pour responsable des erreurs techniques
et rédactionnelles ou des omissions présentes dans ce
document.
1, 9/2003
Marques
HP ZoomSmart Scaling Technology est une marque de
Hewlett-Packard Company.
Les logiciels Microsoft, MS-DOS, MS Windows, Windows,
Windows NT, Windows CE et Microsoft Pocket PC sont des
marques déposées ou commerciales de Microsoft
Corporation aux Etats-Unis et/ou dans d’autres pays ou
régions.
Pentium est une marque déposée d’Intel Corporation aux
Etats-Unis.
Mac, Macintosh, Mac OS, PowerBook et Power Macintosh
sont des marques déposées d’Apple Computer, Inc. aux
Etats-Unis et dans d’autres pays ou régions. TrueType
est une marque commerciale d’Apple Computer, Inc aux
Etats-Unis.
Bluetooth et les logos de Bluetooth sont des marques
commerciales appartenant à Bluetooth SIG, Inc., U.S.A. et
octroyées sous licence à Hewlett-Packard.
Crystal_UGFDISA.book Page 1 Monday, July 7, 2003 3:04 PM

2
Safety Information
Always follow basic safety precautions when using this
product to reduce risk of injury from fire or electric shock.
1 Read and understand all instructions in the
documentation that comes with the printer.
2 Observe all warnings and instructions marked on the
product.
3 Unplug this product from wall outlets before cleaning.
4 Do not install or use this product near water, or when
you are wet.
5 Install the product securely on a stable surface.
6 Install the product in a protected location where no one
can step on or trip over the line cord, and the line cord
cannot be damaged.
7 If the product does not operate normally, see
Troubleshooting in the onscreen user's guide on the
Starter CD.
8 There are no user-serviceable parts inside. Refer
servicing to qualified service personnel.
Sicherheitsinformationen
Verwenden Sie dieses Produkt zur Vermeidung von
Verletzungen (Feuer und Stromschlag) ausschließlich
unter Einhaltung der allgemeinen Sicherheitsvorschriften.
1 Lesen Sie alle Anweisungen in der mit dem Drucker
gelieferten Dokumentation, und stellen Sie sicher,
daß Sie alles verstehen.
2 Beachten Sie alle am Produkt angebrachten
Warnungen und Anweisungen.
3 Ziehen Sie das Netzkabel aus der Steckdose,
bevor Sie das Produkt reinigen.
4 Installieren bzw. verwenden Sie das Produkt nicht in
der Nähe von Wasser. Verwenden Sie das Produkt
nicht, wenn Sie naß sind.
5 Installieren Sie das Produkt auf einer stabilen
Oberfläche.
6 Installieren Sie das Produkt an einem geschützten Ort,
an dem die Kabel weder betreten noch beschädigt
werden können.
7 Wenn das Produkt nicht normal funktioniert,
schlagen Sie unter „Fehlersuche“ nach.
8 Im Innern des Druckers gibt es keine kundenseitig
wartbaren Teile. Vergeben Sie Servicearbeiten
ausschließlich an qualifiziertes Personal.
Consignes de sécurité
Pour éviter les risques de blessures dûs aux flammes et
aux chocs électriques, toujours respecter les précautions
de sécuritées en utilisant cet appareil.
1 Lisez et comprenez toutes les instructions du
documentation fournie avec l’imprimante.
2 Respectez tous les avertissements et étiquettes de
mise en garde sur l’imprimante.
3 Débranchez cette imprimante de la prise murale avant
de la nettoyer.
4 N’installez et n’utilisez pas cet appareil à proximité de
l’eau, ou si vous êtes mouillé.
5 Placez l’imprimante bien à plat sur une surface stable.
6 Installez le produit dans un endroit protégé, où
personne ne peut marcher ni trébucher sur le cordon
secteur afin de ne pas endommager le cordon.
7 Si la produit ne fonctionne pas normalement, lisez la
section Dépannage.
8 L’imprimante ne contient pas de pièces réparables par
l’utilisateur. Confiez l’entretien et les réparations de
l’imprimante à des techniciens qualifiés.
Veiligheidsinformatie
Neem bij gebruik van dit product altijd elementaire
veiligheidsvoorzorgen in acht om het risico van letsel ten
gevolge van brand of elektrische schok te verkleinen.
1 Zorg dat u alle instructies in dedocumentatie die bij
de printer geleverd wordt, heeft gelezenen begrepen.
2 Neem alle op dit product vermelde waarschuwingen
en instructies in acht.
3 Haal het netsnoer uit het stopcontact voordat u dit
product reinigt.
4 Plaats of gebruik dit product niet in de buurt van water
of wanneer u nat bent.
5 Zorg dat het product stevig op een stabiel oppervlak
staat.
6 Zet het product op een veilige plaats waar niemand op
het netsnoer kan trappen of erover kan struikelen en
het netsnoer niet wordt beschadigd.
7 Als het product niet naar behoren functioneert, zie dan
Problemen oplossen.
8 De printer bevat geen onderdelen die door de gebruiker
kunnen worden gerepareerd. Onderhoud en reparaties
moeten worden verricht door gekwalificeerde
onderhoudstechnici.
Crystal_UGFDISA.book Page 2 Monday, July 7, 2003 3:04 PM

3
Informazioni sulla sicurezza
Per utilizzare questo prodotto, attenersi sempre alle
precauzioni di base sulla sicurezza onde evitare il rischio
di lesioni da incendio o folgorazione.
1 Leggere e comprendere bene tutte le istruzioni
contenute nella documentazione in dotazione con la
stampante.
2 Osservare tutti i messaggi di avvertenza e le istruzioni
riportate sul prodotto.
3 Scollegare il prodotto dalla presa di rete prima di
pulirlo.
4 Non installare o usare questo prodotto in prossimità di
acqua o se è bagnato.
5 Installare il prodotto in modo sicuro e su una superficie
stabile.
6 Installare il prodotto in un punto protetto in cui non si
corra il rischio di inciampare nel cavo di alimentazione,
e in cui il cavo non possa venire essere danneggiato.
7 In caso di problemi di funzionamento, consultare la
sezione Risoluzione dei problemi.
8 All’interno della stampante non vi sono parti riparabili
dall’utente. Rivolgersi pertanto a personale di
assistenza qualificato.
Información de seguridad
Siga siempre las precauciones básicas de seguridad al
utilizar este producto a fin de reducir el riesgo de lesiones
por incendio o descargas eléctricas.
1 Lea y entienda las instrucciones contenidas en la
documentación que viene con la impresora.
2 Tenga en cuenta todas las advertencias e
instrucciones indicadas en el producto.
3 Desenchufe este producto de las tomas de corriente de
pared antes de limpiarlo.
4 No instale ni utilice este producto cerca del agua o
cuando usted esté mojado.
5 Instale el producto de manera segura, sobre una
superficie estable.
6 Instale el producto en un lugar protegido donde nadie
pueda pisar o tropezarse con el cable de alimentación
eléctrica y donde dicho cable no sufra daños.
7 Si el producto no funciona normalmente, consulte la
sección Solución de problemas.
8 No hay piezas reparables por el usuario dentro de la
impresora. Remita las tareas de servicio a personal de
servicio calificado.
Crystal_UGFDISA.book Page 3 Monday, July 7, 2003 3:04 PM

4
English
FrançaisDeutsch
HP Deskjet 450 series printer.
This printer provides quick, professional mobile printing.
You can print from notebooks; desktops; wireless
devices such as personal digital assistants (PDAs)
running Microsoft
®
Pocket PC software,Windows
®
CE,
and Palm OS
®
; digital cameras via CompactFlash™
card; and mobile phones with Bluetooth and infrared
connectivity.
For information about using PDAs and Bluetooth, see the
Personal Digital Assistant Guide and the Bluetooth
Printing Guide on the Starter CD.
Drucker HP Deskjet 450.
Dieser Drucker ermöglicht schnelles und professionelles
mobiles Drucken. Drucken ist möglich von Notebooks,
Desktop PCs, schnurlosen Geräten wie PDAs mit
Microsoft
®
Pocket PC Software, Windows
®
CE, und
Palm OS
®
, Digitalkameras über CompactFlash™-Karte
sowie von Mobiltelefonen mit Bluetooth und
Infrarotschnittstelle.
Näheres über den Einsatz von PDAs und Bluetooth
finden Sie in folgenden Handbüchern auf der Starter-CD:
Anleitung für Personal Digital Assistant und Anleitung für
das Drucken mit Bluetooth.
Imprimante HP Deskjet série 450.
Cette imprimante offre une impression mobile rapide
et professionnelle. Elle permet d’imprimer à partir
d’ordinateurs portables, d’ordinateurs de bureau, de
dispositifs sans fil tels que les assistants personnels
munis des systèmes Microsoft
®
Pocket PC,
Windows
®
CE et Palm OS
®
, d’appareils photo
numériques par le biais d’une carte CompactFlash™ et
de téléphones mobiles dotés du système Bluetooth et
d’une connectivité infrarouge.
Pour obtenir de plus amples informations sur l’utilisation
des assistants personnels et sur le système Bluetooth,
reportez-vous au guide d’assistant personnel et au guide
d’impression Bluetooth sur le CD d’installation.
Crystal_UGFDISA.book Page 4 Monday, July 7, 2003 3:04 PM

5
English
Français Deutsch
1
2
5
6
7
8
9
1
4
3
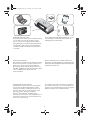
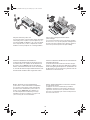
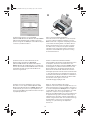
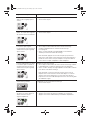
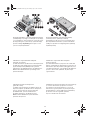
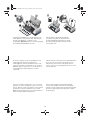
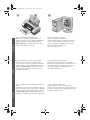
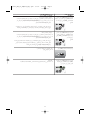
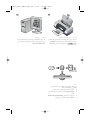
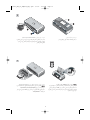
Step 1: Check the package contents.
1) HP Deskjet 450 series printer, 2) power adaptor,
3) power cord, 4) black and color print cartridges,
5) parallel cable, 6) printed documentation (setup poster,
getting started guide, HP customer support guide),
7) Starter CD (software and electronic documentation),
8) battery (HP Deskjet 450CBi/450wbt), 9) HP Bluetooth
printer card (HP Deskjet 450wbt).
Schritt 1: Überprüfen des Verpackungsinhalts.
1) Drucker HP Deskjet 450, 2) Netzteil, 3) Netzkabel,
4) Schwarz- und Farbdruckpatronen, 5) Parallelkabel,
6) gedruckte Dokumentation (Installationsposter,
Anleitung “Die ersten Schritte”, Handbuch
HP Kundenunterstützung),
7) Starter-CD (Software und elektronische
Dokumentation), 8) Akku (HP Deskjet 450CBi/450wbt),
9) HP Bluetooth Druckerkarte (HP Deskjet 450wbt).
Etape 1 : Vérifier le contenu du carton.
1) Imprimante HP Deskjet série 450, 2) Bloc
d’alimentation, 3) Cordon d’alimentation, 4) Cartouches
d’encre noire et couleur, 5) Câble parallèle,
6) Documentation imprimée (carte de configuration,
guide de démarrage, guide d’assistance clientèle HP),
7) CD d’installation (logiciels et documentation
électronique), 8) Batterie (HP Deskjet 450CBi/450wbt),
9) Carte d’imprimante HP Bluetooth
(HP Deskjet 450wbt).
Crystal_UGFDISA.book Page 5 Monday, July 7, 2003 3:04 PM

6
2
1
2
3
6
7
8
9
10
4
5
3
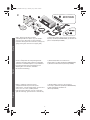
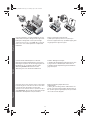
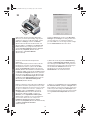
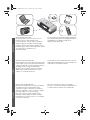
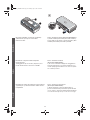
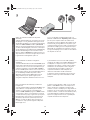
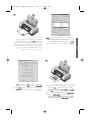
Step 2: Remove the packing tape.
Remove all packing tape from the printer.
Step 3: Identify printer parts (front).
1) Input tray extension, 2) input tray, 3) paper guide,
4) card slot, 5) alignment guide, 6) print cartridge latch,
7) print cartridge socket, 8) output slot, 9) front access
cover, 10) infrared port.
Schritt 2: Entfernen von Klebeband.
Entfernen Sie sämtliches Klebeband vom Drucker.
Schritt 3: Druckerteile (Vorderseite).
1) Zufuhrfachverlängerung, 2) Zufuhrfach,
3) Papierführung, 4) Karteneinzug, 5) Ausrichtungsstange,
6) Verriegelung für Druckpatrone,
7) Druckpatronenhalterung, 8) Ausgabefach,
9) Vordere Abdeckung, 10) Infrarotanschluss.
Etape 2 : Retirer le ruban d’emballage.
Retirez tous les rubans d’emballage de l’imprimante.
Etape 3 : Identifier les parties de l’imprimante
(face avant).
1) Rallonge du bac d’alimentation, 2) Bac d’alimentation,
3) Guide-papier, 4) Fente à carte, 5) Guide d’alignement,
6) Loquet de cartouche d’encre, 7) Logement de cartouche
d’encre, 8) Fente de sortie, 9) Capot avant, 10) Port
infrarouge.
Crystal_UGFDISA.book Page 6 Monday, July 7, 2003 3:04 PM

7
English
Français Deutsch
5
7
5
8
5
6
9
4
5
6 7 8
1 2 3
1
2 3
4
5
6
7
8
9
10
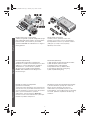
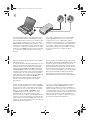
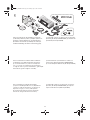
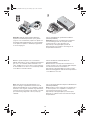
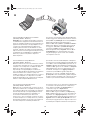
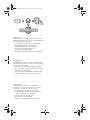
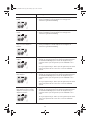
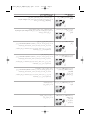
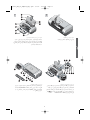
Identify printer parts (control panel).
1) Battery charge LED, 2) left print cartridge LED, 3) right
print cartridge LED, 4) Cancel button, 5) Resume button,
6) Resume LED, 7) Power button, 8) Power LED,
9) Infrared LED. Note: See LED Reference to diagnose
printing problems.
Identify printer parts (back).
1) Battery contacts, 2) battery contact cover,
3) battery slot, 4) power connector, 5) parallel port,
6) CompactFlash™ card slot, 7) universal serial bus
(USB) port, 8) security lock slot, 9) battery,
10) battery release slider.
Druckerteile (Bedienfeld).
1) LED für Akku-Ladezustand, 2) LED für linke
Druckpatrone, 3) LED für rechte Druckpatrone, 4) Taste
“Abbrechen”, 5) Taste “Weiterdrucken”, 6) LED für
“Weiterdrucken”, 7) Taste “Ein/Aus”, 8) LED für
Stromversorgung, 9) LED für Infrarot-Empfang.
Hinweis: Siehe LED-Referenz zur Diagnose von
Druckerstörungen.
Druckerteile (Rückseite).
1) Akku-Kontakte, 2) Abdeckung für Akku-Kontakte,
3) Akku-Steckplatz, 4) Netzanschluss,
5) Parallelanschluss, 6) Steckplatz für
CompactFlash™-Karte, 7) USB-Anschluss,
8) Vorrichtung für Sicherheits-Verriegelung,
9) Akku, 10) Akku-Entriegelung.
Identifier les parties de l’imprimante
(panneau de commande).
1) Témoin de charge de la batterie, 2) Voyant gauche de
cartouche d’encre, 3) Voyant droit de cartouche d’encre,
4)
Touche d’annulation, 5) Touche de reprise, 6) Voyant de
reprise, 7)
Bouton d’alimentation, 8) Témoin
d’alimentation, 9) Voyant infrarouge. Remarque :
reportez-vous à la section Référence des voyants pour
identifier les problèmes d’impression.
Identifier les parties de l’imprimante (face arrière).
1) Contacts de batterie, 2) Capot des contacts de
batterie, 3) Fente de batterie, 4) Connecteur
d’alimentation, 5) Port parallèle, 6) Fente à carte
CompactFlash™, 7) Port USB, 8) Fente de verrouillage
de sécurité, 9) Batterie, 10) Glissière de déblocage
de batterie.
Crystal_UGFDISA.book Page 7 Monday, July 7, 2003 3:04 PM

8
1
2
1
2
4
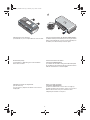
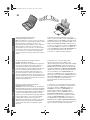
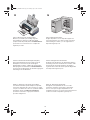
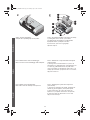
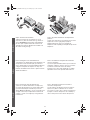
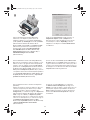
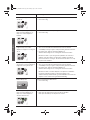
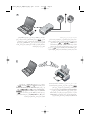
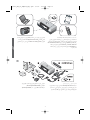
Identify printer parts (bottom).
1) Card holder, 2) cover of replaceable ink service module.
Step 4: Install the battery (HP Deskjet 450CBi/450wbt).
1) Slide the battery into the battery slot at an angle until the
battery is flushed with the contacts. 2) Push the battery into
the battery slot until the battery clicks into place.
Druckerteile (unten).
1) Kartenhalter, 2) Abdeckung des auswechselbaren
Tinten-Servicemoduls.
Schritt 4: Einsetzen des Akkus
(HP Deskjet 450CBi/450wbt).
1) Schieben Sie den Akku schräg in den Akku-Steckplatz,
bis der Akku an den Kontakten anliegt. 2) Drücken Sie den
Akku bis zum Einrasten in den Steckplatz.
Identifier les parties de l’imprimante
(vue de dessous).
1) Porte-cartes, 2) Capot du module de service d’encre
remplaçable.
Etape 4 : Installer la batterie
(HP Deskjet 450CBi/450wbt).
1) Glissez la batterie dans sa fente selon un angle qui
permette de l’aligner au niveau des contacts. 2) Poussez la
batterie dans la fente de façon à entendre le déclic
indiquant que la batterie est en place.
Crystal_UGFDISA.book Page 8 Monday, July 7, 2003 3:04 PM

9
English
Français Deutsch
5
Note: Use only the C8222A battery with the printer. Fully
charge the battery before using (approximately 1 hour
and 30 minutes). When the battery is charging, the
battery charge LED is green. If the LED is red while
charging, the battery might be faulty and need to be
replaced.
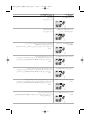
Step 5: Install the HP Bluetooth printer card
(HP Deskjet 450wbt).
Note: Make sure that your Bluetooth host device and
operating system are supported by the printer. For more
information, refer to http://www.hp.com/support/dj450.
1) Insert the Bluetooth card with the LED facing up into
the CompactFlash™ card slot.
Hinweis: Verwenden Sie für den Drucker nur Akkus mit
der Typenbezeichnung C8222A. Laden Sie den Akku vor
der Verwendung vollständig auf (ca. 1 Stunde und
30 Minuten). Während des Ladevorgangs leuchtet die
Akku-LED grün. Leuchtet die LED während des
Ladevorgangs rot, ist der Akku möglicherweise defekt
und muss ersetzt werden.
Schritt 5: Einsetzen der Bluetooth Druckerkarte
(HP Deskjet 450wbt).
Hinweis: Vergewissern Sie sich, dass ihr Bluetooth-
Hostgerät und das Betriebssystem vom Drucker
unterstützt werden. Weitere Informationen finden
Sie unter http://www.hp.com/support/dj450.
1) Setzen Sie die Bluetooth-Karte mit der LED nach oben
in den dafür vorgesehenen Steckplatz ein.
Remarque : N’utilisez que la batterie C8222A avec cette
imprimante. Rechargez complètement la batterie avant
l’utilisation (env. 1 heure et 30 minutes). Lors du
chargement de la batterie, le voyant de charge de la
batterie est vert. Si le voyant est rouge, la batterie est
sans doute défectueuse et doit être remplacée.
Etape 5 : Installer la carte d’imprimante HP Bluetooth
(HP Deskjet 450wbt).
Remarque : Assurez-vous que le périphérique hôte
Bluetooth et son système d’exploitation sont pris en
charge par l’imprimante. Pour plus d’informations,
consultez la page http://www.hp.com/support/dj450.
1) Insérez la carte Bluetooth avec le voyant orienté vers
le haut dans la fente à carte CompactFlash™.
Crystal_UGFDISA.book Page 9 Monday, July 7, 2003 3:04 PM

10
1
2
6
1
2
3
4
7
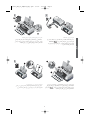
Step 6: Connect the power cord.
1) Connect the power cord to the printer and an alternating
current (AC) power receptacle. 2) Lift the input tray to its
open position. Note: For Windows, only connect the printer
to the computer when you have completed the software
installation or when prompted to do so during installation.
Step 7: Turn on the printer and install the
print cartridges.
1) Press the Power button to turn on the printer. 2) Open
the front access cover. 3) Lift up the print cartridge latches.
4) Remove the print cartridge from its package, and then
remove the protective tape from the print cartridge.
Schritt 6: Schließen Sie das Netzkabel an.
1) Schließen Sie das Netzkabel an den Drucker und an
eine Netzsteckdose an. 2) Heben Sie das Zufuhrfach in
die offene Position. Hinweis: Falls Sie unter Windows
arbeiten, schließen Sie den Drucker erst an den Computer
an, wenn Sie die Software fertig installiert haben bzw. wenn
Sie während der Installation dazu aufgefordert werden.
Schritt 7: Schalten Sie den Drucker ein und installieren
Sie die Druckpatronen.
1) Drücken Sie zum Einschalten des Druckers die Taste
“Ein/Aus”. 2) Öffnen Sie die vordere Abdeckung. 3) Öffnen
Sie die Verriegelung der Druckpatronen. 4) Entnehmen Sie
die Druckpatronen aus der Verpackung, und ziehen Sie die
Schutzfolie von den Patronen ab.
Etape 6 : Brancher le cordon d’alimentation.
1) Raccordez le cordon d’alimentation à l’imprimante
et à une prise fournissant du courant alternatif (CA).
2) Soulevez le bac d’alimentation pour le mettre en
position ouverte. Remarque : Avec Windows, ne
raccordez l’imprimante à l’ordinateur que lorsque
l’installation du logiciel est terminée ou lorsque vous
y êtes convié(e) au cours de l’installation.
Etape 7 : Mettre l’imprimante sous tension et installer
les cartouches d’encre.
1) Appuyez sur la
touche d’alimentation pour allumer
l’imprimante. 2) Ouvrez le capot avant. 3) Soulevez les
loquets des cartouches d’encre. 4) Retirez la cartouche
d’encre de son emballage, puis enlevez le film protecteur
de la cartouche d’encre.
Crystal_UGFDISA.book Page 10 Monday, July 7, 2003 3:04 PM

11
English
Français Deutsch
6
7
5
1
3
2
8
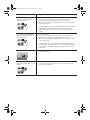
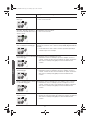
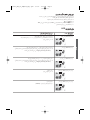
5) Insert and push the color print cartridge into the left
cradle and the black print cartridge into the right cradle.
6) Snap the cartridge latch onto the print cartridge.
7) Close the front access cover. Note: Do not open the
front access cover until the printer has completed the
initialization.
Step 8: Load paper in the input tray.
1) Slide up the input tray extension. 2) Insert up to
45 sheets of paper into the tray. 3) Slide the paper guide
snugly against the edge of the paper.
5) Setzen Sie die Farbdruckpatrone in die linke
Halterung und die Schwarzdruckpatrone in die rechte
Halterung ein. 6) Rasten Sie die Verriegelung über den
Druckpatronen ein. 7) Schließen Sie die vordere
Abdeckung. Hinweis: Öffnen Sie die vordere
Abdeckung erst, wenn der Drucker initialisiert ist.
Schritt 8: Einlegen von Papier.
1) Schieben Sie die Zufuhrfachverlängerung nach oben.
2) Legen Sie bis zu 45 Blatt Papier in das Fach ein.
3) Schieben Sie die Papierführung mit leichtem Druck
gegen das Papier.
5) Insérez et poussez la cartouche d’encre couleur dans
le chariot de gauche et la cartouche d’encre noire dans
le chariot de droite. 6) Refermez le loquet de la
cartouche sur la cartouche d’encre. 7) Fermez le capot
avant. Remarque : N’ouvrez pas le capot avant tant que
l’initialisation de l’imprimante n’est pas terminée.
Etape 8 : Charger le papier dans le bac
d’alimentation.
1) Faites glisser la rallonge du bac d’alimentation vers
le haut. 2) Insérez jusqu’à 45 feuilles de papier dans le
bac. 3) Faites glisser le guide-papier pour qu’il soit bien
calé contre les bords du papier.
Crystal_UGFDISA.book Page 11 Monday, July 7, 2003 3:04 PM

12
9
1
2
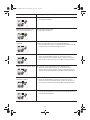
Step 9: Install the software and connect the printer.
1) Insert the Starter CD into the CD-ROM drive, and then
follow the appropriate procedure for your operating system
and connection. For Bluetooth connection, select either
USB or Parallel and click Skip when prompted to connect
the printer. For infrared (IR) connection, ensure the IR port
of your device is enabled (see Infrared Reference to enable
the IR port). Select Other in the Select Port dialog and then
choose the port assigned to the IR device in your host
machine.
2) For USB or parallel connection, connect the USB or
parallel cable. Note: Only connect the printer to the
computer when you have completed the software
installation or when prompted to do so during installation.
If you have connected the printer to the computer before
you install the software, refer to the Readme file in the
Starter CD to complete the printer installation. 3) Follow
the onscreen instructions to complete the printer
installation.
Schritt 9: Installieren Sie die Software, und schließen
Sie den Drucker an.
1) Legen Sie die Starter-CD in das CD-Laufwerk ein, und
folgen Sie der Anleitung für Ihr Betriebssystem und den
jeweiligen Anschluss. Für eine Bluetooth-Verbindung
wählen Sie entweder USB oder Parallel und klicken Sie
auf Überspringen, wenn Sie dazu aufgefordert werden,
den Drucker anzuschließen. Für eine Infrarot-Verbindung
vergewissern Sie sich, dass der Infrarotanschluss Ihres
Geräts aktiviert ist (siehe Infrarot-Referenz zum Aktivieren
des Infrarotanschlusses). Wählen Sie Andere im
Dialogfeld zur Anschlussauswahl und wählen Sie den
Anschluss, der dem Infrarotgerät ihres Hostgerätes
zugeordnet ist.
2) Für eine USB- oder Parallel-Verbindung schließen Sie
das USB- oder Parallelkabel an. Hinweis: Schließen Sie
den Drucker erst an den Computer an, wenn Sie die
Software fertig installiert haben bzw. wenn Sie während
der Installation dazu aufgefordert werden. Falls Sie den
Drucker an den Computer angeschlossen haben, ohne
vorher die Software zu installieren, lesen Sie die Readme-
Datei auf der Starter-CD, um die Druckerinstallation
abzuschließen. 3) Folgen Sie zum Abschließen der
Druckerinstallation den Anweisungen auf dem Bildschirm.
Etape 9 : Installer le logiciel et raccorder l’imprimante.
1) Insérez le CD d’installation dans le lecteur de CD-ROM,
puis suivez la procédure correspondant à votre système
d’exploitation et à votre connexion. En cas de connexion
Bluetooth, sélectionnez USB ou Parallèle et cliquez
sur Ignorer lorsque vous êtes invité(e) à raccorder
l’imprimante. En cas de connexion infrarouge (IR),
assurez-vous que le port IR de votre périphérique est activé
(reportez-vous à la section Référence sur l’infrarouge pour
activer le port IR). Sélectionnez Autres dans la boîte de
dialogue de sélection du port et choisissez le port affecté au
périphérique IR dans l’appareil hôte.
2) Pour les connexions USB ou parallèles, branchez le
câble USB ou parallèle. Remarque : Ne raccordez
l’imprimante à l’ordinateur que lorsque l’installation du
logiciel est terminée ou lorsque vous y êtes convié(e) au
cours de l’installation. Si vous avez raccordé l’imprimante
à l’ordinateur avant d’installer le logiciel, reportez-vous au
fichier Lisez-moi présent sur le CD d’installation pour
terminer l’installation. 3) Suivez les instructions en ligne
pour terminer l’installation de l’imprimante.
Crystal_UGFDISA.book Page 12 Monday, July 7, 2003 3:04 PM

13
English
Français Deutsch
10
Step 10: Enable Bluetooth printing
(HP Deskjet 450wbt - Windows).
Note: For a Bluetooth connection, make sure that your
Bluetooth host device is supported by the printer and that
Bluetooth printing is enabled in your device. See
http://www.hp.com/support/dj450 for a list of supported
Bluetooth devices and refer to the manufacturer’s
documentation for more instructions. 1) After installing
the software in Step 9, perform printer discovery with
your host device (see the Bluetooth Printing Guide).
2) Select the printer from the list of Bluetooth-enabled
printers.
3) Check that the Deskjet 450 printer icon is in the
Printers or Printers and Faxes folder. (Click Start, point
to Settings, and then click Printers in Windows NT 4.0,
Windows 98, Windows Me, and Windows 2000 or click
Start and click Printers and Faxes in Windows XP.) If
you do not see the printer icon, double-click Add Printer
and select the COM port assigned for your Bluetooth
device. Click Next. Select HP and hp deskjet 450 series
in the Add Printer Wizard. Follow the onscreen
instructions to complete the printer installation.
Schritt 10: Aktivieren von Bluetooth-Druck
(HP Deskjet 450wbt - Windows).
Hinweis: Für eine Bluetooth-Verbindung vergewissern
Sie sich, dass ihr Bluetooth-Hostgerät vom Drucker
unterstützt wird und Bluetooth-Druck aktiviert ist.
Unter http://www.hp.com/support/dj450 finden Sie eine
Liste der unterstützten Bluetooth-Geräte. Weitere
Anweisungen können Sie der Dokumentation des
Herstellers entnehmen. 1) Nach der Installation der
Software in Schritt 9 führen Sie eine Druckersuche mit
Ihrem Hostgerät durch (siehe die Anleitung zum Drucken
mit Bluetooth). 2) Wählen Sie den Drucker aus der Liste
der Bluetooth-fähigen Drucker.
3) Überprüfen Sie, ob sich das Deskjet 450
Druckersymbol im Verzeichnis “Drucker” bzw.
“Drucker und Faxgeräte” befindet. (Klicken Sie auf Start,
wählen Sie Einstellungen, und klicken Sie dann auf
Drucker (Windows NT 4.0, Windows 98, Windows Me
und Windows 2000) bzw. auf Drucker und Faxgeräte
(Windows XP). Falls Sie das Druckersymbol dort nicht
sehen, doppelklicken Sie auf Neuer Drucker und
wählen Sie den COM-Anschluss, der Ihrem Bluetooth-
Gerät zugeordnet ist. Klicken Sie auf Weiter. Wählen Sie
HP und hp deskjet 450 series im Druckerinstallations-
Assistenten. Folgen Sie zum Abschließen der
Druckerinstallation den Anweisungen auf dem
Bildschirm.
Etape 10 : Activer l’impression Bluetooth
(HP Deskjet 450wbt - Windows).
Remarque : En cas de connexion Bluetooth, vérifiez que
l’appareil hôte Bluetooth est pris en charge par l’imprimante
et que l’impression Bluetooth est activée dans cet appareil.
Consultez la page http://www.hp.com/support/dj450 pour
connaître tous les appareils Bluetooth pris en charge.
Reportez-vous à la documentation fournie par le fabricant
pour plus d’informations. 1) Une fois le logiciel installé
comme indiqué à l’étape 9, lancez une recherche
d’imprimante sur l’appareil hôte (reportez-vous au Guide
d’impression Bluetooth). 2) Sélectionnez l’imprimante
correspondante dans la liste des imprimantes gérant
Bluetooth.
3) Vérifiez que l’icône de l’imprimante Deskjet 450 se
trouve dans le dossier Imprimantes ou Imprimantes et
télécopieurs. (Cliquez sur Démarrer, pointez sur
Paramètres, puis cliquez sur Imprimantes sous
Windows NT 4.0, Windows 98, Windows Me et
Windows 2000 ou cliquez sur Démarrer, puis sur
Imprimantes et télécopieurs sous Windows XP.)
Si vous ne voyez pas l’icône de l’imprimante, double-
cliquez sur Ajout d’imprimante et sélectionnez le
port COM attribué à l’appareil Bluetooth. Cliquez sur
Suivant. Sélectionnez HP et hp deskjet série 450 dans
l’assistant Ajout d’imprimante. Suivez les instructions en
ligne pour terminer l’installation de l’imprimante.
Crystal_UGFDISA.book Page 13 Monday, July 7, 2003 3:04 PM

14
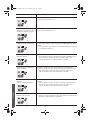
11
4) Right-click the printer icon and click Ports
(Windows 2000, Windows XP, Windows NT 4.0) or Details
(Windows 98 and Windows Me). 5) Make sure that the
printer is assigned to the COM port or virtual Bluetooth port
created for your Bluetooth device.
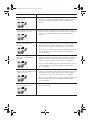
Step 11: Test the software installation.
Print a document from an application you use frequently
to test the software installation and printer connection.
Note: For Bluetooth configuration and printing information,
see the Bluetooth Printing Guide on the Starter CD. For
printing via infrared device, place the device’s infrared
lens within 3 feet (1 meter) from the printer and within
a 30-degree total angle from the printer’s infrared lens.
The printer’s infrared LED turns green when receiving
an infrared transmission.
4) Klicken Sie mit der rechten Maustaste auf das
Druckersymbol und wählen Sie Anschlüsse
(Windows 2000, Windows XP, Windows NT 4.0) bwz.
Details (Windows 98 und Windows Me). 5) Vergewissern
Sie sich, dass der Drucker dem COM-Anschluss oder dem
für Ihr Bluetoothgerät erzeugten virtuellen Bluetooth-
Anschluss zugeordnet ist.
Schritt 11: Testen der Software-Installation.
Um die Installation der Software und den Druckeranschluss
zu überprüfen, drucken Sie ein Dokument aus einer
Anwendung, die Sie häufig verwenden. Hinweis: Näheres
zur Konfiguration von Bluetooth und Informationen zum
Drucken finden Sie in der Anleitung zum Drucken mit
Bluetooth auf der Starter-CD. Zum Drucken mit einem
Infrarotgerät positionieren Sie das infrarot sendende Gerät
so, dass die Infrarotlinse sich im Abstand von weniger als
einem Meter und innerhalb eines Winkels von 30 Grad von
der Infrarotlinse des Druckers befindet. Die Infrarot-LED
des Druckers leuchtet grün auf, wenn eine
Infrarotübertragung empfangen wird.
4) Cliquez sur l’icône de l’imprimante avec le bouton
droit de la souris et cliquez sur Ports (Windows 2000,
Windows XP, Windows NT 4.0) ou Détails (Windows 98
et Windows Me). 5) Assurez-vous que l’imprimante est
affectée au port COM ou au port Bluetooth virtuel créé pour
le périphérique Bluetooth.
Etape 11 : Tester l’installation du logiciel.
Imprimez un document à partir d’une application que vous
utilisez fréquemment pour tester l’installation du logiciel et
la connexion à l’imprimante. Remarque : Pour configurer le
système Bluetooth et obtenir des informations concernant
l’impression, reportez-vous au guide d’impression
Bluetooth sur le CD d’installation. Pour pouvoir imprimer via
un appareil infrarouge, placez la lentille à infrarouge de
l’appareil à moins d’un mètre (3 pieds) de l’imprimante en
formant un angle inférieur à 30° avec la lentille à infrarouge
de l’imprimante. Lorsqu’il reçoit une transmission
infrarouge, le voyant infrarouge de l’imprimante
devient vert.
Crystal_UGFDISA.book Page 14 Monday, July 7, 2003 3:04 PM

15
English
Français Deutsch
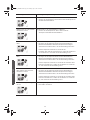
12
Step 12: Align the print cartridges (Windows).
Whenever you install a print cartridge, align the print
cartridges for the best possible print quality. 1) Click
Start, point to Settings, and then click Printers
(Windows NT 4.0, Windows 98, Windows Me, and
Windows 2000) or click Start and click Printers and
Faxes (Windows XP). 2) Right-click the printer icon
and click Printing Preferences (Windows 2000 and
Windows XP), Properties (Windows 98 and
Windows Me), or Document Defaults
(Windows NT 4.0).
3) Click the Services tab, and then click Align Print
Cartridges. 4) Click Align in the dialog and follow the
onscreen instructions to complete the alignment
procedure. Note: You can also align the print cartridge
from the Printer Services tab in the Toolbox.
Schritt 12: Ausrichten der Druckpatronen
(Windows).
Nach jedem Druckpatronenwechsel müssen Sie die
Druckpatronen ausrichten, um die bestmögliche
Druckqualität zu erhalten. 1) Klicken Sie auf Start,
wählen Sie Einstellungen und klicken Sie dann auf
Drucker (Windows NT 4.0, Windows 98, Windows Me
und Windows 2000), oder klicken Sie auf Start und dann
auf Drucker und Faxgeräte (Windows XP). 2) Klicken
Sie mit der rechten Maustaste auf das Druckersymbol
und wählen Sie Druckeinstellungen (Windows 2000
und Windows XP), Eigenschaften (Windows 98 und
Windows Me) bzw. Standardeinstellungen für
Dokumente (Windows NT 4.0).
3) Klicken Sie auf die Registerkarte Gerätewartung
und dann auf Druckpatronen ausrichten. 4) Klicken
Sie im Dialogfeld auf Ausrichten, und folgen Sie zum
Abschließen des Ausrichtvorgangs den Anweisungen
auf dem Bildschirm. Hinweis: Sie können die
Druckpatronen auch über die Registerkarte
Druckerdienste in der Toolbox ausrichten.
Etape 12 : Aligner les cartouches d’encre (Windows).
Pour obtenir la meilleure qualité d’impression possible,
effectuez un alignement des cartouches d’encre chaque
fois que vous installez une cartouche. 1) Cliquez sur
Démarrer, pointez sur Paramètres, puis cliquez
sur Imprimantes (Windows NT 4.0, Windows 98,
Windows Me et Windows 2000) ou cliquez sur
Démarrer, puis sur Imprimantes et télécopieurs
(Windows XP). 2) Cliquez sur l’icône de l’imprimante
avec le bouton droit de la souris et cliquez sur
Préférences d’impression (Windows 2000 et
Windows XP), Propriétés (Windows 98 et Windows Me)
ou Valeurs par défaut du document
(Windows NT 4.0).
3) Cliquez sur l’onglet Services, puis cliquez sur Aligner
les cartouches d’encre. 4) Cliquez sur Aligner dans la
boîte de dialogue et suivez les instructions en ligne pour
terminer la procédure d’alignement. Remarque : Vous
pouvez également aligner les cartouches d’encre à partir
de l’onglet Services de l’imprimante dans la boîte à
outils.
Crystal_UGFDISA.book Page 15 Monday, July 7, 2003 3:04 PM

16
13
14
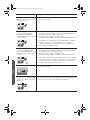
Step 13: Align the print cartridges (Mac).
Whenever you install a print cartridge, align the
print cartridges for the best possible print quality.
1) Open the HP Inkjet Utility and click Calibrate Device.
2) Follow the onscreen instructions to complete the
alignment procedure.
Step 14: Register the printer.
Register the printer to receive important support and
technical information. If you did not register your printer
while installing the software, you can register later at
http://www.register.hp.com.
Schritt 13: Ausrichten der Druckpatronen (Mac).
Nach jedem Druckpatronenwechsel müssen Sie die
Druckpatronen ausrichten, um die bestmögliche
Druckqualität zu erhalten. 1) Öffnen Sie das HP Inkjet-
Dienstprogramm und klicken Sie auf Gerät kalibrieren.
2) Folgen Sie zum Abschließen des Ausrichtvorgangs den
Anweisungen auf dem Bildschirm.
Schritt 14: Registrieren des Druckers.
Registrieren Sie den Drucker, um Kundenunterstützung
und wichtige technische Informationen zu erhalten. Falls
Sie den Drucker nicht beim Installieren der Software
registriert haben, haben Sie hierzu später die Möglichkeit
unter http://www.register.hp.com.
Etape 13 : Aligner les cartouches d’encre (Mac).
Pour obtenir la meilleure qualité d’impression possible,
effectuez un alignement des cartouches d’encre chaque
fois que vous installez une cartouche. 1) Ouvrez l’utilitaire
HP Inkjet et cliquez sur Calibrer le périphérique.
2) Suivez les instructions en ligne pour terminer la
procédure d’alignement.
Etape 14 : Enregistrer l’imprimante.
Enregistrez votre imprimante afin de recevoir des
informations techniques et d’assistance importantes.
Si vous n’avez pas enregistré l’imprimante lors de
l’installation du logiciel, vous pouvez le faire ultérieurement
à l’adresse suivante : http://www.register.hp.com.
Crystal_UGFDISA.book Page 16 Monday, July 7, 2003 3:04 PM

17
English
Français Deutsch
Congratulations!
Your printer is ready to use. For information about using the
printer and troubleshooting, refer to the following
resources:
• the onscreen documentation on the Starter CD
• HP Instant Support (For more information, see the
onscreen user’s guide.)
• the product support site at
http://www.hp.com/support/dj450
• the HP customer support guide (in box).
Herzlichen Glückwunsch!
Ihr Drucker ist betriebsbereit. Informationen zum Betrieb
des Druckers und zur Fehlersuche finden Sie in den
folgenden Ressourcen:
• Online-Dokumentation auf der Starter-CD
• HP Instant Support (näheres hierzu siehe
Online-Benutzerhandbuch)
• Website für Produktsupport unter
http://www.hp.com/support/dj450
• Handbuch HP Kundenunterstützung (im Karton).
Félicitations !
Votre imprimante est prête à l’emploi. Pour de plus amples
informations concernant l’utilisation de votre imprimante ou
son dépannage, reportez-vous aux sources suivantes :
• Documentation en ligne disponible sur le CD
d’installation
• HP Instant Support (pour de plus amples informations,
reportez-vous au guide de l’utilisateur en ligne)
• Site Internet de support produit :
http://www.hp.com/support/dj450
• Guide d’assistance clientèle HP (dans le carton).
Crystal_UGFDISA.book Page 17 Monday, July 7, 2003 3:04 PM

18
Travel tips
The following tips will help you prepare for traveling with
your printer:
• If you are bringing along an extra black or photo print
cartridge, store it in the travel holder (part number
C8233A) to prevent ink leakage.
• You can bring the printer along in a carrying case (part
number C8232A). The carrying case has compartments
for both your notebook and the printer. The
compartments can also be detached if you want to
carry the notebook and printer separately.
• Turn off the printer using the Power button. This
ensures that the print cartridges are returned to the
home position at the right side of the printer and locked
in place.
• Disconnect the printer cable and power adapter from
the printer. Slide down the input tray extension and
close the input tray.
• If you are traveling to another country/region, bring the
necessary plug adapter with you.
• Use only the power adapter that is supplied with the
printer. Do not use any other voltage transformer or
converter. The power adapter can be used with AC
power sources of 100 to 240 volts, 50 or 60 Hz.
• Remove the battery if you will not be using the printer
for more than a month.
Reisetips
Die folgenden Tips helfen Ihnen, den Drucker auf eine Reise
vorzubereiten.
• Falls Sie eine zusätzliche schwarze oder Foto-
Druckpatrone mitnehmen, lagern Sie diese in der
Reisehalterung (Teilenummer C8223A), um ein
Auslaufen von Tinte zu vermeiden.
• Sie können den Drucker in der Tragtasche mitnehmen
(Teilenummer C8232A). Die Tragtasche hat
Abteilungen für Ihr Notebook und den Drucker. Die
Abteilungen können außerdem voneinander getrennt
werden, falls Sie Notebook oder Drucker getrennt
mitnehmen möchten.
• Schalten Sie den Drucker mithilfe der Netztaste aus. So
wird sicher gestellt, dass die Patronenhalterung in die
Ausgangsposition auf der rechten Seite des Drucker
zurück kehr und verriegelt wird.
• Trennen Sie das Druckerkabel und den Netzadapter
vom Drucker. Fahren Sie die Verlängerung des
Eingabefachs ein, und schließen Sie das Eingabefach.
• Falls Sie in ein andere Land bzw. eine andere Region
reisen, nehmen Sie den richtigen Steckeradapter mit.
• Verwenden Sie nur den Netzadapter, der zum
Lieferumfang des Druckers gehört. Benutzen Sie
keinen anderen Spannungstransformator. Der
Netzadapter kann mit Wechselstromquellen von
100 bis 240 Volt und 50 oder 60 Hz verwendet werden.
• Entfernen Sie die Batterie, wenn Sie den Drucker für
mehr als einen Monat nicht verwenden.
Conseils de voyage
Les conseils suivants vous aideront à préparer vos
déplacements avec l’imprimante :
• Si vous emportez une cartouche d’encre noire ou photo
supplémentaire, rangez-la dans le porte-cartouche
(référence C8233A) pour éviter les fuites d’encre.
• L’imprimante peut être emportée dans une sacoche de
transport (référence C8232A). Cette sacoche possède
des compartiments pour loger un ordinateur portable et
l’imprimante. Ces compartiments peuvent être
également détachés l’un de l’autre pour transporter
l’ordinateur portable et l’imprimante séparément.
• Mettez l’imprimante hors tension à l’aide de la touche
d’alimentation. Les cartouches d’encre reviennent ainsi
à droite de l’imprimante où elles sont verrouillées en
position de repos.
• Débranchez le câble d’imprimante et le module
d’alimentation de l’imprimante. Faites glisser la rallonge
du bac d’alimentation et fermez le bac d’alimentation.
• Si vous voyagez à l’étranger, emportez-vous avec vous
la fiche d’adaptation nécessaire.
• N’utilisez que le module d’alimentation fourni avec
l’imprimante. N’utilisez aucun autre convertisseur ou
transformateur de tension. Le module d’alimentation
peut être utilisé avec des alimentations c.a. de 100 à
240 volts, 50 ou 60 Hz.
• Retirez la batterie si vous n’envisagez pas d’utiliser
l’imprimante pendant plus d’un mois.
Crystal_UGFDISA.book Page 18 Monday, July 7, 2003 3:04 PM

19
English
Infrared Reference
You must enable the infrared port in your host machine before you can use it.
1. Reboot your system and press F2 while your system is starting up.
2. Select the System Devices menu and set Infrared Port to Enabled.
3. Set Mode to FIR.
4. If DMA channel conflicts with Parallel port DMA channel, change Parallel Port to EPP.
5. Save and Exit to continue reboot.
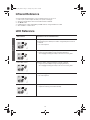
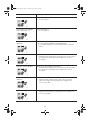
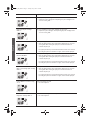
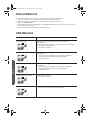
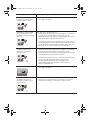
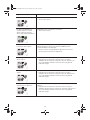
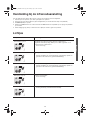
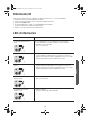
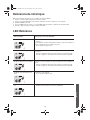
LED Reference
LED indication Explanation and recommended action
Power LED is green. If using AC power: Printer is turned on and idle.
If using battery power: Battery is 41-100% charged and printer is turned
on and idle.
• No action required.
Power LED is red. Battery is less than 10% charged and printer is turned on and idle.
• Plug in the power adapter to begin recharging the battery.
See Charging and using the battery in the onscreen user’s guide.
Power LED is amber. Battery is 10-40% charged and printer is turned on and idle.
• Plug in the power adapter to begin recharging the battery.
See Charging and using the battery in the onscreen user’s guide.
Battery charge LED is green. Battery is charging.
• No action required.
Battery charge LED is red. Battery is faulty.
• Replace the battery (part number C8233A).
Crystal_LED_ENG.fm Page 19 Tuesday, July 8, 2003 3:20 PM
La pagina si sta caricando...
La pagina si sta caricando...
La pagina si sta caricando...
La pagina si sta caricando...
La pagina si sta caricando...
La pagina si sta caricando...
La pagina si sta caricando...
La pagina si sta caricando...
La pagina si sta caricando...
La pagina si sta caricando...
La pagina si sta caricando...
La pagina si sta caricando...
La pagina si sta caricando...
La pagina si sta caricando...
La pagina si sta caricando...
La pagina si sta caricando...
La pagina si sta caricando...
La pagina si sta caricando...
La pagina si sta caricando...
La pagina si sta caricando...
La pagina si sta caricando...
La pagina si sta caricando...
La pagina si sta caricando...
La pagina si sta caricando...
La pagina si sta caricando...
La pagina si sta caricando...
La pagina si sta caricando...
La pagina si sta caricando...
La pagina si sta caricando...
La pagina si sta caricando...
La pagina si sta caricando...
La pagina si sta caricando...
La pagina si sta caricando...
La pagina si sta caricando...
La pagina si sta caricando...
La pagina si sta caricando...
La pagina si sta caricando...
La pagina si sta caricando...
La pagina si sta caricando...
La pagina si sta caricando...
La pagina si sta caricando...
La pagina si sta caricando...
La pagina si sta caricando...
La pagina si sta caricando...
La pagina si sta caricando...
La pagina si sta caricando...
La pagina si sta caricando...
La pagina si sta caricando...
La pagina si sta caricando...
La pagina si sta caricando...
La pagina si sta caricando...
La pagina si sta caricando...
La pagina si sta caricando...
La pagina si sta caricando...
La pagina si sta caricando...
La pagina si sta caricando...
La pagina si sta caricando...
La pagina si sta caricando...
La pagina si sta caricando...
La pagina si sta caricando...
-
 1
1
-
 2
2
-
 3
3
-
 4
4
-
 5
5
-
 6
6
-
 7
7
-
 8
8
-
 9
9
-
 10
10
-
 11
11
-
 12
12
-
 13
13
-
 14
14
-
 15
15
-
 16
16
-
 17
17
-
 18
18
-
 19
19
-
 20
20
-
 21
21
-
 22
22
-
 23
23
-
 24
24
-
 25
25
-
 26
26
-
 27
27
-
 28
28
-
 29
29
-
 30
30
-
 31
31
-
 32
32
-
 33
33
-
 34
34
-
 35
35
-
 36
36
-
 37
37
-
 38
38
-
 39
39
-
 40
40
-
 41
41
-
 42
42
-
 43
43
-
 44
44
-
 45
45
-
 46
46
-
 47
47
-
 48
48
-
 49
49
-
 50
50
-
 51
51
-
 52
52
-
 53
53
-
 54
54
-
 55
55
-
 56
56
-
 57
57
-
 58
58
-
 59
59
-
 60
60
-
 61
61
-
 62
62
-
 63
63
-
 64
64
-
 65
65
-
 66
66
-
 67
67
-
 68
68
-
 69
69
-
 70
70
-
 71
71
-
 72
72
-
 73
73
-
 74
74
-
 75
75
-
 76
76
-
 77
77
-
 78
78
-
 79
79
-
 80
80


in altre lingue
- English: HP deskjet 450 User manual
- français: HP deskjet 450 Manuel utilisateur
- español: HP deskjet 450 Manual de usuario
- Deutsch: HP deskjet 450 Benutzerhandbuch
- Nederlands: HP deskjet 450 Handleiding
Documenti correlati
-
HP DESKJET 460CB Manuale utente
-
HP Officejet 150 Mobile All-in-One Printer series - L511 Guida utente
-
HP Officejet 100 Mobile Printer series - L411 Manuale del proprietario
-
HP Deskjet D4100 Printer series Guida d'installazione
-
-
-
HP Deskjet D4300 Printer series Manuale del proprietario
-
HP Deskjet D1400 Printer series Guida di riferimento
-
-
HP Business Inkjet 2800 Manuale utente