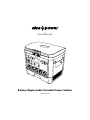
alza power APW-PS600 Portable Battery Replaceable Power Station Manuale utente
- Tipo
- Manuale utente

Battery Replaceable Portable Power Station
APW-PS600
User Manual


ENGLISH 4
DEUTSCH 12
ČESKY 21
SLOVENSKY 29
MAGYAR 37
FRANÇAIS 45
ITALIANO 53
ROMÂNĂ 61
WARRANTY & SUPPORT 69
GARANTIE & BETREUUNG 69
ZÁRUKA & PODPORA 69
ZÁRUKA & PODPORA 69
GARANCIA & TÁMOGATÁS 69
GARANTIE ET SUPPORT 69
GARANZIA E ASSISTENZA 69
GARANȚIE ȘI ASISTENȚĂ 69

4ENGLISH
We value your trust. We hope that you will be happy with our product, and as excited about it as we
are. We try to offer products of the highest quality that satisfy even the most demanding require-
ments. If you are satisfied, it would make us very happy if you chose us again the next time you make
a purchase.
We are environmentally conscious, therefore we use special eco-friendly packaging. Please recycle!
Recycling and Environmental Protection
We try to avoid using plastic packaging and film and only use them when they are absolutely neces-
sary to protect the product. So how are we different?
Packaging you can eat… Well, almost. :-)
We use ink made from soybeans as opposed to classic petroleum-based ink.
The majority of our packaging is made from 100% recyclable paper.
We limit the use of adhesives. If absolutely necessary, we make sure to choose only water-soluble
ones.
We think globally, which means that we actively search for eco-friendly solutions. We keep an eye on
trending technology and place findings of the scientific community into practice.
We don‘t just try to meet quotas and mandates, we aim to exceed them.
THANK YOU FOR CHOOSING US!

5ENGLISH
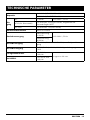
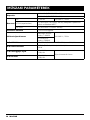
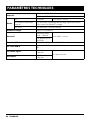
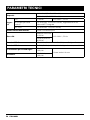
Capacity 1616 Wh (3.7 V/436 800 mAh)
2000 Wh (3.7 V/527 800 mAh)
Input
AC 1,200 W 220–240 V~, 50 Hz
XT60 (for solar panel) 12–60 V/max. 10 A (max. 600 W); built-in solar charging
controller MPPT
DC 5521 12–60 V/max. 7 A (max. 420 W)
Inverter waveform Pure sine wave
AC outlet
Rated power:
2,000 W 220–240 V~, 50 Hz
Peak power: 4,000
W
2× USB-C output PD 100 W (5 V/9 V/12 V/15 V/20 V, max. 5 A) for output 1
4× USB-A output QC3.0 (5 V/3 A; 9 V/2 A; 12 V/2 A) for 1 output; max. 18 W
1x cigarette connector 13.6 V/8 A, max.
108.8 W Total share 8 A max.
2x DC5521 13.6 V/8 A, max.
108.8 W
TECHNICAL PARAMETERS

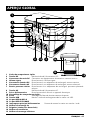
6ENGLISH
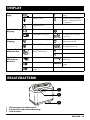
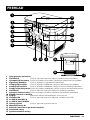
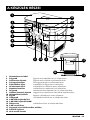
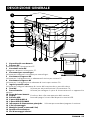
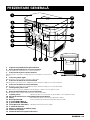
1 Battery compartment lid
2 DC button Turns the DC power on/off.
3 DC output connectors Connect to DC powered devices.
4 Cigarette connector Used to connect the cigarette connector.
5 DC input connector Used to connect to a DC station charging adapter
6 AC input connector Used to connect to AC station charging adapter.
7 Solar panel inputs Used to connect the station charging adapter from a solar panel
8 AC button Used to turn on/off AC power.
9 Power outlets Used to connect the power plug of an electrical appliance.
10 Battery compartment lock
11 Display Displays station operating status data.
12 USB button Turns on / off charging the device via USB.
13 4x USB-A port QC3.0
14 2x USB-C port PD100W
15 Main power switch Used to turn on / off the station.
16 Mounting holes 4x
17 Handles (located on both sides)
18 Ventilation openings
19 Bottom mounting holes
OVERVIEW
2
3
8
4
5
6
7
915
11
12
13
14
16
1
10
17
18
19

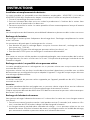
7ENGLISH
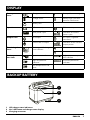
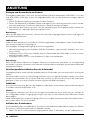
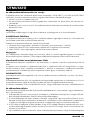
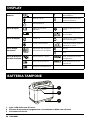
Battery status
icons
Charge status in % Battery failure message
Charge status Battery high / low tem-
perature notification
Battery lock
Input icons AC current input DC current input
Solar panel input Indication of current
power input
Output icons AC output DC input / cigarette
connector
USB-A/USB-C output Indication of the current
output power
Remaining time
icons
Discharge / full charge
time indicator
Minutes
Hours
Station protec-
tion icons
System error indicator High temperature protec-
tion indicator
High temperature
indicator
Overload protection
indicator
Low temperature indi-
cator
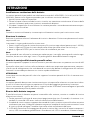
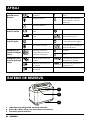
BACKUP BATTERY
DISPLAY
1
2
3
1 LED charge status indicators
2 On / Off button and charge status display
3 Charging connector

8ENGLISH
Battery installation and replacement
The portable station is compatible with two replaceable batteries: APW-PSBP1 (1616 Wh) and
APW-PSBP2 (2000 Wh). Follow these steps to install or replace the battery:
1. Open the lock and open the lid.
2. Hold the battery in both hands and carefully insert it vertically into the interior of the station. You
can insert the battery in both directions.
3. Close the lid and secure the lock. The portable station turns on automatically when the battery
is installed.
Note:
When replacing the battery, first remove the inserted battery and then insert a new one.
Charging the station
Only charge the station with the supplied charging adapter. Charge the station fully before use.
Input connectors intended for charging are:
• AC input port for charging from an AC outlet; super fast charging (max. power 1,200 W)
• XT60 input port for charging from the solar panel (solar panel not included); or
• input port DC5521 for charging e.g. from a car battery.
Note:
If you will not be using the station for a long time, we still recommend charging it regularly, at least
every 3 months. This will extend the life of the built-in battery.
Serial / parallel charging via solar panel
The portable station supports charging via a solar panel with a maximum output of 600 W.
The solar panel is not included in the package and must be purchased separately, including a con-
necting cable, which will be equipped with a terminal suitable for connection to the station. This is the
only way to achieve fast and efficient charging.
WARNING:
The maximum voltage of the solar panels that the portable station supports is 60 V and the maximum
current is 10 A.
Attention:
The portable station must be charged via a single solar panel with a voltage of less than 60 V. An input
voltage exceeding 60 V can seriously damage the station.
Each input connector of the XT60 serial input cable must be connected to the corresponding solar
panel before you can use it.
Charging the backup battery
You can charge the backup battery either by inserting it into the station, via an external charging
module (not included).
1. Press and hold the on / off button (for about 5 seconds) and the station will turn on. The number
of lit LEDs indicates the battery charge status.
2. The external charging module supports two charging methods - via a solar panel and via a car
battery. Connect the backup battery to the external charging module via the charging cable and
then connect the module to either the solar panel or the car battery.
3. The charge status LEDs will flash during charging. As the backup battery charges, the LEDs will
light up gradually. Once all 4 LEDs light up, the backup battery is fully charged.
4. When the station is on, the charge status indicator will still be on. Press and hold the on / off but-
ton and turn off the backup battery.
INSTRUCTIONS

9ENGLISH
Using the station
Make sure before each use that the battery is installed and fully charged.
Station use - alternating current
The portable station allows to supply up to 5 appliances with alternating current at the same time,
provided that the total power does not exceed 2,000 W.
1. Press and hold the power switch to turn on the station. The power switch indicator and the display
light up. The station switches to standby mode.
2. Insert the plug of the appliance into the power outlet in the station.
3. Press the AC button to turn on the AC power for the appliance.
4. After use, press the AC button to turn off the power. The station switches to standby mode. Un-
plug the appliance from the power outlet.
5. To switch off the station completely, press and hold the main switch.
Station use - direct current
1. Press and hold the power switch to turn on the station. The power switch indicator and the display
light up. The station switches to standby mode.
2. Plug the cable end of the device you want to charge to the DC connector.
3. Press the DC button to turn on the DC power of the device.
4. After use, press the DC button to turn off the power. The station switches to standby mode. Pull
out the connector from the port.
5. To switch off the station completely, press and hold the main switch.
Station use - USB output
1. Press and hold the power switch to turn on the station. The power switch indicator and the display
light up. The station switches to standby mode.
2. Press the USB button to turn on the device via USB.
3. Plug the end of the USB connecting cable into the USB port. Plug the other end of the USB con-
necting cable into a port on your device.
4. After use, press the USB button to turn off the power. The station switches to standby mode. Pull
the terminal out of the USB port.
5. To switch off the station completely, press and hold the main switch.
Use of the UPS backup function
1. Connect the portable station to the power outlet using the supplied power adapter. The station
turns on automatically and starts charging.
2. Plug the appliance into the power outlet in the station.
3. Press the AC button to start the alternate current. The connected equipment enters UPS backup
mode.
4. If you disconnect the portable station from the electrical outlet, the station will continue to supply
power to the connected device.
Attention:
Make sure that the portable station is plugged into a properly grounded AC outlet with a stable and
normal voltage.
To make sure that the UPS backup function is used correctly, the total power of the connected devices
must be less than 1,300-1,500 W. If the power is greater than 1,300-1,500 W, the portable station will
automatically shut down power for safety reasons, and shut off charging from an AC outlet and will
only power the connected devices.
INSTRUCTIONS

10 ENGLISH
Keep the portable station clean. Before cleaning, make sure that the station is disconnected from the
power supply and that all connectors of the connected devices are disconnected.
Use only a soft, dry cloth to clean the station. Do not use a cloth soaked in clean water or water con-
taining detergent to clean it.
If the station is very dirty, we recommend using a piece of cotton swab with a small amount of
high-percentage pure alcohol to wipe the surface of the station.
Do not use chemicals, harsh cleaners, solvents, gasoline or other similar substances to clean the
portable station.
Warning:
Never immerse the portable station in water or any other liquid. Do not rinse the portable station
under running water or any other liquid.
Storage
If you are not going to use the portable station, store it in a dry and well-ventilated place.
Charge the portable station regularly, at least once every three months. This will extend the life of the
built-in battery.
FREQUENT QUESTIONS
Question Answer
Is it possible to take the station on board
a plane?
No. The station contains a lithium battery and
according to the valid international rules of air
transport, only equipment with a lithium battery
with a total power not exceeding 100 W can be
transported on board the aircraft.
It does not charge the station, even though the
total power of the connected devices is within
the total power of the station.
The station is not fully charged. Charge it and
then you can use it.
The station emits noises sometime. The station is equipped with an air cooling sys-
tem. This makes it easier for the built-in fan to
dissipate heat, so you may hear the sound of the
fan during use. This is a normal occurrence.
CLEANING AND STORAGE

11ENGLISH
• This product is for domestic use only.
• This product is not a toy. It may contain small components. Please keep away from children.
• Read the operating instructions carefully before use.
• Please check compatibility with the information specified on the product before use.
• Unplug the product from power sources when not in use.
• Only use the product for the specified purpose of use.
• Take extra care when using the product near children.
• Incorrect use of the product can lead to a risk of fire, explosion or other hazard and can result in
a voided warranty.
• Do not insert fingers, hands or objects into any openings in the product.
• Use only accessories supplied with the product or recommended by the manufacturer. Other-
wise, there is a risk of fire, electric shock or injury.
• Use only the supplied adapters to charge the product.
• When charging and using the product, ensure that there is sufficient free space around the prod-
uct for proper air circulation.
• Under no circumstances should you cover the product while it is charging or you are using it.
• Do not use or leave the product in dusty or otherwise contaminated environments.
• Do not expose the product to high temperatures or low temperatures. Keep the product in a dry
environment.
• Do not expose the product or its accessories to moisture or immerse them in liquids. Do not ex-
pose them to dripping or splashing water. Do not place water containers, such as vases, on them.
• Do not expose the product or its accessories to fire, excessive heat or direct sunlight. It is forbid-
den to place sources of open fire on them, such as burning candles.
• Do not use or store the product in places where open flames are used, where flammable or ex-
plosive substances are used or stored.
• Do not disassemble, damage or short-circuit the product. Attempting to modify the power bank
may damage the product and result in a serious injury.
• Do not use the product if it is damaged or emits a suspicious odour.
• If battery fluid leaks, avoid direct contact with both fluid and battery. In case of skin contact, rinse
the area with plenty of clean water. In case of contact of the liquid with eyes, seek medical help
immediately.
• If the product needs to be repaired or maintenance is required that cannot be performed by the
user, contact an authorized service center. The product does not containparts serviceable by the
user. Improper handling of the product may result in a risk of fire or electric shock.
• Use a soft, clean, dry towel for cleaning the surface of the product.
• Do not disassemble the product. Attempting to modify the power bank may damage the product
and result in a serious injury.
SAFETY INFORMATION

12 DEUTSCH
Wir wissen Ihr Vertrauen zu schätzen. Wir hoffen, dass Ihnen das Produkt Freude macht und Sie davon
genauso begeistert sein werden wie wir. Wir sind bestrebt, Produkte in höchster Qualität anzubieten,
die auch hohe Ansprüche erfüllen. Wir freuen uns, wenn Sie sich, falls Sie zufrieden sind, auch das
nächste Mal für uns entscheiden.
Wir denken an die Natur und haben deshalb eine spezielle ökologische Verpackung geschaffen.
Bitte recyceln Sie diese.
Recycling und Umweltschutz
Wir versuchen, auf Kunststoffverpackungen und Folien zu verzichten. Wir verwenden sie nur, wenn
sie für den Schutz des Produkts unbedingt notwendig sind. Und was machen wir sonst noch?
Verpackungen, die man essen kann ... Fast. :-)
Wir drucken mit Sojabohnentinte anstelle der klassisch hergestellten Tinte auf Ölbasis.
Die überwiegende Mehrheit unserer Verpackungen besteht aus 100% recycelbarem Papier.
Wir beschränken den Einsatz von Klebstoffen. Wenn nötig, benutzen wir nur wasserlösliche Kleb-
stoffe.
Wir denken global und suchen aktiv nach ökologischen Lösungen. Wir folgen neuesten technologi-
schen Trends und nutzen das Wissen der Wissenschaft in der Praxis.
Wir erfüllen nicht nur Quoten oder Richtlinien. Wir bemühen uns, auf eigene Faust mit gutem Beispiel
voranzugehen.
DANKE FÜR IHR VERTRAUEN!

13DEUTSCH
Kapazität 1 616 Wh (3,7 V/436 800 mAh)
2 000 Wh (3,7 V/527 800 mAh)
Ein-
gang
AC 1 200 W 220–240 V~, 50 Hz
XT60 (für Solarmodul) 12–60 V/max. 10 A (max. 600 W); eingebauter So-
lar-Lade-Regler MPPT
DC 5521 12–60 V/max. 7 A (max. 420 W)
Wechselrichter-Verlauf Reine Sinuswelle
Steckdosenausgang
Nennspannung:
2 000 W 220–240 V~, 50 Hz
Höchstleistung:
4 000 W
2× USB-C-Ausgang PD 100 W (5 V/9 V/12 V/15 V/20 V, max. 5 A) pro 1 Aus-
gang
4× USB-A-Ausgang QC3.0 (5 V/3 A; 9 V/2 A; 12 V/2 A) pro 1 Ausgang; max.
18 W
1x Zigarettenstecker 13,6 V/8 A, max.
108,8 W Insgesamt 8 A max.
2x DC5521 13,6 V/8 A, max.
108,8 W
TECHNISCHE PARAMETER

14 DEUTSCH
1 Batteriefachdeckel
2 Taste DC
Ein- und Ausschalten der Gleichstromversorgung.
3 DC-Ausgangsanschlüsse
Zum Anschluss von Geräten, die mit Gleichstrom gespeist
sind.
4 Zigarettenstecker
Zum Anschluss des Zigarettensteckers.
5 DC-Eingangsanschluss
Zum Anschluss von Geräten, die mit Gleichstrom gespeist sind
6 AC-Ausgangsanschluss Zum Anschluss eines Adapters zum Aufladen der Ladestation mit
Wechselstrom.
7 Solarmodul-Eingänge Zum Anschluss eines Adapters zum Aufladen der Ladestation über
ein Solarmodul.
8 Taste AC Ein- / Ausschalten der Wechselstromversorgung.
9 Steckdosen Zum Anschluss des Netzsteckers eines Elektrogeräts.
10 Verriegelung des Batteriefachs
11 Display Zeigt den Betriebsstatus der Ladestation an.
12 Taste USB Ein- / Ausschalten des Aufladens eines Geräts über USB.
13 4x USB-A-Anschluss QC3.0
14 2x USB-C-Anschluss PD100W
15 Hauptschalter Zum Ein-/Ausschalten der Ladestation.
16 Montagelöcher 4x
17 Griffe (auf beiden Seiten)
18 Lüftungsöffnungen
19 Untere Montagelöcher
ÜBERSICHT
2
3
8
4
5
6
7
915
11
12
13
14
1
10
16 17
18
19

15DEUTSCH
Batteriestatusan-
zeige
Ladezustand in % Bericht über Batteriestö-
rung
Ladezustand Benachrichtigung über
hohe / niedrige Batterie-
temperatur
Batterieschloss
Symbole für
Eingang
Wechselstromeingang Gleichstromeingang
Solarmodul-Eingang Anzeige der aktuellen
Leistung
Symbole für
Ausgang
Wechselstromausgang Gleichstromeingang /
Zigarettenstecker
USB-A/USB-C Ausgang Anzeige der aktuellen
Ausgangsleistung
Symbole für ver-
bleibende Zeit
Anzeige bis zu Entla-
dung / Vollladung
Minuten
Stunden
Symbole zum
Schutz der La-
destation
Systemfehleranzeige Hochtemperaturschut-
zanzeige
Hochtemperaturanzeige Überlastungsschutzan-
zeige
Niedrigtemperaturan-
zeige
ERSATZBATTERIE
DISPLAY
1
2
3
1 LED-Anzeigen des Ladezustands
2 Ein/Aus-Taste und Ladestandsanzeige
3 Ladeanschluss

16 DEUTSCH
Einlegen und Auswechseln der Batterie
Die tragbare Ladestation ist mit zwei auswechselbaren Batterien kompatibel: APW-PSBP1 (1616 Wh)
und APW-PSBP2 (2000 Wh). Gehen Sie folgendermaßen vor, um die Batterie einzulegen oder zu
ersetzen:
1. Öffnen Sie die Verriegelung und heben Sie den Deckel an.
2. Fassen Sie die Batterie mit beiden Händen und legen Sie sie vorsichtig senkrecht in den Innenbe-
reich der Ladestation. Sie können die Batterie in beide Richtungen einlegen.
3. Schließen Sie den Deckel und sichern Sie die Verriegelung ab. Die tragbare Station schaltet sich
automatisch ein, sobald die Batterie eingesetzt wird.
Bemerkung:
Wenn Sie die Batterie austauschen, nehmen Sie zuerst die eingelegte Batterie heraus und legen Sie
dann die neue Batterie ein.
Ladestation
Laden Sie die Ladestation ausschließlich mit dem mitgelieferten Ladeadapter. Laden Sie die Ladesta-
tion vor dem Gebrauch vollständig auf.
Zum Aufladen sind folgende Eingangsanschlüsse vorgesehen:
• Wechselstromeingang zum Aufladen über die Steckdose; superschnelles Aufladen (max. Leis-
tung 1 200 W)
• Eingangsanschluss XT60 zum Aufladen über ein Solarmodul (das Solarmodul ist nicht im Liefer-
umfang enthalten); oder
• Eingangsanschluss DC5521 zum Aufladen z.B. über eine Autobatterie.
Bemerkung:
Wenn Sie die Station über einen längeren Zeitraum nicht benutzen, empfehlen wir sie regelmäßig
aufzuladen, und zwar mindestens alle 3 Monate. Auf diese Weise verlängern Sie die Lebensdauer der
eingebauten Batterie.
Serielles/paralleles Aufladen über das Solarmodul
Die tragbare Station unterstützt das Aufladen über ein Solarmodul mit einer maximalen Leistung von
600 W.
Das Solarmodul ist nicht im Lieferumfang enthalten und muss separat erworben werden, einschließ-
lich des Anschlusskabels, das mit einem Endstück versehen ist, das zum Anschluss an die Ladestation
geeignet ist. Nur so ist eine schnelle und leistungsstarke Aufladung möglich.
WARNUNG:
Die maximale Spannung der von der tragbaren Ladestation unterstützten Solarmodule beträgt 60
V und die maximale Stromstärke 10 A.
Hinweis:
Die tragbare Ladetation muss durch ein einziges Solarmodul mit einer Spannung von weniger als
60 V aufgeladen werden. Eingangsspannungen von mehr als 60 V können die Ladestation schwer
beschädigen.
Jeder Kabelstecker des seriellen Eingangs XT60 muss mit dem entsprechenden Solarmodul verbun-
den werden, bevor Sie es verwenden.
Aufladen der Ersatzbatterie
Die Ersatzbatterie kann entweder durch Einsetzen in die Ladestation oder über ein externes Lademo-
dul (nicht im Lieferumfang enthalten) aufgeladen werden.
1. Halten Sie die Ein-/Ausschalttaste lange gedrückt (etwa 5 Sekunden), um die Ladestation ein-
ANLEITUNG

17DEUTSCH
zuschalten. Die Anzahl der leuchtenden LED-Anzeigen zeigt den Ladezustand der Batterie an.
2. Das externe Lademodul unterstützt zwei Lademethoden – über das Solarmodul oder über die
Autobatterie. Verbinden Sie die Ersatzbatterie über das Ladekabel mit dem externen Lademodul
und schließen Sie das Lademodul dann entweder an das Solarmodul oder die Autobatterie an.
3. Die LED-Anzeigen des Ladezustands blinken während des Ladevorgangs. Während sich die Er-
satzbatterie aufgeladen wird, schalten sich die LED-Anzeigen nach und nach ein. Sobald alle 4
LED-Anzeigen aufleuchten, ist die Ersatzbatterie vollständig aufgeladen.
4. Wenn die Ladestation eingeschaltet ist, leuchtet die Ladezustandsanzeige weiter. Halten Sie die
Ein-/Ausschalttaste gedrückt und schalten Sie die Ersatzbatterie aus.
Verwendung der Ladestation
Vergewissern Sie sich, dass die Batterie vor jeder Verwendung vollständig aufgeladen ist.
Verwendung der Ladestation – Wechselstrom
Mit der tragbaren Ladestation können bis zu 5 Geräte gleichzeitig mit Wechselstrom versorgt wer-
den, sofern die Gesamtleistung nicht 2 000 W überschreitet.
1. Halten Sie den Hauptschalter lange gedrückt, um die Ladestation einzuschalten. Die Anzeige des
Hauptschalters und das Display leuchten auf. Die Ladestation geht in den Standby-Modus über.
2. Stecken Sie den Netzstecker des Gerätekabels in die Steckdose der Ladestation.
3. Drücken Sie die Taste AC, um die Wechselstromversorgung des Geräts einzuschalten.
4. Wenn Sie das Gerät nicht mehr benutzen, drücken Sie die Taste AC, um es auszuschalten. Die
Ladestation geht in den Standby-Modus über. Ziehen Sie den Netzstecker des Gerätekabels aus
der Steckdose.
5. Halten Sie den Hauptschalter länger gedrückt, um die Ladestation vollständig auszuschalten.
Verwendung der Ladestation – Gleichstrom
1. Halten Sie den Hauptschalter lange gedrückt, um die Ladestation einzuschalten. Die Anzeige des
Hauptschalters und das Display leuchten auf. Die Ladestation geht in den Standby-Modus über.
2. Stecken Sie das Kabelende des zu ladenden Geräts in den Gleichstromanschluss.
3. Drücken Sie die Taste DC, um die Gleichstromversorgung des Geräts einzuschalten.
4. Wenn Sie das Gerät nicht mehr benutzen, drücken Sie die Taste DC, um es auszuschalten. Die
Ladestation geht in den Standby-Modus über. Ziehen Sie den Stecker aus dem Anschluss.
5. Halten Sie den Hauptschalter länger gedrückt, um die Ladestation vollständig auszuschalten.
Verwendung der Ladestation – USB-Ausgang
1. Halten Sie den Hauptschalter lange gedrückt, um die Ladestation einzuschalten. Die Anzeige des
Hauptschalters und das Display leuchten auf. Die Ladestation geht in den Standby-Modus über.
2. Drücken Sie die Taste USB, um die Versorgung des Geräts über USB einzuschalten.
3. Stecken Sie das Ende des USB-Anschlusskabels in den USB-Anschluss. Stecken Sie das andere
Ende des USB-Anschlusskabels in den Anschluss Ihres Geräts.
4. Wenn Sie das Gerät nicht mehr benutzen, drücken Sie die Taste USB, um es auszuschalten. Die
Ladestation geht in den Standby-Modus über. Ziehen Sie den Stecker aus dem USB-Anschluss.
5. Halten Sie den Hauptschalter länger gedrückt, um die Ladestation vollständig auszuschalten.
Verwendung der UPS-Backup-Funktion
1. Schließen Sie die tragbare Ladestation über den mitgelieferten Netzadapter an eine Steckdose
an. Die Ladestation schaltet sich automatisch ein und beginnt zu laden.
2. Stecken Sie den Netzstecker des Geräts in die Steckdose der Ladestation.
3. Drücken Sie die Taste AC, um die Wechselstromversorgung einzuschalten. Das angeschlossene
ANLEITUNG

18 DEUTSCH
Gerät geht in den UPS-Backup-Modus.
4. Wenn Sie den Stecker der tragbaren Ladestation aus der Steckdose ziehen, versorgt die Ladesta-
tion die angeschlossenen Geräte weiterhin mit Strom.
Hinweis:
Vergewissern Sie sich, dass die tragbare Ladestation an eine ordnungsgemäß geerdete Steckdose
mit einer stabilen und normalen Spannung angeschlossen ist.
Damit Sie sicher sein können, dass die UPS-Backup-Funktion richtig genutzt wird, muss die Gesamt-
leistung der angeschlossenen Geräte unter 1 300–1 500 W liegen. Ist die Leistung größer als 1 300–1
500 W, schaltet die tragbare Ladestation aus Sicherheitsgründen die Stromversorgung und das Auf-
laden über die Steckdose automatisch ab und versorgt nur die angeschlossenen Geräte.
REINIGUNG UND LAGERUNG
Halten Sie die tragbare Ladestation sauber. Vergewissern Sie sich vor der Reinigung, dass die La-
destation von der Stromversorgung getrennt ist und dass alle Stecker der angeschlossenen Geräte
getrennt wurden.
Verwenden Sie zur Reinigung der Ladestation nur ein weiches und trockenes Tuch. Verwenden Sie
zur Reinigung kein Tuch, das in sauberem Wasser oder Wasser mit Reinigungsmitteln eingetaucht
wurde.
Wenn die Ladestation stark verschmutzt ist, empfehlen wir, die Oberfläche der Ladestation mit einem
Wattepad aus Baumwolle und einer kleinen Menge hochprozentigem reinem Alkohol abzuwischen.
Verwenden Sie zur Reinigung der tragbaren Ladestation keine Chemikalien, scharfen Reinigungsmit-
tel, Lösungsmittel, Benzin oder ähnliche Stoffe.
Warnung:
Tauchen Sie die tragbare Ladestation niemals in Wasser oder eine andere Flüssigkeit. Waschen Sie
die tragbare Ladestation nicht unter fließendem Wasser oder anderen Flüssigkeiten.
Lagerung
Wenn Sie die tragbare Ladestation nicht benutzen, lagern Sie sie an einem trockenen und gut belüf-
teten Ort.
Laden Sie die tragbare Ladestation regelmäßig auf, mindestens einmal alle drei Monate. Auf diese
Weise verlängern Sie die Lebensdauer der eingebauten Batterie.
FAQ
Frage Antwort
Ist es möglich, die Ladestation an Bord eines
Flugzeugs mitgenommen werden?
Nein. Die Station enthält eine Lithium-Batterie,
und nach den geltenden internationalen Luft-
verkehrsvorschriften dürfen nur Geräte mit ei-
ner Lithium-Batterie mit einer Gesamtkapazität
von höchstens 100 Wh an Bord eines Flugzeugs
transportiert werden.
ANLEITUNG

19DEUTSCH
Die Ladestation wird nicht aufgeladen, auch
wenn die Gesamtleistung der angeschlossenen
Geräte innerhalb der Gesamtleistung der La-
destation liegt.
Die Ladestation ist nicht vollständig geladen.
Laden Sie sie, damit Sie sie benutzen können.
Die Ladestation gibt ab und zu Geräusche ab. Die Ladestation ist mit einem Luftkühlsystem
ausgestattet. Der eingebaute Lüfter leitet die
Wärme besser ab, so dass Sie das Lüfterge-
räusch während des Gebrauchs hören können.
Es handelt sich um eine normale Erscheinung.
FAQ

20 DEUTSCH
• Dieses Produkt ist ausschließlich für den Haushaltsgebrauch vorgesehen.
• Dieses Produkt ist kein Kinderspielzeug. Es kann kleine Teile enthalten. Produkt außer Reichweite
von Kindern aufbewahren.
• Lesen Sie vor dem Gebrauch sorgfältig die Bedienungsanleitung durch.
• Überprüfen Sie vor der Verwendung des Produktes die Kompatibilität anhand der am Produkt
angeführten Angaben.
• Falls Sie das Produkt nicht benutzen, trennen Sie es vom Stromnetz.
• Verwenden Sie das Produkt nur für die Zwecke, für die es bestimmt ist.
• Seien Sie besonders vorsichtig, wenn Sie das Produkt in der Nähe von Kindern verwenden.
• Eine unsachgemäße Verwendung des Produkts kann zu einem Brand, einer Explosion oder einer
anderen gefährlichen Situation und somit zum Erlöschen der Garantie führen.
• Stecken Sie weder Finger, Hände noch sonstige Gegenstände in die Öffnungen des Produkts.
• Verwenden Sie nur das mit dem Produkt gelieferte oder vom Hersteller empfohlene Zubehör.
Anderenfalls besteht die Gefahr eines Brandes, eines Stromunfalls oder einer Verletzung.
• Verwenden Sie zum Aufladen des Produkts nur die mitgelieferten Adapter.
• Achten Sie während des Aufladens und der Verwendung des Produkts darauf, dass um das Gerät
herum ausreichend Freiraum für eine gute Luftzirkulation gewährleistet ist.
• Decken Sie das Produkt niemals ab, während es aufgeladen wird oder in Betrieb ist.
• Das Produkt sollte nicht in einer staubigen und anderswie verschmutzten Umgebung benutzt
und aufbewahrt werden.
• Das Produkt sollte nicht bei hohen oder niedrigen Temperaturen aufbewahrt werden. Das Pro-
dukt sollte stets trocken gelagert werden.
• Setzen Sie das Gerät und sein Zubehör nicht Feuchtigkeit aus und tauchen Sie es nicht in Flüssig-
keiten. Setzen Sie es weder tropfendem noch spritzendem Wasser aus. Legen Sie auf das Produkt
keine mit Wasser befüllten Behälter wie z.B. Vasen.
• Setzen Sie das Produkt oder sein Zubehör nicht Feuer, übermäßig hohen Temperaturen oder
direkter Sonneneinstrahlung aus. Stellen Sie keine offenen Feuerquellen, wie z.B. brennende Ker-
zen, auf das Produkt und sein Zubehör.
• Verwenden oder lagern Sie das Produkt nicht an Orten, an denen ein offenes Feuer verwendet
wird oder an denen brennbare oder explosive Stoffe verwendet oder gelagert werden.
• Das Gerät darf nicht zerlegt, beschädigt oder kurzgeschlossen werden. Unsachgemäße Eingriffe
können das Produkt beschädigen und zu schwerwiegenden Verletzungen führen.
• Verwenden Sie kein beschädigtes oder verdächtig riechendes Produkt.
• Vermeiden Sie den direkten Kontakt mit der Flüssigkeit und der Batterie, falls die Batterie ausge-
laufen ist. Bei Hautkontakt die betroffene Stelle mit reichlich klarem Wasser abspülen. Sollte die
Flüssigkeit in die Augen eindringen, suchen Sie unverzüglich ärztliche Hilfe auf.
• Wenn das Produkt repariert oder gewartet werden muss, die nicht vom Benutzer selbst durchge-
führt werden kann, wenden Sie sich bitte an eine autorisierte Kundendienststelle. Dieses Produkt
enthält keine Teile, die vom Benutzer selbst repariert werden könnten. Ein unsachgemäßer Um-
gang mit dem Produkt kann zu einem Brand oder einem Stromschlag führen.
• Verwenden Sie zur Reinigung der Oberfläche des Produktes ein weiches, sauberes und trocke-
nes Tuch.
• Produkt niemals auseinandernehmen. Unsachgemäße Eingriffe können das Produkt beschädi-
gen und zu schwerwiegenden Verletzungen führen.
SICHERHEITSHINWEISE
La pagina si sta caricando...
La pagina si sta caricando...
La pagina si sta caricando...
La pagina si sta caricando...
La pagina si sta caricando...
La pagina si sta caricando...
La pagina si sta caricando...
La pagina si sta caricando...
La pagina si sta caricando...
La pagina si sta caricando...
La pagina si sta caricando...
La pagina si sta caricando...
La pagina si sta caricando...
La pagina si sta caricando...
La pagina si sta caricando...
La pagina si sta caricando...
La pagina si sta caricando...
La pagina si sta caricando...
La pagina si sta caricando...
La pagina si sta caricando...
La pagina si sta caricando...
La pagina si sta caricando...
La pagina si sta caricando...
La pagina si sta caricando...
La pagina si sta caricando...
La pagina si sta caricando...
La pagina si sta caricando...
La pagina si sta caricando...
La pagina si sta caricando...
La pagina si sta caricando...
La pagina si sta caricando...
La pagina si sta caricando...
La pagina si sta caricando...
La pagina si sta caricando...
La pagina si sta caricando...
La pagina si sta caricando...
La pagina si sta caricando...
La pagina si sta caricando...
La pagina si sta caricando...
La pagina si sta caricando...
La pagina si sta caricando...
La pagina si sta caricando...
La pagina si sta caricando...
La pagina si sta caricando...
La pagina si sta caricando...
La pagina si sta caricando...
La pagina si sta caricando...
La pagina si sta caricando...
La pagina si sta caricando...
La pagina si sta caricando...
La pagina si sta caricando...
La pagina si sta caricando...
-
 1
1
-
 2
2
-
 3
3
-
 4
4
-
 5
5
-
 6
6
-
 7
7
-
 8
8
-
 9
9
-
 10
10
-
 11
11
-
 12
12
-
 13
13
-
 14
14
-
 15
15
-
 16
16
-
 17
17
-
 18
18
-
 19
19
-
 20
20
-
 21
21
-
 22
22
-
 23
23
-
 24
24
-
 25
25
-
 26
26
-
 27
27
-
 28
28
-
 29
29
-
 30
30
-
 31
31
-
 32
32
-
 33
33
-
 34
34
-
 35
35
-
 36
36
-
 37
37
-
 38
38
-
 39
39
-
 40
40
-
 41
41
-
 42
42
-
 43
43
-
 44
44
-
 45
45
-
 46
46
-
 47
47
-
 48
48
-
 49
49
-
 50
50
-
 51
51
-
 52
52
-
 53
53
-
 54
54
-
 55
55
-
 56
56
-
 57
57
-
 58
58
-
 59
59
-
 60
60
-
 61
61
-
 62
62
-
 63
63
-
 64
64
-
 65
65
-
 66
66
-
 67
67
-
 68
68
-
 69
69
-
 70
70
-
 71
71
-
 72
72


alza power APW-PS600 Portable Battery Replaceable Power Station Manuale utente
- Tipo
- Manuale utente
in altre lingue
- English: alza power APW-PS600 Portable Battery Replaceable Power Station User manual
- français: alza power APW-PS600 Portable Battery Replaceable Power Station Manuel utilisateur
- Deutsch: alza power APW-PS600 Portable Battery Replaceable Power Station Benutzerhandbuch
- slovenčina: alza power APW-PS600 Portable Battery Replaceable Power Station Používateľská príručka
- čeština: alza power APW-PS600 Portable Battery Replaceable Power Station Uživatelský manuál
- română: alza power APW-PS600 Portable Battery Replaceable Power Station Manual de utilizare
Documenti correlati
-
alza power APW-PS400V2 Manuale utente
-
 alza power APW-SC2A1D2C200 Solar Charger Manuale utente
-
alza power APW-SC2A1D2C200 Manuale utente
-
alza power APW-MP2A3CGD1 GaN Travel Charger Manuale utente
-
alza power APW-PBPA30PD60x Manuale utente
-
alza power APW-CCA125x Manuale utente
-
alza power APW-CCA120 Manuale utente
-
 alza power APW-CCG165x Manuale utente
-
alza power APW-PHACPB01B Manuale utente


Altri documenti
-
Evolveo PowerCharge 1000 Manuale utente
-
 ETERNICO AET-MS430Sx Wireless Mouse Manuale utente
-
ETERNICO AET-SS20B Eternico Selfie Stick Manuale utente
-
Norauto 2223449 Manuale utente
-
Bigben CL800I Manuale utente
-
EINHELL Expert FREELEXO 500 BT Manuale utente
-
EINHELL Expert FREELEXO 1200 LCD BT Manuale utente
-
Yamaha mcr 040lb Manuale del proprietario
-
GYS POWER PACK 1500 POWER SUPPLY Manuale del proprietario
-
Samsung VR05R5050WK Manuale utente
