
Confi guration requise
Console
• Moniteur VGA, SVGA ou Multisync prenant en charge la plus haute résolution utilisée
sur les ordinateurs à installer
• Une souris USB
• Un clavier USB
Ordinateur
Les composants suivants doivent être installés sur chaque ordinateur :
• Une carte VGA, SVGA ou Multisync
• Un port USB de type A ou des ports souris et clavier PS/2
Câbles
Seuls les jeux de câbles spécialement conçus pour ce commutateur peuvent être
utilisés pour la connexion aux ordinateurs. 2/4 jeux de câbles sont fournis avec le
CS-1732A/CS-1734A.
Présentation du matériel
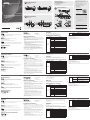
Vue avant
1. Boutons de Sélection de Port
2. LEDs de Port
3. Ports USB Console
2/4 port USB KVMP Switch Quick Start Guide
Requirements
Console
• A VGA, SVGA, or Multisync monitor capable of the highest resolution that you
will be using on any computer in the installation.
• A USB mouse
• A USB keyboard
Computer
The following equipment must be installed on each computer:
• A VGA, SVGA or Multisync card.
• USB Type A port, or PS/2 keyboard and mouse ports.
Cables
Only cable sets specifi cally designed to work with this switch may be used to link
to the computers. 2/4 cables sets are provided with the CS-1732A/CS-1734A
package.
Hardware Review
Front View
1. Port Selection Switches
2. Port LEDs
3. USB Console Ports
Rear View
1. Console Audio Jacks
2. USB Peripheral ports
3. Firmware Upgrade Section
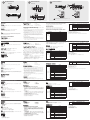
Hardware Installation
1. Plug your USB keyboard and USB mouse into the USB ports located on the
unit's front panel.
2. Plug your monitor, speakers and microphone into the console monitor, speaker
and microphone ports located on the unit's rear panel.
3. Plug the KVM cable's SPHD connector into any available CPU port on the
switch.
Plug the accompanying microphone and speaker cables into the CPU port's
microphone and speaker jacks. Be sure that all the plugs are in the same CPU
port sockets (all in port 1, all in Port 2, etc.).
4. At the other end of the cable:
a. For a USB connection, plug the USB, video, microphone and speaker
cables into their respective ports on the computer.
b. For a PS/2 connection, plug the keyboard, mouse, video, microphone and
speaker cables into their respective ports on the computer.
5. Repeat steps 3 and 4 for any other computers you are connecting up.
6. If you choose to use external power, plug the power adapter cable into the
switch's Power Jack, then plug the power adapter into an AC power source.
7. Turn on the power to the computers.
Operation
1. Invoking Hotkey Mode: Press [Scroll Lock] twice
2. Cycle through the Ports: [Scroll Lock] [Scroll Lock] [Enter]
Detailed Hotkey Operations
Hotkeys Action
[Scoll Lock]
[Scoll Lock]
[Enter]
Switches KVM focus + Audio + Peripheral to
the next Port
[n] [Enter]
Switches KVM focus + Audio + Peripheral to
Port n
[n] [K] [Enter] Switches KVM focus to Port n
[n] [U] [Enter] Switches Peripheral to Port n
[n] [S] [Enter] Switches Audio to Port n
[n] [K] [U]
[Enter]
Switches KVM focus + Peripheral to Port n
[n] [K] [S]
[Enter]
Switches KVM focus + Audio to Port n
[n] [S] [U]
[Enter]
Switches Audio + Peripheral to Port n
[n] [K] [S] [U]
[Enter]
Switches KVM focus + Audio + Peripheral to
Port n
[K] [Enter] witches KVM focus to the next Port
[U] [Enter] Switches Peripheral to the next Port
[S] [Enter] Switches Audio to the next Port
Vue arrière
1.Fiches Audio de Console
2. Section de Périphérique USB
3. Section de Mise à Jour du Matériel
Installation matérielle
1. Branchez votre clavier et souris USB dans les Ports USB situés sur le panneau
avant de l'nité.
2. Branchez votre moniteur dans le Port du Moniteur de la Console situé sur le
panneau arrière de l'nité. Branchez votre moniteur dans le port du moniteur de la
console situé sur le panneau arrière de l’appareil.
Branchez les connecteurs du haut-parleur et du microphone fournis dans les prises
appropriées.
3. Branchez le connecteur SPHD du câble KVM dans tout port de CPU disponible sur
le Commutateur. Branchez les câbles du microphone et des haut-parleurs dans les
fi ches de microphone et haut-parleurs du CPU. Assurez-vous que toutes les prises
soient bien identiques aux socles des Ports du CPU (tout dans Port 1, tout dans
Port 2, etc.).
4. Sur l'utre bout du câble:
a. Pour une connexion USB, branchez les câbles USB, vidéo, du microphone et des
haut-parleurs dans leurs ports respectifs sur l'rdinateur.
b. Pour une connexion PS/2, branchez les câbles du clavier, de la souris, vidéo, du
microphone et des haut-parleurs dans leurs ports respectifs sur l'rdinateur.
5. Répétez les étapes 3 et 4 pour tous les ordinateurs que vous connectez.
6. Si vous choisissez d'tiliser un circuit électrique externe, branchez le câble de
l'daptateur électrique dans la Fiche Electrique du Commutateur, puis branchez
l'daptateur dans une prise électrique CA.
7. Allumez tous les ordinateurs..
Opération
1. Invocation du mode Raccourcis clavier : Appuyez deux fois sur [Scoll Lock]
2. Passez en vue les ports : [Scoll Lock] [Scoll Lock] [Entrée]
Opérations détaillées des raccourcis clavier
Raccourcis clavier Action
[Scoll Lock]
[Scoll Lock]
[Entrée]
Centre l’activité du KVM + son + périphérique
sur le port suivant
[n] [Entrée]
Centre l’activité du KVM + son + périphérique
sur le port n
[n] [K] [Entrée] Centre l’activité du KVM sur le port n
[n] [U] [Entrée] Bascule le périphérique vers le port n
[n] [S] [Entrée] Bascule le son vers le port n
[n] [K] [U]
[Entrée]
Centre l’activité du KVM + périphérique sur le
port n
[n] [K] [S]
[Entrée]
Centre l’activité du KVM + son sur le port n
[n] [S] [U]
[Entrée]
Bascule le son + périphérique vers le port n
[n] [K] [S] [U]
[Entrée]
Centre l’activité du KVM + son + périphérique
sur le port n
[K] [Entrée] Centre l’activité du KVM sur le port suivant
Guide de Démarrage Rapide du CS1732A/CS1734A Commutateur KVMP 2/4 ports USB
Voraussetzungen
Konsole
• Ein VGA-, SVGA- oder Multisync-Monitor, der in der Lage ist, die höchste Aufl ösung
darzustellen, die Sie auf einem der zu installierenden Computer verwenden möchten.
• Eine USB-Maus
• Eine USB-Tastatur
Computer
Für jeden Computer muss Folgendes installiert werden:
• Eine VGA-, SVGA- oder Multisync-Grafi kkarte
• Ein USB-Anschluss Typ A oder ein PS/2-Tastatur- und Mausanschluss
Kabel
Verwenden Sie nur speziell für diesen Switch entwickelte Kabelsets, um das Gerät mit
den Computern zu verbinden. 2 bzw. 4 Kabelsets werden bereits mit dem CS-1732A/
CS-1734A mitgeliefert.
Hardwareübersicht
Vorderseitige Ansicht
1. Schalter für die Auswahl der Ports
2. Port-LEDs
3. USB-Ports Konsole
Rückseitige Ansicht
1. Audiobuchsen der Konsole
2. Bereich der USB-Peripherie
3. Bereich für Firmware-Upgrade
Hardware installieren
1. Schließen Sie die USB-Tastatur und –Maus an die USB-Ports an, die sich an der
Vorderseite des Geräts befi nden.
2. Schließen Sie den Monitor an den Monitoranschluss der Konsole an, der sich an
der Rückseite des Geräts befi ndet. Verbinden Sie Ihren Monitor mit dem Monitor-
Konsolanschluss auf der Geräterückseite.
Verbinden Sie die zugehörigen Lautsprecher- und Mikrofonkabel mit den
entsprechendenBuchsen.
3. Stecken Sie den SPHD-Stecker des KVM-Kabels an einen freien CPU-Port des
Schalters. Schließen Sie die dazugehörigen Mikrofon- und Lautsprecher-Kabel an
die Mikrofon- und Lautsprecherbuchsen des CPU-Ports an. Achten Sie darauf, dass
sich alle Stecker in den Sockeln desselben CPU-Ports befi nden (alle in Port 1, alle
in Port 2, etc.).
4. Und so verfahren Sie mit dem anderen Ende der Kabel:
a. Schließen Sie für einen USB-Anschluss die USB-, Monitor-, Mikrofon- und
Lautsprecherkabel an die entsprechenden Anschlüsse des Computers an.
b. Schließen Sie für einen PS/2-Anschluß die Tastatur-, Maus-, Monitor-,
Mikrofon- und Lautsprecherkabel an die entsprechenden Anschlüsse des
Computers an.
5. Wiederholen Sie die Schritte 3 und 4 für jeden weiteren Computer, der
zusätzlich angeschlossen wird.
6. Wenn das Gerät an das Stromnetz angeschlossen wird, schließen Sie das eine
Ende des Netzadapterkabels an die Netzanschlussbuchse des Schalters und das
andere an eine Netzsteckdose an.
7. Schalten Sie die Computer ein.
Bedienung
1. Hotkey-Modus aktivieren: Drücken Sie zweimal die Taste [Scoll Lock]
2. Zwischen den Ports umschalten: [Scoll Lock] [Scoll Lock] [Enter]
Hotkey-Funktionen im Detail
Hotkeys Aktion
[Scoll Lock]
[Scoll Lock]
[Enter]
Schaltet KVM-Fokus + Audio + Peripheriegerät
auf den nächsten Port
[n] [Enter]
Schaltet KVM-Fokus + Audio + Peripheriegerät
auf den Port n
[n] [K] [Enter] [Schaltet den KVM-Fokus auf Port n
[n] [U] [Enter] Schaltet das Peripheriegerät auf Port n
[n] [S] [Enter] Schaltet die Audiogeräte auf Port n
[n] [K] [U] [Enter]
Schaltet den KVM-Fokus + Peripheriegerät auf
Port n
[n] [K] [S] [Enter] Schaltet den KVM-Fokus + Audio auf Port n
[n] [S] [U] [Enter]
Schaltet das Audiogerät + Peripheriegerät auf
Port n
[n] [K] [S] [U]
[Enter]
Schaltet KVM-Fokus + Audio + Peripheriegerät
auf den Port n
[K] [Entrée] Schaltet den KVM-Fokus auf den nächsten Port
USB KVMP-Schalter (2/4 Ports) CS1732A/CS1734A Kurzanleitung
Requisitos
Consola
• Un monitor VGA, SVGA o Multisync capaz de representar la resolución más elevada
que vaya a usar con cualquiera de los ordenadores a instalar
• Un ratón USB
• Un teclado USB
Ordenador
En cada ordenador se tienen que instalar los siguientes componentes:
• Una tarjeta gráfi ca VGA, SVGA o Multisync
• Un puerto USB con conector de tipo A o bien puertos para teclado y ratón PS/2
Cables
Sólo debe emplear juegos de cables especialmente diseñados para este conmutador
para la conexión a los ordenadores. 2/4 juegos de cables están incluidos con el
CS-1732A/CS-1734A.
Aspectos generales del hardware
Vista frontal
1. Switch di selezione delle porte
2. LED delle porte
3. Porte USB Console
Vista posterior
1. Prese audio console
2. Sezione periferiche USB
3. Sezione di upgrade del fi rmware
Instalación del hardware
1. Inserire la tastiera USB ed il mouse USB nelle Porte USB sul pannello anteriore
dell'unità.
2. Inserire il monitor nella porta monitor della Console sul pannello posteriore dell'unità.
Conecte su monitor al puerto de consola para monitor ubicado en el panel posterior
de la unidad.
Establezca las conexiones para altavoces y micrófono correspondientes con los
puertos de conexión adecuados.
3. Collegare il connettore SPHD del cavo del KVM in una porta CPU disponibile
sullo switch. Collegare il microfono in dotazione ed i cavi delle casse alle prese
microfono e casse della porta CPU. Assicurarsi che tutte le spine siano nelle stesse
prese della porta CPU (tutte nella Porta 1, tutte nella Porta 2 ecc.).
4. All’altra estremità del cavo:
a. Per una connessione USB, collegare i cavi USB, video, microfono e casse nelle
porte rispettive del computer.
b. Per una connessione PS/2, collegare i cavi di tastiera, mouse, video, microfono e
casse nelle porte rispettive del computer.
5. Ripetere le fasi 3 e 4 per qualunque altro computer che si vuole collegare.
6. Se si sceglie l’alimentazione esterna, collegare il cavo dell’adattatore di corrente
alla presa di alimentazione dello switch, poi collegare l’adattatore ad una presa di
corrente AC.
7. Accendere i computer.
Operación
1. Para activar el modo de las teclas de acceso directo: Pulse dos veces la tecla
[Scoll Lock].
2. Alternar entre los puertos: [Scoll Lock] [Scoll Lock] [Intro]
Funciones de las teclas de acceso directo en detalle
Teclas de acceso directo Acción
[Scoll Lock]
[Scoll Lock]
[Intro]
Cambia el foco KVM + Audio + Periférico al
puerto siguiente
[n] [Intro]
Cambia el foco KVM + Audio + Periférico al
puerto n
[n] [K] [Intro] Cambia el foco KVM al puerto n
[n] [U] [Intro] Cambia el periférico al puerto n
[n] [S] [Intro] Cambia el audio al puerto n
[n] [K] [U] [Intro] Cambia el foco KVM + Periférico al puerto n
[n] [K] [S] [Intro] Cambia el foco KVM + Audio al puerto n
[n] [S] [U] [Intro] Cambia el Audio + Periférico al puerto n
Guida di avvio rapido KVMP Switch CS1732A/CS1734A 2/4 porte USB
4. Power Jack
5. Monitor Port
6. CPU Port Section
4.Fiche Electrique
5. Port Moniteur
6. Section du Port de CPU
[U] [Entrée] Bascule le périphérique vers le port suivant
[S] [Entrée] Bascule le son vers le port suivant
[A] [Entrée]
Démarre la fonction Recherche automatique à
des intervalles de 5 secondes (par défaut)
[A] [n] [Entrée]
Démarre la fonction Recherche automatique à
des intervalles de n secondes
[n] représente un nombre entre 1-99
[K] représente la sélection du KVM
[U] représente le périphérique USB
[S] représente les haut-parleurs et le microphone
[A] représente la fonction Recherche automatique
Pour une liste complète des fonctions Raccourcis clavier, consultez le Manuel de
l’utilisateur
[U] [Entrée]
Schaltet das Peripheriegerät auf den nächsten
Port
[S] [Entrée] Schaltet das Audiogerät auf den nächsten Port
[A] [Entrée]
Startet die automatische Suchfunktion mit einer
Intervalldauer von 5 Sekunden (Standard)
[A] [n] [Entrée]
Startet die automatische Suchfunktion mit einer
Intervalldauer von n Sekunden
[n] steht für eine Zahl zwischen 1-99
[K] steht für den KVM-Fokus
[U] steht für das USB-Gerät
[S] steht für Lautsprecher und Mikrofon
[A] steht für die automatische Suchfunktion
Ein vollständige Liste der Hotkey-Funktionen fi nden Sie im Benutzerhandbuch.
[n] [K] [S] [U]
[Intro]
Cambia el foco KVM + Audio + Periférico al
puerto n
[K] [Intro] Cambia el foco KVM al puerto siguiente
[U] [Intro] Cambia el periférico al puerto siguiente
[S] [Intro] Cambia el audio al puerto siguiente
[A] [Intro]
Inicia la búsqueda automática con un intervalo
de 5 segundos (por defecto)
[A] [n] [Intro]
Inicia la búsqueda automática con un intervalo
de n segundos
[n] representa un número entre 1 y 99
[K] representa el foco KVM
[U] representa el dispositivo USB
[S] representa los altavoces y al micrófono
[A] representa la función de búsqueda automática
Para una lista completa de todas las teclas de acceso directo, véase el manual del
usuario.
A
B
C
[A] [Enter]
Begins Auto Scan function at 5 second
intervals (default)
[A] [n] [Enter] Sets Auto Scan function at n second intervals
[n] represents a number between 1-99
[K] represents the KVM focus
[U] represents the USB device
[S] represents the speakers and microphone
[A] represents Auto Scan function
For a complete list of Hotkey functions, refer to the User manual
4. Netzanschlussbuchse
5. Monitoranschluss
6. Bereich des CPU-Ports
4. Presa di alimentazione
5. Porta monitor
6. Sezione porte CPU
A
B
C
A
B
C
A
B
C
© Copyright 2019 ATEN
®
International Co., Ltd.
ATEN and the ATEN logo are trademarks of ATEN International Co., Ltd. All rights reserved. All
other trademarks are the property of their respective owners.
Part No. PAPE-1223-P04G Printing Date: 06/2019
2/4-Port USB KVMP
™
Switch
Quick Start Guide
CS1732A/CS1734A
Support and Documentation Notice
All information, documentation, fi rmware,
software utilities, and specifi cations contained in
this package are subject to change without prior
notifi cation by the manufacturer.
To reduce the environmental impact of our
products, ATEN documentation and software can
be found online at
http://www.aten.com/download/
Technical Support
www.aten.com/support
이 기기는 가정용(B급) 전자파적합기기로서 주로 가정에서 사용하는 것을
목적으로 하며, 모든 지역에서 사용할 수 있습니다.
Important. Before proceeding, download the Installation and
Operation Manual by visiting the website, www.aten.com and
navigating to the product page. The manual includes important
warnings, loading specifi cations and grounding instructions.
Scan for
more information
EMC Information
FEDERAL COMMUNICATIONS COMMISSION INTERFERENCE STATEMENT:
This equipment has been tested and found to comply with the limits for
a Class B digital service, pursuant to Part 15 of the FCC rules. These limits
are designed to provide reasonable protection against harmful interference
in a residential installation. Any changes or modifi cations made to this
equipment may void the user s authority to operate this equipment. This
equipment generates, uses, and can radiate radio frequency energy. If not
installed and used in accordance with the instructions, may cause harmful
interference to radio communications. However, there is no guarantee that
interference will not occur in a particular installation. If this equipment does
cause harmful interference to radio or television reception, which can be
determined by turning the equipment off and on, the user is encouraged to
try to correct the interference by one or more of the following measures:
- Reorient or relocate the receiving antenna;
- Increase the separation between the equipment and receiver;
- Connect the equipment into an outlet on a circuit different from
that to which the receiver is connected;
- Consult the dealer/an experienced radio/television technician for help.
FCC Caution: Any changes or modifi cations not expressly approved by the
party responsible for compliance could void the user's authority to operate
this equipment.
This device complies with Part 15 of the FCC Rules. Operation is subject
to the following two conditions: (1) this device may not cause harmful
interference, and (2) this device must accept any interference received,
including interference that may cause undesired operation.
1 CS1732A/CS1734A USB KVMP Switch
2/4 Custom KVM Cable Sets
1 Firmware Upgrade Cable
1 User Instructions
Package Contents:
A
www.aten.com
www.aten.com
www.aten.com
www.aten.com
Hardware Review
Hardware Review
B
1
2
3
1
2
5 6
3
4
1
2
3
Hardware Installation
C
1
2 3
4
5 6
1
2
3
4
6
a
4
b
4
Front View
Rear View
To prevent damage to your installation from power surges or static electricity,
it is important that all connected devices are properly grounded.

Guía de Inicio Rápido para 2/4 puerto USB KVMP con interruptor CS1732A/CS1734A
Requisiti
Console
• un monitor VGA, SVGA o Multisync, con la più alta risoluzione fra quelle utilizzate
dai computer collegati
• Un mouse USB
• Una tastiera USB
Computer
In ogni computer deve essere installato il seguente equipaggiamento:
• una scheda VGA, SVGA o Multisync
• Una porta USB di tipo A o porte PS/2 per tastiera e mouse
Cavi
Per le connessioni ai computer, si possono utilizzare solamente cavi appositamente
progettati per operare con questo switch. Nella confezione dello switch CS-1732A/
CS-1734A sono inclusi 2/4 set di cavi.
Panoramica sull’hardware
Visione anteriore
1. Interruptores de Selección de Puertos
2. LEDs de Puerto
3. Portaconsolas USB
Visione posteriore
1. Portaconsolas Audio
2. Sección Periferal USB
3. Sección de Modernización de Firmware
Installazione dell'hardware
1. Enchufa su teclado USB y el mouse USB en los Puertos USB localizados en el panel
frontal del aparato.
2. Enchufa su monitor en el puerto de monitor de consola localizado en el panel trasero
del aparato. 2. Collegare il monitor alla porta per il monitor della console posta sul
pannello posteriore del dispositivo.
Inserire gli spinotti di connessione dei diffusori e del microfono in dotazione alle
prese corrispondenti.
3. Enchufa el conector SPHD del cable KVM en cualquier Puerto CPU disponible en el
interruptor. Enchufa el micrófono acompañante y los cables del altavoz en el
micrófono del Puerto CPU y los portaaltavoces. Esté seguro de que todos los
enchufes están en los mismos soquetes de Puerto CPU (todos en Puerto 1, todos
en Puerto 2, etc.).
4. En la otra punta del cable:
a. Para la conexión USB, enchufa los cables del USB, video, micrófono y altavoz en
los respectivos puertos en la computadora.
b. Para la conexión PS/2, enchufa los cables del teclado, mouse, video, micrófono y
altavoz en los respectivos puertos en la computadora.
5. Repite los pasos 3 y 4 para cualesquier otras computadoras Ud. está conectando.
6. Si Ud. decide usar electricidad externa, enchufa el cable adaptador en el portador
del interruptor, para luego enchufar el adapador en una fuente AC.
7. Prende las computadoras.
Funzionamento
1. Modalità di richiesta del tasto chiave: Premere [Bloc Scorr] due volte
2. Spostarsi ciclicamente fra le porte: [Bloc Scorr] [Bloc Scorr] [Invio]
Funzionamento dettagliato dei tasti chiave
Tasti chiave Azione
[Bloc Scorr]
[Bloc Scorr]
[Invio]
Sposta KVM + Audio + periferica alla porta
successiva
[n] [Invio] Sposta KVM + Audio + periferica alla porta n
[n] [K] [Invio] Sposta KVM alla porta n
[n] [U] [Invio] Sposta la periferica alla porta n
[n] [S] [Invio] Sposta l’audio alla porta n
[n] [K] [U] [Invio] Sposta KVM + periferica alla porta n
[n] [K] [S] [Invio] Sposta KVM + audio alla porta n
[n] [S] [U] [Invio] Sposta audio + periferica alla porta n
6. 外部電源を使用する場合は、本スイッチの電源ジャックにACアダプタのケーブル
を差し込んでから、ACアダプタを電源コンセントに差し込んでください。
7. コンピューターの電源を入れてください。
操作方法
1. ホットキーモードの起動: [Scroll Lock]キーを2回たたいてください。
2. ポートを順に切り替える: [Scroll Lock] [Enter]
ホットキー操作方法
ホットキー 機能
[Scoll Lock]
[Scoll Lock]
[Enter]
KVM
フォーカス +オーディオ +USB周辺機器を
同時に次のポートへと切り替える。
[n] [Enter]
KVM
フォーカス + オーディオ + USB周辺機器を
同時にポートnへと切り替える。
[n] [K] [Enter]
[KVM
フォーカスのみをポートnに切り替える。
[n] [U] [Enter]
USB
周辺機器のみをポートnに切り替える。
[n] [S] [Enter]
オーディオのみをポートnに切り替える。
[n] [K] [U]
[Enter]
KVMフォーカス + USB周辺機器をポートnに切り
替える
。
[n] [K] [S]
[Enter]
KVMフォーカス + オーディオをポートnに切り
替える。
システム必要環境
コンソール
• 接続するコンピュータの解像度に適したVGA、SVGAまたはマルチシンク対応モ
ニタ
• USBキーボード
• USBマウス
コンピュータ
接続するコンピュータが以下の装置を搭載している必要があります。
• VGA、SVGA またはマルチシンクカード
• USB タイプA ポートまたは PS/2キーボード・マウスポート
ケーブル
ケーブルはこの製品とコンピュータの接続にのみご使用ください。CS-1732Aには2
本、CS-1734Aには4本のケーブルが同梱されています。
製品各部名称
フロントビュー
1. ポートセレクトスイッチ
2. ポートLED
3. USBコンソール ポート
リアビュー
1. コンソールオーディオジャック
2. USBデバイスセクション
3. ファームウェアアップグレードセクション
ハードウェアセットアップ
1. 本スイッチのフロントパネルにあるUSBポートにUSBキーボードとUSBマウスを
差し込んでください。
2. 本スイッチのリアパネルにあるコンソールモニターポートにモニターを差し込んで
ください。モニターをスイッチのリアパネルにあるコンソールモニターポートに接
続してください。スピーカーとマイクをそれぞれ対応するジャックに接続してくださ
い。
3. 本スイッチの任意のCPUポートにKVMケーブルのSPHDコネクタを差し込んでく
ださい。また、このケーブルについているマイクロフォンとスピーカーケーブルを
CPUポーのマイクロフォンとスピーカージャックに差し込んでください。必ず全ての
プラグが同じ
CPUポートソケット(全てポート1、全てポート2・・・等)に差し込
まれていることを
確認してください。
4. ケーブルの反対側:
a. USB接続に関しては、USB, モニター、マイクロフォンとスピーカーケーブルを
それぞれコンピューターの対応するポートに差し込んでください。
b. PS/2接続に関しては、キーボード、マウス、モニター、マイクロフォンとスピー
カーをコンピューターの対応するポートに差し込んでください。
5. 手順3と4を繰り返して他のコンピューターを接続してください。
マスタービュー2ポート/4ポートUSB KVMPスイッチCS1732A/CS1734A クイックスタートガイド
2/4 포트 USB KVMP 스위치 CS1732A/CS1734A 간략 운용 가이드
요구사양
콘솔
• VGA, SVGA, 또는 사용자의 설치하려는 장비에 고해상도를 지원하는 멀티씽크
모니터
• USB 타입 마우스
• USB 타입 키보드
컴퓨터
설치하려는 각 컴퓨터에 다음과 같은 장비가 설치되어야 합니다.
• VGA, SVGA
또는 멀티씽크 카드
• USB 포트, 또는 PS/2 키보드와 마우스 포트
케이블
본 제품과 사용자의 컴퓨터에 연결하여 사용하는 케이블은 스위치와 특별히 고안된 케
이블을
사용하셔야 합니다. 2/4 케이블 세트가 본 CS-1732A/CS-1734A 제품 패키지
에
포함되어 있습니다.
하드웨어 요구사양
정면도
1. 포트 선택 스위치
2. 포트 LED
3. USB 콘솔 포트
후면도
1. 콘솔 오디오 잭
2. USB허브 포트
3. 펌웨어 업그레이드 소켓
하드웨어 설치방법
1. 앞면의 USB 포트에 USB키보드와 USB 마우스를 연결한다.
2. 모니터를 뒷면의 콘솔 모니터 포트에 연결한다. 스피커와 마이크로폰도콘솔 모니터
포트의 잭에 각각 연결한다. 모니터, 스피커 및 마이크로폰을 장비후면에 있는 콘솔
의 모니터, 스피 커 및 마이크로폰 포트에 각각 연결한다.
3. 제공된 케이블 세트를 KVM스위치의 CPU포트 연결 부분의 비디오 소켓 에 연결하
고, 동시 에 케이블에 있는 스피커와 마이크로폰 잭도 KVM스위치에 연결한다.
4. KVM스위치에 케이블 연결이 끝나면, 케이블의 다른 한쪽도 컴퓨터 본 오, 스피커,
마이크로폰 잭에 연결한다. 이때에 사용하고자 하는 KVM 스위치 포트에 사용 하고
자 하는 컴퓨터가 연결되었는지 확인한다.
5. 3,4번 동작을 반복해서 다른 컴퓨터에도 연결한다.
6. 전원 아답터 케이블을 KVM 스위치의 파워잭에 연결한 뒤, 전원 아답터를 AC 전원
소스에 연결한다. (선택사항)
7. 컴퓨터의 전원을 켠다.
사용방법
1. 핫키 모드에 들어 가기: [Scoll Lock] 키를 두 번 친다.
2. 포트 자동 변환 방법: [Scoll Lock] [Enter]을 순서대로 치면 현재 포트에서 다음 포
트로 자동 전환 된 다.
자세한 핫키 사용방법
핫 키 동작상태
[Scoll Lock]
[Scoll Lock]
[Enter]
컴퓨터
, 오디오, USB 허브가 현재 사용중인 포트
에서
다음 포트로 모두 변환 된다.
[n] [Enter]
컴퓨터
, 오디오, USB 허브가 모두 포트[n]으로 변
환된다
.
[n] [K] [Enter]
컴퓨터
포트만 포트[n]으로 변환 된다.
[n] [U] [Enter]
USB허브만 포트[n]으로 변환 된다.
[n] [S] [Enter]
오디오
포트만 포트[n]으로 변환 된다.
[n] [K] [U]
[Enter]
컴퓨터와
USB허브만 포트[n]으로 변환 된다.
[n] [K] [S]
[Enter]
컴퓨터와
오디오 포트만 포트[n]으로 변환 된다.
[n] [S] [U]
[Enter]
오디오와
USB허브만 포트[n]으로 변환 된다.
[n] [K] [S] [U]
[Enter]
컴퓨터
, 오디오, USB허브 모두가 포트[n]으로 변
환
된다.
[K] [Enter]
컴퓨터만
다음 포트로 변환 된다.
[U] [Enter]
USB 허브만 다음 포트로 변환 된다.
[S] [Enter]
오디오만
다음 포트로 변환 된다.
后视图
硬件安装
电脑
电脑
电脑
电脑
电脑
电脑
电脑
电脑
电脑
[Scoll Lock]
[Scoll Lock]
[Enter]
[n] [Enter]
[n] [K] [Enter]
[n] [U] [Enter]
[n] [S] [Enter]
[n] [K] [U]
[Enter]
[n] [K] [S]
[Enter]
[n] [S] [U]
[Enter]
[n] [K] [S] [U]
[Enter]
系统需求
控制端
• 一组VGA, SVGA,或Multisync 的显示器,可支持安装架构下任何电脑
将使用的最高分辨率
• 一组USB鼠标
• 一组USB键盘
电脑
各台电脑必须安装以下设备:
•
一组VGA, SVGA 或Multisync显示卡
• 一组USB 连接 口,或PS/2 键盘和鼠标连接 口.
线材
只有为本切换器所特制的线材组可用于连接电脑,CS-1732A/CS-1734A
提供2/4组线材
硬件检视
前视图
1. 切换鈕
2. 连接口指示燈
3. 主控端USB键盘/鼠标连接 口
USB KVMP 切换器 CS1732A/CS1734A 快速安裝卡
• VGA,SVGA, Multisync
• USB
• USB
:
•
VGA, SVGA Multisync
• USB PS/2 .
CS-1732A /CS-1734A
2/4
1.
2.
3. USB /
1.
2.
3.
1. USB , KVM USB
2. KVM
3. SPHD , KVM ,
, KVM .
, ( : 1
2 )
4.
a. USB , USB, ,
b. PS/2 , PS/2 , , ,
5. , 3 4
6. , KVM
7. ,
1. : [Scroll Lock] 2
2. : [Scroll Lock] [Scroll Lock] [Enter]
[Scoll Lock]
[Scoll Lock]
[Enter]
KVM + +
[n] [Enter]
KVM + + n
[n] [K] [Enter]
KVM n
[n] [U] [Enter]
n
[n] [S] [Enter]
n
[n] [K] [U]
[Enter]
KVM + n
[n] [K] [S]
[Enter]
KVM + n
[n] [S] [U]
[Enter]
+ n
[n] [K] [S] [U]
[Enter]
KVM + + n
[K] [Enter]
KVM
[U] [Enter]
USB KVMP CS1732A/CS1734A
4. Portador
5. Puerto de Monitor
6. Sección de Puerto CPU
[n] [K] [S] [U]
[Invio]
[Sposta KVM + Audio + periferica alla porta n
[K] [Invio] Sposta KVM alla porta successiva
[U] [Invio] Sposta la periferica alla porta successiva
[S] [Invio] Sposta l’audio alla porta successiva
[A] [Invio]
Dà inizio alla funzione di scansione automatica
ad intervalli di 5 secondi (predefi niti)
[A] [n] [Invio]
Dà inizio alla funzione di scansione automatica
ad intervalli di n secondi
[n] rappresenta un numero da 1 a 99
[K] rappresenta il KVM
[U] rappresenta il dispositivo USB
[S] rappresenta i diffusori ed il microfono
[A] rappresenta la funzione di scansione automatica
Per un elenco completo dei tasti chiave, fare riferimento al manuale dell’utente.
4. 電源ジャック
5. モニターポート
6. CPUポートセクション
[n] [S] [U]
[Enter]
オーディオ
+ USB周辺機器をポートnに切り替
える。
[n] [K] [S] [U]
[Enter]
KVMフォーカス + オーディオ + USB周辺機器を
同時にポートnへと切り替える。
[K] [Enter]
KVM
フォーカスのみを次のポートへと切り替え
る。
[U] [Enter]
USB
周辺機器のみを次のポートへと切り替える。
[S] [Enter]
オーディオのみを次のポートへと切り替える。
[A] [Enter]
オートスキャン機能をスキャン時間の間隔5秒で
開始する。(初期設定値)
[A] [n] [Enter]
オートスキャン機能をスキャン時間の間隔n秒で開
始する。
[n]は、1-99までの数字。
[K]は、KVMフォーカス。
[U]は、USB周辺機器。
[S]は、スピーカーとマイクロフォン。
[A]は、オートスキャン機能。
ホットキー機能の詳細はユーザーマニュアルを参照してください。
4. 파워 잭
5. 모니터 잭
6. CPU 포트 연결 부분
[A] [Enter]
Auto Scan 기능이 실행된다.
(
5초 간격으로 설정되어 있음)
[A] [n] [Enter]
Auto Scan 기능이[n]초 간격으로 실행 된다.
[n]
1-99사의의 숫자를 의미함.
[K] KVM
스위치의 포트를 의미함.
[U] USB
허브를 의미함.
[S]
스피커와 마이크로폰을 의미함.
[A] Auto Scan
기능을 의미함.
더 자세한 핫키 리스트와 핫키 사용 방법은 사용자 매뉴얼을 참조 바랍니다.
电脑
[K] [Enter]
[U] [Enter]
[S] [Enter]
[A] [Enter]
[A] [n] [Enter]
4.
5.
6.
[S] [Enter]
[A] [Enter]
, 5
[A] [n] [Enter]
, n
[n] 1~99
[K] KVM
[U]
USB
[S] ( )
[A]
A
Hardware Review
Hardware Review
B
1
2
5 6
3
4
1
2 3
4
5 6
A
B
C
A
B
C
A
B
C
A
B
C
A
B
C
Rear View
1
2
3
1
2
3
Front View
Hardware Installation
C
1
2
3
4
6
a
4
b
4
To prevent damage to your installation from power surges or static electricity,
it is important that all connected devices are properly grounded.
www.aten.com
www.aten.com
www.aten.com
电话支持:
+86-400-810-0-810
www.aten.com
Phone: +82-2-467-6789
-
 1
1
-
 2
2


in altre lingue
- English: ATEN CS1732a Quick start guide
- français: ATEN CS1732a Guide de démarrage rapide
- español: ATEN CS1732a Guía de inicio rápido
- Deutsch: ATEN CS1732a Schnellstartanleitung
- 日本語: ATEN CS1732a クイックスタートガイド