
A
Hardware Review
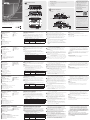
Front View
1
Audio Out (Coaxial)
2
Audio Out (Stereo)
3
Audio Channel Switch
4
IR Port
5
HDMI Audio Out Switch
6
HDMI Video Out
Rear View
1
HDBaseT In
2
RS-232 Serial Port
3
RS-232 Serial Communication Switch
4
Long Reach Mode Switch
5
Firmware Upgrade Switch
6
Power Jack
B
Hardware Installation
To install the VE2812R, refer to the installation diagram above and follow
the steps below:
1
Connect an HDMI-enabled display to the VE2812R’s HDMI Out port.
2
Follow the steps below to set up your audio output.
(a) To use an independent speaker, connect the speaker to the VE2812R’s
Audio Out port (coaxial or stereo) using an appropriate audio cable.
(b) Depending on the interface of your chosen audio output device, adjust
the Audio Channel Switch.
Audio Interface Audio Channel Switch Description
Stereo 2 ch Sets the audio output to channel 2.
Coaxial 5.1 ch Sets the audio output to channel 5.1.
HDMI Auto
Detects the supported audio channel
of the connected HDMI display.
Note: Stereo audio will be mute if the channel is set to Ch5.1.
(c) To mute the audio on the connected HDMI display, put the HDMI
Audio Switch to OFF.
3
Connect the VE2812R’s HDBaseT In port to a video transmitter’s
HDBaseT Out port using a Cat 6a/ATEN 2L-2910 cable.
Note: ATEN recommends pairing the VE2812R with a VE2812T.
4
(Optional) To bypass IR signals to remotely control a device (e.g. blu-ray
disc) connected to the video transmitter, connect an IR receiver to the
VE2812R's IR port and an IR emitter to the VE2812T's IR port.
Note: To purchase an IR receiver and an IR remote control, contact
your local sales representative for more information.
5
(Optional) You can use the RS-232 serial port to do one of the
following:
•
To control the VE2812T using an ATEN Control Box / Control Pad, connect
a Control Box / Control Pad to the VE2812R’s RS-232 Serial port and then
put the RS-232 Serial Communication Switch to Command.
• To bypass RS-232 serial control signals to a PC or a serial device,
connect the PC or serial device (e.g. touch pad) to the VE2812R’s
RS-232 Serial port and put the RS-232 Serial Communication Switch
to Bypass.
B
Hardware Installation
© Copyright 2019 ATEN
®
International Co., Ltd.
ATEN and the ATEN logo are trademarks of ATEN International Co., Ltd. All rights reserved. All
other trademarks are the property of their respective owners.
Part No.PAPE-1223-Q40G Printing Date: 03/2019
HDMI HDBaseT Receiver with Audio
De-Embedding
Quick Start Guide
VE2812R
VE2812R HDMI HDBaseT Receiver with Audio De-Embedding
www.aten.com
Récepteur HDBaseT HDMI VE2812R avec désencapsulation audio
www.aten.com
HDMI-HDBaseT-Empfänger mit Audio-De-Embedding VE2812R
www.aten.com
Receptor de HDMI HDBaseT con Desembededor de audio VE2812R
www.aten.com
Ресивер (приемник) VE2812R HDMI HDBaseT с функцией извлечения звука
www.aten.com
Ricevitore HDMI HDBaseT VE2812R con de-embedding audio
www.aten.com
ATEN VanCryst
™
6
Ground the devices connected to the VE2812R to prevent damages
from power surges or static electricity
.
7
Plug the power cord into the VE2812R’s power jack
.
Long Reach Mode
To extend the VE2812R’s 4K signals up to 150 m, put the Long Reach
Mode Switch to ON.
Package Contents
1 VE2812R HDMI HDBaseT Receiver with Audio De-Embedding
1 RS-232 Terminal Block
4 Foot Pads
1 Power Adapter
1 User Instructions
Support and Documentation Notice
All information, documentation, fi rmware,
software utilities, and specifi cations
contained in this package are subject to
change without prior notifi cation by
the manufacturer.
To reduce the environmental impact of our
products, ATEN documentation and software
can be found online at
http://www.aten.com/download/
Technical Support
www.aten.com/support
이 기기는 업무용(A급) 전자파적합기기로서 판매자 또는
사용자는 이 점을 주의하시기 바라며, 가정외의 지역에
서 사용하는 것을 목적으로 합니다.
Scan for
more information
EMC Information
FEDERAL COMMUNICATIONS COMMISSION INTERFERENCE
STATEMENT:
This equipment has been tested and found to comply with the limits
for a Class A digital device, pursuant to Part 15 of the FCC Rules.
These limits are designed to provide reasonable protection against
harmful interference when the equipment is operated in a commercial
environment. This equipment generates, uses, and can radiate radio
frequency energy and, if not installed and used in accordance with
the instruction manual, may cause harmful interference to radio
communications. Operation of this equipment in a residential area
is likely to cause harmful interference in which case the user will be
required to correct the interference at his own expense.
FCC Caution: Any changes or modifi cations not expressly approved by
the party responsible for compliance could void the user's authority to
operate this equipment.
Warning: Operation of this equipment in a residential environment
could cause radio interference.
This device complies with Part 15 of the FCC Rules. Operation is subject
to the following two conditions: (1) this device may not cause harmful
interference, and (2) this device must accept any interference received,
including interference that may cause undesired operation.
A
Hardware Review
Top View
1
4 5 6
2 3
1
4
5 6
2 3
Top View
1
HDMI Out LED
2
Link LED
3
Power LED
Front View
Rear View
VE2812T
(recommended)
PC
Power
5
3
7
1
4
2
Audio Speaker
HDMI Display
IR Receiver
or /
ATEN Control Box
Control Pad
4
IR Emitter
6
Front View
Rear View
1
2 3
A
Présentation du matériel
Vue de devant
1
Sortie audio (Coaxial)
2
Sortie audio (Stéréo)
3
Commutateur Canal audio
4
Port IR
5
Commutateur Sortie audio HDMI
6
Sortie vidéo HDMI
Vue de derrière
1
Entrée HDBaseT
2
Port série RS-232
3
Commutateur Communication série RS-232
4
Commutateur de mode longue portée
5
Commutateur de mise à niveau du fi rmware
6
Fiche d'alimentation
B
Installation du matériel
Pour installer le VE2812R, consultez le schéma d’installation ci-dessus et
suivez les étapes ci-dessous :
1
Connectez un écran compatible HDMI au port de sortie HDMI du
VE2812R.
2
Suivez les étapes ci-dessous pour confi gurer votre sortie audio.
(a) Pour utiliser un haut-parleur indépendant, connectez le haut-parleur
sur le port de sortie audio (coaxial ou stéréo) du VE2812R à l’aide d’un
câble audio approprié.
(b) En fonction de l’interface du périphérique de sortie audio que vous avez
choisi, ajustez le commutateur Canal audio.
Interface audio
Commutateur Canal
audio
Description
Stéréo 2 ch Règle la sortie audio sur canal 2.
Coaxial 5.1 ch Règle la sortie audio sur canal 5.1.
HDMI Auto
Détecte le canal audio pris en
charge de l’écran HDMI connecté.
Remarque : Le son stéréo est coupé si le canal est réglé sur Ch5.1.
(c) Pour couper le son sur l’écran HDMI connecté, positionnez le
commutateur Audio HDMI sur DÉSACTIVÉ.
3
Connectez le port d’entrée HDBaseT du VE2812R au port de sortie
HDBaseT d’un transmetteur vidéo à l’aide d’un câble Cat 6a/
ATEN 2L-2910.
Remarque : ATEN recommande d’appairer le VE2812R avec un
VE2812T.
4
(En option) Pour contourner les signaux IR et contrôler à distance un
périphérique (par exemple un lecteur de disques blu-ray) connecté au
transmetteur vidéo, connectez un récepteur IR au port IR du VE2812R
et un émetteur IR au port IR du VE2812T.
Remarque : Pour acheter un récepteur IR et une télécommande IR,
contactez votre représentant commercial local pour plus
obtenir d’informations.
5
(En option) Vous pouvez utiliser le port série RS-232 dans l’un des buts
suivants :
•
Pour contrôler le VE2812T à l’aide d’un boîtier de commande / panneau
de commande ATEN, connectez un boîtier de commande / panneau
de commande sur le port série RS-232 du VE2812R puis positionnez le
commutateur Communication série RS-232 sur Commande.
• Pour acheminer les signaux de contrôle série RS-232 vers un PC
ou un périphérique série, connectez le PC ou le périphérique série
(par exemple un pavé tactile) sur le port série RS-232 du VE2812R
et positionnez le commutateur Communication série RS-232 sur
Dérivation.
6
Reliez à la terre les périphériques connectés au VE2812R pour éviter les
dommages causés par les surtensions ou l’électricité statique
.
7
Branchez le cordon d’alimentation dans la prise d’alimentation du
VE2812R
.
Mode Longue portée
Pour étendre les signaux 4K du VE2812R jusqu’à 150 m, positionnez le
commutateur Mode longue portée sur ACTIVÉ.
Vue de dessus
1
LED de sortie HDMI
2
LED Liaison
3
LED d'alimentation
A
Hardwareübersicht
Ansicht von vorne
1
Audioausgang (koaxial)
2
Audioausgang (Stereo)
3
Audiokanalschalter
4
IR-Anschluss
5
HDMI-Audioausgang-Schalter
6
HDMI-Videoausgang
Ansicht von hinten
1
HDBaseT-Eingang
2
Serieller RS-232-Anschluss
3
Serielle-RS-232-Kommunikation-
Schalter
4
Reichweitenschalter
5
Firmware-Aktualisierungsschalter
6
Netzanschluss
B
Hardwareinstallation
Beachten Sie zur Installation des VE2812R die obige Installationsabbildung
und gehen Sie wie folgt vor:
1
Verbinden Sie ein HDMI-fähiges Display mit dem HDMI-Ausgang des
VE2812R.
2
Befolgen Sie die nachstehenden Schritte zur Einrichtung Ihres
Audioausgangs.
(a) Verbinden Sie zur Nutzung eines unabhängigen Lautsprechers den
Lautsprecher über ein geeignetes Audiokabel mit dem Audioausgang
des VE2812R (koaxial oder Stereo).
(b) Passen Sie den Audiokanalschalter je nach Schnittstelle Ihres
ausgewählten Audioausgabegerätes an.
Audioschnittstelle Audiokanalschalter Beschreibung
Stereo 2 Kanal Stellt die Audioausgabe auf Kanal 2 ein.
Koaxial 5.1 Kanal
Stellt die Audioausgabe auf Kanal 5,1
ein.
HDMI Auto
Erkennt den unterstützten Audiokanal
des verbundenen HDMI-Displays.
Hinweis: Stereoton wird stumm geschaltet, falls der Kanal auf Kanal
5.1 eingestellt wird.
(c) Schalten Sie den Ton am verbundenen HDMI-Display stumm, indem
Sie den HDMI-Audioschalter auf Aus einstellen.
3
Verbinden Sie den HDBaseT-Eingang des VE2812R über ein Cat-6a/
ATEN-2L-2910-Kabel mit dem HDBaseT-Ausgang des Videosenders.
Hinweis: ATEN empfi ehlt, VE2812R mit einem VE2812T zu koppeln.
4
(Optional) Zur Umgebung der IR-Signale zur Fernsteuerung eines mit
dem Videosender verbundenen Gerätes (z. B. Blu-ray Disc) verbinden
Sie einen IR-Empfänger mit dem IR-Anschluss des VE2812R und einen
IR-Emitter mit dem IR-Anschluss des VE2812T.
Hinweis: Wenden Sie sich zum Kauf eines IR-Empfängers und einer
IR-Fernbedienung an Ihren örtlichen Händler.
5
(Optional) Über den seriellen RS-232-Anschluss können Sie Folgendes
tun:
•
Verbinden Sie zur Steuerung des VE2812T mittels ATEN-Steuerbox
/ -Bedienfeld besagte(s) Steuerbox / Bedienfeld mit dem seriellen
RS-232-Anschluss des VE2812R, stellen Sie dann den Serielle-RS-232-
Kommunikation-Schalter auf Befehl ein.
• Zur Umgebung serieller RS-232-Steuersignale an einen PC oder ein
serielles Gerät verbinden Sie den PC oder das serielle Gerät (z. B.
Touchpad) mit dem seriellen RS-232-Anschluss des VE2812R und
stellen den Serielle-RS-232-Kommunikation-Schalter auf Bypass ein.
6
Erden Sie mit dem VE2812R verbundene Geräte, damit keine Schäden
durch Überspannung oder statische Elektrizität auftreten
.
7
Schließen Sie das Netzkabel an den Netzanschluss des VE2812R an
.
Reichweitenmodus
Verlängern Sie die 4K-Signale des VE2812R auf bis zu 150 m, indem Sie
den Reichweitenschalter auf Ein setzen.
Ansicht von oben
1
HDMI-Ausgang-LED
2
Verbindung-LED
3
Betriebsanzeige-LED
A
Revisión de hardware
Vista frontal
1
Salida de audio (coaxial)
2
Salida de audio (estéreo)
3
Conmutador de canal de audio
4
Puerto IR
5
Conmutador de salida de audio HDMI
6
Salida de vídeo HDMI
Vista posterior
1
Entrada de HDBaseT
2
Puerto serie RS-232
3
Conmutador de comunicaciones en serie RS-232
4
Interruptor de modo de largo alcance
5
Interruptor de actualización de fi rmware
6
Conector de alimentación
B
Instalación de hardware
Para instalar el VE2812R, consulte el diagrama de instalación anterior y
haga lo siguiente:
1
Conecte una pantalla habilitada para HDMI al puerto de salida HDMI
del VE2812R.
2
Siga los pasos a continuación para confi gurar la salida de audio:
(a) Para utilizar un altavoz independiente, conecte el altavoz al puerto de
salida de audio VE2812R (coaxial o estéreo) mediante un cable de audio
adecuado.
(b) Dependiendo de la interfaz de su dispositivo de salida de audio elegido,
ajuste el Conmutador de canal de audio.
Interfaz de
audio
Conmutador de canal
de audio
Descripción
Estéreo 2 can Establece la salida de audio en canal 2.
Coaxial 5.1 can Establece la salida de audio en canal 5,1.
HDMI Automático
Detecta el canal de audio admitido por
la pantalla HDMI conectada.
Nota: El audio de estéreo estará en silencio si el canal está confi gurado
en Ch5.1.
(c) Para poner el audio en silencio en la pantalla HDMI conectada,
cambie el Conmutador de audio HDMI a posición OFF.
3
Conecte el puerto de entrada de HDBaseT del VE2812R en el puerto
de salida de HDBaseT del transmisor mediante un cable Cat 6a/
ATEN 2L-2910.
Nota: ATEN recomienda emparejar el VE2812R con un VE2812T.
4
(Opcional) Para desviar las señales IR para poder controlar un
dispositivo (p. ej. un disco blu-ray) conectado al transmisor de vídeo de
forma remota, conecte un receptor IR al puerto IR del VE2812R y un
emisor IR al puerto IR del VE2812T.
Nota: Para adquirir un receptor IR y un mando a distancia IR, contacte
con su representante de ventas local para obtener más
información.
5
(Opcional) Puede utilizar el puerto serie RS-232 para realizar lo
siguiente:
•
Para controlar el VE2812T mediante una Caja/panel de control ATEN,
conecte una Caja/panel de control al puerto serie RS-232 del VE2812R y
a continuación, cambie el Conmutador de comunicaciones en serie
RS-232 a posición Comando.
• Para desviar las señales de control en serie RS-232 a un PC o un
dispositivo serie, conecte el PC o dispositivo serie (p. ej. un panel
táctil) al puerto serie RS-232 del VE2812R y cambie el Conmutado de
comunicaciones en serie a posición Derivación.
6
Conecte los dispositivos a tierra que están conectados al VE2812R para
evitar daños relacionados con sobrevoltajes o la electricidad estática
.
7
Enchufe el cable de alimentación en la toma de alimentación del
VE2812R
.
Modo de largo alcance
Para extender las señales 4K del VE2812R hasta 150 m, cambie el
Conmutador de modo de largo alcance a posición ON (activado).
Vista superior
1
LED de salida HDMI
2
LED de enlace
3
LED de alimentación
A
Descrizione hardware
Vista anteriore
1
Uscita audio (coassiale)
2
Uscita audio (stereo)
3
Interruttore canale audio
4
Porta IR
5
Interruttore di uscita audio HDMI
6
Uscita video HDMI
Vista posteriore
1
Ingresso HDBaseT
2
Porta seriale RS-232
3
Interruttore di comunicazione seriale RS-232
4
Interruttore Modalità lungo raggio
5
Interruttore di aggiornamento fi rmware
6
Connettore di alimentazione
B
Installazione dell'hardware
Per installare il VE2812R, fare riferimento allo schema di installazione
precedente ed eseguire i seguenti passaggi:
1
Collegare un display HDMI alla porta di uscita HDMI del VE2812R.
2
Osservare le procedure di seguito per confi gurare l'uscita audio.
(a) Per utilizzare un altoparlante indipendente, collegare l'altoparlante alla
porta di uscita audio del VE2812R (coassiale o stereo) utilizzando un
cavo audio appropriato.
(b) A seconda dell'interfaccia del dispositivo di uscita audio scelto, regolare
l'interruttore canale audio.
Interfaccia
audio
Interruttore canale
audio
Descrizione
Stereo 2 ch Imposta l'uscita audio sul canale 2.
Coassiale 5.1 ch Imposta l'uscita audio sul canale 5.1.
HDMI Auto
Rileva il canale audio supportato del
display HDMI collegato.
Nota: L'audio stereo viene disattivato se il canale viene impostato su
Ch5.1.
(c) Per disattivare l'audio sul display HDMI collegato, portare
l'interruttore audio HDMI su OFF.
3
Collegare la porta di ingresso HDBaseT del VE2812R alla porta di uscita
HDBaseT del trasmettitore video utilizzando un cavo Cat 6a/
ATEN 2L-2910.
Nota: ATEN consiglia di associare il VE2812R ad un VE2812T.
4
(Opzionale) Per bypassare i segnali IR per controllare a distanza un
dispositivo (ad esempio, un disco Blu-ray) collegato al trasmettitore
video, collegare un ricevitore IR alla porta IR del VE2812R e un
emettitore IR alla porta IR del VE2812T.
Nota: Per acquistare un ricevitore IR e un telecomando IR, contattare il
rappresentante locale per ulteriori informazioni.
5
(Opzionale) È possibile utilizzare la porta seriale RS-232 per eseguire
una delle seguenti operazioni:
•
Per controllare il VE2812T utilizzando una scatola comandi/quadro
comandi ATEN, collegare una una scatola comandi/quadro comandi
alla porta seriale RS-232 del VE2812R, quindi portare l'interruttore di
comunicazione seriale RS-232 su Comando.
• Per bypassare i segnali di controllo seriale RS-232 su un PC o un
dispositivo seriale, collegare il PC o il dispositivo seriale (ad esempio,
un touchpad) alla porta seriale RS-232 del VE2812R e portare
l'interruttore di comunicazione seriale RS-232 su Bypass.
6
Collegare a terra i dispositivi collegati a VE2812R per evitare danni
dovuti a sovratensioni o elettricità statica
.
7
Inserire il cavo di alimentazione nel connettore di alimentazione del
VE2812R
.
Modalità lungo raggio
Per estendere i segnali 4K del VE2812R fi no a 150 m, portare l'interruttore
Modalità lungo raggio su ON.
Vista dall'alto
1
LED di uscita HDMI
2
LED Collegamento
3
LED alimentazione
A
Обзор аппаратного обеспечения
Вид спереди
1
Аудиовыход (коаксиальный)
2
Аудиовыход (стерео)
3
Переключатель звуковых каналов
4
ИК-порт
5
Переключатель аудиовыхода HDMI
6
Видеовыход HDMI
Вид сзади
1
Входной разъем HDBaseT
2
Последовательный порт RS-232
3
Переключатель последовательного интерфейса RS-232
4
Переключатель режима Long Reach
5
Переключатель обновления микропрограммы
6
Разъем питания
B
Установка аппаратного обеспечения
Для установки VE2812R выполните следующие действия,
руководствуясь приведенной выше монтажной схемой.
1
Подключите монитор с поддержкой HDMI к выходному разъему
HDMI ресивера VE2812R.
2
Выполните следующие действия для настройки аудиовывода.
(a) Для использования отдельной акустической системы подключите
акустическую систему к аудивыходу (коаксиальному или стерео)
VE2812R соответствующим аудиокабелем.
(b) Отрегулируйте переключатель звуковых каналов в зависимости
от интерфейса выбранного устройства аудиовывода.
Аудиоинтерфейс
Переключатель
звуковых каналов
Описание
Стерео 2 ch Установка 2-канального аудиовывода.
Коаксиальный 5.1 ch
Установка 5.1-канального
ауидовывода.
HDMI Авто
Обнаружение поддерживаемого
звукового канала подключенного
монитора HDMI.
Примечание: Вывод cтереозвука отключается при установке канала Ch5.1.
(c) Чтобы выключить звук на подключенном мониторе HDMI, переведите
переключатель звука HDMI в положение OFF (ВЫКЛ.).
3
Подключите входной разъем HDBaseT ресивера VE2812R к выходному
разъему HDBaseT передатчика видеосигнала кабелем кат. 6a/ATEN 2L-2910.
Примечание: ATEN рекомендует выполнять сопряжение VE2812R с
VE2812T.
4
(Дополнительно) Для проброса (прямой передачи) ИК сигналов и
дистанционного управления устройством (например, диском blu-ray),
подключенным к передатчику видеосигнала, подключите ИК-приемник к ИК-
порту VE2812R, а ИК-передатчик - к ИК-порту VE2812T.
Примечание: За информацией о приобретении ИК-приемника и ИК пульта
ДУ обращайтесь к местному торговому представителю.
5
(Дополнительно) Последовательный порт RS-232 можно использовать для
выполнения следующих действий:
•
Для управления VE2812T с помощью основного или кнопочного контроллера
системы управления ATEN, подключите их к последовательному порту RS-
232 на VE2812R, а затем переведите переключатель последовательного
интерфейса RS-232 в положение
Command (Команды).
•
Для проброса (прямой передачи) сигналов последовательного
управления RS-232, передаваемых на ПК или устройство
с последовательным интерфейсом, подключите ПК или
устройство с последовательным интерфейсом (например,
сенсорную панель) к последовательному порту RS-232 на
VE2812R и переведите переключатель последовательного
интерфейса RS-232 в положение Bypass (Прямая передача).
6
Заземлите устройства, подключенные к VE2812R, для их
защиты от повреждений, вызванных перепадами напряжения и
статическим электричеством
.
7
Подключите шнур питания к разъему питания VE2812R
.
Режим Long Reach Mode (увеличенного радиуса действия)
Для увеличения расстояния передачи VE2812R сигналов 4К до
150 м переведите переключатель режима дальнего действия в
положение ON (ВКЛ.).
Вид сверху
1
Индикатор вывода HDMI
2
Индикатор связи
3
Индикатор питания
La pagina si sta caricando...
-
 1
1
-
 2
2


ATEN VE2812R Guida Rapida
- Tipo
- Guida Rapida
- Questo manuale è adatto anche per
in altre lingue
- English: ATEN VE2812R Quick start guide
- français: ATEN VE2812R Guide de démarrage rapide
- español: ATEN VE2812R Guía de inicio rápido
- Deutsch: ATEN VE2812R Schnellstartanleitung
- русский: ATEN VE2812R Инструкция по началу работы
- português: ATEN VE2812R Guia rápido
- polski: ATEN VE2812R Skrócona instrukcja obsługi
- 日本語: ATEN VE2812R クイックスタートガイド
- Türkçe: ATEN VE2812R Hızlı başlangıç Kılavuzu