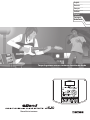
Boss eBand JS-10 Manuale del proprietario
- Tipo
- Manuale del proprietario

Owner’s Manual / Bedienungsanleitung / Mode d’emploi
Manuale dell'utente / Manual de instrucciones
Manual do Proprietário / Gebruikershandleiding
English
Deutsch
Français
Italiano
Español
Português
Nederlands

This product complies with the requirements of EMC Directive 2004/108/EC.
For EU Countries
This Class B digital apparatus meets all requirements of the Canadian Interference-Causing Equipment Regulations.
Cet appareil numérique de la classe B respecte toutes les exigences du Règlement sur le matériel brouilleur du Canada.
NOTICE
AVIS
For the USA
FEDERAL COMMUNICATIONS COMMISSION
RADIO FREQUENCY INTERFERENCE STATEMENT
This equipment has been tested and found to comply with the limits for a Class B digital device, pursuant to Part 15 of the
FCC Rules. These limits are designed to provide reasonable protection against harmful interference in a residential
installation. This equipment generates, uses, and can radiate radio frequency energy and, if not installed and used in
accordance with the instructions, may cause harmful interference to radio communications. However, there is no guarantee
that interference will not occur in a particular installation. If this equipment does cause harmful interference to radio or
television reception, which can be determined by turning the equipment off and on, the user is encouraged to try to correct the
interference by one or more of the following measures:
– Reorient or relocate the receiving antenna.
– Increase the separation between the equipment and receiver.
– Connect the equipment into an outlet on a circuit different from that to which the receiver is connected.
– Consult the dealer or an experienced radio/TV technician for help.
This device complies with Part 15 of the FCC Rules. Operation is subject to the following two conditions:
(1) this device may not cause harmful interference, and
(2) this device must accept any interference received, including interference that may cause undesired operation.
This equipment requires shielded interface cables in order to meet FCC class B limit.
Any unauthorized changes or modifications not expressly approved by the party responsible for compliance could void the user’s
authority to operate the equipment.
For Canada
WARNING
This product contains chemicals known to cause cancer, birth defects and other reproductive harm, including lead.
For C.A. US
(
Proposition 65
)

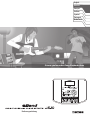
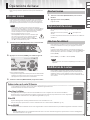
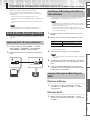
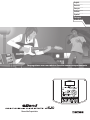
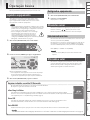
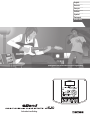
Owner’s Manual
Play the guitar with your favorite songs as your backing
English
Deutsch
Français
Italiano
Español
Português
Nederlands

2
Panel Descriptions . . . . . . . . . . . . . . . . . . . . . . . . . . . . . . . . . . . . . . . . . . . . . . . 3
Front Panel . . . . . . . . . . . . . . . . . . . . . . . . . . . . . . . . . . . . . . . . . . . . . . . . . . . . . 3
Top Panel / Side Panels . . . . . . . . . . . . . . . . . . . . . . . . . . . . . . . . . . . . . . . . . . 4
Top Screen . . . . . . . . . . . . . . . . . . . . . . . . . . . . . . . . . . . . . . . . . . . . . . . . . . . . . . 4
Basic Operation . . . . . . . . . . . . . . . . . . . . . . . . . . . . . . . . . . . . . . . . . . . . . . . . . 5
Turning the Power On . . . . . . . . . . . . . . . . . . . . . . . . . . . . . . . . . . . . . . . . . . .5
Turning the Power O . . . . . . . . . . . . . . . . . . . . . . . . . . . . . . . . . . . . . 5
Moving the Cursor . . . . . . . . . . . . . . . . . . . . . . . . . . . . . . . . . . . . . . . . . . . . . . 5
Selecting an Item . . . . . . . . . . . . . . . . . . . . . . . . . . . . . . . . . . . . . . . . . 5
Changing the Value . . . . . . . . . . . . . . . . . . . . . . . . . . . . . . . . . . . . . . . . . . . . . 5
[MENU] Button . . . . . . . . . . . . . . . . . . . . . . . . . . . . . . . . . . . . . . . . . . . . . . . . . . 6
Play the Guitar with Songs as Your Backing . . . . . . . . . . . . . . . . . . . . . . . . 7
Selecting Songs . . . . . . . . . . . . . . . . . . . . . . . . . . . . . . . . . . . . . . . . . . . . . . . . .7
Displaying Songs by Category . . . . . . . . . . . . . . . . . . . . . . . . . . . . . 7
Registering Your 30 Favorite Songs (BEST 30) . . . . . . . . . . . . . . .7
Selecting Songs on the USB Flash Drive . . . . . . . . . . . . . . . . . . . .8
Deleting Songs . . . . . . . . . . . . . . . . . . . . . . . . . . . . . . . . . . . . . . . . . . . 8
Playing a Guitar While Playing Back a Song . . . . . . . . . . . . . . . . . . . . . . . 8
Switching the Play Mode . . . . . . . . . . . . . . . . . . . . . . . . . . . . . . . . . . 9
Tuning . . . . . . . . . . . . . . . . . . . . . . . . . . . . . . . . . . . . . . . . . . . . . . . . . . . . . . . . . . 9
Recording Performances . . . . . . . . . . . . . . . . . . . . . . . . . . . . . . . . . . . . . . .10
Switching Eects . . . . . . . . . . . . . . . . . . . . . . . . . . . . . . . . . . . . . . . . . . . . . . .10
Changing the Speed of Songs . . . . . . . . . . . . . . . . . . . . . . . . . . . . . . . . . .11
Changing the Pitch of Songs . . . . . . . . . . . . . . . . . . . . . . . . . . . . . . . . . . .11
Removing the Center Sound (Center Cancel) . . . . . . . . . . . . . . . . . . . .12
Repeating Playback of a Specied Segment (AB REPEAT) . . . . . . . .12
Precise Adjustment of the AB REPEAT Segment . . . . . . . . . . .12
Importing Songs from a PC to the JS-10 (eBand Song List Editor) . .13
Before Using eBand Song List Editor . . . . . . . . . . . . . . . . . . . . . . . . . . . .13
Connecting the JS-10 to Your PC . . . . . . . . . . . . . . . . . . . . . . . . . .13
Installing eBand Song List Editor on Your PC . . . . . . . . . . . . . .13
Starting Up eBand Song List Editor . . . . . . . . . . . . . . . . . . . . . . .13
Using eBand Song List Editor . . . . . . . . . . . . . . . . . . . . . . . . . . . . . . . . . . .14
Ripping Songs from CD to the JS-10 (Ripping) . . . . . . . . . . . . .15
Editing Song Information . . . . . . . . . . . . . . . . . . . . . . . . . . . . . . . .16
Ending the Connection with the PC . . . . . . . . . . . . . . . . . . . . . . .16
Convenient Functions . . . . . . . . . . . . . . . . . . . . . . . . . . . . . . . . . . . . . . . . . . .17
Editing the Eects. . . . . . . . . . . . . . . . . . . . . . . . . . . . . . . . . . . . . . . . . . . . . .17
Visually Editing the Sound (EZ EDIT) . . . . . . . . . . . . . . . . . . . . . .17
Advanced Editing of Sounds (PATCH EDIT) . . . . . . . . . . . . . . . .18
MENU of an EFFECT screen . . . . . . . . . . . . . . . . . . . . . . . . . . . . . . .18
Saving Patches . . . . . . . . . . . . . . . . . . . . . . . . . . . . . . . . . . . . . . . . . . .19
Exchanging Two Patches (EXCHANGE) . . . . . . . . . . . . . . . . . . . .19
Initializing the Eect Settings (INITIALIZE) . . . . . . . . . . . . . . . . .19
Backing Up Data on an SD Card to a PC (BACK UP) . . . . . . . . . . . . . .20
Recovering Data Backed Up on a PC to the SD Card (RECOVERY) .20
Changing the Parameters of Songs . . . . . . . . . . . . . . . . . . . . . . . . . . . . .21
View the Song Information . . . . . . . . . . . . . . . . . . . . . . . . . . . . . . .21
Naming Songs . . . . . . . . . . . . . . . . . . . . . . . . . . . . . . . . . . . . . . . . . . . . . . . . .21
Writing Songs to a USB Flash Drive (Export) . . . . . . . . . . . . . . . . . . . . .22
Importing Songs in the USB Flash Drive to the JS-10 (Import) . . . .22
Changing the Patch When the Song is Switched (PATCH SYNC) . .22
Specifying Audio Settings . . . . . . . . . . . . . . . . . . . . . . . . . . . . . . . . . . . . . .23
Switching the INPUT Jack Sensitivity . . . . . . . . . . . . . . . . . . . . . .23
Adjusting the Balance of Low to High Frequency Ranges
(Global EQ) . . . . . . . . . . . . . . . . . . . . . . . . . . . . . . . . . . . . . . . . . . . . . .23
Turning O the JS-10 Speakers . . . . . . . . . . . . . . . . . . . . . . . . . . .23
System Settings for the JS-10 . . . . . . . . . . . . . . . . . . . . . . . . . . . . . . . . . . .24
Changing the Function of the USB COMPUTER Port . . . . . . .24
Allocating Functions to Footswitches . . . . . . . . . . . . . . . . . . . . .24
Backing Up Eect User Patches to an SD Card . . . . . . . . . . . . .24
Restoring Eect User Patches Backed Up on the SD Card . .25
Viewing Free Space on the SD Card and the USB Flash
Drive . . . . . . . . . . . . . . . . . . . . . . . . . . . . . . . . . . . . . . . . . . . . . . . . . . . .25
Adjusting Display Contrast . . . . . . . . . . . . . . . . . . . . . . . . . . . . . . .25
Enabling Auto O . . . . . . . . . . . . . . . . . . . . . . . . . . . . . . . . . . . . . . . .26
Listing the Files on the SD Card as a Song List . . . . . . . . . . . . .26
Selecting the Sound Output from the USB COMPUTER
Port . . . . . . . . . . . . . . . . . . . . . . . . . . . . . . . . . . . . . . . . . . . . . . . . . . . . .26
Initializing an SD Card (FORMAT) . . . . . . . . . . . . . . . . . . . . . . . . .26
Returning the JS-10’s Settings to Default Factory Settings .26
Using the JS-10 as a USB Audio Interfaces . . . . . . . . . . . . . . . . . . . . . . .27
Preparing a USB Driver . . . . . . . . . . . . . . . . . . . . . . . . . . . . . . . . . . .27
Installing the USB Driver. . . . . . . . . . . . . . . . . . . . . . . . . . . . . . . . . .27
Playing Songs on a PC Through the JS-10 . . . . . . . . . . . . . . . . .27
Using the Commercially Available SD Cards . . . . . . . . . . . . . . . . . . . . .28
Replacing the SD Card . . . . . . . . . . . . . . . . . . . . . . . . . . . . . . . . . . .28
Using Footswitches and Expression Pedals . . . . . . . . . . . . . . . . . . . . . .30
Allocating Functions to Footswitches . . . . . . . . . . . . . . . . . . . . .30
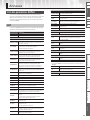
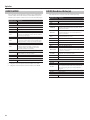
Appendices . . . . . . . . . . . . . . . . . . . . . . . . . . . . . . . . . . . . . . . . . . . . . . . . . . . .31
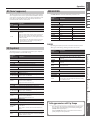
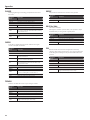
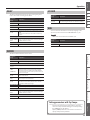
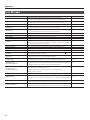
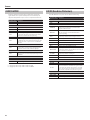
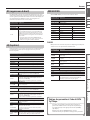
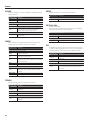
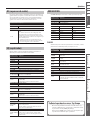
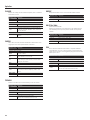
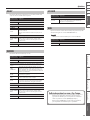
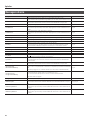
Eect Parameter List . . . . . . . . . . . . . . . . . . . . . . . . . . . . . . . . . . . . . . . . . . .31
Error Messages. . . . . . . . . . . . . . . . . . . . . . . . . . . . . . . . . . . . . . . . . . . . . . . . .36
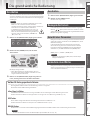
Troubleshooting . . . . . . . . . . . . . . . . . . . . . . . . . . . . . . . . . . . . . . . . . . . . . . .37
Signal Flow . . . . . . . . . . . . . . . . . . . . . . . . . . . . . . . . . . . . . . . . . . . . . . . . . . . .38
Memory Conguration in the JS-10 . . . . . . . . . . . . . . . . . . . . . . . . . . . . .38
Specications . . . . . . . . . . . . . . . . . . . . . . . . . . . . . . . . . . . . . . . . . . . . . . . . . .39
USING THE UNIT SAFELY . . . . . . . . . . . . . . . . . . . . . . . . . . . . . . . . . . . . . . . .40
IMPORTANT NOTES . . . . . . . . . . . . . . . . . . . . . . . . . . . . . . . . . . . . . . . . . . . . .41
Index . . . . . . . . . . . . . . . . . . . . . . . . . . . . . . . . . . . . . . . . . . . . . . . . . . . . . . . . . .43
Contents
Before using this unit, carefully read the sections titled “USING THE
UNIT SAFELY” (p. 40) and “IMPORTANT NOTES” (p. 41). These sections
provide important information concerning the proper operation
of the unit. Additionally, in order to gain a good grasp of every
feature provided by your new unit, this owner’s manual should be
read in its entirety, and it should be saved and kept on hand as a
convenient reference.
Copyright © 2012 BOSS CORPORATION
All rights reserved. No part of this publication may be reproduced
in any form without the written permission of BOSS CORPORATION.

eBand Song List Editor Convenient Functions Appendices
Panel Descriptions Play the Guitar with Songs
as Your Backing
NlPtEsItFrDeEnglish
3
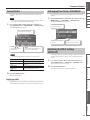
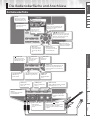
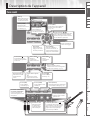
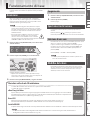
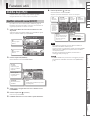
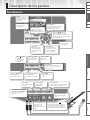
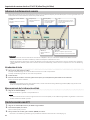
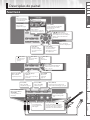
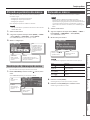
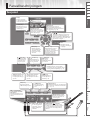
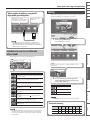
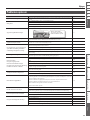
Panel Descriptions
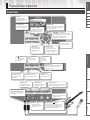
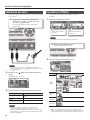
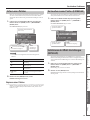
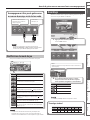
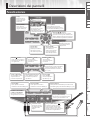
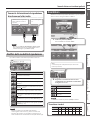
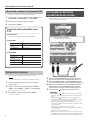
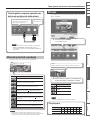
Front Panel
[MENU] button
This button calls up various dierent
functions depending on the screen
displayed (p. 6, p. 18).
Dial
Use this dial to change
values and settings.
[EXIT] button
Press this button to
cancel settings and
return to previous
screens.
[ENTER] button
Use this button to
conrm selection of an
item and to adjust/switch
the values of settings.
[POWER] button
This button switches the
power on and o (p. 5).
[SONG LIST] button
This button displays songs
stored in the SD card and
the USB ash drive (p. 7).
[ ] [ ] (Cursor) buttons
These buttons move the position of the
cursor (highlighted part) in the display.
Use the Dial to adjust the value of
highlighted item (parameter).
Display
Shows Song Name,
Eects Patch name and
other information.
[ ] (Rewind) button
This button moves
the playback location
backward.
[ ] (Fast Forward) button
This button moves the
playback location forward.
[A B] button
This button repeats
the playback (p. 12).
[ ] (STOP) button
This button stops
song playback or
recording.
[ ] (PLAY) button
This button starts
song playback.
[ ] (REC) button
This button
records the
performance.
[SPEED] button
This button changes the speed/pitch
of the song or removes the center
sound (p. 11, p. 12).
[MASTER LEVEL] knob
This knob adjusts the overall
volume of the JS-10.
INPUT 2 (AUX) jack
This jack connects
devices such as digital
audio players.
[AMP] button
This button displays
the AMP screen (p. 18).
[TUNER] button
This button displays the
TUNER screen (p. 9).
[EFFECTS] button
This button is used to select an eect
patch or to edit an eect (p. 10, p. 17).
INPUT 1 (GUITAR/MIC) jack,
INPUT 2 (GUITAR/MIC) jack
These jacks connect guitars or
microphones.
[INPUT LEVEL 1 2] knob
The center knob adjusts the volume
of devices connected to INPUT 1, and
the outer knob adjusts the volume of
devices connected to INPUT 2.

4
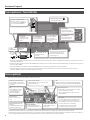
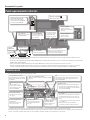
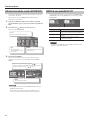
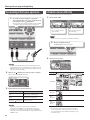
Panel Descriptions
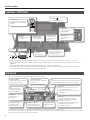
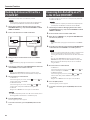
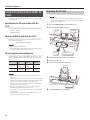
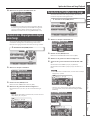
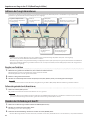
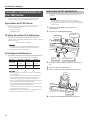
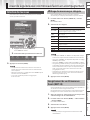
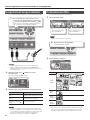
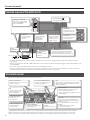
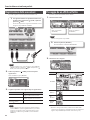
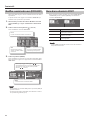
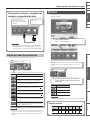
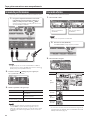
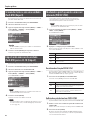
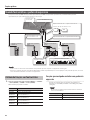
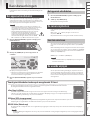
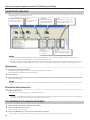
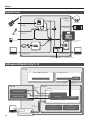
Top Panel / Side Panels
SD CARD slot
Insert an SD card.
EXP PEDAL/CTL 1, 2 jack
Connect a footswitch (sold
separately) or expression pedal
(sold separately) (p. 30).
Security slot ( )
http://www.kensington.com/
PHONES jack
Connect headphones
(sold separately).
LINE OUT jacks
Connect external
speakers.
USB COMPUTER port
Connect the JS-10 to
a PC with a USB cable
(p. 13, p. 27).
USB MEMORY port
Connect a USB ash
drive (sold separately).
USB cap holders
Place caps detached from the USB
MEMORY port or USB COMPUTER
port here.
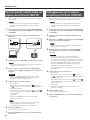
DC IN jack
Connect the supplied
AC adaptor.
To power outlet
Indicator
AC adaptorPower cord
* To prevent malfunction and equipment failure, always turn down the volume, and turn o all the units before making any connections.
* Never insert or remove SD cards or SDHC cards while this unit is turned on. Doing so may corrupt the unit’s data or the data on the SD card or
SDHC card.
* Carefully insert the USB ash drive, SD card, or SDHC card all the way in – until they are rmly in place.
* Place the AC adaptor so the side with the indicator (see illustration) faces upwards and the side with textual information faces downwards.
The indicator will light when you plug the AC adaptor into an AC outlet.
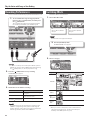
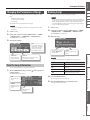
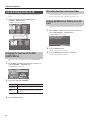
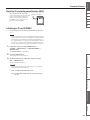
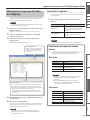
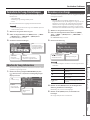
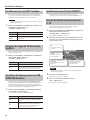
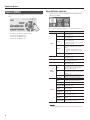
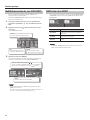
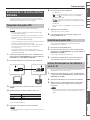
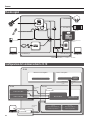
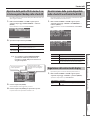
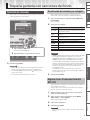
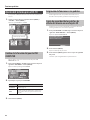
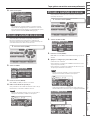
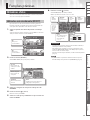
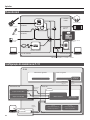
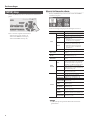
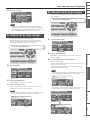
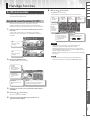
Top Screen
This screen is the basic screen that appears when you turn on the power.
AB REPEAT Segment
Indicates the segment to be
played back repeatedly (p. 12).
Song playback time
Displays time of the
song.
Key and Song Name
Displays the key (p. 21) and name (p. 21)
of the currently selected song.
S/P/C Icons
These icons are displayed when the song’s
playback speed or pitch has been changed or
when Center Cancel is used.
S: Playback speed of the song has been changed
P: Pitch of the song has been changed
C: Center Cancel is turned on
Level Meter
Displays total level of the following sounds:
• The song being played now
• Input to INPUT 1 jack, INPUT 2 jack, and USB
COMPUTER port
IN2
Move the cursor here and the patch number and patch name of
the eect for the INPUT 2 (GUITAR/MIC) jack will be displayed.
Input Sensitivity Icons
Displays icons based on the GAIN
settings (p. 23).
Play Mode
Displays the type of
playback (p. 9).
IN1
Displays the eect patch
number and patch name for
INPUT 1 (GUITAR/MIC) jack.
Song playback location
Displays the current
location within the song.
The explanations in this manual include illustrations that depict what should typically be shown by the display.
Note, however, that your unit may incorporate a newer, enhanced version of the system (e.g., includes newer sounds), so what you actually see in the
display may not always match what appears in the manual.

eBand Song List Editor Convenient Functions Appendices
Panel Descriptions Play the Guitar with Songs
as Your Backing
NlPtEsItFrDeEnglish
5
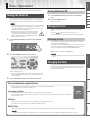
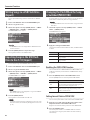
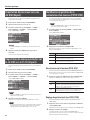
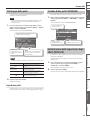
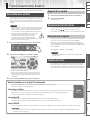
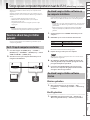
Basic Operation
This section introduces the basic operations for using the JS-10.
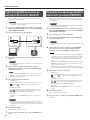
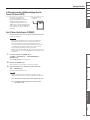
Turning the Power On
Once everything is properly connected (p. 4), be sure to follow the
procedure below to turn on the power. If you turn on equipment in
the wrong order, you risk causing malfunction or equipment failure.
MEMO
• Before turning the unit on/o, always be sure to turn the volume
down. Even with the volume turned down, you might hear some
sound when switching the unit on/o. However, this is normal
and does not indicate a malfunction.
• With the factory settings, the JS-10 will automatically
be switched o 30 minutes after you stop playing or
operating the unit. If you don’t want the unit to turn
o automatically, change the “AUTO OFF” setting to
“OFF” as described on p. 26.
1. Turn the [MASTER LEVEL] knob down to the minimum
level.
2. Press the [POWER] button to turn the unit on.
The unit’s display will be lit.
* This unit is equipped with a protection circuit. A brief interval (a
few seconds) after turning the unit on is required before it will
operate normally.
3. Turn the [MASTER LEVEL] knob and adjust the volume.
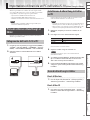
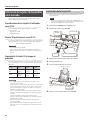
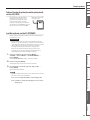
Files included on the supplied SD card
The supplied SD card is inserted into the JS-10 prior to being shipped from the factory.
The following les are included on the SD card.
eBand Song List Editor
This PC software can rip songs from CDs to JS-10 and add names to eBand songs.
Connect the JS-10 with your PC to use this software. For details, refer to “Importing Songs from a PC to the JS-10 (eBand
Song List Editor)” (p. 13).
USB driver
This PC driver (control software) is used for listening to your PC’s sound on the JS-10.
For details, refer to “Using the JS-10 as a USB Audio Interfaces” (p. 27).
ROLAND folder
Files needed for the operation of the JS-10 are saved in this folder. Make sure not to change or delete the contents of this folder.
MEMO
For details about the memory conguration in JS-10 or the data that is saved, refer to “Memory Conguration in the JS-10” (p. 38).
Turning the Power O
1. Turn the [MASTER LEVEL] knob down to the minimum
level.
2. Press the [POWER] button.
The power turns o.
Moving the Cursor
There are multiple parameters (settings) and selections on the
screen.
Press the [
] [ ] (Cursor) buttons to move the cursor.
The parameter value selected with the cursor will be highlighted.
Selecting an Item
To select a displayed item or icon, move the cursor to the item or
icon, and press the [ENTER] button.
This manual uses the following conventions to indicate the steps of
a procedure, such as pressing the [MENU] button in the Top screen,
selecting “SYSTEM,” and then pressing the [ENTER] button.
[MENU] button “SYSTEM” [ENTER] button
MEMO
Press the [EXIT] button several times until you return to the Top
screen.
Changing the Value
To change the parameter setting, move the cursor to the applicable
parameter value, then turn the Dial to change the value. The value
increases when the Dial is turned clockwise and decreases when it
is turned counterclockwise.

6
Basic Operation
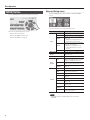
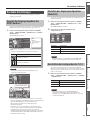
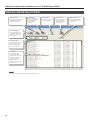
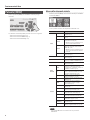
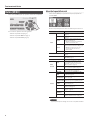
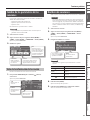
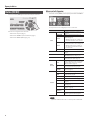
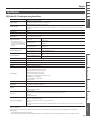
[MENU] Button
Press the [MENU] button to display a menu for each screen.
The JS-10 has the following menu screens.
• Menu in the Top screen (p. 6)
• Menu in the SONG LIST screen (p. 7)
• Menu in the EFFECT screen (p. 18)
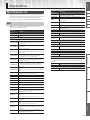
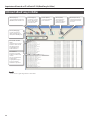
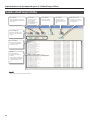
Menu on the top screen
Press the [MENU] button in the top screen to display the MENU
screen.
You can access the JS-10’s settings from this screen.
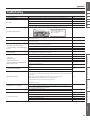
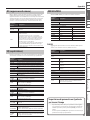
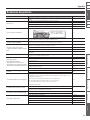
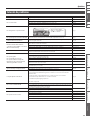
MENU Explanation
SONG
SONG INFO Conrm song information (p. 21).
SONG NAME Change song names (p. 21).
EXPORT
Write the selected song to the USB ash
drive (p. 22).
* “EXPORT” is not displayed if the USB
ash drive has not been inserted.
IMPORT
Store the selected songs on the USB ash
drive to the SD card (p. 22).
* “IMPORT” is not displayed if a song
on the USB ash drive has not been
selected.
ERASE Delete the selected song (p. 8).
BEST 30 EDIT Add the current song to the BEST 30 (p. 7).
AB EDIT
Make precise settings for the AB REPEAT
function (p. 12).
PATCH SYNC Apply the setting in PATCH SYNC (p. 22).
AUDIO
SETTING
INPUT
Select the input sensitivity and other
settings that match the device connected
to INPUT 1 and INPUT 2 jacks (p. 23).
EQ
Apply the equalizer on the overall sound
of the JS-10 and adjust its balance (p. 23).
SPEAKER
Turns the JS-10’s built-in speakers on or
o (p. 23).
SYSTEM
USB MODE Switch the USB MODE (p. 24).
PEDAL
Assign functions to an externally
connected footswitch (p. 30).
PATCH BACKUP Back up eects (p. 24).
PATCH RECOVER
Recover the eects that were backed
up (p. 25).
SD INFO Check the free space on the SD card (p. 25).
USB MEMORY
Check the free space on the USB ash
drive (p. 25).
SETTING
Make a variety of the JS-10 settings
(p. 25 – p. 26).
SD CARD
FORMAT (*)
Initialize (format) the SD card (p. 29).
FACTORY RESET
Restore the JS-10 to its original default
factory settings (p. 26).
MEMO
(*) The SD card that is supplied with the JS-10 cannot be
initialized.

eBand Song List Editor Convenient Functions Appendices
Panel Descriptions Play the Guitar with Songs
as Your Backing
NlPtEsItFrDeEnglish
7
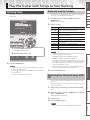
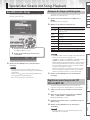
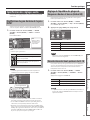
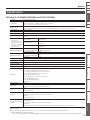
Play the Guitar with Songs as Your Backing
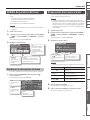
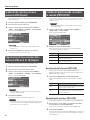
Selecting Songs
Here’s how to select the song you want to hear or the rhythm you
want played.
1. Press the [SONG LIST] button.
The SONG LIST screen appears.
2. Turn the Dial to select a song.
3. Press the [ENTER] button.
MEMO
• You can also select a song by turning the dial while a song name
is selected in the Top screen.
• Press the [
] (PLAY) button in the SONG LIST screen to audition
the selected song.
• The JS-10 can handle up to 4,000 songs.
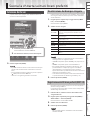
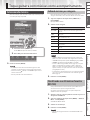
Displaying Songs by Category
Here’s how to have songs be displayed according to a category you
select, such as the album title or artist name.
1. Follow this sequence of steps: [SONG LIST] button
[MENU] button.
The MENU popup appears.
2. Select a category.
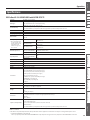
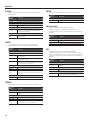
MENU Explanation
ALL SONGS
Songs recorded with the JS-10 and songs that have album
title and artist name registered are listed.
USER Data recorded with the JS-10 is added to this category.
BEST 30
The thirty favorite songs are listed, if these songs have
already been ranked (1–30).
ALBUM Songs are listed by album title.
ARTIST Songs are listed by artist name.
RHYTHM
Rhythms contained on the SD card included with the
JS-10 are listed.
USB MEMORY Files stored in the USB ash drive are listed.
SD CARD Files stored in the SD card are listed.
REMOVE Removes the selected song from the BEST 30 list.
MEMO
• “ALBUM” and “ARTIST” are available when album titles or artist
names are registered with the songs.
• “SD CARD” is available when SD VIEW (p. 26) is ON.
• “REMOVE” is available when BEST 30 is displayed.
• By using the included eBand Song List Editor (p. 13), you can use
your computer to register and edit album titles and artist names.
Also, when you import an audio le, you can select the target
song list (Song, Rhythm, or User).
• Categorization of songs works on songs included with the JS-10
and songs stored with eBand Song List Editor (p. 13).
3. Press the [ENTER] button.
Registering Your 30 Favorite Songs (BEST
30)
You can set the songs listed when BEST 30 is selected as the song
category.
Registering your favorite songs allows you to always have the songs
you want in song lists.
1. Before starting, select songs you want to list in the BEST
30.
2. Follow this sequence of steps: [MENU] button “BEST 30
EDIT” [ENTER] button.
The BEST 30 EDIT screen appears.
3. Select the rank.
4. Press the [ENTER] button.
MEMO
You cannot register songs in the USB ash drive as BEST 30.

Play the Guitar with Songs as Your Backing
8
Selecting Songs on the USB Flash Drive
You can select songs on the USB ash drive.
1. Follow this sequence of steps: [SONG LIST] button
[MENU] button “USB MEMORY” [ENTER] button.
2. Select the song you want to play.
3. Press the [ENTER] button.
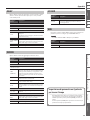
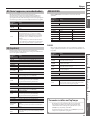
File formats supported by the JS-10
eBand format
Roland/BOSS proprietary compression format
MP3 format
MP3 Format
Sampling rate 44.1 kHz
Bit rate 64 K – 320 Kbps
WAV format
WAV Format
Sampling rate 44.1 kHz
Quantization bit rate 16 bits
Encoding Uncompressed (Linear)
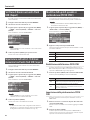
Deleting Songs
Here’s how to delete the selected song.
NOTE
You cannot restore songs once they are deleted.
1. Before starting, select the song you want to delete (p. 7).
2. Follow this sequence of steps: [MENU] button “SONG”
[ENTER] button “ERASE” [ENTER] button.
The message “Are you sure?” appears.
3. To delete a song, press [ENTER] button.
The song will be deleted.
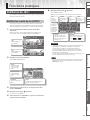
Playing a Guitar While Playing Back a
Song
You can enjoy playing a guitar while playing back a favorite song as
your backing.
1. Press the [ ] (PLAY) button.
The playback of the song will start.
2. Gradually turn the [MASTER LEVEL] knob clockwise until
you reach the desired volume level.
3. Turn the [INPUT LEVEL 1] knob and [INPUT LEVEL 2]
knob down to the minimum level (turn completely
counterclockwise).
4. While playing the guitar, gradually turn the [INPUT LEVEL
1] knob or [INPUT LEVEL 2] knob clockwise until you reach
the desired volume level.
5. Press the [ ] (STOP) button to stop the song.
MEMO
• Pressing the [
] (STOP) button while the song is stopped will
return the song playback location to the beginning (00:00).
• Press the [
] (Rewind) button or the [ ] (Fast Forward)
button to move the song’s playback location back or forward.
• Howling (feedback) could be produced depending on the
location of microphones relative to speakers. This can be
remedied by:
1. Changing the orientation of the microphone(s).
2. Relocating microphone(s) at a greater distance from speakers.
3. Lowering volume levels.
* When you connect a microphone, select an eect from the
categories for microphones (p. 10). Also, switch the input
sensitivity of the INPUT jack to mic (p. 23).

eBand Song List Editor Convenient Functions Appendices
Panel Descriptions Play the Guitar with Songs
as Your Backing
NlPtEsItFrDeEnglish
Play the Guitar with Songs as Your Backing
9
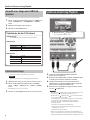
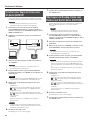
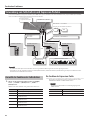
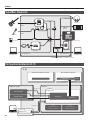
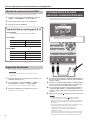
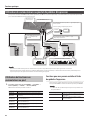
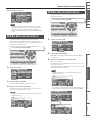
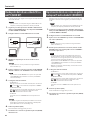
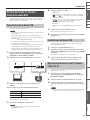
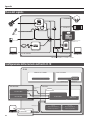
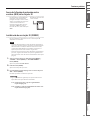
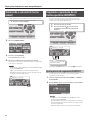
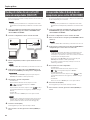
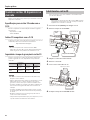
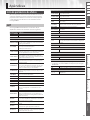
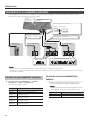
Playing a guitar while playing back a song
on audio players
Use a commercially available
stereo miniature plug cable that
is appropriate for the device.
Digital audio player,
etc.
MEMO
When instruments are connected to the INPUT 2 (GUITAR/
MIC) jack and the INPUT 2 (AUX) jack, only the instrument
connected to the INPUT 2 (AUX) jack can be used.
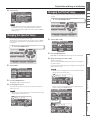
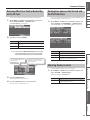
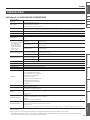
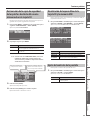
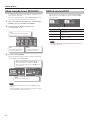
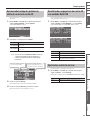
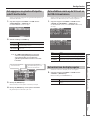
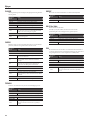
Switching the Play Mode
You can change how the songs are played.
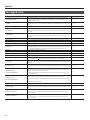
Display Explanation
The current song plays to the end and then stops.
Playback of the current song is repeated.
Songs in the song list are played back in order. *
Songs in the song list are played back in order. Playback
continues until the [
] (Stop) button is pressed. *
Songs in the song list are played back randomly. *
Songs in the song list are played back randomly.
Playback continues until the [
] (Stop) button is pressed. *
Time location “A” is registered (“Repeating Playback of a
Specied Segment (AB REPEAT)” (p. 12)).
Playback will repeat between time locations “A” and “B”
(“Repeating Playback of a Specied Segment (AB REPEAT)”
(p. 12)).
MEMO
When you select a Play Mode marked with an asterisk (*), the
current song will be played to the end and stop if a screen other
than “Top Screen” (p. 4) is displayed.
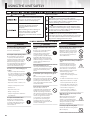
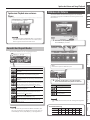
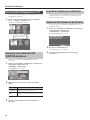
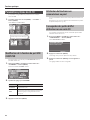
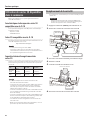
Tuning
Use the tuner in the JS-10 to tune the guitar or bass connected to
INPUT 1 or INPUT 2.
1. Press the [TUNER] button.
The TUNER screen appears.
PITCH
Set the frequency of A4 (the middle A on a piano keyboard).
2. Adjust the tuning until the desired pitch is
shown and both triangles are lit.
Display Explanation
Too low
Tuned
Too high
MEMO
The [TUNER] button will be lit when it is tuned.
Standard tuning
7th 6th 5th 4th 3rd 2nd 1st
Guitar B E A D G B E
Bass B E A D G

Play the Guitar with Songs as Your Backing
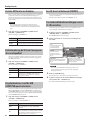
10
Recording Performances
You can record the sounds exactly as you hear them from the JS-10.
1. To record while the song is being played back,
rst press the [ ] (PLAY) button, and then press
the [ ] (REC) button.
The song will be played back and recorded along with
the sounds input to INPUT 1 jack and INPUT 2 jack.
MEMO
In order to record only the sounds input to INPUT 1 jack and
INPUT 2 jack, just press the [
] (REC) button without pressing
the [ ] (PLAY) button (i.e., do not play back the song).
2. Press the [ ] (STOP) button to stop recording.
The REC END popup appears.
3. Decide what to do with the recording.
Icon Explanation
SAVE
The recording is saved in “USER” category in
the song list.
ERASE
The recording is discarded. (The recorded
content will not be saved.)
PREVIEW
(Press the [
] (PLAY) button)
Listen to the recording.
MEMO
Recorded data (songs) are automatically assigned the name
“SONG****: (original song name)” (with **** indicating the
number). However, if the original song name was edited with
eBand Song List Editor, then it will be “SONG****.”
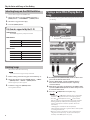
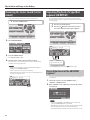
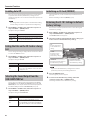
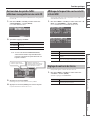
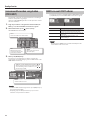
Switching Eects
The internal eects can be switched.
1. Select either IN1 or IN2.
IN2
Eect on INPUT 2 (GUITAR/
MIC) jack
IN1
Eect on INPUT 1 (GUITAR/
MIC) jack
MEMO
The eect will not be applied on AUX jack.
2. Press the [EFFECTS] button.
The PATCH SELECT screen appears.
3. Select a category.
Usage Category
For Guitar
For Bass
For
Microphone
For User
Patch
* When you connect a microphone, select an eect from the
categories for microphones (p. 10). Also, switch the input
sensitivity of the INPUT jack to mic (p. 23).

eBand Song List Editor Convenient Functions Appendices
Panel Descriptions Play the Guitar with Songs
as Your Backing
NlPtEsItFrDeEnglish
Play the Guitar with Songs as Your Backing
11
4. Select a patch.
MEMO
In the default factory settings, appropriate eect patches are
assigned for each song on the supplied SD card. For details,
refer to “Changing the Patch When the Song is Switched (PATCH
SYNC)” (p. 22).
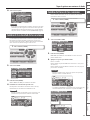
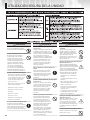
Changing the Speed of Songs
You can change the playback speed of songs.
This feature lets you slow down the song tempo to practice dicult
or fast passages. Changing the song’s speed will not have an eect
on the pitch.
1. Press the [SPEED] button.
2. Select SPEED.
3. Press the [ENTER] button.
Turn SPEED to “ON” to change the speed.
4. Set the playback speed.
You can set the speed in the range of 50 to 150 (%). Normally, the
speed is set to 100.
MEMO
When the speed is changed, the “S” icon that indicates the speed
change appears on the top screen.
Changing the Pitch of Songs
You can change just the pitch without changing the playback speed
of songs.
1. Press the [SPEED] button.
2. Select PITCH or FINE.
3. Press the [ENTER] button.
PITCH FINE is turned “ON.” Pitch of the song can now be changed.
4. Apply the settings for PITCH or FINE.
The pitch is changed.
You can change the PITCH setting in the range from -6 through +7
(in semitone steps).
You can change the FINE setting in the range from -50 through +50
(in ne steps of 1 cent).
MEMO
• When the pitch is changed, the “P” icon that indicates the pitch
change appears on the top screen.
• If a KEY is set in the song parameters (p. 21), the KEY indicator
works according to the PITCH settings.
KEY indicator

Play the Guitar with Songs as Your Backing
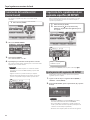
12
Removing the Center Sound (Center
Cancel)
Songs can be played back with the center sound removed.
1. Press the [SPEED] button.
2. Select CENTER CANCEL.
3. Press the [ENTER] button.
Turn CENTER CANCEL to “ON.”
4. Set the location of the sound you want to remove.
“C0” removes the center sound, while “L**” remove the left sound
and “R**” removes the right sound.
MEMO
• Center Cancel applies also to input sounds from the INPUT 2
(AUX) jack and USB COMPUTER port.
• Some sounds cannot be removed completely.
• When Center Cancel is turned on, the “C” icon indicating that it is
on appears on the top screen.
Repeating Playback of a Specied
Segment (AB REPEAT)
Use this feature for guitar solo practice and in other situations
where you want to practice along with a single section as it plays
back repeatedly.
1. Press the [ ] (PLAY) button.
2. Press the [A B] button at the start point and
also at the end point of the repeat segment.
Playback of AB REPEAT
segment will be repeated.
To turn AB REPEAT o, press the [A B] button again.
Precise Adjustment of the AB REPEAT
Segment
You can precisely adjust the start and end points of the segments to
be repeated.
1. Follow this sequence of steps: [MENU] button
“AB EDIT” [ENTER] button.
2. On the AB EDIT screen, adjust the start point (A) and the
end point (B).
MEMO
• You can press [ENTER] on the AB EDIT screen to alternately
switch the AB REPEAT function on and o.
• With MP3 data, you may be unable to play back from a specic
time (the performance starts near the specied time).
• The interval between A and B cannot be less than one second.

eBand Song List Editor Convenient Functions Appendices
Panel Descriptions Play the Guitar with Songs
as Your Backing
NlPtEsItFrDeEnglish
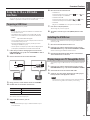
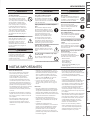
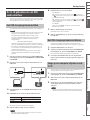
13
Importing Songs from a PC to the JS-10
(eBand Song List Editor)
eBand Song List Editor is software that operates on the PC.
You can perform the following tasks by connecting the PC to the
JS-10 with a USB cable and starting eBand Song List Editor.
• Import songs on music CDs to the JS-10
• Import WAV les and MP3 les on your PC to the JS-10
• Edit song information of songs stored on the JS-10
MEMO
For information on how to use eBand Song List Editor, refer to
the Help in eBand Song List Editor.
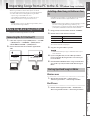
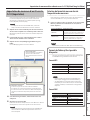
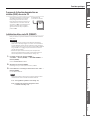
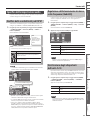
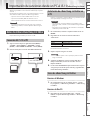
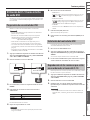
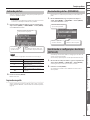
Before Using eBand Song List Editor
Prepare to use eBand Song List Editor on your PC.
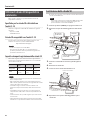
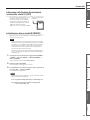
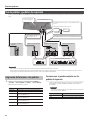
Connecting the JS-10 to Your PC
1. Follow this sequence of steps:
[MENU] button “SYSTEM”
[ENTER] button “USB MODE” [ENTER] button
“eBand SONG LIST EDITOR” [ENTER] button.
2. Connect the PC and the JS-10 with the supplied USB
cable.
USB COMPUTER portUSB port
Installing eBand Song List Editor on Your
PC
Install eBand Song List Editor on your PC. eBand Song List Editor is
included on the SD card that is supplied with the JS-10.
MEMO
• If the latest eBand Song List Editor is already installed in your PC,
proceed to “Starting Up eBand Song List Editor” (p. 13).
• The description of computer procedures will use My Computer
(or Computer) with Windows and Finder with the Mac OS.
1. Using your PC, locate the folders inside “JS-10 EBAND.”
2. Double-click one of the les shown below.
File Name Supported OS
Win.zip Windows 7, Vista, or XP
Mac.dmg Mac OS
The contents of the le are displayed.
3. Copy the “Song List” folder to your PC.
MEMO
We recommend that you copy to a folder that will be easy to
locate afterward.
4. If you’re using Windows, close the “Win.zip” window.
If you’re using Mac OS, drag the “Mac” icon to the Eject
icon in the Dock.
5. Read the le ReadmeEN.txt in the “Song List” folder that
you copied to your PC, and then install eBand Song List
Editor.
Starting Up eBand Song List Editor
Windows users
1. Click the PC’s [Start] button [All Programs]
“eBand Song List Editor” “eBand Song List Editor.”
Mac OS users
1. Double-click the Application folder Roland folder
eBand Song List Editor folder “eBand Song List Editor.”

14
Importing Songs from a PC to the JS-10 (eBand Song List Editor)
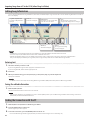
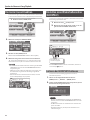
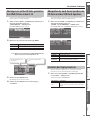
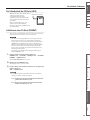
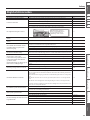
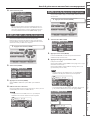
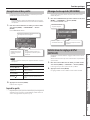
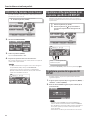
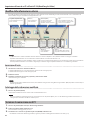
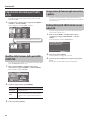
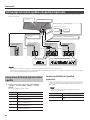
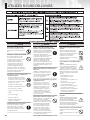
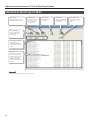
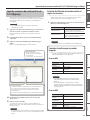
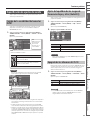
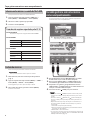
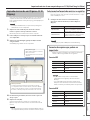
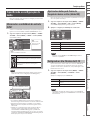
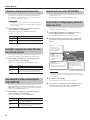
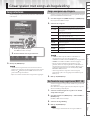
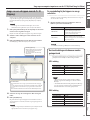
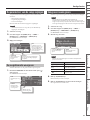
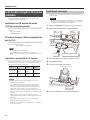
Using eBand Song List Editor
[Delete] button
This button deletes the
selected song.
[Export] button
This button converts
the selected eBand
song into WAV format
and writes it to the PC.
[Write] button
This button saves the
content edited in the
list area to the SD card.
[Disconnect] button
This button disconnects
communication between
the JS-10 and the PC.
[Import] button
This button imports audio les
(WAV/MP3) from the PC to the
JS-10.
[CD Ripping] button
This button rips (reads and
saves) songs from an audio
CD (p. 15).
List Mode buttons
These buttons switch the
song list (Song/Rhythm/
User) for the “List area.”
List area
You can edit the song
information in this area.
Clicking “List Mode buttons”
(Song/Rhythm/User) will
switch the content shown in
this area.
MEMO
• The JS-10 can handle up to 4,000 songs.

eBand Song List Editor Convenient Functions Appendices
Panel Descriptions Play the Guitar with Songs
as Your Backing
NlPtEsItFrDeEnglish
15
Importing Songs from a PC to the JS-10 (eBand Song List Editor)
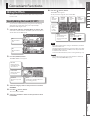
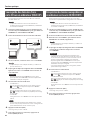
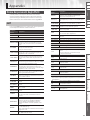
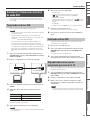
Ripping Songs from CD to the JS-10
(Ripping)
You can rip songs from music CDs to the JS-10. The ripped songs are
added to the song list selected with the “List Mode button” ([Song]
button, [Rhythm] button, or [User] button).
MEMO
In order to rip from a music CD, you will need administrator
privileges on your PC.
1. Click the List Mode button to select the song list to which
you want to add the song.
Decide which song list to add the ripped songs will go.
2. Insert the CD that you want to rip into your PC’s CD drive.
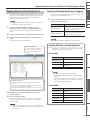
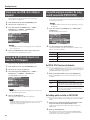
3. Click the [CD Ripping] button in eBand Song List Editor.
The CD Ripping screen appears on your PC.
Track information
The track numbers of the songs on the music CD are displayed.
If the PC is connected to the Internet, Gracenote® MusicID obtains the
song names and artist names and displays them automatically.
However, the information that is available can vary depending on the
CD.
[Obtain again] button
Downloads and re-displays the title
names and artist names.
Your PC must be connected to the
Internet.
4. In eBand Song List Editor, select the song you want to rip.
5. Click the [OK] button.
The selected song will be ripped to the JS-10’s SD card. When the
ripping is complete, the song will be added to the song list.
MEMO
Do not rip a song while playing a music CD on your PC. Noise
may be mixed in with the ripped song.
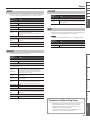
Selecting the Song Format When Ripping
Songs
Here’s how to select the song format when ripping songs from CD
to the JS-10.
1. Make settings by clicking “Conserve Card Memory” in the
“Options” menu.
Conserve Card Memory Import format
ON (Selected)
eBand song format
Data is compressed and imported, placing
priority on the card capacity.
OFF (Cleared)
WAV format
Data is imported, placing priority on the audio
quality (uncompressed).
MEMO
The default setting is “ON” (Conserve Card Memory).
File formats that can be imported
The types and formats of les that can be imported using
eBand Song List Editor are as follows.
MP3 format
Format Settings
Sampling rate 44.1 kHz
Bit rate 64 K – 320 Kbps
File name extension .mp3 (not case-sensitive)
Length One second or more
MEMO
• MP3 les are imported as MP3 format, regardless of the
“Conserve Card Memory” setting.
• If the MP3 le being imported contains ID3 tags for the
song name, artist name, and album title, this information
can also be imported.
WAV format
Format Settings
Sampling rate 44.1 kHz
Quantization bit rate 16 bits
Encoding Uncompressed (Linear)
File name extension .wav (not case-sensitive)
Length One second or more

16
Importing Songs from a PC to the JS-10 (eBand Song List Editor)
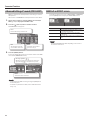
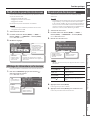
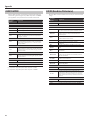
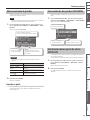
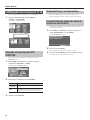
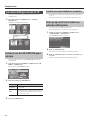
Editing Song Information
You can edit song information (song information, artist name, and album title) for songs saved on the JS-10. The edited song information is shown on
the JS-10’s display.
Artist (*1)
Artist name is displayed.
[Write] button
This button saves the content edited
in the list area to the SD card.
Type
The format of the song in the list is
displayed. This display cannot be changed.
Album (*1)
Album title is displayed.
Song Name / Rhythm Name
Song Name or Rhythm Name is
displayed.
Protect
The song protection setting
(On/O) is displayed.
MEMO
• (*1) When the song list displayed in the list area is “Rhythm” or “User,” then “Album” and “Artist” will not be shown.
• You can store up to 2,000 album titles and artist names combined on the JS-10.
• eBand Song List Editor allows you to use double-byte characters (such as Japanese) for song names, artist names, and album titles.
Also, you can display the double-byte song names, if these songs are imported to the JS-10 with eBand Song List Editor.
Entering text
1. Select the cell that you want to edit.
If you are using Windows, right-click the appropriate cell with the mouse.
If you are using Mac OS, double-click the appropriate cell.
2. Enter text.
3. When you nish entering, press the [Enter] key (or the [return] key) on your PC’s keyboard.
The input is conrmed.
MEMO
For details on how to enter text, refer to “Using eBand Song List Editor” (PDF) from the Help menu in eBand Song List Editor.
Saving the edited information
1. Click the [Write] button.
The edited information will be saved on the JS-10’s SD card.
NOTE
After you have edited the song information, be sure to click the [Write] button. If you exit eBand Song List Editor without saving or disconnect
from the PC, the edited information will be lost.
Ending the Connection with the PC
1. Click the [Disconnect] button in eBand Song List Editor.
2. Press the [EXIT] button on the JS-10.
The message “Are you sure?” appears.
3. To end the connection, press the [ENTER] button on the JS-10.
* To use the eBand Song List Editor again, follow the procedure in “Connecting the JS-10 to Your PC” (p. 13).

eBand Song List Editor Convenient Functions Appendices
Panel Descriptions Play the Guitar with Songs
as Your Backing
NlPtEsItFrDeEnglish
17
Convenient Functions
Editing the Eects
Here’s how to edit the JS-10’s built-in eects and create your own
favorite sound.
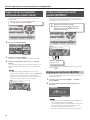
Visually Editing the Sound (EZ EDIT)
You can create sounds intuitively by using visual sound-shaping
grids (dual-axis graph), which allow you to adjust multiple
parameters with a single control.
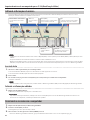
1. Select which of the two available eects you want to edit.
Select “IN1” to edit the eect for the INPUT 1 jack and select “IN2” to
edit the eect for the INPUT 2 jack.
IN1
Eect for INPUT 1
jack.
IN2
Eect for INPUT 2
jack.
2. Press the [EFFECTS] button.
The PATCH SELECT screen appears.
Patch number
Displays the number
for each patch.
IN1 / IN2
Displays the input
jack number for the
eect that is set.
CATEGORY
Basic music style of the
eect.
PATCH
Combinations of multiple eects and
saved settings (patches).
3. Select the category of the sound you want to create from
CATEGORY.
4. Press the [ ] (Cursor) button.
The cursor moves to PATCH.
5. Select the sound that is similar to what you have in mind
from PATCH.
6. Press the [ ] (Cursor) button.
The EZ EDIT screen appears.
Set the parameters using the cursor and the Dial.
SOLO
Sound for
solos.
BACKING
Sound for
backing.
SOFT
Softens the
distortion.
AMBIENCE
Turn the Dial to adjust the
length of the reverb.
Short
. . . Long
Cursor
Turn the Dial to move
the cursor in the
direction selected with
/ .
HARD
Hardens the
distortion.
/
Select
which way
to move
the cursor.
NOTE
If you switch patches before saving an edited eect, the edited
information will be lost.
The edited information will also be lost if you switch songs with
the PATCH SYNC parameter set to ON, because the patches will
be switched at the same time.
To save the edited information, refer to “Saving Patches” (p. 19).
MEMO
You can edit patches even more precisely. Refer to “Advanced
Editing of Sounds (PATCH EDIT)” (p. 18).

18
Convenient Functions
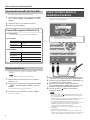
Advanced Editing of Sounds (PATCH EDIT)
Dierent combinations of multiple eects and settings are saved in
eect patches.
Here’s how to use PATCH EDIT to edit all parameters in these eects.
1. Follow the procedure in “Visually Editing the Sound (EZ
EDIT)” (p. 17) to display the EZ EDIT screen.
2. Press the [ ] (Cursor) button a number of times.
The PATCH EDIT screen appears.
DIAL
Turn the Dial to switch the
selected eect ON and OFF.
ENTER
Conrms the selected eect
(proceeds to Step 3).
Cursor
Select the eect that you want to edit.
3. Press the [ENTER] button.
A screen for editing eects appears (screenshots below are the AMP
screen and the MOD SELECT screen).
ENTER
Switches the eect ON and OFF.
Move Page Symbols ( ) ( )
When these symbols are displayed, other edit screens
appear when [
] [ ] (cursor) buttons are pressed.
MEMO
• You can display the AMP screen by pressing the [AMP] button
on the front panel.
• For details on parameters in eects, refer to “Eect Parameter
List” (p. 31).
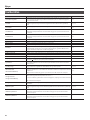
MENU of an EFFECT screen
In the eects-related screens such as PATCH SELECT or PATCH EDIT,
press the [MENU] button to display the EFFECT MENU screen.
EFFECT MENU Explanation
WRITE/NAME
Saves the patch currently being edited (or copies
the currently selected patch).
EXCHANGE
Exchanges the currently selected patch with
another patch.
INITIALIZE
Restores the eect settings to their default factory
state.
MEMO
The displayed MENU items dier depending on the screen or
the location of the cursor.
La pagina si sta caricando...
La pagina si sta caricando...
La pagina si sta caricando...
La pagina si sta caricando...
La pagina si sta caricando...
La pagina si sta caricando...
La pagina si sta caricando...
La pagina si sta caricando...
La pagina si sta caricando...
La pagina si sta caricando...
La pagina si sta caricando...
La pagina si sta caricando...
La pagina si sta caricando...
La pagina si sta caricando...
La pagina si sta caricando...
La pagina si sta caricando...
La pagina si sta caricando...
La pagina si sta caricando...
La pagina si sta caricando...
La pagina si sta caricando...
La pagina si sta caricando...
La pagina si sta caricando...
La pagina si sta caricando...
La pagina si sta caricando...
La pagina si sta caricando...
La pagina si sta caricando...
La pagina si sta caricando...
La pagina si sta caricando...
La pagina si sta caricando...
La pagina si sta caricando...
La pagina si sta caricando...
La pagina si sta caricando...
La pagina si sta caricando...
La pagina si sta caricando...
La pagina si sta caricando...
La pagina si sta caricando...
La pagina si sta caricando...
La pagina si sta caricando...
La pagina si sta caricando...
La pagina si sta caricando...
La pagina si sta caricando...
La pagina si sta caricando...
La pagina si sta caricando...
La pagina si sta caricando...
La pagina si sta caricando...
La pagina si sta caricando...
La pagina si sta caricando...
La pagina si sta caricando...
La pagina si sta caricando...
La pagina si sta caricando...
La pagina si sta caricando...
La pagina si sta caricando...
La pagina si sta caricando...
La pagina si sta caricando...
La pagina si sta caricando...
La pagina si sta caricando...
La pagina si sta caricando...
La pagina si sta caricando...
La pagina si sta caricando...
La pagina si sta caricando...
La pagina si sta caricando...
La pagina si sta caricando...
La pagina si sta caricando...
La pagina si sta caricando...
La pagina si sta caricando...
La pagina si sta caricando...
La pagina si sta caricando...
La pagina si sta caricando...
La pagina si sta caricando...
La pagina si sta caricando...
La pagina si sta caricando...
La pagina si sta caricando...
La pagina si sta caricando...
La pagina si sta caricando...
La pagina si sta caricando...
La pagina si sta caricando...
La pagina si sta caricando...
La pagina si sta caricando...
La pagina si sta caricando...
La pagina si sta caricando...
La pagina si sta caricando...
La pagina si sta caricando...
La pagina si sta caricando...
La pagina si sta caricando...
La pagina si sta caricando...
La pagina si sta caricando...
La pagina si sta caricando...
La pagina si sta caricando...
La pagina si sta caricando...
La pagina si sta caricando...
La pagina si sta caricando...
La pagina si sta caricando...
La pagina si sta caricando...
La pagina si sta caricando...
La pagina si sta caricando...
La pagina si sta caricando...
La pagina si sta caricando...
La pagina si sta caricando...
La pagina si sta caricando...
La pagina si sta caricando...
La pagina si sta caricando...
La pagina si sta caricando...
La pagina si sta caricando...
La pagina si sta caricando...
La pagina si sta caricando...
La pagina si sta caricando...
La pagina si sta caricando...
La pagina si sta caricando...
La pagina si sta caricando...
La pagina si sta caricando...
La pagina si sta caricando...
La pagina si sta caricando...
La pagina si sta caricando...
La pagina si sta caricando...
La pagina si sta caricando...
La pagina si sta caricando...
La pagina si sta caricando...
La pagina si sta caricando...
La pagina si sta caricando...
La pagina si sta caricando...
La pagina si sta caricando...
La pagina si sta caricando...
La pagina si sta caricando...
La pagina si sta caricando...
La pagina si sta caricando...
La pagina si sta caricando...
La pagina si sta caricando...
La pagina si sta caricando...
La pagina si sta caricando...
La pagina si sta caricando...
La pagina si sta caricando...
La pagina si sta caricando...
La pagina si sta caricando...
La pagina si sta caricando...
La pagina si sta caricando...
La pagina si sta caricando...
La pagina si sta caricando...
La pagina si sta caricando...
La pagina si sta caricando...
La pagina si sta caricando...
La pagina si sta caricando...
La pagina si sta caricando...
La pagina si sta caricando...
La pagina si sta caricando...
La pagina si sta caricando...
La pagina si sta caricando...
La pagina si sta caricando...
La pagina si sta caricando...
La pagina si sta caricando...
La pagina si sta caricando...
La pagina si sta caricando...
La pagina si sta caricando...
La pagina si sta caricando...
La pagina si sta caricando...
La pagina si sta caricando...
La pagina si sta caricando...
La pagina si sta caricando...
La pagina si sta caricando...
La pagina si sta caricando...
La pagina si sta caricando...
La pagina si sta caricando...
La pagina si sta caricando...
La pagina si sta caricando...
La pagina si sta caricando...
La pagina si sta caricando...
La pagina si sta caricando...
La pagina si sta caricando...
La pagina si sta caricando...
La pagina si sta caricando...
La pagina si sta caricando...
La pagina si sta caricando...
La pagina si sta caricando...
La pagina si sta caricando...
La pagina si sta caricando...
La pagina si sta caricando...
La pagina si sta caricando...
La pagina si sta caricando...
La pagina si sta caricando...
La pagina si sta caricando...
La pagina si sta caricando...
La pagina si sta caricando...
La pagina si sta caricando...
La pagina si sta caricando...
La pagina si sta caricando...
La pagina si sta caricando...
La pagina si sta caricando...
La pagina si sta caricando...
La pagina si sta caricando...
La pagina si sta caricando...
La pagina si sta caricando...
La pagina si sta caricando...
La pagina si sta caricando...
La pagina si sta caricando...
La pagina si sta caricando...
La pagina si sta caricando...
La pagina si sta caricando...
La pagina si sta caricando...
La pagina si sta caricando...
La pagina si sta caricando...
La pagina si sta caricando...
La pagina si sta caricando...
La pagina si sta caricando...
La pagina si sta caricando...
La pagina si sta caricando...
La pagina si sta caricando...
La pagina si sta caricando...
La pagina si sta caricando...
La pagina si sta caricando...
La pagina si sta caricando...
La pagina si sta caricando...
La pagina si sta caricando...
La pagina si sta caricando...
La pagina si sta caricando...
La pagina si sta caricando...
La pagina si sta caricando...
La pagina si sta caricando...
La pagina si sta caricando...
La pagina si sta caricando...
La pagina si sta caricando...
La pagina si sta caricando...
La pagina si sta caricando...
La pagina si sta caricando...
La pagina si sta caricando...
La pagina si sta caricando...
La pagina si sta caricando...
La pagina si sta caricando...
La pagina si sta caricando...
La pagina si sta caricando...
La pagina si sta caricando...
La pagina si sta caricando...
La pagina si sta caricando...
La pagina si sta caricando...
La pagina si sta caricando...
La pagina si sta caricando...
La pagina si sta caricando...
La pagina si sta caricando...
La pagina si sta caricando...
La pagina si sta caricando...
La pagina si sta caricando...
La pagina si sta caricando...
La pagina si sta caricando...
La pagina si sta caricando...
La pagina si sta caricando...
La pagina si sta caricando...
La pagina si sta caricando...
La pagina si sta caricando...
La pagina si sta caricando...
La pagina si sta caricando...
La pagina si sta caricando...
La pagina si sta caricando...
La pagina si sta caricando...
La pagina si sta caricando...
La pagina si sta caricando...
La pagina si sta caricando...
La pagina si sta caricando...
La pagina si sta caricando...
La pagina si sta caricando...
La pagina si sta caricando...
La pagina si sta caricando...
La pagina si sta caricando...
La pagina si sta caricando...
La pagina si sta caricando...
La pagina si sta caricando...
La pagina si sta caricando...
La pagina si sta caricando...
La pagina si sta caricando...
La pagina si sta caricando...
La pagina si sta caricando...
La pagina si sta caricando...
La pagina si sta caricando...
La pagina si sta caricando...
La pagina si sta caricando...
La pagina si sta caricando...
La pagina si sta caricando...
La pagina si sta caricando...
La pagina si sta caricando...
La pagina si sta caricando...
La pagina si sta caricando...
La pagina si sta caricando...
La pagina si sta caricando...
La pagina si sta caricando...
La pagina si sta caricando...
La pagina si sta caricando...
La pagina si sta caricando...
La pagina si sta caricando...
La pagina si sta caricando...
La pagina si sta caricando...
La pagina si sta caricando...
La pagina si sta caricando...
La pagina si sta caricando...
La pagina si sta caricando...
La pagina si sta caricando...
La pagina si sta caricando...
La pagina si sta caricando...
La pagina si sta caricando...
La pagina si sta caricando...
-
 1
1
-
 2
2
-
 3
3
-
 4
4
-
 5
5
-
 6
6
-
 7
7
-
 8
8
-
 9
9
-
 10
10
-
 11
11
-
 12
12
-
 13
13
-
 14
14
-
 15
15
-
 16
16
-
 17
17
-
 18
18
-
 19
19
-
 20
20
-
 21
21
-
 22
22
-
 23
23
-
 24
24
-
 25
25
-
 26
26
-
 27
27
-
 28
28
-
 29
29
-
 30
30
-
 31
31
-
 32
32
-
 33
33
-
 34
34
-
 35
35
-
 36
36
-
 37
37
-
 38
38
-
 39
39
-
 40
40
-
 41
41
-
 42
42
-
 43
43
-
 44
44
-
 45
45
-
 46
46
-
 47
47
-
 48
48
-
 49
49
-
 50
50
-
 51
51
-
 52
52
-
 53
53
-
 54
54
-
 55
55
-
 56
56
-
 57
57
-
 58
58
-
 59
59
-
 60
60
-
 61
61
-
 62
62
-
 63
63
-
 64
64
-
 65
65
-
 66
66
-
 67
67
-
 68
68
-
 69
69
-
 70
70
-
 71
71
-
 72
72
-
 73
73
-
 74
74
-
 75
75
-
 76
76
-
 77
77
-
 78
78
-
 79
79
-
 80
80
-
 81
81
-
 82
82
-
 83
83
-
 84
84
-
 85
85
-
 86
86
-
 87
87
-
 88
88
-
 89
89
-
 90
90
-
 91
91
-
 92
92
-
 93
93
-
 94
94
-
 95
95
-
 96
96
-
 97
97
-
 98
98
-
 99
99
-
 100
100
-
 101
101
-
 102
102
-
 103
103
-
 104
104
-
 105
105
-
 106
106
-
 107
107
-
 108
108
-
 109
109
-
 110
110
-
 111
111
-
 112
112
-
 113
113
-
 114
114
-
 115
115
-
 116
116
-
 117
117
-
 118
118
-
 119
119
-
 120
120
-
 121
121
-
 122
122
-
 123
123
-
 124
124
-
 125
125
-
 126
126
-
 127
127
-
 128
128
-
 129
129
-
 130
130
-
 131
131
-
 132
132
-
 133
133
-
 134
134
-
 135
135
-
 136
136
-
 137
137
-
 138
138
-
 139
139
-
 140
140
-
 141
141
-
 142
142
-
 143
143
-
 144
144
-
 145
145
-
 146
146
-
 147
147
-
 148
148
-
 149
149
-
 150
150
-
 151
151
-
 152
152
-
 153
153
-
 154
154
-
 155
155
-
 156
156
-
 157
157
-
 158
158
-
 159
159
-
 160
160
-
 161
161
-
 162
162
-
 163
163
-
 164
164
-
 165
165
-
 166
166
-
 167
167
-
 168
168
-
 169
169
-
 170
170
-
 171
171
-
 172
172
-
 173
173
-
 174
174
-
 175
175
-
 176
176
-
 177
177
-
 178
178
-
 179
179
-
 180
180
-
 181
181
-
 182
182
-
 183
183
-
 184
184
-
 185
185
-
 186
186
-
 187
187
-
 188
188
-
 189
189
-
 190
190
-
 191
191
-
 192
192
-
 193
193
-
 194
194
-
 195
195
-
 196
196
-
 197
197
-
 198
198
-
 199
199
-
 200
200
-
 201
201
-
 202
202
-
 203
203
-
 204
204
-
 205
205
-
 206
206
-
 207
207
-
 208
208
-
 209
209
-
 210
210
-
 211
211
-
 212
212
-
 213
213
-
 214
214
-
 215
215
-
 216
216
-
 217
217
-
 218
218
-
 219
219
-
 220
220
-
 221
221
-
 222
222
-
 223
223
-
 224
224
-
 225
225
-
 226
226
-
 227
227
-
 228
228
-
 229
229
-
 230
230
-
 231
231
-
 232
232
-
 233
233
-
 234
234
-
 235
235
-
 236
236
-
 237
237
-
 238
238
-
 239
239
-
 240
240
-
 241
241
-
 242
242
-
 243
243
-
 244
244
-
 245
245
-
 246
246
-
 247
247
-
 248
248
-
 249
249
-
 250
250
-
 251
251
-
 252
252
-
 253
253
-
 254
254
-
 255
255
-
 256
256
-
 257
257
-
 258
258
-
 259
259
-
 260
260
-
 261
261
-
 262
262
-
 263
263
-
 264
264
-
 265
265
-
 266
266
-
 267
267
-
 268
268
-
 269
269
-
 270
270
-
 271
271
-
 272
272
-
 273
273
-
 274
274
-
 275
275
-
 276
276
-
 277
277
-
 278
278
-
 279
279
-
 280
280
-
 281
281
-
 282
282
-
 283
283
-
 284
284
-
 285
285
-
 286
286
-
 287
287
-
 288
288
-
 289
289
-
 290
290
-
 291
291
-
 292
292
-
 293
293
-
 294
294
-
 295
295
-
 296
296
-
 297
297
-
 298
298
-
 299
299
-
 300
300
-
 301
301
-
 302
302
-
 303
303
-
 304
304
-
 305
305
-
 306
306
-
 307
307
-
 308
308
-
 309
309
-
 310
310
-
 311
311
-
 312
312
-
 313
313
-
 314
314
-
 315
315
-
 316
316


Boss eBand JS-10 Manuale del proprietario
- Tipo
- Manuale del proprietario
in altre lingue
- français: Boss eBand JS-10 Le manuel du propriétaire
- español: Boss eBand JS-10 El manual del propietario
- Deutsch: Boss eBand JS-10 Bedienungsanleitung
- Nederlands: Boss eBand JS-10 de handleiding
- português: Boss eBand JS-10 Manual do proprietário
Documenti correlati
Altri documenti
-
Roland UA-1G Manuale utente
-
Yamaha MOXF6 Manuale utente
-
Yamaha MOX6 Manuale del proprietario
-
Yamaha MO6 Manuale del proprietario
-
Yamaha AW2400 Manuale utente
-
-
Yamaha Recording Equipment Manuale utente
-
-
-
Edirol R-1 Manuale del proprietario