Oregon Scientific THGR228N Manuale utente
- Categoria
- Stazioni meteorologiche
- Tipo
- Manuale utente

[ FIG E ]
[ FIG C ]
REMOTE THERMO-HYGROMETER
WITH LCD
MODEL : THGR228N
USER'S MANUAL
[ FIG D ]
[ FIG A ] [ FIG B ]
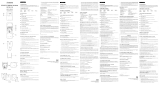
HOW TO USE THE TABLE STAND OR WALL MOUNT
This sensor comes with a wall-mount holder and a removable stand. Use either to
hold the unit in place. [ FIG E]
PRECAUTIONS
This product is engineered to give you years of satisfactory service if you handle it
carefully. Here are a few precautions:
1. Do not immerse the unit in water.
2. Do not clean the unit with abrasive or corrosive materials. They may scratch
the plastic parts and corrode the electronic circuit.
3. Do not subject the unit to excessive force, shock, dust, temperature or humidity,
which may result in malfunction, shorter electronic life span, damaged battery
and distorted parts.
4. Do not tamper with the unit’s internal components. Doing so will invalidate
the warranty on the unit and may cause unnecessary damage. The unit contains
no user-serviceable parts.
5. Only use fresh batteries as specified in the user’s manual. Do not mix new and
old batteries as the old ones may leak.
6. Always read the user’s manual thoroughly before operating the unit.
SPECIFICATIONS
Remote thermo-hygro unit
Displayed temperature range : -50.0°C to +70.0°C (-58.0°F to 158.0°F)
Proposed operating range : -20.0°C to +60.0°C (-4.0°F to 140.0°F)
Temperature resolution : 0.1°C (0.2°F)
Humidity Resolution : 1%
Relative humidity measurement range : 5% RH to 95% RH
RF Transmission Frequency : 433 MHz
Number of channels : 3
RF Transmission Range : Maximum 30 meters
Temperature sensing cycle : around 40 seconds
Power : two (2) UM-4 or “AAA” 1.5V
alkaline batteries
Weight : 63 gm (without batteries)
Dimension : 92 x 60 x 20 mm (H x W x D)
CAUTION
- The content of this manual is subject to change without further notice.
- Due to printing limitation, the displays shown in this manual may differ
from the actual display.
- The contents of this manual may not be reproduced without the permission
of the manufacturer.
EC-DECLARATION OF CONFORMITY
This product contains the approved transmitter module that complies with the es-
sential requirements of Article 3 of the R&TTE 1999 / 5 / EC Directive, if used as
intended and the following standards have been applied:
Safety of information technology equipment
(Article 3.1.a of the R&TTE Directive)
Applied Standard EN 60950-1: 2001
Electromagnetic compatibility
(Article 3.1.b of the R&TTE Directive)
Applied Standards ETSI EN 301 489-1-3 (Ver.1.4.1) : 2002-08
Efficient use of radio frequency spectrum
(Article 3.2 of the R&TTE Directive)
Applied Standards ETSI EN 300 220-3 (Ver1.1.1) : 2000-09
Additional information:
The product herewith complies with the requirements of the Low Voltage Directive
73 / 23 / EC, the EMC Directive 89 / 336 / EC and carries the CE marking accord-
ingly.
Carmelo Cubito
Agrate Brianza (MI) / Italy January 2004
Manufacturer’s EU R&TTE Representative
COUNTRIES RTTE APPROVAL COMPLIED
All EC countries, Switzerland CH
and Norway N
ABOUT OREGON SCIENTIFIC
Visit our website (www.oregonscientific.com) to learn more about Oregon Scien-
tific products such as digital cameras; MP3 players; children's electronic learning
products and games; projection clocks; health and fitness gear; weather stations;
and digital and conference phones. The website also includes contact information
for our customer care department in case you need to reach us, as well as frequently
asked questions and customer downloads.
We hope you will find all the information you need on our website, however if
you'd like to contact the Oregon Scientific Customer Care department directly, please
visit:
www2.oregonscientific.com/service/support
OR
Call 949-608-2848 in the US.
For international enquiries, please visit:
http://www2.oregonscientific.com/about/international/default.asp
FCC STATEMENT
This device complies with Part 15 of the FCC Rules. Operation is subject to the
following two conditions:
(1) This device may not cause harmful interference, and (2) This device must accept
any interference received, including interference that may cause undesired operation.
Warning: Changes or modifications to this unit not expressly approved by the
party responsible for compliance could void the user's authority to operate the
equipment.
NOTE: This equipment has been tested and found to comply with the limits for a
Class B digital device, pursuant to Part 15 of the FCC Rules. These limits are designed
to provide reasonable protection against harmful interference in a residential
installation. This equipment generates, uses and can radiate radio frequency energy
and, if not installed and used in accordance with the instructions, may cause harmful
interference to radio communications.
However, there is no guarantee that interference will not occur in a particular
installation. If this equipment does cause harmful interference to radio or television
reception, which can be determined by turning the equipment off and on, the user is
encouraged to try to correct the interference by one or more of the following
measures:
• Reorient or relocate the receiving antenna.
• Increase the separation between the equipment and receiver.
• Connect the equipment into an outlet on a circuit different from that to which
the receiver is connected.
• Consult the dealer or an experienced radio / TV technician for help.
DECLARATION OF CONFORMITY
The information below is not to be used as contact for support or sales. Please call
our customer service number (listed on our website at www.oregonscientific.com,
or on the warranty card for this product) for all inquiries instead.
We
Name: Oregon Scientific, Inc.
Address: 19861 SW 95th Place,
Tualatin, Oregon 97062 USA
Telephone No.: 1-800-853-8883
Fax No.: 1-503-684-8883
declare that the product
Product No.: BAR608HGA
Product Name: Wireless Weather Station
Manufacturer: IDT Technology Limited
Address: Block C, 9/F, Kaiser Estate, Phase 1, 41 Man
Yue St., Hung Hom, Kowloon, Hong Kong
is in conformity with Part 15 of the FCC Rules. Operation is subject to the following
two conditions:
1) This device may not cause harmful interference.
2) This device must accept any interference received, including interference that
may cause undesired operation.
ITALIANO
INTRODUZIONE
Complimenti per aver acquistato il Sensore Remoto per Termo-igrometro (THGR228N).
Il THGR228N è compatibile con una molteplicità di unità di monitoraggio igrotermiche
multicanale int/est. da 433 MHz. Il funzionamento non richiede nessuna cablatura.
STRUMENTI COMPATIBILI
Nota: Il THGR228N è compatibile con una molteplicità di unità di
monitoraggio. Se non si è sicuri della compatibilità di questa unità, consultare
il proprio concessionario per ulteriore assistenza.
Esempi di strumenti compatibili:
EMR899HGN WMR918N
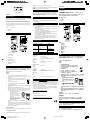
CARATTERISTICHE PRINCIPALI
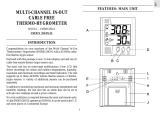
A LCD a due sezioni
Visualizza le letture di temperatura ed umidità rilevate dall’unità a distanza.
• Visualizzazione della temperatura
• Visualizzazione dell’umidità
• Indicatore di ambiente
B INDICATORE LED
Lampeggia quando l'unità remota trasmette un rilevamento.
C SELETTORE
°C/°F
Permette di selezionare i gradi centigradi (°C) o Fahrenheit (°F)
D SELETTORE DEI CANALI
Permette di designare il Canale 1, il Canale 2 o il Canale 3 dell'unità remota
E PULSANTE RESET (AZZERA)
Ripristina i valori predefiniti di tutte le impostazioni.
FVANO BATTERIE
Accoglie due batterie di formato AAA.
G SPORTELLO VANO BATTERIE
H FORO PER IL MONTAGGIO A PARETE
Permette di appendere l'unità a parete.
I SUPPORTO DI APPOGGIO RETRATTILE
Permette di posizionare l'unità principale su una superficie piana.
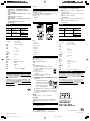
COME INIZIARE
Nota: Per assicurare una ricezione accurata tra lo strumento principale e il
sensore remoto, seguire queste istruzioni attentamente.
INSTALLAZIONE DI BATTERIE E CANALI
1. Posizionare entrambi gli strumenti il più vicino possibile tra di essi.
2. Togliere le viti dal vano batterie.
3. Assegnare un canale diverso a ciascuno dei sensori remoti per mezzo del
selettore dei canali situato all’interno del compartimento batterie del sensore
remoto. [FIG A]
4. Selezionare l'unità di visualizzazione delle temperature con il selettore °C/°F.
[FIG B]
5. Installare due batterie alcaline (tipo UM-4 o “AAA” da 1,5V) seguendo
attentamente le polarità indicate. [FIG C]
6. Inserire le batterie e premere il tasto di azzeramento dello strumento principale.
Seguire le istruzioni che troverete nel manuale dell’Utente.
7. Riposizionare lo sportello del vano batterie ed avvitarlo con le relative viti.
8. Posizionare l'unità remota e l'unità principale entro un campo di trasmissione
efficace, che in circostanze normali varia da 20 a 30 metri.
Nota: Va osservato che il campo di efficienza è notevolmente condizionato dai
materiali dell'edificio e dall'ambiente in cui sono posizionate l'unità principale
e l'unità remota. Provare diverse configurazioni per ottenere il risultato migliore.
Sebbene sia resistente alle intemperie e concepito per l'impiego in ambienti esterni,
il sensore va posizionato lontano dalla luce solare diretta e al riparo da pioggia o
neve.
CAMBIAMENTO DEI CANALI
Una volta che è stato assegnato ad una unità, un canale può essere modificato soltanto
togliendo le batterie e ripetendo la procedura sopra indicata.
AVVERTIMENTO DI BASSA CARICA DELLE
BATTERIE
Un indicatore di esaurimento batteria [ ] si attiverà sul sensore per indicare che
le batterie stanno per scaricarsi e richiedono la sostituzione. L’abbassamento di
carica per un dato sensore è anche indicata sull’unità principale. Le batterie vanno
sostituite quando appare questo indicatore.
Nota: se non smaltite correttamente, le batterie possono risultare nocive.
Per proteggere l’ambiente, portare le batterie scariche in un centro di
smaltimento autorizzato.
INDICAZIONE DI AMBIENTE
Le indicazioni di ambiente si basano sull’umidità relativa registrata e indicano se
l’ambiente circostante è confortevole, umido o secco. [FIG D]
FUNZIONAMENTO
Una volta installate le batterie, il sensore inizierà a trasmettere rilevamenti ad
intervalli di 40 secondi.
Sull’unitá principale sará possibile monitorare la temperatura del sensore remoto.
COME AZZERARE LO STRUMENTO
L’operazione é da dffettuarsi solo sei dati rilevati appaiono incoerenti o se la
comunicazione tra l’unitá remota e l’unitá principale non é attiva.
Per azzerare:
1. Aprire lo sportello del compartimento batterie.
2. Premere con un oggetto appuntito il tasto reset.
3. Riporre il coperchio del vano batterie.
Per ulteriori informazioni, vedere il manuale relativo all'unità principale.
COME USARE IL SUPPORTO DA TAVOLO O PER
IL MONTAGGIO A PARETE
Questo sensore viene fornito con un elemento per il montaggio a parete e con un
supporto asportabile. Usare l'uno o l'altro dispositivo per tenere l'unità in posizione.
[ FIG E ]
PRECAUZIONI
Questo strumento è studiato per offrire molti anni di funzionamento soddisfacente
a condizione che venga maneggiato con cura. Attenersi alle seguenti precauzioni:
1. Non immergere l'unità in liquidi.
2. Non pulire l'unità con sostanze abrasive o corrosive, poiché possono scalfire i
componenti di plastica e corrodere il circuito elettronico.
3. Non sottoporre l'unità a forza eccessiva, urti, polvere temperature eccessive o
umidità che possano provocare mal funzionamenti, ridurre la durata dei circuiti
elettronici, danneggiare la batteria o distorcere i componenti.
4. Non manomettere i componenti interni dell'unità. Così facendo si rende nulla
la garanzia e si possono causare danni superflui. L'unità non contiene
componenti che possono essere riparati dall'utente.
5. Usare solo batterie nuove, come specificato nelle istruzioni del produttore.
Non mischiare batterie nuove con batterie vecchie, poiché queste ultime
possono provocare perdite.
6. Prima di mettere in funzione l'unità, leggere attentamente le istruzioni per
l'uso.
DATI TECNICI
Igrometro / termometro per rilevamenti a distanza
Campo di temperatura visualizzato : da -50°C a +70°C (da -58°F a 158°F)
Campo di esercizio consigliato : da -20°C a +60°C (da -4°F a 140°F)
Risoluzione di temperatura : 0,1°C (0,2°F)
Risoluzione umidità : 1%
Campo di misurazione umidità relativa : da 5% a 95% UR
Frequenza di trasmissione RF : 433 MHz
Numero di canali : 3
Raggio di trasmissione RF : massimo 30 metri
Ciclo di rilevamento temperatura : circa 40 secondi
Alimentazione : 2 batterie UM-4 o "AAA" alcaline da
1,5 V
Peso : 63 g (senza batteria)
Dimensioni : 92 x 60 x 20 mm (L x W x T)
AVVERTENZA
- Il contenuto di questo manuale e le specifiche tecniche di questo prodotto
sono soggetto a modifiche senza preavviso.
- Per via delle limitazioni di stampa, i display mostrati in questo manuale
possono differire dai display effettivi.
- Il contenuto di questo manuale non può essere riprodotto senza il permesso
del produttore.
INFORMAZIONI SU OREGON SCIENTIFIC
Per avere maggiori informazioni sui nuovi prodotti Oregon Scientific, come le
fotocamere digitali, il lettori MP3, i computer didattici per ragazzi, gli orologi
con proiezione dell’ora, le stazioni barometriche, gli orologi da polso
multifunzione, gli strumenti per la cura della persona ed il fitness, ed altro
ancora, visita il nostro sito internet
www.oregonscientific.com
Puoi trovare anche le informazioni necessarie per contattare il nostro servizio
clienti, le risposte ad alcune domande più frequenti (FAQ) o i software da
scaricare gratuitamente.
Sul nostro sito internet potrai trovare tutte le informazioni di cui hai bisogno, ma
se desideri contattare direttamente il nostro Servizio Consumatori puoi visitare il
sito
www2.oregonscientific.com/service/support oppure chiamare al 949-608-
2848 (numero valido esclusivamente per gli USA). Per ricerche di tipo
internazionale puoi visitare invece il sito
www2.oregonscientific.com/about/
international/default.asp
DICHIARAZIONE DI CONFORMITÁ
Questo prodotto contiene il modulo di trasmissione approvato ed è conforme ai
requisiti essenziali dell'articolo 3 della Direttiva 1999 / 5 / CE di R&TTE se
utilizzato per l'uso previsto e se vengono applicati i seguenti standard:
Requisiti essenziali sulla sicurezza dell’apparecchio
(Articolo 3.1.a della direttiva R&TTE)
Standard applicati EN 60950-1: 2001
Compatibilità Elettromagnetica
(Articolo 3.1.b della direttiva R&TTE)
Standard applicati ETSI EN 301 489-1-3 (Ver.1.4.1) : 2002-08
Uso corretto delle spettro delle radiofrequenze
(Articolo 3.2 della direttiva R&TTE)
Standard applicati ETSI EN 300 220-3 (Ver1.1.1) : 2000-09
Informazioni aggiuntive:
L’apparecchio è inoltre conforme alla Direttiva sulla Bassa Tensione 73 / 23 / EC,
alla Direttiva sulla Compatibilità Elettromagnetica 89 / 336 / EC, alla Direttiva
R&TTE 1999 / 5 / EC (appendice II) e recante i rispettivi marchi CE.
Carmelo Cubito
Agrate Brianza (MI) / Italia January 2004
Rappresentante EU del Produttore per la R&TTE
PAESI CONFORMI ALLA DIRETTIVA R&TTE
Tutti i Paesi Europei, Svizzera
e Norvegia
CH
DEUTSCH
EINLEITUNG
Wir gratulieren Ihnen zum Kauf dieses kabellosen Thermo-Hygro-Sensors
(THGR228N).
Das THGR228N ist kompatibel mit verschiedenen 433 MHz Mehrkanal-Thermo-
Hygro-Basisgeräten für Innen-und Außentemperaturen kompatibel. Die Bedienung
ist einfach, und keine Kabelinstallationsarbeiten müssen ausgeführt werden.
KOMPATIBLE GERÄTE
Anmerkung: Das THGR228N ist mit verschiedenen Mehrkanalgeräten
kompatible. Bitte treten Sie mit Ihrem Fachhändler in Verbindung, für
ausführliche Beratung zur Kompatibilität dieses Gerätes.
Beispiele für kompatible Empfangsgeräte:
EMR899HGN WMR918N
EIGENSCHAFTEN
A ZWEIZEILIGE LCD-ANZEIGE
Anzeige der Temperatur-und Luftfeuchtigkeitswerte.
• Temperaturanzeige
• Anzeige für Luftfeuchtigkeit
• Komfort-Indikator
B LED-INDIKATOR
Blinkt während der externe Sensor eine Messung an das Empfangsgerät sendet.
C
°C/°F WAHLSCHALTER
Einstellen der Temperaturanzeige für Celsius- (°C), oder Fahrenheit-Grade
(°F).
D SENDEKANAL-WAHLSCHALTER
Weist einem Sensor Kanal 1, Kanal 2 oder Kanal 3 zu.
E RÜCKSETZ-TASTE (RESET)
Rücksetzung aller Einstellungen auf die Vorgabewerte.
FBATTERIEFACH
Enthält zwei Batterien des Typs "AAA".
GBATTERIEFACH-ABDECKUNG
H HALTERUNG FÜR WANDAUFHÄNGUNG
Um den Aussensensor an einer Wand aufzuhängen.
I ABNEHMBARER STANDBÜGEL
Zur Aufstellung des Aussensensors auf einer ebenen Oberfläche.
VORBEREITUNG ZUM EINSATZ
Anmerkung: Um einen optimalen Empfang zwischen Empfangsgerät und
Aussensensor zu gewährleisten, beachten Sie bitte die folgenden Anweisungen:
EINLEGEN DER BATTERIEN UND
KANAL-EINSTELLUNG
1. Stellen Sie beide Geräte so nah wie möglich beieinander auf.
2. Nehmen Sie die Batterienfachabdeckung ab.
3. Wählen Sie verschiedene Kanäle für jedes Sensorgerät, indem Sie im
Batteriefach die Stellung des Kanalschalters verändern. [FIG A]
4. Stellen Sie die Temperaturanzeige für °C/ °F mittels des entsprechenden
Wahlschalters ein. [FIG B]
5. Legen Sie 2 “Alkali” Batterien (UM-4 oder “AAA”-Größe 1,5V) entsprechend
der angegebenen Polaritäten ein. [FIG C]
6. Legen Sie die Batterien ein oder drücken Sie den Resetknopf des
Empfangsgerätes.
7. Setzen Sie die Batteriefach-Abdeckung wieder auf, und ziehen Sie die
Schrauben fest.
8. Stellen Sie das Empfangsgerät und die Aussensensoren innerhalb der
Reichweite der Geräte auf, d.h. in einem Umkreis von 30 Metern.
ACHTUNG: BATTERIEN GEHÖREN NICHT IN DEN HAUSMÜLL.
BITTE GEBEN SIE DIESE AN DEN DAFÜR VORGESEHENEN
SAMMELSTELLEN AB.
Beachten Sie, daß die tatsächliche Reichweite der Geräte von den jeweils im Gebäude
verwendeten Materialien, und der Position der externen Sensoren abhängt. Testen
Sie verschiedene Aufstellungsorte, um optimale Resultate zu erzielen.
Obwohl die Aussensensoren wetterfest sind, sollten Sie diese dennoch nicht an
Orten plazieren, wo diese direkter Sonneneinstrahlung, Regen oder Schnee
ausgesetzt sind.
ÄNDERN DER KANALZUWEISUNG
Sobald Sie einem Sensor einen Kanal zugewiesen haben, können Sie diese
Einstellung nur durch Herausnehmen der Batterien ändern, und indem Sie den oben
beschriebenen Vorgang wiederholen.
BATTERIEINDIKATOR
Ein Batteriestand-Indikator [ ] erscheint an der Sensoreinheit wenn die Batterien
leer sind und ausgewechselt werden müssen. Ein entsprechender Indikator erscheint
auch am Hauptgerät, und zeigt an, für welchen Sensor die Batterien ausgewechselt
werden müssen. Wechseln Sie die Batterien aus, wenn der Batteriestand-Indikator
erscheint.
Anmerkung: Unsachgemäß entsorgte Batterien können die Umwelt
schädigen. Schützen Sie die Umwelt, und bringen Sie leere Batterien
stets zu einer offiziellen Sammelstelle.
KOMFORT-ANZEIGE
Die Anzeige für den Raumluft-Komfort basiert auf den gespeicherten Werten für
die relative Luftfeuchtigkeit. Ein Indikator zeigt an, ob die Raumluft “angenehm”
oder zu “feucht” ist. [FIG D]
AUFNAHME DES BETRIEBS
Nachdem die Batterien in einen Aussensensor eingelegt wurden, beginnt dieser mit
der Übertragung der gemessenen Temperatur in Intervallen von 40 Sekunden.
Die auf der LCD Anzeige erscheinende Aussensensoranzeige ist von der Auswahl
des Aussensensorkansles abhängig.
SO STELLEN SIE DAS GERÄT AUF DIE
VORGABEWERTE ZURÜCK
Die RESET Funktion wird nur gebraucht, wenn das Gerät ungenau arbeitet.
COMMENT UTILISER LE PIED DE SUPPORT OU
L'INSTALLATION MURALE
Cette sonde est fournie avec un support pour installation murale et un pied amovible.
Utilisez l'un ou l'autre pour maintenir l'appareil en place. [FIG E]
PRECAUTIONS
Ce produit a été conçu pour assurer un bon fonctionnement pendant plusieurs années
à condition d'en prendre soin. Certaines précautions s'imposent:
1. Ne pas immerger l'appareil.
2. Ne pas nettoyer l'appareil à l'aide de produits abrasifs ou corrosifs. Ces produits
peuvent rayer les parties en plastique et attaquer les circuits électroniques.
3. Ne pas exposer l'appareil aux chocs excessifs, ni aux excès de force, poussière,
chaleur, froid ou humidité qui pourraient résulter en un mauvais
fonctionnement, le raccourcissement de la vie de l'appareil, l'endommagement
des piles et la déformation des composants.
4. Ne pas toucher les composants internes de l'appareil. Ceci rendra nul la garantie
et peut causer des dommages. L'appareil ne contient aucun composant pouvant
être réparé par l'utilisateur.
5. Utiliser uniquement des piles neuves du type préconisé dans le manuel
d'utilisation. Ne pas mélanger piles neuves et piles usées afin d'éviter les fuites.
6. Lire soigneusement le manuel d'instructions avant de faire fonctionner
l'appareil.
FICHE TECHNIQUE
Appareil thermo-hygro à distance
Rayon d’affichage des températures : -50,0°C à +70,0°C (-58,0°F à 158,0°F)
Plage de fonctionnement proposée : -20,0°C à +60,0°C (-4,0°F à 140,0°F)
Limite de résolution de température : 0,1°C (0,2°F)
Précision de l’humidité : 1%
Rayon de relevé de l’humidité relative : 5% RH à 95% RH
Fréquence d’émission RF : 433 MHz
Nombre de canaux : 3
Rayon de Communication RF : 30 mètres maximum
Cycle de sondage de température : 40 secondes environ
Alimentation : utilise 2 piles alcalines 1,5V de type
UM-4 "AAA"
Poids : 63 gm (sans piles)
Dimensions : 92 x 60 x 20 mm (H x I x L)
ATTENTION
-Le contenu de ce livret est susceptible de modifications sans avis préalable.
- En raison des restrictions imposées par l'impression, les affichages figurant
dans ce livret peuvent différer de ceux du produit.
-Le contenu de ce livret ne peut être reporduit sans l'autorisation du fabricant.
DÉCLARATION DE CONFORMITE EUROPÉENNE
Cet instrument est muni du module transmetteur. Il est conforme aux conditions
requises par l'article 3 des Directives R&TTE 1999 / 5 / EC si il est utilisé à bon
escient et si la ou les norme(s) suivante(s) sont respectée(s):
Sécurité des appareils à technologie d’information
(Article 3.1.a de la Directive R&TTE)
norme(s) appliquée(s)
EN 60950-1: 2001
Compatibilité électromagnétique
(Article 3.1.b de la Directive R&TTE)
norme(s) appliquée(s)
ETSI EN 301 489-1-3 (Ver.1.4.1) : 2002-08
Utilisation efficace du spectre des fréquences radio
(Article 3.2 de la Directive R&TTE Directive)
norme(s) appliquée(s)
ETSI EN 300 220-3 (Ver1.1.1) : 2000-09
Information supplémentaire:
Par conséquent ce produit est conforme à la Directive Basse tension 73 / 23 / EC,
à la Directive EMC 89 / 336 / EC et à la Directive R&TTE 1999 / 5 / EC (annexe
II) et porte la mention CE correspondante.
Carmelo Cubito
Agrate Brianza (MI) / Italie January 2004
Représentant du fabricant R&TTE
PAYS CONCERNES RTT&E
Tous les pays de l’UE, Suisse
et Norvège
A PROPOS D'OREGON SCIENTIFIC
En consultant notre site internet (www.oregonscientific.fr), vous pourrez obtenir
des informations sur les produits Oregon Scientific: photo numérique; lecteurs MP3;
produits et jeux électroniques éducatifs; réveils; sport et bien-être; stations météo;
téléphonie. Le site indique également comment joindre notre service après-vente.
Nous espérons que vous trouverez toutes les informations dont vous avez besoin
sur notre site, néanmoins, si vous souhaitez contacter le service client Oregon Sci-
entific directement, allez sur le site
www2.oregonscientific.com/service/support ou
appelez le 949-608-2848 aux US. Pour des demandes internationales, rendez vous
sur le site:
www2.oregonscientific.com/about/international/default.asp
CH
FRENCH
INTRODUCTION
Nous vous félicitons d'avoir fait l'acquisition du Senseur Thermo-Hygro à distance
(THGR228N).
Le THGR228N est compatible avec différents appareils de relevés thermo-hygro
intérieur-extérieur multi-canaux 433 MHz. Il est très simple à utiliser et ne nécessite
aucun câblage.
APPAREILS COMPATIBLES
Remarque: Le THGR228N est compatible avec différents appareils multi-canaux.
En cas de doute quant à la compatibilité de cet appareil, s’adressercositaire.
Les exemples d'appareils compatibles sont les suivants:
EMR899HGN WMR918N
CARACTERISTIQUES PRINCIPALES
A LCD deux lignes
Affiche la température et l’humidité actuelles relevées par l’appareil à dis-
tance.
• Affichage de la température
• Affichage de l’humidité
• Indicateur de niveau de confort
B TEMOIN LED
Clignote lorsque la sonde transmet des indications
C COMMUTATEUR
°C / °F
Permet de basculer entre les températures en degrés Centigrade (°C) ou degrés
Fahrenheit (°F)
D COMMUTATEUR DE CANAUX
Désigne le canal utilisé par la sonde: 1, 2 ou 3.
ETOUCHE DE REMISE A ZERO
Remet tous les éléments programmés aux valeurs par défaut.
F COMPARTIMENT A PILES
Accepte deux piles de type AAA
G COUVERCLE DU COMPARTIMENT A PILES
H SUPPORT MURAL
Reçoit l'unité déportée lors d'une fixation au mur
I SOCLE AMOVIBLE
Permet de poser la sonde sur une surface horizontale
MISE EN MARCHE
Remarque: Pour assurer une réception adéquate entre l'unité principale et le
senseur à distance, suivez ces instructions avec précision.
INSTALLATION DES PILES ET DES CANAUX
1. Rapprochez les unités le plus possible l'une de l'autre.
2. Retirez les vis du logement des piles.
3. Assignez un canal différent à chaque senseur à distance en changeant le bou-
ton de canal dans le compartiment à piles du senseur à distance. [FIG A]
4. Sélectionnez l'unité de relevé des températures à l'aide de l'interrupteur
coulissant °C/ °F. [FIG B]
5. Insérez deux piles alcaline (UM4 ou "AAA" de type 1.5V) en respectant
strictement les polarités indiquées. [FIG C]
6. Insérez les piles ou appuyez sur le bouton réinitialisation de l'unité principale.
Suivez les instructions détaillées dans le guide de l'utilisateur.
7. Remettez la trappe du logement des piles en place et resserrez les vis.
8. Positionnez l'appareil commandé à distance et l'appareil principal dans un rayon
de transmission effective, généralement de 30 mètres.
Notez que la portée effective dépend en grande partie des matériaux de con-
struction et de l'emplacement des appareils principaux et commandés à distance.
Bien que la sonde soit étanche et conçue pour être utilisée à l'extérieur, il est conseillé
de la placer à l'abri des rayons du soleil, de la pluie ou de la neige.
CHANGEMENT DE CANAL
Une fois qu'un canal a été attribué à un appareil, vous ne pouvez le changer qu'en
ôtant les piles et en recommençant les procédures ci-dessus.
ALARME DE PILES FAIBLES
Un indicateur de pile faible [ ] activera le senseur pour indiquer que les piles sont
faibles et doivent être remplacées. Les piles faibles d’un senseur donné seront aussi
indiquées sur l’appareil principal. Remplacer les piles quand l’indicateur de pile
faible apparaît.
Remarque: Des piles éliminées n’importe comment peuvent être nocives.
Protéger l’environnement en portant toutes piles épuisées dans une décharge
autorisée.
NIVEAU DE CONFORT
Le niveau de confort est basé sur l’humidité relative enregistrée. Un indicateur sera
affiché pour indiquer si le niveau est confortable, humide ou sec. [FIG D]
FONCTIONNEMENT
Une fois que les piles sont en place, la sonde commence à émettre des échantillonnages à
intervalles de 40 secondes.
La lecture du senseur à distance indiquée sur l’Ecran à cristaux liauides dépend de la
chaîne du senseur à distance qui aura été choisie.
COMMENT REINITIALISER L’APPAREIL
La fonction réinitialisation n'est requise uniquement que lorsque l'unité fonctionne
de manière incorrecte ou mauvaise.
Zur Öffnung:
1. Ouvrez la porte du compatiment à piles.
2. Placez un objet pointu dans le trou marqué RESET et appuyez.
3. Refermez le compartiment à piles.
Reportez-vous au livret de l'utilisateur de votre appareil principal pour de plus amples
informations.
N
N
INTRODUCTION
Congratulations on your purchase of the Remote Thermo-Hygro Sensor
(THGR228N).
The THGR228N is compatible with a variety 433MHz multi-channel in-out thermo-
hygro monitoring units. Operation is easy and no wire installation is required.
COMPATIBLE UNITS
Note: The THGR228N is compatible with a variety of multi-channel units. If
unsure about the compatibility of this units, please consult your dealer for
further advise.
Examples of compatible units are as follows:
EMR899HGN WMR918N
MAIN FEATURES
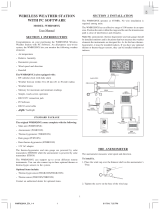
ATwo-line LCD
Displays the current temperature and humidity monitored by the remote unit
• Temperature display
• Humidity display
• Comfort-level indicator
B LED INDICATOR
Flashes when the remote unit transmits a reading
C
°C/°F SLIDE SWITCH
Selects between Centigrade (°C) and Fahrenheit (°F)
D CHANNEL SLIDE SWITCH
Designates the remote unit Channel 1, Channel 2 or Channel 3
E RESET BUTTON
Returns all settings to default values
FBATTERY COMPARTMENT
Accommodates two UM-4 or AAA size alkaline batteries
GBATTERY DOOR
HWALL-MOUNT HOLDER
Supports the remote unit in wall-mounting
I REMOVABLE TABLE STAND
For standing the remote unit on a flat surface
GETTING STARTED
Note: To ensure proper reception between the main unit and the remote sensor,
follow the instructions carefully.
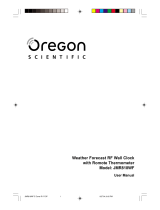
BATTERY AND CHANNEL INSTALLATION
1. Place both units as close as possible to each other.
2. Remove the screws on the battery door of the remote unit.
3. Assign a different channel to each remote sensor by changing the channel
switch in the battery compartment of the remote sensor. [FIG A]
4. Select the units of measurement for the temperature display on the °C/°F
slide switch. [FIG B]
5. Install 2 alkaline batteries (UM-4 or "AAA" size 1.5V) strictly according
to the polarities shown. [FIG C]
6. Insert batteries or press the reset button of the main unit. Follow the instructions
as set out in the User's manual.
7. Replace the battery compartment door and secure its screws.
8. Position the remote sensor and main unit within effective transmission
range, which in usual circumstances, is 30 meters.
Note: The effective range may be limited by building materials and the position
of either the main unit or remote sensors. Try various set-up arrangements for
best result.
Though the sensor is weatherproof, and is meant for use outside, it should be placed
away from direct sunlight, rain, or snow.
CHANGING CHANNELS
Once a channel is assigned to a unit, you can only change it by removing the batteries
and repeating the above procedure.
LOW-BATTERY WARNING
A battery-low indicator [ ] will activate on the sensor to indicate that the batteries
are low and require changing. Low batteries for a given sensor will also be indicated
on the main unit. Replace the batteries when the low-battery indicator appears.
Note: Disposed of improperly, batteries can beharmful. Protect the
environment by taking exhausted batteries to authorized disposal stations.
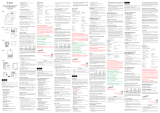
THE COMFORT-LEVEL INDICATOR
The comfort level is based on the recorded relative humidity. An indicator will be
displayed to show if the level is comfortable, wet or dry. [FIG D]
OPERATION
Once batteries are in place, the sensor will start transmitting samplings at 40-second
intervals.
The remote sensor reading shown on the LCD of the main unit depends on which
remote sensor channel has been chosen.
HOW TO RESET THE UNIT
The reset function is required only when the unit is operating in an unfavorable way
or malfunctioning.
To access:
1. Lift open the battery compartment door.
2. Place a blunt stylus into the hole marked RESET and press.
3. Replace the battery compartment door.
See the user's manual of your main unit for further information.
ENGLISH
THGR228N_M_8L-1 2004.9.23, 2:48 PM1
La pagina si sta caricando...
La pagina si sta caricando...
La pagina si sta caricando...
-
 1
1
-
 2
2
-
 3
3
-
 4
4


Oregon Scientific THGR228N Manuale utente
- Categoria
- Stazioni meteorologiche
- Tipo
- Manuale utente
in altre lingue
- English: Oregon Scientific THGR228N User manual
- français: Oregon Scientific THGR228N Manuel utilisateur
- español: Oregon Scientific THGR228N Manual de usuario
- Deutsch: Oregon Scientific THGR228N Benutzerhandbuch
- Nederlands: Oregon Scientific THGR228N Handleiding
- português: Oregon Scientific THGR228N Manual do usuário
- svenska: Oregon Scientific THGR228N Användarmanual
Documenti correlati
-
Oregon SONDE THERMO HYGRO 3 CANAUX Manuale utente
-
 Oregon Scientific THGR228N Manuale utente
-
 Oregon Scientific EMR812HGN Manuale utente
-
 Oregon Scientific AWS888N Manuale del proprietario
-
 Oregon Scientific THR2 8 Manuale utente
-
 Oregon Scientific WMR928NX Manuale utente
-
 Oregon Scientific JMR818WF Manuale utente
-
Oregon Scientific THR238N Manuale utente
-
 Oregon Scientific FERRARI 360 MODENA SPIDER Manuale utente
-
 Oregon Scientific THR128 Manuale del proprietario


