3D Systems CUBE Manuale utente
- Categoria
- Stampanti 3D
- Tipo
- Manuale utente

Cube 3D Printer
2nd generation
®
User Guide
See inside for use and safety information.

Table of Contents
Introduction........................................................................................2
Important safety information
EN...........................................................................................3
DE...........................................................................................4
ES ...........................................................................................5
FR ...........................................................................................6
IT............................................................................................7
DU...........................................................................................8
DA...........................................................................................9
JP ..........................................................................................10
Cube 3D Printer features ............................................................................ 11
At a glance . . . . . . . . . . . . . . . . . . . . . . . . . . . . . . . . . . . . . . . . . . . . . . . . . . . . . . . . . . . . . . . . . . . . . . . . . . . . . . . . . . . . . . . 12
Requirements for your Cube .........................................................................13
Unpacking and setting up your Cube ...................................................................14
Link your Cube to your Cubify account..................................................................15
Unlock your Cube..................................................................................16
Download and install Cube Software for Windows.........................................................16
Download and install Cube Software for Mac OSX ........................................................17
Download your free creations.........................................................................17
Cubify Software overview............................................................................18
WI-FI set-up ......................................................................................20
Non-wireless computer set-up (without WI-FI options)......................................................20
Update Cube rmware . . . . . . . . . . . . . . . . . . . . . . . . . . . . . . . . . . . . . . . . . . . . . . . . . . . . . . . . . . . . . . . . . . . . . . . . . . . . . . 20
Setting Print Jet gap ................................................................................21
Material Cartridge installation.........................................................................22
Printing preparation ................................................................................23
Printing your rst creation..........................................................................24-25
Replacing Material Cartridge .........................................................................26
Cloud printing from Cubify.com .......................................................................27
Finishing your creation ..............................................................................27
Maintaining your Cube . . . . . . . . . . . . . . . . . . . . . . . . . . . . . . . . . . . . . . . . . . . . . . . . . . . . . . . . . . . . . . . . . . . . . . . . . . . . . . 28
Print Pad leveling instructions ........................................................................29

Thank you for purchasing the “Cube
®
” 3D Printer. This printer is portable with a plug and print design that enables everybody
in the family to express their creativity like never before. With ten different material colors to choose from, enjoy the freedom
to print in your true colors or to mix it up.Cube 3D Printers ready-to-print technology provides a new dimension to your
imagination and helps you share your creations with others in the Cubify community at Cubify.com.
At Cubify.com you can:
• Upload your creations for sale
• Purchase creations from others
• Get your creations 3D printed and shipped to you
• Buy the Cube 3D Printer and Cube Cartridges
• Engage with other creative partners
COPYRIGHT INFORMATION
© 2013 by 3D Systems, Inc. All rights reserved. This document is subject to change without notice. This document is
copyrighted and contains proprietary information that is the property of 3D Systems, Inc. Cubify, Cube, and the 3D Systems
logo are registered trademarks of 3D Systems, Inc. Use of the Cubify.com website constitutes acceptance of its Terms of
Service and Privacy Policy.
FCC NOTICE
This equipment has been tested and found to comply with the limits for a class “B” digital device, pursuant to Part 15 of
the FCC Rules. These limits are designed to provide reasonable protection against harmful interference. This equipment
generates, uses, and can radiate radio frequency energy and, if not installed and used in accordance with the instruction
manual, may cause harmful interference to radio communications. Operation of this equipment in a residential area is likely
to cause harmful interference in which case the user will be required to correct the interference at their expense.
WARRANTY
3D Systems warrants that the Cube 3D Printer will be free from defects in materials and workmanship, during the applicable
warranty period, when used under the normal conditions described in the documentation provided to you, including this
user’s guide. 3D Systems will promptly repair or replace the Cube 3D Printer, if required, to make it free of defects during
the warranty period. This warranty excludes (i) normal consumable or expendable parts (such as Material Cartridges, Print
Pads, and CubeStick), (ii) repairs required during the warranty period because of abnormal use or conditions (such as
riots, oods, misuse, neglect or improper service by anyone except 3D Systems or its authorized service provider), and (iii)
repairs required during the warranty period because of the use of non-integrated, non-approved or non-licensed materials
in the Cube 3D Printer. The warranty period for the Cube 3D Printer is ninety (90) days and shall start on the date your
Cube 3D printer is activated. For consumers who are covered by consumer protection laws or regulations in their country of
residence, the benets conferred by our ninety (90) day warranty are in addition to, and operate concurrently with, all rights
and remedies conveyed by such consumers protection laws and regulations, including but not limited to these additional
rights.
THIS WARRANTY IS THE ONLY WARRANTY PROVIDED FOR THE CUBE 3D PRINTER. TO THE MAXIMUM EXTENT
PERMITTED BY LAW, 3D SYSTEMS EXPRESSLY DISCLAIMS ALL OTHER WARRANTIES FOR THE CUBE 3D PRINTER
AND EACH OF ITS COMPONENTS, WHETHER THOSE WARRANTIES ARE EXPRESS, IMPLIED OR STATUTORY
INCLUDING WARRANTIES OF MERCHANTABILITY AND FITNESS FOR INTENDED OR PARTICULAR PURPOSES.
LIMITATION OF LIABILITY
3D SYSTEMS WILL NOT BE RESPONSIBLE FOR CONSEQUENTIAL, EXEMPLARY OR INCIDENTAL DAMAGES (SUCH
AS LOSS OF PROFIT OR EMPLOYEE’S TIME) REGARDLESS OF THE REASON. IN NO EVENT SHALL THE LIABILITY
AND/OR OBLIGATIONS OF 3D SYSTEMS ARISING OUT OF THE PURCHASE, LEASE, LICENSE AND/OR USE OF THE
EQUIPMENT BY YOU OR OTHERS EXCEED THE PURCHASE PRICE OF THE CUBE 3D PRINTER.
2
1 INTRODUCTION

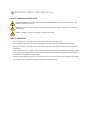
SAFETY SYMBOLS AND DEFINITIONS
SAFETY GUIDELINES
• Follow all safety rules in this section and observe all cautions and warnings in this guide.
• Do not modify any safety features or make modications to the Cube. Doing so is prohibited and voids warranty.
• Use of print materials, or 3D prints other than 3D Systems print materials and genuine 3D Systems components may
void warranty.
• Adult supervision is required; observe children closely and intervene as necessary to prevent potential safety problems
and ensure the Cube’s appropriate use. Ensure small 3D prints are not accessible to young children. These 3D prints
are potential choking hazards for young children.
• When the Cube is operating, the print tip on the Print Jet becomes hot; avoid touching this area until it has cooled down.
• Do not change color of material during printing; doing so may damage the Cube.
!
Hot Surface Hazard: A hot surface is accessible in the vicinity of this sign or at the Print Jet; avoid contact. Hot
surfaces can cause severe burns.
Caution: Indicates something may happen that could cause loss of data, damage to equipment, or could cause
personal injury.
Caution: Indicates a pinch point hazard that could cause person injury.
3
2 IMPORTANT SAFETY INFORMATION (EN)

SICHERHEITSSYMBOLE UND DEFINITIONEN
SICHERHEITSHINWEISE
• Befolgen Sie alle Sicherheitsvorschriften in diesem Abschnitt und beachten Sie alle Vorsichtsmaßnahmen und
Warnhinweise in diesem Handbuch.
• Modizieren Sie keine Sicherheitsmerkmale und nehmen Sie keine Änderungen am Cube-Drucker vor. Dies ist
verboten und kann zum Erlöschen der Gewährleistung führen.
• Die Verwendung von Druckmaterialien oder 3D-Drucken, die keine Originalteile von 3D Systems sind, kann zum
Erlöschen der Gewährleistung führen.
• Die Beaufsichtigung durch Erwachsene ist erforderlich; beobachten Sie Kinder genau und greifen Sie gegebenenfalls
ein, um mögliche Sicherheitsprobleme zu vermeiden und um sicherzustellen, dass der Cube-Drucker ordnungsgemäß
verwendet wird. Stellen Sie sicher, dass kleine 3D-Drucke für kleine Kinder nicht zugänglich sind. Diese 3D-Drucke
bergen eine mögliche Erstickungsgefahr für kleine Kinder.
• Wenn der Cube-Drucker in Betrieb ist, wird die Druckdüse am Print Jet heiß; vermeiden Sie es, diesen Bereich zu
berühren, bis er abgekühlt ist.
• Verändern Sie während des Druckens nicht die Farbe des Materials; dadurch kann der Cube-Drucker beschädigt
werden.
!
Gefahr durch heiße Oberächen: Eine heiße Oberäche ist in der Nähe dieses Zeichens oder am Print Jet
zugänglich; vermeiden Sie jeglichen Kontakt. Heiße Oberächen können schwere Verbrennungen verursachen.
Achtung: Weist darauf hin, dass etwas passieren kann, was zum Verlust von Daten, zu Schäden an den Geräten
oder zu Körperverletzungen führen könnte.
Achtung: Weist auf eine Einklemmgefahr hin, die zu Körperverletzungen führen könnte.
4
2A WICHTIGE SICHERHEITSINFORMATIONEN (DE)

SÍMBOLOS Y DEFINICIONES DE SEGURIDAD
PAUTAS DE SEGURIDAD
• Siga todas las normas de seguridad de esta sección y esté atento a todas las precauciones y advertencias en esta
guía.
• No modique ninguna medida de seguridad ni realice modicaciones a la impresora Cube. Hacerlo está prohibido y
anula la garantía.
• El uso de materiales de impresión o de piezas impresas en 3D que no sean componentes auténticos de 3D Systems
puede anular la garantía.
• Se requiere la supervisión de un adulto; observe a los niños de cerca e intervenga cada vez que sea necesario para
prevenir cualquier posible problema de seguridad y asegurar el uso adecuado de la impresora Cube. Asegúrese de
que las piezas pequeñas impresas en 3D no estén al alcance de niños pequeños. Estas piezas impresas en 3D repre-
sentan un posible peligro de asxia para los niños pequeños.
• Cuando la impresora Cube está funcionando, la punta de impresión se calienta; evite tocar esta área hasta que se
haya enfriado.
• No cambie el color de los materiales durante la impresión; esto puede dañar la impresora Cube.
!
Peligro de supercie caliente: Una supercie caliente se encuentra cerca de esta señal o en la impresora; evite
el contacto con esta. Las supercies calientes pueden causar quemaduras graves.
Precaución: Indica que algo puede ocurrir y causar una pérdida de datos, daños al equipo o lesiones.
Precaución: Indica un peligro de punto de pellizco que podría causar lesiones a una persona.
5
2B INFORMACIÓN IMPORTANTE SOBRE SEGURIDAD (ES)

SYMBOLES DE SÉCURITÉ ET DÉFINITIONS
CONSIGNES DE SÉCURITÉ
• Suivez toutes les consignes de sécurité de cette section et respectez tous les messages d’avertissement du présent
manuel.
• Ne pas modier les dispositifs de sécurité ou apporter des modications au Cube. Cela est interdit et annule la garantie.
• L’utilisation de matériaux d’impression ou d’imprimés en 3D autres que les composants 3D Systems d’origine peut
entraîner l’annulation de la garantie.
• La supervision d’un adulte est requise ; surveillez les enfants en restant à proximité et intervenez si nécessaire pour
éviter tout problème de sécurité potentiel et garantir la bonne utilisation du Cube. Assurez-vous que les petits imprimés
en 3D restent hors de portée des jeunes enfants. Ces imprimés en 3D présentent un risque d’étouffement pour les
jeunes enfants.
• Lorsque le Cube fonctionne, l’extrémité de l’imprimante peut chauffer ; évitez de toucher cette zone jusqu’à ce qu’elle
est refroidie.
• Ne pas modier la couleur du matériau pendant l’impression ; cela peut endommager le Cube.
!
Surface chaude: Une surface chaude est présente à proximité de ce symbole ou sur l’imprimante ; évitez de la
toucher. Les surfaces chaudes peuvent causer de graves brûlures.
Attention: Indique que quelque chose pourrait occasionner une perte des données, des dommages sur
l’équipement ou des blessures.
Attention: Indique un risque de pincement qui pourrait occasionner une blessure.
6
2C INFORMATIONS IMPORTANTES RELATIVES À LA SÉCURITÉ (FR)

SIMBOLI E DEFINIZIONI DI SICUREZZA
LINEE GUIDA DI SICUREZZA
• Attenersi a tutte le norme di sicurezza contenute in questa sezione e rispettare le avvertenze e le precauzioni indicate
nella guida.
• Non alterare le caratteristiche di sicurezza né apportare modiche a Cube. Queste operazioni sono vietate e determi-
nano l’annullamento della garanzia.
• L’utilizzo di materiali di stampa o di componenti di stampa 3D non originali di 3D Systems può comportare
l’annullamento della garanzia.
• È richiesta la supervisione di un adulto; tenere sotto stretta sorveglianza i bambini e, in caso di necessità, intervenire
per evitare eventuali problemi di sicurezza e per garantire l’uso appropriato di Cube. Assicurarsi che i bambini non pos-
sano raggiungere i componenti più piccoli delle stampe 3D, poiché questi potrebbero costituire un pericolo di soffoca-
mento.
• Durante l’attività di Cube, la puntina di stampa del getto d’inchiostro si riscalda; evitare il contatto con quest’area no al
completo raffreddamento.
• Non modicare il colore del materiale durante la stampa; quest’operazione potrebbe causare danni a Cube.
!
Pericolo di supercie calda: In prossimità di questo simbolo o del getto d’inchiostro è presente una supercie
calda; evitare il contatto. Le superci calde possono causare ustioni gravi.
Attenzione: Segnala che un determinato evento potrebbe causare la perdita di dati, danni all’impianto o lesioni
personali.
Attenzione: Segnala la presenza di una zona ad alto rischio che potrebbe causare lesioni personali.
7
2D INFORMAZIONI IMPORTANTI SULLA SICUREZZA (IT)

VEILIGHEIDSSYMBOLEN EN DEFINITIES
VEILIGHEIDSVOORSCHRIFTEN
• Volg alle veiligheidsvoorschriften in dit gedeelte en neem alle opmerkingen en waarschuwingen in deze handleiding in
acht.
• Breng geen wijzigingen aan de veiligheidsvoorzieningen of de Cube aan. Dit is verboden en de garantie komt hierdoor
te vervallen.
• Door gebruik van printmaterialen of 3D-prints anders dan originele 3D Systems-onderdelen kan de garantie komen te
vervallen.
• Oezicht door een volwassene is vereist; houd kinderen nauwlettend in het oog en grijp zo nodig in om mogelijke
veiligheidsproblemen te voorkomen en het juiste gebruik van de Cube te verzekeren. Zorg dat jonge kinderen niet bij
kleine 3D-prints kunnen komen. Deze 3D-prints houden potentieel verstikkingsgevaar in voor jonge kinderen.
• Wanneer de Cube in werking is, wordt de printtip op de Print Jet heet. Raak dit oppervlak niet aan totdat het is af-
gekoeld.
• Wijzig de kleur van het materiaal niet tijdens het printen, anders kan de Cube worden beschadigd.
!
Gevaar voor hete oppervlakken: Er is een toegankelijk heet oppervlak in de nabijheid van dit
waarschuwingsteken of bij de Print Jet. Niet aanraken. Hete oppervlakken kunnen ernstige brandwonden
veroorzaken.
Let op: Duidt op iets wat kan gebeuren dat verlies van gegevens, beschadiging van de apparatuur of lichamelijk
letsel kan veroorzaken.
Let op: Duidt op een gevaarlijk knelpunt dat lichamelijk letsel kan veroorzaken.
8
2E BELANGRIJKE VEILIGHEIDSINFORMATIE (DU)

SIKKERHEDSSYMBOLER OG -DEFINITIONER
SIKKERHEDSRETNINGSLINIER
• Følg alle sikkerhedsreglerne i denne sektion og overhold forsigtighedsregler og advarsler i denne vejledning.
• Sikkerhedsfeatures må ikke modiceres og der må ikke foretages andre modikationer til Cube. Det er forbudt at gøre
det og det vil ugyldiggøre garantien.
• Brugen af andre printmaterialer eller 3D prints end de ægte 3D Systems komponenter kan ugyldiggøre garantien.
• Det er påkrævet at en voksen holder opsyn; hold nøje øje med børn og træd ind hvis det er nødvendigt for at undgå po-
tentielle sikkerhedsproblemer og at sikre at Cube bruges rigtigt. Sørg for at små børn ikke har adgang til små 3D prints.
Disse 3D prints kan udgøre en kvælningsfare for små børn.
• Når Cube er i drift bliver spidsen på printaggregatet varm, så dette område må ikke røres før det er kølet af.
• Materialets farve må ikke ændres under trykning; det kan beskadige Cube.
!
Fare for varm overade: Der ndes en varm overade i nærheden af dette skilt eller ved printaggregatet; undgå
kontakt. Varme overader kan forårsage alvorlige forbrændinger.
Forsigtig: Viser at der kunne ske noget som kan resultere i datatab, beskadigelse af udstyr eller personskade.
Forsigtig: Viser at der ndes en knusefare, som kan forårsage personskade.
9
2F VIGTIG SIKKERHEDSINFORMATION (DA)

安全関連シンボルと定義
SIK 安全ガイドライン
• 本項の安全ルールのすべてに従い、また本書のすべての要注意および警告事項を守ってください。
• 安全機能を修正したり、Cube に改変を加えたりしないでください。そうすることは禁じられており、保証は無効にな
ります。
• 純正 3D Systems コンポーネント以外のプリント材料や 3D プリントの使用は、保証を無効にする場合があります。
• 大人の監視が必要です。子供が使用している時には身近で見守り、安全上の問題を未然に防ぎ、Cube が適切に使用さ
れるよう、必要に応じて介入するようにしてください。小型の 3D プリントが幼児の手に届くことのないようにして
ください。これらの 3D プリントは幼児にとっては、のどを詰まらせる危険物となります。
• Cube が動作中は、プリントジェット上のプリントチップが熱くなります。その部分が冷めるまでは、触れないように
してください。
• プリント中に材料の色を変更しないでください。そうすると Cube を損傷させることがあります。
!
高熱面の危険: このシンボルサインの近くまたはプリントジェット部には表面が高熱となっている部分がありま
す。触れないように注意してください。高熱面で火傷することになります。
要注意: データの喪失、機器の損傷、または人身傷害を引き起こすような何かが起こる場合もあることを示しま
す。
要注意: 人身傷害を引き起こす可能性のある危険個所を示します。
10
2G
安全に関する重要情報 (JP)

The Print Jet print tip heats the material and produces a thin owing material of plastic creating layers that adhere to the
Print Pad. After each layer is produced, the Print Pad lowers so that a new layer can be drawn on top of the last. This
process continues until the last layer on the top of the creation is jetted.
CUBE 3D PRINTER FEATURES
• Material Cartridge
• Durable, ABS & PLA Plastic
• 25 free 3D print creations
• USB & WI-FI connectivity
CUBE 3D PRINTER PROPERTIES
Technology: Plastic Jet Printing (PJP)
Print Jets: Single jet
Max. Creation Size: 5.5” x 5.5” x 5.5” (140 x 140 x 140 mm)
Material: Tough recyclable plastic
Layer Thickness: 10 mil | 0.01 inches 250 microns | 0.25 mm
Supports: Fully automated; easy to peel off
Cartridge: 1 Cartridge prints 13 to 14 mid-sized creations
Material Colors: See Cubify.com for color choices
11
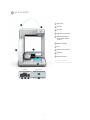
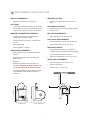
3 CUBE 3D PRINTER FEATURES

A
Cube Tube
B
Print Jet
C
Print Pad
D
Operator’s Touchscreen
F
Material Cartridge
G
Fuse
H
Power Cord Connection
I
USB Port*
J
USB Connection**
E
ON/OFF Push-Button
Power Switch & Menu
Function
RIGHT SIDE
*For rmware update only.
**For loading Cube build les only.
A
B
C
D
E
F
BACK
G H I J
12
4 AT A GLANCE

WEIGHT & DIMENSIONS
• Weight (without cartridge): 4.3 kg (9.5 lbs.)
SOFTWARE
• Complimentary software for Windows and Mac OSX.
This application converts your 3D model into layered
slices (G-code), ready for printing on your machine.
MINIMUM HARDWARE REQUIREMENTS
• A PC with these minimum requirements will be
required to run the Cubify Software
• Processor: Multi-core processor - 2 GHz or faster
per core
• System RAM: 2 GB
• Screen Resolution: 1024x768
WINDOWS REQUIREMENTS
• Cubify Software runs on 32 and 64-bit Operating
Systems
• Windows XP Professional or Home Edition with
Service Pack 3
• Windows 7
• Windows is required for ad-hoc WiFi Print Job
submission. NOTE: Ad-Hoc WI-FI connection will
not connect to Windows XP operating systems
• If not already installed, the Cubify Software installer
will automatically install the Microsoft .NET 4.0
Framework
WIRELESS OPTIONS
• 802.11b/g with: WLAN Infrastructure or Ad hoc
Mode.
NON-WIRELESS OPTION
• USB Memory Stick, to transfer print les (supplied
with the Cube)
MAC OSX REQUIREMENTS
• Cubify Software runs on Mac OSX 10.8
ELECTRICAL REQUIREMENTS
• Outlet requirements: 100-240 Volts, at 50/60 Hz.
• Cube electrical rating: 24V DC, 3.75 amp.
MATERIAL STORAGE
• All polymers degrade with time. The following
conditions ensure the material remains high quality:
• Do not unpack until material is needed.
• Store at room temperature: 16-29° C (60 - 85° F)
OPERATING ENVIRONMENT
• Room Temperature: 16-29° C (60 - 85° F)
• Nozzle- 280°C (536°F)
• Print Pad- 66-77° C (150-170°F)
13
11.25” (28.6 cm)
8” (20.3 cm) 8” (20.3 cm)
8” (20.3 cm)
8” (20.3 cm)
10” (25.4 cm)
13” (33 cm)
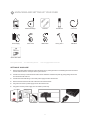
5 REQUIREMENTS FOR YOUR CUBE
WALL

Print Pad
USB Cable**
Cube Tube
USB Stick
Quick Start Guide
CubeStick™
Unclog Tool***
The Cube
Power Supply
Material Cartridge*
Power Cord
cubify.com
*Neon green included **For downloading rmware ***For unclogging lament in Print Jet
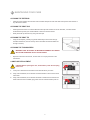
SETTING UP YOUR CUBE
1. Remove the white plastic inserts from each side of the box by pinching the tabs in and bending the inserts out. Pull to
remove both from the box. Lift top of carton up and remove.
2. Lift foam from the top of Cube. Remove foam from the midsection and below the plate by gently pulling out from the
front. Remove Cube from box.
3. Lift foam that Cube was sitting on to access power supply and other accessories.
4. Remove the Print Pad from the foam under the Cube and set it aside.
5. Plug round connector of power supply into the back of the Cube.
6. Plug power cord into power supply, then into outlet or power strip.
14
6 UNPACKING AND SETTING UP YOUR CUBE

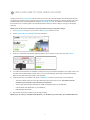
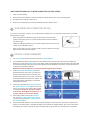
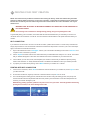
Creating an account on Cubify.com is easy and gives you access to all of the great designs and collections that will drive
and inspire your creativity. Once you have set up an account you will be able to activate your Cube by entering your Cube’s
individual serial number in the designated bar under the Activate My Cube tab. An activation code will then be sent to
the email account you used to register. This code will be used to unlock your Cube so that you can get your 3D printing
underway.
NOTE: If you do not receive an activation code email, please check your spam lter settings.
1. Go to Cubify.com and log in to your account or click Sign Up to create an account.
2. Click on Activate My Cube from My Cubify drop down menu.
3. Enter your 12-character serial number (digits and letters found on the back of your Cube), then click Activate.
4. Your Cube’s serial number is now activated on Cubify.com and your Cube will be assigned to your Cubify account. Your
activation code will be displayed, and also sent to you in an e-mail along with links to help you get started creating.
Make sure the email doesn’t get caught in your spam lter!
5. Using the links from your activation code email, or the My Cubes section in your account, you can download:
• The Cube Software, which turns your 3D models into a le that the Cube can print. The software must be
installed on your computer. Your Cube won’t print without it!
• 25 free, ready-to-print 3D les created by top artists and designers (also on your USB stick)
• Cube 3D Printer User Guide (also on your USB stick)
• Material Safety Data Sheets
6. Now it is time to unlock your Cube so you can begin creating.
NOTE: If you use a PC, you need Microsoft
®
Windows
®
7 or XP (SP3+). If you use a Mac, you need Mac OSX 10.8+
15
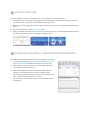
7 LINK YOUR CUBE TO YOUR CUBIFY ACCOUNT

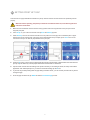
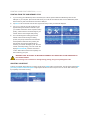
Once you’ve linked your Cube to your Cubify account, you can activate your Cube to start printing!
1. Your activation code to unlock your Cube will appear on the “Congratulations” screen after you activate your Cube in
your Cubify account. A copy of the code should also be sent to your email.
2. Make sure your Cube is plugged in. Press the button on the front panel to turn it on. It may take a few seconds for it to
warm up.
3. Tap on the touchscreen to view the Unlock Cube screen.
4. Enter your activation code and then tap on the check box to unlock your Cube. Your Cube will automatically transition to
the main menu touchscreen and is now unlocked and ready to create!
Download the Cube Software and experiment with it to create your own designs.
1. To download Cube Software, go to My Cubify and click on My Accounts.
Click on My Downloads and select Cube software on the menu page.
2. Click on Setup.exe in the Cube Client.zip. The next screen will ask you if
you would like to open this le. Click Yes.
3. The Cubify Setup Wizard will guide you through the steps to install the
software on your computer. Click Next to launch the Setup Wizard.
• It is necessary to download the Cube software in order to be able to import
.stl or .creation les and convert them to .cube les.
• The .cube le is a machine-specic le type that is coded for the Cube to
read and print.
16
8 UNLOCK YOUR CUBE
9 DOWNLOAD AND INSTALL CUBE SOFTWARE FOR WINDOWS

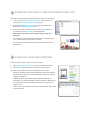
Download the Cube Software and experiment with it to create your own designs.
1. In the menu, Click on Download Cube Software. Double click on the
zip le and the Cubify Mac installer.dmg will appear.
2. Double click Cubify Mac Installer dmg, to make a new window open.
Drag to install into the Applications folder.
3. If the “Drag to install” window did not open, locate the Cubify driver in
your device panel. Click on Cubify to download software.
NOTE: Safari users will not have to unzip the dmg; it unzips as it
downloads.
• It is necessary to download the Cube software in order to be able to import
.stl or .creation les and convert them to .cube les.
• The .cube le is a machine-specic le type that is coded for the Cube to
read and print.
Follow these simple steps to access your 25 free creations:
1. Click on Download Free Creations to start your immediate download.
2. Click Extract in the Creation zip le and extract it to your computer.
There are a couple of le types involved in 3D printing with your Cube:
• .stl le: A 3-dimensional solid computer-aided design (CAD) le that denes
the geometry to be printed. This is the typical le type output of a 3D design
program or software tool.
• .creation le: These les represent the pre-made 3D models that are
optimized for your Cube and available on Cubify for download. Simply import
your .creation le into the Cube software and click Build to prepare your
creation for print.
• .cube le: This is the machine code read by the Cube 3D Printer that enables
it to build your print.
17
10 DOWNLOAD AND INSTALL CUBE SOFTWARE FOR MAC OSX
11 DOWNLOAD YOUR FREE CREATIONS

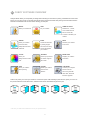
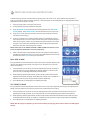
Cubify Software allows you manipulate your design before sending it to the Cube for printing. It simulates the Cube’s Print
Pad so you can orient, scale, re-size and rotate the 3D print to get the best result when printing. Become familiar with the
software and understand the functions before starting your rst print.
IMPORT
Select your creation le.
CENTER
Center your creation
on the Print Pad;
multiple items are auto-
positioned.
BUILD
Creates the Cube le
by adding support
structures; the slicing
process will prepare
your creation.
PRINT
Transfers your creation
to the Cube.
HEAL
Fix your creation.
ORIENT & SCALE
Rotate the X, Y, Z axis;
move creation back &
forth or side to side;
increase or decrease your
creation.
These icons permit you to view your creation in various view points. After selecting a particular view, place your cursor on
the part and hold the mouse button down; rotate the Print Pad to view different angles of the part.
Isometric Right Left Front Back Top Bottom
COLOR*
Select your
background and model
color.
SAVE
Saves your creation
without printing.
UNLOAD
Deletes your creation
from the Cube
software.
CONFIGURE
Connect your computer
and the Cube via
WI-FI using the USB
cable. Also, download
rmware upgrades.
SETTINGS
Choose your print size;
turn rafts & supports
ON or OFF.
MODEL INFO
Displays your creation
information.
* The color you select will not affect the color of your printed creation
18
12 CUBIFY SOFTWARE OVERVIEW

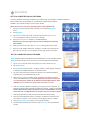
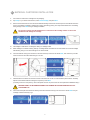
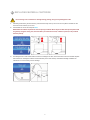
SET UP A COMPUTER (AD HOC) NETWORK
An ad hoc network is a temporary connection to your Cube through your computer or wireless smart phone.
Ad hoc networks can only be wireless, so you must have a wireless network adapter
installed in your computer to setup or join an ad hoc network.
NOTE: Ad hoc will not connect to operating systems running Windows XP.
1. Tap on Setup in the main menu and scroll until you come to the WI-FI Setup
screen.
2. Tap WI-FI Setup.
3. Tap on Ad Hoc in the menu screen. The next screen will show Ad Hoc mode
enabled meaning it is ready to connect to your computer.
4. Open your Internet Access located in your Network Settings.
NOTE: Always select your Cube from your network settings before opening
Cube Software.
5. Select your Cube on the menu. Click on Connect. This may take a few minutes.
7. Open your Cube software and click on “Congure” and select your Cube from the
menu. Click on “Connect;” once connected, you may begin to print your creation.
19
13 WI-FI SETUP
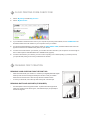
SET UP A COMPUTER (WLAN) NETWORK
WLAN (wireless local area network) allow easy establishment of a secure wireless network.
WLAN connection will allow you to connect to your printer through the Cube Software.
1. Tap on Setup in the main menu and scroll until you come to the WI-FI Setup.
2. Tap on WI-FI Setup.
3. Tap on WLAN in the menu screen. “Acquiring networks” screen appears, meaning it
is searching for available networks to connect to the printer.
4. Tap the on the touch screen to select your network. If your network is password
protected, enter your password and tap on “OK.”
5. After your WI-FI is set up, if needed, the WI-FI rmware may update to the latest
version if the latest rmware is not installed. NOTE: This will only occur when you
are connecting to the network for the rst time and if the WI-FI rmware needs
updating. Once it is updated, the network will be successfully connected.
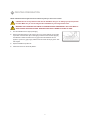
6. If the WI-FI rmware update was necessary, you may get one of two responses: (1)
Network connected update successful; (2) Network connected... Update not successful.
NOTE: If WiFi rmware update reported unsuccessful, the WLAN WiFi connection
should still work. The WiFi rmware will try again with next connection attempt.
7. Click the function button to take you back to the main menu before printing
8. Open your Cube software and click on “Congure” and select your Cube from the
menu. Click on “Connect;” once connected, you may begin to print your creation.
9. Open your Internet Access located on your computer’s taskbar.
10. Scroll and select the network on the menu. Click on Connect. This may take a few
minutes.
La pagina si sta caricando...
La pagina si sta caricando...
La pagina si sta caricando...
La pagina si sta caricando...
La pagina si sta caricando...
La pagina si sta caricando...
La pagina si sta caricando...
La pagina si sta caricando...
La pagina si sta caricando...
La pagina si sta caricando...
La pagina si sta caricando...
-
 1
1
-
 2
2
-
 3
3
-
 4
4
-
 5
5
-
 6
6
-
 7
7
-
 8
8
-
 9
9
-
 10
10
-
 11
11
-
 12
12
-
 13
13
-
 14
14
-
 15
15
-
 16
16
-
 17
17
-
 18
18
-
 19
19
-
 20
20
-
 21
21
-
 22
22
-
 23
23
-
 24
24
-
 25
25
-
 26
26
-
 27
27
-
 28
28
-
 29
29
-
 30
30
-
 31
31


3D Systems CUBE Manuale utente
- Categoria
- Stampanti 3D
- Tipo
- Manuale utente
in altre lingue
- English: 3D Systems CUBE User manual
Documenti correlati
Altri documenti
-
Planar WN-5040-720 Manuale utente
-
LG Bottom freezer refrigerator Manuale utente
-
Sony CUBE-20GX Manuale del proprietario
-
Polaroid CUBE PLUS Manuale utente
-
Bosch Benchmark B18IF905SP Guida utente
-
 Stylies Titan Manuale del proprietario
-
-
-
Bosch Benchmark B36IT900NP Manuale utente
-
Creality Ender-5 Plus Manuale utente
