Inglesina Moovy Instructions Manual
- Categoria
- Sedili dell'auto
- Tipo
- Instructions Manual

READ THESE
INSTRUCTIONS
CAREFULLY
BEFORE USE
AND KEEP THEM
FOR FUTURE
REFERENCES
MANUALE ISTRUZIONI
IT
INSTRUCTION MANUAL
UK
MANUEL D’INSTRUCTIONS
FR
BENUTZERHANDBUCH
DE
MANUAL DE INSTRUCCIONES
ES
,16758.&-$8ĩ<7.2:$1,$
PL
1È92'.328ä,7Ë
CZ
kptusvmykkrqktrqnjqecpk
RU
0$18$/'(,16758&ğ,81,
RO
HASZNÁLATI ÚTMUTATÓ
HU
moovy
ECE 44/04

2
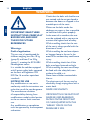
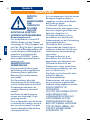
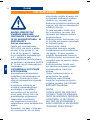
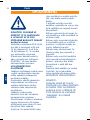
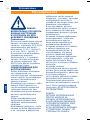
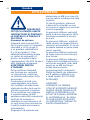
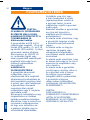
WARNING
ES
,03257$17(
181&$6('(%(87,/,=$5
/$6,//,7$(16(17,'2
(12326,&,21$$48(//2
'(0$5&+$(1(/$6,(172
'(/$17(52'(/&2&+((1(/
&$62(148((67(6($(48,3$'2
'(',6326,7,92³$,5%$*´(1(/
/$'23$6$-(52
IT
,03257$17(,/
6(**,2/,12121'(9(
0$,(66(5(87,/,==$72,1
6(1622332672$48(//2',
0$5&,$68/6(',/($17(5,25(
'(//¶$8721(/&$62&+(48(67$
6,$'27$7$',',6326,7,92
³$,5%$*´68//$72'(/
3$66(**(52
UK
,03257$177+,6&$56($7
08671(9(5%(86('
5($5:$5')$&,1*217+()5217
6($72)&$56(48,33(':,7+
7+(³$,5%$*´'(9,&(217+(
3$66(1*(566,'(
FR
,03257$17/(6,(*(1(
'2,7-$0$,6(75(87,/,6e
(1326,7,21'26$/$5287(
685/(6,(*($9$17'89(+,&8/(
6,/(6,(*((67e48,3e'81
©$,5%$*ª&27(3$66$*(5
DE
:,&+7,*'(5
.,1'(5$8726,7=
'$5)1,(0$/6,1'(5
*(*(1)$+575,&+781*$8)
'(0925'(5(16,7='(6
.5$)7)$+5=(8*6,0)$//(
%(187=7:(5'(1'$66',(6(5
6,7=0,7(,1(0Ä$,5%$*³$8)
'(56(,7('(6%(,)$+5(56
$86*(
RÜSTET IST:
PL
:$ĩ1(
)27(/,.1,*'<1,(
02ĩ(%<û8ĩ<:$1<7<à(0'2
.,(581.8-$='<1$6,('=(1,8
35=('1,06$02&+2'8:
35=<3$'.8*'<-(6721
:<326$ĩ21<=%2.83$6$ĩ(5$
:85=Ą'=(1,(³32'86=.,
32:,(75=1(-´
CZ
'ģ/(ä,7e
6('$ý.$1(60Ë%é7
1,.'<328äË9È1$9(60ċ58
23$ý1e0.(60ċ58-Ë='<
1$3ě('1Ë06('$'/($87$9
3ěË3$'ċä(72726('$'/2-(
9<%$9(12³$,5%$*(0´1$675$1ċ
3$6$äe5$
RU
ǪǨǮǵǶ
ǬǭǺǹDzǶǭǨǪǺǶǴǶǩǰdzȄǵǶǭ
DzǸǭǹdzǶǵǰDzǶǫǬǨǵǭ
ǬǶdzǮǵǶǰǹǷǶdzȄǯǶǪǨǺȄǹȇ
ǪǵǨǷǸǨǪdzǭǵǰǰǬǪǰǮǭǵǰȇ
ǷǸǶǺǰǪǶǷǶdzǶǮǵǶǴǻǽǶǬǻ
ǵǨǷǭǸǭǬǵǭǴǹǰǬǭǵȄǭ
ǭǹdzǰǨǪǺǶǴǶǩǰdzȄǶǹǵǨȁǭǵ
ǻǹǺǸǶDZǹǺǪǶǴ³$,5%$*´ǹǶ
ǹǺǶǸǶǵȃǷǨǹǹǨǮǰǸǨ
RO
,03257$17
6&Ă81(/8/1875(%8,(
87,/,=$71,&,2'$7Ă25,(17$7
Ì16(16,19(566(168/8,'(
0(56$/$87202%,/8/8,ù,
6,78$73(6&$818/$17(5,25
$/$87202%,/8/8,Ì1&$=8/
Ì1&$5($&(67$(67('27$7&8
',632=,7,98/³$,5%$*´3(3$57($
3$6$*(58/8,
HU
)21726
626(+$6=1È/-$$
*<(5(.h/e67$0(1(7,5È11<$/
+È77$/$=(/6ėh/e65(
%(6=(5(/9(+$$=87$6h/e6
/e*=6È..$/9$1(//È79$
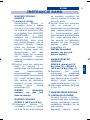
Group O
0 - 10 Kg

3
IT
14
UK
18
FR
22
DE
26
ES
30
PL
34
CZ
38
RU
42
RO
46
HU
50
2
ċ
ǭ
$

4
Click!
2
Group O
0 - 10 Kg
1
4
3
A
B

5
O
g
Group 1
9 - 18 Kg
Click!
4
3
A
B

6
Click!
Click!
6
8
9
1
5
7
10 - 18 Kg
6 - 10 Kg
0 - 6 Kg
D
C

7
9
10
g
D
E

8
1
1
12
11
13

9
14
15

10
1
116

11
17
Click!
18
G
F
H
I

12
19
20
2

13
21

14
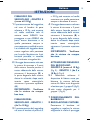
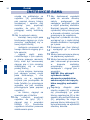
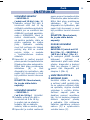
Italiano
IMPORTANTE: LEGGERE
ATTENTAMENTE
QUESTE ISTRUZIONI
E CONSERVARLE PER
RIFERIMENTI FUTURI
Campo applicativo
Il seggiolino è omologato ECE
44/04, per bambini di peso inferiore
a 10 Kg (gruppo 0) e da 9 a 18 Kg
(gruppo 1). Si adatta ai veicoli dotati
di cinture di sicurezza a 3 punti,
omologate in base al regolamento
UN/ECE N° 16 o altri standard
equivalenti.
AVVERTENZE PER L’USO
Qualsiasi modifica apportata,
o l’impiego non conforme alle
istruzioni, può rendere pericoloso
l’utilizzo del seggiolino.
Il costruttore declina ogni
responsabilità, derivante da
modifiche apportate da terzi al
seggiolino o da un uso non corretto.
Qualsiasi modifica o completamento
deve avere l’approvazione
dell’autorità competente.
Verificare che le cinture con le fibbie
non siano attorcigliate e che non
vengano chiuse tra le portiere o
nelle parti mobili dei sedili.
Assicurarsi che le cinture sotto-
addominali siano indossate il più
basso possibile per ben vincolare il
bacino del bambino.
In caso di incidente, il seggiolino deve
essere cambiato con uno nuovo
per mantenere il miglior livello di
sicurezza.
Durante il viaggio controllare che
l’asse del seggiolino sia sempre
parallelo alla direzione di marcia.
Durante il viaggio, evitare di lasciare
oggetti o bagagli liberi nell’abitacolo.
In caso di incidente, potrebbero
causare lesioni.
Durante il viaggio, controllare
che tutte le cinture siano sempre
allacciate e in tensione.
Durante il viaggio, il seggiolino deve
sempre essere fissato con la cintura
di sicurezza, anche senza il bambino.
Evitare di lasciare i bambini
incustoditi in auto.
Le parti in plastica del seggiolino,
possono essere pulite strofinandole
semplicemente con un panno umido.
NON USARE SOLVENTI.
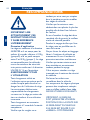
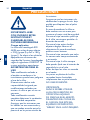
IMPORTANTE: IL SEGGIOLINO
NON DEVE MAI ESSERE
UTILIZZATO, IN SENSO OPPOSTO
A QUELLO DI MARCIA SUL SEDILE
ANTERIORE DELL’AUTO, NEL
CASO CHE QUESTA SIA DOTATA
DI DISPOSITIVO “AIRBAG” SUL
LATO DEL PASSEGGERO.
AVVERTENZE
IT

15
ve
.
o.
O
LE
A
ISTRUZIONI
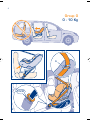
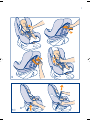
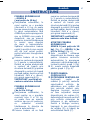
FISSAGGIO DEL
SEGGIOLINO - GRUPPO 0
(meno di 10 Kg)
Il posizionamento del seggiolino,
nel caso di bambini di peso
inferiore a 10 Kg., può avvenire
sul sedile anteriore solo di
vetture senza AIRBAG lato
passeggero o con AIRBAG che
possa essere disattivato, o su
quello posteriore, sempre in
senso opposto a quello di marcia.
Lo schienale del seggiolino deve
essere regolato nella posizione
per la quale il bambino stia il più
coricato possibile, in accordo
con l’etichetta triangolare blu.
Il fissaggio deve avvenire solo con
la cintura di sicurezza a 3 punti
della vettura, facendo passare il
tratto addominale della cintura
attraverso il basamento (B) e
la parte diagonale della cintura,
dietro lo schienale, dopo averla
inserita senza attorcigliarla,
attraverso il passante superiore
(A).
IMPORTANTE: Verificare
che la cintura sia sempre
ben tesa.
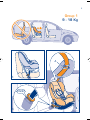
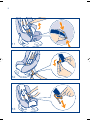
FISSAGGIODEL
SEGGIOLINO - GRUPPO 1
(da 9 a 18 Kg)
Il posizionamento del seggiolino
nel caso di bambini di peso da 9
a 18 Kg. può avvenire sul sedile
anteriore o su quello posteriore,
sempre in direzione di marcia.
Il fissaggio deve avvenire solo con
la cintura di sicurezza a 3 punti
della vettura, facendo passare il
tratto addominale della cintura
attraverso il basamento (B) e
la parte diagonale della cintura,
dietro lo schienale, dopo averla
inserita senza attorcigliarla,
attraverso il passante superiore
(A).
IMPORTANTE: Verificare
che la cintura sia sempre
ben tesa.
ATTENZIONE! FISSAGGIO
DEL SEGGIOLINO
GRUPPO 0 (meno di 10 Kg)
(Fig. 5) - GRUPPO 1 (da 9 a
18 Kg.) (Fig. 6)
E’ necessario utilizzare il
dispositivo di blocco rosso per
bloccare le cinture dell’auto
vicino alla fibbia: tratti diagonale
e lombare per il gruppo 0 (fig.5),
solo tratto diagonale per il
gruppo 1 (Fig. 6).
POSIZIONAMENTO DEL
BAMBINO E
REGOLAZIONE CINTURE
Posizionare il bambino sul
seggiolino e regolare le cinture
scegliendo le asole di passaggio
1
2
3
4
5
6
7
8
Italiano
IT

16
ISTRUZIONI
dello schienale, più adatte alla
sua statura. La regolazione
della tensione della cintura si
ottiene agendo sul regolatore
(D) facendo scorrere la cintura
attraverso le asole della fibbia
d’aggancio e dello schienale.
Per stringere la cintura, spingere
verso l’alto il regolatore (D) e
tirare l’estremità libera (C).
E’ necessario stringere la parte
sinistra della cinghia addominale
tirandola attraverso la fessura
presente nella parte sinistra
della fibbia;
- quindi tirare la cinghia delle
spalle tirandola da dietro lo
schienale,
- tirare il tratto di cinghia
allentato dietro lo schienale
attraverso la parte sinistra della
cinghia che deve essere a sua
volta tirato facendo passare
la cinghia attraverso la fessura
presente nella parte destra della
fibbia,
- stringere la parte destra
della cinghia addominale, e prima
che questa entri nel regolatore,
tenere la cinghia perpendicolare
al lato del seggiolino auto
(altrimenti non è possibile far
passare la cinghia attraverso il
regolatore), e tirarla dall’esterno
del seggiolino.
Per allentare, spingere verso
l’alto il regolatore (D) e tirare
la cintura dall’interno del
seggiolino (E). Il rilascio del
regolatore permette di bloccare
nuovamente la cintura.
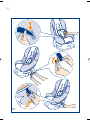
Per adattare l’altezza della cinture
all’altezza del bambino, occorre
procedere come segue: sollevare
la fodera nella parte anteriore
del sedile. Premere le linguette
d’aggancio del cilindretto che
vincola la cintura, nella direzione
delle frecce, sul lato opposto al
regolatore.
Spingere verso il basso il
cilindretto, estrarlo dalla parte
inferiore del corpo sedile e
sfilarlo dalla cintura.
Fare scorrere la cintura (senza la
fibbia) e sfilarla dalle asole dello
schienale.
Reinserire la cintura nelle asole
all’altezza corretta.
Rimettere il cilindretto nella
cintura e fissarlo di nuovo nel
corpo del sedile, premendo le
linguette d’aggancio e tirando la
cintura dall’interno.
IMPORTANTE: Per sganciare
il cilindretto evitare l’uso di
oggetti appuntiti o taglienti
che potrebbero danneggiare
la cintura.
La regolazione della lunghezza
della cintura intergambale (F)
si effettua facendola scorrere
9
10
11
12
13
14
15
16
17
1
1
2
2
IT
Italiano

17
ISTRUZIONI
re
el
el
re
re
re
re
re
te
he
ne
al
il
te
e
la
lo
le
la
el
le
la
re
di
ti
re
za
F)
re
attraverso la fibbia di regolazione
(G) in modo che la cintura sotto-
addominale (H), collegata ad essa
tramite la fibbia di bloccaggio (I),
risulti posizionata all’altezza del
bacino del bambino.
L’aggancio della fibbia avviene
come indicato in fig. 18, mentre lo
sgancio si effettua semplicemente
premendo il pulsante rosso.
REGOLAZIONE
DELL’INCLINAZIONE
Il seggiolino è regolabile in 4
diverse posizioni. Per cambiare
l’inclinazione è necessario
sollevare completamente la leva
posta sul davanti e fare scorrere
il sedile rispetto al basamento.
L’operazione è più agevole se
effettuata quando il bambino
non è seduto nel seggiolino.
UTILIZZO
DEL RIDUTTORE
Il seggiolino è corredato di
un comodo riduttore che
accompagna la prima fase di
crescita del vostro bambino.
ASPORTAZIONE
E LAVAGGIO
DELLA FODERA
La fodera del seggiolino può
essere agevolmente asportata,
operando nel modo seguente:
sollevare la parte anteriore della
fodera. Premere le linguette
d’aggancio del cilindretto che
vincola la cintura, nella direzione
delle frecce, sul lato opposto
al regolatore (fig. 11). Spingere
verso il basso il cilindretto,
estrarlo dalla parte inferiore
del corpo sedile e sfilarlo dalla
cintura. Fare scorrere la cintura
(senza la fibbia) e sfilarla dalle
asole dello schienale. Liberare
la fodera e lavarla con detersivo
neutro a 30°C. Non strizzare,
non centrifugare, non stirare.
Si raccomanda di non utilizzare
il seggiolino:
a) senza la fodera
b) con altre fodere diverse
da quella raccomandata dal
Produttore (la fodera influenza
l’efficienza del seggiolino auto)
18
19
20
21
IT
Italiano

18
IMPORTANT: READ THESE
INSTRUCTIONS CAREFULLY
BEFORE USE, AND KEEP
THEM FOR FUTURE
REFERENCES
Warnings:
Field of application:
This car seat is homologated for
children weighing less than 10 kg
(group 0) and from 9 to 18 kg
(group 1), meeting the ECE 44/04
homologation norms.
It is suitable for vehicles equipped
with 3-points safety belts, approved
on the basis of Regulation UN/
ECE No. 16 or other equivalent
standards.
NOTES FOR USE
Any modification or use not in
conformity with the instructions can
make the use of the seat dangerous.
The manufacturer disclaims
all responsibility deriving from
modifications made by third parties
to the car seat or from incorrect
use.
Any modification or completion
must be approved by the competent
authorities.
Check that the belts with buckles are
not twisted and do not get closed in
between the doors or trapped in the
movable parts of the seats.
Make sure the belts under the
abdomen are worn as low as possible
to hold the child’s pelvis properly.
In the event of an accident, the seat
must be replaced with a new one to
maintain the highest level of safety.
While travelling, check that the axis
of the seat is always parallel with the
direction of travel.
While travelling, do not leave objects
or baggage loose in the car. In the
event of an accident they could cause
injury.
While travelling, check that all the
belts are always fastened and tight.
While travelling, the seat must always
be fixed with the safety belt, even
without the child in it.
Never leave children unattended in
the car.
The plastic parts of the car may be
cleaned by simply wiping them with a
moist cloth.
NEVER USE SOLVENTS.
IMPORTANT THIS CAR SEAT MUST
NEVER BE USED REARWARD
FACING ON THE FRONT SEAT
OF CARS EQUIPPED WITH THE
“AIRBAG” DEVICE ON THE
PASSENGER´S SIDE.
WARNING
UK
English

19
re
n
e
le
o
e
ts
se
ys
a
T
INSTRUCTIONS
FIXING THE SEAT -
GROUP 0 (less than 10 kg)
For children weighing less
than 10 kg, the car seat can
be positioned on the front
passenger seat, only on car with
no airbag there or with airbag
which can be deactivated, or on
a rear seat of the car, but always
facing the rear of the car. The car
seat backrest must be adjusted
into a position with the child laid
as back as possible, according to
the blue dart.
It must be fixed only with adult
3-point safety belt, by running
the lower part of the safety belt
through the base (B) and the
diagonal part of the seat belt
behind the back of the seat, after
running it through the upper
slot (A). Ensure the belt is not
twisted.
IMPORTANT: Check that
the belt is always fully
tightened.
FIXING THE SEAT -
GROUP 1 (from 9 to 18 kg)
For children weighing from 9
to 18 kg, the car seat can be
positioned on the front or rear
seats, facing the front of the car.
It must be fixed only with the
car´s 3-point safety belt, by
running the lower part of the
safety belt through the base
(B) and the diagonal part of the
seat belt behind the back of the
seat, after running it through the
upper slot (A).
IMPORTANT: Check that
the belt is always fully
tightened.
WARNING!
FIXING THE SEAT
GROUP 0 (less than 10 kg)
(Fig. 5) - GROUP 1 (from 9 to
18 kg) (Fig. 6)
You must use the red lock-off
device to block the car´s belt
near the buckle; pay attention to
fix both parts: diagonal and lap
belt (Fig. 5) in the group 0 and
the diagonal belt in the group
1 (Fig. 6)
POSITIONING THE CHILD
AND
ADJUSTING THE BELTS
Position the child on the car seat
and adjust the belts by choosing
the slots in the car seat back that
are most suitable for the child´s
height. The seat belt tension is
adjusted by using the adjuster
running the belt through the
slots on the buckle and on the
seat back. To tighten the seat
belt, push the adjuster upwards
(D) and pull the free end (C).
1
2
3
4
5
6
7
8
UK
English

20
INSTRUCTIONS
It is necessary to tighten the left
hip part of the belt by pulling
the belt behind the slot in the
left tongue of the buckle, then
to fasten the left shoulder
by pulling the belt behind the
backrest, then to draw the
belt part (loosened behind the
backrest) to the right shoulder
which has to be fastened by
pulling the belt behind the slot in
the right tongue of the buckle,
then to stretch the right hip part
of the belt, and before its entry
into the adjusting device to hold
the belt perpendicular to the
CRS (child restraint system)
side (otherwise it is not possible
to run the belt through the
adjuster), and to pull the belt
out of the CRS.
To loosen it, push the adjuster
upwards (D) and pull the belt
from inside the car seat (E).
Release the adjuster to lock the
belt again.
In order to adjust the belts to
the child’s height, follow these
instructions: lift the cover at
the front of the car seat. Press
the hooking tabs of the cylinder
constraining the belt in the
direction of the arrows on the
opposite side to the adjuster.
Push the cylinder downwards,
take it out from the lower part
of the seat body and slip it off
the belt.
Run the belt (without the
buckle) out through the slots on
the seat back.
Put the belt back into the slots
at the right height.
Put the cylinder back onto the
belt and fix it to the seat body
again, pressing the hooking tabs
and pulling the belt from inside.
IMPORTANT: Never use
sharp or pointed objects to
unhook the cylinder as they
could damage the belt.
The length of the belt between
the child’s legs (F) is adjusted
by running it through the
adjustment buckle (G) so that
the hip belt (H), connected to
it by the locking buckle (I), is
positioned at the height of the
child’s pelvis.
The buckle is hooked as shown
in Fig. 9, and is unhooked by
simply pressing the red button.
ADJUSTING SEAT
INCLINATION
The car seat can be adjusted to
one of 4 different positions. To
change the inclination, fully raise
the lever on the front and slide
the seat with respect to the base.
This operation is easier when
the child is not in the seat.
9
10
11
12
13
14
15
16
17
18
19
2
2
UK
English
La pagina si sta caricando...
La pagina si sta caricando...
La pagina si sta caricando...
La pagina si sta caricando...
La pagina si sta caricando...
La pagina si sta caricando...
La pagina si sta caricando...
La pagina si sta caricando...
La pagina si sta caricando...
La pagina si sta caricando...
La pagina si sta caricando...
La pagina si sta caricando...
La pagina si sta caricando...
La pagina si sta caricando...
La pagina si sta caricando...
La pagina si sta caricando...
La pagina si sta caricando...
La pagina si sta caricando...
La pagina si sta caricando...
La pagina si sta caricando...
La pagina si sta caricando...
La pagina si sta caricando...
La pagina si sta caricando...
La pagina si sta caricando...
La pagina si sta caricando...
La pagina si sta caricando...
La pagina si sta caricando...
La pagina si sta caricando...
La pagina si sta caricando...
La pagina si sta caricando...
La pagina si sta caricando...
La pagina si sta caricando...
La pagina si sta caricando...
La pagina si sta caricando...
La pagina si sta caricando...
La pagina si sta caricando...
-
 1
1
-
 2
2
-
 3
3
-
 4
4
-
 5
5
-
 6
6
-
 7
7
-
 8
8
-
 9
9
-
 10
10
-
 11
11
-
 12
12
-
 13
13
-
 14
14
-
 15
15
-
 16
16
-
 17
17
-
 18
18
-
 19
19
-
 20
20
-
 21
21
-
 22
22
-
 23
23
-
 24
24
-
 25
25
-
 26
26
-
 27
27
-
 28
28
-
 29
29
-
 30
30
-
 31
31
-
 32
32
-
 33
33
-
 34
34
-
 35
35
-
 36
36
-
 37
37
-
 38
38
-
 39
39
-
 40
40
-
 41
41
-
 42
42
-
 43
43
-
 44
44
-
 45
45
-
 46
46
-
 47
47
-
 48
48
-
 49
49
-
 50
50
-
 51
51
-
 52
52
-
 53
53
-
 54
54
-
 55
55
-
 56
56


Inglesina Moovy Instructions Manual
- Categoria
- Sedili dell'auto
- Tipo
- Instructions Manual
in altre lingue
- français: Inglesina Moovy
- Deutsch: Inglesina Moovy
- română: Inglesina Moovy
Altri documenti
-
Chicco New Zenith 0 1 Manuale del proprietario
-
Chicco Eletta Istruzioni per l'uso
-
-
-
-
Graco Nautilus Manuale del proprietario
-
Graco Nautilus Group 1/2/3 Car Seat Manuale utente
-
VERTBAUDET TSP106 Manuale utente
-
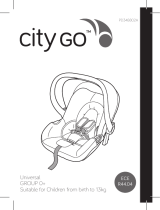 Baby Jogger city GO Manuale utente
-
