
HELO
H.264 Streaming and Recording Encoder
Version 4.2
Published January 29, 2020
Installation and Operation Guide

HELO H.264 Streaming and Recording Encoder v4.2 2 www.aja.com
Notices
Trademarks
AJA® and Because it matters.® are registered trademarks of AJA Video Systems, Inc.
for use with most AJA products. AJA™ is a trademark of AJA Video Systems, Inc. for
use with recorder, router, software and camera products. Because it matters.™ is a
trademark of AJA Video Systems, Inc. for use with camera products.
Corvid Ultra®, lo®, Ki Pro®, KONA®, KUMO®, ROI® and T-Tap® are registered trademarks of
AJA Video Systems, Inc.
AJA Control Room™, KiStor™, Science of the Beautiful™, TruScale™, V2Analog™ and
V2Digital™ are trademarks of AJA Video Systems, Inc.
All other trademarks are the property of their respective owners.
Copyright
Copyright © 2020 AJA Video Systems, Inc. All rights reserved. All information in
this manual is subject to change without notice. No part of the document may be
reproduced or transmitted in any form, or by any means, electronic or mechanical,
including photocopying or recording, without the express written permission of AJA
Video Systems, Inc.
Contacting AJA Support
When calling for support, have all information at hand prior to calling. To contact AJA
for sales or support, use any of the following methods:
Telephone +1.530.271.3190
FAX +1.530.271.3140
Web https://www.aja.com
Support Email suppor[email protected]
Sales Email [email protected]

HELO H.264 Streaming and Recording Encoder v4.2 3 www.aja.com
Contents
Notices . . . . . . . . . . . . . . . . . . . . . . . . . . . . . . . . . . . . . .2
Trademarks . . . . . . . . . . . . . . . . . . . . . . . . . . . . . . . . . . . . . . . . . . . 2
Copyright . . . . . . . . . . . . . . . . . . . . . . . . . . . . . . . . . . . . . . . . . . . . 2
Contacting AJA Support . . . . . . . . . . . . . . . . . . . . . . . . . . . . . . . . . . . 2
Chapter 1 – Introduction . . . . . . . . . . . . . . . . . . . . . . . . . . .5
Overview. . . . . . . . . . . . . . . . . . . . . . . . . . . . . . . . . . . . . . . . . . . . .5
Using Mobile Devices . . . . . . . . . . . . . . . . . . . . . . . . . . . . . . . . . . . 5
Features . . . . . . . . . . . . . . . . . . . . . . . . . . . . . . . . . . . . . . . . . . . . . 6
Hardware . . . . . . . . . . . . . . . . . . . . . . . . . . . . . . . . . . . . . . . . . . . 7
Software . . . . . . . . . . . . . . . . . . . . . . . . . . . . . . . . . . . . . . . . . . . 7
Simplied Block Diagram . . . . . . . . . . . . . . . . . . . . . . . . . . . . . . . . . . 7
What’s In The Box?. . . . . . . . . . . . . . . . . . . . . . . . . . . . . . . . . . . . . . .7
System Requirements. . . . . . . . . . . . . . . . . . . . . . . . . . . . . . . . . . . . .8
HELO REST API Documentation . . . . . . . . . . . . . . . . . . . . . . . . . . . . . . 8
Chapter 2 – Product at a Glance. . . . . . . . . . . . . . . . . . . . . . .9
Front Panel . . . . . . . . . . . . . . . . . . . . . . . . . . . . . . . . . . . . . . . . . . . 9
Buttons . . . . . . . . . . . . . . . . . . . . . . . . . . . . . . . . . . . . . . . . . . . . 9
Ports/Slots . . . . . . . . . . . . . . . . . . . . . . . . . . . . . . . . . . . . . . . . . . 9
Front Panel Status LEDs . . . . . . . . . . . . . . . . . . . . . . . . . . . . . . . . . 10
Factory Reset Button (Hardware) . . . . . . . . . . . . . . . . . . . . . . . . . . . 11
Rear Panel . . . . . . . . . . . . . . . . . . . . . . . . . . . . . . . . . . . . . . . . . . . 12
Connections . . . . . . . . . . . . . . . . . . . . . . . . . . . . . . . . . . . . . . . . 12
Rear Panel Status LEDs . . . . . . . . . . . . . . . . . . . . . . . . . . . . . . . . . 13
Chapter 3 – HELO Installation . . . . . . . . . . . . . . . . . . . . . . . 14
Overview. . . . . . . . . . . . . . . . . . . . . . . . . . . . . . . . . . . . . . . . . . . . 14
Initial HELO Installation. . . . . . . . . . . . . . . . . . . . . . . . . . . . . . . . . . . 14
Network Conguration . . . . . . . . . . . . . . . . . . . . . . . . . . . . . . . . . 14
HELO Recording Quick Start . . . . . . . . . . . . . . . . . . . . . . . . . . . . . . 16
HELO Streaming Quick Start . . . . . . . . . . . . . . . . . . . . . . . . . . . . . . 16
HELO Firmware Update . . . . . . . . . . . . . . . . . . . . . . . . . . . . . . . . . 17
Chapter 4 – eMini-Setup . . . . . . . . . . . . . . . . . . . . . . . . . . 18
Overview. . . . . . . . . . . . . . . . . . . . . . . . . . . . . . . . . . . . . . . . . . . . 18
Acquiring eMini-Setup . . . . . . . . . . . . . . . . . . . . . . . . . . . . . . . . . . . 18
AJA Documentation . . . . . . . . . . . . . . . . . . . . . . . . . . . . . . . . . . . 18
Installing eMini-Setup . . . . . . . . . . . . . . . . . . . . . . . . . . . . . . . . . . . 19
PC Installation . . . . . . . . . . . . . . . . . . . . . . . . . . . . . . . . . . . . . . . 19
Mac Installation . . . . . . . . . . . . . . . . . . . . . . . . . . . . . . . . . . . . . . 20
Running eMini-Setup . . . . . . . . . . . . . . . . . . . . . . . . . . . . . . . . . . . . 20
PC Startup . . . . . . . . . . . . . . . . . . . . . . . . . . . . . . . . . . . . . . . . . 20
Mac Startup . . . . . . . . . . . . . . . . . . . . . . . . . . . . . . . . . . . . . . . . 21
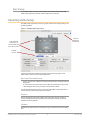
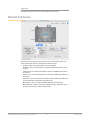
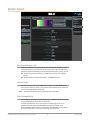
Operating eMini-Setup . . . . . . . . . . . . . . . . . . . . . . . . . . . . . . . . . . . 21
Network Tab Screen. . . . . . . . . . . . . . . . . . . . . . . . . . . . . . . . . . . . . 22
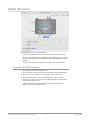
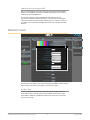
Update Tab Screen. . . . . . . . . . . . . . . . . . . . . . . . . . . . . . . . . . . . . . 23
Firmware Update Procedure. . . . . . . . . . . . . . . . . . . . . . . . . . . . . . 23
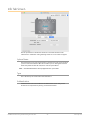
Info Tab Screen . . . . . . . . . . . . . . . . . . . . . . . . . . . . . . . . . . . . . . . . 24
Chapter 5 – HELO Web Interface . . . . . . . . . . . . . . . . . . . . . 25
Overview. . . . . . . . . . . . . . . . . . . . . . . . . . . . . . . . . . . . . . . . . . . . 25
Remote Control Overview . . . . . . . . . . . . . . . . . . . . . . . . . . . . . . . . . 25
Web Browser via Ethernet . . . . . . . . . . . . . . . . . . . . . . . . . . . . . . . . . 25
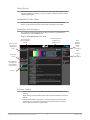
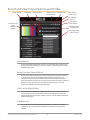
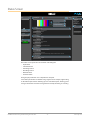
General Screen Description . . . . . . . . . . . . . . . . . . . . . . . . . . . . . . 25
Record and Stream Panel, Buttons and Proles . . . . . . . . . . . . . . . . . . . 28
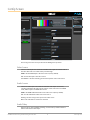
Status Screen . . . . . . . . . . . . . . . . . . . . . . . . . . . . . . . . . . . . . . . . . 30
Cong Screen . . . . . . . . . . . . . . . . . . . . . . . . . . . . . . . . . . . . . . . . . 31
Scheduler Screen . . . . . . . . . . . . . . . . . . . . . . . . . . . . . . . . . . . . . . 34

HELO H.264 Streaming and Recording Encoder v4.2 4 www.aja.com
Recording Proles Screen . . . . . . . . . . . . . . . . . . . . . . . . . . . . . . . . . 39
Import Recording Settings . . . . . . . . . . . . . . . . . . . . . . . . . . . . . . . 39
Recording Prole Settings . . . . . . . . . . . . . . . . . . . . . . . . . . . . . . . 40
Streaming Proles Screen . . . . . . . . . . . . . . . . . . . . . . . . . . . . . . . . . 46
Independent Codecs Menu . . . . . . . . . . . . . . . . . . . . . . . . . . . . . . 46
Import Streaming Settings . . . . . . . . . . . . . . . . . . . . . . . . . . . . . . . 47
Ports Required for Streaming Protocols. . . . . . . . . . . . . . . . . . . . . . . 47
Streaming Prole Settings . . . . . . . . . . . . . . . . . . . . . . . . . . . . . . . 47
Presets Screen . . . . . . . . . . . . . . . . . . . . . . . . . . . . . . . . . . . . . . . . 50
Presets Screen Controls . . . . . . . . . . . . . . . . . . . . . . . . . . . . . . . . . 50
System Screen . . . . . . . . . . . . . . . . . . . . . . . . . . . . . . . . . . . . . . . . 52
Network Screen . . . . . . . . . . . . . . . . . . . . . . . . . . . . . . . . . . . . . . . 55
Firmware Screen . . . . . . . . . . . . . . . . . . . . . . . . . . . . . . . . . . . . . . . 57
Log Screen. . . . . . . . . . . . . . . . . . . . . . . . . . . . . . . . . . . . . . . . . . . 57
Recordings Panel. . . . . . . . . . . . . . . . . . . . . . . . . . . . . . . . . . . . . . . 58
Changing the Recording Destination . . . . . . . . . . . . . . . . . . . . . . . . 59
Viewing Recorded Files . . . . . . . . . . . . . . . . . . . . . . . . . . . . . . . . . 59
Downloading Files . . . . . . . . . . . . . . . . . . . . . . . . . . . . . . . . . . . . 60
Deleting Files . . . . . . . . . . . . . . . . . . . . . . . . . . . . . . . . . . . . . . . 61
Chapter 6 – CDNs and Clients . . . . . . . . . . . . . . . . . . . . . . . 62
Introduction. . . . . . . . . . . . . . . . . . . . . . . . . . . . . . . . . . . . . . . . . . 62
Akamai . . . . . . . . . . . . . . . . . . . . . . . . . . . . . . . . . . . . . . . . . . . . . 62
Amino Set-Top Boxes . . . . . . . . . . . . . . . . . . . . . . . . . . . . . . . . . . . . 62
Elemental Encoder Appliances and Elemental Cloud. . . . . . . . . . . . . . . . 63
Facebook Live. . . . . . . . . . . . . . . . . . . . . . . . . . . . . . . . . . . . . . . . . 63
Instagram via Third Party Application Yellow Duck . . . . . . . . . . . . . . . . . 63
Kaltura . . . . . . . . . . . . . . . . . . . . . . . . . . . . . . . . . . . . . . . . . . . . . 64
OBS (Open Broadcaster Software) . . . . . . . . . . . . . . . . . . . . . . . . . . . . 64
Periscope.tv . . . . . . . . . . . . . . . . . . . . . . . . . . . . . . . . . . . . . . . . . . 64
StreamShark.io . . . . . . . . . . . . . . . . . . . . . . . . . . . . . . . . . . . . . . . . 66
Twitch . . . . . . . . . . . . . . . . . . . . . . . . . . . . . . . . . . . . . . . . . . . . . . 66
UStream . . . . . . . . . . . . . . . . . . . . . . . . . . . . . . . . . . . . . . . . . . . . 67
vMIX. . . . . . . . . . . . . . . . . . . . . . . . . . . . . . . . . . . . . . . . . . . . . . . 67
Wirecast . . . . . . . . . . . . . . . . . . . . . . . . . . . . . . . . . . . . . . . . . . . . 68
Wowza . . . . . . . . . . . . . . . . . . . . . . . . . . . . . . . . . . . . . . . . . . . . . 68
Using the Local Wowza Streaming Engine . . . . . . . . . . . . . . . . . . . . . 68
YouTube Live . . . . . . . . . . . . . . . . . . . . . . . . . . . . . . . . . . . . . . . . . 69
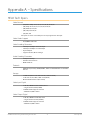
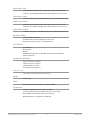
Appendix A – Specications . . . . . . . . . . . . . . . . . . . . . . . . 71
HELO Tech Specs . . . . . . . . . . . . . . . . . . . . . . . . . . . . . . . . . . . . . . . 71
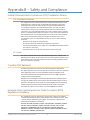
Appendix B – Safety and Compliance . . . . . . . . . . . . . . . . . .73
Warranty and Liability Information . . . . . . . . . . . . . . . . . . . .81
Limited Warranty on Hardware. . . . . . . . . . . . . . . . . . . . . . . . . . . . . . 81
Limitation of Liability . . . . . . . . . . . . . . . . . . . . . . . . . . . . . . . . . . . . 81
Governing Law and Language; Your Rights . . . . . . . . . . . . . . . . . . . . . . 81
Index. . . . . . . . . . . . . . . . . . . . . . . . . . . . . . . . . . . . . . .83

HELO H.264 Streaming and Recording Encoder v4.2 5 www.aja.com
Chapter 1 – Introduction
Overview
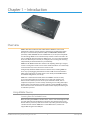
HELO is AJA’s first hardware-based H.264 solution. HELO can receive video
output from a switcher, camera, iPhone or other device and deliver the stream
directly to a Content Delivery Network (CDN) via RTMP, RTMPS, RTMPE, RTSP
(10 clients), HTTPS, RTP/UDP Unicast and Multi Unicast, or HLS (10 clients) (HTTP
Live Streaming). HELO can also simultaneously record the video to its built-in SD
slot, to a USB flash drive attached to its USB 2.0 port, or to a local shared network
drive via its Ethernet port. This lets you configure your recording and streaming
independently for maximum efficiency and flexibility.
HELO has both HDMI and SDI video interfaces for inputting either type of signal,
as well as analog stereo audio in and out. Two hardware buttons are conveniently
located on the front, one for stream and one for record.
Configured by default for DHCP network communications, installing HELO can
be as easy as just plugging in the Ethernet cable. A USB connection with AJA’s
eMini-Setup application also allows quick access directly to the HELO hardware
for network configuration, if necessary.
HELO uses a web browser based UI, where all of HELO’s controls are ready
to use. The robust web browser UI allows you to setup and configure your
CDN connection before you even arrive at your event. Once there, even an
inexperienced operator can start and stop streaming and recording with simple
button pushes. The web UI also provides complete control of HELO’s operations
from a remote location. A low frame rate video monitor displays the video signal
to indicate its presence.
Using Mobile Devices
Streaming from HELO to Mobile Devices
When streaming from HELO to a mobile device, video is sent out through the LAN
port and delivered to the mobile device wirelessly using the HLS protocol. The
wireless delivery is done by a WiFi Access Point or by routing the stream through
a mobile telecom network. HELO does not have WiFi built in, and does not
support WiFi dongles in the USB port.

HELO H.264 Streaming and Recording Encoder v4.2 6 www.aja.com
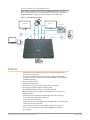
Sending Video to HELO from Mobile Devices
When sending video from a mobile device to HELO for streaming, the mobile
device, such as an iPhone, iPad, or Android device, must be physically connected
to HELO's HDMI input using an appropriate adapter and an HDMI cable.
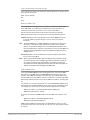
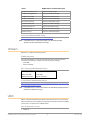
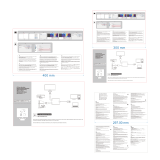
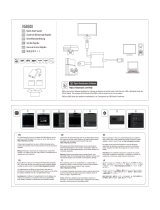
Figure 1. HELO Workflow Diagram
Audio In
1x HDMI
Output
LAN
1x SDI
Input
1x SDI
Output
High Quality
Audio
Video Switcher
HDMI Monitor SDI Monitor
Cloud
1x HDMI
Input
Features
• Simultaneous independent streaming and recording of 3G/HD/SD video
formats from a single input
• HLS streaming (HTTP Live Streaming) to reduce buering and stuttering,
allowing for consumer devices such as iPhones and iPads to connect directly
to HELO for streaming
• Enhanced HTTPS security
• HDMI and SDI BNC inputs
• AV Mute with user graphics upload support for pre-live feeds
• Error logging for quick analysis of streaming issues
• Web UI regionalization for Chinese, Japanese and Korean
• Optionally segmented recording to onboard USB or SD card storage or a
network le store
• Simultaneous dual recording to any destination plus onboard storage
• Closed captioning streaming from SDI input
• Single video source monitoring
• Support for two channels of HDMI or SDI embedded audio or two channels of
consumer level analog audio I/O
• Audio sample rate conversion to 48 kHz for all audio channel inputs
• 32, 96, 128, 192, and 256 kbps output AAC-LC MPEG-4 audio bit rate
• De-interlacing

HELO H.264 Streaming and Recording Encoder v4.2 7 www.aja.com
• Video geometry down scaling
• 2048x1080 center cut to 1920x1080 on SDI input
• Color space conversion, RGB 4:4:4 to Y’Cb’Cr’ 4:2:0
• Alarm conditions
• Preservation of non-audio, video ANC data from SDI input to SDI output
• Integrated Calendar to schedule automatic streaming and/or recording of
events
• Low frame-rate video condence monitor in web UI
• Recordings directory in web UI to view, sort, download or delete recorded les
Hardware
• Hardware H.264 encoding, streaming and recording
Software
• Built-in web server for full remote control and conguration
• eMini-Setup can be used with a USB connection for initial HELO conguration
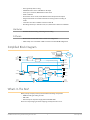
Simplified Block Diagram
HELO CPU
Control
Rec
Button
Stream
Button
HDMI In
SDI In
HDMI Out
SDI Out
Storage
USB
SD Card
RJ-45 LAN
Video
Encode
Audio
Encode
Recording
Interface
Remote Web
Browser
Control
Video Video
2 ch.
Audio
Streaming
Interface
Audio
De-Embedder
Stereo
Analog
Audio In
Stereo
Analog
Audio Out
LAN or WAN
Ethernet
2 ch. Audio
Cong
USB
Conguration and Operation
Conguration Only
Embedded
Web Server
What’s In The Box?
When you unpack your product you will find the following components:
• HELO streaming/recording encoder
• USB cable
• Universal input +5V power supply AJA model DWP-U-R1
Please save all packaging for return shipping, should you wish to do so.

HELO H.264 Streaming and Recording Encoder v4.2 8 www.aja.com
System Requirements
Remote computer configuration and control is accomplished using HELO’s
internal web server. A macOS or Windows computer with a web browser installed
is all that is required. A USB port is also required for eMini-Setup configuration.
NOTE: Safari is the preferred web browser for control on the Mac, and additionally
Chrome and Firefox on Windows. Other web browsers may work, but AJA cannot
guarantee consistent operation for all web browsers or web browser versions.
HELO REST API Documentation
AJA’s REST automation API provides a platform from which you can issue
commands to an AJA device’s internal web server, allowing remote systems
the ability to control AJA embedded or networked devices. With this control
framework, you can build integration and automation scripts, using any scripting
language, allowing you to take full advantage of the device’s functionality.
This documentation is available at the following link:
https://gitlab.aja.com/pub/rest_api

HELO H.264 Streaming and Recording Encoder v4.2 9 www.aja.com
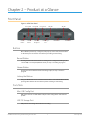
Chapter 2 – Product at a Glance
Front Panel
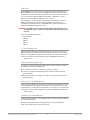
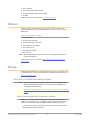
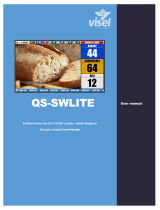
Figure 2. HELO Front Panel
Record
Button
Record LED
Stream LED Factory Reset USB LED SD LED
Stream
Button
Mini-USB
Cong Port
USB Storage
Port
SD Card Slot Power LED
Buttons
Once HELO is powered up, configured, and properly connected, the two buttons
on the front panel are used to start and stop recording and streaming.
Record Button
Pressing the Record button initiates recording to the configured media type (SD
card or USB) or record path (Network Share), or stops a recording in progress.
Stream Button
Pressing the Stream button initiates streaming output, or stops a stream in
progress.
Linking the Buttons
Using the HELO web server screen these two buttons can be linked. When linked,
pressing either button will start and stop both recording and streaming.
Ports/Slots
Mini-USB Config Port
USB connection for use with eMini-Setup for initial configuration and firmware
update.
USB 2.0 Storage Port
USB port for connecting a flash drive for recording.

HELO H.264 Streaming and Recording Encoder v4.2 10 www.aja.com
SD Card Slot
Cards and Formatting
• SDHC (FAT32)
• SDXC (exFAT)
Network RJ-45
• SMB
• NFS
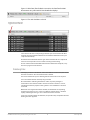
Front Panel Status LEDs
Record LED
Green - Configured media is mounted and ready
Flashing Green - Recording in progress
Amber - Recording is not configured or no network connection for recording
Alternating Amber and Green - Dual Record mode is selected, and one of the
record destinations is ready but the other one is not
Flashing Amber - Input signal loss
Stream LED
Green - Configured stream is ready
Flashing Green - Streaming in progress
Amber- Streaming is not configured, network error or no network connection
Flashing Amber - Input signal loss
USB LED
Storage Available Indicated by Color
Solid (on or off) - Safe to remove media
Green - Plently of storage space available
Yellow - Storage space running low
Red - Storage media full. New recordings are not possible until more space is
made available.
Activity Indicated by Blinking and On/Off Behavior
Blinking On/Off - Media in use, do not remove
Solid off - Media not selected or not present
Solid on - Media mounted and ready
Slow flashing - Recording in progress
Medium flashing - Media being scanned for recordings
Fast flashing - Other file access in progress (file download or delete)
Green - Media mounted and ready
Flashing Green - Recording in progress

HELO H.264 Streaming and Recording Encoder v4.2 11 www.aja.com
SD LED
Storage Available Indicated by Color
Solid (on or off) - Safe to remove media
Green - Plently of storage space available
Yellow - Storage space running low
Red - Storage media full. New recordings are not possible until more space is
made available.
Activity Indicated by Blinking and On/Off Behavior
Blinking On/Off - Media in use, do not remove
Solid off - Media not selected or not present
Solid on - Media mounted and ready
Slow flashing - Recording in progress
Medium flashing - Media being scanned for recordings
Fast flashing - Other file access in progress (file download or delete)
Green - Media mounted and ready
Flashing Green - Recording in progress
Power LED
Green - Power on and normal operation
Amber - Safeboot
Flashing - Identify feature on
Factory Reset Button (Hardware)
A recessed Factory Reset hardware button is located between the USB ports.
Using a paper clip, press and hold for five seconds to perform a factory reset.
The hardware button does a hard reset, which resets everything, including
network connection parameters, and will also erase all saved presets, profiles, and
calendars. It is intended to be used in the factory to ensure a system is in a new
state before shipment, and for use by equipment loan or rental houses that need
to put HELOs into a new state, and also to ensure any saved passwords are erased.
NOTE: A Factory Preset button is also available on the web browser UI (Presets Screen),
but different parameters are reset from the web interface. See "Factory Reset
(Web UI)" on page 50 for more information.

HELO H.264 Streaming and Recording Encoder v4.2 12 www.aja.com
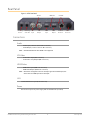
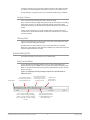
Rear Panel
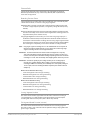
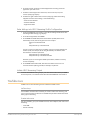
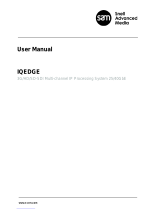
Figure 3. HELO Rear Panel
2 Ch Analog
Audio In
SDI LED
HDMI LED LAN LEDs
2 Ch Analog
Audio Out
SDI
Input
SDI
Output
HDMI
Input
HDMI
Output
RJ45 LAN
Connector
Power
Connector
Connections
Audio
• Audio Input (2 channel 1/8 inch TRS connector)
• Audio Output (2 channel 1/8 inch TRS connector)
NOTE: Embedded audio from SDI or HDMI is also supported.
SDI Video
• 3G SDI Video Input (BNC connector)
• 3G SDI Video Loop Output (BNC connector)
HDMI Video
• HDMI Video Input (HDMI 1.4a connector)
• HDMI Video Output (HDMI 1.4a connector)
NOTE: HELO can be configured to route the SDI input signal to the HDMI output, but
cannot route the HDMI input to the SDI output.
LAN
10/100/1000 Ethernet port (RJ-45 connector)
Power
Uses universal input +5V power supply AJA model DWP-U-R1 (included)

HELO H.264 Streaming and Recording Encoder v4.2 13 www.aja.com
Rear Panel Status LEDs
SDI In LED
This LED indicates the status of the SDI video input signal by color:
Off - No input or invalid input
Green - Lock to SD
Red - Lock to HD
Amber - Lock to 3G
HDMI In LED
This LED indicates the status of the HDMI video input signal by color:
Off - No input or invalid input
Green - Lock to SD
Red - Lock to HD
LAN LEDs
The LED on the right lights amber when there is an Ethernet link.
The LED on the left flashes green when data is being transferred.

HELO H.264 Streaming and Recording Encoder v4.2 14 www.aja.com
Chapter 3 – HELO Installation
Overview
An initial HELO installation includes the following steps:
1. Apply power to HELO.
2. Connect HELO to your Ethernet network.
3. Determine HELO’s IP address (DHCP), or congure HELO’s network settings,
using eMini-Setup and a USB connection.
4. Disconnect eMini-Setup and continue device conguration from the Web
Interface.
5. Launch a web browser and access HELO using its IP address.
6. Connect the HELO inputs and outputs.
7. Congure HELO’s basic operation.
8. Congure a HELO Recording Prole and a Streaming Prole.
9. When HELO is properly installed and congured, recording and/or
streaming can be started and stopped simply by pressing the buttons on
the front panel, or by using the web interface.
The current HELO configuration settings are retained, even when powered off, so
subsequent installations for an identical recording and/or streaming session can
be done with the following simple steps:
1. Apply power to HELO.
2. Connect HELO to your network and connect the HELO inputs and outputs.
3. Press the Record or Stream button to start and stop recording and/or
streaming.
Initial HELO Installation
CAUTION: Please use caution and take security into account when configuring your
HELO unit on your network. It is recommended that you place your HELO behind
a firewall so that it is not accessible on the open internet by unauthorized users.
If you have questions or concerns about how to configure HELO in a way that is
appropriate for your security needs, please consult with your IT staff or a qualified
network security consultant.
Network Configuration
HELO requires a network connection to stream to the internet or record to a
network drive. HELO is shipped from the factory with DHCP enabled, so if your
network has a DHCP server, by simply connecting HELO to your network with
an Ethernet cable, the DHCP server will assign HELO a compatible IP address.
However, you will need to know that IP address before you will be able to access
HELO’s internal web server for initial configuration.
The eMini-Setup application, included with the HELO software and available
as a free download from the AJA website, lets you identify the current HELO IP
address, if configured, or to manually set the network configuration to work in

HELO H.264 Streaming and Recording Encoder v4.2 15 www.aja.com
your environment. Refer to "Chapter 4 eMini-Setup" on page 18 for information
about installing and using AJA’s eMini-Setup application.
Once configured and connected to your network, HELO can be used for recording
to locally inserted media (USB stick or SD card). For streaming or recording to a
network drive, additional HELO configuration is required. A properly configured
HELO can stream and record simultaneously or perform each task individually.
Setting up HELO on a Static Network without eMini-Setup
If you choose not to use eMini-Setup to configure your HELO, this section
describes the steps you can take to temporarily modify your controlling
computer's IP address in order to connect to a HELO that has already had its IP
address set to its default Static IP address.
Because HELO ships with DHCP enabled by default, in order to setup a Static IP
address, you will first need to put HELO into Static IP mode via eMini-Setup or via
the Web interface.
For example, let us assume that, through using eMini-Setup, the Static IP address
of the HELO has previously been set to 192.168.101.1 with a subnet mask of
255.255.255.0.
To enable your computer to connect to HELO without using eMini-Setup, we
will walk through the network configuration steps needed for both MacOS
and Windows to temporarily configure your computer to be set to the static IP
address of 192.168.101. 2.
IMPORTANT: BEFORE following the steps below to alter your Mac or Windows network
configuration, record your existing TCP-IP settings so that you can return your
computer to normal network operation after completing this procedure.
MacOS
1. Open up the MacOS System Preferences and select Network.
2. Input the address information shown below:
• IP Address: 192.168 .101. 2
• Subnet Mask: 255.255.255.0
3. Click Apply. This will put both your computer and your HELO within suitable
address range for connection.
4. Ensure that the HELO device is connected to the Mac via Ethernet (directly
or via LAN).
5. Start Safari (or another browser) and enter 192.168 .101.1 as a web address.
6. Once connected to HELO’s web interface, recongure HELO’s network
parameters as desired.
7. Restore your computer to its normal network TCP-IP settings.
Windows
1. Use Control Panel to access your Local Area Network properties. In
Windows 10 the path is Control Panel > All Control Panel Items >
Network and Sharing Center.
2. Under Connections, click Local Area Connection for the PC’s Ethernet
port.
3. In the resulting General dialog screen, select Properties.
4. On the Networking tab, select Internet Protocol Version 4 and click the
Properties button below.

HELO H.264 Streaming and Recording Encoder v4.2 16 www.aja.com
5. Click the Use the following IP address: radio button and enter the IP
Address and Subnet Mask below:
• IP Address: 192.168.101.2
• Subnet Mask: 255.255.255.0
6. Click OK to store the changes.
7. Connect the Windows PC to HELO’s RJ-45 port (either direct or through your
LAN).
8. Point your web browser to 192.168.101.1.
9. Once connected to HELO’s web interface, recongure HELO’s network
parameters as desired.
10. Restore your computer to its normal network TCP-IP settings.
HELO Recording Quick Start
HELO is shipped from the factory configured with the following basic recording
settings:
• Input - (HDMI, Video Source on HELO web browser Cong screen)
• Audio Input Source - (HDMI, Audio Source on Cong screen)
• Recording Target - (SD, Recording Media Type on Recording Proles screen)
• Recording default format is Selected Input Video Geometry Full Frame Rate
20Mb MOV
The easiest way to record is to simply apply power to HELO, connect HELO’s HDMI
port to a valid video/audio source, insert formatted SD media into HELO’s SD slot,
and then press the Record button on HELO’s front panel. The Record button and
SD LEDs will blink green while recording. Pressing the Record button again stops
the recording.
To change HELO’s configuration settings (other than IP address) requires a
network connection to HELO and a computer running a web browser, as
described above. You can then change the input source (SDI or HDMI), recording
target (USB, SD card or network drive), and the recording format. Refer to "Chapter
5 HELO Web Interface" on page 25 for detailed information.
NOTE: On Mac systems, after deleting files from a USB thumb drive or SD card, you must
also empty the trash to make that space available on the media.
HELO Streaming Quick Start
HELO is shipped from the factory configured with the following basic streaming
settings:
• Input - (HDMI, Video Source on HELO web browser Cong screen)
• Audio Input Source - (HDMI, Audio Source on Cong screen)
• RTMP Stream Type - (RTMP on Streaming Proles Screen)
• Streaming default format is Selected Input Video Geometry Full Frame Rate
20Mb RTMP
Streaming requires a valid video/audio source, a network connection, and HELO
configured with specific settings to match the Content Delivery Network (CDN)
you will be using. Typically these CDN credentials for RTMP streaming include the
following:
• RTMP Server URL
• RTMP Stream Name
• RTMP Username
• RTMP Password

HELO H.264 Streaming and Recording Encoder v4.2 17 www.aja.com
The Server URL and Stream Name combine to create the information needed for
the RTMP server to understand the incoming stream.
You obtain this information directly from the CDN and, using a web browser,
enter the data into HELO’s Streaming Profiles configuration screen. This
information is intended only for your streaming session(s).
Caution! Do not share your streaming credentials with anyone. That information
allows anyone to access and stream to your channel without your knowledge
or permission. CDNs will not ask for a stream key by email, so ignore any such
requests. HELO stored presets contain streaming credentials. If you share an
exported preset to someone, that person can extract the credentials. Before
loaning the device to someone, or returning it as a rental, the factory reset
button should be used to clear the device of sensitive information.
Your CDN or Video Server may also have other recommended settings for your
streaming session. For best results you should follow those recommendations
closely.
Refer to "Chapter 5 HELO Web Interface" on page 25 for detailed information
about HELO streaming configuration.
After you have entered the CDN credentials into HELO and configured any
other streaming settings, you can simply connect a valid video/audio source to
HELO (either HDMI or SDI) and press the Stream button on HELO’s front panel.
Depending on the CDN/Video Server being used there may be a delay before the
streamed signal is viewable on the output.
HELO Firmware Update
Visit the AJA website (https://www.aja.com) to locate and download the latest
firmware. The following page provides support information and includes links to
locations where you can download updates:
https://www.aja.com/products/helo#support

HELO H.264 Streaming and Recording Encoder v4.2 18 www.aja.com
Chapter 4 – eMini-Setup
Overview
This chapter describes using the eMini-Setup application to initially communicate
with and configure the HELO over a direct USB connection. Once configured,
the HELO can be accessed via an Ethernet network using a web browser.
Subsequently, that device can then be reconfigured over that network, using its
IP address and built in web server.
NOTE: The eMini-Setup application is only used to setup selected Ethernet capable AJA
devices, and cannot be used to connect to or setup other AJA Mini-Converters.
The general procedure is:
1. Acquire eMini-Setup from the AJA website and install the eMini-Setup
application onto a computer.
2. Connect the HELO to that computer’s USB port.
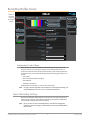
3. Launch the eMini-Setup application.
4. Go to the Control Network tab and Media Network tab, where the IP
address settings are displayed. You can use the existing DHCP assigned IP
address, or it can be changed manually.
5. You can also use eMini-Setup to load rmware to the device, although this
can also be done quickly and easily using the web browser interface.
Acquiring eMini-Setup
AJA’s eMini-Setup application is available for download from the AJA website.
To download the latest eMini-Setup package, which includes the eMini-Setup
application and documentation:
1. Go to:
https://www.aja.com/family/software#eminisetup
2. Click the link corresponding to the version you want to download for Mac or
Windows.
AJA Documentation
Included with the eMini-Setup download is the AJA device's documentation,
which can be accessed from the eMini-Setup UI via the Help/Manual drop-down
menu. This manual includes eMini-Setup information.
Documentation can also be accessed directly from the Mac eMini-Setup installer
in the Documentation folder.
Documentation included with the eMini-Setup application is the version available
at the time of distribution. However, AJA’s documentation can be updated
regularly, so newer versions may exist.
To download just the latest documentation, go to:
https://www.aja.com/support
Click the product name and open the Manuals link.

HELO H.264 Streaming and Recording Encoder v4.2 19 www.aja.com
Installing eMini-Setup
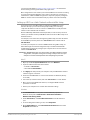
PC Installation
To install eMini-Setup on a Windows PC:
1. Download the application from the AJA website. See "Acquiring eMini-Setup"
on page 18.
2. Open the AJA_eMini-Setup_win.zip le.
3. Double-click on the AJA_eMini-Setup.msi le.
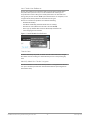
4. The Setup Wizard will guide you through the installation.
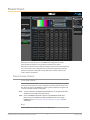
Figure 4. eMini-Setup PC Wizard
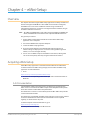
5. Click Next to begin. Answer the questions in the subsequent dialogues,
including device software installation if displayed. When nished, an AJA
eMini-Setup shortcut will be installed on the desktop, and you will be able
to locate the eMini-Setup application in the AJA folder in the Programs
listing.
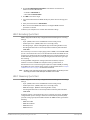
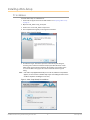
NOTE: If the eMini-Setup application already exists on the PC, a different Setup Wizard
appears. (In some instances, Windows may require uninstalling an earlier version
of eMini-Setup before installing a new version.)
Figure 5. eMini-Setup Wizard, Re-installation

HELO H.264 Streaming and Recording Encoder v4.2 20 www.aja.com
With this screen you can Repair (reinstall) or Remove (uninstall) eMini-Setup on
the PC.
Mac Installation
To install the application on a Mac:
NOTE: Mac computers must be Intel-based (G5, G4 and earlier models will not work with
eMini-Setup).
1. Download the application from the AJA website. See "Acquiring eMini-Setup"
on page 18.
2. Unzip the le.
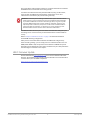
3. Double-click on the AJA eMini-Setup.dmg le.
4. Answer the prompt and a utility program will be launched.
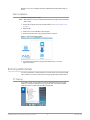
Figure 6. eMini-Setup Mac Installer
5. To complete the installation drag the “AJA eMini-Setup” icon to the
Applications folder.
Running eMini-Setup
Connect your Ethernet capable AJA device to the PC or Mac via the supplied USB
cable, and then connect the external power supply (supplied) to that AJA device.
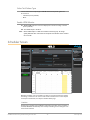
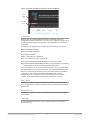
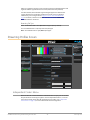
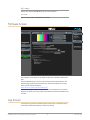
PC Startup
To run eMini-Setup on a PC, double-click on the AJA eMini-Setup icon on your
desktop, or open the AJA folder in the program list and click on the AJA eMini-
Setup application located inside the eMini-Setup folder.
La pagina si sta caricando...
La pagina si sta caricando...
La pagina si sta caricando...
La pagina si sta caricando...
La pagina si sta caricando...
La pagina si sta caricando...
La pagina si sta caricando...
La pagina si sta caricando...
La pagina si sta caricando...
La pagina si sta caricando...
La pagina si sta caricando...
La pagina si sta caricando...
La pagina si sta caricando...
La pagina si sta caricando...
La pagina si sta caricando...
La pagina si sta caricando...
La pagina si sta caricando...
La pagina si sta caricando...
La pagina si sta caricando...
La pagina si sta caricando...
La pagina si sta caricando...
La pagina si sta caricando...
La pagina si sta caricando...
La pagina si sta caricando...
La pagina si sta caricando...
La pagina si sta caricando...
La pagina si sta caricando...
La pagina si sta caricando...
La pagina si sta caricando...
La pagina si sta caricando...
La pagina si sta caricando...
La pagina si sta caricando...
La pagina si sta caricando...
La pagina si sta caricando...
La pagina si sta caricando...
La pagina si sta caricando...
La pagina si sta caricando...
La pagina si sta caricando...
La pagina si sta caricando...
La pagina si sta caricando...
La pagina si sta caricando...
La pagina si sta caricando...
La pagina si sta caricando...
La pagina si sta caricando...
La pagina si sta caricando...
La pagina si sta caricando...
La pagina si sta caricando...
La pagina si sta caricando...
La pagina si sta caricando...
La pagina si sta caricando...
La pagina si sta caricando...
La pagina si sta caricando...
La pagina si sta caricando...
La pagina si sta caricando...
La pagina si sta caricando...
La pagina si sta caricando...
La pagina si sta caricando...
La pagina si sta caricando...
La pagina si sta caricando...
La pagina si sta caricando...
La pagina si sta caricando...
La pagina si sta caricando...
La pagina si sta caricando...
La pagina si sta caricando...
-
 1
1
-
 2
2
-
 3
3
-
 4
4
-
 5
5
-
 6
6
-
 7
7
-
 8
8
-
 9
9
-
 10
10
-
 11
11
-
 12
12
-
 13
13
-
 14
14
-
 15
15
-
 16
16
-
 17
17
-
 18
18
-
 19
19
-
 20
20
-
 21
21
-
 22
22
-
 23
23
-
 24
24
-
 25
25
-
 26
26
-
 27
27
-
 28
28
-
 29
29
-
 30
30
-
 31
31
-
 32
32
-
 33
33
-
 34
34
-
 35
35
-
 36
36
-
 37
37
-
 38
38
-
 39
39
-
 40
40
-
 41
41
-
 42
42
-
 43
43
-
 44
44
-
 45
45
-
 46
46
-
 47
47
-
 48
48
-
 49
49
-
 50
50
-
 51
51
-
 52
52
-
 53
53
-
 54
54
-
 55
55
-
 56
56
-
 57
57
-
 58
58
-
 59
59
-
 60
60
-
 61
61
-
 62
62
-
 63
63
-
 64
64
-
 65
65
-
 66
66
-
 67
67
-
 68
68
-
 69
69
-
 70
70
-
 71
71
-
 72
72
-
 73
73
-
 74
74
-
 75
75
-
 76
76
-
 77
77
-
 78
78
-
 79
79
-
 80
80
-
 81
81
-
 82
82
-
 83
83
-
 84
84


in altre lingue
- English: AJA HELO User manual
Documenti correlati
Altri documenti
-
Buffalo HD-PZN1.0U3B Guida utente
-
Helo Camera-B-Kit Guida utente
-
-
 PRANITE IU013A Manuale utente
-
 PRANITE IU013A Guida utente
-
D-Link DSB-T100 Manuale utente
-
 visel QS-SWLITE Manuale del proprietario
-
 Snell Advanced Media IQEDGE-40-18B Manuale utente
-
Master SM40 10inch E21 Manuale del proprietario
-
Ubiquiti airCam MINI Manuale utente


