
Inox45
Salon05-14-ISTRUZIONI-Trx_Layout 23/05/14 09:42 Pagina 1
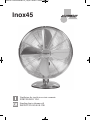
Ventilatore da tavolo in acciaio cromato
ISTRUZIONI D’USO
Standing fan in chrome stil
INSTRUCTIONS FOR USE

2
A
R
Y
U
S
H2
D
H1
N
O
P
Q
T
L
Z
E
C
F
G
M
B
E
I
N
X1
X2
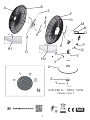
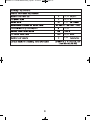
220-240 V~ 50Hz 50 W
Climate class T

Base34-11-17-ISTRUZIONI-TRX_Layout 1 01/12/17 18:02 Pagina 3

Base34-11-17-ISTRUZIONI-TRX_Layout 1 01/12/17 18:02 Pagina 4

Base34-11-17-ISTRUZIONI-TRX_Layout 1 01/12/17 18:02 Pagina 5

Base34-11-17-ISTRUZIONI-TRX_Layout 1 01/12/17 18:02 Pagina 6
73,24
48,29
1,52
64,63
3,20
15,45

7
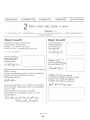
A Griglia anteriore
B Ganci chiusura
C Ventola
D Vite bloccaggio ventola
E 4 viti per bloccaggio griglia posteriore
F Griglia posteriore
G Maniglia
H1-H2 fori
I Albero motore
orebla us alotnev oiggassif rep accaT L
motore
M Corpo motore
N Selettore intensità ventilazione
O Perno oscillazione
P Manopola per regolazione inclinazione
Q Vite con sede quadrata
R Vite di fermo
S Manopola per vite con sede quadrata
T Piantana
U Base
Z Rondella
Y Vite blocca base
X1 Vite per fissaggio griglie
X2 Dado per fissaggio griglie
MONTAGGIO PIANTANA-BASE
-Posizionare centrandola la piantana T
nel basamento U.
-Allinere al centro l’insieme piantana-
Y odnativva etnemadlas eraccolb e esab
(vite blocca base-piantana) dopo avere
posizionato correttamente la rondella Z.
MONTAGGIO VENTILATORE
-Operazioni da eseguire con spina disin-
serita dalla rete elettrica.
-Posizionare il blocco base-piantana as-
semblato tenendo sulla sinistra la tacca
posta sopra il foro passante.
-Prendere il corpo motore M con l’albero
motore I rivolto verso l’utilizzatore e po-
sizionarlo sopra la piantana.
-Fare coincidere i fori e inserire la vite
con sede quadrata Q rispettando il cor-
retto posizionamento (inserire da
destra verso sinistra).
-Avvitare la manopola P nella sua sede
e regolare l’inclinazione del corpo mo-
tore.
-Applicare la griglia posteriore G al cor-
po motore e bloccarla con le 4 viti E.
Attenzione: la maniglia F della griglia G
deve essere rivolta verso l’alto e il foro
H2 verso il basso.
-Innestare sull’albero motore I la ventola
C e bloccarla con la vite D nella sua cor-
retta sede L.
-Posizionare la griglia anteriore A sulla
griglia posteriore F allineando in
basso i
2 fori H1 e H2.
-Inserire la vite X1 attraverso i 2 fori H1-
H2 e bloccare con il dado X2.
-Chiudere i ganci B posti sulla circonfe-
renza della griglia anteriore A.
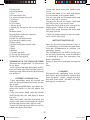
ISTRUZIONI PER L’USO
-Per avviare la ventilazione ruotare il se-
lettore N su 1 - 2 - 3 a secondo dell’in-
tensità desiderata.
-Se si desidera di fare oscillare il ventila-
tore premere il perno Q verso il basso.
L’inclinazione del gruppo motore può
essere variata allentando la manopola P
e ribloccandola ad operazione effettua-
ta.
Per interrompere il flusso dell’aria ruota-
re il selettore su 0.
PULIZIA
Con spina disinserita dalla presa di cor-
rente periodicamente, spolverare con un
panno morbido le griglie dell’apparec-
chio, il corpo motore e le pale.
NON utilizzare detersivi spray ne solven-
ti.
manuale inox 34.indd 8 18/12/17 14:21
-Avvitare la vite di fermo R nella sua sede
situata appena sopra la manopola S.
-Avvitare la manopola S sulla vite con
sede quadrata Q.

Base34-11-17-ISTRUZIONI-TRX_Layout 1 01/12/17 18:02 Pagina 8

Base34-11-17-ISTRUZIONI-TRX_Layout 1 01/12/17 18:02 Pagina 9

Base34-11-17-ISTRUZIONI-TRX_Layout 1 01/12/17 18:02 Pagina 10

Base34-11-17-ISTRUZIONI-TRX_Layout 1 01/12/17 18:02 Pagina 11
73,24
48,29
1,52
64,63
3,20
15,45

12
A Front grid
B Closing hooks
C Fan
D Screw blocks fan
E 4 screw to lock rear grid
F Grid rear
G Handle
H1-H2 Holes
I Motor shaft
L Notch for fixing the fan on the motor
shaft
M Motor body
N Ventilation intensity selector
O Oscillation pin
P Knob for tilt adjustment
Q Screw with square seat
R Stop screw
S Screw knob with square seat
T Rod
U Base
Z Washer
Y Screw base lock
X1 Screw for fixing grid
X2 Nut for fixing grid
ASSEMBLING OF THE CIRCULAR STAND
-Position the upright pole T in the centre
of the base.
-Centre the on upright pole/base and se-
cure well with the base/upright pole fa-
stening screw after correctly positioning
the washer Z.
ASSEMBLY COOLING FAN
-These operations must be carried out
with the plug disconnected from the po-
wer outlet.
-Place the assembledbase unit block ke-
eping the notch on the left above the
hole.
-Take the motor body with the motor
shaft facing the user and place it above
the rod.
-Make the holes coincide and insert the
square seat screw respecting the correct
positioning (insert from right to left)
-Screw
the
knob
onto
the
square
seat
screw.
-Screw the locking screw into its seat lo-
cated just above the knob.
-Screw the knob in its seat and adjust
the inclination of the motor body.
-Put the rear grid on the motor body and
lock it with the 4 screws.
-Engage the fan on the motor shaft and
lock the screw in its correct seat.
-Place the front grid on the rear grid by
aligning the 2 holes at the bottom.
-Insert the screw through the holes and
lock with the nut.
-Close the hooks placed on the circumfe-
rence of the front grid.
INSTRUCTIONS FOR USE
Start the fan by turning selector V on l- 2
- 3 depending on the intensity you want.
Press pin Q downwards to activate the
swinging action.
The
inclination of the motor section can
neht dna N bonk gninesool yb deirav eb
re blocking it once the operation has
been completed.
Rotate V onto the O position to stop the
air
flow
CLEANING
Disconnect the appliance from the po-
tsud evomer yllacidoirep dna teltuo rew
from the grills, motor section and bla-
des with a soft cloth. DO NOT use spray
detergents or solvents!
manuale inox 34.indd 8 18/12/17 15:31

Base34-11-17-ISTRUZIONI-TRX_Layout 1 01/12/17 18:02 Pagina 14
13

Base34-11-17-ISTRUZIONI-TRX_Layout 1 01/12/17 18:02 Pagina 15
14

15
Base34-11-17-ISTRUZIONI-TRX_Layout 1 01/12/17 18:02 Pagina 13

16
IN45-4319-I
Mod. Ola
Mod. Silver
Mod. Inox45 Mod. Inox45
-
 1
1
-
 2
2
-
 3
3
-
 4
4
-
 5
5
-
 6
6
-
 7
7
-
 8
8
-
 9
9
-
 10
10
-
 11
11
-
 12
12
-
 13
13
-
 14
14
-
 15
15
-
 16
16


in altre lingue
- English: Johnson INOX 45 User manual
Documenti correlati
-
Johnson FRULLONE Manuale utente
-
-
-
-
-
-
-
-
-