
Installation and Operation Manual
REFRIGERATOR / FREEZER
S50 L/R, S70 L/R, S140 (START)
TN, TNN, TNV / BT, BTV
4247000, 4247001, 4247002, 4247003, 4247004, 4247005, 4247006, 4247008, 4247010 4247012,
4247013, 4247014, 4247015, 4247020, 4247022, 4247030. 4247032, 4247034, 4247036, 4247038,
4247040, 4247042, 4247044, 4247046, 4247048

2
RATING PLATE MATRIKELANGABEN TARGHETTA TECNICA
1. Manufacturer 1. Hersteller 1 Construttore
2. Serial number 2. Seriennummer 2 Matricola
3. Code 3. Kodenummer 3 Codice
4. Model 4. Modell 4 Modello
5. Voltage 5. Spannung 5 Tensione
6. Running absorbed current 6. Stromaufnahme in Betrieb 6 Corrente assorbita in funzionamento
7. Max refrigerant power 7. Kälteleistung 7 Potenza refrigerante
8. Running absorbed power 8. Leistungaufnahme in Betrieb 8 Potenza assorbita in funzionamento
9. Defrost heating element power 9. Abtauuheizungleistung 9 Potenza della resistenza di sbrinamento
10. Other elements nominal power 10. Nennleistung anderer Heizungen 10 Potenza nominale di altre resistenze
11. Lamp power 11. Lichtleistung 11 Potenza lampada
12. Max and min. pressure 12. Mindest- und Höchstleistung 12 Pressione minima e massima
13. Refrigerant, type and q.ty 13 Kältemittel, Art und Menge 13 Refrigerante, tipo e quantità
14. Net capacity 14 Nettokapazität 14 Capacità netta
15. Insulation expanding gas 15 Expansionsmittel 15 Gas espandente nell’isolamento
16. Manufacture year 16 Baujahr 16 Anno di fabbricazione
17. Climatic class
ENGLISH
17 Klimaklasse
DEUTSCH
17 Classe climatica
ITALIANO
PLAQUE SIGNALÉTIQUE DATOS DE MATRÍCULA TECHNISCH LABEL
1 Constructeur 1. Constructor 1 Constructeur
2 Matricule 2. Matricula 2 Registratie
3 Code 3. Codigo 3 Code
4 Modèle 4. Modelo 4 Model
5 Tension 5. Tension 5 Spanning
6 Courant absorbé en marche 6. Corriente absorbida en funcionamiento 6 Opgenomen stroom in werking
7 Puissance frigorifique 7. Potencia frigorifiqua 7 Vermogen koelmiddel
8 Puissance absorbée en marche 8. Potencia absorbida en funcionamiento 8 Opgenomen vermogen in werking
9 Puissance de la résistance de dégivrage 9. Potencia de la resistencia de
descongelacion
9 Vermogen van de weerstand voor
ontdooien
10 Puissance nominale des autres résistances 10. Potencia nominal de otras resistencias 10 Nominaal vermogen van andere
weerstanden
11 Puissance lampe 11. Potencia lampara 11 Vermogen lamp
12 Pression min. et max. 12. Pression minima y maxima 12 Minimale en maximale druk
13 Réfrigerant, type et quantité 13. Refrigerante, tipo, cantidad 13 Koelmiddel, type en hoeveelheid
14 Capacité nette 14. Capacidad neta 14 Netto capaciteit
15 Gaz détendant dans l'isolation 15. Gas extendiente en el aislamiento 15 Uitzettend gas in de isolering
16 Année de fabrication 16. Ano de fabricacion 16 Bouwjaar
17 Classe climatique
FRANC
Ą
IS
17. Clase climatica
ESPAÑOL
17 Klimaatklasse
NEDERLANDS
ТЕХНИЧЕСКАЯ ТАБЛИЧКА
1 Изготовитель
2 Серийный номер
3 Код
4 Модель
5 Напряжение
6 Ток, поглощаемый при функционировании
7 Мощность охлаждения
8 Мощность, поглощаемая при
функционировании
9 Мощность сопротивления размораживания
10 Номинальная мощность других
сопротивлений
11 Мощность лампы
12 Минимальное и максимальное давление
13 Охлаждения, тип и количество
14 Емкость
15 Газ, расширяемый при изоляции
16 Год выпуска
17 Климатический класс
РУССКИЙ

ENGLISH 3
3
GENERAL RECOMMENDATIONS
GENERAL RECOMMENDATIONSGENERAL RECOMMENDATIONS
GENERAL RECOMMENDATIONS
RECEPTION A
RECEPTION ARECEPTION A
RECEPTION AND DISPOSING OF UNIT
ND DISPOSING OF UNITND DISPOSING OF UNIT
ND DISPOSING OF UNIT
INTENDED USE
This applianceare designed for indoor use and should only be used to
store food and beverages. The manufacturer shall not be held liable for
the consequences resulting from unintended uses of this appliance.
Do not store food in direct contact with the structure.
Both the appliance’s construction features and the condensing unit’s
capacity have been designed to store only pre-cooled products. Never
place carbonated beverages into the low-temperature compartment as
they may explode. Never place liquids or hot food into the appliance and
do not fill lidded containers to the top.
In all appliances there are surfaces subject to frosting. Depending on the
model, frost may be melted away either automatically (automatic defrost)
or manually. Never attempt to remove frost using a pointed object
because in this way you could irreparably damage the appliance.
Do not use any mechanical device or other artificial means to accelerate
the defrost process.
The Manufacturer declines all responsibility, and the warranty shall be
null and void, if electrical and/or mechanical alterations are made to the
product.
The warranty shall also be null and void if the product is tampered with
or, in general, in case of alterations not expressly authorised and not
made in compliance with the instructions given herein.
CONTROLS
AT RECEPTION
The refrigerators are shipped in appropriate protective packing. On arrival,
check that the appliance has not incurred transport damage and that it is
complete according to the order. In the event of visible damage
immediately note the damage on the transport documents with the
following wording:
“RECEIVED WITH RESERVE FOR EVIDENT DAMAGE OF PACKING”
since the delivery terms are ex factory this involves reimbursement of
damages by the insurance company.
IMPORTANT
ALL THE OPERATIONS INDICATED BELOW MUST BE PERFORMED IN
RESPECT OF EXISTING SAFETY REGULATIONS, BOTH FOR THE
EQUIPMENT IN USE AND FOR THE OPERATING PROCEDURES
WARNING
BEFORE BEGINNING HANDLING OPERATIONS ENSURE THAT
THE LIFTING CAPACITY IS SUFFICIENT FOR THE APPLIANCE
IN QUESTION
HANDLING
HANDLING with FORK LIFT or SIMILAR
Insert the forks into the side of back of the wooden pallet supplied with the
appliance.
Begin lifting checking that the appliance is in stable equilibrium.
WARNING
DURING HANDLING OPERATIONS DO NOT TIP OR
TURNOVER
IF IT’S NECESSARY TO TRANSPORT APPLIANCE
HORIZONTALY; YOU HAVE TO WAIT AT LEAST 2 HOURS
BEFORE OPERATING.
WARNING
THE RESPECT OF THE RECOMMENDATIONS PRINTED ON
THE OUTSIDE OF THE PACKING IS A GUARANTEE OF A
SOUND PHYSICAL AND OPERATING CONDITION OF THE
APPLIANCE ALL TO THE ADVANTAGE OF THE END-USER.
THEREFORE THE FOLLOWING IS RECOMMENDED:
• HANDLE WITH CARE
• KEEP DRY
• STACKING OF OTHER OBJECTS ON THE APPLIANCE MUST BE
ABSOLUTELY AVOIDED.
UNPACKING
Cardboard packing
Cut the band straps with scissors
Lift the carton (the corner padding will also slide off).
Wooden packing
Unnail the wodden panels starting with the front and top.
Slide off the nylon wrapping over the top of the unit.
Nylon packing
After having removing the adhesive tape, slide off the nylon wrapping
over the top of the unit.
Lift the appliance to separate it from the pallet.
Place the appliance on the ground in its chosen position.
Check for visible damage.
Keep the packing out of the reach of children as it could be a danger
hazard.
Dispose of the packing to the specialised collection or recycling points
(respect existing regulations).
Check that the serial number corresponds to the transport documents.
DISPOSAL OF UNIT
Our appliances contain the refrigerant shown on the corresponding
rating plate as per Regulation (EC) No. 2037/2000 of 29 June 2000; in
addition, the appliance is composed of reusable or recyclable parts and
materials. Therefore, at the end of its lifetime, the appliance should be
delivered to a specific disposal centre. The best method to ensure that
no one will remain trapped inside is to take off the door completely.
The appliance must not be disposed of together with household waste
and metal scrap.
Absolutely avoid damaging the refrigeration circuit, particularly near the
heat exchanger.
IMPORTANT
COMPLY WITH LOCAL REGULATIONS IN FORCE
CONCERNING THE FINAL DISPOSAL OF THIS TYPE OF
EQUIPMENT.

4 ENGLISH
4
START
STARTSTART
START-
--
-UP
UPUP
UP
IMPORTANT
BEFORE CONNECTING THE APPLIANCE CHECK THAT THE DATA ON THE SERIAL PLATE CORRESPOND TO
THE ACTUAL ELECTRICAL SUPPLY.
THE SERIAL PLATE GIVING THE ELECTRICAL DATA REQUIRED IN THE INSTALLATION IS FOUND ON THE TOP RIGHT-
HAND SIDE OF THE FRONT CONTROL PANEL OR ON THE RIGHT SIDE OF THE COMPARTMENT.
THE INSTALLATION MUST BE MADE ACCORDING TO THE INSTRUCTIONS GIVEN IN THIS SECTION, BY
PROFESSIONALLY QUALIFIED PERSONNEL.
THE ELECTRICAL SAFETY OF THIS APPLIANCE IS ONLY GUARANTEED WHEN IT IS CONNECTED TO AN EFFICIENT
EARTHING PLANT AS PRESCRIBED BY EXISTING ELECTRICAL SAFETY REGULATIONS.
THE CONSTRUCTOR DECLINES ALL RESPONSIBILITY FOR DAMAGES CAUSED BY THE DISRESPECT OF AN EFFICIENT
EARTHING OF THE PLANT.
THE APPLIANCE MUST ALSO BE FITTED WITH AN EQUIPOTENTIAL SYSTEM WHOSE EFFICIENCY MUST BE VERIFIED
ACCORDING TO EXISTING REGULATIONS.
THE USE OF ADAPTERS, MULTI-PLUGS, AND/OR EXTENSION LEADS IS STRICTLY PROHIBITED
PRELIMINARY GENERAL CHECKS
Check that the floor is able to support the weight of the appliance and
that it is level.
Control the appliance is perfectly level. Regulate the adjustable feet if
necessary. Use a level, if needed. The maximum permissible deviation
from the horizontal plane is +/-0.5 degrees.
All four feet should rest on the floor. This will ensure proper door
operation.
To ensure proper airflow and avoid any damage to the refrigeration
circuit, allow a minimum side clearance of 50 mm (2 inches) and 500
mm (20 inches) on the upper side.
Do not place the appliance close to heat sources (such as ovens,
radiators, etc.) or exposed to direct sunlight and provide suitable
insulation from walls or floor if they transmit heat.
If the appliance has been moved, wait for a while before switching it on
again. In particular, if it was not handled vertically, you need to wait at
least 2 hours.
Remove the plastic protection from the external surfaces.
• Wash the inside part with tepid water and mild soap.
• Place the appliance as far as possible from heat sources.
• Do not prevent air from circulating inside the engine compartment.
• Keep away from children the closing keys (if available).
PRELIMINARY ELECTRICAL CHECKS
The network voltage and frequency values should be the same of those
reported on the appliance part number plate (point 6 of the "Rating
Plate" paragraph).
• Connectors should be secured to the electrical switchboard correctly
(during handling and transport, vibrations could have caused loosening).
• Fit a 16A fuse upstream from the socket.
• Switch the main switch that will be connected to the power lead plug to
the OFF position.
• Check that the socket is suitable for the appliance plug. If necessary,
the socket should be replaced with an appropriate one by qualified
personnel. This personnel should also make sure that the socket cable
section is appropriate to the power absorbed by the appliance. Check
that the plug is plugged into the socket
START-UP AND CHECKS
After the above controls have been thoroughly completed the appliance
may be started-up:
Turn the main switch, connected to the power cable plug, to the ON
position.
Turn the switch of the appliance to the ON position.. .
After about 1 minute, the compressor will start cycling until internal
temperature reaches the factory-set value.
Do not load the appliance until the set temperature value has been
reached
Visualise the SET POINT ; if necessary set the desired value, based on
the type of product being stored.
To modify the factory setting of this value consult the CONTROL PANEL
section.
IMPORTANT
BEFORE INTRODUCING ANY FOODS, WAIT UNTIL THE UNIT
REACHES ITS OPERATING TEMPERATURE.
NEVER EXCEED THE MAX. LOADING LIMIT SHOWED ON THE
STICKER PLACED INSIDE THE COMPARTMENT
RESPECT MINIMUM SIDE AND TOP CLEARANCE (SEE
PRELIMINARY GENERAL CHECKS)
OPERATION
Proper storage of foodstuffs is a relevant factor in the safe and sanitary
production of food; in addition, it improves the efficiency of foodservice
activities and positively affects energy consumption. Follow the
directions below to obtain the highest performance possible out of your
appliance.
Products should always be stored on the shelves; do not place any
products on the cabinet’s bottom.
IMPORTANT
PRODUCTS SHOULD BE PLACED INTO THE APPLIANCE IN
SUCH A WAY AS TO ALLOW UNOBSTRUCTED AIRFLOW.
ALWAYS LEAVE SOME FREE SPACE BETWEEN THE
PRODUCTS AND PREVENT THEM FROM COMING IN
CONTACT WITH THE WALLS. IF NEEDED, ADJUST THE
DISTANCE BETWEEN SHELVES.

ENGLISH 5
5
CONTROL PANEL
CONTROL PANELCONTROL PANEL
CONTROL PANEL
KEYBOARD AND CONNECTED FUNCTIONS
To lock the keyboard keep pressed the key AUX ()and the key
ON/STAND-BY() for 2 sec: the display will show "Loc" when locked and
"UnL" when not.
ON/STAND BY; keeping pressed the key for 4 s the appliance will turn
off/on
MANUAL DEFROST; keeping pressed the key for 4 s: a manual defrost
starts when the function Overcooling is not activated and the evaporator
temperature allows it.
Power on/off of the compartment light manually (only for models with
glass door) or power on/off of the auxiliary exit manually (if present).
Key DOWN: to scroll the menu labels or decrease the values; keeping
pressed for 4 s the function Overcooling will be activated.
During the function Overcooling the working setpoint is decreased; duration
and temperature offset are established by parameters.
During the function Overcooling, the defrost will never start; if the time
interval for a defrost ends during the function, it will be delayed.
Key UP: to scroll the labels of the menu or increase the values; keeping
pressed for 4 s. starts the function for low and high percentage of relative
humidity (only for some models).
The display will show "rhL" (functioning for low percentage of relative
humidity) or "rhH" (functioning for high percentage of relative humidity) for
10 s.
If the umidity control is not available,the label " ---- " will be shown for 1 s.
SET POINT, permits to access and modify set point.
OPERATION
Find following operation status:
status "on" (the device is powered and turned on)
status "stand-by" (the appliances is turned off but the device is still
powered)
status "off": to put into “off” status it is necessary to turn off the main
switch or disconnect it from power supply.
IMPORTANT
DO NOT PERFORM ANY MAINTAINANCE WHEN THE
APPLIANCE IS IN ON OR STAND BY
DISCONNECT FROM ELECTRICAL POWER SUPPLY NET.
If the panel is switched on during normal functioning the display will show the
temperature of the compartment.
It is possible to show the value of the evaporator probe (if present) keeping
pressed the key DOWN () for 2 s; keeping pressed the key DOWN () for
2 s the display will show “Pb2”. Pressing the key SET () the temperature of
the evaporator will appear.
After a short time of break or pressing shortly the key SET you return to the
display of the compartment temperature.
SILENCE OF BUZZER (IF PRESENT)
Press shortly any key.
SETTING OF SET POINT
• press and release the key SET(): the compressor LED will blink
• press and release the key UP () or the key DOWN () within 15 s.
• press and relaese the key SET() or do not operate for 15 s; the
compressor LED will switch off, after which the device will end the procedure.
BASIC HACCP FUNCTION
The device is able to store up to 3 alarms HACCP.
The device provides the following informations:
• the critical value
• the duration of the alarm (from 1 min to 99 h and 59 min, partial if the
alarm is in course).
COD. TYPE OF ALARM CRITICAL VALUE
AL alarm minimum
temperature
the minimum temperature of the
compartment during this type of alarm
AH alarm maximum
temperature
the maximum temperature of the
compartment during this type of alarm
Id alarm entrance door
micro
the maximum temperature of the
compartment during this type of alarm
The device updates the informations if the new alarm is worse than the one
stored or provided that the informations have already been shown.
If the device is switched off, no alarm will be stored.
When the cause of the alarm finish, the display restores the standard
operation.
HACCP LED provides informations concerning the memory status of the
HACCP alarms;
DISPLAY OF INFORMATIONS CONCERNING
HACCP ALARMS
• press the key DOWN () for 2 s: the display shows the first label.
• press and release the key UP () or the key DOWN () to select "LS"
• press and release the key SET (): the display shows one of the codes
given in the table above
To select an alarm:
• press and release the key UP () or the key DOWN () (f.e. to select
"AH").
To show the informations concerning the alarm:
• press and release the key SET (): the LED HACCP stops to blink and
the display will show the following informations (for example):
DISPLAY MEANING
8,0 The critical value is 8,0 °C/8 °F
Dur The display is about to show the duration of the alarm
h01 The alarm lasted 1 h (continues ...)
n15 The alarm lasted 1 h and 15 min
AH Selected alarm
To exit the succession of informations:
• press and release the key ON/STAND-BY(): the display will show the
selected alarm (in the example “AH3").
To exit the procedure:
• exit from the succession of informations
• press and release the key UP () or the key DOWN () until the
display shows the compartment temperature or do not operate for 60 s.
In alternative exit from the succession of informations
• press and release the key ON/STAND-BY().
If no alarm is stored, the label “LS" will not be showed.

6 ENGLISH
6
CLEANING, MAINTENANCE AND
CLEANING, MAINTENANCE ANDCLEANING, MAINTENANCE AND
CLEANING, MAINTENANCE AND
TROUBLESHOOTING
TROUBLESHOOTINGTROUBLESHOOTING
TROUBLESHOOTING
This section has been dedicated to the end-user and is extremely important
for the appliance to work correctly in the long-term.
A few simple operations conscientiously carried out at set periods can avoid
the need of servicing by specialised personnel.
The operations to be made do not require any particular technical knowledge
IMPORTANT
BEFORE BEGINNING ANY TYPE OF MAINTENANCE OR
CLEANING WORK ON THE APPLIANCE DISCONNECT THE
MAINS POWER SUPPLY.
WARNING
DO NOT WASH THE APPLIANCE DIRECTLY WITH HIGH PRESSURE
WATER JETS.
AVOID SPRAYING WATER DIRECTLY ONTO ELECTRICAL PARTS.
CLEANING
How often you will need to clean the appliance depends largely on how
often you use it.
Analyze the use and schedule the required cleaning operations.
To clean the appliance’s inside and outside, use a neutral or slightly
alkaline detergent.
We recommend that you clean the inside with a disinfectant every once
in a while. Impurities may be removed using a damp cloth. Removing the
shelves makes cleaning the inside easier.
Never use metallic tools for clearing appliance; it could be damaged.
For a deeper cleaning of the compartment, remove the shelf guide.
IMPORTANT
THE APPLIANCES ARE MADE OF AISI 304 STEEL WHICH IS
CORROSION PROOF UNDER NORMAL USE.
AVOID USING DETERGENTS OR SIMILAR CLEANERS THAT MAY BE
DETRIMENTAL TO ITS PROTECTION.
ROUTINE MAINTENANCE
CONDENSING COIL
It is important that the coil is capable of offering the maximum possible
heat exchange. It is therefore important that its surface be always free of
dirt or dust that may be deposited by the effect of the fan’s operation.
Use a vacuum cleaner and soft bristled brush to remove all the
impurities such as paper or dust that may have deposited on the coil.
When brushing the condenser, exercise great care so as to avoid
damaging the aluminium grid or the fans.
If a filter is present, remove and clean it. Afterwards, put it in the original
position. If damaged or too dirty, ask for its replacement and change it.
DOOR/DRAWER GASKETS
To ensure a perfect seal, it’s important to check the gaskets to be
undamaged and perfectly closing.
POWER CABLE
Check that the power cable that connects the appliance to the mains
socket is not cut, cracked or altered in such a way as to compromise the
insulation. Contact your authorised service centre if this requires
maintenance.
LONG SHUTDOWNS
If the appliance is inactive for long periods of time proceed as follows:
Turn the main switch to the OFF position.
Remove the plug from its socket.
Empty the appliance and clean as in point CLEANING.
Leave the door ajar to avoid bad odours from forming.
Protect the compressor group from dust.
CHANGING THE LIGHT BULB [NOT VALID FOR
MODELS WITH GLASS DOORS]
To change the light bulb perform the following steps:
• Switch off the appliance and disconnect the power cord;
• Open the appliance door; and remove the protective glass shield;
• Unscrew the light bulb located in the instrument panel and replace it with an
identical component (voltage of the light bulb is shown on the sticker);
• Refit the glass shield.
FAULT
The following items will help you find possible solutions to some troubles
the unit could be subject to. It is understood that the information given
here does not cover all possible cases. Whenever a safety device
triggers, it means that there is a malfunction; before resetting it, check
and remove the cause. You’ll find below a list of possible troubles and
their causes
After making the above checks, if the fault persist contact your after-
sales service. Remenber to specify the nature of the defect, the
appliance’s code and serial number, which you will find on its nameplate.
PROBLEM
Possible cause
What to do
1 APPLIANCE DOESN’T START
1.1 Appliance isn’t connected to the power supply
Check that the plug is fitted into the mains power supply socket
correctly.
2 COMPRESSOR RARELY STOPS
2.1 Room temperature is too high
Ensure proper ventilation to the room
2.2 Refrigerated cabinet condenser is dirty
Check it on a regular basis and clean it thoroughly.
2.3 Low refrigerant charge
Call an authorised technical support centre to find and repair any
leaks and to recharge the compressor with refrigerant.
2.4 Door gaskets do not ensure proper seal
Call an authorised technical support centre to perform the
necessary replacement
2.5 Frost build-up on the evaporator
Do not place hot or high water content foodstuffs into the
appliance and, if needed, perform a manual defrost cycle
2.6 Evaporator motor fan(s) damaged
Call an authorised technical support centre to perform the
necessary replacement
3 OVERFLOWING OF SELF-EVAPORATING CONDENSATE TRAY
3.1 Hot or high-water content foodstuffs are being introduced into the
appliance too often.
Do not introduce hot or high water content foodstuffs into the
appliance
3.2 Doors and/or drawers are opened too often.
Pay attention to the conditions of use of your appliance
4 COMPARTMENT TEMPEATURE TOO HIGH
4.1 Refrigerated cabinet condenser is dirty
Check it on a regular basis and clean it thoroughly.
4.2 Feeble aeration of the zone around the technical compartment.
Remove any obstructions for a correct airflow
4.3 Hot air entering the compartment.
Check the correct closure of the door and the gasket to be
proper. If it’s not possible to adjust functioning, call a technical
support centre to perform replacement and regulations
4.4 Frost build-up on the evaporator
Perform a manual defrost cycle

DEUTSCH 7
7
FUNKTIONSBESCHREIBUN
FUNKTIONSBESCHREIBUNFUNKTIONSBESCHREIBUN
FUNKTIONSBESCHREIBUNG,
G,G,
G,
ERHALT DER WARE UND BESEITIGUNG
ERHALT DER WARE UND BESEITIGUNGERHALT DER WARE UND BESEITIGUNG
ERHALT DER WARE UND BESEITIGUNG
ZULÄSSIGE VERWENDUNG
Das Gerät darf ausschließlich zur Konservierung von Lebensmitteln und
Getränken verwendet werden. Der Hersteller übernimmt keine Haftung
für durch zweckentfremdete Verwendung des Gerätes verursachte
Schwierigkeiten.
Die Lebensmittel nicht in direktem Kontakt mit der Struktur aufbewahren.
Der Bau des Gerätes und die Leistungsfähigkeit des
Verflüssigungssatzes wurden ausschließlich zur Konservierung von
vorgekühlten Produkten konzipiert. Niemals kohlensäurehaltige
Getränke in das Kühlfach legen: sie können explodieren. Niemals
Flüssigkeiten oder heiße Lebensmittel einführen und mit Deckeln
versehene Behälter nicht bis zum Rand füllen.
In allen Geräten gibt es Oberflächen, die sich mit Reif überziehen.
Dieser Reif, kann abhängig vom Modell, automatisch (automatische
Abtauung) oder manuell entfernt werden.
Versuchen Sie niemals den Reif mit einem spitzen Gegenstand zu
entfernen, dadurch würden unbehebbare Schäden am Gerät riskiert.
Keine mechanischen Vorrichtungen oder sonstige, künstliche Mittel
benutzen, um den Abtauvorgang zu beschleunigen.
Für elektrische bzw. mechanische Änderungen übernimmt der Hersteller
keinerlei Haftung; sie lassen auch die Garantie verfallen.
Auch allgemeine Manipulierungen, die nicht ausdrücklich genehmigt
werden und den Angaben dieses Handbuchs nicht entsprechen, lassen
die Garantie verfallen.
KONTROLLE BEI ERHALT DER WARE
Die Kühlschränke werden in eigenes dazu bestimmten
Schutzverpackungen zum Versand gebracht. Man sollte sich bei Erhalt der
Ware vergewissern, ob diese eventuelle Transportschäden erlitten hat und
ob sie mit allen Teilen gemäss Bestellung ausgestattet ist. Bei sichtbaren
Beschädigungen muss der Schaden umgehend auf der Transportunterlage
wie folgt vermerkt werden:
“RÜCKNAHME MIT VORBEHALT WEGEN AUFFÜLLIGEN
VERPACKUNGSSCHÄDEN” DA DIE RÜCKGABE AB Werk mit dem
Schadenersatz zu Lasten der Versicherung verbunbden ist.
WICHTIG
ALLE IM FOLGENDEN AUFGEFÜHRTEN ARBEITSGÄNGE MÜSSEN
DEN GELTEN SICHERHEITSNORMEN GEMÄSS DURCHGEFÜHRT
WERDEN. DIES GILT SOWOHL FÜR DIE VERWENDETE AUSRÜSTUNG
ALS AUCH FÜR DIE BEDIENUNGSWEISE
ACHTUNG
SICH VOR DER HANDHABUNG VERGEWISSERN, OB DAS
ANHEBUNGSVERMÖGEN DEM GEWICHT DER
BETREFFENDEN EINHEIT ANGEMESSEN IST.
HANDHABUNG
HANDHABUNG MIT GABELSTAPLER O.Ä
Die Gabeln in die Längsseite der mitgelieferten Holzpalette des Geräts
einführen.
Die Einheit anheben und sich dabei vergewissern, dass sich diese im
stabilen Gleichgewicht befindet.
ACHTUNG
WÄHREND DER HANDHABUNG NICHT UMDREHEN
BZW.KIPPEN
FALLS TRANSPORT IN HORIZONTALER LAGE NÖTIG
WIRD,VOR DER INBETRIEBNAHME MINDESTENS 2
STUNDEN WARTEN
WICHTIGE HINWEISE
DIE BEFOLGUNG DER AUF DER AUSSENSEITE DER
VERPACKUNG AUFGEFÜHRTEN EMPFEHLUNGEN GARANTIERT
DEM ENDBENUTZER DIE UNVERSEHRTHEIT UND DIE
FUNKTIONSTÜCHTIGKEIT DES GERÄTS DESHALB ENTFIEHLT
MAN:
• VORSICHTIGE HANDHABUNG
• TROCKEN LAGERN.
• AUF KEINEN FALL ANDERE GEGENSTÄNDE AUF DAS GERÄT
STELLEN
BESEITIGUNG DER VERPACKUNG
Kartonverpackung
Die Umreifungsbänder Verpackung mit einer Schere durchschneiden.
Den Verpackungskarton anheben (gleichzeitig die Schutzwinkelprofile
herausziehen).
Holzverpackung
Die Holzpaneele aufnageln, indem man mit dern Stim- und Oberpaneel
beginnt.
Die Nylonschutzhülle von oben abziehen.
Nylonverpackung
Den Befestigungsklebestreifen beseitigen und anschließend die
Nylonschutzhülle entfernen, indem man sie vom oberen Geräteteil
abzieht.
Das Gerät anheben und von der Palette lösen.
Das Gerät in Übereinstimmung mit dem vorbestimmten Punkt auf den
Boden legen.
Das Gerät auf sichtbare Beschädigungen prüfen.
Das Verpackungsmaterial könnte eine mögliche Gefahrenquelle darstellen
und sollte deshalb außer Reichweite von Kindern gehalten werden.
Die Verpackungsprodukte an spezialisierte Sammel- und Recyclingstellen
weiterleiten (die geltenden Normen beachten).
Die Kennummer mit den Angaben der Begleitpapiere vergleichen.
BESEITIGUNG
Unsere Geräte enthalten laut Europäischer Verordnung (EG) Nr.
2037/2000 vom 29. Juni 2000, das auf dem Typenschild beschriebene
Kühlmittel; außerdem ist das Gerät aus wiederverwendbaren oder
recycelbaren Teilen und Materialien zusammengesetzt. Deshalb ist es,
wenn das Gerät nicht mehr benutzt wird, wichtig es bei Recyclinghöfen
abzuliefern.
Das Ausbauen der Tür ist die beste Lösung, um zu garantieren, dass
niemand im Innern eingesperrt bleiben kann.
Das Gerät darf nicht mit Siedlungsabfällen und Schrott entsorgt werden.
Die Beschädigung des Kühlkreislaufs, vor allem in der Nähe des
Tauschers, muss vermieden werden.
WICHTIG
DIE VERSCHROTTUNG DIESER GERÄTEARTEN DIE LOKAL
GÜLTIGEN VORSCHRIFTEN EINHALTEN.

8 DEUTSCH
8
INBETRIEBNAHME
INBETRIEBNAHMEINBETRIEBNAHME
INBETRIEBNAHME
WICHTIG
BEVOR MAN DAS GERÄT ANSCHLIESST, SOLLTE MAN SICH VERGEWISSERN, DASS DIE DATEN DES
LEISTUNGSSCHILDES DENEN DES STROMNETZES ENTSPRECHEN.
DAS GERÄTESCHILD, AUF DEM DIE FÜR DIE INSTALLATION ERFORDERLICHEN ELEKTRISCHEN DATEN ANGEGEBEN
SIND, IST IN ÜBEREINSTIMMUNG MIT DER RECHTEN OBERSEITE DER VORDEREN SCHALTTAFEL POSITIONIERT.
DIE INSTALLATION MUSS GEMÄSS DEN ANGABEN DES VORLIEGENDEN ABSCHNITTS VOM QUALIFIZIERTEN
FACHPERSONAL DURCHGEFÜHRT WERDEN.
DIE ELEKTRISCHE SICHERHEIT DIESES GERÄTES IST NUR DANN GARANTIERT, WENN DAS GERÄT DEN GELTENDEN
ELEKTRISCHEN SICHERHEITSNORMEN GEMÄSS AN EINE LESITUNGSFÄHIGE ERDUNGSANLAGE ANGESCHLOSSEN IST.
DER ERBAUER LEHNT JEDE VERANTWORTUNG FÜR EVENTUELLE SCHÄDEN AB, DIE AUF EINE FEHLENDE ERDUNG
DER ANLAGE ZURÜCKZUFÜHREN SIND.
DAS GERÄT MUSS AUSSERDEM IN EIN ÄQUIPOTENTIALSYSTEM EINGESCHLOSSEN WERDEN, DESSEN
LEISTUNGSFÄHIGKEIT DEN GELTENDEN NORMEN GEMÄSS GEPRÜFT WERDEN MUSS.
AUF KEINEN FALL ADAPTER, MEHRFACHSTECKDOSEN UND/ODER VERLÄNGERUNGSKABEL BENUTZEN.
VORBEREITENDE ALLGEMEINE KONTROLLEN
Sich überzeugen, dass sich die Auflagefläche für das Gerätegewicht
eignet und eben ist.
Das Gerät nivellieren. Gegebenenfalls den beweglichen Teil der
einstellbaren Füße einstellen, um eine perfekte Ausrichtung zu erzielen.
Eventuell eine entsprechende Libelle verwenden. Die empfohlene
Höchstabweichung von der horizontalen Ebene beträgt +/- 0,5 Grad. Alle
Füße müssen auf dem Boden aufliegen. Auf diese Weise wird der
korrekte Betrieb der Türen gesichert.
Sich für eine ausreichende Luftzirkulation und um jeden Schaden am
Kühlkreislauf zu vermeiden davon überzeugen, dass das Gerät mit
einem seitlichen Freiraum von mindestens 50 mm und von mindestens
500 mm nach oben aufgestellt wird; das Gerät nicht in der Nähe von
Wärmequellen (wie Öfen, Heizkörpern, etc ...) oder an einem Ort, der
direktem Sonnenlicht ausgesetzt ist, aufstellen und das Gerät, wo dies
angebracht ist, von jeder beliebigen, von der Wand oder vom Boden
übertragenen Wärmequelle isolieren.
Falls das Gerät versetzt wurde, ist es erforderlich, bevor dasselbe
wieder eingeschaltet wird, eine bestimmte Zeit zu warten. Vor allem falls
die Handhabung nicht in senkrechter Lage erfolgte, muss man
mindestens 2 Stunden warten.
Die Schutzfolie von den Außenflächen abziehen.
• Das Innere mit lauwarmem Wasser und Neutralseife reinigen.
• Das Gerät so weit wie möglich von Wärmequellen aufstellen.
• Die ungehinderte Zirkulation der Luft des Motorraums nicht
beeinträchtigen.
• Die Schlüssel (falls vorhanden) müssen außerhalb der Reichweite von
Kindern aufbewahrt werden.
KONTROLLEN DES ELEKTRISCHEN TEILS
Die Wert der Netzspannung und –frequenz müssen mit denen
übereinstimmen, die auf dem Typenschild des Geräts angegeben
werden (Punkt 6 des Abschnitts "Dati matricolari").
• Die Steckverbindungen müssen korrekt an der Schalttafel befestigt
werden (die Vibrationen während der Bewegung und des Transports
könnten dazu geführt haben, dass sie sich gelockert haben).
• Der Steckdose eine Sicherung zu 16A vorschalten.
• Den Hauptschalter, an den der Stecker des Netzkabels angeschlossen
wird, in die Position OFF bringen.
• Sicherstellen, dass die Steckdose mit dem Netzstecker des Geräts
kompatibel ist.
Wenden Sie sich an Fachpersonal, falls die Netzsteckdose durch eine
eines anderen Typs ausgewechselt werden muss. Dieses Fachpersonal
muss sicherstellen, dass der Querschnitt der Leiter der Netzsteckdose
der Leistungsaufnahme des geräts angemessen ist.
Sicherstellen, dass der Netzstecker ordnungsgemäß in die
Netzsteckdose eingesteckt ist.
INBETRIEBNAHME- PRÜFUNGEN
Nachdem die obengenannten Anweisungen sorgfältig durchgeführt wurden,
kann das Gerät in Betrieb gesetzt werden:
Den Hauptschalter, an den der Stecker des Versorgungskabels
angeschlossen ist, in die Position ON bringen.
Den Schalter des Gerätes in die Position ON bringen. .
Nach 1 Minute startet der Kompressor und die Innentemperatur wird auf
den werkseitig eingestellten Sollwert gebracht.
Das Gerät nicht beladen, solange die Temperatur den voreingestellten
Sollwert nicht erreicht hat. Sollte es notwendig sein, die werkseitig
eingestellten Parameter zu ändern, sind die im Kapitel
"Einstellanleitung" wiedergegebenen Anleitungen zu lesen.
WICHTIG
BEVOR MAN DIE LEBENSMITTEL EINFÜHRT, DAS GERÄT
IN BETRIEBSZUSTAND BRINGEN.
DIE IM RAUMINNEREN ANGEZEIGTE LADELINIE NICHT
ÜBERSCHREITEN.
DIE SEITLICHEN MINDESTABSTÄNDE ZWISCHEN DEN
GERÄTEN BEACHTEN
BETRIEB
Die richtige Konservierung der Lebensmittel stellt einen wichtigen Aspekt
bezüglich der hygienischen und sicheren Lebensmittelproduktion dar,
verbessert die Effizienz der gastronomischen Tätigkeiten und wirkt sich
positiv auf den Stromverbrauch aus. Die unten aufgeführten
Anweisungen befolgen, um die bestmögliche Leistung des Gerätes zu
erzielen.
Die Produkte müssen stets auf den Ablagen gelagert werden; keine
Produkte auf den Kühlraumboden legen.
WICHTIG
DIE LEBENSMITTEL MÜSSEN SO IN DAS GERÄT GELEGT
WERDEN, DASS EIN FREIER LUFTSTROM GEWÄHRLEISTET
IST. ZWISCHEN DEN JEWEILIGEN LEBENSMITTELN
AUSREICHEND PLATZ LASSEN UND DIESE NICHT IN
BERÜHRUNG MIT DEN SEITENWÄNDEN BRINGEN. IM
BEDARFSFALL DEN ABSTAND ZWISCHEN DEN ABLAGEN
ÄNDERN.

DEUTSCH 9
9
SCHALTTAFEL
SCHALTTAFELSCHALTTAFEL
SCHALTTAFEL
TASTATUR UND DEREN FUNKTIONEN
Um die Tastatur zu sperren, die Taste AUX () und die Taste ON/STAND-
BY() 2 s lang drücken: ist sie gesperrt, zeigt das Display "Loc" an, wenn
ungesperrt "UnL".
ON/STAND BY; hält man die Taste 4 s gedrückt, schaltet sich das Gerät
aus/ein.
MANUELLE ABTAUUNG; hält man die Taste 4 s gedrückt: beginnt eine
manuelle Abbtauung unter Bedingung, dass die Funktion Overcooling nicht
läuft und die Temperatur des Verdampfers es erlaubt.
Ein-/Ausschaltung der Raumbeleuchtung auf manuelle Weise(in
Modellen mit Glastüren) oder Ein-/Ausschaltung des Hilfsausganges auf
manuelle Weise (falls vorhanden).
Taste AB: skrollt die Punkte des Menus und senkt die Werte; für 4 s lang
gedrückt aktiviert sich die Funktion Overcooling. Während der Funktion
Overcooling wird der Arbeits-Set Point um Temperatur und für die von
Paramentern eingestellte Zeit gesenkt.
Während der Funktion Overcooling wird nie die Abtauung aktiviert; fällt der
Zeitabstand der Abtauung wenn die Funktion im Gange ist, wird die
Abtauung am Ende derselben gestartet.
Taste AUF: skrollt die Punkte des Menus und steigert die Werte; für 4 s
lang gedrückt, aktiviert sich die Funktion des hohen oder niedrigen
Prozentsatzes der relativen Feuchtigkeit (nur bei einigen Modellen). Das
Display zeigt "rhL" (Betrieb niedriger Prozentsatz relativer Feuchtigkeit) oder
"rhH" (Betrieb hoher Prozentsatz relativer Freuchtigkeit) für 10 s an. Ist die
Funktion nicht verfügbar, wird bei Druck der Taste AUF () die Anzeige " ---
- " für 1 s erscheinen.
SET POINT, erlaubt den Zutritt und die Änderung des Set Point.
BETRIEB
Folgende Betriebsstatus sind vorhanden:
Status "on" (die Schalttafel wird versorgt und ist eingeschaltet )
Status "stand-by" (das Gerät ist aus aber die Schalttafel wird versorgt)
Status "off": um auf “off” zu schalten, muss man den Hauptschalter oder
die Versorgung ausschalten.
WICHTIG
KEINE WARTUNG VORNEHMEN SOLANGE DAS GERÄT AUF
ON ODER STAND BY IST.
VOM NETZ ODER DER ELEKTRISCHEN VERSORGUNG
ABSCHALTEN.
Ist die Steuerung eingeschaltet, zeigt das Display bei normalem Betrieb die
Raumtemperatur an.
Wechselweise ist es möglich den Wert der Verdampfersonde (falls
vorhanden) zu zeigen, indem man die Taste AB () 2 s lang gedrückt hält;
drückt man die Taste AB () 2 s, zeigt das Display die Schrift “Pb2”. Drückt
man die Taste SET () erscheint die Temperatur des Verdampfers.
Nach kurzer Zeit ohne Benutzung oder durch kurze Betätgung der Taste
SET kehrt man zur Anzeige der Raumtemperatur zurück.
GERÄUSCHLOSIGKEIT DES BUZZER (FALLS
VORHANDEN)
Kurz irgendeine Taste drücken.
EINSTELLUNG DES SET POINT
• drücken und loslassen der Taste SET(): der Kompressor LED blinkt
• drücken und loslassen der Taste AUF () oder AB () innerhalb 15 s
• drücken und loslassen der Taste SET() oder für 15 s nicht benutzen;
der Kompressor LED schaltet aus, und die Schalttafel verlässt das Verfahren
HACCP GRUNDFUNKTIONEN
Die Steuerung kann bis zu 3 HACCP Alarme speichern.
Die Steuerung liefert folgende Informationen:
• kritischer Wert
• Alarmdauer (von 1 min bis 99 h und 59 min, teils wenn Alarm im Gange)
COD. ALARMTYP KRITISCHER WERT
AL Alarm minimum
Temperatur
Die minimum Temperatur des Raumes
während eines solchen Alarms
AH Alarm maximum
Temperatur
Die maximum Temperatur des Raumes
während einse solchen Alarms
Id Alarm Eingang Tür
Micro
Die maximum Temperatur des Raumes
während einse solchen Alarms
Die Steuerung vertagt die Informationen falls der neue Alam schlimmer als
der gespeicherte ist oder unter Bedingung, dass die neuen Informationen
schon gezeigt wurden.
Ist die Steuerung ausgeschaltet, wird kein Alarm gespeichert.
Verschwindet die Ursache des Alarms, stellt das Display den normalen
Betrieb wieder her.
Der HACCP LED liefert Informationen über den Speicherzustand der HACCP
Alarme;
ANZEIGE DER INFORMATIONEN ÜBER DIE
HACCP ALARME
• drücken der Taste AB () für 2 s: das Display zeigt der erste Punkt an.
• drücken und loslassen der Taste AUF () oder AB () um "LS" zu wählen
• drücken und loslassen der Taste SET (): das Display einen der Kodes
der oberen Tabelle an.
Um einen Alarm zu wählen:
• drücken und loslassen der Taste AUF () oder AB () (z.B. um "AH" zu
wählen).
Um Informationen über Alarm zu zeigen:
• drücken und loslassen der Taste SET (): der HACCP LED hört auf zu
blinken und das Display zeigt in Abfolge diese Informationen (zum Beispiel):
ANZEIGE BEDEUTUNG
8,0 Der kritische Wert ist 8,0 °C/8 °F
Dur Das Display wird die Alarmdauer anzeigen
h01 Der Alarm hat 1Std gedauert (hält an ...)
n15 Der Alarm hat 1Std und 15 Min gedauert
AH Gewählter Alarm
Um die Nachfolge der Informationen zu verlassen:
~ drücken und loslassen der Taste ON/STAND-BY(): das Display zeigt
den gewählten Alarm (im Beispiel "AH3").
Um das Verfahren zu verlassen:
• verlassen der Nachfolge der Informationen
• drücken und loslassen der Taste AUF () oder AB () bis das Display
die Raumtemperatur anzeigt oder 60 s lang nicht bedienen.
Wechselweise Nachfolge der Informationen verlassen
• drücken und loslassen der Taste ON/STAND-BY().
Hat das Instrument keinen Alarm gespeichert, wird der Punkt "LS" nicht
angezeigt.

10 DEUTSCH
10
REINIGUNG, WARTUNG UND STÖRUNG
REINIGUNG, WARTUNG UND STÖRUNGREINIGUNG, WARTUNG UND STÖRUNG
REINIGUNG, WARTUNG UND STÖRUNG
Dieser Abschnitt betrifft den Endverbraucher und ist für den dauerhaften
und vorschriftsmäßigen Betrieb des Gerätes von äußerster Wichtigkeit.
Die sorgfältige und regelmäßige Durchführung einiger Arbeitsgänge beugt
dem Eingriff des Fachpersonals vor. Die durchzuführenden Maßnahmen
setzen keine besonderen technische Kenntnisse voraus.
WICHTIG
BEVOR MAN DIE WARTUNG BZW. REINIGUNG VORNIMMT,
DIE STROMVERSORGUNG DES GERÄTES AUSSCHALTEN.
ACHTUNG
DAS GERÄT NICHT MIT DIREKTEN HOCHDRUCKWASSERSTRAHLEN
REINIGEN. AUF KEINEN FALL WASSERSTRAHLEN AUF DIE
ELEKTRISCHEN TEILE RICHTEN.
REINIGUNG
Die Notwendigkeit einer Reinigung des Gerätes hängt größtenteils von der
Verwendungshäufigkeit ab. Die sachgemäße Verwendung beachten und die
notwendigen Reinigungsarbeiten programmieren. Zur Reinigung der Innen- und
Außenflächen ein neutrales oder leicht alkalisches Reinigungsmittel verwenden.
Man empfiehlt, den Innenraum gelegentlich mit einem Desinfektionsmittel zu
reinigen. Eventuelle Unreinheiten können mit einem feuchten Tuch beseitigt
werden. Die Entfernung der Ablagen erleichtert die Reinigung des Innenraums.
Eine Berührung zwischen dem Wasser und den elektrischen Komponenten
verhindern. Es ist verboten, zur Gerätereinigung einen Druckstrahl zu
verwenden. Niemals Metallgegenstände benutzen, um das Gerät zu reinigen;
es könnte beschädigt werden. Fur eine tiefere inwandige Reinigung ist es
notwendig die Schienen der Ablagehalterungen zu entfernen.
WICHTIG
DIE GERÄTE WERDEN AUS CNS HERGESTELLT, DER
WIDERSTANDSFÄHIG GEGEN KORROSIONEN IST, DIE DURCH
DEN NORMALEN GEBRAUCH ENTSTEHEN KÖNNEN.
AUF KEINEN FALL REINIGUNGSMITTEL BZW.
REINIGUNGSSYSTEME ANWENDEN, DIE DIE MASCHINE
BESCHÄDIGEN KÖNNTEN.
ALLGEMEINE WARTUNG
KONDENSATIONSBATTERIE
Die Batterie muß unbedingt in der Lage sein, maximalen Wärmeaustausch zu
bieten. Deshalb ist es äußerst wichtig, daß ihre Oberfläche stets frei von Staub-
bzw. Schmutzpartikel ist, die sich infolge der Elektroventilatorentätigkeit
abgelagert haben.
Mit Hilfe eines Staubsaugers und eines Pinsels bzw. einer metallfreien Bürste
alle Verschmutzungen (z.B. Papier, Staub), die sich eventuell auf der
Batterieoberfläche abgelagert haben, entfernen.
Die Aluminiumrippen auf Beschädigungen bzw. Biegungen prüfen. Falls
derartige Beschädigungen vorliegen sollten, die Batterie mit Hilfe des eigens
dazu bestimmten Gerätes "kämmen", um den optimalen Luftdurchstrom
wiederherzustellen. Falls ein Filter vorhanden ist, diesen entfernen und reinigen
und danach wieder in die ursprüngliche Lage einsetzten. Fall der Filter
beschädigt oder zu schmutzig ist, einen zum austauschen bestellen.
TÜRDICHTUNG
Sich vergewissern, dass die Türdichtungen einwandfrei sind: es ist sehr
wichtig eine perfekte Schliessung zu garantieren.
VERSORGUNGSKABEL
Sich vergewissern, ob das Versorgungskabel Beschädigungen,
Rißbildungen bzw. andere Veränderungen aufweist, die die Isolierung
beeinträchtigen könnten. Sich bei erforderlicher Wartung an einen
zugelassenen Kundendienst wenden.
LÄNGERE STILLSTANDSZEITEN
Bei längeren Stillstandszeiten wie folgt vorgehen:
Den Netzschalter in die Position OFF bringen.
Den Stecker aus der Steckdose ziehen.
Das Gerät entleeren und den Angaben von Punkt 1.0 gemäß vorgehen.
Die Türen nicht vollständig schließen, um das Entstehen von üblen
Gerüchen zu vermeiden.
Die Kompressorgruppe vor Staub schützen.
AUSTAUSCH DER GLÜHBIRNE [AUSSER BEI
MODELLE MIT GLASTÜREN]
Für den Austausch der Glühbirne sind folgende Anweisungen zu befolgen
(die Glühbirnenspannung ist auf einem Klebe-Etikett angegeben):
• Das Gerät abschalten und das Netzkabel herausziehen;
• Tür öffnen: Die Befestigungsschraube der Frontblende mithilfe eines
Schlitzschraubendrehers lösen;
• Die Frontblende öffnen;
• Die Glühbirne abschrauben und dabei auf ihre Temperatur, die hoch
sein könnte, achten;
• Den Austausch vornehmen und für die Wiederherstellung des Gerätes
in umgekehrter Reihenfolge vorgehen.
STÖRUNGEN
Bei einem fehlerhaften Betrieb des Geräts die nachfolgend aufgeführte
Liste kontrollieren, um festzustellen, ob es ohne Hilfe des
Kundendienstes wieder in Betrieb gesetzt warden kann; in diesem
Handbuch sind selbstverständlich nicht alle Möglichkeiten aufgeführt.
Die Einschaltung einer Sicherheitsvorrichtung ist Anzeichen einer
Betriebsstörung; vor Wiederinbetriebnahme muß die Ursache festgestellt
und beseitigt werden.
Falls die Störung danach weiterbesteht, wenden Sie sich bitte an den
technischen Dienst, mit folgenden art der Störung, codenummer und
kennzeichen des Geräts, die dem Geräteschild entnommen werden können
PROBLEM
Mögliche Ursache
Eingriff
1 DAS GERÄT STARTET NICHT
1.1 Das Gerät ist nicht korrekt an der Versorgung angeschlossen
Kontrollieren, dass der Stecker richtig in der Dose steckt
2 DER KOMPRESSOR STOPPT SELTEN
2.1 Die Raumtemperatur ist zu hoch
Den Raum ausreichend lüften
2.2 Der Kühlschrankkondensator ist schmutzig
Ihn regelmäßig überprüfen und reinigen.
2.3 Kühlmittelmenge zu gering
Für die Ermittlung und Reparatur von Lecks und um die
Nachfüllung des Kühlgases auszuführen, wenden Sie sich bitte
an eine dafür zuständige technische Kundendienststelle
2.4 Tür-und Schubladendichtungen unwirksam
Für den Ersatz wenden Sie sich bitte an eine dafür zuständige
technische Kundendienststelle
2.5 Verdampfer ist vereist
Keine heißen Lebensmittel mit hohem Flüssigkeitsgehalt einführen;
falls erforderlich, einen manuellen Abtauvorgang ausführen
2.6 Der Ventilator funktioniert nicht korrekt
Sich für einen eventuellen Austausch an die zuständige
Kundendienststelle wenden
3 ÜBERLAUFEN DER SELBSTVERDAMPFENDEN KONDENSSCHALE
3.1 Häufiges Einführen von warmen Lebensmittel mit hohem Wassergehalt.
Keine warme Lebensmittel mit hohem Wassergehalt einführen
3.2 Häufiges öffnen der Türen bzw. Schubladen
Die Geräteanwendungsbedingungen beachten
4 RAUMTEMPERATUR IST UNGENÜGEND
4.1 Verschmutzte Kondensationbatterie
Sie regelmäßig überprüfen und reinigen.
4.2 Mangelhafte Belüftung der Zone, die an den Technischen Bereich Angrenzt
Eventuelle Verstopfungen beseitigen.
4.3 Eintritt heisser Luft in den Raum
Sich vergewissern, dass die Türe sich richtig schliesst und die
Dichtung funktioniert. Falls der Betrieb nicht wieder hergestellt
warden kann, sich für eine Lösung oder Regulierung an die
zuständige Kundendienststelle wenden
4.4 Verdampfer ist vereist
Einen manuellen Abtauvorgang ausführen

ITALIANO 11
11
DESCRIZIONE FUNZIONALE
DESCRIZIONE FUNZIONALEDESCRIZIONE FUNZIONALE
DESCRIZIONE FUNZIONALE
RICEVIMENTO E DISMISSIONE
RICEVIMENTO E DISMISSIONERICEVIMENTO E DISMISSIONE
RICEVIMENTO E DISMISSIONE
USO CONSENTITO
Gli apparecchi sono progettati per l’installazione all’interno e deve
essere impiegata esclusivamente per la conservazione di cibi e
bevande.
Il costruttore non sarà responsabile per le conseguenze derivanti
dall’utilizzo dell’apparecchiatura per altri scopi.
Non conservare gli alimenti a diretto contatto della struttura.
La costruzione dell’apparecchiatura e la capacità dell’unità
condensatrice sono state progettate esclusivamente per la
conservazione di prodotti pre-raffreddati.
Non mettere mai nello scompartimento a bassa temperatura bibite
gassate: possono esplodere.
Non introdurre mai liquidi o alimenti caldi e non riempire fino all’orlo i
recipienti muniti di coperchio.
Non superare mai il limite di carico indicato dall’apposita etichetta posta
all’interno della cella.
In tutte le apparecchiature ci sono delle superfici che si coprono di brina.
A seconda del modello, tale brina può essere eliminata automaticamente
(sbrinamento automatico) oppure manualmente. Non tentate mai di
togliere la brina con un oggetto appuntito, si rischierebbe di danneggiare
irrimediabilmente l’apparecchiatura.
Non usare alcun dispositivo meccanico o altro mezzo artificiale per
accelerare il processo di sbrinamento.
Viene declinata ogni responsabilità del Produttore con decadimento
della garanzia in caso di modifiche elettriche e/o meccaniche.
Manomissioni in genere non espressamente autorizzate e che non
rispettino quanto riportato nel presente manuale, fanno decadere la
garanzia.
CONTROLLO AL RICEVIMENTO
Gli apparecchi sono spediti in appositi imballi di protezione. Controllare
all’arrivo che l’apparecchio non abbia subito danneggiamenti durante il
trasporto e che lo stesso sia completo nelle sue parti come da ordine. Nel
caso di danni visibili annotare immediatamente sul documento
relativo al trasporto il danno riscontrato riportando la dicitura :
“RITIRO CON RISERVA PER EVIDENTI DANNI A IMBALLO” in quanto
la resa franco stabilimento comporta il risarcimento dei danni a carico
dell’assicurazione.
IMPORTANTE
TUTTE LE OPERAZIONI DI SEGUITO CITATE DEBBONO ESSERE
ESEGUITE IN CONFORMITÀ ALLE NORME DI SICUREZZA VIGENTI,
SIA PER QUANTO RELATIVO ALL’ATTREZZATURA USATA SIA PER
QUANTO RELATIVO ALLE MODALITÀ OPERATIVE.
ATTENZIONE
PRIMA DI DAR CORSO A OPERAZIONI DI MOVIMENTAZIONE
ASSICURARSI CHE LA CAPACITÀ DI SOLLEVAMENTO SIA
ADEGUATA AL PESO DELL’APPARECCHIO IN QUESTIONE.
MOVIMENTAZIONE
MOVIMENTAZIONE con CARRELLO ELEVATORE o SIMILARE
Inserire le forche sul lato anteriore o posteriore della pedana in legno a
corredo dell’apparecchio.
Dar corso al sollevamento assicurandosi che l’apparecchio sia in
equilibrio stabile.
ATTENZIONE
NEL CORSO DELLA MOVIMENTAZIONE NON CAPOVOLGERE
O ROVESCIARE.
SE SI RENDE INDISPENSABILE IL TRASPORTO IN
ORIZZONTALE; ATTENDERE ALMENO 2 ORE PRIMA DI
METTERLO IN FUNZIONE.
AVVERTENZE
IL RISPETTO DELLE RACCOMANDAZIONI RIPORTATE
SUL LATO ESTERNO DELL’IMBALLO È GARANTE DI UNA
INTEGRITÀ FISICA E FUNZIONALE DELL’APPARECCHIO A
TUTTO VANTAGGIO DELL’UTILIZZATORE FINALE. VIENE
RACCOMANDATO QUINDI DI:
• MOVIMENTARE CON CURA
• TENERE ALL’ASCIUTTO
• EVITARE NEL MODO PIÙ ASSOLUTO DI SOVRAPPORRE
ALL’APPARECCHIO ALTRI OGGETTI.
RIMOZIONE IMBALLO
Imballo in cartone
Tagliare con forbice le reggette di chiusura.
Sollevare il cartone di imballo.
Imballo in legno
Schiodare i pannelli in legno iniziando dal frontale e da quello superiore.
Togliere la protezione in nylon sfilandola dalla parte superiore.
Imballo in nylon
Dopo aver tolto il nastro adesivo di fissaggio, togliere la protezione in nylon
sfilandola dalla parte superiore dell’apparecchio.
Sollevare l’apparecchio in modo da separarlo dalla pedana.
Appoggiare l’apparecchio a terra in corrispondenza del punto predestinato.
Verificare la presenza di danni visibili.
Tenere fuori dalla portata di mano dei bambini il materiale di imballo in
quanto potenziale fonte di pericolo.
Smaltire i prodotti di imballo facendoli confluire ai centri di raccolta o di
riciclaggio specializzati (attenersi alle norme vigenti).
Verificare la rispondenza del numero di matricola con quanto riportato nel
documento di accompagnamento.
DISMISSIONE
Le nostre apparecchiature contengono il fluido refrigerante, in base al
Regolamento Europeo C.E. n. 2037/2000 del 29 giugno 2000, descritto
nella targhetta matricolare; inoltre l’apparecchiatura è composta da parti
e materiali riutilizzabili o riciclabili. Quindi, terminato l’utilizzo
dell’apparecchiatura è importante che venga consegnata a centri di
smaltimento ecologico. Togliere la porta è il miglior modo per assicurare
che nessuno possa rimanere rinchiuso all’interno.
L’apparecchiatura non deve essere smaltita con rifiuti urbani e rottami.
Deve essere evitato il danneggiamento del circuito frigorifero.
IMPORTANTE
RISPETTARE LE NORMATIVE LOCALI VIGENTI PER LA
ROTTAMAZIONE DI QUESTO GENERE DI APPARECCHI.

12 ITALIANO
12
MESSA IN FUNZIONE
MESSA IN FUNZIONEMESSA IN FUNZIONE
MESSA IN FUNZIONE
IMPORTANTE
PRIMA DI COLLEGARE L’APPARECCHIO ACCERTARSI CHE I DATI DI TARGA SIANO RISPONDENTI A QUELLI
DELLA RETE ELETTRICA.
LA TARGHETTA MATRICOLARE RECANTE I DATI ELETTRICI NECESSARI ALL’INSTALLAZIONE È POSIZIONATA IN
CORRISPONDENZA DEL LATO SUPERIORE DESTRO DEL PANNELLO FRONTALE COMANDI O SUL FIANCO DESTRO
DELLA CELLA.
L’INSTALLAZIONE DEVE ESSERE EFFETTUATA SECONDO LE ISTRUZIONI RIPORTATE ALLA PRESENTE SEZIONE DA
PERSONALE PROFESSIONALMENTE QUALIFICATO.
LA SICUREZZA ELETTRICA DI QUESTA APPARECCHIATURA È ASSICURATA SOLTANTO QUANDO LA STESSA È
CORRETTAMENTE COLLEGATA AD UN EFFICACE IMPIANTO DI MESSA A TERRA COME PREVISTO DALLE VIGENTI
NORME DI SICUREZZA ELETTRICA.
IL COSTRUTTORE DECLINA OGNI RESPONSABILITÀ PER EVENTUALI DANNI CAUSATI DALLA MANCANZA DI MESSA A
TERRA DELL’IMPIANTO.
L’APPARECCHIO DEVE ESSERE INOLTRE INCLUSO IN UN SISTEMA EQUIPOTENZIALE LA CUI EFFICIENZA DEVE
ESSERE VERIFICATA SECONDO LE NORME IN VIGORE.
È VIETATO L’USO DI ADATTATORI, PRESE MULTIPLE, E/O PROLUNGHE.
CONTROLLI PRELIMINARI GENERICI
Verificare che il piano d’appoggio sia adatto a sopportare il peso
dell’apparecchio e sia in piano.
Posizionare l’apparecchio a bolla. Agire eventualmente sulla parte
mobile dei piedini regolabili fino ad ottenere un perfetto allineamento.
Eventualmente utilizzare un’apposita livella. La deviazione massima
consigliata dal piano orizzontale è di +/-0,5 gradi.
Tutti i piedini devono poggiare sul pavimento. In questo modo viene
assicurato il corretto funzionamento delle porte.
Per una sufficiente circolazione d’aria e per evitare qualsiasi danno al
circuito frigorifero assicurarsi che sia installato con minimo 50 millimetri
di spazio libero ai lati ed almeno 500 mm; tra il soffitto e la parte
superiore.
Non mettere l’apparecchio vicino a fonti di calore (quali forni, caloriferi,
ecc...) o in un luogo esposto alla luce diretta del sole e, ove del caso,
isolare l’apparecchio da qualsiasi fonte di calore trasmessa dalla parete
o dal suolo.
Nel caso in cui l’apparecchiatura sia stata spostata, è necessario
aspettare un certo tempo prima di rimetterla in funzione. In particolare se
la movimentazione è avvenuta con l’apparecchiatura non verticale,
bisogna attendere almeno 2 ore.
Togliere la plastica a protezione delle superfici esterne.
Lavare l’interno con acqua tiepida e sapone neutro.
Non impedire il libero circolare dell’aria del vano motore.
Le chiavi di chiusura (se disponibili) non devono essere a portata di
mano dei bambini.
CONTROLLI PRELIMINARI ALLA PARTE ELETTRICA
Il valore della tensione e della frequenza di rete deve corrispondere a
quello riportato nella targhetta matricolare dell’apparecchiatura (punto 6
del paragrafo "Dati matricolari").
I connettori devono essere fissati correttamente al quadro elettrico
(durante la movimentazione ed il trasporto le vibrazioni potrebbero aver
prodotto degli allentamenti).
Installare a monte della presa un fusibile da 16A.
Portare l’interruttore generale a cui andrà collegata la spina del cavo di
alimentazione nella posizione OFF.
Verificare la compatibilità della presa con la spina dell’apparecchio. Nel
caso si rendesse necessario fare sostituire la presa con altra di tipo
adatto da personale professionalmente qualificato. Quest’ultimo dovrà
anche accertare che la sezione dei cavi della presa sia idonea alla
potenza assorbita dall’apparecchiatura.
Verificare che la spina sia inserita nella presa.
MESSA IN FUNZIONE - VERIFICHE
Dopo aver effettuato scrupolosamente quanto sopra esposto è possibile
avviare l'apparecchio :
Portare l’interruttore generale a cui è collegata la spina del cavo di
alimentazione nella posizione ON.
Portare l’interruttore dell’apparecchio in posizione ON. .
Dopo 1 minuto, il compressore parte e la temperatura interna si regola al
valore impostato in fabbrica.
Non caricare l’apparecchiatura fino a quando la temperatura non avrà
raggiunto il valore preimpostato.
Visualizzare il SET POINT ed eventualmente impostare il valore
desiderato in base alla tipologia di prodotto conservato.
Per le modalità operative relative alla variazione del valore
predeterminato in fabbrica consultare la sezione PANNELLO DI
COMANDO.
IMPORTANTE
PRIMA DI INSERIRE GLI ALIMENTI PORTARE
L’APPARECCHIO A REGIME.
NON SUPERARE MAI IL LIMITE DI CARICO INDICATO
DALL’APPOSITA ETICHETTA POSTA ALL’INTERNO DELLA
CELLA.
RISPETTARE LE DISTANZE MINIME TRA APPARECCHIATURE E
PER LA VENTILAZIONE (VEDI CONTROLLI PRELIMINARI
FUNZIONAMENTO
La corretta conservazione delle derrate è un fattore importante nella
produzione igienica e sicura di alimenti ed inoltre migliora l’efficienza
delle attività gastronomiche e incide sul consumo di energia. Rispettare
le istruzioni riportate sotto per ottenere il massimo rendimento
dall’apparecchiatura.
I prodotti devono essere sempre conservati sui ripiani; non caricare
prodotti sul fondo della cella.
IMPORTANTE
I PRODOTTI DEVONO ESSERE CARICATI
NELL’APPARECCHIATURA IN MODO TALE DA PERMETTERE
IL LIBERO FLUSSO DELL’ARIA.
LASCIARE DEGLI SPAZI LIBERI TRA I PRODOTTI E NON
SISTEMARLI A CONTATTO CON LE PARETI.
ALL’OCCORRENZA, MODIFICARE LA DISTANZA TRA I
RIPIANI.

ITALIANO 13
13
PANNELLO DI COMANDO
PANNELLO DI COMANDOPANNELLO DI COMANDO
PANNELLO DI COMANDO
TASTIERA E FUNZIONI ASSOCIATE
Per bloccare la tastiera tenere premuto il tasto AUX ()e il tasto
ON/STAND-BY() per 2 s: il display visualizzerà "Loc" quando bloccata e
"UnL" se sbloccata.
ON/STAND BY; tenendo premuto il tasto per 4 s l’apparecchio si
spegnerà/accenderà
SBRINAMENTO MANUALE; tenendo premuto il tasto per 4 s: si attiva
uno sbrinamento manuale alle condizioni che la funzione Overcooling non
sia attivata la temperatura dell’evaporatore lo consentano.
Accensione/spegnimento della luce della cella in modo manuale (solo
per modelli con porte vetro) o accensione/spegnimento deII’uscita ausiliaria
in modo manuale (se presente).
Tasto freccia GIÙ: scorre le voci del menù e decrementa i valori;
tenuto premuto per 4 s la funzione Overcooling si attiverà.
Durante la funzione Overcooling il setpoint di lavoro viene decrementato
della temperatura e per il tempo stabiliti da parametri.
Durante la funzione Overcooling lo sbrinamento non viene mai attivato; se
I’intervaI|o di sbrinamento scade quando la funzione è in corso, lo
sbrinamento verrà attivato alla conclusione della funzione.
Tasto freccia SU: scorre le voci del menù; incrementa i valori; tenuto
premuti per 4 s attiva la funzione per bassa o alta percentuale di umidità
relativa (solo per alcuni modelli).
Il display visualizzerà "rhL" (funzionamento per bassa percentuale di umidità
relativa) o "rhH" (funzionamento per alta percentuale di umidità relativa) per
10 s.
Se la funzione non è disponibile, la pressione del tasto SU () provocherà
la visualizzazione dellindicazione " ---- " per 1 s.
SET POINT, permette di accedere alla funzione di modifica del set point.
FUNZIONAMENTO
Esistono i seguenti stati di funzionamento:
lo stato "on" (lo strumento e alimentato ed è acceso)
lo stato "stand-by" (Io strumento è alimentato ma e spento via software)
lo stato "off": per metterlo in stato “off” è necessario spegnere
l’interrutore a monte o scollegarlo dall’alimentazione.
IMPORTANTE
NON ESEGUIRE NESSUNA MANUTENZIONE QUANDO
L’APPARECCHIATURA È IN ON O IN STAND BY.
DISINSERIRLO DALLA RETE DI ALIMENTAZIONE ELETTRICA.
Se lo strumento e acceso, durante il normale funzionamento il display
visualizzerà la temperatura della cella.
In alternativa è possibile visualizzare il valore della sonda evaporatore (se
presente) tenendo premuto il tasto DOWN () per 2 s; tenere premuto il
tasto DOWN () per 2 s il display visualizzerà la scritta “Pb2”. Premendo il
tasto SET () apparirà la temperatura dell’evaporatore
Dopo un breve periodo di inativittà o premendo il tasto SET brevemente si
tornerà alla visualizzazione della temperatura della cella.
TACITAZIONE DEL BUZZER (SE PRESENTE)
Premere brevemente un tasto qualsiasi.
IMPOSTAZIONE DEL SET POINT
• premere e rilasciare il tasto SET(): il LED compressore Iampeggerà
• premere e rilasciare il tasto UP () o il tasto DOWN () entro 15 s.
• premere e rilasciare il tasto SET() o non operare per 15 s il LED
compressore si spegnerà, dopodiché lo strumento uscirà dalla
procedura.
FUNZIONI HACCP DI BASE
Lo strumento è in grado di memorizzare fino a 3 allarmi HACCP.
Lo strumento fornisce le seguenti informazioni:
• il valore critico
• la durata deII’aIIarme (da 1 min a 99 h e 59 min, parziale se I’aIIarme è
in corso).
COD. TIPO DI ALLARME VALORE CRITICO
AL allarme temperatura di
minima
la minima temperatura della cella
durante un allarme di questo tipo
AH allarme temperatura di
massima
la massima temperatura della cella
durante un allarme di questo tipo
Id allarme ingresso micro
porta
la massima temperatura della cella
durante un allarme di questo tipo
Lo strumento aggiorna le informazioni se il nuovo evento è più critico di
quello in memoria o a condizione che Ie informazioni siano già state
visualizzate.
Se lo strumento è spento, non verrà memorizzato alcun allarme.
Quando la causa che ha provocato l’allarme scompare, il display ripristina il
normale funzionamento.
II LED HACCP fornisce informazioni riguardanti lo stato della memoria degli
allarmi HACCP;
VISUALIZZAZIONE DELLE INFORMAZIONI
RIGUARDANTI GLI ALLARMI HACCP
• premere il tasto DOWN () per 2 s: il display visualizza la prima Iabel.
• premere e rilasciare il tasto UP () o il tasto DOWN () per
selezionare "LS"
• premere e rilasciare il tasto SET (): il display visualizzerà uno dei
codici riportati nella tabella precedente
Per selezionare un allarme:
• premere e rilasciare il tasto UP () o il tasto DOWN () (p.e. per
selezionare "AH").
Per visualizzare le informazioni riguardanti |’allarme:
• premere e rilasciare il tasto SET (): il LED HACCP smettera di
lampeggiare e il display visualizzerà in successione le seguenti informazioni
(per esempio):
INFORMAZ. SIGNIFICATO
8,0 il valore critico è di 8,0 °C/8 °F
Dur il display sta per visualizzare la durata dell’allarme
h01 l’allarme è durato 1 h (continua ...)
n15 l’allarme e durato 1 h e 15 min
AH l'allarme selezionato
Per uscire dalla successione di informazioni:
• premere e rilasciare il tasto ON/STAND-BY(): il display visualizzerà
l’allarme selezionato (nell’esempi0 "AH3").
Per uscire dalla procedura:
• uscire dalla successione di informazioni
• premere e rilasciare il tasto UP () o il tasto DOWN () fino a quando
il display visualizza là temperatura della cella o non operare per 60 s.
In alternativa uscire dalla successione di informazioni
• premere e rilasciare il tasto ON/STAND-BY().
Se lo strumento non ha alcun allarme in memoria, la label "LS" non verra
visualizzata.

14 ITALIANO
14
PULIZIA, MANUTENZIONE E GUASTI
PULIZIA, MANUTENZIONE E GUASTIPULIZIA, MANUTENZIONE E GUASTI
PULIZIA, MANUTENZIONE E GUASTI
Questa sezione è dedicata all'utilizzatore finale ed è estremamente
importante per il regolare funzionamento nel tempo dell'apparecchio.
Poche operazioni eseguite con scrupolo e periodicamente possono evitare
di dover ricorrere a interventi di personale specializzato.
Le operazioni da effettuare non richiedono conoscenze tecniche particolari
IMPORTANTE
PRIMA DI DAR CORSO A QUALSIASI OPERAZIONE DI
MANUTENZIONE O PULIZIA DELL'APPARECCHIO
DISINSERIRLO DALLA RETE DI ALIMENTAZIONE ELETTRICA.
ATTENZIONE
NON LAVARE L’APPARECCHIO CON GETTI D’ACQUA DIRETTI E AD
ALTA PRESSIONE.
EVITARE DI INDIRIZZARE L’ACQUA SULLE PARTI ELETTRICHE.
PULIZIA
La necessità di effettuare la pulizia dell’apparecchiatura dipende in gran
parte dalla frequenza di utilizzo. Osservare l’utilizzo e programmare le
operazioni di pulizia necessarie.
Per pulire l’interno e l’esterno, utilizzare un detergente neutro o
leggermente alcalino. Si consiglia di pulire saltuariamente l’interno con
un disinfettante. Le impurità possono essere rimosse con un panno
umido. La rimozione dei ripiani facilita la pulizia dell’interno.
Non usare mai oggetti metallici per pulire l’apparecchiatura; essa
potrebbe venir danneggiata.
Per effetturare una pulizia interna più accurata è necessario rimuovere le
guide supporto griglie
IMPORTANTE
GLI APPARECCHI SONO REALIZZATI IN ACCIAIO INOSSIDABILE
RESISTENTE ALLA CORROSIONE DERIVANTE DA NORMALE
UTILIZZO.
EVITARE L’USO DI SOSTANZE DETERGENTI O SISTEMI DI PULIZIA
CHE NE POSSANO COMPROMETTERE L’INTEGRITÀ.
MANUTENZIONE ORDINARIA
BATTERIA CONDENSANTE
È importante che la batteria sia in grado di offrire il massimo scambio
termico. Verificare quindi che la sua superficie sia sempre libera da
sporco o polveri che possono essersi depositate per effetto dell'azione
degli elettroventilatori.
Rimuovere con l'ausilio di un aspirapolvere, di un pennello o di una
spazzola non metallica tutte le impurità tipo carta e polveri che possono
essersi depositate sulla superficie della batteria evitando accuratamente
di piegare o danneggiare le alette o le pale del motoventilatore.
In caso di presenza di pannello filtrante, rimuoverlo e pulirlo. Al termine
riposizionarlo nella posizione iniziale. Se danneggiato o troppo intasato,
richiedere il ricambio e sostituirlo.
GUARNIZIONI PORTA
Verificare l’integrità delle guarnizioni della porta: è di fondamentale
importanza che sia garantita una perfetta tenuta.
CAVO DI ALIMENTAZIONE
Verificare che il cavo di alimentazione che collega l'apparecchio alla
presa non presenti lacerazioni, screpolature o alterazioni tali da
comprometterne l’isolamento. Contattare un centro di assistenza
autorizzato nel caso si renda necessaria della manutenzione.
FERMATE PROLUNGATE
In caso di prolungata inattività procedere come di seguito specificato:
Spegnere l’apparecchiatura e staccare il cavo di alimentazione;
Vuotare l’apparecchio e procedere alla sua pulizia come descritto alla
voce PULIZIA.
Lasciare le porte socchiuse onde evitare la formazione di cattivi odori.
Proteggere dalla polvere il gruppo compressore.
SOSTITUZIONE LAMPADA [TRANNE MODELLI
PORTE VETRO]
Per la sostituzione della lampadina è necessario seguire le seguenti
istruzioni (il tipo della lampadina è indicato in una etichetta adesiva):
• Spegnere l’apparecchiatura e staccare il cavo di alimentazione;
• Aprire la porta e togliere il vetrino di protezione della lampadina;
• Svitare la lampadina posta all’interno del cruscotto e sostituire con una
nuova di uguale caratteristiche;
• Riposizionare il vetrino di protezione.
GUASTI
Nel caso di un mal funzionamento dell’apparecchiatura, controllare il
seguente elenco per verificare se è possibile rimetterla in funzione senza
l’intervento dell’assistenza; resta inteso che quanto riportato non copre
totalmente la casistica delle possibilità.
L'intervento di un dispositivo di sicurezza indica anomalia di
funzionamento; prima di ripristinare verificare ed eliminarne la causa.
Se il difetto persiste rivolgetevi all’assistenza tecnica ricordandovi di
segnalare la natura del difetto, il codice ed il numero di matricola
dell’apparecchio che si possono rilevare dalla targhetta tecnica situata
all’interno dello stesso.
PROBLEMA
Possibile causa
Intervento
1 L’APPARECCHIO NON PARTE
1.1 L’apparecchio non e collegato correttamente all’alimentazione
Controllare che la spina sia inserita correttamente nella presa
della corrente
2 IL COMPRESSORE SI ARRESTA RARAMENTE
2.1 La temperatura del locale è troppo elevata
Aerare opportunamente il locale
2.2 Il condensatore del frigorifero è sporco
Controllarlo e pulirlo accuratamente ed a periodi regolari.
2.3 La carica del refrigerante è scarsa
Rivolgersi ad un centro assistenza competente per individuare e
la riparare le perdite ed eseguire la ricarica
2.4 Le guarnizioni porta/e sono poco efficienti
Se non è possibile ripristinare la funzionalità, rivolgersi ad un
centro assistenza competente per l’eventuale sostituzione
2.5 L’evaporatore si impacca
Non ntrodurre derrate calde e con alto contenuto d’acqua e alla
occorrenza eseguire uno sbrinamento manuale
2.6 Il motoventilatore non funziona correttamente
Rivolgersi ad un centro assistenza competente per l’eventuale
sostituzione
3 TRACIMAZIONE DELLA BACINELLA AUTOEVAPORANTE
3.1 Introduzione frequente di derrate calde e con alto contenuto d’acqua
Non introdurre derrate calde e con alto contenuto d’acqua
3.2 Aperture porte e/o cassetti troppo frequenti
Prestare attenzione alle condizioni di impiego della
apparecchiatura
4 TEMPERATURA DELLA CELLA INSUFFICIENTE
4.1 Il condensatore del frigorifero è sporco
Controllarlo e pulirlo accuratamente ed a periodi regolari.
4.2 Scarsa aerazione della zona adiacente al vano tecnico
Togliere eventuali ostruzioni.
4.3 Ingresso di aria calda nella cella
Controllare che la porta chiuda correttamente e che la
guarnizione sia funzionale. Se non è possibile ripristinare la
funzionalità, rivolgersi ad un centro assistenza competente per
l’eventuale sostituzione e regolazione
4.4 L’evaporatore è impaccato
Eseguire uno sbrinamento manuale

FRANCĄIS 15
15
DESCRI
DESCRIDESCRI
DESCRIPTION
PTIONPTION
PTION F
F F
FONCTIONELLE
ONCTIONELLEONCTIONELLE
ONCTIONELLE
R
RR
RECEPTION
ECEPTIONECEPTION
ECEPTION E
E E
ET
TT
T
ELIMINATION DE L’APPAREIL
ELIMINATION DE L’APPAREILELIMINATION DE L’APPAREIL
ELIMINATION DE L’APPAREIL
UTILISATION AUTORISÉE
Les appareils sont conçus pour être installés à l’intérieur et doit être
employé exclusivement pour la conservation de la nourriture et des
boissons. Le fabricant ne pourra en aucun cas être reconnu responsable
des conséquences dérivantes de l’utilisation de l’appareil à d’autres fins.
Ne pas conserver les aliments en contact direct avec la structure.
La construction de l’appareil et la capacité du groupe de condensation
ont été conçues exclusivement pour la conservation de produits pré-
réfrigérés. Ne jamais ranger de boissons gazeuses dans le
compartiment à basse température : elles pourraient exploser. Ne jamais
introduire de liquides ou d’aliments chauds dans l’appareil et ne pas
remplir jusqu’au ras les récipients munis d’un couvercle.
Tous les appareils comportent des surfaces qui se couvrent de givre.
Suivant le modèle, ce givre peut être éliminé automatiquement
(dégivrage automatique) ou manuellement.
Ne jamais tenter d’éliminer le givre à l’aide d’un objet pointu, sous peine
d’endommager l’appareil de manière irrémédiable.
N’utiliser aucun dispositif mécanique ou autre moyen artificiel pour
accélérer le processus de dégivrage.
Le fabricant décline toute responsabilité (avec annulation de la garantie)
en cas de modifications électriques et/ou mécaniques.
Toute altération n’ayant pas été expressément autorisée et non
conforme aux prescriptions du présent manuel, entraînera l’annulation
de la garantie.
CONTROLE A LA RECEPTION
Les armoires sont expédiées dans des emballages de protection spéciaux.
Contrôler à l’arrivée que l’appareil n’ait pas été endommagé pendant le
transport et qu’il présente toutes les parties mentionnées dans la
commande. En cas de dommages visibles, indiquer immédiatement sur le
document de transport le défaut en ajoutant le commentaire :
“RETRAIT SOUS RESERVE POUR DOMMAGES VISIBLES SUR
L’EMBALLAGE” car le retour franco l’établissement comporte le
dédommagement à la charge de l’assurance.
IMPORTANT
TOUTES LES OPERATIONS CITEES CI-APRES CONCERNANT LES
EQUIPEMENTS ET LES MODALITES OPERATIONNELLES DOIVENT ETRE
EFFECTUEES CONFORMEMENT AUX REGLES DE SECURITE EN
VIGUEUR.
ATTENTION
AVANT DE DEPLACER OU SOULEVER UN APPAREIL, S’ASSURER
QUE LA CAPACITE DE LEVAGE CONVIENT AU POIDS DE
L’APPAREIL.
MANUTENTION
MANUTENTION avec CHARIOT ELEVATEUR ou SIMILAIRE.
Introduire les fourches à l’avant ou à l’arrière du socle en bois de
l’appareil.
Soulever le tout en s’assurant que l’appareil est en équilibre parfait.
ATTENTION
PENDANT LES OPERATIONS DE MANUTENTION, NE PAS
RETOURNER NI RENVERSER L’APPAREIL.
S’IL FAUT TRASPORTER L’APPAREIL EN HORIZONTALE;
ATTENDRE AU MOINS 2 HEURES AVANT DE METTRE EN
FONCTION.
RECOMMANDATIONS
RESPECTER LES RECOMMANDATIONS MENTIONNEES SUR
L’EMBALLAGE POUR GARANTIR L’INTEGRITE PHYSIQUE ET
FONCTIONNELLE DE L’APPAREIL EN VUE D’EN TIRER LE
MEILLEUR PROFIT; IL EST DONC RECOMMANDE DE :
• MANUTENTIONNER L’APPAREIL AVEC LE PLUS GRAND SOIN
• L’INSTALLER DANS UN ENDROIT SEC
• EVITER ABSOLUMENT D’INSTALLER D’AUTRES OBJETS AU-
DESSUS DE L’APPAREIL.
DEBALLAGE
Emballage en carton
Couper les feuillards de fermeture à l’aide de ciseaux.
Soulever le carton d’emballage (faire également glisser simultanément
les coins de protection).
Emballage en bois
Déclouer les panneaux en bois en commençant du frontal et du
supérieur.
Enlever la protection en nylon en l’enlevant de la partie supérieure.
Emballage en nylon
Après avoir enlevé le ruban adhésif de fixage, enlever la protection en
nylon en nylon en l’enlevant de la partie supérieure de l’appareil.
Soulever l’appareil pour le dégager du socle.
Poser l’appareil au sol en correspondance du point prévu pour
l’installation.
Vérifier s’il y a des dommages visibles.
Ne pas laisser les éléments de l’emballage à la portée des enfants car
ils représentent un danger évident.
Éliminer les éléments d’emballage en les amenant dans des centres
spécialisés pour le recyclage ( s’en tenir aux normes en vigueur ).
Vérifier que le numéro de série correspond au numéro mentionné sur le
document d’accompagnement.
MISE AU REBUT DE L’APPAREIL
Nos appareils contiennent un fluide frigorigène conforme au règlement
(CE) n° 2037/2000 du 29 juin 2000, mentionné sur la plaquette
signalétique ; par ailleurs, l’appareil est constitué d’éléments et de
matériaux réutilisables ou recyclables. Au terme de son cycle de vie,
l’appareil doit être remis à des centres de traitement écologique.
Déposer la porte représente la meilleure manière de s’assurer que
personne ne puisse rester enfermé accidentellement à l’intérieur.
L’appareil ne doit pas être mis au rebut avec les déchets urbains et la
ferraille. Eviter d’endommager le circuit frigorifique, notamment à
proximité de l’échangeur.
IMPORTANT
LE REGLES LOCALES EN VIGUER POUR LA MISE A LA
FERRAILLE DE CE GENRE D’APPAREILS

16 FRANCĄIS
16
MISE EN SERVICE
MISE EN SERVICEMISE EN SERVICE
MISE EN SERVICE
IMPORTANT
AVANT DE BRANCHER L’APPAREIL, S’ASSURER QUE LES DONNEES DE LA PLAQUETTE SIGNALETIQUE
CORRESPONDENT A CELLES DU RESEAU ELECTRIQUE.
LA PLAQUETTE SIGNALETIQUE MENTIONNANT LES DONNEES ELECTRIQUES NECESSAIRES A L’INSTALLATION EST
PLACEE EN CORRESPONDANCE DU COTE SUPERIEUR DROIT DU PANNEAU AVANT DE COMMANDE.
L’INSTALLATION DOIT ETRE EFFECTUEE SELON LES INSTRUCTIONS MENTIONNEES DANS CE CHAPITRE DE LA PART
DE TECHNICIENS QUALIFIES.
LA SECURITE ELECTRIQUE DE CET APPAREIL EST ASSUREE UNIQUEMENT SI L’APPAREIL EST RELIE A UNE PRISE DE
TERRE EFFICACE CONFORMEMENT AUX NORMES DE SECURITE ELECTRIQUE EN VIGUEUR.
LE FABRICANT DECLINE TOUTE RESPONSABILITE POUR LES EVENTUELS DOMMAGES DUS A L’ABSENCE DE LA PRISE
DE TERRE.
L’APPAREIL DOIT ETRE EGALEMENT INSERE A L’INTERIEUR D’UN SYSTEME EQUIPOTENTIEL DONT L’EFFICACITE
DEVRA ETRE CONFORME AUX NORMES EN VIGUEUR.
IL EST INTERDIT D’UTILISER DES ADAPTATEURS, DES PRISES MULTIPLES, ET/OU DES RALLONGES.
CONTROLES PRELIMINAIRES
Vérifier que le plan d’appui puisse supporter le poids de l’appareil et qu’il
soit de niveau;
Niveler l'appareil à l'aide d'un niveau à bulle. Agir, le cas échéant, sur la
partie mobile des pieds réglables jusqu’à avoir un alignement parfait.
Utiliser de préférence un bon niveau. La déviation maximale autorisée
pour le plan horizontal est de +/- 0,5 degrés. Tous les pieds doivent
reposer sur le sol. De cette manière le correct fonctionnement des
portes sera assuré.
Afin d’assurer une circulation suffisante de l’air et éviter tout
endommagement du circuit frigorifique, veiller à installer l’appareil en
laissant un espace libre d’au moins 50 mm sur les côtés e tau moins de
500 mm sur la partie supérieure.
Ne pas installer l’appareil à proximité de sources de chaleur (fours,
radiateurs, etc.) ou dans des endroits exposés au rayonnement solaire
direct ; si besoin en est, isoler l’appareil de toute source de chaleur
transmise par les parois ou le sol.
En cas de déplacement de l’appareil, il est nécessaire d’attendre un
certain temps avant de le remettre en marche. Sur tout si la manutention
a été effectué avec l’appareil en position pas vertical, il faut attendre au
moins 2 heures.
Enlever le plastique qui protège les surfaces extérieures.
Laver son intérieur à l’eau tiède et savon neutre.
Positionner l’appareil le plus loin possible de sources de chaleur.
Ne pas empêcher la libre circulation de l’air du moteur.
Garder les clés de fermeture (si disponibles) hors de portée des enfants.
CONTRÔLES DE LA PARTIE ÉLECTRIQUE
• La valeur de la tension et de la fréquence du secteur doit correspondre
à celle indiquée sur la plaque de matricule de l’appareil (point 6 du
paragraphe " PLAQUE SIGNALÉTIQUE").
• Les connecteurs doivent être fixés correctement au tableau électrique
(pendant la manutention et le transport les vibrations pourraient avoir
causé des relâchements).
• Installer un fusible de 16A en amont de la prise.
• Ramener l’interrupteur général, auquel il faudra brancher la prise du
câble d’alimentation, sur la position ETEINT (OFF).
Vérifier la compatibilité de la prise femelle avec la prise mâle de
l’appareil. Le cas échéant, faire remplacer la prise femelle par une autre
adéquate par un personnel professionnel qualifié. Ce dernier devra
même s’assurer que la section des câbles de la prise est appropriée à la
puissance absorbée par l’appareil. Vérifier que la prise mâle est insérée
dans la prise femelle.
MISE EN SERVICE - VERIFICATIONS
Après avoir effectué soigneusement toutes ces opérations, mettre
l’appareil en marche:
Amener l’interrupteur général auquel est reliée la fiche du câble
d’alimentation sur la position ON.
Amener l’interrupteur de l’appareil sur la position ON.
Après une minute, le compresseur démarre et la température interne se
réglera par rapport à la valeur programmée en usine. Ne pas charger
l’appareil tant que la température n’a pas atteint la valeur programmée.
S’il devait se rendre nécessaire de modifier les paramètres programmés
en usine, lire les instructions fournies dans le chapitre " Panneau de
Commande"
IMPORTANT
AVANT D’INTRODUIRE LES ALIMENTS, AMENER
L’APPAREIL A LA BONNE TEMPERATURE.
JAMAIS SUPERER LE LIMITE DE CHARGEMENT INDIQUE PAR
L’ADHESIF A’ L’INTERIEUR DE LA CHAMBRE .
RESPECTER LA DISTANCE MINIME ENTRE L’APPAREIL ET LA
VENTILATION (VOIR CONTROLES PRELIMINAIRES
FONCTIONNEMENT
La conservation correcte des denrées alimentaires est un élément
fondamental dans la production hygiénique et sûre des aliments ; par
ailleurs, elle optimise les activités gastronomiques et contribue à réduire
la consommation d’énergie.
Pour obtenir le meilleur rendement de l’appareil, respecter les
instructions fournies ci-dessous.
Les produits doivent toujours être conservés sur les étagères ; ne pas
charger de produits au fond du compartiment réfrigéré.
IMPORTANT
LES PRODUITS DOIVENT ÊTRE CHARGÉS DANS L’APPAREIL
DE MANIÈRE À PERMETTRE LE LIBRE PASSAGE DE L’AIR.
LAISSER DES ESPACES LIBRES ENTRE LES PRODUITS ET NE
JAMAIS LES METTRE EN CONTACT DIRECT AVEC LES
CLOISONS. SI BESOIN EN EST, MODIFIER LA DISTANCE
ENTRE LES ÉTAGÈRES.

FRANCĄIS 17
17
PANNEAU DE COMMANDE
PANNEAU DE COMMANDEPANNEAU DE COMMANDE
PANNEAU DE COMMANDE
CLAVIER ET CES FONCTIONS
Pour bloquer le clavier tenir appuyé la touche AUX () et la touche
ON/STAND-BY() pour 2 s: l’exposition montrerà "Loc" quand bloqué et
"UnL" quand pas bloqué.
ON/STAND BY; tenir appuyé la touche pour 4 s, l’appareil
s’éteindrà/s’allumerà
DEGIVRAGE MANUEL; tenir appuyé la touche pour 4 s: un dégivrage
manuel commence, au condition que la fonction Overcooling ne soit pas
actionné et la température de l’évaporateur le permet.
Allumage/ arrête de l’éclairage de la chambre de façon manuel
(seulement dans modèles avec portes vitrées) ou allumage/arrête de la
sortie auxiliaire de façon manuel.(si présent).
Touche BAS: feuillète les labels du menu et diminuit les valeurs;tenir
appuyer pour 4 s: la fonction Overcooling s’actionne.
Pendent la function Overcooling, le set-point de travail vient diminuit de la
température et pour le temps établit par des paramètres.
Pendent la fonction Overcooling le dégivrage ne vient jamais actionné; si
I’intervalle de temps du dégivrage se vérifie pendent la fonction, le dégivrage
vient actionné à la fin de la fonction.
Touche HAUT: feuillète les labels du menu; augment les valeurs; tenir
appuyé pour 4 s actionne la fonction pour bas ou haut pourcentage
d’humidité rélative (seulement pour certain modèles).
I’exposition montrerà "rhL" (fonctionnement pour bas pourcentage d’humidité
rélative) ou "rhH" (fonctionnement pour haut poucentage d’humidité rélative)
pour 10 s.
Si la fonction n’est pas disponible, la pression de la touche HAUT ()
montre l’affichage " ---- " pour 1 s.
SET POINT, permets d’accéder à la fonction du set-point.
FONCTIONNEMENT
Les suivantes status de fonctionnement existent :
Le status "on" (l’instrument est alimenté et allumé)
Le status "stand-by" (I’appareil est éteint mais l’instrument alimenté)
Le status "off": pour mettre le status “off” il faut éteindre l’interrupteur
principal ou détacher l’alimentation.
IMPORTANT
PAS FAIRE AUCUNE ENTRETIEN QUAND L’APPAREIL EST
EN ON OU EN STAND BY.
DETACHER L’ALIMENTATION ELECTRIQUE.
Si l’instrument est allumé, pendent l’ordinaire fonctionnement le display
montre la température de la chambre.
Par contre il est possible voir la valeur de la sonde évaporateur (si présente)
tenir appuyé la touche BAS () pour 2 s; tenir appuyé la touche BAS ()
pour 2 s le display montrerà l’enseigne “Pb2”. Appuyer la touche SET ()
apparirà la température de l’evaporateur
Après peux de temps sans utilisation ou appuyer brèvement la touche SET
on retourne à l’affichage de la température de la chambre.
SILENCE DU BUZZER (SI PRESENTE)
Appuyer brèvement une touche à choix.
IMPOSTATION DU SET POINT
• appuyer et laisser la touche SET(): le LED compresseur clignoterà
• appuyer et laisser la touche HAUT() ou la touche BAS() entre 15 s.
• appuyer et laisser la touche SET() ou pas opérer pour 15 s le LED
compresseur s’éteindrà, après quoi l’instrument sortirà la procédure.
FONCTIONS HACCP DE BASE
L’instrument est capable de sauver jusqu’à 3 alarmes HACCP.
L’instrument fourni les suivantes informations:
• la valeur critique
• la durée de I’aIarme (de 1 min à 99 h et 59 min, partiale si I’aIarme est
en cours).
COD. TYPE D’ALARME VALEUR CRITIQUE
AL alarme température de
minimum
température minimale de la chambre
pendent un alarme de ce genre
AH alarme température de
maximum
température maximale de la chambre
pendent un alarme de ce genre
Id alarme entrée micro
porte
température de la chambre pendent un
alarme de ce genre
L’instrument actualise les informations si le nouveau alarme est pire de
l’alarme déjà sauvé ou à condition que les informations ont été déjà montré.
Si l’instrument est éteint, auqun alarme verrà sauver.
Quand la cause à provoquer l’alarme s’éteint, le display restaure le
fonctionnement ordinaire.
Le LED HACCP fourni des informations concernants le status de mémoire
des alarmes HACCP;
AFFICHAGE DES INFORMATIONS CONCERNANT
LES ALARMES HACCP
• appuyer la touche BAS() pour 2 s: le display montrerà le premier
label.
• appuyer et laisser la touche HAUT () ou la touche BAS() pour
choisir "LS"
• appuyer et laisser la touche SET (): le display montrerà un des codes
de la tabelle dessus.
Pour choisir un alarme:
• appuyer et laisser la touche HAUT () ou la touche BAS () (p.e. pour
choisir "AH").
Pour montrer les informations concernants l’alarme:
• appuyer et laisser la touche SET (): le LED HACCP arrète de clignoter
et le display montrerà en séquance les suivantes informations (par example):
ALARME SIGNIFIE
8,0 la valeur critique est de 8,0 °C/8 °F
Dur la display est en train de montrer la durata de l’alarme
h01 l’alarme a duré 1 h (continue ...)
n15 l’alarme a duré 1 h et 15 min
AH l'alarme choisi
Pour sortir la séquance d’informations:
• appuyer et laisser la touche ON/STAND-BY(): le display montrerà
l’alarme choisit (dans l’exemple "AH3").
Pour sortir la procédure:
• sortir la séquance d’informations
• appuyer et laisser la touche HAUT () ou la touche BAS () jusqu’à
quand le display montre la température de la chambre ou pas opérer pour
60 s.
Par contre sortir la séquance d’informations
· appuyer ou laisser la touche ON/STAND-BY().
Si l’instrument n’a auqun alarme sauvé, le label "LS" ne vient pas montré.

18 FRANCĄIS
18
NETTOYAGE, ENTRETIEN
NETTOYAGE, ENTRETIEN NETTOYAGE, ENTRETIEN
NETTOYAGE, ENTRETIEN E
EE
ET
TT
T
PANNES
PANNESPANNES
PANNES
Ce chapitre s’adresse à l'utilisateur final et est extrêmement important pour
le fonctionnement régulier et la durée de vie de l'appareil. Quelques
opérations effectuées soigneusement et régulièrement permettent d’éviter
de faire appel à des techniciens spécialisés.
Les opérations à effectuer ne nécessitent aucune connaissance technique
spéciale et se résument en de simples contrôles des composants de l'appareil.
IMPORTANT
AVANT TOUTE OPERATION D’ENTRETIEN OU DE NETTOYAGE
DE L'APPAREIL, NE PAS OUBLIER DE LE DEBRANCHER.
ATTENTION
NE PAS LAVER L’APPAREIL DIRECTEMENT AU JET D’EAU A HAUTE PRESSION.
FAIRE ATTENTION A NE PAS MOUILLER LES PARTIES ELECTRIQUES.
NETTOYAGE
La nécessité d’effectuer le nettoyage de l’appareil dépend en grande
partie de la fréquence d’utilisation. Observer l’utilisation et, de
conséquence, programmer les opérations de nettoyage nécessaires.
Pour nettoyer l’intérieur et l’extérieur, utiliser un détergent neutre ou
légèrement alcalin.
Il est conseillé de nettoyer l’intérieur de temps en temps avec un désinfectant.
Les impuretés peuvent être éliminées avec un chiffon humide. Le retrait des
étagères facilite beaucoup le nettoyage de l’intérieur.
Ne jamais permettre que de l’eau puisse entrer en contact avec les
composants électriques.
Il est interdit d’utiliser un jet sous pression pour nettoyer l’appareil. Ne
jamais utiliser d’objets métalliques pour nettoyer l’appareil, sous peine
de l’endommager.
Pour nettoyer l’intérieur plus proprement il faut enlever les guides
support grille.
IMPORTANT
LES APPAREILS SONT REALISES EN ACIER AISI RESISTANT A LA
CORROSION DUE A L’UTILISATION NORMALE.
EVITER D’UTILISER DES PRODUITS DETERGENTS OU DES SYSTEMES
DE NETTOYAGE QUI POURRAIENT COMPROMETTRE SON.
ENTRETIEN HABITUEL
BATTERIE DE CONDENSATION
Il est important que la batterie puisse offrir le plus grand échange
thermique possible. Il faut donc pour cela que sa surface soit
parfaitement propre: retirer la poussière qui aurait pu se déposer sous
l’effet de l'action des ventilateurs.
Passer l’aspirateur et un pinceau ou une brosse non métallique pour
retirer toutes les impuretés (papier et poussière) qui auraient pu se
déposer sur la surface de la batterie.
Vérifier que les ailettes en aluminium n’aient pas été endommagées ni
pliées, le cas échéant, les "redresser" à l’aide de l’outil prévu à cet effet
pour rétablir la situation initiale et obtenir un flux d'air optimal.
S’il y a un filtre, l’enlever et le nettoyer. A la fin installer de nouveaux
dans sa position d’origine. Si cassé ou trop sale, demander la pièce
détachée et le changer.
JOINTS PORTE
Vérifier l’integrité des joints de la porte. Il est très important guarantire
une fermeture impéccable.
CABLE D’ALIMENTATION
Vérifier que le câble qui relie l'appareil à la prise ne soit pas déchiré,
crevassé ou endommagé au point de compromettre son isolation.
S’adresser à un centre d’assistance autorisé au cas où il faudrait
intervenir sur le câble.
ARRETS PROLONGES
En cas d’arrêt prolongé de l’appareil, procéder de la façon suivante:
Amener l’interrupteur de réseau sur la position OFF.
Débrancher l’appareil.
Vider l’appareil et le nettoyer en suivant les conseils du point NETTOYAGE.
Laisser les portes entr’ouvertes pour éviter la formation de mauvaises odeurs.
Protéger le groupe compresseur contre la poussière.
REMPLACEMENT DE L'AMPOULE [MOINS
MODELES PORTES VITREES]
Pour remplacer l'ampoule, respecter les instructions suivantes (le
voltage de l'ampoule est indiqué sur une étiquette adhésive) :
• Éteindre l’appareil et le débrancher;
• Ouvrir la porte;
• Retirer le cabochon de protection de l'ampoule;
• Dévisser l'ampoule qui se trouve à l’intérieur du bandeau de
commande et la remplacer par une neuve ayant le même voltage;
• Replacer le cabochon de protection.
RECHERCHE DES PANNES
En cas de mauvais fonctionnement de l’appareil, utiliser la liste suivante
pour vérifier la possibilité de le remettre en service sans l’intervention de
l’assistance technique; nous n’avons évidemment pas pu considérer la
totalité des possibilités.
Si un dispositif de sécurité intervient, cela indique qu’il y a une anomalie de
fonctionnement; avant de rétablir la situation initiale, vérifier et éliminer la cause.
Si le défaut persiste, adressez-vuos à l’assistance technique et
souvenez-vuos de signaler la nature du défaut, le code et le numéro
d’immatriculation de l’appareil que vous pourrez lire sur le plaque
indiquant les caractéristique qui se trove sur l’appareil.
PROBLEME
Cause possible
Intervention
1 LE COMPRESSEUR NE DEMARRE PAS
1.1 L’appareil ne’est pas alimenté corrèctement.
Contrôler que la fiche soit correctement introduite dans la prise
de courant
2 LE COMPRESSEUR S’ARRETE RAREMENTE
2.1 La température ambiante est trop élevée
Ventilez le local opportunément
2.2 Le condenseur du réfrigérateur est sale
Contrôlez-le périodiquement et nettoyez-le soigneusement
2.3 La charge en fluide frigorigène est insuffisante
Adressez-vous à un centre après-vente compétent pour trouver
et réparer les fuites et pour recharger l’unité
2.4 Joints de la/des porte/s défaillants
Adressez-vous à un centre après-vente compétent
pour le/les remplacer
2.5 L’évaporateur a trop de givre
N’introduisez pas d’aliments chauds ou à haute teneur en eau
et, si besoin en est, faites un dégivrage manuel
2.6 Moto-ventilateur en panne
Adressez-vous à un centre après-vente compétent pour les
remplacer
3 SUINTEMENTS DEPUIS LE BAC À ÉVAPORATION AUTOMATIQUE
3.1 Introduction fréquente d’aliments chauds et à haute teneur en eau.
N’introduisez pas d’aliments chauds et à haute teneur en eau
3.2 Ouverture trop fréquente des portes et/ou des tiroirs
Veiller aux conditions d’utilisation de l’appareil
4 TEMPERATURE INSUFFISANTE DANS LA CHAMBRE
4.1 Le condenseur du réfrigérateur est sale
Contrôlez-le périodiquement et nettoyez-le soigneusement
4.2 Mauvaise aeration de la zone adjacente l’elogement technique
Libérer éventuellement les entrée/sortie de l’air du condenseur
4.3 Entrée d’air chaude dans la chambre
Contrôler que la porte ferme corrèctement et que le joint soit
fonctionale. S’il n’est pas possible restaurer le fonctionnement,
s’adresser à un centre après-vente compétent
pour le/les remplacer
4.4 L’évaporateur a trop de givre
Faites un dégivrage manuel

ESPAÑOL 19
19
DESCRI
DESCRIDESCRI
DESCRIPCIÓN FU
PCIÓN FUPCIÓN FU
PCIÓN FUNCIONAL
NCIONALNCIONAL
NCIONAL
R
RR
RECEPCIÓN
ECEPCIÓNECEPCIÓN
ECEPCIÓN
Y
YY
Y
ELIMINACIÓN DEL APAR
ELIMINACIÓN DEL APARELIMINACIÓN DEL APAR
ELIMINACIÓN DEL APARATO
ATOATO
ATO
USO PERMITIDO
El aparato debe utilizarse exclusivamente para conservar alimentos y
bebidas. El fabbricante no es responsable de las consecuencias
producidas por el uso del aparato con otros fines.
No conserve los alimentos en contacto directo con la estructura.
La construcción del aparato y la capacidad del grupo de condensación
han sido diseñadas exclusivamente para conservar productos que
hayan sido enfriados previamente. No coloque nunca bebidas con gas
en el compartimento de baja temperatura ya que pueden explotar.
No introduzca nunca líquidos o alimentos calientes y no llene hasta el
borde los recipientes con tapa.
En todos los aparatos hay superficies que se cubren de escarcha.
Según el modelo, la escarcha puede eliminarse manual o
automáticamente (desescarche automático). Nunca trate de quitar la
escarcha con un objeto puntiagudo ya que podría dañar
irremediablemente el aparato.
No use ningún dispositivo mecánico ni ningún otro medio artificial para
acelerar el proceso de desescarche.
El fabricante declina toda responsabilidad en caso de modificaciones
eléctricas y/o mecánicas, que causarán asimismo la pérdida de validez
de la garantía.
La garantía caducará en caso de cualquier alteración que no haya sido
expresamente autorizada y que no respete lo indicado en este manual.
CONTROLO A. LA RECEPCIÓN
Los aparatos son enviados en adecuados embalajes de protección.
Controlar a la llegada que el aparato no haya padecido daños durante el
transporte y que el mismo esté completo en sus partes como de pedido.
En el caso de daños visibles apuntar enseguida sobre el documento
relativo al transporte el daño hallado reconduciendo la dicción :
"RETIRO CON RESERVA POR EVIDENTES DAÑOS A. EMBALAJE" en
cuanto la entrega franco establecimiento comporta el reembolso de
los daños a cargo del seguro
IMPORTANTE
TODAS LAS OPERACIONES EN SEGUIDA INDICADOS DEBEN SER
EJECUTADAS EN CONFORMIDAD A. LAS NORMAS DE SEGURIDAD
VIGENTES, SEA POR CUÁNTO RELATIVO A. EL APAREJO USADO
SEA POR CUÁNTO RELATIVO A. LAS MODALIDADES OPERATIVAS
ATENCIÓN
ANTES DE DAR CURSO A. OPERACIONES DE MANUTENCIÓN
CERCIORARSE QUE LA CAPACIDAD DE LEVANTAMIENTO SEA
ADECUADA A. EL PESO DEL APARATO EN CUESTIÓN.
MANUTENCIÓN
MANUTENCIÓN con CARRETILLA ELEVADOR o SIMILAR.
Insertar las horcas sobre el lado anterior o posterior de la tarima de
madera a ajuar del aparato.
Dar curso al levantamiento cerciorándose que el aparato esté en
equilibrio estable.
ATENCIÓN
EN EL CURSO DE LA MANUTENCIÓN NO VOLCAR O
VOLTEAR.
SI SE HACE INDISPENSABLE EL TRANSPORTE EN
HORIZONTAL, ESPERAR AL MENOS 2 HORAS ANTES DE
PONERLO EN FUNCIÓN.
ADVERTENCIA
EL RESPETO DE LAS RECOMENDACIONES INDICADAS
SOBRE EL LADO EXTERIOR DEL EMBALAJE ES GARANTE
DE UNA INTEGRIDAD FÍSICA Y FUNCIONAL DEL APARATO A.
TODO VENTAJA DEL USUARIO FINAL. ES ENCOMENDADO
POR LO TANTO DE:
• ANIMAR CON CURA.
• TENER A. LA SEQUEDAD.
• EVITAR EN EL MODO MÁS ABSOLUTO DE SOVRAPPORRE A. EL
APARATO OTRO OBJETOS.
ELIMINACIÓN EMBALAJE
Embalaje en cartón.
Cortar con tijera las precintas de cierre.
Levantar el cartón de embalaje.
Embalaje de madera.
Desenclavar los paneles de madera iniciando del frontal y de aquél
superior.
Sacar la protección de nailon desfilándola de la parte superior.
Embalaje de nailon
Después de haber sacado la cinta adhesiva de fijado, sacar la
protección de nailon desfilándola de la parte superior del aparato.
Levantar el aparato de modo que separarlo de la tarima.
Apoyar el aparato a tierra en correspondencia del punto predestinado.
Averiguar la presencia de daños visibles.
Tener fuera del alcance de mano de los niños el material de embalaje en
cuánto potencial fuente de peligro.
Eliminar los productos de embalaje haciéndolos confluir a los centros de
colección o reciclaje especializados, atenerse a las normas vigentes.
Averiguar la correspondencia del número de matrícula con cuanto
indicado en el documento de acompañamiento.
ELIMINACIÓN DEL APARATO
Según el Reglamento (CE) n.° 2037/2000 de 29 de junio de 2000,
nuestros aparatos contienen el refrigerante indicado en su placa de
características; además, el aparato está compuesto por piezas y
materiales reutilizables o reciclables. Por tanto, cuando el aparato ya no
se utilice es importante entregarlo a un centro de eliminación
especializado. Desmontar la puerta es la mejor manera de asegurar que
nadie pueda quedar encerrado dentro. intercambiador.
El aparato no debe ser eliminado junto con los residuos urbanos ni con
la chatarra. Debe evitarse de dañar el circuito frigorífico, sobretodo
cerca del intercambiador.
IMPORTANTE
RESPETAR LAS NORMATIVAS LOCALES VIGENTES POR EL
DESGUACE DE ESTE GÉNERO DE APARATOS.

20 ESPAÑOL
20
PUESTA EN FUNCIONAMI
PUESTA EN FUNCIONAMIPUESTA EN FUNCIONAMI
PUESTA EN FUNCIONAMIENTO
ENTOENTO
ENTO
IMPORTANTE
ANTES DE CONECTAR EL APARATO CERCIORARSE QUE LOS DATOS DE PLACA DE MATRÍCULA SEAN
CONFORMES A. AQUELLOS DE LA RED ELÉCTRICA.
LA ETIQUETA MATRICULAR RECANTE LOS DATOS ELÉCTRICOS NECESARIOS A. LA INSTALACIÓN ES POSICIONADO
EN CORRESPONDENCIA DEL LADO SUPERIOR DERECHO DEL PANEL FRONTAL MANDAS O SOBRE LA CADERA
INTERIOR DERECHA.
LA INSTALACIÓN TIENE QUE SER EFECTUADA SEGÚN LAS INSTRUCCIONES INDICADAS A. LA PRESENTE SECCIÓN
POR PERSONAL PROFESIONALMENTE CALIFICADO.
LA SEGURIDAD ELÉCTRICA DE ESTA INSTRUMENTACIÓN ES ASEGURADA SOLAMENTE CUANDO LA MISMA ES
CONECTADA CORRECTAMENTE A UNA EFICAZ INSTALACIÓN DE MISA A. TIERRA COMO PREVISTO POR LAS
VIGENTES NORMAS DE SEGURIDAD ELÉCTRICAS.
EL CONSTRUCTOR DECLINA CADA RESPONSABILIDAD POR EVENTUALES DAÑOS CAUSADOS POR LA FALTA DE MISA
A. TIERRA DE LA INSTALACIÓN.
EL APARATO TIENE QUE ADEMÁS SER INCLUSO EN UN SISTEMA EQUIPOTENCIAL CUYO EFICIENCIA TIENE QUE SER
AVERIGUADA SEGÚN LAS NORMAS EN VIGOR.
ES PROHIBIDO EL EMPLEO DE ADAPTADORES, TOMAS MÚLTIPLES O ALARGADORES.
CONTROLAS PRELIMINARES GENÉRICOS
Averiguar que el plan de apoyo sea apto a soportar el peso del aparato
y sea en llano.
Coloque el equipo a nivel. Si es necesario, regular la parte móvil de los
pies de apoyo regulables hasta obtener un perfecto alineamiento;
Eventualmente utilizar un adecuado nivel de nivel. La desviación
máxima aconsejada por el plan horizontal es de +/-0,5 grados.
Todas las patas tienen que apoyar sobre el suelo. De este modo es
asegurado el correcto funcionamiento de las puertas.
Para una suficiente circulación de aire y para evitar cualquier daño al
circuito frigorífico cerciorarse que sea instalado con mínimos 50
milímetros de espacio libre a los lados y al menos 500 mm entre el
techo y.la parte superior
No pongas el aparato cerca de fuentes de calor, cuales hornos,
radiadores, etcétera..) o en un lugar expuesto a la luz directa del sol y,
donde del caso, aislar el aparato de cualquiera fuente de calor
transmitida de la pared o del suelo. En el caso en que el aparato haya
sido desplazado, es necesario esperar cierto tiempo antes de reponerlo
en función.
En particular si la manutención ha ocurrido con el aparato no
vertical, hace esperar al menos 2 horas.
Quite el plástico de protección de las superficies externas.
Lave la parte interna con agua tibia y jabón neutro.
Coloque el equipo lo más lejos posible de fuente de calor.
No impida que el aire circule libremente en el alojamiento de motor.
Las llaves de cierre (si disponibles) no deben estar al alcance de la
mano de los niños.
CONTROLES DE LA PARTE ELÉCTRICA
El valor del atención y de la frecuencia de alimentación debe
corresponder con el indicado en la etiqueta de matrícula del equipo
(punto 6 del párrafo " DATOS DE MATRÍCULA ").
Los conectores se deben fijar correctamente al cuadro eléctrico (durante
el desplazamiento y el transporte las vibraciones podrían haber
producido aflojamientos).
Instale antes de la toma un fusible de 16 A.
Ponga el interruptor general donde se conectará la clavija del cable de
alimentación en la posición OFF.
Verifique la compatibilidad de la toma con la clavija del equipo. Si fuera
necesario haga cambiar la toma con otro de tipo adecuado por parte del
personal professionalmente calificado. Este personal deberá verificar
que la sección de los cables de la toma sea adecuada a la
potencia
absorbida por el equipo. Verifique que la clavija esté insertada en la
toma.
PUESTA EN FUNCIONAMIENTO Y VERIFICACIONES
Después de haber seguido con atención lo descrito arriba es posible
arrancar el equipo:
Ponga el interruptor general donde se conectará la clavija del cable de
alimentación en la posición ON.
Ponga el interruptor el equipo en la posición ON.
Transcurrido un minuto, el compresor arranca y la temperatura interior
se ajusta al valor programado en fábrica.
No cargue el aparato hasta que la temperatura alcance el valor
ajustado.
Si necesita cambiar los parámetros ajustados en fábrica, lea las
instrucciones del Capítulo "Instrucciones de ajuste".
IMPORTANTE
ANTES DE INSERTAR LOS ALIMENTOS LLEVAR EL
APARATO A. RÉGIMEN.
NO SUPERES NUNCA EL LÍMITE DE CARGA INDICADO POR LA
ADECUADA ETIQUETA POSTA A. EL INTERIOR DEL
COMPARTIMENTO.
RESPETAR LAS DISTANCIAS MÍNIMAS ENTRE LOS APARATOS Y
POR LA VENTILACIÓN, (VER CONTROLES PRELIMINARES)
FUNCIONAMIENTO
La correcta conservación de los productos alimenticios es un factor
importante en la producción higiénica y segura de alimentos; además,
mejora la eficacia de las actividades gastronómicas e influye en el
consumo de energía. Respete las indicaciones dadas a continuación
para obtener el máximo rendimiento del aparato.
Conserve siempre los productos sobre los estantes; no cargue
productos en el fondo de la cámara.
IMPORTANTE
LOS PRODUCTOS SE DEBEN CARGAR EN EL APARATO DE
TAL MANERA QUE EL AIRE PUEDA CIRCULAR LIBREMENTE
ENTRE ELLOS. DEJE ESPACIOS VACÍOS ENTRE LOS
PRODUCTOS Y EVITE QUE TOQUEN LAS PAREDES.
SI ES NECESARIO, AJUSTE LA DISTANCIA ENTRE LOS ESTANTES.
La pagina si sta caricando...
La pagina si sta caricando...
La pagina si sta caricando...
La pagina si sta caricando...
La pagina si sta caricando...
La pagina si sta caricando...
La pagina si sta caricando...
La pagina si sta caricando...
La pagina si sta caricando...
La pagina si sta caricando...
La pagina si sta caricando...
La pagina si sta caricando...
La pagina si sta caricando...
-
 1
1
-
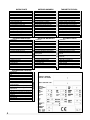 2
2
-
 3
3
-
 4
4
-
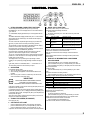 5
5
-
 6
6
-
 7
7
-
 8
8
-
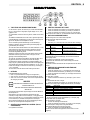 9
9
-
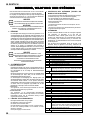 10
10
-
 11
11
-
 12
12
-
 13
13
-
 14
14
-
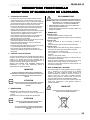 15
15
-
 16
16
-
 17
17
-
 18
18
-
 19
19
-
 20
20
-
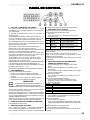 21
21
-
 22
22
-
 23
23
-
 24
24
-
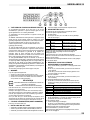 25
25
-
 26
26
-
 27
27
-
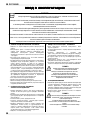 28
28
-
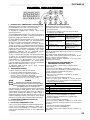 29
29
-
 30
30
-
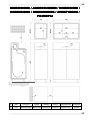 31
31
-
 32
32
-
 33
33


Metos TN Istruzioni per l'uso
- Tipo
- Istruzioni per l'uso
in altre lingue
- English: Metos TN Operating instructions
- français: Metos TN Mode d'emploi
- español: Metos TN Instrucciones de operación
- Deutsch: Metos TN Bedienungsanleitung
- русский: Metos TN Инструкция по эксплуатации
- Nederlands: Metos TN Handleiding
Altri documenti
-
Whirlpool ADN 255 Guida utente
-
 Gastrodomus GA200PR Manuale del proprietario
-
Electrolux ERN29801 Manuale utente
-
Carel powerSplit Manuale utente
-
Scholtes RCB 3x AAA F C OT Operating Instructions Manual
-
 Gastrodomus GAP630F Manuale del proprietario
-
Electrolux SG254N11 Manuale utente
-
-
-
Satrap OP254GSA+N Manuale utente

