


Wir beglückwünschen Sie zum Kauf dieses Kühlschranks, der unter
Anwendung hochmoderner Technologien hergestellt wurde. Dadurch
wird eine unkomplizierte Verwendung im Einklang mit der Umwelt
gewährleistet.
Wir empfehlen Ihnen, diese Schnellanleitung und die technischen Daten
aufmerksam durchzulesen, damit Sie mit Ihrem neuen Kühlschrank
vertraut werden.
DEUTSCH Seite 2-5
Congratulations on purchasing this fridge, which has been designed
using the latest technologies for an easy-to use, environmentally friendly
appliance.
We recommend you read this guide and the technical datasheet carefully
to fi nd out everything you need to know about your new fridge.
ENGLISH
pg. 6-9
Toutes nos félicitations pour avoir choisi ce réfrigérateur, réalisé avec
des technologies de pointe qui garantissent facilité d‘emploi et respect
de la nature.
Nous vous conseillons de lire attentivement ce guide ainsi que la fi che
technique pour vous familiariser avec votre nouveau réfrigérateur.
FRANÇAIS page 10-13
Congratulazioni per l‘acquisto di questo frigorifero, realizzato con
tecnologie all‘avanguardia, che garantiscono un facile utilizzo nel rispetto
della natura.
Vi consigliamo un‘attenta lettura di guesta guida rapida e dalla scheda
tecnica per familiarizzare con il Vostro nuovo frigorifero.
ITALIANO pag. 14-17

2 DE
ALLGEMEINE VORSICHTSMAßNAHMEN
UND EMPFEHLUNGEN
Dieses Gerät ist nur für die Aufbewahrung von Lebensmitteln bestimmt. Jede
andere Verwendung ist als gefährlich zu erachten. Der Hersteller ist nicht
für eventuelle, aus zweckentfremdeter Verwendung erwachsende Schäden
haftbar.
Konformitätserklärung: Dieses Gerät entspricht in den Teilen, die ihrem
Zweck gemäß mit Lebensmitteln in Berührung kommen, der CEE-Richtlinie
89/109.
Das Gerät entspricht den Europäischen Richtlinien 2004/108/EC und
2006/95/EC sowie nachfolgenden Revisionen.
Eventuelle Defekte müssen dem Verkäufer innerhalb von 7 Tagen nach
dem Kaufdatum mitgeteilt werden. Außerdem ist das Durchlesen der
Garantiebedingungen zu empfehlen.
Dieses Gerät darf nicht von Personen (einschließlich Kindern) verwendet
werden, die eingeschränkte körperliche, sensorische oder geistige Fähigkeiten
besitzen. Das gilt auch für Personen, die keine ausreichende Erfahrung bzw.
Wissen haben; es sei denn, diese werden von einer für deren Sicherheit
verantwortlichen Person beaufsichtigt bzw. sind in die Verwendung des Geräts
eingewiesen worden.
Kinder sollten beaufsich
tigt werden, um sicherzustellen, dass diese nicht
mit dem Gerät spielen.
Dieses Elektrohaushaltsgerät ist entsprechend der EU-
Richtlinie 2002/96/CE über Elektro- und Elektronik-Altgeräte
(WEEE) gekennzeichnet. Bitte sorgen Sie dafür, dass das
Gerät ordnungsgemäß entsorgt wird, damit mögliche negative
Auswirkungen auf Umwelt und Gesundheit vermieden werden, die
bei einer unsachgemäßen Entsorgung des Altgerätes entstehen könnten.
Das Symbol auf dem Produkt bedeutet, dass dieses Gerät nicht in
den normalen Hausmüll gehört, sondern den jeweiligen kommunalen
Rücknahmesystemen für Elektro- und Elektronik-Altgeräte übergeben werden
muss. Die Entsorgung muss im Einklang mit den geltenden Umweltrichtlinien
für die Abfallentsorgung erfolgen.
Für nähere Informationen über Entsorgung und Recycling dieses Produktes
wenden Sie sich bitte an Ihre kommunalen Einrichtungen (Umweltamt) oder
an die Abfallentsorgungsgesellschaft Ihrer Stadt bzw. an Ihren Händler.
Sorgen Sie dafür, dass der Netzstecker auch nach der Aufstellung des Geräts
zugänglich bleibt.
Verwenden Sie keine elektrischen Geräte im Innern des Lebensmittelfachs,
ausgenommen jene Geräte, die dem Gerät beiliegen oder in unseren
Kundendienstzentren erhältlich sind. Vor dem elektrischen Anschluss des
Gerätes überprüfen, dass die auf dem Typenschild angegebenen Daten
denen des lokalen Stromnetzes entsprechen.
Das Typenschild des Produkts befi ndet sich im Inneren des Gerätes, im
unteren linken Teil des Kühlraums.
Der Hersteller kann nicht für eventuelle Schäden haftbar gemacht werden,
die entstehen könnten, wenn die Anlage nicht geerdet ist.
Nach dem Aufstellen des Gerätes an seinem endgültigen Stellplatz
mindestens 2 Stunden warten, bevor Sie das Gerät einschalten.
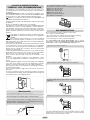
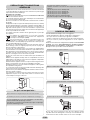
Zur Gewährleistung einer höheren Effi zienz sollte ein mindestens 5 cm großer
Abstand zwischen dem Gerät und den Wänden oder dahinter oder darüber
befi ndlichen Gegenständen eingehalten werden, wie auf der Abbildung
beschrieben.
Was man nicht tun sollte...
Installieren Sie den Kühlschrank nicht in der Nähe von Wärmequellen.
Verändern Sie nichts an dem Stecker und verwenden Sie weder
Adapter noch Verlängerungskabel.
Wenn Ihr Kühlschrank aus Edelstahl besteht, ist er zum Schutz
seiner Oberfl äche mit einer abziehbaren Folie versehen. Verwenden
Sie beim Entfernen dieser Folie keine scharfen Gegenstände, damit
die Oberfl äche nicht zerkratzt wird.
Stellen Sie das Gerät nicht in Außenbereichen auf.
Das Gerät eignet sich zum Gebrauch in folgenden
Umgebungstemperaturbereichen:
+10 +32°C bei der Klimaklasse SN
+16 +32°C bei der Klimaklasse N
+18 +38°C bei der Klimaklasse ST
+18 +43°C bei der Klimaklasse T
+16 +38°C bei der Klimaklasse N/ST
(Siehe Typenschild des Produkts)
PRAKTISCHE HINWEISE
Um Energie zu sparen, empfehlen wir Ihnen Folgendes:
- Stellen Sie keine warmen Speisen in den Kühlschrank.
- Zwängen Sie nicht zu viele Speisen in den Kühlschrank, damit eine korrekte
Ventilation gewährleistet ist.
- Vermeiden Sie die Berührung der Speisen mit der Rückwand des Kühlschranks.
- Bei Stromausfall sollte die Kühlschranktür möglichst nicht geöffnet
werden.
Während des Betriebs verursacht der Kühlschrank einige absolut normale
Geräusche, die Sie möglicherweise vernehmen werden. Dazu gehören:
leichtes BRUMMEN, GURGELN, RAUSCHEN und RASSELN ODER
ZISCHEN sowie leise Geräusche wie SCHNALZEN oder KNACKEN.
Kleine Ratschläge zur Reduzierung des Vibrationsgeräusches:
Wenn Sie die Anweisungen befolgt haben, das Gerät aber dennoch merkwürdige
Geräusche von sich gibt (abweichend von denen, die beim normalen Betrieb
entstehen), wenden Sie sich bitte an den technischen Kundendienst.
Stellen Sie die Füßchen so ein, dass das Gerät richtig gerade steht.
Vermeiden Sie den Kontakt zwischen Behältnissen und Gefäßen aus Glas.
Stellen Sie das Gerät so auf, dass ein Abstand zu anderen Möbeln
oder Geräten besteht.
Kontrollieren Sie, ob die internen Zubehörteile korrekt angebracht sind.

3 DE
INSTANDHALTUNG UND PFLEGE
Die korrekte Instandhaltung des Geräts sichert dessen lange
Lebensdauer. Denken Sie daran, vor jeder Wartungsmaßnahme den
Stecker zu ziehen.
Reinigung
Es ist zu empfehlen, den Kühlschrank regelmäßig zu reinigen: die
Außenteile mit einem feuchten Lappen, die inneren Bereiche mit Natron.
Verwenden Sie keine scheuernden Produkte. In der Mitte der Rückwand
des Kühlschranks fi nden Sie das Wasser-Ablaufl och, das nicht verstopfen
darf und regelmäßig zu reinigen ist.
Abtauen
Sie sollten das Kühlgerät jedesmal dann abtauen, wenn sich eine große
Reifschicht gebildet hat. In diesem Fall schalten Sie das Gerät aus
und lassen Sie die Türen offen stehen. Verwenden Sie keine scharfen
oder mechanischen Gegenstände (Messer, Scheren usw.), um das Eis
von den Innenteilen zu entfernen. Anderenfalls kann der Kühlkreislauf
beschädigt werden.
ACHTUNG: Die Bildung einer dünnen Reifschicht an der inneren
Rückwand des Kühlschranks ist normal.
Auswechseln des Lämpchens
Zum Auswechseln des Lämpchens im Inneren der Kühlzelle gehen Sie
folgendermaßen vor:
Stellen Sie das Thermostat auf ”0“ und ziehen Sie den Stecker aus
der Steckdose.
Nehmen Sie den durchsichtigen Lampendeckel ab, indem Sie ihn an
den Seiten mit einem Schlitzschraubendreher vorsichtig auseinander
drücken und ihn nach oben abziehen.
Schrauben Sie das Lämpchen heraus und ersetzen Sie es durch
ein baugleiches Lämpchen mit der gleichen Leistung.
Setzen Sie den Lampendeckel wieder auf und schließen Sie das
Gerät an den Stromkreis an.
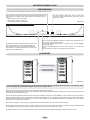
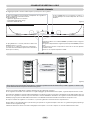
DIE AUFBEWAHRUNG UND DAS EINGEFRIEREN
Die Aufbewahrungszeit von gefrorenen Speisen in den Abteilen
sollte circa einen Monat betragen.
Für die Gefrierfächer
schauen Sie bitte in der nebenstehenden
Tabelle nach.
Das Einfrieren darf nur in den Abteilen
erfolgen.
Leitfaden zur Lösung von Problemen
Der technische Kundendienst steht Ihnen stets gern zur Verfügung, aber
häufi g können Sie kleine, scheinbar beunruhigende Unannehmlichkeiten
und Probleme selbst lösen. Das Problem kann nämlich mit nicht korrekter
Nutzung oder Aufstellung oder mit ungeeigneten Umgebungsbedingungen
zusammen hängen. In diesen Fällen würde Ihnen der Festpreis für das
Herbeirufen der Techniker in Rechnung gestellt, auch wenn das Produkt
noch in der Garantiezeit ist.
Nachfolgend fi nden Sie ein paar einfache Hinweise für die Behebung einiger
Störungen:
DER KÜHLSCHRANK FUNKTIONIERT NICHT
- Steckt der Stecker richtig in der Steckdose?
- Steht der Thermostat auf ”0“ oder „Stop“?
- Ist der Strom ausgefallen ?
DER KÜHLSCHRANK WIRD NICHT KALT GENUG
- Ist das Thermostat richtig eingestellt? Wenn nicht, stellen Sie es höher.
- Standen die Türen länger als normal offen?
- Wurde eine übermäßige Menge an frischen Waren verstaut?
- Wurden warme Speisen in den Kühlschrank gestellt?
ES HAT SICH EINE ZU DICKE EISSCHICHT GEBILDET
- Stand die Tür länger als normal offen? Schalten Sie den Kühlschrank aus,
entfernen Sie die Eisschicht und nehmen Sie ihn dann wieder in Betrieb.
- Ist das Drehrad zur Temperatureinstellung auf eine zu kalte Temperatur
gestellt (hohe Zahlen)? Stellen Sie es auf einen niedrigeren Wert.
ÜBERMÄßIGE BILDUNG VON KONDENSWASSER
- Stand die Tür länger als normal offen?
- Wurde eine übermäßige Menge an frischen Waren verstaut?
- Wurden warme Speisen in den Kühlschrank gestellt?
WASSER IM KÜHLRAUM
- Das Vorhandensein von Wassertröpfchen an den Wänden des Kühlraums
wird unter besonderen Feuchtigkeitsbedingungen der Umgebung als
normal erachtet.
- Ist das Ablaufl och verstopft?
DIE KÜHLRAUM-BELEUCHTUNG FUNKTIONIERT NICHT
- Steckt der Stecker richtig in der Steckdose?
- Ist der Strom ausgefallen ?
- Zum Auswechseln des Lämpchens folgen Sie bitte der Anleitung.
Wenn die Störung weiterhin besteht, kontaktieren Sie den technischen
Kundendienst. Dazu teilen Sie bitte diesem die Kurzbezeichnung des
Gerätetyps und die Matrikelnummer des Gerätes mit, die Sie dem
Typenschild entnehmen können.
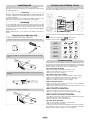
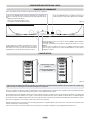
Damit Aroma, Gehalt und Frische der Speisen bestmöglich erhalten bleiben,
sollten sie wie auf der unten stehenden Abbildung ersichtlich im Kühlraum
untergebracht werden. Die Speisen sollten in Alufolie oder Kunststoff oder
in entsprechenden Behältnissen mit Deckel verpackt sein.
2 - 3
MONATE
4 - 6
MONATE
6 - 8
MONATE
10 - 12
MONATE
KÜHLSCHRANK

4 DE
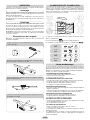
GEFRIERSCHRÄNKE LOGIC
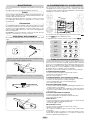
STEUEREINHEIT
Um an die Steuereinheit zu gelangen, braucht man nur die obere Kühlschranktür zu öffnen.
EINFRIEREN
Die rote Anzeige des Alarms leuchtet auf, wenn die Temperatur des Gefrierraums
den elektronisch eingestellten Wert übersteigt. Dies kann folgende Ursachen
haben:
- das Gerät wurde soeben eingeschaltet
- die Tür wurde zu lange offen gelassen
- es wurden warme Speisen hineingestellt
Das grüne Lämpchen ON zeigt an, dass das Gerät läuft.
Es leuchtet bei jeder Einstellung des Thermostats auf, mit
Ausnahme von OFF.
(Abbildung 1)
Die gelbe/orangefarbene Anzeige leuchtet auf, wenn man die
Taste SUPER mindestens 1 Sekunde lang gedrückt hält.
In diesem Fall ist der Kompressor kontinuierlich in Betrieb.
(Die Elektronik des Gerätes deaktiviert diese Funktion auto-
matisch nach circa 50 Stunden.)
Wenn man die Taste ON/OFF mindestens 2 Sekunden lang gedrückt hält, kann
das Gerät an- und abgeschaltet werden.
Um die Temperatur des Gefrierschranks zu regulieren, muss die Taste ON/OFF
kurz gedrückt werden.
Bei jedem Knopfdruck leuchtet ein weiteres der 5 Lämpchen auf, von links nach
rechts.
Je mehr Lämpchen leuchten, desto niedriger ist die Temperatur.
SCHOCKGEFRIERFACH
AKTIVIERUNGSGRIFF
SCHOCKGEFRIEREN
(Abbildung 2)
Achtung: Hier befi ndet sich das Typenschild, auf dem die Höchstmenge der Speisen, die eingefroren werden können, sowie alle Daten, die im
Falle eines Defekts dem Kundendienst mitgeteilt werden müssen, verzeichnet sind.
Alle Fächer des Gefrierschrankes gewährleisten die optimale Aubewahrung des Gefriergutes.
Zum Einfrieren der maximal möglichen Gefriermenge laut Matrikelschild empfehlen wir, die Schubladen vorübergehend zu entfernen und die einzufrierenden
Speisen direkt auf den Metallrost zu legen.
Bei Druck auf die Taste SUPER leuchtet die entsprechende gelbe/orangefarbene Anzeige auf (siehe Abbildung 1). Nach 24 Stunden legen Sie die Speisen
direkt auf den Metallrost. Nach weiteren 24 Stunden ist der Gefriervorgang abgeschlossen: die Schubladen können wieder hineingeschoben und die Speisen
im Gefrierschrank verteilt werden. Nun drücken Sie erneut auf die Taste SUPER, um diese Modalität zu deaktivieren. Andernfalls wird sie nach circa 50
Stunden automatisch elektronisch aufgehoben.
Bei Normtests bezüglich von Gefriervorgang und Aufbewahrung sind alle Schubladen außer der untersten herauszunehmen.
Einige Modelle sind mit der Funktion „Shock Freezing“ ausgestattet, die ein sehr schnelles Einfrieren in weniger als 4 Stunden ermöglicht. Dadurch werden
die organoleptischen Eigenschaften der Speisen (Farbe, Konsistenz, Geschmack) besser bewahrt (max. 3 kg).
Die Funktion wird aktiviert, wenn man den Griff zwischen dem ersten und dem zweiten Gefrierfach betätigt, bis die grüne Anzeige erscheint.

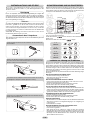
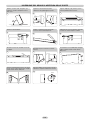
5 DE
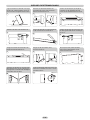
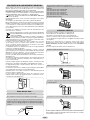
1
Legen Sie den Gefrierschrank hin oder neigen
Sie ihn zu 45°, damit die Arbeiten an dessen
Unterseite leichter ausgeführt werden können.
2
Entfernen Sie durch Abschrauben der
Schrauben das untere rechte Scharnier.
Nehmen Sie dann die Tür ab.
3
Nehmen Sie die Kappen (A) und (B) ab,
schrauben Sie die Schrauben ab und
ziehen Sie die Stirnwand teilweise heraus.
4
Schrauben Sie das rechte Scharnier ab.
(A) (B)
5
Stechen Sie das linke Loch der Stirnwand
an der vorbezeichneten Stelle durch.
6
Nehmen Sie das linke obere Scharnier aus
der beiliegenden Zubehörtüte und bringen
Sie es an.
7
Bringen Sie mit Hilfe der Schrauben und
Kappen die Stirnwand wieder an.
8
Bringen Sie die Tür und das untere
Scharnier wieder an.
9
Der entsprechende Umbau der Griffe:
entfernen Sie die Zierkappen an der
rechten Seite der Türen.
Schrauben Sie die Griffe von der linken Seite
ab und bringen Sie sie an der rechten Seite an,
befestigen Sie anschließend die Zierkappen
an der linken Seite der Türen.
Stellen Sie das Gerät wieder aufrecht hin und
warten Sie 2 Stunden, bevor Sie es erneut
in Betrieb nehmen.
10
11
2 Stunden
WECHSEL DES TÜRANSCHLAGS

6 EN
A SPACE IS NEEDED BETWEEN
„GENERAL“ AND „RECOMMENDATIONS“
This appliance is only intended for storing foods. Any other use is
considered hazardous and the manufacturer may not be held liable for
any damages.
Conformity declaration: the parts of this appliance intended to come
into contact with foodstuffs conform to the directive 89/109/EEC and the
Italian Law decree no. 108 of 25/01/92 implementing this directive.
Appliance conforming to the European directives 2004/108/EC and
2006/95/EC and subsequent amendments.
The dealer shall be notifi ed of any damage within 7 days from purchasing
the appliance.
We also recommend you read the terms of the warranty.
This appliance is not intended for use by persons (including children) with
reduced physical, sensory or mental capabilities, or lack of experience
and knowledge, unless they have been given supervision or instruction
concerning use of the appliance by a person responsible for their safety.
Children should be supervised to ensure that they do not play with the
appliance.
This appliance is marked according to the European directive
2002/96/EC on Waste Electrical and Electronic Equipment
(WEEE).
By ensuring this product is disposed of correctly, you will help
prevent potential negative consequences for the environment
and human health, which could otherwise be caused by inappropriate
waste handling of this product.
The symbol on the product indicates that this product may not be treated
as household waste. Instead it shall be handed over to the applicable
collection point for the recycling of electrical and electronic equipment.
Disposal must be carried out in accordance with local environmental
regulations for waste disposal.
For more detailed information about treatment, recovery and recycling of
this product, please contact your local city offi ce, your household waste
disposal service or the shop where you purchased the product.
Leave the power plug accessible even after the installation of the
apparatus.
Do not use electrical devices inside the food compartments, except
for the ones equipped with the apparatus or available from our service
centres.
Before plugging in the appliance, make sure the voltage on the rating plate
is the same as the voltage in your home. The rating plate is inside the
appliance, in the bottom left-hand corner of the fridge compartment.
The manufacturer may not be held liable for any damage caused by
unearthed wiring systems.
After you have installed the fridge, wait for at least two hours before
turning it on.
To ensure your appliance works as effi ciently as possible, leave at least
a 5 cm gap between the fridge and the wall and between the fridge and
items behind or above it (see diagram below).
What to avoid...
Do not install the fridge close to sources of heat.
Do not alter plugs or use adapter plugs or extension leads.
If you have purchased a stainless steel fridge, it will have a peel-off
fi lm protecting the surface. Do not use sharp implements to remove
the fi lm, as these could damage the steel.
Do not install the appliance outside.
The appliance works properly at the following temperature ranges:
Climatic class: SN +10 +32°C
Climatic class: N +16 +32°C
Climatic class: ST +18 +38°C
Climatic class: T +18 +43°C
Climatic class: N/ST +16 +38°C
(See appliance‘s rating plate)
RECOMMENDATIONS
We recommend the following, for greater energy saving:
- Do not put hot foods in the fridge.
- Do not pack foods close together as this prevents air circulating.
- Make sure foods do not touch the back of the fridge.
- If the electricity goes off, do not open the fridge door.
The fridge makes some noises when working. This is entirely
normal and you might hear HUMMING, GURGLING, RUSTLING AND
WHISTLING, as well as slight CLICKING OR JUMPING noises.
Adjust the feet to level the appliance.
Make sure glass containers do not touch in the appliances.
Install the fridge leaving a gap between it and other furniture or
appliances.
Make sure accessories are installed properly.
If you have followed the instructions, but your product continues to make
irritating noises, other than those resulting from a normal functioning,
please contact the technical support service.

7 EN
MAINTENANCE
Proper maintenance will ensure a long life for your appliance.
Remember to remove the plug before you clean/defrost the fridge, change
the fridge light bulb, etc.
Cleaning
Clean the outside of the fridge at regular intervals with a damp cloth. Use
a solution of bicarbonate of soda and water to clean the inside. Do not
use abrasive products.
An outlet for draining water is located in the middle of the back of the
fridge. Make sure this outlet is not obstructed; clean regularly.
Defrosting
It is recommended to defrost the refrigerator each time an excessive layer
of frost is formed, then leave the doors open with the apparatus switched
off and avoid using sharp or mechanical objects (knives, scissors, etc)
to remove the ice from the internal parts, in order to avoid damaging the
refrigerating circuit.
NOTE: a small amount of ice on the back of the fridge compartment is
normal.
Replacing the fridge light bulb
To replace the light bulb in the fridge compartment:
Adjust the thermostat to „0“ and remove the plug from the socket.
Use a fl at screwdriver to lift up the grid and remove the see-through
cover.
Remove the light bulb and replace with the same type and same
watt bulb.
Re-fi t the cover and plug in the appliance.
STORING AND FREEZING FOODS
To make sure foods retain their fl avour and substance and stay fresh,
store them in the fridge compartment as shown in the fi gure below. Wrap
foods in tin foil or cling fi lm or put them in closed containers.
Frozen foods can be stored for approximately one month in compartments
.
See the table for storing foods in
compartments.
Foods can only be frozen in
compartments.
Trouble-shooting
Please contact our service department if you have any diffi culties. However
you can often solve small or apparently alarming problems yourself. In fact
problems may be caused by incorrect use or installation or by unsuitable
ambient conditions and in these cases you will be charged.
THE FRIDGE DOES NOT WORK
- Make sure the plug is inserted properly in the socket.
- Make sure the thermostat is not set to „0“ or Stop.
- Make sure the electricity is working.
THE FRIDGE IS NOT COLD ENOUGH
- Make sure the thermostat is set properly. Adjust to higher settings.
- Make sure the fridge doors have not been left open for too long.
- Make sure you haven‘t stored too much food in the fridge.
- Make sure you haven‘t put hot foods in the fridge.
THERE IS TOO MUCH FROST
- Make sure the door has not been left open for too long. Unplug the
fridge, defrost and then turn it back on.
- Make sure the thermostat is not set at a temperature which is too cold
(high settings). Adjust to lower settings.
THERE IS TOO MUCH CONDENSATION
- Make sure the door has not been left open for too long.
- Make sure you haven‘t stored too many fresh foods in the fridge.
- Make sure you haven‘t put hot foods in the fridge.
THERE IS WATER IN THE FRIDGE COMPARTMENT
- A few drops of water on the sides of the fridge compartment is normal,
particularly when a room is humid/damp.
- Make sure the water outlet is not obstructed.
THE LIGHT DOES NOT WORK
- Make sure the plug is inserted in the socket properly.
- Make sure the electricity is working.
- Follow the instructions in the technical datasheet to replace the bulb.
If the problem continues, contact our service department, giving the
appliance number and serial number on the rating plate.
FRIDGE AREA
2 - 3
MONTHS
4 - 6
MONTHS
6 - 8
MONTHS
10 - 12
MONTHS

8 EN
LOGIC UPRIGHT FREEZERS
CONTROL PANEL
Open the top door of the freezer to access the control panel.
FREEZING
The red ALARM light goes on when the temperature inside the freezer is higher
than the electronic setting. This can depend on the following:
- the appliance has just been turned on
- the door has been left open too long
- warm foods have been placed inside
The green ON light indicates that the freezer is running. It
comes on with all temperature settings except OFF.
(Figure 1)
The yellow/orange light goes on when the SUPER button is
pressed and held for at least 1 second.
In this case the compressor continues to function as normal.
(This function is automatically deactivated electronically after
approximately 50 hours).
Pressing the ON/OFF button and holding it down for at least 2 seconds lets you
turn the unit on and off.
To regulate the freezer temperature, press ON/OFF quickly.
Each time you press the key one of the 5 lights goes on, from left to right.
The more lights on, the colder the temperature.
SHOCK FREEZING
COMPARTMENT
SHOCK FREEZING
ACTIVATION HANDLE
(Figure 2)
NB. This is the label indicating the maximum quantities of food you can freeze and the information to give our Service I Department in the
event of a fault.
The preservation of frozen foods is guaranteed in all of the freezer‘s compartments.
When the freezer is full, it is advised to remove the drawers and place the food directly on the shelves for optimal congelation.
Turn the thermostat clockwise to SUPER and the yellow/orange light will come on (see fi g. 1). After 24 hours, put foods directly on the metal rack. Freezing
takes 24 hours and you can then put the compartments back and arrange the foods in the freezer. Reset the thermostat to position 2/3.
To test out the freezing and conservation functions remove all the drawers apart from the bottom one.
Some models are equipped with a „Shock Freezing“ function which freezes items quickly in less than 4 hours and guarantees better-tasting food (max. 3kg).
To use, turn the handle between the fi rst and second compartments until the green indicator is visible.

9 EN
1
Tip the refrigerator over onto the fl oor or to
a 45° angle to make working on the bottom
section easier.
2
Remove the lower right-hand hinge by
unscrewing it and then remove the door.
3
Remove plugs (A) and (B), loosen the
screws and partially remove the panel.
4
Unscrew the hinge on the right.
(A) (B)
5
Cut and break the slot on the left side of
the panel, as shown in the diagram.
6
Fit the upper left hinge (found in the
accessories kit).
7
Reinstall the panel, securing it with the
screws and plugs.
8
Replace the door and fi x the lower hinge.
9
To reverse the handles: remove the
decorative plugs located on the right-hand
side of the door.
Unscrew the handles from the left side and
move them to the right side. Then position
the decorative plugs into the holes on the left
side of the door.
Return the appliance to the upright position
and wait two hours before turning it on.
10
11
2 hours
INVERTING THE DOOR

10 ES10 FR
PRÉCAUTIONS ET SUGGESTIONS
GÉNÉRALES
Cet appareil devra être destiné exclusivement à la conservation des aliments
; toute autre utilisation est dangereuse et le constructeur ne peut être jugé
responsable d‘éventuels dommages.
Déclaration de conformité:
Appareil conforme aux directives européennes 2004/108/CE et 2006/95/CE
et à leurs amendements ultérieurs.
Les éventuels dommages devront être communiqués au revendeur dans
les 7 jours qui suivent la date d‘achat.
Nous vous conseillons en outre de prendre connaissance des conditions
de garantie.
Cet appareil n‘est pas conçu pour être utilisé par des personnes (ou enfants)
dont les capacités physiques, sensorielles ou mentales seraient réduites, ni
par des personnes ne disposant d‘aucune expérience ou connaissance s‘y
rapportant, à moins qu‘elles ne soient sous surveillance ou qu‘elles aient
reçu des instructions précises relatives au fonctionnement de l‘appareil par
un tiers responsable de leur sécurité.
Les enfants doivent être surveillés afi n de garantir qu‘ils ne jouent pas
avec l‘appareil.
Cet appareil est commercialisé en accord avec la directive
européenne 2002/96/CE sur les déchets des équipements
électriques et électroniques (DEEE).
En vous assurant que ce produit est correctement recyclé, vous
participez à la prévention des conséquences négatives sur
l‘environnement et la santé publique qui pourraient être causées par une
mise au rebut inappropriée de ce produit.
Le symbole sur ce produit indique qu‘il ne doit pas être traité comme un
déchet ménager. Il doit être rapporté jusqu‘à un point de recyclage des
déchets électriques et électroniques.
La collecte de ce produit doit se faire en accord avec les réglementations
environnementales concernant la mise au rebut de ce type de déchets. Pour
plus d‘information au sujet du traitement, de la collecte et du recyclage de
ce produit, merci de contacter votre mairie, votre centre de traitement des
déchets ou le magasin où vous avez acheté ce produit.
La prise de courant doit rester accessible même après l’installation de
l’appareil.
N’utilisez aucun appareil électrique dans les compartiments réservés à
l’alimentation, à l’exception de ceux fournis avec l’appareil ou disponibles
auprès de notre service après vente.
Avant de brancher l‘appareil, assurez-vous que les données fi gurant sur sa
plaque correspondent à celles du réseau de distribution électrique.
La plaque de données se trouve à l‘intérieur de l‘appareil, en bas à gauche
du compartiment réfrigérateur.
Le constructeur ne peut être jugé responsable d‘éventuels dommages dus
à la non-mise à la terre de l‘installation.
Après la mise en place défi nitive de l‘appareil, attendez au moins 2 heures
avant de le mettre en marche.
Pour augmenter son effi cacité, laissez un espace d‘au moins 5 cm entre
l‘appareil et les parois ou les objets situés derrière ou au-dessus de lui,
comme indiqué sur la fi gure ci-dessous.
Ce qu‘il ne faut pas faire...
Évitez d‘installer le réfrigérateur près de sources de chaleur.
Ne modifi ez pas la fi che et n‘utilisez ni adaptateurs ni rallonges.
Si votre réfrigérateur est en acier inoxydable, il est doté d‘un
revêtement décollable qui protège sa surface.
Pour décoller ce revêtement, évitez d‘utiliser des objets coupants qui
pourraient endommager l‘acier.
N‘installez pas l‘appareil à l‘extérieur.
L‘appareil fonctionne correctement aux températures ambiantes
suivantes :
+10 +32 °C pour la classe climatique SN ;
+16 +32 °C pour la classe climatique N ;
+18 +38 °C pour la classe climatique ST ;
+18 +43 °C pour la classe climatique T ;
+16 +38°C pour la classe climatique N/ST ;
(Consultez la plaque de données de l‘appareil)
CONSEILS PRATIQUES
Pour économiser de l‘énergie, nous vous suggérons :
- d‘éviter d‘introduire des aliments chauds dans le réfrigérateur ;
- de ne pas entasser les aliments pour garantir la ventilation ;
- d‘éviter le contact entre les aliments et la paroi de fond du réfrigérateur ;
- de ne pas ouvrir les portes du réfrigérateur en cas de coupure de
courant.
Durant son fonctionnement, le réfrigérateur émet quelques bruits absolument
normaux, dont: légers BOURDONNEMENTS, GARGOUILLEMENTS,
BRUISSEMENTS, CHUINTEMENTS, CLAQUEMENTS ou CLIQUETIS.
Quelques astuces pour réduire le bruit de vibration:
Si vous avez suivi les instructions mais que votre appareil continue
à produire des bruits dérangeants, autres que ceux résultant de son
fonctionnement normal, veuillez contacter notre service technique.
Réglez les pieds pour aligner l‘appareil.
Évitez le contact entre conteneurs et récipients en verre.
Installez l‘appareil à l‘écart de meubles ou d‘appareils électroménagers.
Contrôlez que les accessoires intérieurs sont bien montés.

11 PT
11 FR
ENTRETIEN
L‘entretien correct de l‘appareil garantit sa longévité. N‘oubliez pas de
débrancher la fi che avant toute opération.
Nettoyage
Nettoyez périodiquement l‘extérieur du réfrigérateur avec un chiffon
humide, et l‘intérieur avec une solution de bicarbonate de soude ; évitez
d‘utiliser des produits abrasifs.
Le centre de la paroi de fond du réfrigérateur est pourvu d‘un trou
d‘évacuation de l‘eau, qu‘il est important de ne pas boucher et de nettoyer
périodiquement.
Dégivrage
Il est recommandé de dégivrer le réfrigérateur dès qu’une couche
excessive de givre se forme. Laissez les portes de l’appareil éteint
ouvertes et n’utilisez pas d’objets pointus ou mécaniques (couteaux,
paires de ciseaux, etc) pour supprimer la glace sur les parties intérieures
afi n d’éviter d’endommager le circuit de réfrigération.
ATTENTION : la présence de gouttes de givre sur la paroi de fond du
compartiment réfrigérateur est normale, à condition que leur quantité
ne soit pas excessive.
Remplacement de l‘ampoule
Opérations de remplacement de l‘ampoule située à l‘intérieur du
compartiment frigidaire:
CONSERVATION ET CONGÉLATION
Pour conserver au mieux l‘arôme, la substance et la fraîcheur des
aliments, il est conseillé de les ranger dans le compartiment réfrigérateur
comme indiqué sur la fi gure ci-dessous en prenant soin de les envelopper
d‘une feuille d‘aluminium ou de plastique ou de les placer dans les
conteneurs à couvercle prévus à cet effet.
Le temps de conservation des aliments congelés est d‘environ un mois
dans les compartiments
.
Pour les compartiments
consultez le tableau adjacent.
La congélation ne peut avoir lieu que dans les compartiments
.
Guide de dépannage
Le service d‘assistance technique est toujours à votre disposition, mais vous
pouvez souvent résoudre vous-même les petits inconvénients et problèmes
apparemment alarmants. En effet, le problème peut être lié à une erreur
d‘utilisation ou d‘installation ou à des conditions ambiantes inadaptées.
Ci-après, les solutions à quelques problèmes.
LE RÉFRIGÉRATEUR NE FONCTIONNE PAS
- La fi che est-elle bien insérée dans la prise de courant ?
- Le thermostat est-il sur 0 ou Stop ?
- Y a-t-il une coupure de courant ?
LE RÉFRIGÉRATEUR N‘EST PAS ASSEZ FROID
- Le thermostat est-il bien réglé ? Réglez-le sur des numéros plus hauts.
- Les portes sont-elles restées trop longtemps ouvertes ?
- La quantité d‘aliments emmagasinée est-elle excessive ?
- Le réfrigérateur contient-il des aliments chauds ?
FORMATION EXCESSIVE DE GIVRE
- Les portes sont-elles restées trop longtemps ouvertes ? Éteignez l‘appareil,
dégivrez et rallumez-le.
- Le bouton de réglage de la température est-il réglé sur une température
trop froide (numéros hauts) ? Réglez-le sur des numéros plus bas.
FORMATION EXCESSIVE DE CONDENSATION
- Les portes sont-elles restées trop longtemps ouvertes ?
- La quantité d‘aliments emmagasinée est-elle excessive ?
- Le réfrigérateur contient-il des aliments chauds ?
PRÉSENCE D‘EAU DANS LE COMPARTIMENT
- La présence de gouttelettes sur les parois du compartiment est normale
en cas d‘humidité ambiante excessive.
- Le trou d‘évacuation est-il bouché ?
LA LUMIÈRE NE FONCTIONNE PAS
- La fi che est-elle bien insérée dans la prise de courant ?
- Y a-t-il une coupure de courant ?
- Pour remplacer la lampe, suivez les instructions fi gurant sur la fi che
technique du produit.
Si le problème persiste, contactez le service d‘assistance technique et
communiquez-lui le sigle et le numéro complet fi gurant sur la plaque de
données de l‘appareil.
Réglez le thermostat sur ”0“ et débranchez la fi che de la prise de
courant électrique.
Retirez le couvercle de protection en élargissant les languettes avec
un tournevis plat et en tirant vers le haut.
Dévissez l‘ampoule et remplacez-la par une ampoule analogue
ayant la même puissance.
Placez le couvercle de protection et branchez l‘appareil au réseau
de distribution électrique.
2 - 3
MOIS
4 - 6
MOIS
6 - 8
MOIS
10 - 12
MOIS
COMPARTIMENT
RÉFRIGÉRATEUR

12 FR
CONGÉLATEURS VERTICAUX LOGIC
PANNEAU DE COMMANDE
Pour accéder au panneau de commande, il suffi t d‘ouvrir la porte du congélateur.
CONGÉLATION
Le témoin rouge ALARM s‘allume lorsque la température du congélateur est
supérieure à celle qui est réglée électroniquement. Cela peut dépendre du fait
que :
- l‘appareil vient juste d‘être allumé ;
- la porte est restée trop longtemps ouverte ;
- le congélateur contient des aliments chauds.
Le témoin vert ON indique que le congélateur est en marche ; il
s‘allume quelle que soit la position du thermostat, sauf OFF.
(fi gure 1)
Le témoin jaune/orange s‘allume si vous appuyez sur la touche
SUPER pendant au moins 1 seconde. Dans ce cas, le compres-
seur fonctionne en continu. (La fi che électronique désactivera
automatiquement cette fonction après 50 heures environ.)
Appuyer pendant au moins 2 secondes sur la touche ON/OFF permet d‘allumer
et d‘éteindre l‘appareil.
Pour régler la température du congélateur, appuyez brièvement sur la touche
ON/OFF.
Chaque fois que vous appuyez sur la touche, les 5 LEDS s‘allument l‘une après
l‘autre, de gauche à droite. Plus le nombre de LEDS allumées est élevé, plus la
température est basse.
COMPARTIMENT SHOCK
FREEZING
MANETTE D‘ACTIVATION DU
SHOCK FREEZING
(fi gure 2)
N.B. Position de la plaque de données de l‘appareil, sur laquelle fi gure la quantité maximale d‘aliments qu‘il est possible I de congeler ainsi
que les données à communiquer à l‘assistance technique en cas de panne.
La bonne conservation des aliments congelés est garantie dans tous les compartiments du congélateur. Pour la congélation de la charge maximum déclarée,
il convient de disposer les aliments directement sur les grilles, en retirant temporairement les tiroirs.
Si vous appuyez sur la touche SUPER, le témoin jaune/orange s‘allumera (voir fi gure 1). Après 24 heures, posez directement les aliments sur la grille métal-
lique. 24 heures plus tard, les aliments sont congelés ; vous pouvez alors remettre les tiroirs en place et répartir les aliments dans le congélateur. Appuyez
à nouveau sur la touche SUPER pour désactiver cette fonction. Autrement, la fi che électronique la désactivera automatiquement après 50 heures environ.
Pour tester la congélation et la conservation, enlevez tous les tiroirs sauf celui du bas.
Certains modèles disposent de la fonction „Shock Freezing“ qui permet une congélation rapide en moins de 4 heures, préservant ainsi les propriétés nutri-
tionnelles des aliments congelés (max 3Kg).
Pour activer cette fonction, poussez la manette située entre le premier et le deuxième compartiment, jusqu‘à l‘apparition de la bande verte.

13 FR
1
Couchez le réfrigérateur ou inclinez-le de 45°
pour faciliter les opérations à effectuer sur sa
partie inférieure.
2
Démontez le gond inférieur droit en
dévissant les vis, puis démontez la porte.
3
Retirez les bouchons (A) et (B), dévissez
les vis et extrayez partiellement le bandeau.
4
Dévissez le gond droit.
(A) (B)
5
Découpez et rompez le trou gauche du
bandeau selon l‘empreinte.
6
Sortez le gond supérieur gauche du
sachet des accessoires et fi xez-le.
7
Remontez le cache en le fi xant avec les vis
et les bouchons.
8
Remontez la porte et fi xez le gond
inférieur.
9
Pour inverser les poignées : retirez les
bouchons de décoration du côté droit des
portes.
Dévissez les poignées de gauche et déplacez-
les du côté droit, puis placez les bouchons
de décoration sur le côté gauche des portes.
Remettez l‘appareil à la verticale et attendez
2\ heures avant de le mettre en marche.
10
11
2 heures
INVERSION DU SENS D‘OUVERTURE DES PORTES

14 IT
PRECAUZIONI E SUGGERIMENTI GENERALI
Questo apparecchio dovrà essere destinato solo alla conservazione degli
alimenti, ogni altro uso è da considerarsi pericoloso e il costruttore non
può essere considerato responsabile per eventuali danni.
Dichiarazione di conformità: questa apparecchiatura, nelle parti destinate
a venire a contatto con sostanze alimentari, è conforme alla prescrizione
della Dir. CEE 89/109 e al D.L. di attuazione n. 108 del 25/01/92.
Apparecchio conforme alle Direttive Europee 2004/108/EC, 2006/95/EC
e successive modifi che.
Eventuali danni dovranno essere comunicati al rivenditore entro 7 giorni
dall‘acquisto.
Si consiglia inoltre di prendere visione delle condizioni di garanzia.
Questo elettrodomestico non dovrà essere destinato a persone (compresi
bambini) con handicap fi sici, sensoriali, mentali, o mancanti di esperienza
o conoscenza d´uso, senza la supervisione di persone che abbiano preso
visione delle istruzioni d´uso e che siano direttamente responsabili della
loro sicurezza.
Accertarsi che i bambini non giochino vicino all´elettrodomestico per
preservare la loro sicurezza.
Questo elettrodomestico è marcato conformemente alla Direttiva
Europea 2002/96/CE sui rifi uti da apparecchiature elettriche ed
elettroniche (WEEE).
Assicurandovi che questo prodotto sia smaltito correttamente,
aiuterete ad evitare possibili conseguenze negative all‘ambiente
e alla salute delle persone, che potrebbero verifi carsi a causa d‘un errato
trattamento di questo prodotto giunto a fi ne vita.
Il simbolo sul prodotto indica che questo apparecchio non può
essere trattato come un normale rifiuto domestico; dovrà invece
essere consegnato al punto più vicino di raccolta per il riciclo delle
apparecchiature elettriche ed elettroniche.
Lo smaltimento deve essere effettuato in accordo con le regole ambientali
vigenti per lo smaltimento dei rifi uti.
Per informazioni più dettagliate sul trattamento, recupero e riciclo di
questo prodotto, per favore contattare l‘uffi cio pubblico di competenza (del
dipartimento ecologia e ambiente), o il vostro servizio di raccolta rifi uti a
domicilio, o il negozio dove avete acquistato il prodotto.
Lasciare accessibile la spina d‘alimentazione anche dopo l‘installazione
dell‘apparecchio.
Non utilizzare apparecchi elettrici all‘interno del comparto alimenti, ad
eccezione di quelli in dotazione all‘apparecchio o disponibili presso i
nostri centri assistenza.
Prima di collegare l‘apparecchio all‘impianto elettrico, accertarsi che i dati
di targa siano rispondenti a quelli della rete di distribuzione elettrica.
La targa dati del prodotto è situata all‘interno dello stesso, in basso a
sinistra nella zona frigo.
II costruttore non può essere considerato responsabile per eventuali danni
causati dalla mancanza dì messa a terra dell‘impianto.
Attendere almeno 2 ore dalla collocazione in sede defi nitiva prima di
mettere in funzione l‘apparecchio.
Per una maggiore effi cienza lasciare almeno uno spazio di 5 cm. tra
l‘apparecchio e le pareti o gli oggetti retrostanti o soprastanti lo stesso,
come descritto nella fi gura a lato.
Cose da non fare...
Evitare di installare il frigorifero vicino a fonti di calore.
Non modifi care la spina ne usare adattatori o prolunghe.
Se il vostro frigorifero è in acciaio inox sarà dotato di un rivestimento
pelabile che ne protegge la superfi cie. Per togliere questo involucro,
è bene evitare l‘uso di oggetti taglienti che potrebbero danneggiare
l‘acciaio.
Non posizionate l‘apparecchio in luoghi estemi.
L‘apparecchio funziona correttamente tra queste temperature
ambiente:
+10 +32°C per la classe climatica SN
+16 +32°C per la classe climatica N
+18 +38°C per la classe climatica ST
+18 +43°C per la classe climatica T
+16 +38°C per la classe climatica N/ST
(Vedi targa dati del prodotto)
CONSIGLI PRATICI
Per un miglior risparmio energetico vi suggeriamo di:
- Evitare di inserire cibi caldi all‘interno del frigorifero.
- Non stipare i cibi per garantire una corretta ventilazione.
- Evitare il contatto tra i cibi e la parete di fondo del frigorifero.
- In caso di mancata energia elettrica è consigliabile non aprire la porta
del frigorifero.
Durante il suo funzionamento, il frigorifero emette alcuni rumori
assolutamente normali, che potrà capitarvi di avvertire quali: leggeri
RONZII, GORGOGLII, FRUSCII e SIBILI, lievi rumori come SCHIOCCHI
o SCATTI.
Piccoli accorgimenti per ridurre il rumore di vibrazione:
Regolare i piedini per allineare il mobile.
Evitare il contatto tra contenitori e recipienti di vetro.
Installare l‘apparecchio distanziandolo da altri mobili
o elettrodomestici.
Controllare il corretto montaggio degli accessori interni.
Se avete seguito le indicazioni, ma il vostro prodotto continua ad emettere
rumori fastidiosi e diversi da quelli di normale funzionamento, contattare
il servizio di assistenza tecnica.

15 IT
MANUTENZIONE
Una corretta manutenzione dell‘apparecchio garantisce una lunga vita
allo stesso.
Ricordate di staccare la spina prima di qualsiasi operazione.
Pulizia
E‘ bene effettuare periodicamente la pulizia estema del frigorifero con
un panno umido, ed interna con una soluzione di bicarbonato di sodio,
evitando l‘utilizzo di prodotti abrasivi.
Sulla parete di fondo del frigorifero, nella parte centrale, troverete un
foro di drenaggio dell‘acqua, che è importante non ostruire e pulire
periodicamente.
Sbrinamento
E‘ consigliabile sbrinare il frigorifero ogni volta si formi un eccessivo
strato di brina, quindi lasciare le porte aperte ad apparecchio spento
ed evitare l‘uso di oggetti taglienti o meccanici (coltelli, forbici e...) per
togliere il ghiaccio dalle parti interne, onde evitare il danneggiamento
del circuito refrigerante.
ATTENZIONE: La presenza di brina sulla parete di fondo del vano
frigorifero, se in quantità non eccessiva, è normale.
Sostituzione della lampadina
Per sostituire la lampadina all‘interno della cella frigorifero, agire come
segue:
Posizionare i termostati sulla posizione „O“ e togliere la spina dalla
presa della corrente elettrica.
Togliere il coperchietto trasparente di protezione allargando le alette
con un cacciavite a taglio e tirando verso l‘alto.
Svitare la lampadina e sostituirla con una analoga e con la medesima
potenza.
Posizionare il coperchietto protettivo e collegare l‘apparecchio alla
corrente elettrica.
LA CONSERVAZIONE E LA CONGELAZIONE
Per conservare al meglio aroma, sostanza e freschezza dei cibi è
consigliabile riporli nel vano frigorifero come è indicato nella fi gura
sottostante, avendo cura di avvolgerli in fogli di alluminio o plastica oppure
negli appositi contenitori con coperchio.
La conservazione dei cibi congelati è di circa un mese negli scomparti
.
Per i vani
attenersi alla tabella a fi anco.
La congelazione può avvenire solamente negli scomparti
.
Guida alla soluzione dei problemi
II servizio di Assistenza Tecnica è sempre a vostra disposizione, ma
spesso piccoli inconvenienti e problemi apparentemente allarmanti
possono essere risolti direttamente da voi. Il problema, infatti, può essere
legato ad uso o installazione errati, oppure a condizioni ambientali non
idonee. In questi casi vi verranno addebitate le spese per il diritto fi sso
di chiamata, anche se il prodotto è ancora in garanzia.
Di seguito troverete una facile guida alla soluzione di alcuni problemi:
IL FRIGORIFERO NON FUNZIONA
- La spina è inserita correttamente nella presa di corrente?
- Il termostato è in posizione O o Stop?
- Manca la corrente elettrica?
IL FRIGORIFERO NON E‘ SUFFICIENTEMENTE FREDDO
- La regolazione del termostato è corretta? regolare su numeri più alti
- Le porte sono state aperte per un tempo prolungato?
- E‘ stata immagazzinata una eccessiva quantità di cibi?
- Sono stati inseriti cibi caldi?
ECCESSIVA FORMAZIONE DI BRINA
- La porta è rimasta aperta per tempi prolungati? Spegnere l‘apparecchio,
sciogliere la brina e farlo ripartire.
- La manopola di regolazione della temperatura è impostata ad una
temperatura troppo fredda (numeri alti)? Regolare la manopola su
numeri più bassi.
ECCESSIVA FORMAZIONE DI CONDENSA
- La porta è rimasta aperta per tempi prolungati?
- E‘ stata immagazzinata una quantità elevata di cibi freschi?
- Sono stati inseriti cibi caldi?
ACQUA IN CELLA
- La presenza di goccioline sulle pareti della cella sono ritenute normali
in particolari condizioni di umidità dell‘ambiente.
- Il foro di drenaggio è ostruito?
NON FUNZIONA LA LUCE
- La spina è inserita correttamente nella presa di corrente?
- Manca la corrente elettrica?
- Per sostituire la lampadina seguire le istruzioni sulla scheda tecnica
del prodotto.
Se il problema permane contattare il servizio di assistenza tecnica,
comunicando la sigla dell‘apparecchio e la matricola completa che
troverete sui dati di targa dell‘apparecchio.
ZONA FRIGO
2 - 3
MESI
4 - 6
MESI
6 - 8
MESI
10 - 12
MESI

16 IT
CONGELATORI VERTICALI LOGIC
QUADRO COMANDI
Per raggiungere il quadro comandi è suffi ciente aprire la porta superiore del congelatore.
CONGELAZIONE
La spia rossa ALARM si accende quando la temperatura del congelatore è
superiore a quella impostata elettronicamente.
Ciò può dipendere da:
- apparecchio appena messo in funzione
- porta rimasta aperta troppo a lungo
- introduzione di alimenti caldi
La spia verde ON indica che il congelatore è in funzione, si
accende qualunque sia la termica impostata, ad eccezione
dell‘ OFF
(Figura 1)
La spia gialla/arancio si accende premendo il relativo tasto
SUPER per almeno 1 secondo.
In questo caso il compressore funzionerà continuamente.
(La scheda elettronica disattiverà questa funzione automatica-
mente dopo circa 50 ore).
Premendo per almeno 2 secondi il tasto ON/OFF è possibile accendere e spegnere
l‘apparecchio.
Per regolare la temperatura del congelatore premere il pulsante ON/OFF per breve
tempo.
Ad ogni pressione del tasto corrisponde l‘accensione di uno dei 5 led, partendo
da sinistra a destra.
Più led sono accesi più la temperatura è fredda.
COMPARTO SHOCK
FREEZING
MANIGLIA DI ATTIVAZIONE
SHOCK FREEZING
(Figura 2)
NB. In questa posizione troverete la targa matricola, contenente la quantità massima di alimenti che è possibile congelare, I e i dati da comu-
nicare all‘Assistenza Tecnica qualora si verifi casse un guasto.
La buona conservazione degli alimenti congelati è garantita in tutti gli scomparti del congelatore.
Per la congelazione del massimo carico dichiarato si consiglia di appoggiare gli alimenti direttamente sui ripiani, e togliendo temporaneamente i cassetti.
Premendo il tasto SUPER si accenderà la relativa spia gialla/arancio (vedi fi gura 1). Dopo 24 ore introdurre i cibi direttamente sulla griglia metallica. Trascorse
altre 24 ore la congelazione è terminata, si possono reintrodurre i cassetti e ridistribuire i cibi all‘interno del congelatore. Premere nuovamente il pulsante
SUPER per spegnere questa modalità, altrimenti tale funzione verrà disattivata automaticamente dalla scheda elettronica dopo 50 ore circa.
Per le prove normative di congelazione e conservazione , se presenti, togliere tutti i cassetti ad esclusione di quello in basso.
Alcuni modelli sono provvisti della funzione „Shock Freezing“ che permette un congelamento rapido in meno di 4 ore e garantendo migliori proprietà orga-
nolettiche dei cibi congelati (max 3Kg).
L‘attivazione della funzione avviene muovendo la maniglia presente tra il primo e il secondo scomparto, sino a rendere visibile l‘indicatore verde.

17 IT
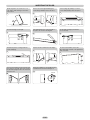
1
Sdraiare o inclinare di 45° il frigorifero, per
facilitare le operazioni nella parte inferiore
dello stesso.
2
Togliere la cerniera inferiore destra
svitando le viti, quindi togliere la porta.
3
Togliere i tappi (A) e (B), svitare le viti ed
estrarre parzialmente il cruscotto.
4
Svitare la cerniera destra.
(A) (B)
5
Incidere e rompere l‘asola sinistra del
cruscotto nella zona dell‘impronta.
6
Dalla busta accessori in dotazione, prelevare
e i fi ssare la cerniera superiore sinistra.
7
Rimontare il cruscotto, fi ssando con le viti
e i tappini.
8
Rimontare la porta e fi ssare la cerniera
inferiore.
9
Per effettuare la reversibilità delle maniglie:
togliere i tappini estetici sul lato destro
delle porte.
Svitare le maniglie dal lato sinistro e spostarle
sul lato destro, quindi posizionare i tappini
estetici sul lato sinistro delle porte.
Riportare l‘apparecchio in posizione verticale e
attendere 2 ore prima di rimetterlo in funzione.
10
11
2 ore
INVERSIONE DEL SENSO DI APERTURA DELLE PORTE

Z STUDIO > 08-2008 – 41029716
-
 1
1
-
 2
2
-
 3
3
-
 4
4
-
 5
5
-
 6
6
-
 7
7
-
 8
8
-
 9
9
-
 10
10
-
 11
11
-
 12
12
-
 13
13
-
 14
14
-
 15
15
-
 16
16
-
 17
17
-
 18
18
-
 19
19
-
 20
20


Documenti correlati
Altri documenti
-
Candy FRHNMF3306AL Manuale utente
-
Iberna CFM3665E SN Manuale utente
-
ROSIERES RBDP 2653 Manuale utente
-
ROSIERES RBDP 2653 Manuale utente
-
-
Candy BCBS172HP Manuale utente
-
Hoover FRHCN3984 Manuale utente
-
Hoover HBOD 174 Manuale utente
-
Whirlpool W55VM 1120 W CH 2 Guida utente
-
Whirlpool KDA 1420 WS 2 Guida utente