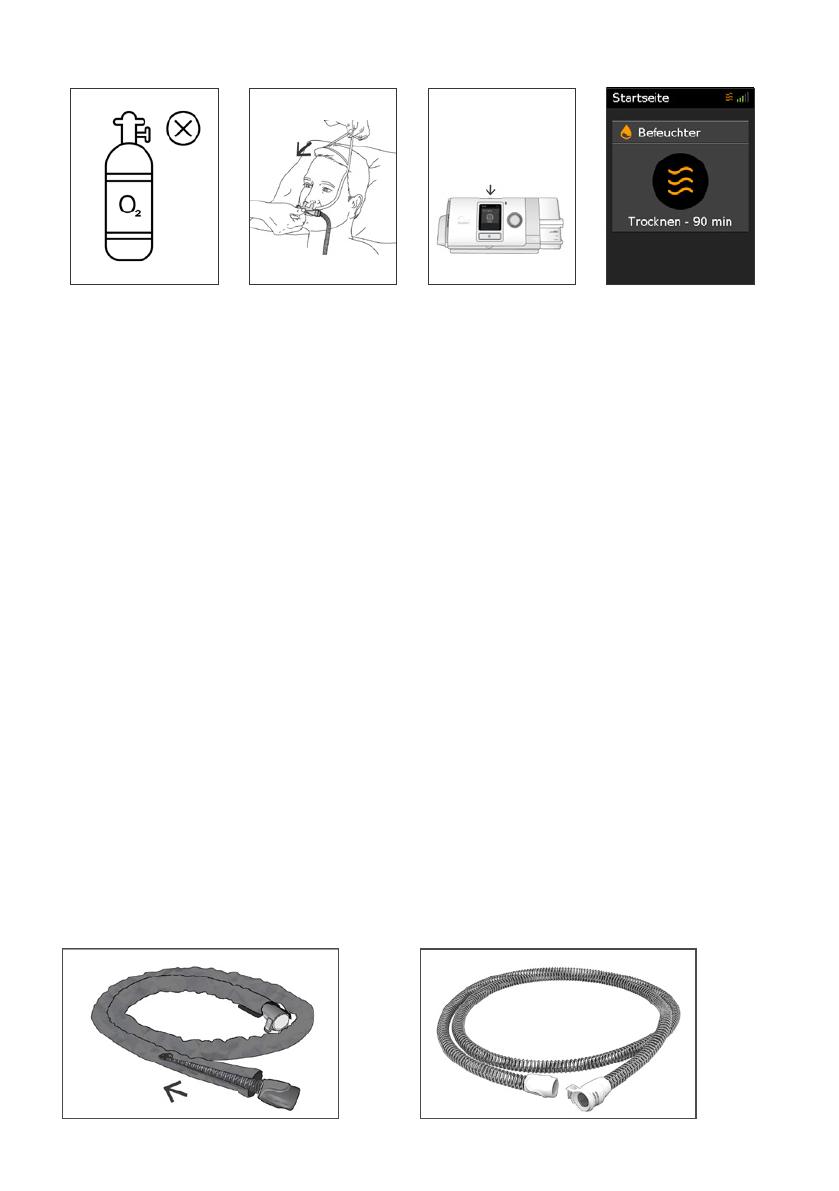
ResMed HFT Guida utente

Tipo
Guida utente
Quick start guide
English | Deutsch | Français | Italiano | Nederlands | Español | Português
2
Read your entire LumisHFT User Guide before use.
Setup
1
With the device on a stable level surface
below head height, connect one end of the
power cord into the power supply unit and
the other end into the power outlet.
Fit the tubing wrap around the air tubing.
3 4
Connect the air tubing firmly to the air outlet
located on the rear of the device.
Open the humidifier and fill it with water up
to the maximum water level mark.
56
Close the humidifier and insert it into the
side of the device.
Connect the free end of the air tubing firmly
onto the high-flow nasal cannula.
Note: It is recommended to place the device on a heat resistant pad to avoid possible heat damage
to surfaces.
English 1
Connecting/disconnecting supplemental oxygen
Your Lumis HFT device is designed to be compatible with levels of supplemental oxygen up to
15 L/min.
Always make sure that the device is turned on and airflow generated before the oxygen supply is
turned on. Always turn the oxygen supply off before the device, so that unused oxygen does not
accumulate within the device enclosure and create a risk of fire.
Note: Do not connect supplemental oxygen input directly to a medical gas pipeline system, oxygen
bottle or other high pressure oxygen source. A flow regulator must be fitted to ensure the delivered
oxygen remains at or below 15 L/min.
For advice on connecting to an oxygen source, contact your homecare provider.
Connecting
12
Disconnecting
12
Refer to the Lumis HFT User Guide for warnings and cautions and details on how to perform a
functional check.
2
Setting therapy
Note: Your clinician should have applied your prescribed settings to your device.
Warmup
1. Select Run Warmup.2. Warmup will take between
10-20 mins. Therapy can be
started at any time during
Warmup.
3. When Warmup is complete,
Ready will be displayed.
Start therapy
4. Fit your high-flow
nasal cannula.
5. Press the Start/Stop button to start therapy. 6. If you have
supplemental
oxygen, ensure
source is now
turned ON.
Stop therapy
1. Ensure oxygen
source is turned
OFF.
2. Remove your High
Flow Nasal Cannula.
3. Press the Start/Stop
button and then
press the dial to
confirm Yes to stop
therapy.
4. Drying mode will
commence.
English 3
Warming mode pre-heats the water before starting therapy so that the air is not cold or dry at the
start of therapy.
Drying mode runs for 90 mins and dries the air tubing and cannula so that it is ready for use the
next time. Ensure that the air tubing and cannula remain connected to the device and air flow
unimpeded during the Drying mode.
Caring for your device
Refer to the Lumis HFT User Guide for a detailed cleaning and maintenance information.
Cleaning
You should clean the device weekly as described. Refer to the nasal cannula user guide for detailed
instructions on cleaning your nasal cannula.
1. Wash the humidifier and air tubing in warm water using mild detergent.
2. Wash the tubing wrap in cold to warm water using a mild detergent. Rinse well and drip dry.
3. Rinse the humidifier and air tubing thoroughly and allow to dry out of direct sunlight and/or heat.
4. Wipe the exterior of the device with a dry cloth.
Checking – tubing and tubing wrap
Remove the tubing wrap and check the air tubing is clean. Replace it if there are any holes, tears or
cracks.
4
Lesen Sie vor dem Gebrauch die gesamte LumisHFT-Gebrauchsanweisung durch.
Therapie vorbereiten
1
Platzieren Sie das Gerät auf einer stabilen,
ebenen Fläche unterhalb der Kopfhöhe.
Schieben Sie den Stecker des Stromkabels
in die Stromeingangsbuchse des Gerätes.
Verbinden Sie ein Ende des Netzkabels mit
dem Netzteil und das andere Ende mit der
Steckdose.
Legen Sie die Komforthülle um den
Atemschlauch.
3 4
Verbinden Sie den Atemschlauch fest mit
dem Luftauslass auf der Rückseite des
Gerätes.
Öffnen Sie den Befeuchter und füllen Sie ihn
bis zur maximalen Wasserstandsmarkierung
mit Wasser.
56
Schließen Sie den Befeuchter und setzen
Sie ihn seitlich in das Gerät ein.
Verbinden Sie das freie Ende des
Atemschlauchs fest mit der High-Flow-
Nasenkanüle.
Hinweis: Hinweis: Es wird empfohlen, das Gerät auf eine hitzefeste Unterlage zu stellen,
ummögliche Hitzeschäden an Oberflächen zu vermeiden.
Deutsch 1
Anschließen/Trennen der zusätzlichen Sauerstoffgabe
Ihr Lumis HFT-Gerät ist für eine zusätzliche Sauerstoffgabe von bis zu 15 L/min geeignet.
Vergewissern Sie sich immer, dass das Gerät eingeschaltet ist und ein Luftfluss zustande kommt,
bevor die Sauerstoffzufuhr eingeschaltet wird. Die Sauerstoffzufuhr muss immer ausgeschaltet
werden, bevor das Gerät ausgeschaltet wird, um zu vermeiden, dass sich unverbrauchter Sauerstoff
im Gerätegehäuse ansammelt und somit ein Brandrisiko entsteht.
Hinweis: Der Einlass für die zusätzliche Sauerstoffgabe darf nicht direkt mit einem Leitungssystem
für medizinische Gase, einem Sauerstoffzylinder oder einer sonstigen Sauerstoffzufuhr mit hohem
Druck verbunden werden. Es muss ein Flussregler eingebaut werden, um sicherzustellen, dass
höchstens 15L/min Sauerstoff abgegeben werden.
Wenden Sie sich an Ihren Leistungserbringer, wenn Sie Hilfe beim Anschluss an eine
Sauerstoffquelle benötigen.
Anschließen
12
Trennen
12
Warnungen und Vorsichtshinweise sowie Einzelheiten zur Durchführung einer Funktionsprüfung
finden Sie in der Lumis HFT-Gebrauchsanweisung
2
Therapie einstellen
Hinweis: Hinweis: Ihr Arzt sollte die verschriebenen Einstellungen bereits auf Ihrem Gerät
eingerichtet haben.
Aufwärmen
1. Wählen Sie Aufwärmen.2. Der Aufwärmvorgang dauert
etwa 10 bis 20 Minuten.
Die Therapie kann jederzeit
während des Aufwärmens
gestartet werden.
3. Wenn das Aufwärmen
beendetist, wird Bereit
angezeigt.
Therapie starten
4. Legen Sie Ihre High-
Flow-Nasenkanüle an.
5. Drücken Sie zum Starten der Therapie die
Start/Stopp-Taste.
6. Wenn Sie zusätzlichen
Sauerstoff verwenden,
stellen Sie sicher, dass
die Sauerstoffquelle
jetzt eingeschaltet ist.
Deutsch 3
Therapie beenden
1. Vergewissern
Sie sich, dass die
Sauerstoffquelle
ausgeschaltet ist.
2. Nehmen Sie
Ihre High-Flow-
Nasenkanüle ab.
3. Drücken Sie die Start/
Stopp-Taste und
anschließend den
Bedienregler, um zu
bestätigen, dass die
Therapie beendet
werden soll.
4. Der
Trocknungsmodus
beginnt.
Der Wärmemodus wärmt das Wasser vor Beginn der Therapie vor, damit die Luft zu Beginn der
Therapie nicht kalt oder trocken ist.
Der Trocknungsmodus läuft 90 Minuten lang und trocknet den Atemschlauch und die Nasenkanüle,
damit Sie für den nächsten Einsatz bereit sind. Sorgen Sie dafür, dass Atemschlauch und
Nasenkanüle während des Trocknungsmodus mit dem Gerät verbunden bleiben und der Luftstrom
nicht behindert wird.
Pflege des Gerätes
Ausführliche Informationen zu Reinigung und Wartung entnehmen Sie bitte der Lumis HFT-
Gebrauchsanweisung.
Reinigung
Sie sollten das Gerät wöchentlich wie beschrieben reinigen. Ausführliche Anweisungen zur
Reinigung Ihrer Nasenkanüle entnehmen Sie bitte der Gebrauchsanweisung für die Nasenkanüle.
1. Reinigen Sie den Befeuchter und den Atemschlauch in warmem Wasser mit einem milden
Reinigungsmittel.
2. Waschen Sie die Komforthülle in handwarmem Wasser mit einem milden Reinigungsmittel.
Gutabspülen und abtropfen lassen.
3. Spülen Sie den Befeuchter und den Atemschlauch gut ab und lassen Sie diese vor direktem
Sonnenlicht und/oder Hitze geschützt trocknen.
4. Wischen Sie das Gerät außen mit einem trockenen Tuch ab.
Überprüfen – Schlauch und Komforthülle
Nehmen Sie die Komforthülle ab und überprüfen Sie, ob der Atemschlauch sauber ist. Wenn Löcher
oder Risse vorhanden sind, tauschen Sie ihn aus.
4
Veillez à lire l’intégralité du guide d’utilisation du LumisHFT avant d’utiliser l’appareil.
Installation
1
L’appareil étant posé sur une surface stable
et en dessous de la hauteur de la tête du
patient, branchez une extrémité du câble
d’alimentation sur le bloc d’alimentation
etl’autre extrémité sur la prise de courant.
Entourez le circuit respiratoire avec
lahousse prévue à cet effet.
3 4
Raccordez fermement le circuit respiratoire
à la sortie d’air à l’arrière de l’appareil.
Ouvrez l’humidificateur et remplissez-le
d’eau jusqu’au repère de niveau d’eau
maximum.
56
Fermez l’humidificateur et insérez-le dans
lecôté de l’appareil.
Raccordez l’extrémité libre du circuit
respiratoire fermement sur la canule
nasaleà haut débit.
Remarque: Il est recommandé de placer l'appareil sur un tapis résistant à la chaleur pour éviter
d'éventuels dommages causés aux surfaces par la chaleur.
Français 1
Connexion/déconnexion de l’adjonction d’oxygène
Votre appareil Lumis HFT est conçu pour être compatible avec l’adjonction d’oxygène à un débit
pouvant atteindre 15l/min.
Toujours s’assurer que l’appareil est sous tension et qu’un débit d’air est généré avant d’activer
l’alimentation en oxygène. Couper systématiquement l’alimentation en oxygène avant l’appareil,
pour éviter que de l’oxygène non utilisé ne s’accumule dans le boîtier de l’appareil et ne crée un
risque d’incendie.
Remarque: Ne pas raccorder l’entrée d’adjonction d’oxygène directement à un circuit de gaz
médical, une bouteille d’oxygène ou toute autre source d’oxygène à haute pression. Un régulateur
de débit doit être monté afin de garantir que le débit d’oxygène délivré reste constant ou inférieur
à15l/min.
Pour tout conseil relatif à la connexion d’une source d’oxygène, contactez votre prestataire de santé
à domicile.
Connexion
12
Déconnexion
12
Consultez le mode d’emploi du Lumis HFT afin de prendre connaissance des avertissements et des
mises en garde ainsi que des détails sur la réalisation d’une vérification du fonctionnement.
2
Réglage du traitement
Remarque: Votre médecin devrait avoir configuré dans votre appareil les paramètres qui vous ont
été prescrits.
Préchauffage
1. Sélectionnez Lancer le
préchauffage.
2. Le préchauffage prend
entre 10 et 20 minutes.
Le traitement peut être
démarré à tout moment
pendant le Préchauffage.
3. Une fois le Préchauffage
terminé, Prêt s’affiche.
Démarrez le traitement
4. Ajustez votre canule
nasale à haut débit.
5. Appuyez sur le bouton Marche/Arrêt pour
démarrer le traitement.
6. Si une adjonction
d’oxygène est
nécessaire, assurez-
vous que la source
d’oxygène est
allumée.
Français 3
Arrêtez le traitement
1. Assurez-vous que
la source d’oxygène
est DÉSACTIVÉE.
2. Retirez votre canule
nasale à haut débit.
3. Appuyez sur le
bouton Démarrer/
Arrêter, puis appuyez
sur la molette pour
confirmer Oui
afin d’arrêter le
traitement.
4. Le mode Séchage
commence.
Le mode Chauffage préchauffe l’eau avant de démarrer le traitement pour que l’air ne soit pas froid
ou sec au début du traitement.
Le mode Séchage fonctionne pendant 90 minutes et sèche l’air dans le circuit respiratoire et la
canule de sorte à être prêt pour la prochaine utilisation. Assurez-vous que le circuit respiratoire et
lacanule restent connectés à l’appareil et que le flux d’air s’écoule librement en mode Séchage.
Entretien de votre appareil
Consultez le guide d’utilisation du Lumis HFT pour des informations détaillées sur le nettoyage
etlamaintenance.
Nettoyage
Nettoyez l’appareil hebdomadairement de la manière décrite. Consultez le guide d’utilisation de
lacanule nasale pour des instructions détaillées sur le nettoyage de votre canule nasale.
1. Nettoyez l’humidificateur et le circuit respiratoire à l’eau tiède avec un détergent doux.
2. Nettoyez la housse du circuit respiratoire à l’eau froide ou tiède avec un détergent doux. Rincez
et égouttez jusqu’au séchage complet.
3. Rincez soigneusement l’humidificateur et le circuit respiratoire et laissez sécher à l’abri de la
lumière directe du soleil et/ou de la chaleur.
4. Essuyez l’extérieur de l’appareil à l’aide d’un chiffon sec.
Contrôle – circuit respiratoire et housse de circuit respiratoire
Retirez la housse du circuit respiratoire et vérifiez que le circuit respiratoire est propre. Vous devez
laremplacer si elle présente des trous, déchirures ou fissures.
4
Prima dell’uso, leggere per intero la Guida all’uso di Lumis HFT.
Installazione
1
Con l'apparecchio su di una superficie piana
e stabile sotto l'altezza della testa, collegare
un'estremità del cavo di alimentazione
all'alimentatore e l'altra estremità a una
presa elettrica.
Avvolgere la guaina per tubi intorno al
circuito respiratorio.
3 4
Collegare saldamente il circuito respiratorio
alla presa di uscita dell'aria sul retro
dell'apparecchio.
Aprire l'umidificatore e riempirlo con acqua
fino alla tacca indicante il livello massimo
dell'acqua.
56
Chiudere l'umidificatore e introdurlo
nell'apposito spazio sul lato dell'apparecchio.
Connettere la cannula nasale ad alto flusso
all'estremità libera del circuito respiratorio.
Nota: Si consiglia di posizionare l’apparecchio su di un tappetino resistente al calore per evitare
possibili danni termici alle superfici.
Italiano 1
2
Collegamento/scollegamento dell’ossigeno supplementare
L’apparecchio Lumis HFT è progettato per essere compatibile con livelli di ossigeno supplementare
fino a 15l/min.
Prima di attivare l’erogazione di ossigeno verificare sempre che l’apparecchio sia acceso e che
generi un flusso d’aria. L’erogazione di ossigeno va sempre spenta prima dell’apparecchio, di modo
che l’ossigeno inutilizzato non si accumuli all’interno dell’apparecchio, con conseguente rischio
diincendio.
Nota: Non collegare l’ingresso dell’ossigeno supplementare direttamente all’impianto di erogazione
di gas medicali, alla bombola di ossigeno o ad altra sorgente di ossigeno ad alta pressione. Si dovrà
interporre un regolatore di flusso per assicurare che l’ossigeno somministrato resti in corrispondenza
o al di sotto di 15l/min.
Per istruzioni sul collegamento a una sorgente di ossigeno, contattare il proprio fornitore di servizi
diassistenza.
Collegamento
12
Scollegamento
12
Per le avvertenze, le precauzioni e dettagli su come eseguire una verifica del funzionamento,
consultare la guida all’uso di Lumis HFT.
Impostazione della terapia
Nota: Il medico dovrebbe già aver applicato all’apparecchio le impostazioni corrispondenti alla
prescrizione.
Riscaldamento
1. Selezionare Avvia
riscaldamento.
2. Il riscaldamento impiegherà
10-20 minuti. La terapia
può essere avviata in
qualsiasi momento durante
ilRiscaldamento.
3. Al termine del
Riscaldamento si
visualizzerà il messaggio
Pronto.
Avviare la terapia
4. Inserire la cannula
nasale ad alto
flusso.
5. Premere il pulsante Start/Stop per avviare
laterapia.
6. In presenza
di ossigeno
supplementare,
assicurarsi che la
relativa sorgente
siaaccesa.
Italiano 3
4
Interrompere la terapia
1. Assicurarsi che
la sorgente di
ossigeno sia spenta.
2. Rimuovere la
cannula nasale ad
alto flusso.
3. Premere il pulsante
Start/Stop, quindi
premere il selettore
per confermare
l'arresto della
terapia (Sì).
4. Inizierà la modalità
diasciugatura.
La modalità di riscaldamento riscalda l’acqua prima di avviare la terapia, in modo tale che all’inizio
della terapia l’aria non sia fredda o asciutta.
La modalità di asciugatura viene eseguita per 90 minuti, asciugando il circuito respiratorio e la
cannula affinché siano pronti per l’utilizzo successivo. Durante la modalità di asciugatura, assicurarsi
che il circuito respiratorio e la cannula restino collegati all’apparecchio e che il flusso d’aria non sia
ostacolato.
Cura dell’apparecchio
Consultare la guida all’uso di Lumis HFT per informazioni sulla pulizia e la manutenzione.
Pulizia
Pulire l’apparecchio con frequenza settimanale come descritto. Consultare la guida per l’utente della
cannula nasale per istruzioni dettagliate sulla pulizia della cannula.
1. Lavare l’umidificatore e il circuito respiratorio in acqua tiepida usando un detergente delicato.
2. Lavare la guaina per tubi in acqua da fredda a tiepida usando un detergente delicato. Sciacquare
bene e far sgocciolare.
3. Sciacquare bene l’umidificatore e il circuito respiratorio e lasciarli asciugare al riparo dalla luce
solare diretta e/o dal calore.
4. Passare un panno asciutto sull’esterno dell’apparecchio.
Controllo del tubo e della guaina
Rimuovere la guaina del tubo e controllare che il circuito respiratorio sia pulito. Sostituirlo in presenza
di fori, lacerazioni o incrinature.
Lees vóór gebruik de volledige gebruikershandleiding van uw Lumis.
Opzetten
1
Met het apparaat op een stabiel egaal
oppervlak lager dan het hoofd steekt u
het ene uiteinde van het netsnoer in de
voedingseenheid en het andere uiteinde
inhet stopcontact.
Plaats de wikkel van de slang rondom
deluchtslang.
3 4
Sluit de luchtslang stevig aan op de
luchtuitlaat op de achterkant van het
apparaat.
Open de bevochtiger en vul het tot aan
hetmaximale waterpeil met water.
56
Sluit de bevochtiger en steek deze in
dezijkant van het apparaat.
Sluit het vrije uiteinde van de luchtslang
stevig aan op de high-flow neusbril.
Opmerking: Opmerking: Het wordt aanbevolen het apparaat op een hittebestendige onderlegger
teplaatsen om hitteschade aan oppervlakten te vermijden.
Nederlands 1
2
Aanvullende zuurstof verbinden/loskoppelen
Uw Lumis HFT-apparaat is ontworpen om compatibel te zijn met hoeveelheden aanvullende zuurstof
tot 15 L/min.
Zorg altijd dat het apparaat is ingeschakeld en luchtflow wordt gegenereerd voordat u de
zuurstoftoevoer inschakelt. Schakel altijd de zuurstoftoevoer uit voordat u het apparaat uitschakelt,
zodat zich geen ongebruikte zuurstof ophoopt in de behuizing van het apparaat, waardoor
brandgevaar ontstaat.
Opmerking: Verbind geen aanvullende zuurstoftoevoer rechtstreeks aan een pijplijnsysteem
voor medisch gas, zuurstoffles of andere bron van zuurstof onder hoge druk. Er moet altijd een
stroomregulator geplaatst worden om te verzekeren dat de geleverde zuurstof op of onder
15L/minblijft.
Neem voor advies over het verbinden met een zuurstofbron contact op met uw thuiszorgverlener.
Verbinden
12
Loskoppelen
12
Raadpleeg de gebruikershandleiding van Lumis HFT voor waarschuwingen en details over hoe
ueenfunctiecontrole uitvoert.
Therapie instellen
Opmerking: Opmerking: Uw clinicus moet de voorgeschreven instellingen toepassen op het apparaat.
Opwarming
1. Selecteer Opwarming
uitvoeren.
2. Opwarming zal 10-20 minuten
duren. De therapie kan op
ieder moment gestart worden
tijdens de opwarming.
3. Wanneer de opwarming
voltooid is, wordt klaar
getoond.
De therapie starten
4. Stel uw high-flow
neusbril af.
5. Druk op de Start/stop-knop om de therapie
te starten.
6. Indien u aanvullende
zuurstof heeft,
verzeker dat de bron
nu AAN staat.
De therapie stopzetten
1. Verzeker dat de
zuurstofbron UIT
staat.
2. Verwijder uw high-
flow neusbril.
3. Druk op de start-/
stopknop en druk
dan op de draaiknop
om Ja te bevestigen
en de therapie te
beëindigen.
4. De droogmodus
zalstarten.
Nederlands 3
  • Page 1 1
  • Page 2 2
  • Page 3 3
  • Page 4 4
  • Page 5 5
  • Page 6 6
  • Page 7 7
  • Page 8 8
  • Page 9 9
  • Page 10 10
  • Page 11 11
  • Page 12 12
  • Page 13 13
  • Page 14 14
  • Page 15 15
  • Page 16 16
  • Page 17 17
  • Page 18 18
  • Page 19 19
  • Page 20 20
  • Page 21 21
  • Page 22 22
  • Page 23 23
  • Page 24 24
  • Page 25 25
  • Page 26 26
  • Page 27 27
  • Page 28 28
  • Page 29 29
  • Page 30 30

ResMed HFT Guida utente

Tipo
Guida utente