Suntec Wellness AIR DEHUMIDIFIER DRYFIX 20 LUMIO Manuale del proprietario
- Tipo
- Manuale del proprietario

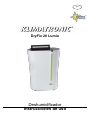
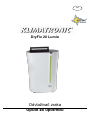
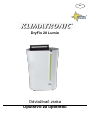
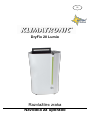
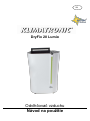
DryFix 20 Lumio
Luftentfeuchter
Bedienungsanleitung
DE

Wir danken Ihnen für den Kauf dieses Gerätes der Marke Suntec Wellness. Bitte lesen Sie die Bedienungsanleitung
aufmerksam, bevor Sie das Gerät in Betrieb nehmen. Bewahren Sie diese Bedienungsanleitung zum späteren Nachschlagen
auf.
Sicherheitshinweise
VORSICHT!
Dieses Gerät kann von Kindern ab 8 Jahren und darüber
und von Personen mit reduzierten physischen,
sensorischen oder mentalen Fähigkeiten oder Mangel an
Erfahrung und/oder Wissen benutzt werden, wenn sie
beaufsichtigt oder bezüglich des sicheren Gebrauchs des
Gerätes unterwiesen wurden und die daraus
resultierenden Gefahren verstanden haben. Kinder dürfen
nicht mit dem Gerät spielen. Reinigung und Benutzer-
Wartung dürfen nicht durch Kinder ohne Beaufsichtigung
durchgeführt werden. Kinder unter 3 Jahren ohne
permanente Aufsicht müssen daran gehindert werden, auf
das Gerät zugreifen zu können.
Kinder ab 3 Jahren und unter 8 Jahren dürfen das Gerät
nur unter der Voraussetzung ein- und ausschalten, dass
das Gerät in seiner vorgesehenen Gebrauchslage
positioniert oder installiert, sie bezüglich des sicheren
Gebrauchs des Gerätes unterwiesen und beaufsichtigt
werden und die möglichen Gefahren verstanden haben.
Kinder ab 3 Jahren und unter 8 Jahren dürfen das Gerät
nicht an die Steckdose anschliessen, es regulieren,
reinigen oder die Wartung durchführen.
• Bitte nutzen Sie das Gerät mit Vorsicht.
• Um einen elektrischen Schlag, eine Verletzung oder einen
Brand zu vermeiden, darf das Gerät nur in Innenräumen und
im Haushalt benutzt werden.
• Bitte nehmen Sie das Gerät nur bei der auf dem Typenschild
angegebenen Netzspannung in Betrieb (AC 220-240V,
50Hz). Sollten Sie unsicher sein, lassen Sie es bitte von einer

qualifizierten Person überprüfen.
• Bitte ziehen Sie den Netzstecker, bevor Sie das Gerät
reinigen oder auseinandernehmen.
• Bitte fassen Sie keine beweglichen Teile des Gerätes an und
stecken Sie Ihre Finger oder andere Objekte (z.B. Bleistift)
nie in das Schutzgitter.
• Bitte besprühen Sie das Gerät nie mit Flüssigkeiten und
tauchen Sie es nicht ins Wasser.
• Bitte verwenden Sie keine Verlängerungskabel.
• Bitte schalten Sie das Gerät nie ein, wenn das Kabel oder
der Stecker beschädigt sind.
• Bitte lassen Sie das Netzkabel nicht über scharfe Kanten
hängen und stellen Sie sicher, dass dieses nicht geknickt ist.
• Bitte betreiben Sie das Gerät nicht, wenn das Stromkabel,
der Netzstecker oder das Gerät Schäden aufweisen. Ist eine
Reparatur notwendig, wenden Sie sich bitte an Ihre
Verkaufsstelle.
• Bitte lassen Sie das Gerät nicht unbeaufsichtigt.
• Bitte versuchen Sie nicht das Gerät selbstständig zu
reparieren, auseinanderzubauen oder in sonst einer Weise
zu verändern.
• Der Gebrauch von fremden Zubehörteilen kann zu
Verletzungen führen.
• Bitte benutzen Sie das Gerät ausschließlich für den
Verwendungszweck, zu dem es entwickelt wurde.
• Bitte kippen Sie das Gerät nicht während der Nutzung.
Dieses soll nur in vertikaler Position in Betrieb genommen
werden.
• Bitte beachten Sie, dass das Gerät immer aufrecht
transportiert und gelagert werden muss, da der Kompressor
beschädigt werden kann.
• Bitte vermeiden Sie das Gerät nach der Nutzung direkt

wieder einzuschalten, da Sie somit den Kompressor
beschädigen können. Bitte warten Sie ca. 5 Minuten bevor
Sie dieses erneut in Betrieb nehmen.
• Bitte schalten Sie das Gerät immer zuerst mit der „POWER-
Taste“ ein oder aus. Bitte ziehen Sie anschließend den
Stecker.
• Bitte platzieren Sie das Gerät an einem trockenen, stabilen,
ebenen Untergrund.
• Das Gerät soll nicht im Raum mit einer Luftfeuchtigkeit von
>85% (z.B. Wäscherei) installiert werden.
• Bitte hängen Sie Ihre Wäsche zum Trocknen nie vor dem
Luftauslass auf. Bitte halten Sie einen Abstand von
mindestens 1 Meter ein.
• Bitte nutzen Sie das Gerät nie in der Nähe von Heizquellen
und entflammbaren oder gefährlichen Gegenständen.
• Falsche Handhabung kann das Gerät beschädigen.
• Bitte lagern Sie keine brennbaren Flüssigkeiten (z.B. Benzin)
in der Nähe des Gerätes. Explosionsgefahr!
• Das Gerät darf nicht in staubigen Räumen oder
Räumlichkeiten, mit einer hohen Konzentration an Gasen,
Lösungsmitteln, anderen flüchtigen organischen
Mischungen oder leicht entzündlichen Luftgemischen
verwendet werden.
Energie sparen und Sicherheitsschutz
• Bitte decken Sie das Aus- oder Einlassgitter nie ab.
• Das Gerät sollte mit einem Abstand von mindestens 20 cm
zur Wand oder zu sonstigen Hindernissen aufgestellt
werden.
• Bitte halten Sie die Filter und das Gitter sauber. Dieses
sollten ca. 3-mal in der Woche gereinigt werden. Da die Filter
Partikel aus der Luft entfernen, sollten Sie diese des Öfteren

nach Bedarf gereinigt werden.
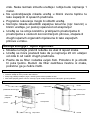
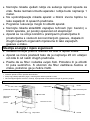
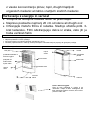
Installation
• Um Energie zu sparen, schließen Sie bitte alle Türen und Fenster im Raum.
• Bitte stellen Sie das Gerät auf einen ebenen flachen Untergrund.
• Bei der ersten Inbetriebnahme lassen Sie das Gerät bitte kontinuierlich 24 Stunden laufen.
• Um laute Geräusche und Vibrationen zu vermeiden, können Sie unter dem Gerät einen kleinen Teppich oder eine
Gummimatte platzieren.
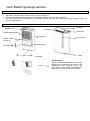
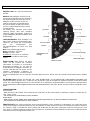
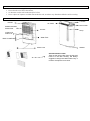
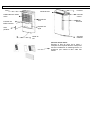
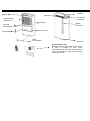
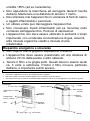
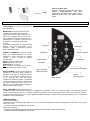
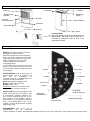
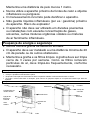
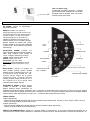
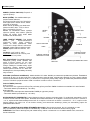
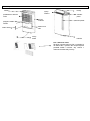
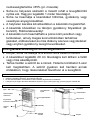
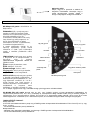
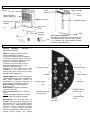
Komponenten
Luftauslass
Lamellen
Leuchtstreifen
Bedienfeld
Rollen
Lufteinlass
Wassertank
Netzkabel
Rückseite
Stetiger Abfluss-
Anschluss
Vorfilter/Aktivkohlefilter
Griff
Aktivkohlefilter:
Nehmen Sie den Aktivkohlefilter bitte aus dem
Beutel raus und platzieren Sie diesen in das
Filtergehäuse. Wir empfehlen Ihnen, den
Filter jeden dritten Monat auszutauschen,
damit die Luft im Raum immer frisch bleibt.

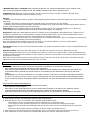
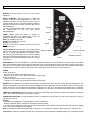
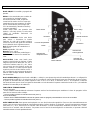
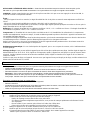
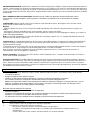
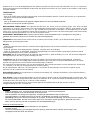
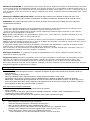
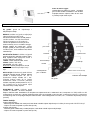
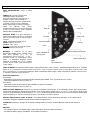
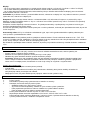
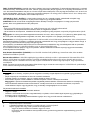
Betriebsanzeige
Bedienfeld
EIN/AUS Taste: Ein- und Ausschalten des
Gerätes.
MODUS: Bitte betätigen Sie diese Taste,
um zwischen folgenden Modi zu wechseln:
AUTO/HIGH/LOW oder FAN. Das Gerät
startet im „AUTO“-Modus, bis Sie ein
anderes Programm ausgewählt haben.
Der AUTO-Modus ist ideal für Zuhause
(50-55% Luftfeuchtigkeit) und ist zudem
energiesparend.
Sie können sich zwischen einer hohen
Leistung (HIGH) oder einer niedrigen
Leistung (LOW) entscheiden. Sollten Sie
„FAN“ auswählen, läuft der Ventilator ohne
Entfeuchtung.
LEUCHTSTREIFEN: Bitte betätigen Sie
diese Taste, um den Leuchtstreifen zu de/-
aktivieren. Die Farbe der Leuchtstreifen
wird sich entsprechend des
Feuchtigkeitsgrades im Raum wie folgt
ändern:
Rot: Hohe Luftfeuchtigkeit, ≥70%
Grün: Angenehm, 70%-40%
Orange: Trocken, <40%
Anmerkung: Es kann bis zu 2 Minuten
dauern bis der Indikator seine Farbe
ändert.
OSZILLATION: Bitte drücken Sie diese
Taste, um die Position der Lamellen
einzustellen. Sie können 3 verschiedene
Richtungen auswählen: 45°, 90° oder ein
kontinuierliches Schwingen zwischen 45°
und 90°. Bitte drücken Sie einmal, um die
Lamellen kontinuierlich schwingen zu
lassen. Durch weiteres Drücken können
Sie die Lamellenposition auf 45° oder 90° einstellen. Bitte achten Sie darauf, dass die Lamellen beim Betrieb immer geöffnet
sind.
UP-/DOWN Taste: Drücken Sie bitte die „UP-“ oder „DOWN-Taste“, um die gewünschte Luftfeuchtigkeit einzustellen. Die
Standardeinstellung liegt bei 55%. Sollten Sie 35% auswählen, wird der Kompressor weiterhin arbeiten, bis der Wassertank
voll ist. Die Luftfeuchtigkeitsstufe kann von 35% bis 80% in 5% Abständen eingestellt werden. Der Kompressor arbeitet weiter,
bis die gewünschte Luftfeuchtigkeit erreicht wird. Das Gerät wechselt in den „Fan“-Modus und der Ventilator verteilt die Luft im
Raum.
TIMER-FUNKTION:
Ausschaltzeit:
- Bitte drücken Sie die TIMER-Taste, während das Gerät läuft, um die Ausschaltzeit zu bestimmen. Nutzen Sie dafür die Up-
oder Down -Taste.
- Die Zeit lässt sich stundenweise (0-24h) einstellen.
Einschaltzeit:
- Bitte drücken Sie die TIMER-Taste, während das Gerät ausgeschaltet ist, um die Einschaltzeit zu bestimmen.
- Die Zeit lässt sich stundenweise (0-24h) einstellen.
FROSTSCHUTZ: Das Gerät verfügt über eine Frostschutzfunktion. Diese schaltet sich automatisch ein, sobald der innere
Sensor eine niedrige Temperatur gemessen hat; die „Defrost“-Leuchte leuchtet auf. Wenn die Temperatur im Raum zwischen
5°C und 12°C liegt, so schaltet sich diese Funktion alle 30 Minuten ein. Wenn die Temperatur im Raum zwischen 12°C und
20°C liegt, so schaltet sich diese Funktion alle 45 Minuten ein. Sobald die Frostschutzfunktion inaktiv wird, schaltet das Gerät
automatisch in den voreingestellten Modus um.
Down-Taste
Leuchtstreifen
Oszillation
Frostschutzanzeige
EIN/AUS Taste
Up-Taste
Ionisator
Timer-Funktion
Modus
“Wassertank voll”-
Anzeige

“WASSERTANK VOLL”-ANZEIGE: Diese Funktion schaltet sich ein, sobald der Wassertank voll ist, entfernt wurde
oder nicht ordnungsgemäß installiert wurde. Der Indikator leuchtet rot auf und ein Signalton ertönt.
IONISATOR: Bitte aktivieren Sie diese Funktion, um die Luft im Raum frisch zu halten. Sobald Sie die ION-Taste
betätigen, leuchtet die entsprechende Kontrollleuchte auf.
Display:
- Sobald das Gerät eingeschaltet ist, wird der Luftfeuchtigkeitsgrad des Raumes automatisch gemessen und auf dem Display
angezeigt.
- Sobald der gewünschte Entfeuchtungsgrad eingestellt wurde, erscheint dieses auf dem Display.
- Sobald die Timer-Funktion aktiviert wurde, wird die eingestellte Zeit für einige Sekunden auf dem Display blinken, danach
wird der Luftfeuchtigkeitsgrad des Raumes angezeigt.
Anmerkung: Wenn die Luftfeuchtigkeit in der Umgebung niedriger als 20% ist, zeigt das Display „LO“ an. Wenn die
Luftfeuchtigkeit in der Umgebung höher als 90% ist, wird auf dem Display „HI“ angezeigt.
Kompressor: Sollte die Luftfeuchtigkeit im Raum 2% weniger als die ausgewählte Luftfeuchtigkeit sein, schaltet sich der
Kompressor automatisch aus. Währenddessen sorgt der Ventilator-Modus dafür, dass sich keine abgestandene Luft im
Raum befindet. Das Gerät wird somit eine minimale Menge von Energie verbrauchen.
Der Kompressor verfügt ebenso über eine Schutzfunktion. Diese erfordert automatisch und je nach Bedarf einen Neustart ca.
3 Minuten nach dem Gerätestart oder Modusumstellung.
Nach der Inbetriebnahme empfehlen wir Ihnen, das Gerät ca. 10 Minuten abkühlen zu lassen, ehe der Betrieb
wiederaufgenommen wird, um den Kompressor zu schützen.
Auto-Restart: Sollte sich das Gerät unerwartet ausschalten, z.B. wegen Stromausfall, wird es in dem voreingestellten Modus
neu starten.
Wäsche Trocknen: Sie können das Gerät nutzen, um Ihre Wäsche schneller zu trocknen. Bitte stellen Sie den
Entfeuchtungsgrad auf 35%-50% ein. 35% bedeutet schnelleres Trocknen; das Gerät wird aktiv, bis der Wassertank voll ist.
Schalten Sie bitte zusätzlich die Ventilator-Funktion (FAN) ein; fixieren Sie die Lamellen im 45° Winkel oder lassen Sie diese
kontinuierlich schwingen.
Bitte legen Sie keine Wäsche auf das Gerät. Stellen Sie bitte sicher, dass das Gerät von der Wäsche nicht blockiert wird;
bitte beachten Sie einen Sicherheitsabstand von mind. 1,5 Meter.
Kondenswasserableitung
Wassertank:
- Sobald der Wassertank voll ist, leuchtet der Wassertank-Voll-Indikator rot; es ertönt ein Alarmsignal.
- Bitte schalten Sie das Gerät ab und ziehen Sie den Netzstecker.
- Bitte ziehen Sie den Wassertank vorsichtig heraus, entfernen Sie den Tankdeckel und kippen Sie das Wasser aus.
- Anschließend setzen Sie bitte den Deckel wieder ein und schieben Sie den Wassertank vorsichtig in das Gerät
hinein.
Anmerkung: Um Schimmel und Bakterien zu vermeiden, reinigen Sie den Wassertank bitte regelmäßig. Bitte befüllen
Sie diesen mit sauberem Wasser mit ein wenig Reinigungsmittel. Der Tank soll geschüttelt und anschließend entleert
und mit sauberem Wasser durchgespült werden. Bitte beachten Sie, dass der Wassertank nicht spülmaschinenfest
ist.
Kontinuierliche Kondenswasserableitung:
- Sie finden die Drainageöffnung auf der Rückseite des Gerätes.
- Bitte entfernen Sie den Stopfen.
- Bitte führen Sie den Drainageschlauch (nicht im Lieferumfang enthalten) in die Öffnung ein, platzieren Sie das
andere Ende des Schlauches in ein Auffangsgefäß hinein und lassen Sie das Wasser abfließen.
- Bitte achten Sie darauf, dass der Schlauch fest angeschlossen ist, um das Auslaufen des Wassers zu vermeiden.
Wartungsanleitung
1. Bitte schalten Sie das Gerät aus.
2. Bitte ziehen Sie immer den Netzstecker bevor Sie das Gerät reinigen.
3. Bitte beachten Sie, dass ausschließlich der Staubfilter gereinigt werden darf:
- Bitte entfernen Sie die vordere Abdeckung und entnehmen Sie vorsichtig den Filter.
- Ist der Filter nur leicht verstaubt, können Sie ihn schnell und einfach mit dem Staubsauger reinigen.
- Bitte spülen Sie den Filter unter fließendem Wasser ab und trocknen Sie ihn anschließend mit einem weichen
Tuch.
- Bitte lassen Sie den Filter trocknen und fügen Sie diesen wieder im Filtergehäuse ein.
4. Bitte reinigen Sie das Gerät mit einem angefeuchteten Tuch und wischen Sie mit einem trockenen Tuch nach.
5. Bitte verwenden Sie keine chemischen Lösungsmittel (wie Benzin, Alkohol) oder heißes Wasser.

6. Wird das Gerät über längeren Zeitraum nicht benutzt, so schalten Sie bitte das Gerät aus, ziehen Sie den Netzstecker
und bringen Sie das Gerät an einen trockenen, kühlen und sicheren Platz.
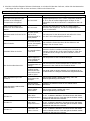
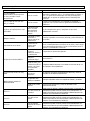
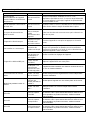
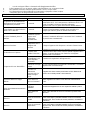
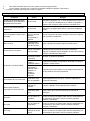
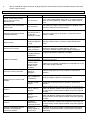
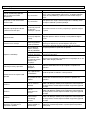
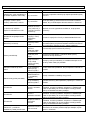
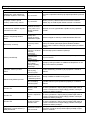
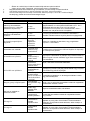
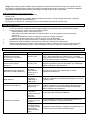
Problembehandlung
Problem
Ursache
Lösung
Die Entfeuchtungsleistung des
Gerätes ist bei niedrigeren
Temperaturen sehr gering.
Das ist normal.
Der Kompressor entfeuchtet optimal bei einer
Umgebungstemperatur >15°C. Ist die Temperatur niedriger
als 15°C und der Luftfeuchtigkeitsgrad niedriger als der
eingestellte, kann das Gerät keine Feuchtigkeit aus der Luft
ziehen.
Kalte und/oder heiße Luft
kommt aus dem Luftauslass
heraus.
Das ist normal.
Während der Inbetriebnahme wird die Luftfeuchtigkeit
absorbiert und eingefroren, um den Feuchtigkeitsgrad im
Raum zu reduzieren.
Die Wassertank-Voll-Leuchte ist
aktiviert.
Der Tank ist voll,
oder ist nicht
ordnungsgemäß im
Gerät platziert.
Bitte entleeren Sie den Wassertank und stellen Sie sicher,
dass der Tank ordnungsgemäß platziert ist.
Keine Funktion.
Das Gerät ist nicht
an eine Stromquelle
angeschlossen.
Bitte schließen Sie das Gerät an die Steckdose an und
betätigen Sie die Power-Taste.
Lamellen öffnen sich nicht.
Der Lamellen-Motor
ist blockiert.
Prüfen Sie bitte, ob die Lamellen blockiert werden. Bitte
versuchen Sie die Lamellen vorsichtig hoch und runter zu
bewegen, während das Gerät ausgeschaltet ist. Sollte dies
nicht funktionieren, bringen Sie das Gerät bitte zu Ihrem
Händler.
Das Gerät entfeuchtet nicht.
Ist die
Luftfeuchtigkeit im
Raum niedriger als
die eingestellte?
Bitte überprüfen Sie die Geräteeinstellungen.
Ist die
Raumtemperatur zu
niedrig?
Bitte versuchen Sie die Raumtemperatur zu erhöhen oder
platzieren Sie das Gerät in einem anderen Raum.
Ist der Luftauslass
blockiert? Ist der
Abstand zwischen
dem Gerät und der
Wand zu klein?
Das Gerät sollte mit einem Abstand von mindestens 20 cm
zur Wand oder zu sonstigen Hindernissen aufgestellt werden.
Die Luftumwälzung ist sehr
schwach.
Ist der Luftfilter
verschmutzt oder
verstopft?
Bitte reinigen Sie die Luftfilter regelmäßig, wie in der
Bedienungsanleitung beschrieben.
Laute Geräusche während der
Inbetriebnahme.
Steht das Gerät
schief oder instabil?
Platzieren Sie bitte das Gerät an eine stabile ebene
Oberfläche.
Ist der Luftfilter
verschmutzt?
Bitte reinigen Sie den Luftfilter wie in der
Bedienungsanleitung beschrieben.
E3 oder E4
Fehler beim
Feuchtigkeitssensor
Bitte ziehen Sie den Netzstecker und lassen Sie das Gerät
für min. 10 Minuten abkühlen. Erst dann können Sie dieses
wieder in Betrieb nehmen. Falls das gleiche Problem auftritt,
kontaktieren Sie bitte Ihren Händler.
E1 oder E2
Fehler beim
Temperatursensor
Bitte ziehen Sie den Netzstecker und lassen Sie das Gerät
für min. 10 Minuten abkühlen. Erst dann können Sie dieses
wieder in Betrieb nehmen. Falls das gleiche Problem auftritt,
kontaktieren Sie bitte Ihren Händler.
E5 oder E6
Fehlfunktion des
inneren Sensors
Bitte ziehen Sie den Netzstecker und lassen Sie das Gerät
für min. 10 Minuten abkühlen. Erst dann können Sie dieses
wieder in Betrieb nehmen. Falls das gleiche Problem auftritt,
kontaktieren Sie bitte Ihren Händler.

„Defrost“-Leuchte ist aktiviert,
der Betrieb wird ständig
unterbrochen.
Die
Frostschutzfunktion
ist aktiviert.
Warten Sie bitte bis die Frostschutzfunktion automatisch
deaktiviert wird. Bitte erhöhen Sie die Temperatur im Raum,
falls dieses Problem öfters vorkommt.
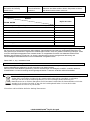
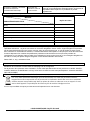
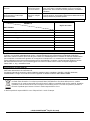
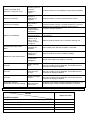
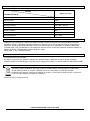
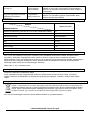
Technische Daten
MODELL
TECHN. DATEN
DryFix 20 Lumio
Entfeuchtungsleistung (Liter/Tag bei 30°C und 80% Luftfeuchtigkeit)
20 l
Stromaufnahme
365W
Leistungsaufnahme
220V-240V/50Hz
Gehäuse-Abmessungen
380 x 580 x 195 mm
Gewicht
14,3 Kg
Kältemittel
R290
Stromstärke
1,2A
Entfeuchtungsgrad
35% – 80%
Kältemittel
(CE) N 842/2006: Dieser Luftentfeuchter enthält das Kältemittel R290. Die Kältemittelmenge beträgt jedoch weniger
als 1kg und ist in einem geschlossenen Kühl-Kreislauf. Das Kühlmittel weist zwar kein Ozonabbaupotenzial auf, ist
aber gemäß Kyoto Protokoll ein sogenanntes Treibhausgas und kann somit zur globalen Erwärmung beitragen, sofern
es an die Atmosphäre abgegeben wird. Deshalb dürfen nur ausgebildete Techniker mit Kältemittel Zertifikat eine
Befüllung bzw. Entleerung vornehmen. Ihr Suntec Luftentfeuchter muss bei sachgerechter Benutzung und
unbeschädigtem Kühlmittel-Kreislauf nicht mit Kältemittel nachgefüllt werden.
R290, GWP: 3, 75g = 0.000225t CO2e
EG-Konformitätserklärung
Das Gerät entspricht den wesentlichen Gesundheits- und Sicherheitsanforderungen der Europäischen Union. Die EG-
Konformitätserklärung ist Basis für die CE-Kennzeichnung dieses Gerätes.
Mit Erscheinen dieser Bedienungsanleitung verlieren alle bisherigen ihre Gültigkeit. SUNTEC, SUNTEC Wellness,
KLIMATRONIC und das Sonnenlogo sind eingetragene Marken. © 2020/01 SUNTEC WELLNESS GMBH.
Hinweise zum Umweltschutz
Dieses Symbol zeigt an, dass das Produkt innerhalb der EU nicht als normaler Haushaltsabfall entsorgt
werden darf. Um mögliche Schäden für die Umwelt und die menschliche Gesundheit zu verhindern,
entsorgen Sie das Gerät verantwortungsbewusst, um die nachhaltige Wiederverwertung von
Materialressourcen zu fördern. Bitte geben Sie Ihr benutztes Produkt über die Sammelstellen zurück oder
wenden Sie sich an das Geschäft, in dem Sie das Produkt gekauft haben. So kann das Produkt
umweltgerecht und sicher recycelt werden.
Für Irrtümer und Druckfehler wird keine Haftung übernommen.
© 2020 KLIMATRONIC® DryFix 20 Lumio
SUNTEC WELLNESS GMBH / HOLZSTRASSE 2 / 40221 DÜSSELDORF / DEUTSCHLAND

DryFix 20 Lumio
Dehumidifier
Instruction Manual
GB

Thank you for buying this product from Suntec Wellness. Please read the manual carefully before using the appliance.
Retain this manual for future reference.
Safety Instructions
CAUTION!
This appliance can be used by children aged from 8
years and above and persons with reduced physical,
sensory and mental capabilities or lack of experience
and knowledge if they have been given supervision or
instruction concerning use of the appliance in a safe
way and understand the hazards involved. Cleaning and
user maintenance shall not be made by children without
supervision. Children of less than 3 years should be
kept away unless continuously supervised.
Children aged from 3 years and less than 8 years shall
only switch on/off the appliance provided that it has
been placed or installed in its intended normal
operating position and they have been given
supervision or instruction concerning use of the
appliance in a safe way and understand the hazards
involved.
Children aged from 3 years and less than 8 years shall
not plug in, regulate and clean the appliance or perform
user maintenance.
• Use the appliance with care.
• This appliance is for indoor use only and intended for use
in a domestic environment only. Any other use is not
recommended by the manufacturer and may cause fire,
electrical shocks or other injury to user or property.
• This unit must be only connected to an outlet with a rated
voltage of AC 220-240V / 50Hz. Should you have any
doubts regarding the suitability of your electrical supply,
have it checked by a qualified electrician.

• Disconnect the power plug from socket before
dismantling, assembling or cleaning.
• Avoid touching any moving parts of the appliance. Never
insert fingers, pencils or any other objects through the
guard.
• Do not clean the unit by spraying it or immersing it in
water.
• Please do not use an extension cord to connect the unit.
• Never operate this appliance if the cord, power
adapter or plug is damaged.
• Please ensure the power cord is not stretched or
exposed to sharp object/edges.
• Please refrain from further usage if the power cord,
power plug or the appliance are damaged and contact
your seller.
• Do not leave the appliance unattended.
• Do not attempt to repair, disassemble or change the
appliance by yourself.
• The use of accessory not recommended by SUNTEC
may cause harm.
• Do not use the appliance for any other purposes than its
intended use.
• Do not tilt the unit while in use. The unit is designed to
work only in vertical position.
• This dehumidifier must always be stored and transported
upright, otherwise irreparable damage may be caused to
the compressor.
• Avoid restarting the unit unless 5 minutes have passed
since being turned off. This prevents damage to the
compressor.
• Never use the mains plug as a switch to start and turn off
the dehumidifier. Use the ON/OFF switch located on the

control panel.
• Always place the unit on a dry and stable surface.
• The appliance should not be installed in laundry or wet
rooms where the humidity is higher than 85% RH.
• Do not dry laundry above the unit. Place the laundry at
least 1 meter away from your dehumidifier.
• Do not place the unit next to heat sources (e.g. electrical
fires, fireplaces, etc.).
• Avoid mishandling the dehumidifier. Dropping, throwing
the unit can cause damage to its internals and increases
the risks of operating it.
• Do not store or use gasoline, petrol, paint, solvents or
other flammable vapors or liquids in the vicinity of this
dehumidifier or any other appliance.
• This dehumidifier must not be used in spaces where
there is a high concentration of gases, solvent or other
volatile organic compounds; in very dusty environments;
in any domestic, commercial or industrial environment
where air composition is flammable.
Energy saving and unit safety protection tips
• Do not cover or restrict the airflow from the outlet or inlet
grills.
• For maximum performance the minimum distance from a
wall or objects should be 20 cm.
• Keep the filters or grills of the unit clean. Under normal
conditions, filters or grills should be cleaned once every
three weeks (approximately). Since the filters remove
airborne particles, more frequent cleaning may be
necessary, depending on the air quality.

Installation
• In order to save energy, do not open windows or doors while the unit is running.
• Place the unit on a hard / flat surface.
• On first use run the unit continuously for 24 hrs.
• Place a piece of carpet or a rubber mat under the unit, to reduce any vibrations while the unit is running.
Parts
Air Outlet
Louvers
Control Panel
Wheels
Lamp
Handle
Air Inlet
Prefilter/activated
Carbon filter
Continuous
Drain Port
Water Tank
Back Cover
Power Cord
Activated Carbon Filter:
Take out the carbon filter from the bag and
insert it in the filter housing. We always
suggest to change the carbon filter every 3
months. It keeps the room fresh.

Defrost indicator
Control Panel
POWER: Use this button to turn on or turn off the
appliance.
MODE CONTROL: Use this button to select the
function of this unit: AUTO/HIGH/LOW or FAN. The
appliance will start with the AUTO-function until you
choose another function. The AUTO-Modus is ideal for
domestic environment humidity of 50-55% RH and for
saving electricity.
You can choose between HIGH or LOW. If you choose
the “FAN”-function the fan will work without
dehumidification.
LAMP: Please press this button to activate or
deactivate the lamp. The indicator light colour will
change according to the humidity condition:
Red: high humidity, RH ≥70%
Green: comfortable 70%-40% RH
Orange: dry, RH<40%
Note: It can take about 2 minutes until the indicator will
change the colour.
OSCILLATION: Use this function, if you need to set the
position of the louvers. There are 3 different directions:
45°, 90° or swing mode between 45° and 90°. Press
the button for the swing mode. If you continue pressing
the button, the louvers will change to 45° or 90°. Do not
operate the unit if the self-opening louvers do not open
on power on.
UP/DOWN key: Press UP/DOWN key to select the desired humidity level. Default relative humidity is 55%. If you select
35%, the compressor will not stop until the water tank is full. The humidity level can be set within a range of 35% RH to
80% RH in 5% increments. The compressor will work until the desired humidity is measured. The FAN-modus will change
automatically and will move the air around the room ensuring the entire air in the room is processed.
TIMER:
Power-off function:
- Press the Timer-button, while the device is on.
- Use the “up” or “down” key to set the time period (0-24 hours)
Power-on function:
- Press the Timer-button, while the device is off.
- Use the “up” or “down” key to set the time period (0-24 hours)
DEFROST: The appliance will defrost automatically as programmed once the coil sensor detects temperature. The
indicator will light up at the same time. Once defrosting finishes, the appliance will recover to its previous running mode.
When the unit is in a room where the temperature is between 5°C and 12°C, the defrost mode enters every 30 minutes.
When the unit is in a room where the temperature is between 12°C and 20°C, the defrost mode enters every 45 minutes.
TANK-FULL INDICATOR: Red light will be on and the unit will beep when the tank is ready to be emptied or when the
tank is removed or not replaced in the proper position.
IONIZATION FUNCTION: Use the Ionization function, to refresh the air in the room. As soon as you press the “ION”-key,
the light will come on.
Display:
- When the unit is plugged in, it will indicate the room humidity level.
- When the humidity level is selected, it will indicate the set humidity.
- As soon as you activate the timer, the set time will be shown on the display for a few seconds and then the humidity
level in the room will appear on the display.
Note: If ambient humidity is lower than 20%, it will show “LO”. If ambient humidity is higher than 90% it will show “HI”.
Compressor: When the selected humidity is 2% lower than the user selected humidistat setting; the compressor will be
Up-Key
Down Key
Lamp
Ionizer
Oscillation
Timer
Operation Indicator
Mode
Tank-full indicator
Power

shut off automatically, but the fan will still move to ensure air is not stale in the room. The unit will use only a minimal
amount of energy in fan mode.
When the humidity is equal or higher than user selected humidity the compressor will restart once the 3-minute delay
compressor protection expires.
We recommend you to leave the unit to rest for about 10 minutes before using it again, to protect the compressor.
Auto-Restart: If the unit stops off unexpectedly due to the power cut, it will restart with the previous function selected.
Laundry: Set the humidity level to 35%-50% RH. 35% is very dry and the unit will work until water tank is full. Set the fan
to HIGH-function and the louvres to swing mode or 45 °C, directing the airflow onto clothes / laundry dryer. Please do not
place your laundry directly on the device. Make sure that there is nothing blocking the hot air exhaust airflow and place
them 1,5 meters away from the device.
Condensation Drainage
Water Tank:
- When the tank is full the indicator light will flash and the unit will beep.
- Turn the device off and unplug the unit.
- Slowly pull out and empty the water tank.
- Reinsert it into the dehumidifier.
Note: To prevent growth of mould, mildew and bacteria, clean the tank every few weeks. Fill the tank with clean water
and add a little mild detergent. Swish it around and then empty the tank and rinse. Do not use a dishwasher to clean
the tank.
Continuous Draining:
- Please find on the back of the unit the drain outlet.
- Remove the plastic bung.
- Please insert the pipe (not included) into the drain outlet, direct the pipe to a suitable drainage point and let the water
flow out smoothly.
- Make sure that the connection between the pipe and the drain outlet is tight, so that there is no leak.
Maintenance and care
1. Please turn the device off.
2. Unplug the unit from the power outlet before cleaning.
3. To clean the dust filter, please follow the instructions:
- Remove the filter housing from the unit and pull out the filter from the frame.
- If the filter is dusty, use a vacuum attachment or a soft brush to clean.
- Wash the filter with warm water and dry it with a soft cloth.
- Leave it to dry before reinserting it into the filter frame.
4. Clean the unit with a wet cloth and then wipe it with a dry cloth.
5. Please do not use any chemical solvents or hot water.
6. If the unit will not be used for a long time period, turn it off, unplug it, cover the unit and keep it in a dry and safe
place.
Troubleshooting
Issue
Cause
Solution
The dehumidifier does not extract
much water if the temperature is
low.
Normal Operation
The compressor works best in temperatures above
15°C. If the temperature is lower than 15°C and the
air is dryer than the setting on the unit, the device will
not extract water.
Cold and/or hot air comes out from
the air outlet.
Normal Operation
When the unit is in dehumidifying mode it absorbs
humid air from the room and freezes it to reduce
humidity in the room.
Is the tank-full indicator activated?
Tank full or the tank has
not been properly
inserted.
Empty the tank and make sure the tank is properly
inserted in the unit.
No function.
Is the plug properly
inserted in the socket?
Insert the plug into the socket and press the
POWER-button.

Front louvres do not open.
Louvre motor is
blocked
Check if anything is blocking the louvre. Try to move
gently the louvres up and down, while the unit is off.
If failed, return the unit to your seller.
Dehumidifier does not extract water.
Is the unit set to a
humidity level lower
than the one in the
room?
Please check the humidity level settings.
Is the temperature in
the room too low for
water extraction to be
efficient?
Please increase the temperature in the room or
reposition the unit.
Is the air outlet grill
blocked? Is the unit too
close to walls?
Please ensure a distance of at least 20 cm between
the unit and the walls.
Airflow seems weak.
Is the filter dirty or
clogged?
Please clean the filters regularly as per user manual.
Unit is noisy during operation.
Is the unit on uneven
surface?
Please place the unit on a flat horizontal surface.
Is filter clogged?
Please clean the filters regularly as per user manual.
E3 oder E4
Humidity sensor error
Unplug the unit, rest and plug it back in. If error
repeats, contact your seller.
E1 oder E2
Temperature sensor
error
Unplug the unit, rest and plug it back in. If error
repeats, contact your seller.
E5 oder E6
Abnormal coil sensor
temperature
Unplug the unit, rest and plug it back in. If error
repeats, contact your seller.
Defrost light on and unit stops
regularly.
Unit is defrosting
Allow the unit to automatically defrost. The protection
will clear after the unit self-defrosts. Increase
temperature in the room if this repeats too often.
Technical Data
MODEL
TECHN. DATA
DryFix 20 Lumio
Dehumidifying capacity (Liter/day, at 30 °C / 80% RH)
20 l
Rated Power
365W
Rated voltage
220V-240V/50Hz
Dimensions
380 x 580 x 195 mm
Weight
14,3 Kg
Refrigerant
R290
Amperage
1,2A
Humidity level setting
35% – 80%

Refrigerant
(CE) N 842/2006: This dehumidifier contains the refrigerant R143A. The amount of refrigerant is less than 1kg, and is in
a closed cooling circuit. The coolant does have zero ozone depletion potential, but is a so-called greenhouse gases under
the Kyoto Protocol and may thus contribute to global warming, if it is released to the atmosphere. Therefore, only trained
technicians with refrigerant certificate make a filling or emptying. Suntec your dehumidifier does not have to use if used
properly and undamaged coolant circuit can be refilled with refrigerant.
R290, GWP: 3, 75g = 0.000225t CO2e
EC-Declaration of Conformity
The unit complies with the essential health and safety requirements of the European Union. The EC declaration of
conformity is the basis for the CE marking of this unit.
With the publication of this manual, all previous are not valid. SUNTEC, SUNTEC Wellness, KLIAMTRONIC and the
Sun logo are registered trademarks. © 2020/01 SUNTEC WELLNESS GMBH
Note concerning protection of environment
This product must not be disposed of via normal household waste after its service life but must be taken
to a collection station for the recycling of electrical and electronic devices. The symbol on the product, the
operating instructions or the packaging indicate such disposal procedures. The materials are recycable in
accordance with their respective symbols. By means of re-use, material recycling or any other form of
recycling old appliances you are making an important contribution to the protection of our environment.
Please ask your local council where your nearest disposal station is located.
No liability is assumed for printing errors and mistakes.
© 2020 KLIMATRONIC® DryFix 20 Lumio
SUNTEC WELLNESS GMBH / HOLZSTRASSE 2 / 40221 DÜSSELDORF / GERMANY

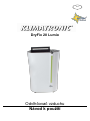
DryFix 20 Lumio
Deshumidificador
Instrucciones de uso
ES

Le agradecemos la compra de este aparato de la marca Suntec Wellness. Antes de poner en funcionamiento el aparato le
rogamos que lea estas instrucciones de uso. Conserve estas instrucciones de uso para poder consultarlas posteriormente.
Indicaciones de seguridad
¡CUIDADO!
Este aparato puede ser utilizado por niños a partir de 8
años de edad y por personas con capacidades físicas,
sensoriales o mentales disminuidas o con experiencia o
conocimientos escasos, si lo hacen bajo supervisión o han
sido instruidos en el uso seguro del aparato así como en
los peligros que entraña. No deje que los niños jueguen
con el aparato. La limpieza y el mantenimiento por cuenta
del usuario no deben ser realizados por niños sin
supervisión.
Los niños menores de 3 años no deben tener acceso al
aparato si no están vigilados constantemente.
Los niños de edades comprendidas entre 3 y 8 años
únicamente pueden encender y apagar el aparato con la
condición de que el aparato esté situado e instalado en su
lugar de uso normal, que estén vigilados y hayan sido
instruidos en el uso seguro del mismo y que hayan
comprendido los peligros potenciales del aparato.
Los niños de edades comprendidas entre 3 y 8 años no
deben enchufar el aparato a la toma de corriente, regularlo,
limpiarlo ni llevar a cabo el mantenimiento.
• Le rogamos que utilice el aparato con cuidado.
• Con el fin de evitar descargas, lesiones o quemaduras, el
aparato deberá utilizarse exclusivamente en interiores y en
el hogar.
• Ponga el aparato en marcha únicamente con la tensión de
red que se indica en la placa de características (AC 220-
240V, 50Hz). Si no estuviese seguro, deje que lo compruebe
una persona cualificada.
• Desenchufe el cable de alimentación antes de limpiar o
La pagina si sta caricando...
La pagina si sta caricando...
La pagina si sta caricando...
La pagina si sta caricando...
La pagina si sta caricando...
La pagina si sta caricando...
La pagina si sta caricando...
La pagina si sta caricando...
La pagina si sta caricando...
La pagina si sta caricando...
La pagina si sta caricando...
La pagina si sta caricando...
La pagina si sta caricando...
La pagina si sta caricando...
La pagina si sta caricando...
La pagina si sta caricando...
La pagina si sta caricando...
La pagina si sta caricando...
La pagina si sta caricando...
La pagina si sta caricando...
La pagina si sta caricando...
La pagina si sta caricando...
La pagina si sta caricando...
La pagina si sta caricando...
La pagina si sta caricando...
La pagina si sta caricando...
La pagina si sta caricando...
La pagina si sta caricando...
La pagina si sta caricando...
La pagina si sta caricando...
La pagina si sta caricando...
La pagina si sta caricando...
La pagina si sta caricando...
La pagina si sta caricando...
La pagina si sta caricando...
La pagina si sta caricando...
La pagina si sta caricando...
La pagina si sta caricando...
La pagina si sta caricando...
La pagina si sta caricando...
La pagina si sta caricando...
La pagina si sta caricando...
La pagina si sta caricando...
La pagina si sta caricando...
La pagina si sta caricando...
La pagina si sta caricando...
La pagina si sta caricando...
La pagina si sta caricando...
La pagina si sta caricando...
La pagina si sta caricando...
La pagina si sta caricando...
La pagina si sta caricando...
La pagina si sta caricando...
La pagina si sta caricando...
La pagina si sta caricando...
La pagina si sta caricando...
La pagina si sta caricando...
La pagina si sta caricando...
La pagina si sta caricando...
La pagina si sta caricando...
La pagina si sta caricando...
La pagina si sta caricando...
La pagina si sta caricando...
La pagina si sta caricando...
La pagina si sta caricando...
La pagina si sta caricando...
La pagina si sta caricando...
La pagina si sta caricando...
La pagina si sta caricando...
La pagina si sta caricando...
La pagina si sta caricando...
La pagina si sta caricando...
La pagina si sta caricando...
La pagina si sta caricando...
La pagina si sta caricando...
La pagina si sta caricando...
La pagina si sta caricando...
La pagina si sta caricando...
La pagina si sta caricando...
La pagina si sta caricando...
La pagina si sta caricando...
La pagina si sta caricando...
La pagina si sta caricando...
La pagina si sta caricando...
La pagina si sta caricando...
La pagina si sta caricando...
La pagina si sta caricando...
La pagina si sta caricando...
La pagina si sta caricando...
La pagina si sta caricando...
La pagina si sta caricando...
La pagina si sta caricando...
La pagina si sta caricando...
La pagina si sta caricando...
La pagina si sta caricando...
La pagina si sta caricando...
La pagina si sta caricando...
La pagina si sta caricando...
La pagina si sta caricando...
La pagina si sta caricando...
La pagina si sta caricando...
La pagina si sta caricando...
La pagina si sta caricando...
La pagina si sta caricando...
La pagina si sta caricando...
La pagina si sta caricando...
La pagina si sta caricando...
La pagina si sta caricando...
La pagina si sta caricando...
La pagina si sta caricando...
La pagina si sta caricando...
La pagina si sta caricando...
La pagina si sta caricando...
La pagina si sta caricando...
-
 1
1
-
 2
2
-
 3
3
-
 4
4
-
 5
5
-
 6
6
-
 7
7
-
 8
8
-
 9
9
-
 10
10
-
 11
11
-
 12
12
-
 13
13
-
 14
14
-
 15
15
-
 16
16
-
 17
17
-
 18
18
-
 19
19
-
 20
20
-
 21
21
-
 22
22
-
 23
23
-
 24
24
-
 25
25
-
 26
26
-
 27
27
-
 28
28
-
 29
29
-
 30
30
-
 31
31
-
 32
32
-
 33
33
-
 34
34
-
 35
35
-
 36
36
-
 37
37
-
 38
38
-
 39
39
-
 40
40
-
 41
41
-
 42
42
-
 43
43
-
 44
44
-
 45
45
-
 46
46
-
 47
47
-
 48
48
-
 49
49
-
 50
50
-
 51
51
-
 52
52
-
 53
53
-
 54
54
-
 55
55
-
 56
56
-
 57
57
-
 58
58
-
 59
59
-
 60
60
-
 61
61
-
 62
62
-
 63
63
-
 64
64
-
 65
65
-
 66
66
-
 67
67
-
 68
68
-
 69
69
-
 70
70
-
 71
71
-
 72
72
-
 73
73
-
 74
74
-
 75
75
-
 76
76
-
 77
77
-
 78
78
-
 79
79
-
 80
80
-
 81
81
-
 82
82
-
 83
83
-
 84
84
-
 85
85
-
 86
86
-
 87
87
-
 88
88
-
 89
89
-
 90
90
-
 91
91
-
 92
92
-
 93
93
-
 94
94
-
 95
95
-
 96
96
-
 97
97
-
 98
98
-
 99
99
-
 100
100
-
 101
101
-
 102
102
-
 103
103
-
 104
104
-
 105
105
-
 106
106
-
 107
107
-
 108
108
-
 109
109
-
 110
110
-
 111
111
-
 112
112
-
 113
113
-
 114
114
-
 115
115
-
 116
116
-
 117
117
-
 118
118
-
 119
119
-
 120
120
-
 121
121
-
 122
122
-
 123
123
-
 124
124
-
 125
125
-
 126
126
-
 127
127
-
 128
128
-
 129
129
-
 130
130
-
 131
131
-
 132
132
-
 133
133
-
 134
134


Suntec Wellness AIR DEHUMIDIFIER DRYFIX 20 LUMIO Manuale del proprietario
- Tipo
- Manuale del proprietario
in altre lingue
- français: Suntec Wellness AIR DEHUMIDIFIER DRYFIX 20 LUMIO Le manuel du propriétaire
- español: Suntec Wellness AIR DEHUMIDIFIER DRYFIX 20 LUMIO El manual del propietario
- Deutsch: Suntec Wellness AIR DEHUMIDIFIER DRYFIX 20 LUMIO Bedienungsanleitung
- Nederlands: Suntec Wellness AIR DEHUMIDIFIER DRYFIX 20 LUMIO de handleiding
- português: Suntec Wellness AIR DEHUMIDIFIER DRYFIX 20 LUMIO Manual do proprietário
- slovenčina: Suntec Wellness AIR DEHUMIDIFIER DRYFIX 20 LUMIO Návod na obsluhu
- polski: Suntec Wellness AIR DEHUMIDIFIER DRYFIX 20 LUMIO Instrukcja obsługi
Documenti correlati
-
Suntec Wellness TABLE FAN COOLBREEZE 3000 TV Manuale del proprietario
-
-
-
-
-
-
-
-
-
Altri documenti
-
Tristar DH-5419 Manuale utente
-
Princess 01.353120.01.001 Manuale utente
-
Suntec Klimatronic DryFix 20 Design Manuale utente
-
Livington Smart Chill Manuale utente
-
-
Silvercrest SLE 280 A2 Operating Instructions Manual
-
Bosch PAD10000 Manuale utente
-
DAM DH422X Guida utente
-
LANAFORM S1 Manuale utente
-
 Inventor AV1-10L Manuale utente
