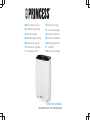
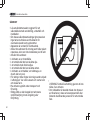
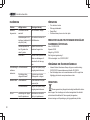
Princess 01.353120.01.001 Manuale utente
- Tipo
- Manuale utente

EN Instruction manual
NL Gebruiksaanwijzing
FR Mode d’emploi
DE Bedienungsanleitung
ES Manual de usuario
PT Manual de utilizador
IT Manuale utente
SV Bruksanvisning
CS Návod na použití
PL Instrukcja obsługi
SK Návod na použitie
Smart Dehumidifier
01.353120.01.001 / 01.353130.01.001
FI Ohjekirja
DK Brugervejledning
NO Bruksanvisningen

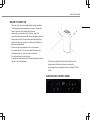
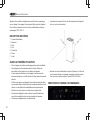
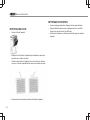
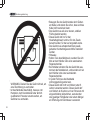
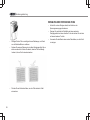
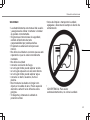
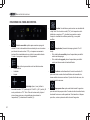
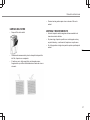
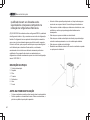
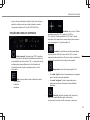
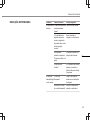
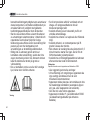
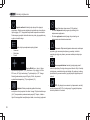
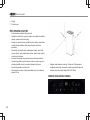
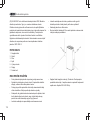
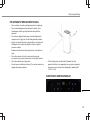
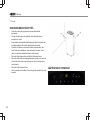
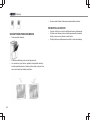
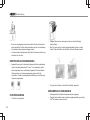
PARTS DESCRIPTION / ONDERDELENBESCHRIJVING / DESCRIPTION DES PIÈCES
/ TEILEBESCHREIBUNG / DESCRIPCIÓN DE LAS PIEZAS / DESCRIÇÃO DOS
COMPONENTES / DESCRIZIONE DELLE PARTI / BESKRIVNING AV DELAR /
OPIS CZĘŚCI / POPIS SOUČÁSTÍ / POPIS SÚČASTÍ / BESKRIVELSE AF BESTAND-
DELE / OSIEN KUVAUKSET / BESKRIVELSE AV DELER
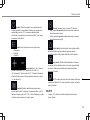
1
7
6
4
5
2
3

Instruction manual
3
SAFETY
• Please read this user’s manual carefully to
ensure proper use, maintenance and
installation.
• By ignoring the safety instructions the
manufacturer cannot be held responsible for
the damage.
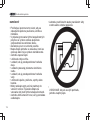
• The appliance is for indoor use only.
• Do not use the unit on a socket under
repairs or not installed properly.
• Do not use the unit:
• near a source of fire.
• in an area where oil is likely to splash.
• in an area exposed to direct sunlight.
• in an area where water is likely to splash.
• near a bath, a shower or a swimming pool.
• Never insert your fingers or any other object
into the air outlet. Take special care to warn
children of these dangers.
• Keep the unit upward while transport and
storage.
• Before cleaning or moving the unit, always
turn off or disconnect the power supply.
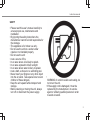
•WARNING: In order to avoid overheating, do
not cover the unit.
• If the supply cord is damaged, it must be
replaced by the manufacturer, its service
agent or similarly qualified persons in order
to avoid a hazard.
EN

Instruction manual
4
• Never move the appliance by pulling the cord
and make sure the cord cannot become
entangled.
• The appliance must be placed on a stable, level
surface.
• This appliance is only to be used for household
purposes and only for the purpose it is made
for.
• The appliance shall be installed in accordance
with national wiring regulations.
• Notes:
• Contact the dealer or a designated repair shop
if any parts are damaged;
• In case of any damage, please turn off the unit,
disconnect the power supply and contact the
dealer or a designated repair shop.
• In any case, the power cord shall be firmly
grounded.
• This appliance shall not be used by children
aged less than 8 years. This appliance can be
used by children aged from 8 years and above
and persons with reduced physical, sensory or
mental capabilities or lack of experience and
knowledge if they have been given supervision
or instruction concerning use of the appliance in
a safe way and understand the hazards
involved. Children shall not play with the
appliance. Keep the appliance and its cord out
of reach of children aged less than 8 years.
Cleaning and user maintenance shall not be
made by children unless older than 8 and
supervised.
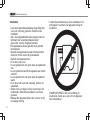
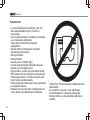
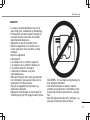
Warning
• To protect yourself against an electric shock, do
not immerse the cord, plug or appliance in the
water or any other liquid.
• The appliance shall be stored in a room without
continuously operating ignition sources (for
example: open flames , an operating gas
appliance or an operating electric heater).
• Do not pierce or burn.
• Be aware that refrigerants may not contain an
odor.
• Contact authorized service technician for repair
or maintenance of this unit.
• Do not pull , deform or modify the power supply
cord , or immerse it in water . Pulling or misuse
of the power supply cord can result in damage
to the unit and cause electrical shock.
• Compliance with national gas regulations shall
be observed.
• Keep ventilation openings clear of obstructions.

Instruction manual
5
• Any person who is involved with working on
or opening a refrigerant circuit should hold a
current valid certificate from an industry
accredited assessment authority which
authorizes their competence to handle
refrigerants safely in accordance with an
industry recognized assessment
specification.
• Servicing should only be performed as
recommended by the equipment
manufacturer. Maintenance and repair
requiring the assistance of other skilled
personnel should be carried out under the
supervision of a person(s) competent in the
use of flammable refrigerants.
• Do not stop the unit by pulling out the power
plug whilst in operation as this may cause
an electric shock or fire due to heat
generation unless strange sounds are heard
or if strange smells or smoke appear from
the unit.
• Unplug the unit if strange sounds, smell, or
smoke comes from it.
Caution
• Please make sure the product ventilates all
the time, make sure the inlet and outlet
ventilation are not blocked in any way.
• Operate this unit on a horizontal surface to
avoid water leakage.
• Do not operate this unit in an explosive or
corrosive atmosphere.
• Operate this unit in an ambient of 35 degree
centigrade or less.
• When the unit is shut off, please wait at least
3.5 minutes before restarting. This to
prevent the compressor from being
damaged.
• To avoid the household electricity block out,
please do not use any extension cord for
this unit.
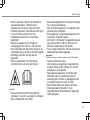
Refrigerant
Specific information regarding appliances with R 290 refrigerant gas.
• Thoroughly read all of the warnings.
EN

Instruction manual
6
• When defrosting and cleaning the appliance ,
do not use any tools other than those
recommended by the manufacturing company.
• The appliance must be placed in an area
without any continuously sources of ignition (for
example: open flames , gas or electrical
appliances in operation).
• Do not puncture and do not burn.
• This appliance contains Y g (see rating label
back of unit ) of R290 refrigerant gas.
• R290 is a refrigerant gas that complies with the
European directives on the environment. Do not
puncture any part of the refrigerant circuit.
• If the appliance is installed, operated or stored
in a non-ventilated area, the room must be
designed to prevent to the accumulation of
refrigerant leaks that could result in a fire risk or
explosion due to ignition of the refrigerant
caused by electric heaters, stoves, or other
sources of ignition.
• The appliance must be stored in such a way as
to prevent mechanical failure.
• Individuals who operate or work on the
refrigerant circuit must have the appropriate
certification issued by an accredited
organization that ensures competence in
handling refrigerants according to a specific
evaluation recognized by associations in the
industry.
• Repairs must be performed based on the
recommendation from the manufacturing
company. Maintenance and repairs that require
the assistance of other qualified personnel must
be performed under the supervision of an
individual specified in the use of flammable
refrigerants.
(CE) N 842/2006: This unit contains the refrigerant R290. The amount of
refrigerant is less than 1kg, and is in a closed cooling circuit. The coolant
does have zero ozone depletion potential, but is a so-called greenhouse
gases under the Kyoto Protocol and may thus contribute to global
warming, if it is released to the atmosphere. Therefore only trained
technicians with refrigerant certificate make a filling or emptying. Your
appliance does not have be refilled with refrigerant if used properly and
has an undamaged coolant circuit. GWP: R290: 3
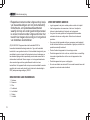
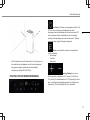
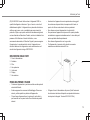
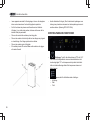
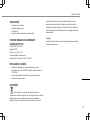
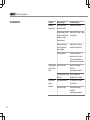
PARTS DESCRIPTION
1. Supply cord
2. Tank
3. Filter
4. Back
5. Air outlet
6. Display
7. Front

Instruction manual
7
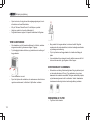
BEFORE THE FIRST USE
• Place the unit in the correct upright position before unpacking.
• Take the appliance andaccessoriesoutthebox.Removethe
stickers,protective foilorplasticfrom thedevice.
• Before using your appliance for the first time, wipe off all
removable parts with a damp cloth. Never use abrasive products.
• Please ensure the unit is not placed against objects which will
obstruct air intake e.g. furniture or curtains as this will affect its
performance dramatically.
• Please don’t place or operate the unit in a narrow place
• Do not place the unit in full sun as it might shut down due to
overheat and the color of the unit may soon fade out.
• Do not place the unit in a humid place.
• A distance of 20cm minimum must be kept between the unit and
the wall or any other obstacles. • Putthepower cable intothe socket.(Note: Make surethe
voltagewhich is indicated on the devicematchesthe
localvoltage beforeconnecting the device.Voltage220V-240V
50Hz).
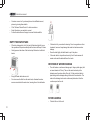
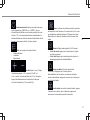
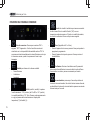
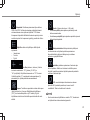
FUNCTIONS OF CONTROL PANEL
EN

Instruction manual
8
•Power button: Press to turn unit "ON" or "OFF". The current
humidity level will be displayed with the defaults of the continuous
mode “CO” and the compressor will then start immediately
dehumidification with the power indicator lamp on, when the
compressor stops the light will flash.
•Mode: use to switch between the different modes.
– Dehumidify
– Fan
– Laundry
•Up-Down (hum+, hum-): Set the required
humidity: "CO" (continuous), 30 to 90% and “AU” (comfort). The
default mode is “CO”. Note: Press up and down at the same time to
convert the display from temperature (°C) to humidity (%).
•Speed: Fan speed can be switched between high or low.
Note: In comfortable mode ("AU") with a room temperature above 27
degree and in Laundry mode the fan speed is fixed and cannot be
adjusted.
•Timer (Regular time range 01-24 hours):
– In the power on state press timer to set the timer for scheduled
shutdown.
– In the off state press timer to set the timer for scheduled start of
the dehumidifier.
•Swing: Swing function on/off, pressing the button when the
dehumidifier is on will let the louver swing continuously, press the
button again to let the louver stop moving.
•Child lock: press 5 seconds to activate the child lock function,
all other functions will not work when activated, to disable the child
lock press the same button again for 5 seconds.
•WiFi: To set the dehumidifier in pair mode, press and hold
the Wi-Fi button until you hear 3 beeps, it could take about 6 seconds.
USE
• When the dehumidify mode is set to “CO” the dehumidifier will
continue to operate regardless of the humidity level.
• When the dehumidifier is set to a required humidity level the
compressor and fan will run if the indoor humidity level is higher or
equal to 3% or more of the set humidity. After the humidity in the room

Instruction manual
9
drops below 2% of the set humidity level, the compressor is
turned off and the dehumidification stops. The ok indicator lamp
will turn on. If the dehumidifier stops dehumidifying and the room
humidity rises above or equals 3% or more of the set humidity,
the compressor starts dehumidifying again. Note that the
compressor will only work again after the protection status of
three minutes has expired. The indoor humidity is maintained at
the set humidity level by the above cycle operation.
• Comfort "AU" function
– Between 5°C and 20°C room temperature, the automatic
selection is set to 60% humidity.
– Between 20°C and 27°C room temperature, the automatic
selection is set to 55% humidity.
– If the room temperature is above 27°C the humidity is set to
50%.
– The dehumidifier stops working when the room temperature
comes below 5°C.
• Laundry mode, with this function enabled, the dehumidifier will
continue to operate (compressor, fan operation) regardless of the
humidity level. The fan speed is locked at high speed and cannot
be adjusted.
• Fan mode, The compressor does not work. The fan can choose
two operating modes: high fan speed and low fan speed.
Humidity setting button cannot be pressed in fan mode.
• Full water protection, the dehumidifier will stop working when the
water tank is full, the full indicator will go on and the machine will
make an alarm sound. By pressing any key the alarm sound will
stop immediately. Please empty the drainage tank, see “Empty
the water tank” section. After emptying the water tank the original
machine's operating status is restored. (Note that the compressor
will only work again after the protection status of three minutes
has expired.)
• Defrost function, when the machine turns automatically into the
defrosting mode, the compressor is turned off, the fan is
defrosted by high winds and the defrost indicator will go on. To
protect the dehumidifier and remove more water from the air, the
dehumidifier must sometimes stop cooling to melt the ice. A
sensor detects the formation of ice, activates a switch that turn off
the compressor. The fan keeps running so that the air flow from
the room can pass and help with the defrosting process. Once
the defrosting process has finished the original machine's
operating status is restored. (Note that the compressor will only
work again after the protection status of three minutes has
expired.)
USING THE DEHUMIDIFIER WITH CLIMATE APP
The dehumidifier can be used manually with its built-in controls or
you can use a smart phone to control it. Before you begin, ensure the
Homewizard Climate app is downloaded. The Homewizard Climate
app is available on Android and iOS.
Pair your dehumidifier to HomeWizard Climate app
• Make sure your dehumidifier is powered.
• Open HomeWizard Climate APP.
EN

Instruction manual
10
• Create an account or if you already have a HomeWizard account,
please log in using those details.
• Click "Add new Climate Device" to add a new device.
• Select the device you wanted to connect.
• Follow the instructions on the app to connect the dehumidifier.
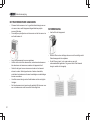
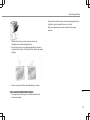
EMPTY THE WATER TANK
• When the drainage tank is full, the tank full indicator light will turn on,
the operation will stop automatically and the buzzer will beep 15 times.
• Gently press on the sides of the tank and pull the tank out with both
hands.
• Empty the water tank above a sink.
• Do not remove the float from the water tank, otherwise the water
sensor cannot detect the water level, causing the unit to malfunction.
• If the tank is dirty, use water for cleaning. Do not use gasoline or other
chemicals, because it may damage the water tank and cause water
leakage.
• Press the tank tightly with both hands to put it into place.
• If the water tank is not positioned correctly, the full water sensor will
remain active and the dehumidifier will not work.
CONTINUOUS WATER DRAINAGE
• The unit features a continuous drainage port. Using a plastic pipe (with
an inner diameter of 10mm). Take out the water tank and put the
drainpipe over the water outlet of the unit. Put the water tank back in
place and guide the drainpipe through the hole of the water tank. The
water in the drainage tank can be continuously drained out from the
continuous port on the unit.
FILTER CLEANING
• Take the filter out of the unit.

Instruction manual
11
• Clean the filter using a vacuum cleaner to gently absorb dust on
the filter screen surface.
• Use some warm water and a mild detergent if it is very dirty.
Make sure the filter is completely dry before you put it back.
• Push the two hooks to put the filter back into the unit.
CLEANING MAINTENANCE
• Before cleaning, be sure to disconnect the unit from any electric
supply outlet.
• First clean the surface with a neutral detergent and wet cloth, and
then wipe it with a dry cloth.
• Do not use gasoline or other chemicals to clean the unit.
EN

Instruction manual
12
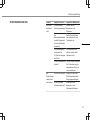
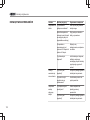
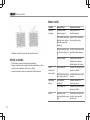
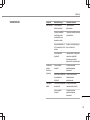
TROUBLESHOOTING
Problem Possible causes Suggested solution
The machine
doesn't work.
Is the power line properly
connected?
Connect the plug into the
socket.
Full water indicator light
is on (water tank full or
not in the right place).
Drain the water in the tank
and put it in place.
The room temperature is
above 35 degrees or
under 5 degrees.
The protection is started and
the machine will not work.
Is the lock on? If the lock is on, please
unlock by press and hold the
lock button for 5 seconds.
Dehumidificatio
n function
cannot start.
Is the filter blocked? Clean the filter (screen)
according to the cleaning
instructions.
Is the air inlet or outlet
blocked?
Remove the obstruction from
the air inlet or outlet.
The machine
makes noise.
Is the machine tilted? Move the machine to a flat,
horizontal surface.
Is the filter blocked? Clean the filter (screen)
according to the cleaning
instructions.
E1 Code Coil sensor short circuit
or open circuit
Check if the line is loose or
replace the coil sensor.
STORAGE
• Empty the water in the tank.
• Roll up the power cord.
• Clean the filter.
• Store the unit in a cool and dry place.
THE PRODUCT OR EQUIPMENT CONTAINS
FLUORINATED GREENHOUSE GAS.
Art.nr. 353120 / 353130
Coolant: R290
Quantity in kg: 0.05 / 0.09
Global Warming Potential: 3
CO2 Equivalent in tonnes: 0.00015 / 0.00027
DECLARATION OF CONFORMITY
• Hereby, Smartwares Europe declares that the radio equipment type
353120 / 353130 are in compliance with Directive 2014/53/EU
• The full text of the EU declaration of conformity is available at the
following internet address: www.princesshome.eu/doc
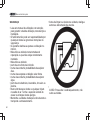
ENVIRONMENT
This appliance should not be put into the domestic garbage at the
end of its durability, but must be offered at a central point for the recycling
of electric and electronic domestic appliances. This symbol on the
appliance, instruction manual and packaging puts your attention to this
important issue. The materials used in this appliance can be recycled. By

Instruction manual
13
recycling of used domestic appliances you contribute an important
push to the protection of our environment. Ask your local authorities
for information regarding the point of recollection.
Support
You can find all available information and spare parts at
www.princesshome.eu!
EN

Gebruiksaanwijzing
14
VEILIGHEID
• Lees deze gebruiksaanwijzing zorgvuldig door
voor een correct(e) gebruik, onderhoud en
installatie.
• Als u de veiligheidsinstructies negeert, kan de
fabrikant niet verantwoordelijk worden
gehouden voor de mogelijke schade.
• Het apparaat is alleen geschikt voor gebruik
binnenshuis.
• Gebruik het apparaat niet als het stopcontact
defect is of niet correct is geïnstalleerd.
• Gebruik het apparaat niet:
• in de buurt van vuur.
• in een gebied met een grote kans op spattende
olie.
• in een gebied dat wordt blootgesteld aan direct
zonlicht.
• in een gebied met een grote kans op spattend
water.
• in de buurt van een bad, wasserij, douche of
zwembad.
• Steek nooit uw vingers of een voorwerp in de
luchtuitlaat. Waarschuw kinderen voor deze
gevaren.
• Bewaar het apparaat tijdens het vervoer en bij
de opslag rechtop.
• U dient de stroomtoevoer uit te schakelen of te
ontkoppelen voordat u het apparaat reinigt of
verwijdert.
•WAARSCHUWING: Om oververhitting te
voorkomen raden we u aan om het apparaat
niet te bedekken.

Gebruiksaanwijzing
15
• Als het netsnoer beschadigd is, moet het
worden vervangen door de fabrikant, de
onderhoudsmonteur van de fabrikant of door
personen met een soortgelijke kwalificatie
om gevaar te voorkomen.
• Verplaats het apparaat nooit door aan het
snoer te trekken en zorg dat het snoer niet
in de war kan raken.
• Het apparaat moet op een stabiele, vlakke
ondergrond worden geplaatst.
• Dit apparaat is uitsluitend voor huishoudelijk
gebruik en voor het doel waar het voor
bestemd is.
• Het apparaat moet worden geïnstalleerd in
overeenstemming met nationale
bedradingsvoorschriften.
• Opmerkingen:
• Neem contact op met de dealer of een
aangewezen reparatiewerkplaats als er
onderdelen beschadigd zijn.
• In het geval van schade is het de bedoeling
dat u het apparaat uitschakelt, de
stroomtoevoer ontkoppelt en contact
opneemt met de dealer of een aangewezen
reparatiewerkplaats.
• Het netsnoer moet sowieso stevig worden
geaard.
• Dit apparaat mag niet worden gebruikt door
kinderen jonger dan 8 jaar. Dit apparaat kan
worden gebruikt door kinderen vanaf 8 jaar
en door personen met verminderde
lichamelijke, zintuiglijke of geestelijke
vermogens of gebrek aan de benodigde
ervaring en kennis indien ze onder toezicht
staan of instructies krijgen over hoe het
apparaat op een veilige manier kan worden
gebruikt alsook de gevaren begrijpen die
met het gebruik samenhangen. Kinderen
mogen niet met het apparaat spelen. Houd
het apparaat en het netsnoer buiten bereik
van kinderen jonger dan 8 jaar. Laat
reiniging en onderhoud niet door kinderen
uitvoeren, tenzij ze ouder zijn dan 8 jaar en
onder toezicht staan.
Waarschuwing
• Dompel het snoer, de stekker of het
apparaat niet onder in water of andere
vloeistoffen om elektrische schokken te
voorkomen.
• Het apparaat moet worden opgeslagen in
een ruimte zonder voortdurend werkende
ontstekingsbronnen (bijvoorbeeld: open
vlammen, een werkend gasapparaat of een
werkende elektrische verwarming).
NL

Gebruiksaanwijzing
16
• Doorboor of verbrand het apparaat niet.
• Houd er rekening mee dat koelmiddelen
geurloos kunnen zijn.
• Neem contact op met een geautoriseerde
servicetechnicus voor reparatie- of
onderhoudswerkzaamheden aan dit apparaat.
• Trek niet aan het netsnoer en vervorm of wijzig
het niet. Dompel het ook niet onder in water.
Door aan het netsnoer te trekken of het
verkeerd te gebruiken, kan het apparaat
beschadigd raken en een elektrische schok
worden veroorzaakt.
• Het is verplicht de nationale gasvoorschriften in
acht te nemen.
• Zorg dat de ventilatieopeningen niet worden
geblokkeerd.
• Mensen die werken aan een koelcircuit of zo'n
circuit openen, moeten in het bezit zijn van een
actueel, geldig certificaat van een door de
branche geaccrediteerde beoordelingsautoriteit
dat bevestigt dat ze bekwaam zijn in een veilige
omgang met koelmiddelen conform een door de
branche erkende beoordelingsspecificatie.
• Reparatiewerkzaamheden mogen alleen
worden uitgevoerd voor zover deze zijn
aanbevolen door de fabrikant van de
apparatuur. Onderhouds- en
reparatiewerkzaamheden waarbij de hulp van
ander geschoold personeel nodig is, moeten
worden uitgevoerd onder toezicht van een of
meer personen die bekwaam zijn in het gebruik
van brandbare koelmiddelen.
• Stop het apparaat niet door het netsnoer uit het
stopcontact te trekken terwijl het apparaat is
ingeschakeld. De warmte die hierbij ontstaat,
kan namelijk een elektrische schok of brand
veroorzaken. De enige situaties waarin u dit wel
mag doen, is als u vreemde geluiden hoort, een
vreemde geur ruikt of er rook uit het apparaat
komt.
• Ontkoppel het apparaat als er vreemde
geluiden, geuren of rook ontstaan.
Opgelet
• Zorg ervoor dat het product de hele tijd
geventileerd blijft en dat de inlaten en uitlaten
van de ventilatie niet worden geblokkeerd.

Gebruiksaanwijzing
17
• Bedien dit apparaat op een horizontaal
oppervlak om waterlekkage te voorkomen.
• Bedien dit apparaat niet in een explosieve of
corrosieve omgeving.
• Bedien dit apparaat in een omgeving van
maximaal 35 graden Celcius.
• Wacht nadat het apparaat is uitgeschakeld
minstens 3,5 minuten voordat u het
apparaat opnieuw opstart. Dit om te
voorkomen dat de compressor beschadigd
raakt.
• Om een stroomuitval te voorkomen, raden
we u aan om geen verlengsnoer te
gebruiken voor dit apparaat.
Koelmiddel
Specifieke informatie over apparaten met R290-koelgas.
• Lees alle waarschuwingen zorgvuldig door.
• Bij het ontdooien en reinigen van het
apparaat mogen alleen de hulpmiddelen
worden gebruikt die door het productiebedrijf
worden aangeraden.
• Het apparaat moet worden neergezet in een
ruimte zonder voortdurend werkende
ontstekingsbronnen (bijvoorbeeld: open
vlammen, gas of werkende elektrische
apparaten).
• Doorboren of verbranden is niet toegestaan.
• Dit apparaat bevat Y g (zie het typeplaatje
aan de achterkant van het apparaat) R290-
koelgas.
• R290 is een koelgas dat voldoet aan de
Europese milieurichtlijnen. Doorboor geen
enkel deel van het koelcircuit.
• Als het apparaat wordt geïnstalleerd,
gebruikt of opgeslagen in een niet-
geventileerde ruimte, moet de ruimte zijn
ontworpen om de ophoping van koelmiddel
in geval van lekkages te voorkomen.
Koelmiddellekkages kunnen de kans op
brand of explosies vergroten doordat
elektrische verwarmingen, fornuizen of
andere ontstekingsbronnen ervoor zorgen
dat het koelmiddel ontbrandt.
• Het apparaat moet dusdanig worden
opgeslagen dat mechanische storingen
worden voorkomen.
• Mensen die werken aan het koelcircuit of het
bedienen, moeten in het bezit te zijn van de
juiste certificering, die is verleend door een
geaccrediteerde organisatie en die
garandeert dat ze vaardig zijn in de omgang
met koelmiddelen in overeenstemming met
een specifieke evaluatie die wordt erkend
door brancheverenigingen.
NL

Gebruiksaanwijzing
18
• Reparaties moeten worden uitgevoerd op basis
van de aanbevelingen van het productiebedrijf.
Onderhouds- en reparatiewerkzaamheden
waarbij de hulp van ander geschoold personeel
is vereist, moeten worden uitgevoerd onder het
toezicht van degene die kundig is in het gebruik
van brandbare koelmiddelen.
(CE) N 842/2006: Dit apparaat bevat het koelmiddel R290. De
hoeveelheid koelmiddel bedraagt minder dan 1kg en het koelmiddel
bevindt zich in een gesloten koelcircuit. Het koelmiddel draagt niet bij aan
ozonafbraak, maar is volgens het Kyotoprotocol wel een broeikasgas en
kan daardoor bijdragen aan de opwarming van de aarde wanneer het in
de atmosfeer terechtkomt. Daarom mogen vul- en leegwerkzaamheden
alleen worden uitgevoerd door gekwalificeerde technici met een
koelcertificaat. Het apparaat hoeft niet opnieuw met koelmiddel te worden
gevuld als het correct wordt gebruikt en het koelcircuit onbeschadigd is.
GWP (aardopwarmingsvermogen): R290: 3
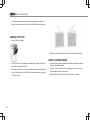
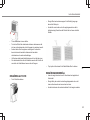
BESCHRIJVING VAN ONDERDELEN
1. Netsnoer
2. Reservoir
3. Filter
4. Achterkant
5. Luchtuitlaat
6. Display
7. Voorkant
VOOR HET EERSTE GEBRUIK
• Leg het apparaat in de juiste verticale positie voordat u het uitpakt.
• Haal het apparaat en de accessoires uit de doos.Verwijder de
stickers, de beschermfolie of het plastic van het apparaat.
• Veeg voor het eerste gebruik van het apparaat alle afneembare
onderdelen af met een vochtige doek. Gebruik nooit schurende
producten.
• Zorg ervoor dat het apparaat niet tegen voorwerpen wordt geplaatst
die de luchtinlaat blokkeren, zoals meubilair of gordijnen, omdat dit de
prestaties aanzienlijk beïnvloedt.
• Plaats of bedien het apparaat niet in een krappe ruimte.
• Plaats het apparaat niet in de volle zon, omdat het door oververhitting
kan worden uitgeschakeld en de kleur van het apparaat snel kan
vervagen.
• Plaats het apparaat niet op een vochtige plek.
• Er moet een afstand van minimaal 20 mm worden bewaard tussen het
apparaat en eventuele andere obstakels.

Gebruiksaanwijzing
19
• Sluit het netsnoer aan op het stopcontact.(Let op: Zorg er voor
het aansluiten van het apparaat voor dat het op het apparaat
aangegeven voltage overeenkomt met de plaatselijke
netspanning.Voltage220V-240V50Hz).
FUNCTIES VAN HET BEDIENINGSPANEEL
•Aan-uitknop: Tik hierop om het apparaat aan (ON) of uit
(OFF) te zetten. Het huidige vochtigheidsniveau wordt
weergegeven met de standaarden van de continue modus 'CO'
en de compressor begint onmiddellijk met de ontvochtiging,
waarbij het indicatorlampje van de aan-uitknop aan is. Zodra de
compressor stopt, begint het lampje te knipperen.
•Modus: wordt gebruikt om tussen de verschillende
modi te schakelen.
– Ontvochtigen
– Ventilator
– Wasmodus
•Omhoog-Omlaag (hum+, hum-):
Stel de gewenste vochtigheid in: 'CO' (continu), 30 tot 90% en
'AU' (comfort). De standaardmodus is 'CO'. Opmerking: Houd de
plus- en minknoppen tegelijkertijd ingedrukt om het display van
temperatuur (°C) naar vochtigheid (%) om te schakelen.
NL

Gebruiksaanwijzing
20
•Snelheid: De snelheid van de ventilator kan op hoog of laag
worden ingesteld. Opmerking: In de comfortabele modus ('AU') met
een kamertemperatuur van meer dan 27 graden en in de wasmodus
ligt de ventilatorsnelheid vast en kan deze niet worden aangepast.
•Timer (Normale tijdspanne 01-24 uur):
– Druk in de stand Aan op de timer om een geplande uitschakeling
in te stellen.
– Druk in de stand Uit op de timer om een geplande inschakeling
van de ontvochtiger in te stellen.
•Swing: Swing-functie aan/uit. Als deze knop wordt ingedrukt
wanneer de ontvochtiger aan is, wordt de ventilatiejaloezie op en neer
bewogen. Als u deze knop opnieuw indrukt, houdt de ventilatiejaloezie
op met bewegen.
•Kindervergrendeling: houd deze knop vijf seconden lang
ingedrukt om de kindervergrendelingsfunctie te activeren. Wanneer
deze functie is geactiveerd, werken alle andere functies niet. Om de
kindervergrendeling te deactiveren, houdt u dezelfde knop opnieuw vijf
seconden lang ingedrukt.
•Wifi: Om de ontvochtiger in de koppelingsmodus te zetten,
houdt u de wifiknop ingedrukt totdat u drie piepjes hoort. Dit kan
ongeveer zes seconden duren.
GEBRUIK
• Als de ontvochtigingsmodus is ingesteld op 'CO', blijft de ontvochtiger
werkzaam ongeacht het vochtigheidsniveau.
• Als de ontvochtiger is ingesteld op een vereist vochtigheidsniveau,
blijven de compressor en ventilator werken als het vochtigheidsniveau
binnen hoger is dan of gelijk is aan 3% van de ingestelde vochtigheid.
Als de vochtigheid in de ruimte minder dan 2% van het ingestelde
vochtigheidsniveau bereikt, wordt de compressor uitgeschakeld en
wordt het ontvochtigen stopgezet. Het OK-indicatielampje gaat aan.
Als de ontvochtiger ophoudt met ontvochtigen en de vochtigheid in de
ruimte 3% of meer van de ingestelde vochtigheid bereikt, begint de
compressor weer met ontvochtigen. Houd er rekening mee dat de
compressor pas weer gaat werken nadat de beveiligingsstatus van
drie minuten voorbij is. De vochtigheid binnen wordt op het ingestelde
vochtigheidsniveau gehouden door de bovenstaande cycluswerking.
• Comfortfunctie 'AU'
– Bij een kamertemperatuur tussen 5°C en 20°C wordt de
automatische selectie ingesteld op een vochtigheid van 60%.
– Bij een kamertemperatuur tussen 20°C en 27°C wordt de
automatische selectie ingesteld op een vochtigheid van 55%.
– Als de kamertemperatuur meer dan 27°C bedraagt, wordt de
vochtigheid ingesteld op 50%.
La pagina si sta caricando...
La pagina si sta caricando...
La pagina si sta caricando...
La pagina si sta caricando...
La pagina si sta caricando...
La pagina si sta caricando...
La pagina si sta caricando...
La pagina si sta caricando...
La pagina si sta caricando...
La pagina si sta caricando...
La pagina si sta caricando...
La pagina si sta caricando...
La pagina si sta caricando...
La pagina si sta caricando...
La pagina si sta caricando...
La pagina si sta caricando...
La pagina si sta caricando...
La pagina si sta caricando...
La pagina si sta caricando...
La pagina si sta caricando...
La pagina si sta caricando...
La pagina si sta caricando...
La pagina si sta caricando...
La pagina si sta caricando...
La pagina si sta caricando...
La pagina si sta caricando...
La pagina si sta caricando...
La pagina si sta caricando...
La pagina si sta caricando...
La pagina si sta caricando...
La pagina si sta caricando...
La pagina si sta caricando...
La pagina si sta caricando...
La pagina si sta caricando...
La pagina si sta caricando...
La pagina si sta caricando...
La pagina si sta caricando...
La pagina si sta caricando...
La pagina si sta caricando...
La pagina si sta caricando...
La pagina si sta caricando...
La pagina si sta caricando...
La pagina si sta caricando...
La pagina si sta caricando...
La pagina si sta caricando...
La pagina si sta caricando...
La pagina si sta caricando...
La pagina si sta caricando...
La pagina si sta caricando...
La pagina si sta caricando...
La pagina si sta caricando...
La pagina si sta caricando...
La pagina si sta caricando...
La pagina si sta caricando...
La pagina si sta caricando...
La pagina si sta caricando...
La pagina si sta caricando...
La pagina si sta caricando...
La pagina si sta caricando...
La pagina si sta caricando...
La pagina si sta caricando...
La pagina si sta caricando...
La pagina si sta caricando...
La pagina si sta caricando...
La pagina si sta caricando...
La pagina si sta caricando...
La pagina si sta caricando...
La pagina si sta caricando...
La pagina si sta caricando...
La pagina si sta caricando...
La pagina si sta caricando...
La pagina si sta caricando...
La pagina si sta caricando...
La pagina si sta caricando...
La pagina si sta caricando...
La pagina si sta caricando...
La pagina si sta caricando...
La pagina si sta caricando...
La pagina si sta caricando...
La pagina si sta caricando...
La pagina si sta caricando...
La pagina si sta caricando...
La pagina si sta caricando...
La pagina si sta caricando...
La pagina si sta caricando...
La pagina si sta caricando...
La pagina si sta caricando...
La pagina si sta caricando...
La pagina si sta caricando...
La pagina si sta caricando...
La pagina si sta caricando...
La pagina si sta caricando...
La pagina si sta caricando...
La pagina si sta caricando...
La pagina si sta caricando...
La pagina si sta caricando...
La pagina si sta caricando...
La pagina si sta caricando...
La pagina si sta caricando...
La pagina si sta caricando...
La pagina si sta caricando...
La pagina si sta caricando...
La pagina si sta caricando...
La pagina si sta caricando...
La pagina si sta caricando...
La pagina si sta caricando...
La pagina si sta caricando...
La pagina si sta caricando...
La pagina si sta caricando...
La pagina si sta caricando...
La pagina si sta caricando...
La pagina si sta caricando...
La pagina si sta caricando...
La pagina si sta caricando...
La pagina si sta caricando...
La pagina si sta caricando...
La pagina si sta caricando...
La pagina si sta caricando...
La pagina si sta caricando...
La pagina si sta caricando...
La pagina si sta caricando...
La pagina si sta caricando...
La pagina si sta caricando...
La pagina si sta caricando...
La pagina si sta caricando...
La pagina si sta caricando...
La pagina si sta caricando...
La pagina si sta caricando...
La pagina si sta caricando...
La pagina si sta caricando...
La pagina si sta caricando...
La pagina si sta caricando...
La pagina si sta caricando...
La pagina si sta caricando...
La pagina si sta caricando...
La pagina si sta caricando...
La pagina si sta caricando...
La pagina si sta caricando...
-
 1
1
-
 2
2
-
 3
3
-
 4
4
-
 5
5
-
 6
6
-
 7
7
-
 8
8
-
 9
9
-
 10
10
-
 11
11
-
 12
12
-
 13
13
-
 14
14
-
 15
15
-
 16
16
-
 17
17
-
 18
18
-
 19
19
-
 20
20
-
 21
21
-
 22
22
-
 23
23
-
 24
24
-
 25
25
-
 26
26
-
 27
27
-
 28
28
-
 29
29
-
 30
30
-
 31
31
-
 32
32
-
 33
33
-
 34
34
-
 35
35
-
 36
36
-
 37
37
-
 38
38
-
 39
39
-
 40
40
-
 41
41
-
 42
42
-
 43
43
-
 44
44
-
 45
45
-
 46
46
-
 47
47
-
 48
48
-
 49
49
-
 50
50
-
 51
51
-
 52
52
-
 53
53
-
 54
54
-
 55
55
-
 56
56
-
 57
57
-
 58
58
-
 59
59
-
 60
60
-
 61
61
-
 62
62
-
 63
63
-
 64
64
-
 65
65
-
 66
66
-
 67
67
-
 68
68
-
 69
69
-
 70
70
-
 71
71
-
 72
72
-
 73
73
-
 74
74
-
 75
75
-
 76
76
-
 77
77
-
 78
78
-
 79
79
-
 80
80
-
 81
81
-
 82
82
-
 83
83
-
 84
84
-
 85
85
-
 86
86
-
 87
87
-
 88
88
-
 89
89
-
 90
90
-
 91
91
-
 92
92
-
 93
93
-
 94
94
-
 95
95
-
 96
96
-
 97
97
-
 98
98
-
 99
99
-
 100
100
-
 101
101
-
 102
102
-
 103
103
-
 104
104
-
 105
105
-
 106
106
-
 107
107
-
 108
108
-
 109
109
-
 110
110
-
 111
111
-
 112
112
-
 113
113
-
 114
114
-
 115
115
-
 116
116
-
 117
117
-
 118
118
-
 119
119
-
 120
120
-
 121
121
-
 122
122
-
 123
123
-
 124
124
-
 125
125
-
 126
126
-
 127
127
-
 128
128
-
 129
129
-
 130
130
-
 131
131
-
 132
132
-
 133
133
-
 134
134
-
 135
135
-
 136
136
-
 137
137
-
 138
138
-
 139
139
-
 140
140
-
 141
141
-
 142
142
-
 143
143
-
 144
144
-
 145
145
-
 146
146
-
 147
147
-
 148
148
-
 149
149
-
 150
150
-
 151
151
-
 152
152
-
 153
153
-
 154
154
-
 155
155
-
 156
156
-
 157
157
-
 158
158


Princess 01.353120.01.001 Manuale utente
- Tipo
- Manuale utente
in altre lingue
- français: Princess 01.353120.01.001 Manuel utilisateur
- español: Princess 01.353120.01.001 Manual de usuario
- Deutsch: Princess 01.353120.01.001 Benutzerhandbuch
- Nederlands: Princess 01.353120.01.001 Handleiding
- português: Princess 01.353120.01.001 Manual do usuário
- slovenčina: Princess 01.353120.01.001 Používateľská príručka
- dansk: Princess 01.353120.01.001 Brugermanual
- polski: Princess 01.353120.01.001 Instrukcja obsługi
- svenska: Princess 01.353120.01.001 Användarmanual
Documenti correlati
Altri documenti
-
ProBreeze PB-20 Manuale utente
-
Concept OV1100 Manuale utente
-
Taurus Alpatec DH 1201 Manuale del proprietario
-
Beko BP112C Manuale del proprietario
-
 Pro Breeze PB-15-UK-FBA Manuale utente
-
Master DHP 55 -55DV R290 E20 Manuale del proprietario
-
-
-
-
Suntec Wellness AIR DEHUMIDIFIER DRYFIX 20 LUMIO Manuale del proprietario
