Virutex ABB311 Manuale del proprietario
- Categoria
- Utensili elettrici
- Tipo
- Manuale del proprietario

Ensambladora a batería
Cordless Joinng Machine
Rainureuse d'entailles sans l
Akku-Lamellenfräsmaschine
Assemblatrice a baeria
Fresadora de lamelas a bateria
беспроводной Фрезер для шкантов и пазов
Bezprzewodowy Lamelownica
ABB311
MANUAL DE INSTRUCCIONES
OPERATING INSTRUCTIONS
MODE D’EMPLOI
GEBRAUCHSANWEISUNG
MANUALE D’ISTRUZIONI
MANUAL DE INSTRUÇÕES
ИНСТРУКЦИЯ ПО ЭКСПЛУАТАЦИИ
INSTRUKCJA OBSŁUGI

2
MANUAL DE INSTRUCCIONES
OPERATING INSTRUCTIONS
MODE D'EMPLOI
GEBRAUCHSANWEISUNG
MANUALE D'ISTRUZIONI
MANUAL DE INSTRUÇÕES
ИНСТРУКЦИЯ
ПО
ЭКСПЛУАТАЦИИ
INSTRUKCJA OBSŁUGI
página/page
seite/pagina
страница/strona
ESPAÑOL Ensambladora a batería ABB311
9
ENGLISH ABB311 Cordless Joinng Machine
14
FRANÇAIS Rainureuse d'entailles sans l ABB311
19
DEUTSCH Akku-Lamellenfräsmaschine ABB311
25
ITALIANO Assemblatrice a baeria ABB311
31
PORTUGUÉS Fresadora de lamelas a bateria ABB311
37
РУССКИЙ беспроводной Фрезер для шкантов и пазов ABB311
43
POLSKI Bezprzewodowy Lamelownica ABB311
49
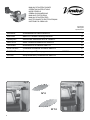
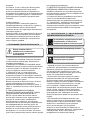
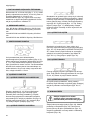
Nº 0
Nº 10
Fig. 1 Fig. 2

3
Nº 20
Fig. 3
Fig. 4 Fig. 5
Fig. A
Nº 6
Fig. 8
Fig. 6 Fig. 7

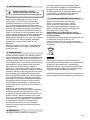
4
Fig. 13 Fig. 14
Fig. 9 Fig. 10
Fig. 11 Fig. 12

5
Fig. 15 Fig. 16 Fig. 17
Fig. 18 Fig. 19
Fig. 20 Fig. 21
Fig. 22

6
Fig. 29
Fig. 30
Fig. 23 Fig. 24 Fig. 25
Fig. 28Fig. 27Fig. 26
A

7
Fig. 32Fig. 31
Fig. 33 Fig. 34
Fig. 35
DE
Fig. 36 Fig. 37

8
Fig. 38
19
7
4
Fig. 39
Fig. 40
Fig. 41
19 7
19
22
21
20 20
2 Ah
4 Ah
4 Ah (c)
6 5 7
65

9
o piezas en moviento. Los cables dañados o enredados
aumentan el riesgo de choque eléctrico.
e) Cuando maneje una herramienta eléctrica en el
exterior, use una prolongación de cable adecuada para
uso en el exterior. El uso de una prolongación de cable
adecuada para uso en el exterior reduce el riesgo de
choque eléctrico.
f) Si fuese imprescindible utilizar la herramienta eléc-
trica en un entorno húmedo, es necesario conectarla
a través de un fusible diferencial. La aplicación de un
fusible diferencial reduce el riesgo a exponerse a una
descarga eléctrica.
3) Seguridad personal
a) Esté alerta, vigile lo que está haciendo y use el sentido
común cuando maneje una herramienta eléctrica. No
use una herramienta eléctrica cuando esté cansado o
bajo la influencia de drogas, alcohol o medicamentos. Un
momento de distracción mientras maneja herramientas
eléctricas puede causar un daño personal serio.
b) Use equipo de seguridad. Lleve siempre protección para
los ojos. La utilización para las condiciones apropiadas de
un equipo de seguridad tal como mascarilla antipolvo,
zapatos no resbaladizos, gorro duro, o protección para
los oídos reducirá los daños personales.
c) Evite un arranque accidental. Asegúrese de que el
interruptor está en posición “abierto” antes de enchufar
la clavija. Transportar herramientas eléctricas con el dedo
sobre el interruptor o enchufar herramientas eléctricas
que tienen en interruptor en posición “cerrado” evita
accidentes.
d) Retire llave o herramienta antes de arrancar la herra-
mienta eléctrica. Una llave o herramienta dejada unida
a una pieza rotativa de una herramienta eléctrica puede
causar un daño personal.
e) No se sobrepase. Mantenga los pies bien asentados
sobre el suelo y conserve el equilibrio en todo momento.
Esto permite un mejor control de la herramienta eléctrica
en situaciones inesperadas.
f) Vista adecuadamente. No vista ropa suelta o joyas.
Mantenga su pelo, su ropa y guantes elejados de las
piezas en movimiento. La ropa suelta, las joyas o el pelo
largo pueden ser cogidos en las piezas en movimiento.
g) Si hay dispositivos para la conexión de medios de
extracción y recogida de polvo, asegúrese de que éstos
estén conectados y se usen correctamente. El uso de
estos dispositivos puede reducir los riesgos relacionados
con el polvo.
h) No permita que la familiaridad obtenida con el uso
frecuente de herramientas se vuelva complaciente e
ignore los principios de seguridad de las herramientas.
Un descuido puede causar lesiones graves en una frac-
cion de segundo.
4) Utilización y cuidados de las herramientas eléctricas.
a) No fuerce la herramienta eléctrica. Use la herramienta
ESPAÑOL
ENSAMBLADORA A BATERÍA ABB311
1. INSTRUCCIONES DE SEGURIDAD
1.1 INSTRUCCIONES GENERALES DE SEGURIDAD
Antes de utilizar la máquina lea atenta-
mente éste MANUAL DE INSTRUCCIONES
Asegúrese de haberlo comprendido antes
de empezar a operar con la máquina.
Conserve todas las advertencias e instrucciones para
referencia en el futuro. El término "herramienta eléctrica"
en las advertencias se refiere a la herramienta eléctrica
accionada por la red eléctrica (con cable) o a una he-
rramienta eléctrica accionada por batería (sin cable).
Lea estas instrucciones. La no observación
de todas las instrucciones relacionadas a
continuación puede dar como resultado un
choque eléctrico, fuego y/o una lesión seria.
1) Área de trabajo
a) Mantenga el área de trabajo limpia y bien iluminada.
Las áreas desordenadas y oscuras provocan accidentes.
b) No maneje herramientas eléctricas en atmósferas ex-
plosivas, tales como en presencia de líquidos inflamables,
gases o polvo. Las herramientas eléctricas crean chispas
que pueden encender el polvo o humos.
c) Mantenga alejados a los niños y curiosos mientras
maneja una herramienta eléctrica. Las distracciones
pueden causarle la pérdida del control.
d) Nunca deje la herramienta eléctrica desatendida. Deje
la máquina solo cuando la herramienta este totalmente
en punto muerto.
2) Seguridad eléctrica
a) La clavija de la herramienta eléctrica debe coincidir
con la base de la toma de corriente. No modificar nunca
la clavija de ninguna manera. No usar ningún adaptador
de clavijas con herramientas eléctricas puestas a tierra.
Clavijas no modificadas y bases coincidentes reducirán
el riesgo de choque eléctrico.
b) Evite el contacto del cuerpo con superficies puestas
a tierra como tuberías, radiadores, cocinas eléctricas y
refrigeradores. Hay un riesgo aumentado de choque
eléctrico si su cuerpo está puesto a tierra.
c) No exponga las herramientas eléctricas a la lluvia
o a condiciones de humedad. El agua que entre en la
herramienta aumentará el riesgo de choque eléctrico.
d) No abuse del cable. No usar nunca el cable para
llevar, levantar o desenchufar la herramienta eléctrica.
Mantenga el cable lejos del calor, aceite, cantos vivos

10
eléctrica correcta para su aplicación. La herramienta
eléctrica correcta hará el trabajo mejor y más seguro
al ritmo para la que fue concebida.
b) No use la herramienta eléctrica si el interruptor no
la enciende o apaga “cerrado” y “abierto”. Cualquier
herramienta eléctrica que no pueda controlarse con el
interruptor es peligrosa y debe repararse.
c) Desenchufe la clavija de la fuente de alimentación y
o batería antes de efectuar cualquier ajuste, cambio de
accesorios, o de almacenar las herramientas eléctricas.
Tales medidas preventivas de seguridad reducen el riesgo
de arrancar la herramienta accidentalmente.
d) Almacene las herramientas eléctricas inactivas fuera
del alcance de los niños y no permita el manejo de la
herramienta eléctrica a personas no familiarizadas con
las herramientas o con estas instrucciones. Las herra-
mientas eléctricas son peligrosas en manos de usuarios
no entrenados.
e) Mantega las herramientas eléctricas. Compruebe que
las partes móviles no estén desalineadas o trabadas, que
no haya piezas rotas u otras condiciones que puedan
afectar el funcionamiento de las herramientas eléctricas.
Las herramientas eléctricas se reparan antes de su suo,
cuando están dañadas. Muchos accidentes son causados
por herramientas eléctricas pobremente mantenidas.
f) Mantenga las herramientas de corte afiladas y limpias.
Las herramientas de corte mantenidas correctamente
con los bordes de corte afilados son menos probables
de trabarse y más fáciles de controlar.
g) Use la herramienta eléctrica, accesorios y puntas de
herramienta, etc. de acuerdo con estas instrucciones y
de la manera prevista para el tipo particular de herra-
mienta eléctrica, teniendo en cuenta las condiciones de
trabajo y el trabajo a desarrolar. El uso de la herramienta
eléctrica para aplicaciones diferentes de las previstas
podría causar unas situación de peligro.
h) Mantenga las empuñaduras secas, limpias y libres
de aceite y grasa. Las asas resbaladizas no permiten un
manejo seguro y control de la herramienta en situaciones
inesperadas. Las herramientas eléctricas con el interrup-
tor encendido invitan a estas situaciones.
5) Servicio
a) Haga revisar su herramienta eléctrica por un servicio
de reparación cualificado usando solamente piezas de
recambio idénticas. Esto garantizará que la seguridad
de la herramienta eléctrica se mantiene.
b) Utilice únicamente piezas originales para la su repa-
ración y mantenimiento. El uso de accesorio y piezas
incompatibles pueden provocar descargas eléctricas y
otros lesiones.
1.2. INSTRUCCIONES DE SEGURIDAD
PARA EL MANEJO DE LA ENSAMBLADORA
Leer atentamente el FOLLETO DE INS-
TRUCCIONES GENERALES DE SEGURIDAD
que se adjunta con la documentación de
la máquina.
1. La tensión de alimentación debe corresponder con los
datos indicados en la chapa características.
2. PELIGRO; MANTENER LA MANO ALEJADA DEL AREA DE
CORTE. Mantener las manos lejos de la cuchilla. No coger
la máquina por debajo mientras está en funcionamiento.
3. Asegúrese que el mecanismo de protección (retroceso)
funcione libremente y sin posibilidad de quedar rete-
nido. No bloquear el mecanismo con la cuchilla salida.
Utilizar siempre la protección: La protección protege al
usuario de los fragmentos de fresas rotas y de contactos
involuntarios con la fresa.
4. AL SUSTITUIR LA CUCHILLA, USAR SOLAMENTE CU-
CHILLAS ORIGINALES VIRUTEX.
No utilizar nunca cuchillas que no cumplan las carac-
terísticas especificadas en este manual.
No utilizar cuchillas deformadas o que presenten roturas.
No emplear cuchillas de acero rápido.
La cuchilla debe tener una velocidad asignada al menos
igual a la marcada sobre la Máquina: Las cuchillas que
funcionen a una velocidad superior a su velocidad asigna-
da pueden salir parcialmente proyectadas y causar daños.
5. EVITE CORTAR CLAVOS Y NUDOS. Inspeccionar y sacar
los clavos de la madera antes de cortar. Intentar evitar
cortar entre nudos.
6. Sostenga la máquina por sus superficies de agarre
aisladas, ya que la cuchilla puede tocar su propio cable
de alimentación: Cortar un cable en "tensión" puede
poner "en tensión" las partes metálicas accesibles de la
máquina y provocar un choque eléctrico sobre el usuario.
Para cualquier manipulación de la má-
quina, desconectarla de la batería como
medida de seguridad para el operario.
1.3 INSTRUCCIONES DE SEGURIDAD PARA EL
USO Y CUIDADO DE LA BATERÍA Y EL CARGADOR
No caliente la batería por encima de 45°C.
Protejala de una exposición prolongada
a los rayos de sol directos.
No deseche la batería en el fuego.
Proteja la batería de la lluvia.

11
• Recargue solamente con el cargador especificado por
el fabricante. Un cargador que es adecuado para un
tipo de bloque de baterías puede ocasionar un peligro
de incendio cuando se usa con otro bloque de baterías.
• Use las herramientas solamente con los bloques de
baterías diseñados específicamente. El uso de cualquier
otro bloque de baterías puede ocasionar un peligro de
daños e incendio.
• Cuando un bloque de baterías no esté en uso,
manténgalo alejado de otros objetos metálicos como
clips para papeles, monedas, llaves, clavos, tornillos, u
otros pequeños objetos matálicos que puedan establecer
una conexión de un terminal al otro. Un cortocircuito
entre ambos terminales de la batería puede ocasionar
quemaduras o un incendio.
• En condiciones abusivas, puede derramarse líquido de
la batería; evite el contacto. Si accidentalmente tiene
lugar un contacto, lávelo con agua. Si el líquido toca
a los ojos, busque ayuda medica adicionalmente. El
liquido derramado de la batería puede causar irritación
o quemaduras.
• No utilice baterías o útiles dañados o modificados. Las
baterías dañadas o modificadas puede comportarse de
forma imprevisible y no correcta y producir un fuego o
explosión y ocasionar un daño.
• Evite encendidos involuntarios. Asegurese que el
interruptor de encendido/apagado esté en la posición
de apagado antes de colocar la batería.
Llevar las herramientas eléctricas con el dedo en el
interruptor o insertar la batería con el interruptor en
posición encendido da lugar a accidentes.
• No abrir las baterías. Existe peligro de dañar el circuito.
• En caso de daños y uso indebido de la batería, pueden
emitirse vapores. En este caso sitúese en un lugar
ventilado y busque asistencia médica en caso necesario.
Los vapores pueden irritar el sistema respiratorio.
• Cuando la batería esté defectuosa, el líquido puede
escapar y entrar en contacto con componentes
adyacentes. Revise las piezas correspondientes, límpielas
o reemplácelas si es necesario.
• Proteja la batería contra el calor, la irradiación solar
continua y el fuego. Existe peligro de explosión.
Lea todas las instrucciones y advertencias
de seguridad.
• Proteja el cargador de la batería de la lluvia y la
humedad. La entrada de agua en el mismo aumenta el
riesgo de descarga eléctrica.
• No cargue otras baterías. El cargador de la batería
sólo es adecuado para cargar baterías de iones de litio
dentro del rango de tensión indicado. De lo contrario,
existe peligro de incendio y explosión.
• Mantenga el cargador de la batería limpio. La suciedad
puede causar peligro de descarga eléctrica.
• Revise el cargador de la batería, el cable y el enchufe
siempre antes de usarlos. No utilice el cargador cuando
se detecten defectos. No abra el cargador por su cuenta,
hágalo reparar sólo por personal cualificado que utilice
repuestos originales. Los cargadores, los cables y los
enchufes dañados aumentan el riesgo de descarga eléctrica.
• No utilice el cargador de la batería en superficies
fácilmente inflamables, por ejemplo, papel, textiles,
etc..., o en ambientes combustibles. Existe peligro de
incendio debido al calentamiento del cargador durante
el ciclo de carga.
2. CARACTERÍSTICAS
Tensión de la batería...................................................20 V
Velocidad sin carga...........................7.000 min-1
Tipo de batería…................................................................Li-Ion
Tiempo de carga de la batería…......................60 minutos
Capacidad de la batería..............................................2 a 4 A
Disco..........................................................D100xD22x4mm
Profundidad máx fresado.....................................…..20 mm
Peso neto…........................................................................3 kg
Nivel de Presión acústica Ponderado A.................92 dBA
Nivel de Potencia acústica Ponderada A...........103 dBA
Incertidumbre de la medición.............................K: 3 dBA
¡Usar protectores auditivos!
Nivel total de emisión de vibraciones..........ah: 4,7 m/s2
Incertidumbre de la medición.............................K: 1,5 m/s2
3. CARACTERISTICAS DE LA MÁQUINA
Motor sin escobillas
La herramienta eléctrica está equipada con un motor sin
escobillas que proporciona las siguientes ventajas (en
comparación con la herramienta eléctrica que tiene un
motor con escobillas):
• Alta fiabilidad debido a la falta de piezas que se des-
gastan (escobillas de carbón, conmutador).
• Mayor tiempo de funcionamiento en una sola carga.
• Diseño compacto y ligero.
Protección de temperatura
El sistema de protección de temperatura permite des-
activar automáticamente la herramienta eléctrica en
caso de exceso de carga o cuando la temperatura de la
batería 7 (Fig. 38) excede los 70ºC. El sistema garantiza
la protección de la herramienta eléctrica contra daños
en caso de un uso inadecuado.
Protección contra sobrecargas
La batería 7 (Fig. 38) está protegida por el sistema de
seguridad contra descarga completa. En este caso, la
herramienta eléctrica se desconecta automáticamente.

12
No intente encender la herramienta
eléctrica cuando el sistema de protec-
ción esté activado, la batería 7 (Fig. 38)
puede dañarse.
Indicadores del estado de carga de la batería (Fig. 5)
Al pulsar el botón 6 los indicadores 5 mostrarán el estado
de carga de la batería 7.
Protección contra sobrecalentamiento
En caso de sobrecalentamiento, el sistema de protección
del motor, apaga automáticamente la herramienta eléc-
trica. Si esto ocurre, deje que la herramienta eléctrica
se enfríe antes de volver a encenderla.
Protección contra sobrecargas
El sistema de protección contra sobrecargas del motor
apaga automáticamente la herramienta eléctrica cuando
se opera de una manera que provoca una corriente
anormalmente alta.
Arranque suave
El arranque suave permite que la herramienta eléctrica
gradualmente sin sacudidas ni contragolpes.
4. PROCEDIMIENTO DE CARGA DE LA BATERÍA
Tiempo de carga de la bateria
Funcionamiento inicial de la herramienta eléctrica
Antes del primer uso, la batería 7 (Fig. 38) se debe cargar
completamente.
Proceso de carga (Fig. 39)
• Presione el bloqueo de la batería 4 y retire la batería
7 (Fig. 38).
• Conecte el cargador 19 al suministro de energía.
• Inserte la batería 7 en el cargador 19 (Fig. 39).
• Después de la carga, desconecte el cargador 19 del
suministro de energía.
• Retire la batería 7 del cargador 19 y monte la batería
7 en la herramienta eléctrica.
Indicadores del cargador (Fig. 40)
Los indicadores del cargador 21 y 22 informan sobre el
proceso de carga de la batería 7 (Fig. 38). Las señales
de los indicadores 21 y 22 se muestran en la etiqueta
20 (Fig. 40).
• Fig. 40.1 - (El indicador verde 22 está iluminado, la
batería 7 no está colocada en el cargador 19) – el cargador
19 está conectado a la red eléctrica (listo para cargar).
• Fig. 40.2 - (El indicador verde 22 está parpadeando, la
batería 7 está colocada en el cargador 19) – la batería
7 se está cargando.
• Fig. 40.3 - (El indicador verde 22 está iluminado, la
batería 7 está colocada en el cargador 19) - la batería
7 está completamente cargada.
• Fig. 40.4 - (El indicador rojo 21 está iluminado, la
batería 7 está colocada en el cargador 19) - el proceso
de carga de la batería 7 se ha interrumpido debido a
una temperatura inadecuada. Cuando las condiciones
de temperatura sean normales, el proceso de cargar
se reanudará.
• Fig. 40.5 - (El indicador rojo 21 está parpadeando, la
batería 7 está colocada en el cargador 19) – el proceso
de carga de la batería 7 se ha interrumpido debido a
un fallo en la misma. Sustituya la batería defectuosa 7
está prohibido su posterior uso.
Durante el proceso de carga, la batería 7 y el cargador
19 se calientan, esto es un proceso normal.
5. PUESTA EN MARCHA
Para la puesta en marcha de la máquina presionar hacia
delante sobre el pulsador (Fig. 14) el cual se quedará
enclavado en posición de marcha. Para parar la máquina
presionar simplemente sobre la parte trasera del pulsador
y este retornara automáticamente a su posición de reposo.
6. EQUIPO ESTANDAR
El equipo estandar incluye: maletin de transporte, fresa
de metal duro, aceitera de engrase, llaves de servicio y
tobera aspiración.
7. ACCESORIOS OPCIONALES
- Fresa MD D100x4 Ref 1440382
- Escuadra guia lateral CB64B Ref 6446078
- Acoplamiento aspiración externa 6446073 2,25 m
- Acoplamiento aspiración externa 1746245 5 m
8. DESCRIPCIÓN GENERAL
DE LA ENSAMBLADORA ABB311
La ensambladora ABB311 esta especialmente diseñada
para realizar el ranurado en paneles para la colocación
de pastillas de ensamblaje. Su cabezal regulable en
altura y ángulo permite la realización de cualquier tipo
de ensamblaje con gran rapidez y precisión. La máquina
va equipada con salida de viruta canalizada y conector
para acoplar toma de aspiración externa.
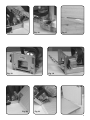
9. REGULACIÓN DE PROFUNDIDADES
Para láminas de nº0, nº10 o nº20 (Figs. 1, 2, 3) situar
el regulador en posición 0, 10 o 20 respectivamente,
obteniendo así una profundidad de 8, 10 o 12 mm.
Para láminas del nº 6 (Fig. A), deberá graduar la salida
de la sierra a su máxima profundidad 20 mm, del modo
indicado en el apartado 11.

13
10. PASTILLAS DE MADERA
Pastillas nº0 Ref.1405001: Medidas: 45x15x4 mm.
Pastillas nº10 Ref.1405002: Medidas: 55x19x4 mm.
Pastillas nº20 Ref.1405003: Medidas: 63x24x4 mm.
Pastillas nº 6 Ref. 1405004: Medidas: 85x30x4 mm.
11. DISTRIBUCIÓN DE LAS RANURAS
Un trazo de lápiz es suficiente. (Figs. 4 y 5). Situar la
referencia de la máquina frente al mismo. (Figs. 6, 7, 8)
Los trazos se efectúan con la ayuda de un metro, una
plantilla o incluso a ojo.
Para la colocación de la pastilla del nº 6 son necesarias
dos ranuras contiguas, por lo que deberá efectuar dos
trazos a una separación de 15 mm entre ellos.
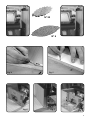
12. ENSAMBLAJE
12.1 ENSAMBLAJE EN MEDIO DEL TABLERO
.......... ....
Para tableros de 16, 19 y 22 mm (para tableros mayores
utilizar el frontal móvil y el frontal abatible): Situar la
pieza a ensamblar, al borde del trazo de lápiz previamente
marcado, según se indica en la (Fig. 9). Fresar las ranuras
verticales según se indica en la (Fig. 10), y las horizontales
según la (Fig. 11). Encolar y montar (Fig. 12).
12.2 ENSAMBLAJE DE UN EXTREMO
.......... ....
Para cualquier espesor del tablero, utilizar el frontal
móvil y el frontal abatible. Colocar el frontal móvil a la
altura deseada o del espesor del tablero. Colocar el frontal
abatible en posición de 90° y efectuar la ranura (Figs.
13 y 14). Encolar y montar (Fig. 17). El desplazamiento
máximo del frontal móvil, sobre el centro de la fresa de
corte es de 45 mm (Figs. 15 y 16).
12.3 ENSAMBLAJE EN INGLETE
............. .
Para cualquier espesor del tablero y ángulo, utilizar el
frontal móvil y el frontal abatible (Figs. 18 y 19) Ejemplo:
INGLETE A 45°. Situar a la distancia deseada el frontal
móvil y el frontal abatible a 45° (Figs. 20 y 21). Encolar
y montar (Fig. 22).
12.4 ENSAMBLAJE DE MARCOS
............. .
Pueden hacerse ensamblajes de marcos a testa o en
inglete. Es aconsejable poner dos láminas si el espesor
es mayor de 25 mm (Figs. 23, 24, 25).
12.5 ENSAMBLAJE LONGITUDINAL
Para ensamblajes longitudinales, situar el frontal móvil
de acuerdo con el espesor del tablero, y proceder según
figuras (Figs. 26, 27, 28).
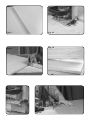
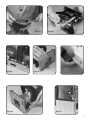
13. CAMBIO DE DISCO
Desconecte la máquina de la red
eléctrica para cualquier operación de
mantenimiento.
Quitar los tornillos A que sujetan la tapa: (Fig. 29).
Separar la base del cuerpo máquina (Fig. 30). Extraer disco
situando la llave fija según (Fig. 31). Limpiar asiento, y
proceder a la inversa para su montaje (Fig. 32).
14. REGULACIÓN DE LA PROFUNDIDAD
Desconecte la máquina de la red
eléctrica para cualquier operación de
mantenimiento.
Posicionar regulador en el nº20 y graduar la salida del
disco a 12 mm mediante las tuercas, manteniendo la
máquina presionada en posición de corte. (Figs. 33 y 34).
Para verificar la profundidad haga una ranura, intro-
duzca una lámina y marque un trazo. Dele la vuelta y
compruebe que el trazo se superpone, o corrija el defecto
regulando las tuercas. (Fig. 35).
Para graduar la profundidad de corte al máximo, para el

14
Conforme a la Directiva Europea 2002/96/CE los usuarios
pueden contactar con el establecimiento donde adquirie-
ron el producto, o con las autoridades locales pertinentes,
para informarse sobre cómo y dónde pueden llevarlo
para que sea sometido a un reciclaje ecológico y seguro.
VIRUTEX se reserva el derecho de modificar sus productos
sin previo aviso.
ENGLISH
ABB311 CORDLESS JOINTING MACHINE
1. SAFETY INSTRUCTIONS
1.1 GENERAL SAFETY INSTRUCTIONS
Read these OPERATING INSTRUCTIONS.
Make sure you have understood them befo-
re operating the machine for the first time.
Save all warnings and instructions for future reference.
The term “power tool” in the warnings refers to the power
tool run off the electrical network (with a power cord)
or to a battery run power tool (cordless).
Read all instructions. Failure to follow
all instructions listed below may result
in electric shock, fire and/or serious
injury. The term “power tool” in all of
the warnings listed below refers to your
mains operated (corded) power tool or
battery operated (cordless) power tool.
1) Work area
a) Keep work area clean and well lit. Cluttered and dark
areas invite accidents.
b) Do not operate power tools in explosive atmospheres,
such as in the presence of flammable liquids, gases or
dust. Power tools create sparks which may ignite the
dust or fumes.
c) Keep children and bystanders away while operating a
power tool. Distractions can cause you to lose control.
d) Never leave the power tool unattended. Leave the
machine only when the tool is completely in neutral.
2) Electrical safety
encaje de pastillas del Nº 6, posicione el regulador en el
número 20 y gradue la salida del disco a 20 mm mediante
las tuercas, manteniendo la máquina presionada en la
posición de corte (Figs. 33 y 34)
Recomendaciones:
Mantenga limpia la máquina y efectúe un engrase
periódico de las guías, para que no queden nunca
secas. (Fig. 36).
15. NIVEL DE RUIDOS Y VIBRACIONES
Los niveles de ruido y vibraciones de esta herramienta
eléctrica han sido medidos de acuerdo con la Norma
Europea EN 60745-2-19 y EN 60745-1 y sirven como base
de comparación con máquinas de semejante aplicación.
El nivel de vibraciones indicado ha sido determinado
para las aplicaciones principales de la herramienta,
y puede ser utilizado como valor de partida para la
evaluación de la exposición al riesgo de las vibraciones.
Sin embargo, el nivel de vibraciones puede llegar a ser
muy diferente al valor declarado en otras condiciones
de aplicación, con otros útiles de trabajo o con un
mantenimiento insuficiente de la herramienta eléctrica
y sus útiles, pudiendo llegar a resultar un valor mucho
más elevado debido a su ciclo de trabajo y modo de uso
de la herramienta eléctrica.
Por tanto, es necesario fijar medidas de seguridad de
protección al usuario contra el efecto de las vibraciones,
como pueden ser mantener la herramienta y útiles de
trabajo en perfecto estado y la organización de los
tiempos de los ciclos de trabajo (tales como tiempos
de marcha con la herramienta bajo carga, y tiempos de
marcha de la herramienta en vacío y sin ser utilizada
realmente ya que la reducción de estos últimos puede
disminuir de forma sustancial el valor total de exposición).
16. GARANTÍA
Todas las máquinas electroportátiles VIRUTEX, tienen una
garantía válida de 12 meses a partir del día de suministro,
quedando excluidas todas las manipulaciones o daños
ocasionados por manejos inadecuados o por desgaste
natural de la máquina. Para cualquier reparación, diri-
girse al Servicio Oficial de Asistencia Técnica VIRUTEX.
17. RECICLAJE DE LAS
HERRAMIENTAS ELÉCTRICAS
Nunca tire la herramienta eléctrica con el resto de resi-
duos domésticos. Recicle las herramientas, accesorios y
embalajes de forma respetuosa con el medio ambiente.
Respete la normativa vigente de su país.
Aplicable en la Unión Europea y en países europeos
con sistemas de recogida selectiva de residuos:
La presencia de esta marca en el producto o en el
material informativo que lo acompaña, indica que al
finalizar su vida útil no deberá eliminarse junto con
otros residuos domésticos.

15
a) Power tool plugs must match the outlet. Never modify
the plug in any way. Do not use any adapter plugs with
earthed (grounded) power tools. Unmodified plugs and
matching outlets will reduce risk of electric shock.
b) Avoid body contact with earthed or grounded sur-
faces such as pipes, radiators, ranges and refrigerators.
There is an increased risk of electric shock if your body
is earthed or grounded.
c) Do not expose power tools to rain or wet conditions.
Water entering a power tool will increase the risk of
electric shock.
d) Do not abuse the cord. Never use the cord for carrying,
pulling or unplugging the power tool. Keep cord away
from heat, oil, sharp edges or moving parts. Damaged
or entangled cords increase the risk of electric shock.
e) When operating a power tool outdoors, use an
extension cord suitable for outdoor use. Use of a cord
suitable for outdoor use reduces the risk of electric shock.
f) If operating a power tool in a damp location is una-
voidable, use a residual current device (RCD) protected
supply. Use of an RCD reduces the risk of electric shock.
3) Personal safety
a) Stay alert, watch what you are doing and use com-
mon sense when operating a power tool. Do not use a
power tool while you are tired or under the influence
of drugs, alcohol or medication. A moment of inatten-
tion while operating power tools may result in serious
personal injury.
b) Use safety equipment. Always wear eye protection.
Safety equipment such as dust mask, non-skid safety
shoes, hard hat, or hearing protection used for appro-
priate conditions will reduce personal injuries.
c) Avoid accidental starting. Ensure the switch is in the
off position before plugging in. Carrying power tools
with your finger on the switch or plugging in power
tools that have the switch on invites accidents.
d) Remove any adjusting key or wrench before turning
the power tool on. A wrench or a key left attached to a
rotating part of the power tool may result in personal
injury.
e) Do not overreach. Keep proper footing and balance
at all times. This enables better control of the power
tool in unexpected situations.
f) Dress properly. Do not wear loose clothing or jewellery.
Keep your hair, clothing and gloves away from moving
parts. Loose clothes, jewellery or long hair can be caught
in moving parts.
g) If devices are provided for the connection of dust
extraction and collection facilities, ensure these are
connected and properly used. Use of these devices can
reduce dust related hazards.
h) Do not allow the familiarity with the frequent use of
tools to become complacent and ignore the principles
of tool safety. Negligence can cause serious injury in
a split second.
4) Power tool use and care
a) Do not force the power tool. Use the correct power
tool for your application. The correct power tool will
do the job better and safer at the rate for which it was
designed.
b) Do not use the power tool if the switch does not turn
it on and off. Any power tool that cannot be controlled
with the switch is dangerous and must be repaired.
c) Disconnect the plug from the power source before
making any adjustments, changing accessories, or storing
power tools. Such preventive safety measures reduce the
risk of starting the power tool accidentally.
d) Store idle power tools out of the reach of children
and do not allow persons unfamiliar with the power tool
or these instructions to operate the power tool. Power
tools are dangerous in the hands of untrained users.
e) Maintain power tools. Check for misalignment or
binding of moving parts, breakage of parts and any other
condition that may affect the power tools operation. If
damaged, have the power tool repaired before use. Many
accidents are caused by poorly maintained power tools.
f) Keep cutting tools sharp and clean. Properly maintained
cutting tools with sharp cutting edges are less likely to
bind and are easier to control.
g) Use the power tool, accessories and tool bits etc., in
accordance with these instructions and in the manner
intended for the particular type of power tool, taking
into account the working conditions and the work to be
performed. Use of the power tool for operations different
from those intended could result in a hazardous situation.
h) Keep the handles dry, clean and free of oil and grease.
The sliding handles do not allow safe handling and control
of the tool in unexpected situations. Power tools with
the switch on invite these situations.
5) Service
a) Have your power tool serviced by a qualified repair
person using only identical replacement parts. This will
ensure that the safety of the power tool is maintained.
b) Use only original parts for repair and maintenance.
The use of incompatible accessories and parts can cause
electric shock and other injuries.
1.2 SAFETY INSTRUCTIONS FOR
THE JOINTING MACHINE USE
Carefully read the GENERAL SAFETY
INSTRUCTION LEAFLET enclosed with the
machine documents.
1. Supply voltage must be the same as that indicated
on the specifications plate.
2. DANGER: KEEP HANDS AWAY FROM THE CUTTING
ZONE. Never put hands near the cutting blade. Do not
hold the underside of the machine when it is operating.

16
3. Ensure that the safety mechanism (retraction)
functions freely without any danger of being held
back. Do not block the mechanism with the blade in
the exposed position.
Always use the protective mechanism: The protective
mechanism safeguards the user against fragments of
broken bits and from accidental contact with the bit.
4. WHEN REPLACING THE BLADE, USE ONLY ORIGINAL
VIRUTEX BLADES. Never use blades which do not comply
with the properties specified in this manual. Do not use
malformed or broken blades. Do not use high-speed steel.
The assigned speed of the blade must be at least equal
to that marked on the machine: Blades that work at a
faster speed than the assigned speed may be partially
thrown out, causing injury.
5. AVOID CUTTING NAILS AND KNOTS. Inspect the
wood and remove nails before cutting. Try not to cut
through knots.
6. Hold the machine by the insulated gripping surfaces,
as the blade may touch the machine’s power cable:
Cutting an electrified cable may also electrify the ac-
cessible metal parts of the machine and cause electric
shock to the user.
Unplug the machine from the battery out-
let before any maintenance operations.
1.3 SAFETY INSTRUCTIONS FOR USE AND MAIN-
TENANCE OF THE BATTERY AND CHARGER
Do not store the tool and battery cartridge
in locations where the temperature may
reach or exceed 45° C.
Do not incinerate the battery cartridge.
Do not expose battery cartridge to water
or rain.
• Only recharge with the manufacturer's specified
charger. Only recharge with the manufacturer's specified
charger. A charger which is suitable for one type of
battery cartridge can cause a fire risk on another type
of battery cartridge.
• Only use this power tool with the battery cartridge
specifically designed for this model. The use of other
types of battery cartridges may cause injury to the
operator and a fire risk.
• When the battery cartridge is not in use, keep it away
from metal objects, such as paper clips, coins, keys, nails,
screws or other small metal objects that can establish
contact from one terminal to the other. Shorting the
battery terminals may cause burns or a fire.
• Battery fluid may be spilled under extreme conditions;
avoid contact with this liquid. In case of accidental
contact, rinse thoroughly with water. If the liquid comes
into contact with your eyes, seek medical attention.
Battery fluid may cause irritation or burns.
• Do not use damaged or modified batteries. Damaged
or modified batteries can behave in an unpredictable
way and may cause injury to the operator and a fire risk.
• Avoid switching the device on accidentally. Make sure
the on/off switch is in the off position before inserting
the battery. Carrying the power tool with your finger
on the on/off switch or inserting the battery with the
switch in the on position can cause accidents.
• Do not open the batteries. You could damage the
circuits.
• Fumes may be aired if there is battery damage and
improper use. In this case, go to a well-ventilated location
and seek medical assistance, if necessary. Fumes cause
respiratory irritation.
• When the battery is defective, the liquid may leak and
come into contact with adjacent components. Check the
corresponding parts. Clean or replace them, if necessary.
• Protect the battery from heat, continued solar radiation
and fire. There is an explosion hazard.
Read all instructions and safety warnings.
• Protect the battery charger from rain and moisture.
Water entering the charger increases the risk of electric
shock.
• Do not charge other batteries. The battery charger is
only suitable for charging lithium-ion batteries within
the indicated voltage range. Otherwise, there is a fire
and explosion hazard.
• Keep the battery charger clean. Dirt can cause a risk
of electric shock.
• Always check the battery charger, its cable and plug
before using them. Do not use the charger if you see it
is damaged. Do not open the charger on your own. Have
it repaired by a qualified person who uses original spare
parts. Damaged chargers, cables and plugs increase the
risk of electric shocks.
• Do not use the battery charger on highly flammable
surfaces. For example, paper, textiles, etc., or in
combustible environments. A fire hazard exists from the
charger heating during the charging cycle.
2. SPECIFICATIONS
Battery voltage........................................................20 V
No-load speed...............................................7,000 min-1
Battery type.…................................................................Li-Ion

17
Time to charge battery.…................................60 min
Battery capacity.....................................................2 or 4 Ah
Disc.....................................................D100xD22x4mm
Routing depth.................................................…..20 mm
Weight...........................................................................3 kg
Weighted equivalent continuous acoustic
pressure level A.............................................................92 dBA
Acoustic power level A...............................................103 dBA
Uncertainty...................................................................K: 3 dBA
Wear ear protection!
Vibration total values.........................................ah: 4,7 m/s2
Uncertainty..........................................................K: 1,5 m/s2
3. SPECIFICATIONS OF THE TOOL
Brushless motor
Power tool equipped with a brushless motor that pro-
vides the following advantages (compared to the power
tool having a brush motor):
• High reliability due to the lack of wearing parts (car-
bon brushes, commutator).
• Increased operating time on a single charge.
• Compact design and light weight.
Temperature protection
The temperature protection system enables to auto-
matically deactivate the power tool in case of excess
load or when the temperature of the battery 7 (Fig. 38)
is exceeding 70°C. The system guarantees protection of
the power tool from damage in case of noncompliance
with the operation conditions.
Overdischarge protection
The battery 7 (Fig. 38) is protected by the safety system
against deep discharge. In case of complete discharge,
the power tool is automatically switched off.
Do not try to switch on the power tool
when the protection system is activated
the battery 7 (Fig. 38) can be damaged.
Indicators of the state of battery charge (Fig. 5)
With the push of the button 6 the indicators 5 show
the state of charge of the battery 7.
Overheating protection
Overheating protection system of the engine automati-
cally switches off the power tool in case of overheating.
In this situation, let the tool cool before turning the
power tool on again.
Overload protection
Overload protection system of the engine automatically
switches off the power tool when it is operated in a man-
ner that causes it to draw an abnormally high current.
Soft start
Soft start enables smooth start of power tools - is
being run up gradually with no jerks and kickbacks; no
jump-like load is imposed on the motor upon switching.
4. HOW TO CHARGE THE BATTERY
Battery charging time
Initial operating of the power tool
Before the first use, the battery 7 (Fig. 38) must be
fully charged.
Charging process (Fig. 39)
• Press the battery lock 4 and remove the battery 7
(Fig. 38).
• Connect the charger 19 to the power supply.
• Insert battery 7 into charger 19 (Fig. 39).
• Disconnect the charger 19 from power supply after
charging.
• Remove the battery 7 from the charger 19 and mount
battery 7 in the power tool.
Charger indicators (Fig. 40)
Charger indicators 21 and 22 inform of the battery 7
(Fig. 38) charging process. Signals of the indicators 21
and 22 are shown on the label 20. (Fig. 40).
• Fig. 40.1 - (The green indicator 22 is on, the battery
7 is not inserted in the charger 19) - the charger 19 is
connected to the power network (ready for charging).
• Fig. 40.2 - (The green indicator 22 is blinking, the
battery 7 is inserted in the charger 19) - the battery 7
is being charged.
• Fig. 40.3 - (The green indicator 22 is on, the battery 7 is
inserted in the charger 19) - the battery 7 is fully charged.
• Fig. 40.4 - (The red indicator 21 is on, the battery 7
is inserted in the charger 19) - the charging process of
the battery 7 is terminated due to inappropriate tem-
perature. When the temperature conditions are normal,
the process of charging will resume.
• Fig. 40.5 - (The red indicator 21 is blinking, the battery
7 is inserted in the charger 19) - the charging process
of the battery 7 is terminated because of its failure.
Replace the faulty battery 7, its further use is prohibited.
In the process of charging the battery 7 and the charger
19 become hot, it is a normal process.
5. STARTING UP THE MACHINE
To start up the machine, push button forward (Fig. 14)
to the on position.
To stop the machine, simply press the back of the switch
and it will return to the off position.

18
6. STANDARD EQUIPMENTS
Standard equipment includes: carrying case, hard metal
blade, oil can and machine wrenches, and dust connector.
7. OPTIONAL ACCESSORIES
1440382 HM blade d.100x4
6446073 Standard dust collector attachment 2.25 m
6446078 CB64B Lateral fence.
8. GENERAL DESCRIPTION OF THE
ABB311 JOINTING MACHINE
The ABB311 jointing machine is especially designed for
making slots in panels for inserting joint splines.
The angle and height of the head are adjustable, which
means you can make any type of joint quickly and
accurately. The machine comes equipped with a channel
chip outlet and a connector for coupling it to an external
suction source.
9. DEPTHS ADJUSTMENT
For nº0, nº10 or nº20 (Figs. 1, 2 and 3) splines, set the
adjustment at position 0, 10 or 20, respectively, to obtain
a depth of 8, 10 or 12 mm.
For Nº6 splines (Fig. A), the saw outlet must be adjusted
to its maximum depth of 20 mm, as shown in section 11.
10. WOODEN SPLINES
Nº0 splines Ref.1405001:Dimensions: 45x15x4 mm
Nº10 splines Ref.1405002:Dimensions: 55x19x4 mm
Nº20 splines Ref.1405003:Dimensions: 63x24x4 mm
Nº6 splines Ref.1405004:Measurements: 85x30x4 mm
11. LAYING OUT THE SLOTS
..............
A pencil line is enough for this operation (Figs. 4 and 5).
Position the reference mark on the machine against it
(Figs. 6, 7 and 8). Pencil lines can be made using a ruler
or a template, or even by eye.
Two adjoining slots are required to attach the No.6
spline. Therefore two lines, 15 mm apart, must be drawn.
12. JOINTING
12.1 JOINTING TO A PLANE SURFACE
..............
For 16, 19 and 22 mm boards (for boards larger than
these use the movable front part and the movable fence):
Place the piece to be assembled on the edge of the
previously drawn pencil line as shown in (Fig. 9). Mill the
vertical grooves as shown in (Fig. 10) and the horizontal
grooves as shown in (Fig. 11). Glue and assemble. (Fig. 12).
12.2 JOINTING AT AN END
..............
For all board thicknesses use the movable front panel
and the movable fence.
Position the front movable panel at the desired height
or board thickness. Place the movable fence panel in
the 90° position and mill the slot (Figs. 13 and 14). Glue
and assemble (Fig. 17).
Maximum displacement of the movable front panel over
the centre of the blade tool is 45 mm. (Figs. 15 and 16).
12.3 MITRE JOINTING
..............
For all board thicknesses and angle, use the movable
front panel and the movable fence (Figs. 18 and 19).
Example: 45° MITRE JOINT. Position the front movable
panel at the desired distance and the movable fence
at 45° (Figs. 20 and 21). Glue and assemble (Fig. 22).
12.4 FRAME JOINTING
.............
Frames can be mitre or square jointed. Two splines are
recommended if the thickness is greater than 25 mm.
(Figs. 23, 24, 25).
12.5 LENGTHWISE JOINTING
For lengthwise jointing, the movable front panel should
be set at board thickness. Proceed as indicated in figures
(Figs. 26, 27, 28).

19
13. CHANGING THE DISC
Unplug the machine from the electrical
outlet before any maintenance operations.
Remove the cover A fixing bolts (Fig. 29).
Separate the base from the machine body (Fig. 30).
Remove the disc with the wrench, as shown in (Fig. 31).
Clean the seat and follow the instructions for assembly
in reverse order (Fig. 32).
14. DEPTH ADJUSTEMENT
Unplug the machine from the electrical
outlet before any maintenance operations.
Put the depth regulator in the nº 20 position and set
the disc outlet at 12 mm with the nuts, maintaining
the machine in the cutting position (Figs. 33 and 34).
To check the depth, cut a groove, insert a piece of board
and mark with a pencil. Turn it over and check that the
mark coincides. If not, correct the defect by adjusting
the nuts. (Fig. 35).
To adjust the depth of the cut to its maximum, to fit
the No.6 splines, position the regulator at number 20
and use the nuts to adjust the outlet of the disc to 20
mm, keeping the machine pressed down in the cutting
position (Figs. 33 and 34).
Recommendations:
Keep the machine clean and lubricate the guides perio-
dically. They should never be left dry (Fig. 36).
15. NOISE LEVEL AND VIBRATIONS
The noise and vibration levels of this device have been
measured in accordance with European standard EN
60745-2-19 and EN 60745-1 and serve as a basis for com-
parison with other machines with similar applications.
The indicated vibration level has been determined for
the device’s main applications and may be used as an
initial value for evaluating the risk presented by expo-
sure to vibrations. However, vibrations may reach levels
that are quite different from the declared value under
other application conditions, with other tools or with
insufficient maintenance of the electrical device or its
accessories, reaching a much higher value as a result
of the work cycle or the manner in which the electrical
device is used.
Therefore, it is necessary to establish safety measures
to protect the user from the effects of vibrations, such
as maintaining both the device and its tools in perfect
condition and organising the duration of work cycles
(such as operating times when the machine is subjected
to loads, and operating times when working with no-load,
in effect, not in use, as reducing the latter may have a
considerable effect upon the overall exposure value).
16. WARRANTY
All VIRUTEX power tools are guaranteed for 12 months
from the date of purchase, excluding any damage which
is a result of incorrect use or of natural and tear on the
machine. All repairs should be carried out by the official
VIRUTEX technical assistance service.
17. RECYCLING ELECTRICAL EQUIPMENT
Never dispose of electrical equipment with domestic was-
te. Recycle equipment, accessories and packaging in ways
that minimise any adverse effect on the environment.
Comply with the current regulations in your country.
Applicable in the European Union and in European
countries with selective waste collection systems:
If this symbol appears on the product or in the accom-
panying information, at the end of the product's useful
life it must not be disposed of with other domestic waste.
In accordance with European Directive 2002/96/EC, users
may contact the establishment where they purchased the
product or the relevant local authority to find out where
and how they can take the product for environmentally
friendly and safe recycling.
VIRUTEX reserves the right to modify its products
without prior notice.
FRANÇAIS
RAINUREUSE D'ENTAILLES ABB311
1. CONSIGNES DE SÉCURITÉ
1.1 CONSIGNES GÉNÉRALES DE SÉCURITÉ
Avant d'utiliser la machine, lisez attentive-
ment ce MANUEL D'INSTRUCTIONS. Assurez-
vous de bien avoir tout compris avant de
commencer à travailler sur la machine.
Conservez toutes les mises en garde et les instructions
pour vous y reporter ultérieurement. Le terme "outil
électrique" utilisé dans les consignes désigne un outil

20
électrique fonctionnant sur le secteur (câblé) ou sur
batterie (sans fil).
Lire toutes les indications. Le non-respect
des instructions indiquées ci-après peut
entraîner un choc électrique, un incendie et/
ou de graves blessures sur les personnes. La
notion d’«outil électroportatif» mentionnée
par la suite se rapporte à des outils électri-
ques raccordés au secteur (avec câble de
raccordement) et à des outils électriques
à batterie (sans câble de raccordement).
1) Place de travail
a) Maintenez l’endroit de travail propre et bien éclairé.
Un lieu de travail en désordre ou mal éclairé augmente
le risque d’accidents.
b) N’utilisez pas l’appareil dans un environnement
présentant des risques d’explosion et où se trouvent
des liquides, des gaz ou poussières inflammables. Les
outils électroportatifs génèrent des étincelles risquant
d’enflammer les poussières ou les vapeurs.
c) Tenez les enfants et autres personnes éloignés durant
l’utilisation de l’outil électroportatif. En cas d’inattention
vous risquez de perdre le contrôle sur l’appareil.
d) Ne laissez jamais l'outil électrique sans surveillance.
Quitter la machine uniquement lorsque l'outil est com-
plètement en neutre.
2) Sécurité relative au système électrique
a) La fiche de secteur de l’outil électroportatif doit être
appropriée à la prise de courant. Ne modifiez en aucun
cas la fiche. N’utilisez pas de fiches d’adaptateur avec des
appareils avec mise à la terre. Les fiches non modifiées
et les prises de courant appropriées réduisent le risque
de choc électrique.
b) Evitez le contact physique avec des surfaces mises à la
terre tels que tuyaux, radiateurs, fours et réfrigérateurs.
Il y a un risque élevé de choc électrique au cas où votre
corps serait relié à la terre.
c) N’exposez pas l’outil électroportatif à la pluie ou à
l’humidité. La pénétration d’eau dans un outil électro-
portatif augmente le risque d’un choc électrique.
d) N’utilisez pas le câble à d’autres fins que celles prévues,
n’utilisez pas le câble pour porter l’appareil ou pour
l’accrocher ou encore pour le débrancher de la prise
de courant. Maintenez le câble éloigné des sources de
chaleur, des parties grasses, des bords tranchants ou des
parties de l’appareil en rotation. Un câble endommagé
ou torsadé augmente le risque d’un choc électrique.
e) Au cas où vous utiliseriez l’outil électroportatif à
l’extérieur, utilisez une rallonge autorisée homologuée
pour les applications extérieures. L’utilisation d’une
rallonge électrique homologuée pour les applications
extérieures réduit le risque d’un choc électrique.
f) Si l’usage d’un outil dans un emplacement humide
est inévitable, utiliser une alimentation protégée par un
dispositif à courant différentiel résiduel (RCD). L’usage
d’un RCD réduit le risque de choc électrique.
3) Sécurité des personnes
a) Restez vigilant, surveillez ce que vous faites. Fai-
tes preuve de bon en utilisant l’outil électroportatif.
N’utilisez pas l’appareil lorsque vous êtes fatigué ou
après avoir consommé de l’alcool, des drogues ou avoir
pris des médicaments. Un moment d’inattention lors
de l’utilisation de l’appareil peut entraîner de graves
blessures sur les personnes.
b) Portez des équipements de protection. Portez tou-
jours des lunettes de protection. Le fait de porter des
équipements de protection personnels tels que masque
anti-poussières, chaussures de sécurité antidérapantes,
casque de protection ou protection acoustique suivant
le travail à effectuer, réduit le risque de blessures.
c) Evitez une mise en service par mégarde. Assurez-vous
que l’interrupteur est effectivement en position d’arrêt
avant de retirer la fiche de la prise de courant. Le fait
de porter l’appareil avec le doigt sur l’interrupteur ou
de brancher l’appareil sur la source de courant lorsque
l’interrupteur est en position de fonctionnement, peut
entraîner des accidents.
d) Enlevez tout outil de réglage ou toute clé avant de
mettre l’appareil en fonctionnement. Une clé ou un
outil se trouvant sur une partie en rotation peut causer
des blessures.
e) Ne surestimez pas vos capacités. Veillez à garder
toujours une position stable et équilibrée. Ceci vous
permet de mieux contrôler l’appareil dans des situations
inattendues.
f) Portez des vêtements appropriés. Ne portez pas de
vêtements amples ni de bijoux. Maintenez cheveux,
vêtements et gants éloignés des parties de l’appareil
en rotation. Des vêtements amples, des bijoux ou des
cheveux longs peuvent être happés par des pièces en
mouvement.
g) Si des dispositifs servant à aspirer ou à recueillir les
poussières doivent être utilisés, vérifiez que ceux-ci
soient effectivement raccordés et qu’ils sont correcte-
ment utilisés. L’utilisation de tels dispositifs réduit les
dangers dus aux poussières.
h) Ne laissez pas la familiarité acquise avec l'utilisation
un outillage fréquent devient complaisant et Ignorez
les principes de sécurité des outils.
La négligence peut causer des blessures graves à une
fraction deuxième.
4) Utilisation et emploi soigneux de l’outil électroportatif
a) Ne surchargez pas l’appareil. Utilisez l’outil électro-
portatif approprié au travail à effectuer. Avec l’outil
électroportatif approprié, vous travaillerez mieux et avec
plus de sécurité à la vitesse pour laquelle il est prévu.
b) N’utilisez pas un outil électroportatif dont
La pagina sta caricando ...
La pagina sta caricando ...
La pagina sta caricando ...
La pagina sta caricando ...
La pagina sta caricando ...
La pagina sta caricando ...
La pagina sta caricando ...
La pagina sta caricando ...
La pagina sta caricando ...
La pagina sta caricando ...
La pagina sta caricando ...
La pagina sta caricando ...
La pagina sta caricando ...
La pagina sta caricando ...
La pagina sta caricando ...
La pagina sta caricando ...
La pagina sta caricando ...
La pagina sta caricando ...
La pagina sta caricando ...
La pagina sta caricando ...
La pagina sta caricando ...
La pagina sta caricando ...
La pagina sta caricando ...
La pagina sta caricando ...
La pagina sta caricando ...
La pagina sta caricando ...
La pagina sta caricando ...
La pagina sta caricando ...
La pagina sta caricando ...
La pagina sta caricando ...
La pagina sta caricando ...
La pagina sta caricando ...
La pagina sta caricando ...
La pagina sta caricando ...
La pagina sta caricando ...
La pagina sta caricando ...
-
 1
1
-
 2
2
-
 3
3
-
 4
4
-
 5
5
-
 6
6
-
 7
7
-
 8
8
-
 9
9
-
 10
10
-
 11
11
-
 12
12
-
 13
13
-
 14
14
-
 15
15
-
 16
16
-
 17
17
-
 18
18
-
 19
19
-
 20
20
-
 21
21
-
 22
22
-
 23
23
-
 24
24
-
 25
25
-
 26
26
-
 27
27
-
 28
28
-
 29
29
-
 30
30
-
 31
31
-
 32
32
-
 33
33
-
 34
34
-
 35
35
-
 36
36
-
 37
37
-
 38
38
-
 39
39
-
 40
40
-
 41
41
-
 42
42
-
 43
43
-
 44
44
-
 45
45
-
 46
46
-
 47
47
-
 48
48
-
 49
49
-
 50
50
-
 51
51
-
 52
52
-
 53
53
-
 54
54
-
 55
55
-
 56
56


Virutex ABB311 Manuale del proprietario
- Categoria
- Utensili elettrici
- Tipo
- Manuale del proprietario
in altre lingue
- français: Virutex ABB311 Le manuel du propriétaire
- español: Virutex ABB311 El manual del propietario
- Deutsch: Virutex ABB311 Bedienungsanleitung
- português: Virutex ABB311 Manual do proprietário
- polski: Virutex ABB311 Instrukcja obsługi
Documenti correlati


Altri documenti
-
Dexter General Istruzioni per l'uso
-
Hitachi CL 18DSL Handling Instructions Manual
-
Hitachi CL14DSL Manuale del proprietario
-
Hitachi P14DSL Manuale utente
-
-
Hitachi CR 18DL Manuale del proprietario
-
Hitachi R14DL Manuale utente
-
-