
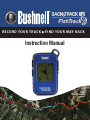
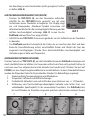
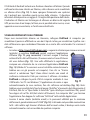
Instruction Manual
RECORD YOUR TRACK FIND YOUR WAY BACK
B
C
12-13
Model#: 360600 /
360610


3
TABLE OF CONTENTS PAGE #
ENGLISH
FrANçAIS
ESPAñOL
DEuTSCH
ITALIANO
4-17
18-31
32-45
46-59
60-73

4
Warnings and Notices
GPS System & Location Accuracy Notice:
The Global Positioning System (GPS) is operated by the government of the United States, which is solely responsible for its accuracy
and maintenance. The system is subject to changes which could affect the accuracy and performance of all GPS equipment. The
inherent nature of the GPS system itself limits the accuracy of the distance indicated on the unit’s display to within about ±3~5
meters (or yards) of the actual marked location.
Warning:
This device is intended as a supplemental handheld navigation aide only. The user assumes all responsibility associated with the
use of this product. It must not be used for any purpose requiring precise measurement of location, direction, distance, velocity or
topography. This device should not be used for any aircraft navigation applications.
Vehicular Use Notice:
Bushnell is committed to the safe and responsible enjoyment of the outdoors.
Do not use this product while driving. An accident can result in property damage, injury or death if the operator fails to practice
prudent driving practices. It is the sole responsibility of the driver of any vehicle to operate the motor vehicle in a safe manner.
Information from the GPS unit can distract the operator of a motor vehicle. It is unsafe to operate the controls of the GPS unit while
operating a motor vehicle. If used in a motor vehicle, it must not be used by the operator of the motor vehicle. If it is used in a motor
vehicle it must be mounted in a manner such that it does not distract the operator, does not interfere with the operator’s field of view,
and does not block or interfere with the air bags or other safety mechanisms of the motor vehicle. Windshields and car windows with
integrated metallic materials, such as defrosters, or car window tinting films, can degrade GPS reception inside a car.
Liability Notice:
In no event shall Bushnell be liable for any incidental, special, indirect or consequential damages, whether resulting from the use,
misuse, or inability to use this product or from defects in the product.
Some states do not allow the exclusion of incidental or consequential damages, so the above limitations may not apply to you.
Lightning Indicator Warning:
Bushnell Fishtrack uses the latest electronic and computer technology to detect and track storms.
However, storms can rapidly evolve and change. Therefore the FishTrack should be used in conjunction
with other weather information sources. The FishTrack detects ACTIVE storms, and cannot predict when
or where a storm may form and or where the first lightning strike occurs. It is not a predictor, but an
indication lightning has happened and is near. Please seek shelter whenever your area experiences
severe weather of any kind. Do not use the Bushnell Fishtrack in any way that may increase your
exposure to severe weather. Bushnell assumes no responsibility for the use or misuse of this product.

5
13
2
45
9
12
3
4
5
6
12
7
810
11
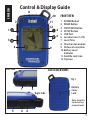
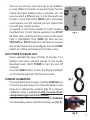
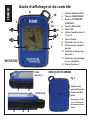
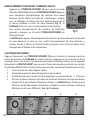
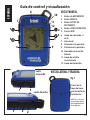
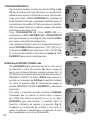
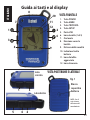
Control & Display Guide
1. POWER Button
2. MARK Button
3. TRIP/DATA Button
4. SETUP Button
5. USB Port
6. Location Icon (1 of 5)
7. Local Time
8. Direction to Location
9. Distance to Location
10. Battery Level
Indicator
11. Satellite Lock Icon
12. Trip Icon
Battery
Cover
Lock
Fig. 1
Note: Serial # is
inside battery
compartment.
Left Side
FRONT VIEW
SIDE & BACK VIEWS
Right Side
ENGLISH

6
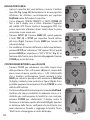
BASIC SETUP
• Open battery cover and insert 3 AAA batteries (Fig 1,
pg 4). Record the serial # inside-you’ll need it later to
register your FishTrack online. Close the cover.
• Go outdoors. HOLD POWER (1) (keep the button
pressed) until the display comes on. Wait for GPS
satellite lock (icon stops blinking) (11). This may take
a few minutes after the first power-up in a new area.
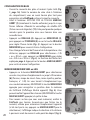
• Press SETUP (4). Press MARK (2), then press the TRIP
(3) or SETUP button to set the Hour for your area
(Fig. 2). Press the MARK button to return to the Setup
screen.
• To change the time and temp/distance formats, press
SETUP to select “12h” or “0F/yd”, then press MARK to
set to “24h” or “0C/m”. (Fig. 3). The arrow’s function is
explained on page 6. Press POWER to exit Setup.
MARKING/RETURNING to a LOCATION
• Press POWER to select one of five Location icons or
up to 20 numbers (6) (Fish, Boat Ramp, Fishing Rod,
Dock, Hook, #1-20). While standing at the Location
you want to mark, HOLD MARK to save its position
in the FishTrack’s memory (the display will change
as shown) (Fig. 4). You can now turn the power off
(HOLD POWER) and leave the location.
• To return to the location you marked, turn the
FishTrack on. Make sure the same icon or # you used
to mark the location is shown (if not, press POWER
to select it). The display indicates the direction and
distance back to the location (Fig. 5). Move in the
direction of the arrow, watching for the distance to
decrease. When you reach the location, the “Mark”
icon will flash in the center of the display.
Fig. 2
Fig. 4
Fig. 5
Fig. 3

7
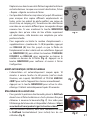
Fig. 6
Fig. 7
8
• You can use the five icons (and up to 20 numbers)
to mark different locations of any kind (your favorite
fishing spot, boat loading ramp, a campsite, etc.). Be
sure you select a different icon or # to store each new
location. If you hold down MARK with a previously
used location icon still selected, you will replace that
one with your current location.
• To expand or restrict the number of “extra” locations
(numbers from 1 to 20) that are available, Press SETUP
(4) three times until the location arrow on the lower
right is highlighted. Press MARK (2), then use the
TRIP/DATA or SETUP buttons to decrease or increase
the number below the arrow (Fig. 6). Press the MARK
button to confirm and return to the Setup screen.
AUTO POWER OFF/BACKLIGHT
• Power automatically turns off after 10 minutes if no
buttons have been pressed (except in Trip mode,
described next). HOLD POWER to turn the unit off
manually.
• Press the MARK button to turn the display backlight
on. It automatically turns off after 30 seconds.
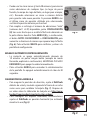
COMPASS CALIBRATION
• To ensure directional accuracy, hold the FishTrack out
in front of you and move it in a “Figure 8” pattern a few
times to re-calibrate the compass (Fig. 7). A compass
calibration video is available at: http://www.bushnell.
com/products/gps/instruction-videos/.
• For best results, we recommend holding the FishTrack
in a horizontal position (not tilted) during use (Fig. 8).
Fig. 8

8
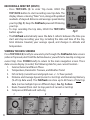
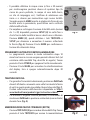
RECORDING A NEW TRIP (ROUTE)
• Press TRIP/DATA (3) to enter Trip mode. HOLD the
TRIP/DATA button to start recording new trip data. The
display shows a moving “hiker” icon, along with updated
readouts of elapsed distance and average speed during
your trip (Fig. 9). Keep the FishTrack powered ON during
your trip.
• To stop recording the trip data, HOLD the TRIP/DATA
button again.
• The FishTrack automatically saves the data it collects between the time you
start and stop recording your trip, including the date and time of the trip,
total distance traveled, your average speed, and changes in altitude and
temperature.
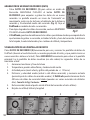
VIEWING THE DATA SCREENS
Press TRIP/DATA (3) briefly to view and cycle through the FishTrack’s data screens
(when in Trip mode, don’t hold the button down or you will start a new trip or stop your
current trip). Press POWER briefly to return to the main navigation screen. The 6
data screens display (in order) the following data for your current location :
1. Sunrise/Sunset and Moon Phase
2. Temperature, Barometric Pressure, and Weather Trend
3. Fish Activity (current level and graph over +/- 12 hour period)
4. Distance and Average Speed (current or last trip) and Remaining Memory
(% of trip data used). The FishTrack can store up to 48 hours of total trip
data (can be multiple trips on different days). See Fig. 9 above.
5. Route Traveled (from start to stop points of current or last trip)
6. Compass w/Altitude and Lat/Long
Fig. 9
1 2 3 5 6

9
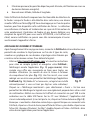
Your Bushnell Fishtrack includes a lightning detector feature.
When lightning has been detected in your local area, a visual alert
will be displayed on screen (Fig. 10). You must physically push any
of the 4 buttons to clear this notification from the screen. The
detector will notify you of lightning strikes within a 15 mile radius
of your location. The lightning indicator does not need to obtain a
GPS signal lock to warn you of a strike-however no notification is possible, and no
warning will appear, if the unit is turned off.
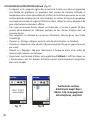
VIEWING TRIP DATA
After recording at least one trip, connecting the FishTrack to your computer will
enable you to see the path you took on any of 4 types of map, view a trip data
graph, and share your trip via email or social media. To get the software:
• Go to http://www.FishTrackgps.com/ and follow the directions to create an
account (free) and register your FishTrack, and download
the software app (Fig. 12, next pg.). Your account provides
online backup for all your trip data. (Serial number is inside
the battery compartment-(Fig. 11). After registering, you’ll be
taken to a screen to download the FishTrack application (Fig.
13) (Adobe Air® is required-it will be installed automatically if
you do not already have it on your computer). Click “Download
Now”, then select “Open”. A link to download the software
will also be provided in your confirmation email. Turn on the
FishTrack and connect its USB port to your computer with
the supplied USB cable. On Windows® PCs, the app should open automatically
(if not, click the desktop icon (Fig. 14)). Note: if you get a Windows “AutoPlay”
popup when you connect your FishTrack, click “Open Folder to View Files”, then
double click a .btk (trip data) file). On Mac®, double click the “FishTrack” icon in
your Applications folder to launch the application.
• Enter the User Name (email address) and Password you used when setting up
your account, then select “LOGIN” (Fig. 15). This will enable all your trip data
to be stored within your online account, so it will be automatically backed up,
and accessible to you from any computer.
Fig. 11
Fig. 10

10
a
b
c
d
f
e
Fig. 12
Fig. 16 Fig. 15
Fig. 14
Fig. 13

11
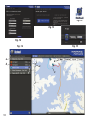
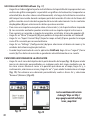
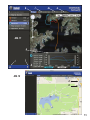
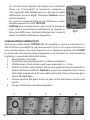
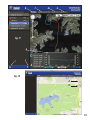
USING THE FISHTRACK APP (Fig. 16)
• After the FishTrack app opens, you will see one or more gray folders on the
left (a) below “My Downloaded Tracks”, each labeled with a date. Each folder
contains information on the trips taken in a 24 hour period.
• Click the folder to open it and view the individual trips (b) you made on that
date (the duration of each trip is based on the time elapsed between the
starting and stopping of a new trip recording when you held down the TRIP
button).
• The route you traveled for each trip is shown as a colored line (c) on a map.
Four types of maps are available-click on the name of a map type (d) to
change the view:
MAP-a “road map” style view, complete with road names.
SATELLITE-an aerial photo of the area.
HYBRID-a combination of the first two maps.
TERRAIN-this is a topographic map showing elevation data for the area.
• The zoom slider and position arrow pad allow you to zoom in/out and move
around on the map (e).
• Click on the name of a trip to highlight it on the map. You can hide any trip by
clicking on the “eye” icon next to it’s name (f).
• To change the name of a folder (from the default date to something like
“Canyon Trip Day 1”), right click on its name. You can also right click on a trip
within the folder to rename it.

12
Please read the Google™ Maps
Terms of Service at:
http://maps.google.com/intl/en/
help/terms_maps.html
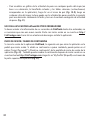
USING THE FISHTRACK APP (Fig. 17)
• Clicking on the “handle” (g) at the bottom center of the map screen will open
a popup graph window. This will allow you to view graphs for elevation,
temperature or speed (any two of these) over distance traveled, or over time
elapsed during any part of your trip. The graph line color matches the selected
trip segment’s color. Use the pull-downs (h) to select what data is displayed.
• To create a new folder, click the plus (+) icon on the bottom left (i). Existing
trips can be dragged from their original folder into the new one.
• To delete a trip or trips folder, drag it to the trash icon (j).
• Click “Share” (k) to post your trip map on Facebook.
• Click “Export Current Map” (l) and to save as a .jpg image, or send via email
• Click “Settings” (m) to select the menu language and English/metric units.
• When you have finished using the FishTrack application, simply click “Logout”
(n). Your trip data is automatically saved in your account.
ADDITIONAL APP FEATURES
• Clicking on the target icon on the right side of the map (Fig. 18, A) will allow
you to add custom location marks anywhere on the map, using one of five
icons. Move the cursor where you want it on the map, click, then select an
icon and click “+” to add the location to the map (Fig. 19). To remove a custom
location, click it again and select “Remove” (Fig. 20).
Fig. 19 Fig. 20

13
g
ij
h
Fig. 17
k ml n
Fig. 18
A
B

14
• To view a fish activity graph for any point on the map (based on its location,
current date/time and solunar tables built into the app), click the fish icon
(Fig. 18, B), then anywhere on the map. You can even view predicted (or past)
fish activity for that location by changing the date and time within the fish
activity pop-up window (Fig. 21).
USING THE FISHTRACK APP ON OTHER COMPUTERS
If you want to access your FishTrack trip information from another computer, it
is not necessary for you to create a new account. Simply login to your account at
http://FishTrackgps.com , click on the download link, and install the app.
LOGIN/CHANGE PASSWORD
If you log out of the FishTrack application, you will be prompted to log in again
the next time you launch the application. If you forget your password or want
to change it, you may click on the “Forgot Password?” link on the application log
in screen (Fig. 22). You may also change your password after logging in to your
existing account at http://FishTrackgps.com. Click “My Profile” in the menu at the
top of the screen (Fig. 23).

15
Fig. 22 Fig. 23
Fig. 21

16
ONE YEAR LIMITED WARRANTY
Your Bushnell® FishTrack™ GPS unit is warranted to be free of defects in materials and
workmanship for one year after the date of purchase. In the event of a defect under this
warranty, we will, at our option, repair or replace the product, provided that you return
the product postage prepaid. This warranty does not cover damages caused by misuse,
improper handling, installation, or maintenance provided by someone other than a Bushnell
Authorized Service Department.
Any return made under this warranty must be accompanied by the items listed below:
1. A check/money order in the amount of $10.00 to cover the cost of postage and
handling
2. Name and address for product return
3. An explanation of the defect
4. Proof of Date Purchased
5. Product should be well packed in a sturdy outside shipping carton, to prevent
damage in transit, with return postage prepaid to the address listed below:
IN U.S.A. Send To: IN CANADA Send To:
Bushnell Outdoor Products Bushnell Outdoor Products
Attn.: Repairs Attn.: Repairs
9200 Cody 140 Great Gulf Drive, Unit # B
Overland Park, Kansas 66214 Vaughan, Ontario L4K 5W5
For products purchased outside the United States or Canada please contact your local
dealer for applicable warranty information.
In Europe you may also contact
Bushnell at:
Bushnell Germany GmbH
European Service Centre
Mathias-Brüggen-Str. 80
D-50827 Köln
GERMANY
Tel: +49 221 995568-0
Fax: +49 221 995568-20
This warranty gives you specific legal rights.
You may have other rights which vary from country to country.
©2013 Bushnell Outdoor Products

17
FCC Note:
This equipment has been tested and found to comply with the limits for a Class B digital device,
pursuant to Part 15 of the FCC Rules. These limits are designed to provide reasonable protection
against harmful interference in a residential installation. This equipment generates, uses and can
radiate radio frequency energy and, if not installed and used in accordance with the instructions,
may cause harmful interference to radio communications. However, there is no guarantee that
interference will not occur in a particular installation. If this equipment does cause harmful
interference to radio or television reception, which can be determined by turning the equipment
off and on, the user is encouraged to try to correct the interference by one or more of the
following measures:
· Reorient or relocate the receiving antenna.
· Increase the separation between the equipment and receiver.
· Connect the equipment into an outlet on a circuit different from that to which the receiver is
connected.
· Consult the dealer or an experienced radio/TV technician for help.
Shielded interface cable must be used with the equipment in order to comply with the limits for
a digital device pursuant to Subpart B of Part 15 of FCC Rules.
Adobe®,Air®, Copyright © 2011 Adobe Systems Incorporated. All rights reserved.
Windows® Copyright © 2011 Microsoft. Windows® is a registered trademark of Microsoft Corporation in the United States and other
countries. All rights reserved.
Mac®, Copyright © 2011 Apple Inc. Mac® is a registered trademark of Apple Inc. in the United States and other countries. All rights
reserved.
Third-party marks and brands are the property of their respective owners. All products, dates, and figures are preliminary and subject to
change without notice.
Google is the registered trademark of Google, Inc.
Please read the Google® Maps Terms of Service at: http://maps.google.com/intl/en/help/terms_maps.html

18
Avertissements et remarques
Système de navigation par satellite (GPS) & Remarque sur la précision de la localisation :
Le système de navigation par satellite (GPS) est exploité par le gouvernement des Etats-Unis qui est seul responsable de l’exactitude
de ses informations et de sa maintenance. Le système est susceptible de subir des modifications qui pourraient affecter la précision
et les performances de tous les équipements GPS. La nature même du système GPS limite la précision de la distance indiquée sur
l’écran du BackTrack à ±3~5 mètres (ou yards).
Avertissement :
Cet appareil est uniquement destiné à la navigation pédestre. L’utilisateur assume la responsabilité associée à l’utilisation de ce
produit. Cet appareil ne doit pas être utilisé pour des applications nécessitant la mesure précise d’un emplacement, d’une direction,
d’une distance, d’une vitesse ou pour des applications de topographie. Cet appareil ne doit pas être utilisé pour la navigation
aérienne.
Remarque concernant l’utilisation de cet appareil avec un véhicule :
La vocation de Bushnell est de vous faire apprécier la nature en toute sécurité et en étant responsable.
N’utilisez pas ce produit pendant que vous conduisez. Un accident pourrait entraîner des dommages matériels, une blessure ou la
mort si l’utilisateur ne fait pas preuve de suffisamment de prudence lorsqu’il conduit. Le conducteur du véhicule est seul responsable
de la conduite de son véhicule. Les informations données par le GPS peuvent distraire le conducteur d’un véhicule motorisé. Il n’est
pas prudent de manipuler l’appareil GPS pendant la conduite. Lorsqu’il est utilisé dans un véhicule motorisé, l’appareil ne doit pas
être utilisé par le conducteur du véhicule. Lorsqu’il est utilisé dans un véhicule motorisé, l’appareil doit être fixé de manière à ne pas
distraire le conducteur, ne pas se trouver dans le champ de vision du conducteur et ne pas se trouver sur la trajectoire des airbags ou
autres dispositifs de sécurité du véhicule. Les pare-brises et les vitres de voiture avec des matériaux métalliques intégrés, tels que les
dégivreurs, ou les films de coloration pour vitre, peuvent dégrader la réception du GPS à l’intérieur de la voiture.
Responsabilité :
La responsabilité de Bushnell ne saurait en aucun cas être mise en cause en cas de dommages accidentels, particuliers ou
immatériels résultant de l’utilisation, d’une mauvaise utilisation ou de l’incapacité à utiliser ce produit ou des défauts de ce produit.
Certains Etats n’autorisent pas l’exclusion des dommages accessoires ou immatériels ; les limitations décrites ci-dessus peuvent
donc ne pas vous concerner.
Avertissement relatif à l’indicateur de foudre :
Le FishTrack de Bushnell utilise les toutes dernières technologies informatiques et électroniques
pour détecter et suivre les orages. Néanmoins, les orages peuvent rapidement évoluer et changer.
Par conséquent, le FishTrack doit être utilisé en association avec d’autres sources d’informations
météorologiques. Le FishTrack détecte les orages ACTIFS, il ne peut pas prédire quand et où un orage
risque de se former ni à quel endroit la foudre tombera pour la première fois. Il ne prédit pas mais indique
quand la foudre tombe à proximité. Veuillez vous mettre à l’abri lorsque votre zone subit des conditions
météorologiques difficiles. N’utilisez pas le FishTrack de Bushnell d’une façon qui pourrait augmenter
votre exposition à des conditions météorologiques difficiles. Bushnell n’assume aucune responsabilité
concernant l’utilisation ou la mauvaise utilisation de ce produit.

19
13
2
45
9
12
3
4
5
6
12
7
810
11
Guide d’achage et de contrôle
1. Touche Marche/Arrêt
2. Touche MÉMORISER
3. Bouton ITINÉRAIRE/
DONNÉES
4. Touche RÉGLAGE
5. Port USB
6. Icône d’emplacement
(1 sur 5)
7. Heure locale
8. Direction vers le lieu
9. Distance par rapport
au lieu
10. Indicateur de charge
des piles
11. Icône du verrouillage
sur les satellites
12. Icône Itinéraire
Système de
verrouillage du
couvercle des
piles
Fig. 1
Remarque : N° de
série à l’intérieur
du compartiment
à piles.
Côté droit
Côté
gauche
VUE DE FACE
VUES DE CÔTÉ ET ARRIÈRE
FrANçAIS

20
CONFIGURATION DE BASE
• Ouvrez le couvercle des piles et insérez 3 piles AAA (Fig.
1, page 16). Notez le numéro de série situé à l’intérieur
du compartiment, vous en aurez besoin plus tard pour
enregistrer votre FishTrack en ligne. Fermez le couvercle.
• Allez à l’extérieur. APPUYEZ SUR LA TOUCHE MARCHE/
ARRÊT (1) (maintenez la touche enfoncée) jusqu’à ce que
l’écran s’allume. Attendez le verrouillage du satellite GPS
(l’icône cesse de clignoter) (11). Cela peut prendre quelques
minutes après la première mise sous tension dans une
nouvelle zone.
• Appuyez sur RÉGLAGE (4). Appuyez sur MÉMORISER (2),
puis appuyez sur ITINÉRAIRE (3) ou sur la touche RÉGLAGE
pour régler l’heure locale (Fig. 2). Appuyez sur le bouton
MÉMORISER pour revenir à l’écran Configuration.
• Pour changer le format de l’heure et de la température / des
distances, appuyez sur RÉGLAGE pour sélectionner « 12h
» ou « 0F/yd », puis appuyez sur MÉMORISER pour régler
sur « 24h » ou « 0C/m ». (Fig. 3). La fonction des flèches est
expliquée page 6. Appuyez sur le bouton MARCHE/ARRÊT
pour sortir du menu Configuration.
MÉMORISER/REVENIR VERS un LIEU
• Appuyer sur le bouton MARCHE/ARRÊT pour sélectionner
une des cinq icônes d’emplacement ou jusqu’a 20 numéros
(6) (Poisson, rampe de mise à l’eau, canne à pêche, ponton,
hameçon, n° 1-20). En vous tenant à l’emplacement que
vous voulez mémoriser, MAINTENEZ la touche MÉMORISER
appuyée pour enregistrer sa position dans la mémoire
du FishTrack (l’affichage illustré apparaît) (Fig. 4). Vous
pouvez mettre l’appareil hors tension (MAINTENEZ la touche
MARCHE/ARRÊT appuyée) et quitter le lieu.
• Pour revenir au lieu que vous avez mémorisé, mettez le
FishTrack sous tension. Assurez-vous que l’icône (ou le
numéro) utilisée pour mémoriser l’emplacement apparaît
(si tel n’est pas le cas, appuyez sur MARCHE/ARRÊT pour la
sélectionner). L’affichage indique la direction et la distance
à parcourir avant de revenir à votre point de départ (Fig. 5).
Fig. 2
Fig. 4
Fig. 5
Fig. 3
La pagina si sta caricando...
La pagina si sta caricando...
La pagina si sta caricando...
La pagina si sta caricando...
La pagina si sta caricando...
La pagina si sta caricando...
La pagina si sta caricando...
La pagina si sta caricando...
La pagina si sta caricando...
La pagina si sta caricando...
La pagina si sta caricando...
La pagina si sta caricando...
La pagina si sta caricando...
La pagina si sta caricando...
La pagina si sta caricando...
La pagina si sta caricando...
La pagina si sta caricando...
La pagina si sta caricando...
La pagina si sta caricando...
La pagina si sta caricando...
La pagina si sta caricando...
La pagina si sta caricando...
La pagina si sta caricando...
La pagina si sta caricando...
La pagina si sta caricando...
La pagina si sta caricando...
La pagina si sta caricando...
La pagina si sta caricando...
La pagina si sta caricando...
La pagina si sta caricando...
La pagina si sta caricando...
La pagina si sta caricando...
La pagina si sta caricando...
La pagina si sta caricando...
La pagina si sta caricando...
La pagina si sta caricando...
La pagina si sta caricando...
La pagina si sta caricando...
La pagina si sta caricando...
La pagina si sta caricando...
La pagina si sta caricando...
La pagina si sta caricando...
La pagina si sta caricando...
La pagina si sta caricando...
La pagina si sta caricando...
La pagina si sta caricando...
La pagina si sta caricando...
La pagina si sta caricando...
La pagina si sta caricando...
La pagina si sta caricando...
La pagina si sta caricando...
La pagina si sta caricando...
La pagina si sta caricando...
La pagina si sta caricando...
-
 1
1
-
 2
2
-
 3
3
-
 4
4
-
 5
5
-
 6
6
-
 7
7
-
 8
8
-
 9
9
-
 10
10
-
 11
11
-
 12
12
-
 13
13
-
 14
14
-
 15
15
-
 16
16
-
 17
17
-
 18
18
-
 19
19
-
 20
20
-
 21
21
-
 22
22
-
 23
23
-
 24
24
-
 25
25
-
 26
26
-
 27
27
-
 28
28
-
 29
29
-
 30
30
-
 31
31
-
 32
32
-
 33
33
-
 34
34
-
 35
35
-
 36
36
-
 37
37
-
 38
38
-
 39
39
-
 40
40
-
 41
41
-
 42
42
-
 43
43
-
 44
44
-
 45
45
-
 46
46
-
 47
47
-
 48
48
-
 49
49
-
 50
50
-
 51
51
-
 52
52
-
 53
53
-
 54
54
-
 55
55
-
 56
56
-
 57
57
-
 58
58
-
 59
59
-
 60
60
-
 61
61
-
 62
62
-
 63
63
-
 64
64
-
 65
65
-
 66
66
-
 67
67
-
 68
68
-
 69
69
-
 70
70
-
 71
71
-
 72
72
-
 73
73
-
 74
74


in altre lingue
- English: Bushnell 360600 User manual
- français: Bushnell 360600 Manuel utilisateur
- español: Bushnell 360600 Manual de usuario
- Deutsch: Bushnell 360600 Benutzerhandbuch