
8
Status of the information · Stand der
Informationen · Statut de l’information · Status
van de informatie · Stan informacji · Estado de
la información · Status for oplysningerne · Stato
delle informazioni:
03/2023 Ident.-No.:
Ident.-
No.: 56348/56349/56351 042023-8V1
IAN 416174_2210
EDI Light GmbH
Heiligkreuz 22
6136 Pill
AUSTRIA

OS
IAN 416174_2210
LED CEILING LIGHT | LED-DECKENLEUCHTE
PLAFONNIER À LED
56348
56351
56349
GB IE NI
LED CEILING LAMP
Assembly, operating and safety instructions
DE AT CH
LED-DECKENLEUCHTE
Montage-, Bedienungs- und Sicherheitshinweise
FR BE
PLAFONNIER À LED
Instructions de montage, d’utilisation et de sécurité
NL BE
LED-PLAFONDLAMP
Montage-, bedienings- en veiligheidsvoorschriften
PL
PLAMPA SUFITOWA LED
Instrukcje montażu, obsługi i bezpieczeństwa
ES
LÁMPARA LED DE TECHO
Instrucciones de montaje, funcionamiento y seguridad
DK
LED LOFTSLAMPE
Monterings-, betjenings- og sikkerhedsanvisninger
IT MT
LAMPADA LED DA SOFFITTO
Istruzioni di montaggio, funzionamento e sicurezza

GB/IE/NI Assembly, operating and safety instructions Page 5
DE/AT/CH Montage-, Bedienungs- und Sicherheitshinweise Seite 13
FR/BE Instructions de montage, d‘utilisation et de sécurité Page 21
NL/BE Montage-, bedienings- en veiligheidsvoorschriften Pagina 29
PL Instrukcja montażu, obsługi i bezpieczeństwa Strona 37
ES Instrucciones de montaje, funcionamiento y seguridad Página 45
DK Monterings-, betjenings- og sikkerhedsanvisninger Side 53
IT/MT Istruzioni di montaggio, funzionamento e sicurezza Pagina 61
GB IE NI
Before reading, unfold the two pages with the illustrations and then familiarise yourself with all the functions of the unit.
DE AT CH
Klappen Sie vor dem Lesen die beiden Seiten mit den Abbildungen aus und machen Sie sich anschließend mit allen Funktionen des Gerätes vertraut.
FR BE
Avant de lire le mode d‘emploi, ouvrez les deux pages contenant les illustrations et familiarisez-vous ensuite avec toutes les fonctions de l‘appareil.
NL BE
Vouw vóór het lezen de beide pagina‘s met de afbeeldingen open en maak u vertrouwd met alle functies van het apparaat
PL
Przed przeczytaniem proszę rozłożyć obie strony z ilustracjami, a następnie proszę zapoznać się z wszystkimi funkcjami urządzenia.
ES
Antes de leer, despliegue las dos páginas con las ilustraciones y luego familiarícese con todas las funciones del aparato. familiarícese con todas las funciones del aparato.
DK
Før du læser, vend begge sidene med billeder frem og bliv bekendt med alle apparatets funktioner.
IT MT
Prima di leggere aprire le due pagine con le immagini e prendere confidenza con le diverse funzioni dell’apparecchio.
LED CEILING LIGHT | LED-DECKENLEUCHTE
PLAFONNIER À LED

56348
56349
1
2
5
3
4
6
9
10
14
1
2
5
3
4
6
7
8
9
10
12
13
12
13
11


1
2
5
3
4
6
9
14
56351
12
13 10

5GB/MT
List of pictograms used* .................................................................................. Page 6
Introduction ........................................................................................................ Page 6
Intended use ....................................................................................................... Page 7
Delivery contents ................................................................................................. Page 7
Parts description ................................................................................................. Page 7
Technical data .................................................................................................... Page 7
Safety .................................................................................................................. Page 7
Safety notes ........................................................................................................ Page 7
Preparation ........................................................................................................ Page 8
Tools and materials required ................................................................................ Page 8
Prior to installation ........................................................................................... Page 8
Initial use ............................................................................................................ Page 9
Installing the light ................................................................................................ Page 9
Directing the spotlight .......................................................................................... Page 9
Changing light bulbs ........................................................................................... Page 9
Maintenance and cleaning .............................................................................. Page 10
Disposal .............................................................................................................. Page 10
Declaration of conformity................................................................................ Page 10
Warranty and service ...................................................................................... Page 11
Warranty ........................................................................................................... Page 11
Service adress .................................................................................................... Page 11
Warranty card .................................................................................................... Page 12

6 GB/MT
LED ceiling light
Introduction
Congratulations on the purchase of your
new product. You have chosen a
high-quality product. Please be sure to
carefully read all the instructions for use. Fold out the
page with the diagrams. These instructions are part
of the product and contain important information on
setup and operation. Always observe all safety
instructions. Before using this product for the first
time, verify that the correct voltage is available and
that all parts are properly installed. If you have any
questions or are unsure about operating the product,
please contact your retailer or the service centre.
Please keep these instructions in a safe place and
include them when passing this product on to others.
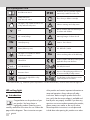
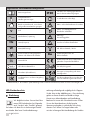
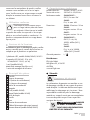
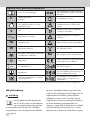
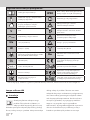
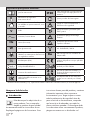
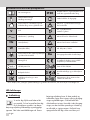
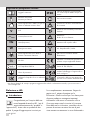
List of pictograms used*
Read the instructions! IP20 Protection class: no protection against
water! Only suitable for indoor use.
Safety instructions
Instructions for action This is how you behave correctly!
This light is only suitable for indoor use
in dry and enclosed spaces. Observe warnings and safety notes!
VVolt Risk of accidents and risk of fatal injury
for infants and children!
AC current/voltage Warning! Danger of electric shock!
Hz Hertz (frequency) Caution - hot surfaces!
WWatts (effective power) incl. LED bulb / GU10
This light is not suitable for dimmer
or electronic switches. Ra Colour rendering index of the LED lamp
Thread E14 Product complies with the product-specific
applicable European directives.
14 incl. LED bulb E14 TÜV SÜD/GS-tested
Protection class I Dispose of the packaging and device in
an environmentally friendly manner!
Only insert the light bulb in a dry
environment. LED LED
The LED lamps in these luminaries can be
replaced by the end customer.
* For further details, e.g. additional symbol explanations or technical information, can be found at www.edi-light.com

7GB/MT
Intended use
This light is only suitable for indoor use
in dry and enclosed spaces. The
electrician installing the product must not
install the product on a moist or conductive surface!
This product is intended to be used in private
households only.
Delivery contents
Always check that all the parts are present and that
the product is in perfect condition immediately after
unpacking.
1 LED ceiling light, model 56348/56349/ 56351
3 LED light bulbs (56349:E14, 4 W;
56348/56351: GU10, 4,6 W)
1 Tool (model 56349)
Installation materials (wall plugs and screws)
1 Set of assembly instructions and instructions for use
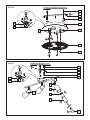
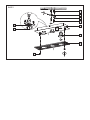
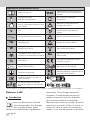
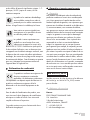
Parts description
1 Dowel
2 Mounting bracket
3 Screw (connection housing)
4 Screw (mounting bracket)
5 Connection housing
6 Light bulb
7 Tool (model 56349)
8 Ring nut (model 56349)
9 Lamp glass
10 Socket
11 Spotlight
12 Lustre terminal
13 Mains connection cord (external)
14 Decorative screws (model 56348/56351)
Technical data
Item no.: 56348 / 56349 / 56351
Operating voltage: 220-240 V~ 50/60 Hz
Total output: 56348/56351:
GU10, 3x max. 5W
56349:
E14, 3x max. 4W
Dimensions: 56348: Ø approx. 25 cm
56349: length approx. 50 cm
56351: length approx. 36 cm
Light bulb: 56348/56351:
GU10, 3x 4,6 W,
3000K, 400lm (360°),
Ra=82
56349:
E14, 3x 4 W, 3000K,
350lm (360°), Ra=80
Protection class: I /
Distributor:
EDI Light GmbH
Heiligkreuz 22, 6136 Pill
AUSTRIA
www.edi-light.com
Safety
Safety notes
Damage due to failure to comply with these operat-
ing instructions will void the warranty! We assume
no liability for consequential damages! We assume
no liability for property damage or personal injury
due to improper handling or failure to observe the
safety instructions!
■WARNING! DANGER TO
LIFE AND RISK OF ACCIDENT
FOR INFANTS AND CHIL-
DREN!
Never leave children unsupervised with the
packaging material. The packaging material
poses a suffocation hazard. Children frequently
underestimate the dangers. Always keep
children away from the product.
■This product is not a toy and should be kept
out of the reach of children. Children cannot
recognise the dangers associated with the use
of the product.
■This product may be used by children aged 8
years and up, as well as by persons with reduced

8 GB/MT
physical, sensory or mental capacities or lacking
experience and knowledge, so long as they are
supervised or instructed in the safe use of the
product and understand the associated risks.
Do not allow children to play with the product.
Cleaning and user maintenance must not be
performed by children without supervision.
Avoid the risk of fatal injury
from electric shock
■Have the electrical installation performed by
an electrician or a person trained in electrical
installation.
■Never use the light if you detect any damage.
■Remove the fuse or switch off the circuit breaker
(0 setting) in the fuse box prior to installation.
■Prior to installation, verify the mains voltage
on site corresponds with the operating voltage
required for the light (220–240 V∼ 50/60 Hz).
■Never open the housing of the light or insert
any objects into it. Such interventions pose a
risk of fatal injury from electric shock.
■Only insert light bulbs of the correct type and
do not exceed the maximum output of the bulb
(see “Technical data“).
■Only parts provided by the manufacturer may
be used.
■Replace defective light bulbs immediately once
they have cooled down.
■Do not install the light on a wet or conductive
surface!
Prevent fire and injury hazards
■CAUTION! RISK OF BURNS
DUE TO HOT SURFACES! Ensure
the light has been switched off and
has cooled down before touching it to avoid
burns. Light bulbs become very hot.
■Allow the lamp to cool for at least 15 minutes
before replacing a defective bulb.
■When the light is in operation, individual parts
may become hot. Allow the light to cool down
completely before performing any work.
■Do not carelessly leave the light or packaging
material lying around. Plastic film / bags, plastic
parts, etc. are dangerous for children to play with.
■To prevent a fire hazard do not operate the
light in its packaging.
■Do not cover the light with objects. Excessive
heat build-up can result in fire.
For your safety
■Prepare the installation with care and allow
sufficient time. First organise all parts or mate-
rials so they are easy to reach.
■Always be attentive! Always pay attention to what
you are doing and always use common sense.
■Never install the light if you are having difficul-
ty concentrating or do not feel well.
Preparation
Tools and materials required
The specified tools and materials are not included.
The information and values specified are non-bind-
ing and are only provided as a reference. The
nature of the material is determined by the specific
local conditions.
– Pencil / marking tool
– Voltage tester
– Screwdriver
– Electric drill
– Drill
– Hammer
– Ladder
Prior to installation
Important: The electrical connection must be
performed by a trained electrician or a person
instructed in electrical installation. This person must
be familiar with the properties of the light and
connection regulations.

9GB/MT
Note: Remove all packaging material before first use.
■Familiarize yourself with all the instructions and
diagrams in this manual, as well as with the
light itself, before you install it.
■Before installation, ensure that the mains con-
nection cord (external) to which the light will be
connected is not energized. For this purpose,
remove the fuse or switch off the circuit breaker
(0 setting) in the fuse box.
■Use a voltage tester to verify its deenergised
status.
Initial use
Installing the light
□Loosen the screws 3 visible at the side of the
connection housing 5 and remove the
mounting bracket 2 at the back.
□Use the slotted holes in the mounting bracket
2 intended for the screws to mark the drill
holes.
□Now drill the mounting holes (approx. 6 mm,
depth approx. 40 mm). Be sure not to damage
the mains connection cord (external) 13 .
□Insert the dowels 1 into the drill holes.
□Fasten the mounting bracket 2 using the
screws 4 provided.
□Now connect the external lead of the light to
the mains connection cord (external) 13 using
the lustre terminal 12 .
□Note: Be sure to correctly connect each of the
individual wires of the mains connection cord
(external): live wire, black or brown = symbol
L; neutral wire, blue = symbol N; earth wire,
green-yellow = symbol .
□Now use the screws 3 to fasten the light to the
mounting bracket 2 .
Model 56348/56351:
□Use a clean, lint-free cloth to insert the light
bulbs 6 .
□Carefully screw the light bulb 6 clockwise for
a ¹⁄₄ rotation into the socket. Ensure that it is
positioned correctly.
□Now place the lamp glass 9 on the spacers
provided and fasten it with the decorative
screws 14.
□Your light is now ready to use.
□Reinsert the fuse or switch the circuit breaker
back on.
Model 56349:
□Loosen the ring nut 8 from the socket 10 .
□Place the lamp glass 9 carefully over the
socket 10 and fasten it in place by tightening
the ring nut 8 using the supplied tool 7 . Be
sure all are positioned correctly.
□Use a clean, lint-free cloth to insert the light
bulbs 6 .
□Insert the appropriate light bulb (see “Technical
data“) by carefully screwing it in a clockwise
direction. Ensure that it is positioned correctly.
□Your light is now ready to use.
Directing the spotlight
□Only change the direction of the spotlights 11
when the light is switched off.
□Allow the light to cool off completely.
□Adjust the individual spotlights 11 to the de-
sired position by their base. The spotlights can
be turned approx. 320 °.
□Reinsert the fuse or switch the circuit breaker
back on.
Changing light bulbs
WARNING! DANGER OF ELECTRIC
SHOCK!Disconnect the lights from the mains
before replacing the light bulb. To do so, remove
the fuse or switch off the circuit breaker in the fuse
box (position 0).
□Only use light bulbs as specified in chapter
“Technical data“.
□Allow the light to cool off completely.
□Use a clean, lint-free cloth to replace the bulb.

10 GB/MT
Model 56348/56351:
□Loosen the decorative screws 14 and remove
the lamp glass 9.
□Carefully remove the defective light bulb 6
from the socket by turning it anticlockwise for a
¹⁄₄ rotation.
□Carefully screw the new light bulb 6 clockwise
for a ¹⁄₄ rotation into the socket.
□Verify it is positioned correctly.
□Then fit the lamp glass 9 again and fasten it
with the decorative screws 14.
□Reinsert the fuse or switch the circuit breaker
back on.
Model 56349:
□Remove the defective light bulb 6 by carefully
unscrewing in an anticlockwise direction.
□Insert the new light bulb 6 by carefully screw-
ing it in a clockwise direction.
□Ensure that it is positioned correctly.
□Reinsert the fuse or switch the circuit breaker
back on.
Maintenance and cleaning
WARNING! DANGER OF ELECTRIC
SHOCK! Disconnect the light from the
power supply before cleaning. To do so,
remove the fuse or switch off the circuit breaker in
the fuse box (0 setting).
WARNING! DANGER OF ELECTRIC
SHOCK! For electrical safety reasons,
never clean the light with water or other
liquids, or immerse it in water.
CAUTION! RISK OF BURNS FROM
HOT SURFACES! Allow the fixture to
cool down completely.
Do not use solvents, petrol, etc. These would dam-
age the light.
□Allow the light to cool down completely.
□Only clean with a dry, lint-free cloth.
□Then replace the fuse or switch on the circuit
breaker in the fuse box (I setting).
Disposal
The packaging is made of environmentally friendly
materials that you can dispose of at local recycling
points.
Observe the marking of the packaging
materials for waste separation, which
are marked with abbreviations (a) and
numbers (b) with following meaning: 1–7: plastics/
20–22: paper and fibreboard/80–98: composite
materials.
Contact your local refuse disposal
authority for more details of how to
dispose of your worn-out product.
The adjacent symbol of a crossed-out
wheeled garbage can indicates that this
device is subject to Directive 2012/19/
EU. This directive states that you must not dispose of
this device with normal household waste at the end
of its service life, but must take it to specially set up
collection points, recycling centres or disposal
companies. This disposal is free of charge for you.
Protect the environment and dispose of it properly.
Declaration of conformity
This product complies with the require-
ments of the applicable European and
national directives. Corresponding
declarations and documents are deposited with the
manufacturer. The product complies with the
requirements of the German Equipment and
Product Safety Act.
In the course of product improvements, we reserve
the right to make technical and optical changes to
the article. Subject to typographical and printing
errors.
This product contains a light source of energy
efficiency class F.

11GB/MT
Warranty and service
Warranty
We provide a 3 year warranty from the date of
purchase. Our products are manufactured using
modern production methods and are subject to
precise quality control. We guarantee that this
product is in perfect condition. During the warranty
period we will remedy any defects in material
or manufacture free of charge. In the event of
an unexpected defect, please return the carefully
packaged product to the service address specified.
The warranty does not extend to damage due to
improper operation, or to wear parts and consuma-
bles. These can be ordered from the telephone
number listed for a charge. Repairs not covered by
the warranty (e.g. light bulbs) may also be
requested at cost from the service address listed.
The product will be repaired at the specified service
location. Timely processing and return can only
be ensured by sending the product directly to this
address. If you would like additional product infor-
mation, need to order accessories or if you have a
question about the service process, please contact
our Customer Service Department at the telephone
number specified. Please include the item number
(see “Technical data“) when inquiring about the
product.
IAN 416174_2210
Please have your receipt and the item number
(IAN
416174_2210
) ready as your proof of pur-
chase when enquiring about your product.
Service address
Great Britain & Ireland
EGLO UK LTD.
Unit 12 Cirrus Park, Lower Farm Road, Moulton Park
Industrial Estate, NORTHAMPTON NN3 6UR
T: +44 1604 790 986

12 GB/MT
Warranty card
Return address:
Name/First name:
Country/Postal code/City/Street address:
Phone number:
Item number/Description:
Purchase date/Point of purchase:
Description of the defect:
Date/Signature:
Non-warranty cases:
Please return the un-repaired item, carriage paid.
Please inform me of the costs. Repair the product for a fee.

13DE/AT/CH
Legende der verwendeten Piktogramme* ................................................... Seite 14
Einleitung ........................................................................................................... Seite 14
Bestimmungsgemäße Verwendung ...................................................................... Seite 15
Lieferumfang ..................................................................................................... Seite 15
Teilebeschreibung .............................................................................................. Seite 15
Technische Daten ............................................................................................... Seite 15
Sicherheit ........................................................................................................... Seite 15
Sicherheitshinweise ............................................................................................ Seite 15
Vorbereitung ..................................................................................................... Seite 17
Benötigtes Werkzeug und Material ...................................................................... Seite 17
Vor der Installation ........................................................................................... Seite 17
Inbetriebnahme ................................................................................................ Seite 17
Leuchte montieren .............................................................................................. Seite 17
Spot ausrichten .................................................................................................. Seite 18
Leuchtmittel wechseln ......................................................................................... Seite 18
Wartung und Reinigung ................................................................................. Seite 18
Entsorgung ........................................................................................................ Seite 19
Konformitätserklärung ................................................................................... Seite 19
Informationen/Garantie ................................................................................. Seite 19
Garantie ........................................................................................................... Seite 19
Serviceadresse ................................................................................................... Seite 20
Garantiekarte .................................................................................................... Seite 20

14 DE/AT/CH
LED-Deckenleuchte
Einleitung
Wir beglückwünschen Sie zum Kauf Ihrer
neuen LED-Deckenleuchte (im Folgenden
auch “Leuchte” oder “Produkt” genannt).
Sie haben sich damit für ein hochwertiges Produkt
entschieden. Bitte lesen Sie diese Bedienungs-
anleitung vollständig und sorgfältig durch. Klappen
Sie die Seite mit der Abbildung aus. Diese Anleitung
gehört zu diesem Produkt und enthält wichtige
Hinweise zur Inbetriebnahme und Handhabung.
Beachten Sie immer alle Sicherheitshinweise. Prüfen
Sie vor der Inbetriebnahme, ob die korrekte
Spannung vorhanden ist und ob alle Teile richtig
montiert sind. Sollten Sie Fragen haben oder
unsicher in Bezug auf die Handhabung des Produkts
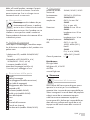
Legende der verwendeten Piktogramme*
Anweisungen lesen! IP20 Schutzart: kein Schutz gegen Wasser!
Nur für den Innenbereich geeignet.
Sicherheitshinweise
Handlungsanweisungen So verhalten Sie sich richtig!
Diese Leuchte ist ausschließlich für den
Betrieb im Innenbereich, in trockenen
und geschlossenen Räumen geeignet. Warn- und Sicherheitshinweise beachten!
VVolt Lebens- und Unfallgefahren für
Kleinkinder und Kinder!
Wechselstrom/-spannung Warnung!
Stromschlaggefahr!
Hz Hertz (Frequenz) Vorsicht vor heißen Oberflächen!
WWatt (Wirkleistung) inkl. LED Leuchtmittel / GU10
Dieser Leuchte ist nicht geeignet für
Dimmer und elektronische Schalter. Ra Farbwiedergabe-Index des
LED-Leuchtmittels
Gewinde E14 Produkt entspricht den produktspezifisch
geltenden europäischen Richtlinien.
14 inkl. LED-Leuchtmittel E14 TÜV SÜD/GS-geprüft
Schutzleiter (Schutzklasse I) Entsorgen Sie Verpackung und Gerät
umweltgerecht!
Leuchtmittel nur in trockener Umgebung
einsetzen LED LED
Die LED-Leuchtmittel dieser Leuchten kön-
nen vom Endkunden getauscht werden.
* Weitere Details, z. B. zusätzliche Symbolerklärungen bzw. technische Informationen, finden Sie unter www.edi-light.com

15DE/AT/CH
sein, setzen Sie sich bitte mit Ihrem Händler oder der
Servicestelle in Verbindung. Bewahren Sie diese
Anleitung bitte sorgfältig auf und geben Sie sie ggf.
an Dritte weiter.
Bestimmungsgemäße Verwendung
Diese Leuchte ist ausschließlich für den
Betrieb im Innenbereich, in trockenen
und geschlossenen Räumen geeignet.
Die Elektrofachkraft, die das Produkt installiert, hat
darauf zu achten, dass das Produkt nicht auf feuch-
tem oder leitendem Untergrund installiert wird!
Dieses Produkt ist nur für den Einsatz in privaten
Haushalten vorgesehen.
Lieferumfang
Kontrollieren Sie unmittelbar nach dem Auspacken
immer den Lieferumfang auf Vollständigkeit sowie
den einwandfreien Zustand des Produkts.
1 LED-Deckenleuchte, Modell 56348/56349/ 56351
3 LED-Leuchtmittel (56349:E14, 4 W;
56348/56351: GU10, 4,6 W)
1 Werkzeug (Modell 56349)
Montagematerial (Dübel und Schrauben)
1 Montage- und Bedienungsanleitung
Teilebeschreibung
1 Dübel
2 Montagewinkel
3 Schraube (Anschlussgehäuse)
4 Schraube (Montagewinkel)
5 Anschlussgehäuse
6 LED-Leuchtmittel
7 Werkzeug (Modell 56349)
8 Schraubring (Modell 56349)
9 Lampenglas
10 Fassung
11 Spot
12 Lüsterklemme
13 Netzanschlusskabel (extern)
14 Dekoschraube (Modell 56348/56351)
Technische Daten
Artikelnummer: 56348 / 56349 / 56351
Betriebsspannung: 220-240 V~ 50/60 Hz
Gesamtleistung: 56348/56351:
GU10, 3x max. 5W
56349:
E14, 3x max. 4W
Maße: 56348: Ø ca. 25 cm
56349: Länge ca. 50 cm
56351: Länge ca. 36 cm
LED-Leuchtmittel: 56348/56351:
GU10, 3 x 4,6 W,
3000K, 400lm (360°),
Ra=82
56349:
E14, 3x 4 W, 3000K,
350lm (360°), Ra=80
Schutzklasse: I /
Inverkehrbringer:
EDI Light GmbH
Heiligkreuz 22, 6136 Pill
AUSTRIA
www.edi-light.com
Sicherheit
Sicherheitshinweise
Bei Schäden, die durch Nichtbeachtung dieser
Bedienungsanleitung verursacht werden, erlischt
der Garantieanspruch! Für Folgeschäden wird
keine Haftung übernommen! Bei Sach- oder
Personenschäden, die durch unsachgemäße
Handhabung oder Nichtbeachtung der Sicher-
heitshinweise verursacht werden, wird keine
Haftung übernommen!
■WARNUNG! LEBENS-
UND UNFALLGEFAHREN FÜR
KLEINKINDER UND KINDER!
Lassen Sie Kinder niemals unbeaufsichtigt mit
dem Verpackungsmaterial. Es besteht
Erstickungs gefahr durch Verpackungsmaterial.

16 DE/AT/CH
Kinder unterschätzen häufig die Gefahren.
Halten Sie Kinder stets vom Produkt fern.
■Dieses Produkt ist kein Spielzeug, es gehört
nicht in Kinderhände. Kinder können die
Gefahren, die im Umgang mit dem Produkt
entstehen, nicht erkennen.
■Dieses Produkt kann von Kindern ab 8 Jahren
und darüber sowie von Personen mit verrin-
gerten physischen, sensorischen oder mentalen
Fähigkeiten oder Mangel an Erfahrung und
Wissen benutzt werden, wenn sie beaufsich-
tigt oder bezüglich des sicheren Gebrauchs
des Produkts unterwiesen wurden und die
daraus resultierenden Gefahren verstehen.
Kinder dürfen nicht mit dem Produkt spielen.
Reinigung und Benutzerwartung dürfen nicht
von Kindern ohne Beaufsichtigung durchgeführt
werden.
Vermeiden Sie Brand- und
Verletzungsgefahr
■Lassen Sie die Elektroinstallation durch einen
ausgebildeten Elektriker oder eine für Elektro-
installation eingewiesene Person durchführen.
■Benutzen Sie Ihre Leuchte niemals, wenn Sie
irgendwelche Beschädigungen feststellen.
■Entfernen Sie vor der Montage die Sicherung
oder schalten Sie den Leitungsschutzschalter im
Sicherungskasten aus (0-Stellung).
■Vergewissern Sie sich vor der Montage, dass
die vorhandene Netzspannung mit der benö-
tigten Betriebsspannung der Leuchte überein-
stimmt (220–240 V∼ 50/60 Hz).
■Öffnen Sie niemals das Gehäuse der Leuchte
oder stecken irgendwelche Gegenstände in
dieselbe. Derartige Eingriffe bedeuten Lebens-
gefahr durch elektrischen Schlag.
■Setzen Sie nur Leuchtmittel des richtigen Typs
ein und überschreiten Sie nicht die max. Leis-
tung der Leuchte (siehe „Technische Daten“).
■Es dürfen nur die vom Hersteller vorgesehenen
Teile verwendet werden.
■Wechseln Sie defekte Leuchtmittel im abgekühl-
ten Zustand sofort aus.
■Die Leuchte nicht auf feuchtem oder leitendem
Untergrund installieren!
Vermeiden Sie Brand- und
Verletzungsgefahr
■VORSICHT! VERBRENNUNGS-
GEFAHR DURCH HEISSE
OBERFLÄCHEN!
Stellen Sie sicher,
dass die Leuchte ausgeschaltet und abgekühlt
ist, bevor Sie diese berühren, um Verbrennun-
gen zu vermeiden. Leuchtmittel entwickeln eine
starke Hitze.
■Lassen Sie die LED-Leuchte vor dem Ersetzen
eines defekten Leuchtmittels mindestens 15
Minuten auskühlen.
■Bei Betrieb der Leuchte können an einzelnen
Teilen hohe Temperaturen auftreten. Lassen Sie
die Leuchte vor allen Arbeiten abkühlen.
■Lassen Sie die Leuchte oder Verpackungsmate-
rialien nicht achtlos liegen. Plastikfolien/Plastik-
tüten, Kunststoffteile etc. könnten für Kinder zu
einem gefährlichen Spielzeug werden.
■Die Leuchte darf nicht in der Verpackung be-
trieben werden, um Brandgefahr zu vermeiden.
■Decken Sie die Leuchte nicht mit Gegenständen
ab. Eine übermäßige Wärmeentwicklung kann
zu Brandentwicklung führen.
So verhalten Sie sich richtig!
■Bereiten Sie die Montage sorgfältig vor und
nehmen Sie sich ausreichend Zeit. Legen Sie
alle Einzelteile oder Material vorher übersicht-
lich und griffbereit zurecht.
■Seien Sie stets aufmerksam! Achten Sie immer
darauf, was Sie tun und gehen Sie stets mit
Vernunft vor.
■Montieren Sie die Leuchte in keinem Fall, wenn
Sie unkonzentriert sind oder sich unwohl fühlen.

17DE/AT/CH
Vorbereitung
Benötigtes Werkzeug und Material
Die genannten Werkzeuge und Materialien sind
nicht im Lieferumfang enthalten. Es handelt sich
hierbei um unverbindliche Angaben und Werte
zur Orientierung. Die Beschaffenheit des Materials
richtet sich nach den individuellen Gegebenheiten
vor Ort.
– Bleistift/Markierwerkzeug
– Spannungsprüfer
– Schraubendreher
– Bohrmaschine
– Bohrer
– Hammer
– Leiter
Vor der Installation
Wichtig: Der elektrische Anschluss muss durch
einen ausgebildeten Elektriker oder eine für Elekt-
roinstallation eingewiesene Person erfolgen. Diese
muss Kenntnis über die Eigenschaften der Leuchte
und Anschlussbestimmung haben.
Hinweis: Entfernen Sie vor der ersten Inbetrieb-
nahme sämtliches Verpackungsmaterial.
■Machen Sie sich vor der Installation mit allen
Anweisungen und Abbildungen in dieser Be-
dienungsanleitung sowie mit der Leuchte selbst
vertraut.
■Stellen Sie vor der Installation sicher, dass an
dem Netzanschlusskabel (extern), an dem
die Leuchte angeschlossen werden soll, keine
Spannung vorliegt. Entfernen Sie hierfür die
Sicherung oder schalten Sie den Leitungs-
schutzschalter im Sicherungskasten aus
(0-Stellung).
■Überprüfen Sie die Spannungsfreiheit mittels
Spannungsprüfer.
Inbetriebnahme
Leuchte montieren
□Lösen Sie die seitlich am Anschlussgehäuse 5
sichtbaren Schrauben 3 und nehmen Sie den
Montagewinkel 2 auf der Rückseite ab.
□Markieren Sie die Bohrlöcher mit Hilfe der im
Montagewinkel 2 für die Schrauben vor ge-
sehenen Langlöcher.
□Bohren Sie nun die Befestigungslöcher (ca. 6
mm, Tiefe ca. 40 mm). Stellen Sie sicher, dass
Sie das Netzanschlusskabel (extern)
13
nicht
beschädigen.
□Führen Sie die Dübel 1 in die Bohrlöcher ein.
□Befestigen Sie den Montagewinkel 2 mit den
mitgelieferten Schrauben 4 .
□Verbinden Sie nun das Anschlusskabel der
Leuchte mittels Lüsterklemme 12 mit dem
Netzanschlusskabel (extern) 13 .
Hinweis: Achten Sie darauf, dass Sie die
einzelnen Leiter des Netzanschlusskabels
(extern) 13 jeweils richtig anschließen:
strom führender Leiter, schwarz oder braun
= Symbol L, Neutralleiter, blau = Symbol N,
Schutzleiter, grün-gelb = Symbol .
□Verschrauben Sie nun die Leuchte mittels der
Schrauben 3 mit dem Montagewinkel 2 .
Modell 56348/56351:
□Benutzen Sie zum Einsetzen der Leuchtmittel
6 ein sauberes, fusselfreies Tuch.
□Drehen Sie das Leuchtmittel 6 vorsichtig mit
einer ¹⁄4-Drehung im Uhrzeigersinn in die
Fassung. Überprüfen Sie den richtigen Sitz.
□Stecken Sie nun das Lampenglas 9 auf die
vorgesehen Abstandhalter und befestigen Sie
dieses mit den Dekoschrauben 14
□Ihre Leuchte ist nun betriebsbereit.
□Setzen Sie die Sicherung wieder ein oder
schalten Sie den Leitungsschutzschalter
wieder an.

18 DE/AT/CH
Modell 56349:
□Lösen Sie den Schraubring 8 von der Fassung 10 .
□Stecken Sie das Lampenglas 9 vorsichtig über
die Fassung 10 und befestigen Sie es, indem
Sie den Schraubring 8 mittels mitgeliefertem
Werkzeug 7 festdrehen. Achten Sie auf den
richtigen Sitz.
□Benutzen Sie zum Einsetzen der Leuchtmittel 6
ein sauberes, fusselfreies Tuch.
□Setzen Sie das entsprechende Leuchtmittel 6
(siehe „Technische Daten“) ein, indem Sie es
vorsichtig im Uhrzeigersinn einschrauben.
Überprüfen Sie den richtigen Sitz.
□Ihre Leuchte ist nun betriebsbereit.
Spot ausrichten
□Verändern Sie die Ausrichtung der Spots 11
nur, wenn die Leuchte ausgeschaltet ist.
□Lassen Sie die Leuchte vollständig abkühlen.
□Drehen Sie die einzelnen Spots 11 am Fuß in
die gewünschte Richtung. Die Spots lassen sich
um ca. 320 ° drehen.
□Setzen Sie die Sicherung wieder ein oder schal-
ten Sie den Leitungsschutzschalter wieder an.
Leuchtmittel wechseln
WARNUNG! STROMSCHLAGGEFAHR!
Trennen Sie zum Auswechseln des Leuchtmittels die
Leuchte zuerst vom Stromnetz. Entfernen Sie hierfü
die Sicherung oder schalten Sie den Leitungsschutz-
schalter im Sicherungskasten aus (0-Stellung).
□Verwenden Sie nur Leuchtmittel wie im Kapitel
„Technische Daten“ angegeben.
□Lassen Sie die Leuchte vollständig abkühlen.
□Benutzen Sie zum Auswechseln ein sauberes,
fusselfreies Tuch.
Modell 56348/56351:
□Lösen Sie die Dekoschrauben 14 und entfernen
das Leuchtenglas 9 .
□Drehen Sie das defekte Leuchtmittel 6 vorsich-
tig mit einer ¹⁄4-Drehung gegen den Uhrzeiger-
sinn aus der Fassung.
□Drehen Sie das neue Leuchtmittel 6 vorsichtig
mit einer ¹⁄4-Drehung im Uhrzeigersinn in die
Fassung.
□Überprüfen Sie den richtigen Sitz.
□Bringen Sie anschließend das Leuchtenglas 9
erneut an und befestigen Sie dieses mit den
Dekoschrauben 14.
□Setzen Sie die Sicherung wieder ein oder schal-
ten Sie den Leitungsschutzschalter wieder an.
Modell 56349:
□Entfernen Sie das defekte Leuchtmittel 6, in-
dem Sie es vorsichtig gegen den Uhr zeigersinn
herausdrehen.
□Setzen Sie das neue Leuchtmittel 6 ein, indem
Sie es vorsichtig im Uhrzeigersinn einschrauben.
□Überprüfen Sie den richtigen Sitz.
□Setzen Sie die Sicherung wieder ein oder
schalten Sie den Leitungsschutzschalter
wieder an.
Wartung und Reinigung
WARNUNG! STROMSCHLAG-
GEFAHR! Trennen Sie zur Reinigung das
Produkt zuerst vom Stromnetz. Entfernen
Sie hierfür die Sicherung oder schalten Sie den
Leitungsschutzschalter im Sicherungskasten aus
(0-Stellung)
WARNUNG! STROMSCHLAG-
GEFAHR! Aus Gründen der elektrischen
Sicherheit darf die Leuchte niemals mit
scharfen Reinigungsmitteln gereinigt oder in
Wasser getaucht werden.
VORSICHT! VERBRENNUNGSGE-
FAHR DURCH HEISSE OBERFLÄCHEN!
Lassen Sie die Leuchte vollständig
abkühlen.
Benutzen Sie kein Lösungsmittel, Benzin o. Ä. Die
Leuchte würde hierbei Schaden nehmen.
□Lassen Sie die Leuchte vollständig abkühlen.
□Verwenden Sie zur Reinigung nur ein trocke-
nes, fusselfreies Tuch.
La pagina si sta caricando...
La pagina si sta caricando...
La pagina si sta caricando...
La pagina si sta caricando...
La pagina si sta caricando...
La pagina si sta caricando...
La pagina si sta caricando...
La pagina si sta caricando...
La pagina si sta caricando...
La pagina si sta caricando...
La pagina si sta caricando...
La pagina si sta caricando...
La pagina si sta caricando...
La pagina si sta caricando...
La pagina si sta caricando...
La pagina si sta caricando...
La pagina si sta caricando...
La pagina si sta caricando...
La pagina si sta caricando...
La pagina si sta caricando...
La pagina si sta caricando...
La pagina si sta caricando...
La pagina si sta caricando...
La pagina si sta caricando...
La pagina si sta caricando...
La pagina si sta caricando...
La pagina si sta caricando...
La pagina si sta caricando...
La pagina si sta caricando...
La pagina si sta caricando...
La pagina si sta caricando...
La pagina si sta caricando...
La pagina si sta caricando...
La pagina si sta caricando...
La pagina si sta caricando...
La pagina si sta caricando...
La pagina si sta caricando...
La pagina si sta caricando...
La pagina si sta caricando...
La pagina si sta caricando...
La pagina si sta caricando...
La pagina si sta caricando...
La pagina si sta caricando...
La pagina si sta caricando...
La pagina si sta caricando...
La pagina si sta caricando...
La pagina si sta caricando...
La pagina si sta caricando...
La pagina si sta caricando...
La pagina si sta caricando...
-
 1
1
-
 2
2
-
 3
3
-
 4
4
-
 5
5
-
 6
6
-
 7
7
-
 8
8
-
 9
9
-
 10
10
-
 11
11
-
 12
12
-
 13
13
-
 14
14
-
 15
15
-
 16
16
-
 17
17
-
 18
18
-
 19
19
-
 20
20
-
 21
21
-
 22
22
-
 23
23
-
 24
24
-
 25
25
-
 26
26
-
 27
27
-
 28
28
-
 29
29
-
 30
30
-
 31
31
-
 32
32
-
 33
33
-
 34
34
-
 35
35
-
 36
36
-
 37
37
-
 38
38
-
 39
39
-
 40
40
-
 41
41
-
 42
42
-
 43
43
-
 44
44
-
 45
45
-
 46
46
-
 47
47
-
 48
48
-
 49
49
-
 50
50
-
 51
51
-
 52
52
-
 53
53
-
 54
54
-
 55
55
-
 56
56
-
 57
57
-
 58
58
-
 59
59
-
 60
60
-
 61
61
-
 62
62
-
 63
63
-
 64
64
-
 65
65
-
 66
66
-
 67
67
-
 68
68
-
 69
69
-
 70
70


in altre lingue
- français: LIVARNO 416174 Le manuel du propriétaire
- español: LIVARNO 416174 El manual del propietario
- Deutsch: LIVARNO 416174 Bedienungsanleitung
- Nederlands: LIVARNO 416174 de handleiding
- dansk: LIVARNO 416174 Brugervejledning
- polski: LIVARNO 416174 Instrukcja obsługi
Documenti correlati
-
LIVARNO 387209 Manuale del proprietario
-
-
-
-
-
-
-
-
-