Vitamix 7500 Manuale del proprietario
- Categoria
- Frullatori
- Tipo
- Manuale del proprietario

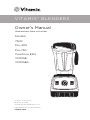
Owner’s Manual
Vita-Mix® Corporation
8615 Usher Road
Cleveland, OH 44138-2103 U.S.A.
1.800.848.2649 / 1.440.235.4840
vitamix.com
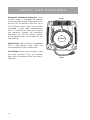
VITAMIX® BLENDERS
Models:
7500
Pro-300
Pro-750
Creations Elite
VM0158
VM0158A
Read and save these instructions

2
CONTENTS
Contents ..................................................................................................................................... 2
Let’s get started ......................................................................................................................3
Service and Registration ...................................................................................................... 4
Important Safeguards ...........................................................................................................5
Parts and Features ................................................................................................................. 8
Control Panel ............................................................................................................................11
About the Blades .................................................................................................................. 14
Tamper .......................................................................................................................................15
How to Use the Tamper.......................................................................................................16
Hints for Setting Speeds .....................................................................................................17
Operating Instructions .........................................................................................................18
Operating Instructions .........................................................................................................19
Care and Cleaning ............................................................................................................... 20
Troubleshooting .....................................................................................................................22
Specifications .........................................................................................................................28

3
LET’S GET STARTED
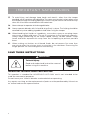
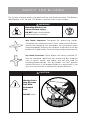
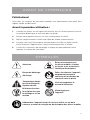
SYMBOLS
Caution
Read and understand
owner’s manual
Electrical shock hazard
Unplug while not in use, before cleaning, changing accessories or
approaching parts that move in use
High temperature when
blending hot liquids.
Operate with lid and lid
plug in place
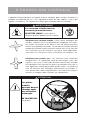
Never touch moving parts.
Keep hands and utensils out
of container
Do not insert items into
container while blender
is in use
Do not immerse
Congratulations!
You are about to see how quick, easy and delicious healthy eating can be!
Before first use:
1. Please read all the safety information, warnings and instructional material
found in this booklet.
2. Set your Vitamix machine on a dry, level surface.
3. Carefully remove the cable tie on the power cord.
4. Make sure the On/O switch is set to O. Plug the machine into an
grounded electrical outlet.
5. Follow the cleaning instructions on page 20 to prepare your machine
for use.

4
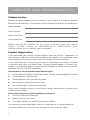
SERVICE AND REGISTRATION
Vitamix Service
Record the model number and serial number of your Vitamix in the spaces provided
below for future reference. These numbers can be found on the back of the motor base.
Model Number
Serial Number
Date of Purchase
Purchased From
Before returning this product for any reason, including repair, first contact
Vitamix Customer Service at 1.800.848.2649 or 1.440.235.4840, email
[email protected]om, or contact your local dealer.
Product Registration
If you purchased your Vitamix® machine directly from the Vita-Mix® Corporation via
the company’s website or call center by phone, your product was registered at the
time of purchase and your Vitamix machine’s warranty has been activated.
If you purchased your Vitamix machine from an International Distributor or Dealer
in countries other than the United States, Canada, United Kingdom, or Ireland, your
product is warranted through the International Distributor or Dealer and need not be
registered with the Vita-Mix Corporation.
Your machine is not yet registered with Vitamix if you:
1. Purchased from a Dealer in the United States, Canada, United Kingdom, or Ireland
2. Purchased from a military base
3. Purchased from a retail or wholesale store
4. Received your Vitamix machine as a gift
5. Are not the original owner of the machine
Enjoy faster and easier service in the future by taking a few minutes to register your
Vitamix machine today.
Choose one of these easy ways to register your machine:
1. Online at vitamix.com/warranty
2. Email [email protected]om
3. Call 1.800.848.2649 or 1.440.235.4840, press option 2
Your warranty may be honored by Vita-Mix
®
Corporation or an authorized dealer.
Failure to register your machine will not diminish your warranty rights.

5
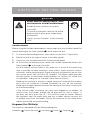
IMPORTANT SAFEGUARDS
READ ALL INSTRUCTIONS, SAFEGUARDS, AND WARNINGS BEFORE
OPERATING BLENDER.
1. Read all instructions.
2. Not intended for use by or near children or persons with reduced physical, sensory,
or mental capabilities or lack of experience and knowledge. Close supervision is
necessary when any appliance is used by or near children or incapacitated persons.
3. DO NOT IMMERSE. To protect against the risk of electrical shock, do not put the
blender base in water or other liquid.
4. Unplug from outlet when not in use, before putting on or taking o parts, and before
cleaning.
5. Avoid contacting moving parts.
6. Do not operate any appliance with a damaged cord or plug or after the appliance
malfunctions, or is dropped or damaged in any manner. Call Vitamix Customer
Service at 1.800.848.2649 or 1.440.235.4840 or email servic[email protected] at
once for examination, repair, replacement, or electrical or mechanical adjustment. If
purchased outside the U.S.A. or Canada, contact your local Vitamix dealer.
7. Alteration or modification of any part of the blender base or container, including the
use of any part or parts that are not genuine authorized Vitamix parts, may cause
fire, electric shock, or injury.
8. The use of attachments not expressly authorized or sold by Vitamix for use with this
blender, including canning jars, may cause fire, electric shock, or injury.
9. To protect against risk of electrical shock turn the appliance OFF, then unplug from
the outlet when not in use, before assembling or disassembling parts and before
cleaning. To unplug, grasp the plug and pull from the outlet. Never pull from the
power cord.
10. Do not use outdoors.
11. Do not let cord hang over edge of table or counter.
12. Do not let cord contact hot surface, including the stove.
13. Keep hands and utensils out of container while blending to reduce the risk of severe
injury to persons or damage to the blender. A rubber scraper or spatula may be used,
but only when the Vitamix blender is not running.
14. The tamper provided must be used only when the main part of the lid is in place.
15. Blades are sharp. Handle or remove blade and blade assembly from the
container with extreme care to avoid injury. To reduce the risk of injury, never
place a blade assembly on the motor base unless assembled to the Vitamix
container.
16. Do not leave foreign objects, such as spoons, forks, knives or the lid plug, in the
container as this will damage the blades and other components when starting the
machine and may cause injury.
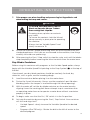
WARNING: To avoid the risk of serious injury when using your Vitamix®
blender, basic safety precautions should be followed, including the following.

6
IMPORTANT SAFEGUARDS
17. To avoid injury and damage, keep hands and utensils, other than the tamper
provided, out of container while blending. The cover must remain in place when using
the tamper through the lid plug opening. A utensil may be used in the container only
when the it has been removed from the motor base.
18. Never attempt to operate with damaged blades.
19. Always operate blender with lid and lid plug firmly in place. The lid plug should be
removed only when adding ingredients and when using the tamper.
20. When blending hot liquids or ingredients, use caution; spray or escaping steam
may cause scalding and burns. Do not fill container to the maximum capacity.
Always begin processing on the lowest speed setting, variable speed 1. Keep
hands and other exposed skin away from the lid opening to prevent possible
burns.
21. When making nut butters or oil-based foods, do not process for more than
one minute after the mixture starts to circulate in the container. Processing for
longer periods can cause dangerous overheating.
WARNING
To Avoid Injury.
Read and understand instruction manual
before using this machine.
IMPORTANT INSTRUCTIONS FOR SAFE USE
This product is intended for HOUSEHOLD USE ONLY and is not intended to be
used for commercial purposes.
Do not leave your Vitamix blender unattended when operating.
Any repair, servicing, or the replacement of parts must be performed by Vitamix or
an authorized service representative.
SAVE THESE INSTRUCTIONS

7
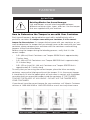
IMPORTANT SAFEGUARDS
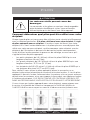
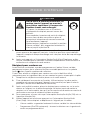
WARNING
Electrical Shock Hazard.
Use grounded outlet only.
DO NOT remove ground.
DO NOT use an adapter.
DO NOT use an extension cord.
Failure to follow instructions can cause death
or electrical shock.
NOTICE: THE FAILURE TO FOLLOW ANY OF THE IMPORTANT SAFEGUARDS
AND THE IMPORTANT INSTRUCTIONS FOR SAFE USE IS A MISUSE OF YOUR
VITAMIX BLENDER THAT CAN VOID YOUR WARRANTY AND CREATE THE RISK
OF SERIOUS INJURY.

8
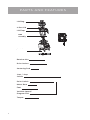
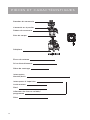
PARTS AND FEATURES
Drive Socket
Blade
Assembly
Lid Plug
2-Part Lid
Lid Flaps
Container
Retainer Nut
Centering Pad
Start / Stop
Switch
Feet
Tamper
Variable Speed/
Program Dial
Pulse Switch
Motor Base

9
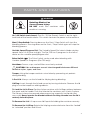
PARTS AND FEATURES
On / O Switch (not shown): The On / O (or Power) Switch is on the right-
hand side of the machine base. This switch controls the power to the machine.
Start / Stop Switch: Pressing down on the Start / Stop Switch will start the
blending process. Pressing down on the Start / Stop Switch again will stop the
blending process.
Variable Speed/Program Dial: The Variable Speed Dial selects blade rotation
speeds from 1 to 10 (low to high). The Pro-750 has 5 programs to the left of
center on the variable speed/program dial.
Pulse Switch ( ): The Pulse Switch can be used when blending with
Variable Speeds or Programs (Pro-750 only).
Container: Ounces, cups, and milliliters are clearly marked.
CAUTION: Lids and tampers are not interchangeable between dierent
container styles, types, and sizes.
Tamper: Using the tamper maintains circulation by preventing air pockets
during blending.
2-Part Lid: Always use the lid and the lid plug during blending.
Lid Plug: Insert through the lid and secure by turning clockwise. Remove the lid
plug to use the tamper or add ingredients.
To Lock the Lid in Place: Position lid on container with lid flaps midway between
the spout and the handle. Push the lid onto the container until it locks in place.
The lid must always be secured when processing, especially hot liquids that
may scald. Never operate the blender without checking to make sure the lid is
securely locked in place.
To Remove the Lid: Lift up on one lid flap while holding the container securely.
To Remove the Lid Plug: Rotate the lid plug counterclockwise from the “locked”
to “unlocked” position and lift out.
WARNING
Rotating Blades Can
Cause Severe Injury.
DO NOT reach into container while
machine is running.

10
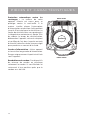
PARTS AND FEATURES
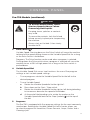
Automatic Overload Protection: Your
Vitamix motor is designed to protect
itself from overheating. If the motor shuts
o turn o the power switch for up to
45 minutes to reset. Reset time will be
extended if high room temperatures
exist. To reduce the reset time, unplug
the machine, remove the container,
and blow air into the center section
of the bottom with a hair dryer on the
cool setting.
Power Cord: Your machine is equipped
with a long power cord. Store the
unused portion neatly underneath.
Cord Wrap: Plastic cord retainers hold
the cord securely. They are flexible,
and return to position after the cord is
lifted out.
Front
Back

11
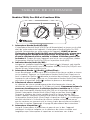
CONTROL PANEL
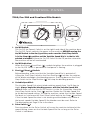
1. On/O Switch:
The On/Off (or Power) Switch is on the right-hand side of the machine base.
The On/Off Switch controls the power to the machine. BEFORE moving the
On/Off Switch to the On (I) position, make sure the Start/Stop Switch
is in the Stop ( ) position and the Variable Speed Dial is to the far left,
pointed at number 1. Move the On/Off Switch to the Off position whenever
the machine will be left unattended.
2. On/O Indication:
When the Pulse ( ) and Start ( ) symbols brighten, the machine is plugged
in, the On/Off Switch is powered On and power is flowing.
3. Start ( )/Stop ( ) Switch:
Before blending, make sure that the Variable Speed Dial is pointed at 1.
Lifting the Start/Stop Switch to the Start Position ( ) initiates the rotation
of the blades and begins the blending process. Pressing down on the Start/
Stop Switch to the Stop Position ( ) will stop the blending process.
4. Variable Speed Dial:
The Variable Speed Dial selects blade rotation speeds from 1 to 10 (low to
high). Always begin the blending process with the Variable Speed Dial
set to 1. Make sure that the On/Off Switch is in the On (I) position. Move the
Start/Stop Switch to the Start ( ) position. Rotate the Variable Speed Dial
to the desired speed setting. To stop the machine, rotate the Variable Speed
Dial back to 1 and move the Start/Stop Switch back to the Stop ( ) position.
If the Variable Speed function is not working and the blades only rotate at
the lowest speed (Variable Speed 1) the blender must be reset. Refer to
Troubleshooting on Page 22 for instructions.
5. Pulse Switch ( ):
Pressing down on the Pulse Switch will cause the machine to blend at the
speed setting shown on the Variable Speed Dial for as long as the Pulse
Switch is held down.
OFF
ON
1
35
4
2
7500, Pro-300 and Creations Elite Models

12
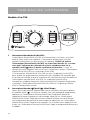
CONTROL PANEL
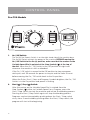
Pro-750 Models
2
3
4
5
OFF
ON
1
1. On / O Switch:
The On/Off (or Power) Switch is on the right-hand side of the machine base.
The On/Off Switch controls the power to the machine. BEFORE moving the
On / O Switch to the On (I) position, make sure that the marker on the
Variable Speed Dial is pointed at the Stop Symbol ( ) at the top of
the dial. Move the On / O Switch to the O position at night and
whenever the machine is left unattended.
If the On / O switch is moved to the O position to stop a program
mid-cycle, wait 30 seconds for power to recycle and the timer to reset
before moving the On / O switch back to the On position.
When the Pulse, Start / Stop, and Program Symbols brighten, the On / O
Switch is in the On position and power is flowing.
2. Start ( ) / Stop ( ) Switch:
After the marker on the Variable Speed Dial is rotated from the
Stop Symbol ( ) either to Variable Speed 1 or a Program, press the
Start / Stop Switch to start the machine and initiate the blending process.
Pressing the Start / Stop Switch again will stop the blending process.
Programs can be interrupted by pushing down the Start / Stop switch
at any time. If reactivated by pushing down the Start / Stop switch, the
program will start at the beginning.

13
CONTROL PANEL
Pro-750 Models (continued)
CAUTION
To Avoid Possible Burns, Never
Start on Speeds Above 1 when
Processing Hot Liquids.
Escaping steam, splashes or contents
mayscald.
To secure the contents, lock the lid and
lid cap securely in place prior to operating
the machine.
Always start on Variable 1, then slowly
increase to 10.
3. Pulse Switch ( ):
Variable Speed: Pressing down on the Pulse Switch will cause the machine
to blend at the speed setting shown on the Variable Speed Dial for as long
as the Pulse Switch is held down.
Programs: The Pulse function can be used when a program is selected.
Pushing down the Pulse switch when a program is selected will cause the
machine to run at 50% of high power for as long as the Pulse switch is
pusheddown.
4. Variable Speed Dial:
The Variable Speed Dial serves two functions: the use of five program
settings or ten variable speed settings.
• To use programs: rotate the Variable Speed Dial to the left to the
desired program.
• To use Variable Speed:
a. Rotate the Variable Speed dial to the right to 1.
b. Press down on the Start / Stop switch.
c. Rotate the Variable Speed dial to the right or left during blending
to increase or decrease the speed of the blades.
d. At the end of the blending cycle, rotate the marker on the
Variable-Speed dial back to the Stop Symbol ( ) at the top of
thedial.
5. Programs:
The Pro-750 is equipped with five program settings for the most commonly
used recipes. Rotating the Variable Speed Dial left of center allows you
to select a program for Smoothies, Frozen Desserts, Soups, Purées and a
Cleaning cycle.

14
WARNING
Rotating Blades Can
Cause Severe Injury.
DO NOT reach into container
while machine is running.
Wet Blade Container: Designed for processing liquids,
including juice, frozen mixtures, sauces, soups, purees, batters,
and for wet chopping. The wet blades can also process grain
and knead dough, but they are not quite as efficient as the dry
blades in this application. See instructions for dry container use.
Dry Blade Container: These blades are clearly marked “D”
and are designed specifically for processing dry materials
such as grains, cereal, and coffee, and are also used for
kneading bread dough. The dry blades can NOT process
liquids efficiently. If you prepare herbs on a regular basis, you
may wish to purchase a separate dry blade container.
The Vitamix machine comes standard with the wet blade container. The blade is
identified by a “W” for wet. This blade is used for most of your recipes.
Moving Parts
May Become
Hot With
Extended
Use.
DO NOT touch.
ABOUT THE BLADES
CAUTION
D
WD
W

15
CAUTION
Rotating Blades Can Cause Damage.
Lids and tampers are not interchangeable between
dierent container styles, types, and sizes. Use the tamper
that was supplied with your machine.
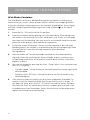
How to Determine the Tamper to use with Your Container
Each type of tamper is designed to be used safely and eectively with a
particular container. If a tamper came with your container, it is the correct
tamper for the container. If a tamper did not come with your container, or you
want to determine if a tamper that you already have can be used with your new
container, please compare your container with the containers and matching
tampers to the illustration below.
Before using the tamper during the blending process, verify that it is the
correct tamper.
• 2,0 L (64 oz.) Short Containers use Tamper 016041 that is approximately
11 inches long.
• 2,0 L (64 oz.) Tall Containers uses Tamper 000760 that is approximately
12-½ inches long.
• 0,9 L (32 oz.) and 1,4 L (48 oz.) Containers use Tamper 015033 that is
approximately 9-¾ inches long.
To verify that you are using the correct tamper, place the lid on an empty
container, remove the lid plug and insert the tamper. If it is the correct tamper
it should easily fit into the opening but will not come in contact with the blades
no matter how you move the tamper inside the container. IF THE TAMPER
TOUCHES THE BLADES AT ANY ANGLE - DO NOT USE THE TAMPER WITH
YOUR CONTAINER.
If you do not have the correct tamper for your container, call Vitamix Customer
services at 1.800.848.2649 or 1.440.235.4840 or e-mail [email protected].
TAMPER

16
WARNING
Rotating Blades Can
Cause Severe Injury.
• DO NOT put hands, spatulas, etc. in
the container while the machine is
running or while the container is still
on the base.
• Lids and tampers are not
interchangeable between dierent
container styles, types, and sizes.
Use the tamper that was supplied
with your machine.
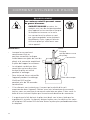
IMPORTANT:
• The splash disk (near the top of
the tamper) and lid prevent the
tamper from hitting the blades
when the lid is secured properly
in the locked position.
• The container should not be
more than two-thirds full when
the tamper is used during
blending.
• To avoid overheating during
blending, DO NOT use the
tamper for more than
30 consecutive seconds.
• If the food does not circulate, the
machine may have trapped an air
HOW TO USE THE TAMPER
Tamper Splash Disk
Tamper
Blade Assembly
Lid
bubble. Carefully remove the lid plug while making sure the lid stays firmly
in place. Release the air bubble by inserting the tamper through the lid plug
opening.
• Holding the tamper straight down may not help the ingredients circulate.
If necessary, point the tamper toward the sides or corners of the container.
DO NOT try to force the tamper deeper into the container.

17
HINTS FOR SETTING SPEEDS
CAUTION
Never Start on Speeds Above 1 with
Hot Liquids to Avoid Possible Burns.
Escaping steam, splashes or contents
may scald.
To secure the contents, lock the lid and lid
plug securely in place prior to operating
the machine.
Always start on Variable 1, slowly increase
to 10.
Variable Speed
Before using the Variable Speed option, always begin with the Variable Speed Dial
marker pointing to the Stop Symbol ( ) at the top of the dial.
1. To activate the blending process, press down on the Start / Stop Switch.
2. Rotate the dial to the right of center to Variable Speed 1.
3. Slowly turn the Variable Speed Dial to the desired speed
4. At the end of the blending cycle, rotate the Variable Speed dial back to the
Stop Symbol ( ) at the top of the dial.
Use the highest setting stated in the recipe for as much of the processing
time as possible to make smoothies, soup, shakes, frozen mixtures, purées,
nut butter, and for grinding grain. Processing times will generally be less than
one minute (most take less than 30 seconds). The higher speed provides
the best quality of refinement, breaking down ice, frozen fruit, whole fruit
orvegetables, and grains to a smooth, lump-free consistency.
Blending for too long at too low a speed setting will overheat the machine
and cause the Automatic Overload Protection to turn o the machine.
Blending on a higher speed maximizes the working of the motor's cooling fan
to avoid overheating.
If the mixture stops circulating, you may have trapped an air bubble. To
resolve Insert the tamper through the lid plug and stir until it “burps”. If
this does not work, press the On / O switch to stop the motor. Remove
the container from the motor base and use a rubber spatula to press the
air bubble away from the blades. Return the container to the motor base,
replace the lid and continue blending.
Programs (Pro-750 Only)
The machine is equipped with the following programs:
Smoothie ( ) Frozen Dessert ( ) Hot Soup ( ) Purée ( ) Cleaning ( )

18
OPERATING INSTRUCTIONS
Wet-Blade Container
The Wet Blade Container is designed for processing liquids, including juice,
frozen mixtures, sauces, soups, purées, batters and for wet chopping. Before
using this container with programs or the Variable Speed option, always begin
with the Variable Speed Dial pointing to the Stop Symbol ( ) at thetop of
the dial.
1. Move the On / O switch to the On position.
2. Load the container before placing it on the motor base. Place liquids and
soft foods in the container first, then solid items and, finally, ice. Although
not necessary for blending, you may want to cut or break food into smaller
pieces for more precise measurement of ingredients.
3. Fasten the 2-part lid securely. Always use the complete 2-part lid when
blending(unless the tamper is inserted through the lid cap opening). Make
sure that the lid is securely latched, especially when blending
hot ingredients.
4. With the motor o, set the wet-blade container on the motor base by
aligning it over the centring pad. Never attempt to put a container onto
an operating motor base or to operate a motor base without a container
properly in place.
5. Activate the blades by pressing the Start / Stop Switch. Your container may
shift as it is aligned.
• Variable Speed - slowly rotate the Variable Speed Dial to the right to the
desired speed.
• Programs (Pro-750 only) - Rotate the dial to the left of center to the
desired program.
6. If the mixture stops circulating, you may have trapped an air bubble. To
resolve, insert the tamper through the lid cap and stir until it “burps”. If
this does not work, press the On / O switch to stop the motor. Remove
the container from the motor base and use a rubber spatula to press the
air bubble away from the blades. Return the container to the motor base,
replace the lid and continue blending.

19
7. Take proper care when handling and processing hot ingredients and
when making hot soup and sauces.
8. Due to the machine’s speed, processing times are much quicker than with
standard appliances. Until you are accustomed to the machine, time things
carefully to avoid over-processing.
9. After pressing the Start / Stop switch to stop the cycle, wait until the blades
stop completely before removing the lid or container from the motor base.
Dry-Blade Container
Before using this container with programs or the Variable Speed option, always
begin with the Variable Speed Dial pointing to the Stop Symbol ( ) at the top of
the dial.
If purchased, your dry-blade container should be used only for hard, dry
materials, such as grain, and for kneading dough.
1. Load the container before placing it on the motor base.
2. Fasten the 2-part lid securely. Always use the complete 2-part lid when
blending (unless the tamper is inserted through the lid cap opening).
3. With the motor o, set the dry-blade container on the motor base by
aligning it over the centring pad. Never attempt to put a container onto
an operating motor base or to operate a motor base without a container
properly in place.
4. To begin, make sure that the On / O switch is in the On position.
5. Activate the machine by pressing the Start / Stop Switch. Your container
will shift and align itself.
• Variable Speed - slowly increase the Variable Speed to the desired
speed.
• Programs (Pro-750 only) - Rotate the dial to the left of center to the
desired program.
OPERATING INSTRUCTIONS
CAUTION
To Avoid Possible Burns, Never
Start on Speeds Above 1 when
Processing Hot Liquids.
Escaping steam, splashes or contents
mayscald.
To secure the contents, lock the lid and
lid cap securely in place prior to operating
themachine.
Always start on Variable Speed 1 and
slowly increase to 10.

20
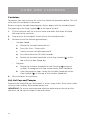
Container
To prepare your new machine for initial use, follow the procedure below. This will
clean the unit and break in the motor.
Before using the Variable Speed option, always begin with the Variable Speed
Dial pointing to the Stop Symbol ( ) at the top of the dial.
1. Fill the container half full of warm water and add a few drops of liquid
dishsoap to the container.
2. Snap or push the complete 2-part lid into the locked position.
3. Perform one of the following procedures:
• Variable Speed:
a. Rotate the Variable Speed dial to 1.
b. Press the Start / Stop switch.
c. Slowly increase variable speed to 10.
d. Run the machine for 30 to 60 seconds.
e. Rotate the Variable Speed dial to the Stop Symbol ( ) at the
top of the Variable Speed dial.
• Program
a. Rotate the Variable Speed dial to the Cleaning ( ) program
symbol. The program will stop automatically when complete.
b. After the program stops, rotate the Variable Speed dial to the
Stop Symbol ( ) at the top of the Variable Speed dial.
4. Rinse and drain the container.
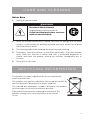
Lid, Lid Cap and Tamper
Separate the lid and lid cap. Wash parts in warm, soapy water. Rinse clean under
running water and dry. Reassemble before use.
IMPORTANT: To ensure continued and eective performance, do not put the
container, lid, lid cap or tamper in the dishwasher.
CARE AND CLEANING
La pagina si sta caricando...
La pagina si sta caricando...
La pagina si sta caricando...
La pagina si sta caricando...
La pagina si sta caricando...
La pagina si sta caricando...
La pagina si sta caricando...
La pagina si sta caricando...
La pagina si sta caricando...
La pagina si sta caricando...
La pagina si sta caricando...
La pagina si sta caricando...
La pagina si sta caricando...
La pagina si sta caricando...
La pagina si sta caricando...
La pagina si sta caricando...
La pagina si sta caricando...
La pagina si sta caricando...
La pagina si sta caricando...
La pagina si sta caricando...
La pagina si sta caricando...
La pagina si sta caricando...
La pagina si sta caricando...
La pagina si sta caricando...
La pagina si sta caricando...
La pagina si sta caricando...
La pagina si sta caricando...
La pagina si sta caricando...
La pagina si sta caricando...
La pagina si sta caricando...
La pagina si sta caricando...
La pagina si sta caricando...
La pagina si sta caricando...
La pagina si sta caricando...
La pagina si sta caricando...
La pagina si sta caricando...
-
 1
1
-
 2
2
-
 3
3
-
 4
4
-
 5
5
-
 6
6
-
 7
7
-
 8
8
-
 9
9
-
 10
10
-
 11
11
-
 12
12
-
 13
13
-
 14
14
-
 15
15
-
 16
16
-
 17
17
-
 18
18
-
 19
19
-
 20
20
-
 21
21
-
 22
22
-
 23
23
-
 24
24
-
 25
25
-
 26
26
-
 27
27
-
 28
28
-
 29
29
-
 30
30
-
 31
31
-
 32
32
-
 33
33
-
 34
34
-
 35
35
-
 36
36
-
 37
37
-
 38
38
-
 39
39
-
 40
40
-
 41
41
-
 42
42
-
 43
43
-
 44
44
-
 45
45
-
 46
46
-
 47
47
-
 48
48
-
 49
49
-
 50
50
-
 51
51
-
 52
52
-
 53
53
-
 54
54
-
 55
55
-
 56
56


Vitamix 7500 Manuale del proprietario
- Categoria
- Frullatori
- Tipo
- Manuale del proprietario
in altre lingue
- English: Vitamix 7500 Owner's manual
- français: Vitamix 7500 Le manuel du propriétaire
- português: Vitamix 7500 Manual do proprietário