
Piatto doccia Ceramilux®
Shower tray Ceramilux®
ISTRUZIONI DI MONTAGGIO
ASSEMBLY INSTRUCTIONS
Docce/ Shower
1/5
PDX
APDX . . . . .
MANUTENZIONE
Per la normale pulizia si consiglia
di utilizzare detergenti di uso
comune.
Si sconsiglia l'utilizzo di
detergenti abrasivi, acidi e
anticalcare.
MAINTENANCE
For normal cleaning use common
detergents.
Do not use either abrasive
detergents or solvents, acids and
anti limestone.
NOTA
La ferramenta in dotazione
permette Il fissaggio degli
accessori su pareti in mattoni
pieni o forati e in calcestruzzo.
Per pareti in cartongesso è
necessario rinforzare
adeguatamente la zona
interessata ed eventualmente
adottare sistemi di fissaggio
specifici.
NOTE
The assembly material supplied
allows the installation of the
accessories on solid and hollow
brick walls and on concrete walls.
For plasterboard walls it is
necessary to reinforce adequately
the area concerned and to adopt
specific fixing systems if
necessary.
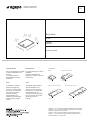
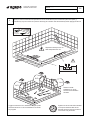
TIPOLOGIE
Y=X
Y1
Tolleranza +-2 mm. al metro per lunghezza e larghezza per misure standard.
Tolleranza +-1,5 mm. al metro per lunghezza e larghezza per misure speciali.
Tolleranza sulla planarità +-2 mm. al metro
Tolerance +- 2mm per meter for length and width (standard dimensions)
Tolerance +- 1.5 mm per meter for length and width (special dimensions)
Evenness tolerance +- 2 mm per metre
Y1
50
(1” 31/32)
X
Y
50
(1” 31/32)
50
(1” 31/32)
50
(1” 31/32)
30
(1”3/16)
STANDARD
A MISURA CON INVASO RETTANGOLARE
A MISURA CON INVASO QUADRATO
X=700-800-900
Y1=1300
X
Y1=1500
Y
X
A MISURA CON SCARICO CENTRALE

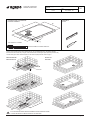
CONTENUTO DELLA CONFEZIONE
PACKAGE CONTENTS
ISTRUZIONI DI MONTAGGIO
ASSEMBLY INSTRUCTIONS
COD.
17075 20171108/4 - SV
VERS.
STRUMENTI
TOOLS
2/5
APDX . . . . .
INSTALLATO
MOUNTED
PREDISPOSIZIONE
PREDISPOSITION
Realizzare la sede del sifone utilizzando l’accessorio Agape cod. AKITPZVAS. e considerando l’ingombro del piatto
ordinato. Il tubo di scarico deve essere di diametro 40 mm. Per la profondità dello scavo vedi sezione a pagina 2.
Build the recess for the waste trap, using item code AKITPZVAS and considering the place required by the shower tray
ordered. Waste pipe of 40mm diameter required. For the recess’s depth please see section on page 2.
X
Y
30 (1”3/16)
=
=
200 (2”)
PILETTA/WASTE .PLA0443B3
SCARICO FLESSIBILE / FLEXIBLE DRAIN PIPE
X/2
Y-50
AKITPZVAS
X/2
50
130
X-200
Y/2
silicone
E’ MOLTO IMPORTANTE REALIZZARE UN BASAMENTO PERFETTAMENTE PLANARE
IT IS VERY IMPORTANT TO CREATE A PERFECTLY LEVELED BASE

ISTRUZIONI DI MONTAGGIO
ASSEMBLY INSTRUCTIONS
APDX . . . . .
3/5
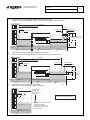
sigillare/ pavimento finito
Sezione piatto doccia con pozzetto AKITPZVAS: soluzione a filo pavimento
Shower tray section with AKITPZVAS: option with shower installed flush with finished floor surface
Sezione piatto doccia con pozzetto APDX: soluzione fuori pavimento
Shower tray section with kit APDX: option with shower installed above finished floor surface
1a
1b
rivestimento finito (piastrelle o altro)
30
66+ pendenza scarico
inclination of waste pipe
160
702/802/902
2-3 mm.
sigillare/
finished wall surface (e.g. tiles, etc.)
seal seal
finished floor surface
130
pozzetto con piletta sifonata / waste trap
solaio / floor
sottofondo/underfloor surface
2-3 mm.
pavimento finito
rivestimento finito (piastrelle o altro)
30
+ pendenza scarico
inclination of waste pipe
160
702/802/902
2-3 mm.
finished wall surface (e.g. tiles, etc.)
finished floor surface
130
solaio / floor
sottofondo/underfloor surface
50
rivestimento finito
(piastrelle o altro)
2-3 mm.
finished wall surface
(e.g. tiles, etc.)
solaio / floor
sottofondo/underfloor surface
2-3 mm.
ATTENZIONE: LE MISURE UTILI DEL
PIATTO SI RIDUCONO
ATTENTION: THE USE FULL
DIMENSION OF THE SHOWER
TRAY DIMINISH.
36
80
N.B. Controllare le tolleranze a pag 1
Please note: control le tolerances on p.1
sigillare/
sigillare/seal seal
1cSezione piatto doccia con rivestimento sopra l’ APDX
Shower tray section with finished wall surface over the APDX
pozzetto con piletta sifonata / waste trap
36

ISTRUZIONI DI MONTAGGIO
ASSEMBLY INSTRUCTIONS
APDX . . . . .
4/5
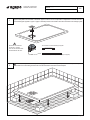
1
2
Verificare che il pavimento e la superficie di appoggio siano a livello.Collegare la piletta allo scarico e provare l’impianto
Check if floor and seating are horizontal. Connect the waste to the drain and test the plant
Applicare alla piletta il tubo flessibile in dotazione oppure un tubo ø 40 mm che permetta il collegamento con la rete di scarico.
Fix the flexible pipe supplied or a pipe of (segno x diametro) 40mm to the waste to allow the connection to the sewage system
Tubo flessibile in dotazione/Flexible pipe supplied
Tubo commerciale (non fornito)/Commercial pipe (not supplied)
ESEGUIRE LE ISTRUZIONI
ALLEGATE AL SIFONE
FOLLOW THE INSTRUCTIONS
ACCOMPANYING THE TRAP

ISTRUZIONI DI MONTAGGIO
ASSEMBLY INSTRUCTIONS
5/5
3
silicone
silicone
Sigillare con silicone antimuffa e attendere
24 ore prima dell’utilizzo della doccia.
Seal with anti-mould silicone and wait 24
hours before using the shower.
Leggere le istruzioni d’uso e installazione allegate al piatto.
Read the instructions or use and installation to the shower
tray supplied
Temperatura dell’acqua max. 55°
Water temperature max. 55°
APDX . . . . .
= =
II piatto può avere una tolleranza sulla planarità di 2 mm/mt. Se necessario prima di siliconare spessorare il piatto (1).
The shower tray may be 2 mm/mt out of plumb.If necessary put a thicness under the shower tray before applying the silicone
non fornite
not supplied
H
2
O
H
2
O
H
2
O
Testare la corretta
installazione con acqua
Lest the correct installation
with water
-
 1
1
-
 2
2
-
 3
3
-
 4
4
-
 5
5


agape APDX_SQB3 Assembly Instructions
- Tipo
- Assembly Instructions
in altre lingue
- English: agape APDX_SQB3
Documenti correlati
-
agape AVAS0906 Assembly Instructions
-
-
-
-
-
-
-
-
-
