Yamaha N3X Manuale del proprietario
- Categoria
- Pianoforti digitali
- Tipo
- Manuale del proprietario

FRANÇAIS
ESPAÑOL
ES
FR
EN
Owner’s Manual
Mode d'emploi
Manual de instrucciones
IMPORTANT – Check your power supply –
Make sure that your local AC mains voltage matches the voltage
specified on the name plate on the bottom panel. In some areas
a voltage selector may be provided on the bottom of the main
keyboard unit near the power cord. Make sure that the voltage
selector is set for the voltage in your area. The voltage selector
is set at 240V when the unit is initially shipped. To change the
setting use a “minus” screwdriver to rotate the selector dial so
that the correct voltage appears next to the pointer on the panel.
Before using this instrument, be sure to read “PRECAUTIONS”
on pages 5–6.
When assembling the unit, consult a qualified AvantGrand
dealer. (Refer to the assembly instructions at the end of this
manual.)
IMPORTANT – Vérifiez votre source d'alimentation –
Vérifiez que la tension de l'alimentation secteur correspond à
celle spécifiée sur la plaque du fabricant, située sur le panneau
inférieur. Les instruments vendus dans certaines régions
disposent d'un sélecteur de tension sur la partie inférieure du
clavier de l'unité principale, à côté du cordon d'alimentation.
Assurez-vous que le sélecteur de tension est réglé sur la tension
utilisée dans votre région. À sa sortie d'usine, le sélecteur est
réglé sur 240 V. Pour modifier ce réglage, utilisez un tournevis
plat et faites tourner le cadran du sélecteur jusqu'à ce que la
valeur correcte apparaisse à côté de l'indicateur sur le panneau.
Avant d'utiliser cet instrument, lisez attentivement la section
« PRÉCAUTIONS D'USAGE » aux pages 5-6.
Lors du montage de l'unité, contactez un revendeur AvantGrand
agréé. (Reportez-vous aux instructions de montage figurant à la
fin de ce manuel.)
IMPORTANTE – Compruebe la fuente de alimentación –
Asegúrese de que la tensión de la red eléctrica local de CA
coincide con la tensión especificada en la placa situada en el
panel inferior. Es posible que en algunas zonas se suministre un
selector de tensión en la parte inferior de la unidad del teclado
principal, junto al cable de alimentación. Asegúrese de que este
selector está ajustado según la tensión de la zona. El selector
de tensión viene ajustado de fábrica para 240 V. Para cambiar
el ajuste, utilice un destornillador de punta normal para girar el
selector hasta que la tensión correcta aparezca al lado del
puntero del panel.
Antes de utilizar el instrumento, lea la sección
“PRECAUCIONES”, en las páginas 5-6.
Al montar la unidad, consulte con un concesionario cualificado
de Avant Grand (consulte las instrucciones de montaje al final
de este manual).
ENGLISH
N3X

2•N3X
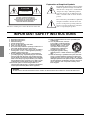
PRODUCT SAFETY MARKINGS: Yamaha electronic
products may have either labels similar to the graphics
shown below or molded/stamped facsimiles of these
graphics on the enclosure. The explanation of these graph-
ics appears on this page. Please observe all cautions indi-
cated on this page and those indicated in the safety
instruction section.
See bottom of Keyboard enclosure for graphic symbol
markings.
The exclamation point within the equi-
lateral triangle is intended to alert the
user to the presence of important operat-
ing and maintenance (servicing) instruc-
tions in the literature accompanying the
product.
The lightning flash with arrowhead
symbol, within the equilateral triangle,
is intended to alert the user to the pres-
ence of uninsulated “dangerous volt-
age” within the product’s enclosure that
may be of sufficient magnitude to con-
stitute a risk of electrical shock.
IMPORTANT NOTICE: All Yamaha electronic products
are tested and approved by an independent safety testing
laboratory in order that you may be sure that when it is
properly installed and used in its normal and customary
manner, all foreseeable risks have been eliminated. DO
NOT modify this unit or commission others to do so unless
specifically authorized by Yamaha. Product performance
and/or safety standards may be diminished. Claims filed
under the expressed warranty may be denied if the unit is/
has been modified. Implied warranties may also be
affected.
SPECIFICATIONS SUBJECT TO CHANGE: The
information contained in this manual is believed to be cor-
rect at the time of printing. However, Yamaha reserves the
right to change or modify any of the specifications without
notice or obligation to update existing units.
ENVIRONMENTAL ISSUES: Yamaha strives to pro-
duce products that are both user safe and environmentally
friendly. We sincerely believe that our products and the
production methods used to produce them, meet these
goals. In keeping with both the letter and the spirit of the
law, we want you to be aware of the following:
Battery Notice: This product MAY contain a small non-
rechargeable battery which (if applicable) is soldered in
place. The average life span of this type of battery is
approximately five years. When replacement becomes nec-
essary, contact a qualified service representative to per-
form the replacement.
Warning: Do not attempt to recharge, disassemble, or
incinerate this type of battery. Keep all batteries away from
children. Dispose of used batteries promptly and as regu-
lated by applicable laws. Note: In some areas, the servicer
is required by law to return the defective parts. However,
you do have the option of having the servicer dispose of
these parts for you.
Disposal Notice: Should this product become damaged
beyond repair, or for some reason its useful life is consid-
ered to be at an end, please observe all local, state, and fed-
eral regulations that relate to the disposal of products that
contain lead, batteries, plastics, etc.
NOTICE: Service charges incurred due to lack of knowl-
edge relating to how a function or effect works (when the
unit is operating as designed) are not covered by the manu-
facturer’s warranty, and are therefore the owners responsi-
bility. Please study this manual carefully and consult your
dealer before requesting service.
NAME PLATE LOCATION: The graphic below indi-
cates the location of the name plate. The model number,
serial number, power requirements, etc., are located on this
plate. You should record the model number, serial number,
and the date of purchase in the spaces provided below and
retain this manual as a permanent record of your purchase.
Model
Serial No.
Purchase Date
SPECIAL MESSAGE SECTION
CAUTION
RISK OF ELECTRIC SHOCK
DO NOT OPEN
CAUTION: TO REDUCE THE RISK OF ELECTRIC SHOCK.
DO NOT REMOVE COVER (OR BACK).
NO USER-SERVICEABLE PARTS INSIDE.
REFER SERVICING TO QUALIFIED SERVICE PERSONNEL.
92-469-q (bottom)

N3X •3
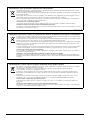
1. IMPORTANT NOTICE: DO NOT MODIFY THIS UNIT!
This product, when installed as indicated in the instructions
contained in this manual, meets FCC requirements. Modifica-
tions not expressly approved by Yamaha may void your author-
ity, granted by the FCC, to use the product.
2. IMPORTANT: When connecting this product to accessories
and/or another product use only high quality shielded cables.
Cable/s supplied with this product MUST be used. Follow all
installation instructions. Failure to follow instructions could void
your FCC authorization to use this product in the USA.
3. NOTE: This product has been tested and found to comply with
the requirements listed in FCC Regulations, Part 15 for Class
“B” digital devices. Compliance with these requirements pro-
vides a reasonable level of assurance that your use of this
product in a residential environment will not result in harmful
interference with other electronic devices. This equipment gen-
erates/uses radio frequencies and, if not installed and used
according to the instructions found in the users manual, may
cause interference harmful to the operation of other electronic
devices. Compliance with FCC regulations does not guarantee
that interference will not occur in all installations. If this product
is found to be the source of interference, which can be deter-
mined by turning the unit “OFF” and “ON”, please try to elimi-
nate the problem by using one of the following measures:
Relocate either this product or the device that is being affected
by the interference.
Utilize power outlets that are on different branch (circuit breaker
or fuse) circuits or install AC line filter/s.
In the case of radio or TV interference, relocate/reorient the
antenna. If the antenna lead-in is 300 ohm ribbon lead, change
the lead-in to co-axial type cable.
If these corrective measures do not produce satisfactory
results, please contact the local retailer authorized to distribute
this type of product. If you can not locate the appropriate
retailer, please contact Yamaha Corporation of America, Elec-
tronic Service Division, 6600 Orangethorpe Ave, Buena Park,
CA90620
The above statements apply ONLY to those products distrib-
uted by Yamaha Corporation of America or its subsidiaries.
* This applies only to products distributed by YAMAHA CORPORATION OF AMERICA. (class B)
FCC INFORMATION (U.S.A.)
COMPLIANCE INFORMATION STATEMENT
(DECLARATION OF CONFORMITY PROCEDURE)
Responsible Party : Yamaha Corporation of America
Address : 6600 Orangethorpe Ave., Buena Park, Calif. 90620
Telephone : 714-522-9011
Type of Equipment : Hybrid Piano
Model Name : N3X
This device complies with Part 15 of the FCC Rules.
Operation is subject to the following two conditions:
1) this device may not cause harmful interference, and
2) this device must accept any interference received including interference
that may cause undesired operation.
See user manual instructions if interference to radio reception is suspected.
* This applies only to products distributed by YAMAHA
CORPORATION OF AMERICA.
(FCC DoC)

4•N3X Owner’s Manual
The above warning is located on the bottom of the unit.
Explanation of Graphical Symbols
The lightning flash with arrowhead symbol
within an equilateral triangle is intended to
alert the user to the presence of uninsulated
“dangerous voltage” within the product’s
enclosure that may be of sufficient magni-
tude to constitute a risk of electric shock to
persons.
The exclamation point within an equilateral
triangle is intended to alert the user to the
presence of important operating and main-
tenance (servicing) instructions in the liter-
ature accompanying the product.
1 Read these instructions.
2 Keep these instructions.
3 Heed all warnings.
4 Follow all instructions.
5 Do not use this apparatus near water.
6 Clean only with dry cloth.
7 Do not block any ventilation openings. Install in accor-
dance with the manufacturer’s instructions.
8 Do not install near any heat sources such as radiators,
heat registers, stoves, or other apparatus (including
amplifiers) that produce heat.
9 Do not defeat the safety purpose of the polarized or
grounding-type plug. A polarized plug has two blades
with one wider than the other. A grounding type plug
has two blades and a third grounding prong. The wide
blade or the third prong are provided for your safety. If
the provided plug does not fit into your outlet, consult
an electrician for replacement of the obsolete outlet.
10 Protect the power cord from being walked on or
pinched particularly at plugs, convenience receptacles,
and the point where they exit from the apparatus.
11 Only use attachments/accessories specified by the
manufacturer.
12 Use only with the cart, stand, tri-
pod, bracket, or table specified by
the manufacturer, or sold with the
apparatus. When a cart is used,
use caution when moving the
cart/apparatus combination to
avoid injury from tip-over.
13 Unplug this apparatus during
lightning storms or when unused for long periods of
time.
14 Refer all servicing to qualified service personnel. Ser-
vicing is required when the apparatus has been dam-
aged in any way, such as power-supply cord or plug is
damaged, liquid has been spilled or objects have fallen
into the apparatus, the apparatus has been exposed to
rain or moisture, does not operate normally, or has
been dropped.
(UL60065_03)
CAUTION: TO REDUCE THE RISK OF
ELECTRIC SHOCK, DO NOT REMOVE
COVER (OR BACK). NO USER-SERVICEABLE
PARTS INSIDE. REFER SERVICING TO
QUALIFIED SERVICE PERSONNEL.
CAUTION
RISK OF ELECTRIC SHOCK
DO NOT OPEN
IMPORTANT SAFETY INSTRUCTIONS
WARNING
TO REDUCE THE RISK OF FIRE OR ELECTRIC SHOCK, DO NOT EXPOSE THIS APPARATUS TO RAIN OR MOISTURE.

N3X Owner’s Manual •5
PRECAUTIONS
PLEASE READ CAREFULLY BEFORE PROCEEDING
Please keep this manual in a safe and handy place for future reference.
WARNING
Always follow the basic precautions listed below to avoid the possibility of serious injury or even death from electrical
shock, short-circuiting, damages, fire or other hazards. These precautions include, but are not limited to, the
following:
• Do not place the power cord near heat sources such as heaters or radiators. Also,
do not excessively bend or otherwise damage the cord, or place heavy objects on
it.
• Only use the voltage specified as correct for the instrument. The required voltage
is printed on the name plate of the instrument.
• Use only the supplied power cord/plug.
• Check the electric plug periodically and remove any dirt or dust which may have
accumulated on it.
• This instrument contains no user-serviceable parts. Do not open the instrument
or attempt to disassemble or modify the internal components in any way. If it
should appear to be malfunctioning, discontinue use immediately and have it
inspected by qualified Yamaha service personnel.
• Do not expose the instrument to rain, use it near water or in damp or wet
conditions, or place on it any containers (such as vases, bottles or glasses)
containing liquids which might spill into any openings. If any liquid such as water
seeps into the instrument, turn off the power immediately and unplug the power
cord from the AC outlet. Then have the instrument inspected by qualified Yamaha
service personnel.
• Never insert or remove an electric plug with wet hands.
• Do not put burning items, such as candles, on the unit. A burning item may fall
over and cause a fire.
• When one of the following problems occur, immediately turn off the power switch
and disconnect the electric plug from the outlet. Then have the device inspected
by Yamaha service personnel.
- The power cord or plug becomes frayed or damaged.
- It emits unusual smells or smoke.
- Some object has been dropped into the instrument.
- There is a sudden loss of sound during use of the instrument.
CAUTION
Always follow the basic precautions listed below to avoid the possibility of physical injury to you or others, or damage
to the instrument or other property. These precautions include, but are not limited to, the following:
• Do not connect the instrument to an electrical outlet using a multiple-connector.
Doing so can result in lower sound quality, or possibly cause overheating in the
outlet.
• When removing the electric plug from the instrument or an outlet, always hold the
plug itself and not the cord. Pulling by the cord can damage it.
• Remove the electric plug from the outlet when the instrument is not to be used for
extended periods of time, or during electrical storms.
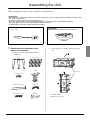
• Read carefully the attached documentation explaining the assembly process.
Failure to assemble the instrument in the proper sequence might result in damage
to the instrument or even injury.
• Do not place the instrument in an unstable position where it might accidentally
fall over.
• Since this product is very heavy, make sure that a sufficient number of people are
on hand to help, so you can lift and move it safely and easily. Attempting to lift or
move the instrument by force may damage your back, result in other injury, or
cause damage to the instrument itself.
• Before moving the instrument, remove all connected cables, to prevent damage to
the cables or injury to anyone who might trip over them.
• When setting up the product, make sure that the AC outlet you are using is easily
accessible. If some trouble or malfunction occurs, immediately turn off the power
switch and disconnect the plug from the outlet. Even when the power switch is
turned off, electricity is still flowing to the product at the minimum level. When
you are not using the product for a long time, make sure to unplug the power cord
from the wall AC outlet.
Power supply/Power cord
Do not open
Water warning
Fire warning
If you notice any abnormality
Power supply/Power cord
Assembly
Location
DMI-5 1/2

6•N3X Owner’s Manual
• Though the wooden parts of this instrument have been designed and produced
with care concerning the environment and human health, in some rare instances
customers may sense an unusual odor or develop irritation in the eyes, due to the
coating material and adhesive.
To avoid this, we recommend that you observe the following:
1. Specially ventilate the room for several days after unpacking and installing this
instrument, since it has been packed in airtight conditions in order to maintain
quality during transportation.
2. If the room housing the instrument is small, continue to ventilate it normally,
either daily or periodically.
3. If you have left the instrument in a closed room for a long time under high
temperature, ventilate the room, then lower the temperature if possible, before
using the instrument.
• Before connecting the instrument to other electronic components, turn off the
power for all components. Before turning the power on or off for all components,
set all volume levels to minimum.
• Be sure to set the volumes of all components at their minimum levels and
gradually raise the volume controls while playing the instrument to set the desired
listening level.
• Do not insert a finger or hand in any gaps on the fallboard or instrument. Also
take care that the fallboard does not pinch your finger.
• Do not apply excessive force when closing the fallboard.
A fallboard equipped with the SOFT-CLOSE™ mechanism closes the cover
slowly. Applying excessive force to the fallboard when closing it could damage
the SOFT-CLOSE™ mechanism, and possibly result in injury to your hands and
fingers caught under the closing fallboard.
• Never insert or drop paper, metallic, or other objects into the gaps on the
fallboard, panel or keyboard. This could cause physical injury to you or others,
damage to the instrument or other property, or operational failure.
• Do not rest your weight on, or place heavy objects on the instrument, and do not
use excessive force on the buttons, switches or connectors.
• Do not use the instrument/device or headphones for a long period of time at a
high or uncomfortable volume level, since this can cause permanent hearing loss.
If you experience any hearing loss or ringing in the ears, consult a physician.
• Do not place the bench in an unstable position where it might accidentally fall
over.
• Do not play carelessly with or stand on the bench. Using it as a tool or stepladder
or for any other purpose might result in accident or injury.
• Only one person should sit on the bench at a time, in order to prevent the
possibility of accident or injury.
• For benches that can be adjusted, do not adjust the bench height while sitting on
the bench, since this can cause excessive force to be imposed on the adjustment
mechanism, possibly resulting in damage to the mechanism or even injury.
• If the bench screws become loose due to extensive long-term use, tighten them
periodically using the specified tool in order to prevent the possibility of accident
or injury.
• Keep special watch over any small children so that they don’t fall off the rear of the
bench. Since the bench does not have a backrest, unsupervised use may result in
accident or injury.
Always turn the power off when the instrument is not in use.
NOTICE
To avoid the possibility of malfunction/ damage to the product, damage to data, or damage to other property, follow the notices below.
Handling
• Do not use the instrument in the vicinity of a TV, radio, stereo equipment, mobile phone, or other electric devices. Otherwise, the instrument, TV, or radio
may generate noise. When you use the instrument along with an application on your iPad, iPhone or iPod touch, we recommend that you set “Airplane
Mode” to “ON” on that device in order to avoid noise caused by communication.
• Do not expose the instrument to excessive dust or vibrations, or extreme cold or heat (such as in direct sunlight, near a heater, or in a car during the day)
to prevent the possibility of panel disfiguration, damage to the internal components or unstable operation. (Verified operating temperature range: 5° –
40°C, or 41° – 104°F.)
• Do not place vinyl, plastic or rubber objects on the instrument, since this might discolor the panel or keyboard.
• Bumping the surface of the instrument with metal, porcelain, or other hard objects can cause the finish to crack or peel. Use caution.
Maintenance
• When cleaning the instrument, use a soft and dry/slightly damp cloth. Do not use paint thinners, solvents, alcohol, cleaning fluids, or chemical-
impregnated wiping cloths.
• Gently remove dust and dirt with a soft cloth. Do not wipe too hard since small particles of dirt can scratch the instrument's finish.
• During extreme changes in temperature or humidity, condensation may occur and water may collect on the surface of the instrument. If water is left, the
wooden parts may absorb the water and be damaged. Make sure to wipe any water off immediately with a soft cloth.
Saving data
• Some of the data of this instrument (page 40) are retained when the power is turned off. However, the saved data may be lost due to some failure, an
operation mistake, etc.
• The Song data saved to the internal memory of this instrument (page 34) are retained when the power is turned off. However, the saved data may be lost
due to some failure, an operation mistake, etc. Save your important data onto USB flash drive/an external device such as a computer (pages 38, 43).
Before using a USB flash drive, make sure to refer to page 36.
• To protect against data loss through USB flash drive damage, we recommend that you save your important data onto spare USB flash drive or an external
device such as a computer as backup data.
Connections
Handling caution
Using the bench (If included)
Yamaha cannot be held responsible for damage caused by improper use or modifications to the instrument, or data that is lost or destroyed.
DMI-5 2/2

N3X Owner’s Manual •7
Information
About copyrights
• Copying of the commercially available musical data including but not limited to MIDI data and/or audio data is strictly prohibited except for your personal
use.
• This product incorporates and bundles contents in which Yamaha owns copyrights or with respect to which Yamaha has license to use others' copyrights.
Due to copyright laws and other relevant laws, you are NOT allowed to distribute media in which these contents are saved or recorded and remain virtually
the same or very similar to those in the product.
* The contents described above include a computer program, Accompaniment Style data, MIDI data, WAVE data, voice recording data, a score, score
data, etc.
* You are allowed to distribute medium in which your performance or music production using these contents is recorded, and the permission of Yamaha
Corporation is not required in such cases.
About functions/data bundled with the instrument
• Some of the preset songs have been edited for length or arrangement, and may not be exactly the same as the original.
About this manual
• The illustrations and displays as shown in this manual are for instructional purposes only, and may appear somewhat different from those on your
instrument.
• iPad, iPhone or iPod touch are trademarks of Apple Inc., registered in the U.S. and other countries.
• The company names and product names in this manual are the trademarks or registered trademarks of their respective companies.
Tuning
• Unlike an acoustic piano, this instrument does not need to be tuned by an expert (although the pitch can be user-adjusted to match other instruments).
This is because the pitch of digital instruments is always maintained perfectly. However, if you feel there is something abnormal concerning the keyboard
touch, contact your Yamaha dealer.
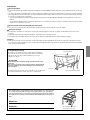
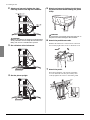
Transporting / Placing
If you move to another location, transport the instrument
horizontally. Do not lean it up against a wall or stand it up
side down. Do not subject the instrument to excessive
vibration or shock.
CAUTION
When moving the instrument, always hold the bottom of the
main unit.
Be sure not to hold the control panel located on the bottom left.
Improper handling can result in damage to the instrument or
personal injury.
To enhance the safety and to protect the floor, we recommend
to put the instrument on caster cups (for a grand piano).
Do not hold here.
Hold here.
Do not hold the control panel.
The model number, serial number, power requirements, etc., may be found
on or near the name plate, which is at the bottom of the unit. You should
note this serial number in the space provided below and retain this manual
as a permanent record of your purchase to aid identification in the event of
theft.
Model No.
Serial No.
(bottom_en_01)
The name plate is located
on the bottom of the unit.

8•N3X Owner’s Manual
Hybrid Piano
N3X
Combining over a century’s experience in crafting world-class pianos with the latest in advanced
technologies, Yamaha proudly introduces an instrument that is closer than ever to an actual
acoustic grand piano—equipped with every essential element pianists demand.
Authentic acoustic piano touch with special grand piano action and piano keyboard
An actual acoustic grand piano has an unmistakable rich expressive quality, thanks to its finely nuanced touch and
exceptional response. The remarkable AvantGrand N3X is the culmination of our many decades of expertise in
crafting grand pianos, and offers the discerning player a specially-developed grand piano action featuring a
configuration identical to the action of a real grand. The wood construction of the keyboard mirrors that of a grand
piano, and features the material ”Ivorite” for the white keys, giving them a texture amazingly close to that of natural
ivory. The result is a wonderfully expressive keyboard that provides an authentic touch and feel. In addition to a
hammer sensor, this instrument employs a non-contact key sensor that has no effect on the movement of the keys, yet
accurately recognizes the player's pressure on the keyboard, timing, and the other delicate nuances that affect musical
expression. Moreover, the TRS (Tactile Response System;
page 25) realistically reproduces the resonance of the
instrument, or the physical vibration that you feel from the keys or the pedals when you play a real grand piano.
Unique acoustic-sampling technique and speaker system
One of the most important factors in the resonance of an actual grand piano is the soundboard. Aiming to effectively
recreate that resonance, we sampled the grand piano voices utilizing Spatial Acoustic Sampling, which samples at
not only the left and right, but also center and rear positions. In addition, the installed speakers mimic the positions in
the grand piano from which the original samples were taken, and each of the speakers is equipped with its own
dedicated amplifier. This Spatial Acoustic Speaker System ensures optimum sound at the player's position, providing
more natural expression in the delicate nuances of each note. Moreover, a Soundboard Resonator, installed where the
music rest would be when laid flat, enhances the expressive response of the sound, providing a realistic response—
especially in the high notes.
The sound of several famous grand pianos in a single instrument Page 20
The AvantGrand N3X puts the sounds of several different renowned grand pianos at your fingertips, including the
CFX, Yamaha’s flagship concert grand piano, a Bösendorfer* Imperial, an instrument esteemed by pianists
throughout its long history, and more—each with its own distinctive appeal and sonic characteristics. Simply select
the particular piano sound desired, according to the music you intend to play or your personal preferences.
* Bösendorfer is a subsidiary company of Yamaha.
Natural sound distance sensation for headphone play Page 18
This instrument features a binaural sampling sound designed especially for use with headphones. Binaural sampling
is a method which uses two microphones placed where the ears of a performer would be, and records that piano
sound as it is. Listening to the sound created through this method with headphones gives the impression of being
immersed in the sound, as if it was actually emanating from the piano.

N3X Owner’s Manual •9
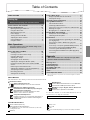
Table of Contents
About Manuals
This instrument has the following documents and instructional materials.
Included Documents
Owner’s Manual (this book)
This manual describes how to use this instrument.
Online Materials (from Yamaha Downloads)
iPhone/iPad Connection Manual (only in English,
French, German and Spanish)
Explains how to connect the instrument to smart
devices, such as an iPhone, iPad, etc.
Computer-related Operations
Includes instructions on connecting this instrument to a
computer, and operations related to transferring files
and MIDI data.
MIDI Reference
Contains MIDI related information such as MIDI Data
Format and the MIDI Implementation Chart.
MIDI Basics (only in English, French, German and
Spanish)
Contains basic explanations about MIDI.
To obtain these manuals, access the Yamaha Downloads, enter the
model name for searching the desired files.
Included Accessories
Owner’s Manual (this book)
Online Member Product Registration
The “PRODUCT ID” on the sheet will be needed when you fill out the
User Registration form.
Warranty*
Felt key cover
Power cord
Bench*
* May not be included depending on your area. Check with your Yamaha
dealer.
Yamaha Downloads http://download.yamaha.com/
PRECAUTIONS ....................................................... 5
Setting Up
Panel Controls and Terminals .................................. 10
Playing the Keyboard ................................................ 12
Opening/Closing the Fallboard....................................12
Using the Music Rest...................................................12
Opening/Closing the Lid ..............................................13
Power Supply ..............................................................14
Turning the Power On/Off............................................15
Adjusting the Master Volume.......................................17
Using Headphones......................................................18
Using the Pedals .........................................................19
Main Operations
Basic Operations and More ...................................... 20
Selecting a Voice.........................................................20
Listening to the Voice Demo Songs ............................21
Using the Metronome ..................................................22
Adjusting the Tempo....................................................23
Changing the Touch Sensitivity ...................................24
Adjusting the Strength of Vibration (TRS) ...................25
Playing the Realistic Resonance-enhanced VRM
Voices..........................................................................26
Enhancing the Sound with Reverb ..............................27
Adjusting the Brightness of the Sound (Brilliance) ......27
Transposing the Pitch in Semitones ............................28
Fine-tuning the Pitch....................................................29
Setting the Scale Tuning .............................................30
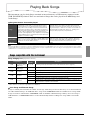
Playing Back Songs...................................................31
Songs compatible with this instrument........................ 31
Playing back Songs .................................................... 32
Recording Your Performance ...................................34
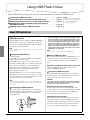
Using USB Flash Drives ............................................ 36
About USB Flash Drives ............................................. 36
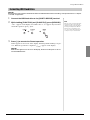
Formatting USB Flash Drive ....................................... 37
Copying User Songs in the Instrument to USB Flash Drive
.38
Deleting a Song file..................................................... 39
Managing files on a USB flash drive ........................... 39
Backup Data and Initializing ..................................... 40
Backup Data in Internal Memory................................. 40
Initializing the Backup Data......................................... 40
Connections ............................................................... 41
Connecting Audio Devices ([AUX IN] jack, AUX OUT
[L/L+R] [R] jacks) ........................................................ 41
Connecting to a Mixer—OUTPUT [L] [R] jacks
(Balanced)................................................................... 42
Connecting to a Computer ([USB TO HOST] terminal)
... 43
Connecting to an iPhone/iPad (MIDI [IN] [OUT]
connectors, [USB TO HOST] terminal) ....................... 43
Connecting External MIDI Devices (MIDI [IN] [OUT]
connectors) ................................................................. 44
Appendix
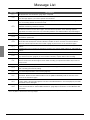
Message List .............................................................. 46
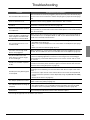
Troubleshooting......................................................... 47
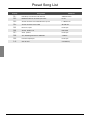
Preset Song List......................................................... 48
Assembling the Unit .................................................. 49
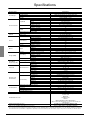
Specifications.............................................................52
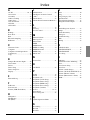
Index............................................................................ 53
Quick Operation Guide* ............................................54
* This is a quick reference for operation of the functions assigned to the buttons
and keyboard.
Getting started playing your new Avant Grand!
This section explains how to make detailed settings for the
instrument’s various functions.
This section includes a list of display messages, Quick
Operation Guide and other information.

10 • N3X Owner’s Manual
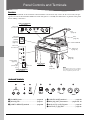
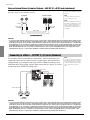
Panel Controls and Terminals
Overview
The jacks and terminals on the underside of the instrument as shown here may seem to be in reverse from your per-
spective in front of the instrument. Make sure when using these to carefully check the names as printed on the panel
before making connections.
Jacks and Terminals
q [PHONES] jacks .................................. page 18
w [AUX IN] jack........................................ page 41
e [USB TO DEVICE] terminal ................. page 36
r [USB TO HOST] terminal .....................page 43
t MIDI [IN] [OUT] connectors..........pages 43, 44
y AUX OUT [L/L+R] [R] jacks .................page 42
u OUTPUT [L] [R] jacks ..........................page 42
Stay
(page 13)
Jacks and Terminals
(See below.)
Lid
(page 13)
Music rest
(page 12)
Fallboard
(page 12)
Pedals
(page 19)
[AC IN]
connector
(page 14)
Power switch
(page 15)
Underneath
the instrument
<
Right
(toward higher
keys)
>
Towa rd
rear leg
>
Left
(toward lower
keys)
Underneath
the instrument
Underneath
the instrument
Control panel
(page 11)
Jacks and Terminals
(See below.)
NOTE
Do not place any objects on the soundboard
(area shaded in gray in the illustration above).
Doing so may adversely affect the sound.
Soundboard
qwe
ty ur
Setting Up

Panel Controls and Terminals
N3X Owner’s Manual •11
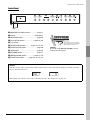
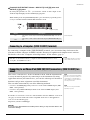
Control Panel
i [MASTER VOLUME] control ................ page 17
o Display.............................................See below.
!0 [RECORD] button ................................ page 35
!1 [PLAY/STOP] button..................... pages 32, 35
!2 [+]/[-] button
!3 [DEMO/SONG] button ........... pages 21, 32, 34
!4 [PIANO/VOICE] button ........................ page 20
!5 [TRS] button......................................... page 25
!6 [REVERB] button ................................. page 27
!7 [METRONOME] button ................ pages 22, 23
!8 [FUNCTION] button ..........pages 16, 27, 28, 29
i
o
!0 !1 !2 !3 !4 !5 !6 !7 !8
NOTICE
Do not pull on the [MASTER VOLUME] control to
slide out the control panel.
The control panel is located at
the bottom left of the instrument.
Slide the panel out to use it.
Display
Indicates various values such as Song number and Parameter value. Note that the display turns dark and cannot
be seen after the value is set.
This display also indicates various three-character messages. For details, refer to page 46.
d.01
5
Song number Parameter value

12 • N3X Owner’s Manual
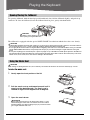
Playing the Keyboard
To open the fallboard, hold the hand grip with both hands, then lift the fallboard slightly, and push it up
and back. To close the fallboard, lower the fallboard back in place gently with both hands.
The fallboard is equipped with the special SOFT-CLOSE™ mechanism which closes the cover slowly.
CAUTION
• Hold the fallboard with both hands when opening or closing it. Do not release it until it is fully opened or closed. Be careful to
avoid catching fingers (yours or others, especially children’s) between the fallboard and the unit.
• Do not apply excessive force when closing the fallboard. Applying excessive force to the fallboard when closing it could dam-
age the SOFT-CLOSE™ mechanism, and possibly result in injury to your hands and fingers caught under the closing fall-
board.
• Do not place anything (such as metal objects or pieces of paper) on top of the fallboard. Small objects placed on the fallboard
may fall inside the unit when the fallboard is opened and may be nearly impossible to remove. Once inside, they could cause
electric shock, short circuit, fire or other serious damage to the instrument.
CAUTION
When raising or lowering the music rest, do not release your hands from the music rest until it is all the way up or down.
To raise the music rest:
1 Gently open the front portion of the lid.
2 Pull the music rest up and toward yourself until it
remains at the desired angle. The music rest is
latched at angles of 35 degrees and 70 degrees.
3 Open the music brace.
CAUTION
Do not apply excessive force to the music brace. Doing so could
release the stopper of the music rest and the music rest could be
lowered suddenly, possibly resulting in injury to your hands and fin-
gers caught under the music rest.
Opening/Closing the Fallboard
Using the Music Rest
CAUTION
Be careful to avoid catching your fingers
when opening/closing the fallboard.

Playing the Keyboard
N3X Owner’s Manual •13
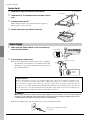
To lower the music rest:
1 Close the music brace.
2 Pull the music rest toward yourself as far as it will
go. When the music rest is at a 35 degree angle,
raise it to a 70 degree angle, then pull it toward
yourself.
3 Gently lower the music rest backward until it is all
the way down.
4 Gently close the front portion of the lid.
WARNING
Do not let children open or close the lid. Also, be careful to avoid catching fingers (yours or others, and especially those of chil-
dren) when raising or lowering the lid.
To open the lid
1 Gently open the front portion of the lid.
2 Hold the right side of the lid and raise it.
3 Raise the lid stay and carefully lower the lid so
that the end of the stay fits into the recess in the
lid.
WARNING
• Make sure that the end of the stay fits securely in the lid recess. If
the stay is not properly seated in the recess, the lid may fall, caus-
ing damage or injury.
• When the lid is open, do not place your head or other parts of your
body under it. Otherwise, severe injury could result if the lid
should fall.
• Be careful that you or others do not bump the stay while the lid is
raised. Also, make sure to close the lid when moving the instru-
ment. If bumped, the stay may be dislodged out of the lid recess
causing the lid to fall.
Opening/Closing the Lid
2
3
Do not hold here.
Hold here.
Lid stay

Playing the Keyboard
14 • N3X Owner’s Manual
To close the lid
1 Hold the lid stay and carefully raise the lid.
2 Hold the lid in its raised position and lower the lid
stay.
3 Carefully lower the lid.
When using the music rest, lower the music rest (page 13)
before going on to the next step.
4 Gently close the front portion of the lid.
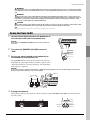
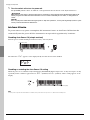
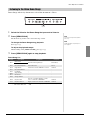
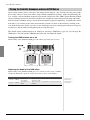
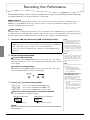
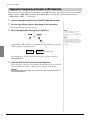
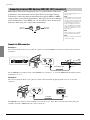
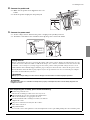
1 Make sure the power switch on the instrument is
set to the off position.
2 Connecting the power cord
2-1 Set the voltage selector and insert the power cord plug to
the [AC IN] connector. Refer to the “Panel Controls and
Terminals” on page 10 for information on the location of
the [AC IN] connector.
WARNING
Make sure your instrument is rated for the AC voltage supplied in the area in which it is to be used. (The voltage rat-
ing appears on the name plate on the bottom panel). Connecting the unit to an inappropriate AC supply can seri-
ously damage the internal circuitry and may even pose a shock hazard!
2-2 Insert the plug on the other end of the power cord to a standard AC outlet.
Power Supply
Voltage Selector
Before connecting the AC power cord, check the setting of the voltage selector which is provided in some
areas. To set the selector for 110V, 127V, 220V or 240V main voltages, use a “minus” screwdriver to rotate
the selector dial so that the correct voltage for your region appears next to the pointer on the panel. The volt-
age selector is set at 240V when the unit is initially shipped. After the proper voltage has been selected, con-
nect the AC power cord to the AC IN and an AC wall outlet. A plug adaptor may be also provided in some
areas to match the pin configuration of the AC wall outlets in your area.
3
1
2
Do not hold here.
Hold here.
Lid stay
Power switch: off
Voltage
Selector
[AC IN] connector
(The shape of the plug differs depending
on the locale.)

Playing the Keyboard
N3X Owner’s Manual •15
WARNING
Use only the AC power cord supplied with the instrument. If the supplied power cord is lost or damaged and needs
to be replaced, contact your Yamaha dealer. The use of an inappropriate replacement can pose a fire and shock haz-
ard!
WARNING
The type of AC power cord provided with the instrument may be different depending on the country in which the
instrument was purchased. (In some areas a plug adaptor may be provided to match the pin configuration of the AC
wall outlets in your area.) Do NOT modify the plug provided with the instrument. If the plug will not fit the outlet,
have a proper outlet installed by a qualified electrician.
CAUTION
When setting up the product, make sure that the AC outlet you are using is easily accessible. If some trouble or mal-
function occurs, immediately turn off the power switch and disconnect the plug from the outlet.
NOTE
When disconnecting the power cord, first turn off the power, then follow this procedure in reverse order.
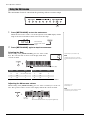
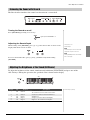
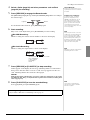
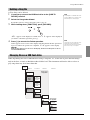
1 Grip the control panel located at the bottom left of
the instrument and slide it out towards you.
NOTICE
Do not pull on the [MASTER VOLUME] control to slide out the con-
trol panel.
2 Turn down the [MASTER VOLUME] control to
“MIN.”
3 Turn on the switch located on the bottom left of
the keyboard to turn the power on.
The [POWER] indicator located below the left end of the key-
board lights up. The display indicators flash in a pattern, indi-
cating the instrument is currently starting up, and stop flashing
when startup is completed.
NOTICE
Do not press any keys until the instrument has completely started up (approx. ten seconds after turning on the switch).
Doing so may cause some keys to not sound normally.
4 Playing the keyboard.
While playing the keyboard, adjust the volume level by using the [MASTER VOLUME] control located at the
left of the panel.
Turning the Power On/Off
Lights up
Off On
Power switch
Increases
the level.
Decreases
the level.

Playing the Keyboard
16 • N3X Owner’s Manual
5 Turn the switch off to turn the power off.
The [POWER] indicator turns off. Slide the control panel back into the bottom of the keyboard after use.
CAUTION
Even after the power switch is turned off, electricity is still flowing to the instrument at the minimum level. Remove the
electric plug from the outlet when the instrument is not to be used for extended periods of time, or during electrical
storms.
NOTICE
Press only the power switch when turning the power on. Any other operations, such as pressing the keys, buttons or ped-
als may cause the instrument to malfunction.
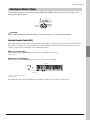
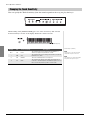
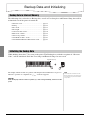
Auto Power Off function
To prevent unnecessary power consumption, this instrument features an Auto Power Off function that
automatically turns the power off if the instrument is not operated for approximately 30 minutes.
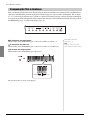
Disabling Auto Power Off (simple method)
Turn the power on while holding down the lowest key on the keyboard.
The indication “
PoF
” appears on the display briefly and Auto Power Off is disabled.
Disabling or enabling the Auto Power Off setting
While the power is on, simultaneously hold down the [FUNCTION] button and press the A5 key. Pressing the A5 key
repeatedly in this condition toggles between “
OFF
” (disabled) and “
On
” (enabled), and the setting appears on the
display.
NOTE
To turn the power on again after Auto Power Off has been enabled, turn the power switch to the off position once, and then back to the ON position.
Lowest key (A-1)
PoF
A5
Highest key (C7)

Playing the Keyboard
N3X Owner’s Manual •17
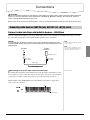
To adjust the volume level by using the [MASTER VOLUME] control located at the left of the panel
while playing the keyboard.
CAUTION
Do not use this instrument at a high volume level for a long period of time, or your hearing may be damaged.
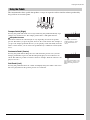
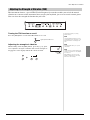
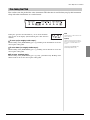
Intelligent Acoustic Control (IAC)
This function automatically adjusts and controls the sound quality according to the overall volume of the instrument.
Even when the volume is low, it permits both low sounds and high sounds to be clearly heard. Note that the IAC is
effective only from the sound output of the instrument speakers.
To turn on/off the IAC:
While holding down [FUNCTION], press the C0 key repeatedly (as necessary).
Default setting: On
To adjust the IAC Depth:
While holding down [FUNCTION], press one of the keys between A0–D#1.
Setting range: -3 (A0) – 0 (C1) – 3 (D#1)
Default setting: 0 (C1)
The higher the value, the more clearly that low and high sounds are heard at lower volume levels.
Adjusting the Master Volume
Increases
the level.
Decreases
the level.
C0 C1
(0)
A0
(-3)
D#1 (3)
Lowest
key (
A-1)

Playing the Keyboard
18 • N3X Owner’s Manual
Since this instrument is equipped with two [PHONES] jacks, you
can connect two sets of standard stereo headphones. If you are
using only one set of headphones, insert a plug into either jack;
this automatically shuts off the speakers.
CAUTION
Avoid listening to the instrument at a high volume level through headphones
for a long period of time, to prevent hearing damage.
NOTE
The TRS is turned off when headphones are connected. Press the [TRS] button to turn it on (page 25).
NOTE
When the TRS (page 25) is on, sound can be heard to some degree even when the headphones are connected.
Reproducing the Natural Sound Distance Sensation (when using Headphones)—Binaural Sampling
and Stereophonic Optimizer
This instrument features two advanced technologies that allow you to enjoy exceptionally realistic, natural sound,
even though listening on headphones.
Binaural Sampling (“CFX Grand” Voice only)
Binaural sampling is a method that uses two special microphones set at the ear position of a performer and records
the sound from a piano as it is. Listening to the sound with this effect through headphones gives the impression of
being immersed in the sound, as if it was actually emanating from the piano. Moreover, you can enjoy the sound
naturally for a long time without ear strain. When the default voice, “CFX Grand” (page 20) is selected, connecting
the headphones automatically enables the binaural sampling sound.
Stereophonic Optimizer (Voices other than “CFX Grand”)
The Stereophonic Optimizer is an effect which reproduces natural sound distance like the sound of binaural sam-
pling even though you hear it on headphones. When the voice except “CFX Grand” (page 20) is selected, connect-
ing the headphones makes this Stereophonic Optimizer effective.
Turning the Binaural Sampling and Stereophonic Optimizer function on/off
When headphones are connected, the sound from this instrument changed to the sound of Binaural Sampling or the
sound enhanced with the Stereophonic Optimizer. Since these sounds are optimized for listening with headphones,
we recommend that you set this function to “OFF” (as described below).
While holding down [PIANO/VOICE] button, press the C6 key repeatedly (if necessary) to turn this function on/off.
The specified value is shown on the display while both controls are held.
Default setting: On
Using Headphones
You should turn these functions off when:
• Playing the sound of this instrument with an external powered speaker system or a mixer, while monitoring the sound
output from this instrument on connected headphones.
• Making an audio recording (page 34) and then playing that recorded audio Song through speakers.
(Make sure to turn off these functions before audio recording.)
NOTE
Before connecting an external powered speaker system or a mixer, be sure to read “Using an External Stereo System for Playback—AUX OUT [L/L+R] [R] jacks (unbalanced)” (page
42) or “Connecting to a Mixer—OUTPUT [L] [R] jacks (Balanced)” (page 42).
Standard stereo
phone plug
C6
Highest key (C7)

Playing the Keyboard
N3X Owner’s Manual •19
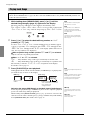
The instrument has three pedals that produce a range of expressive effects similar to those produced by
the pedals on an acoustic piano.
Damper Pedal (Right)
Pressing this pedal will sustain notes longer. Releasing this pedal immediately stops
(damps) any sustained notes. The damper pedal features a half-pedal function.
Half-pedal function
This function allows the sustain length to vary depending on how far the pedal is
pressed. The farther you press the pedal, the more the sound sustains. For example, if
you press the damper pedal and all notes you are playing sound a bit murky and loud
with too much sustain, you can release the pedal half way to subdue the sustain (murk-
iness).
Sostenuto Pedal (Center)
Pressing this pedal while holding the notes will sustain the pressed notes (as if the
damper pedal had been pressed), but all subsequently played notes will not be sus-
tained. This makes it possible to sustain a chord, for example, while the other notes are
played “staccato.”
Soft Pedal (Left)
Pressing this pedal will reduce the volume and slightly change the timbre of the notes.
The notes played before this pedal is pressed are not affected.
Using the Pedals
If you press and hold the
damper pedal here, all the
notes shown will be sus-
tained.
If you press and hold the soste-
nuto pedal here, only the notes
held at this timing will be sus-
tained.

20 • N3X Owner’s Manual
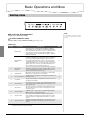
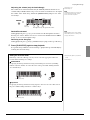
Basic Operations and More
To select the CFX Grand Voice:
Simply press [PIANO/VOICE].
To select a different Voice:
While holding down [PIANO/VOICE], press [+] or [-].
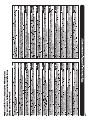
Voice List
*VRM: Simulated string resonance sound with physical modeling when the damper pedal is pressed or keys
are pressed. Refer to page 26 for details.
Selecting a Voice
NOTE
To understand the characteristics of various
voices, listen to demo songs for each voice
(page 21).
Display Voice name Descriptions VRM*
1
CFX Grand
Four-channel Voice featuring multi sampling of Yamaha’s
CFX flagship concert grand piano sound, with wide dynamic
range for maximum expressive control. It is suitable for play-
ing in any music genre and style. When headphones are
connected, this Voice is automatically changed to “Binaural
CFX Grand” (below).
Binaural CFX
Grand
Yamaha’s CFX flagship concert grand piano sound sampled
by Binaural Sampling, the method optimized for headphone
use. Listening this through headphones gives the impres-
sion of being immersed in the sound, as if it was actually
emanating from the piano. This Voice is selected automati-
cally when headphones are connected. Refer to page 18 for
details. (This Voice cannot be selected following the proce-
dure of “Selecting a Voice” instructions above.)
2
Bösendorfer
Imperial
The sound of the famed Vienna-made Bösendorfer flagship
grand piano, utilizing four-channel sampling. This Voice has
a rich and captivating sound, ideal for expressing the most
delicate and tender musical passages.
3
Bright Grand
Bright piano sound. Good for clear expression and “cutting
through” other instruments in an ensemble.
4
Bösendorfer Grand
The Bösendorfer grand piano sound with a lively attack and
brilliant presence.
5
Pop Grand
A bright, richly metallic sound ideal for pop music styles and
for playing in ensembles.
6
Stage E.Piano
The sound of an electric piano using hammerstruck metallic
“tines.” Soft tone when played lightly, and an aggressive tone
when played hard.
-
7
DX E.Piano
An electronic piano sound produced by an FM synthesizer.
The tone will change as you vary your playing touch. Ideal
for popular music.
-
8
Vintage E.Piano
A different type of electric piano sound than Stage E.piano.
Widely used in rock and popular music.
-
9
Harpsichord 8’
The sound of the instrument frequently used in baroque
music. Variations in playing touch will not affect the volume,
and a characteristic sound will be heard when you release
the key.
-
10
Harpsichord 8’+4’
A harpsichord with an added upper octave. Produces a more
brilliant sound. Variations in playing touch will not affect the
volume.
-
Main Operations
La pagina sta caricando ...
La pagina sta caricando ...
La pagina sta caricando ...
La pagina sta caricando ...
La pagina sta caricando ...
La pagina sta caricando ...
La pagina sta caricando ...
La pagina sta caricando ...
La pagina sta caricando ...
La pagina sta caricando ...
La pagina sta caricando ...
La pagina sta caricando ...
La pagina sta caricando ...
La pagina sta caricando ...
La pagina sta caricando ...
La pagina sta caricando ...
La pagina sta caricando ...
La pagina sta caricando ...
La pagina sta caricando ...
La pagina sta caricando ...
La pagina sta caricando ...
La pagina sta caricando ...
La pagina sta caricando ...
La pagina sta caricando ...
La pagina sta caricando ...
La pagina sta caricando ...
La pagina sta caricando ...
La pagina sta caricando ...
La pagina sta caricando ...
La pagina sta caricando ...
La pagina sta caricando ...
La pagina sta caricando ...
La pagina sta caricando ...
La pagina sta caricando ...
La pagina sta caricando ...
La pagina sta caricando ...
La pagina sta caricando ...
La pagina sta caricando ...
La pagina sta caricando ...
La pagina sta caricando ...
-
 1
1
-
 2
2
-
 3
3
-
 4
4
-
 5
5
-
 6
6
-
 7
7
-
 8
8
-
 9
9
-
 10
10
-
 11
11
-
 12
12
-
 13
13
-
 14
14
-
 15
15
-
 16
16
-
 17
17
-
 18
18
-
 19
19
-
 20
20
-
 21
21
-
 22
22
-
 23
23
-
 24
24
-
 25
25
-
 26
26
-
 27
27
-
 28
28
-
 29
29
-
 30
30
-
 31
31
-
 32
32
-
 33
33
-
 34
34
-
 35
35
-
 36
36
-
 37
37
-
 38
38
-
 39
39
-
 40
40
-
 41
41
-
 42
42
-
 43
43
-
 44
44
-
 45
45
-
 46
46
-
 47
47
-
 48
48
-
 49
49
-
 50
50
-
 51
51
-
 52
52
-
 53
53
-
 54
54
-
 55
55
-
 56
56
-
 57
57
-
 58
58
-
 59
59
-
 60
60


Yamaha N3X Manuale del proprietario
- Categoria
- Pianoforti digitali
- Tipo
- Manuale del proprietario
in altre lingue
- English: Yamaha N3X Owner's manual
- français: Yamaha N3X Le manuel du propriétaire
- español: Yamaha N3X El manual del propietario
- Deutsch: Yamaha N3X Bedienungsanleitung
- русский: Yamaha N3X Инструкция по применению
- Nederlands: Yamaha N3X de handleiding
- português: Yamaha N3X Manual do proprietário
- dansk: Yamaha N3X Brugervejledning
- čeština: Yamaha N3X Návod k obsluze
- polski: Yamaha N3X Instrukcja obsługi
- svenska: Yamaha N3X Bruksanvisning
- Türkçe: Yamaha N3X El kitabı
- suomi: Yamaha N3X Omistajan opas
- română: Yamaha N3X Manualul proprietarului
Documenti correlati
-
Yamaha VXS3F Guida d'installazione
-
Yamaha N2 Manuale utente
-
-
-
Yamaha NP-12 Manuale del proprietario
-
-
-
-
-