
www.ivt-ht.com | tools for every use
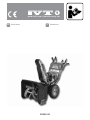
SNWB-252
EN
Snow blower
IT
Spazzaneve

2
EN
CONGRATULATION!
Dear customer,
IVT team would like to thank you for your choice and for
the condence you put in our product.
Our aim is always to offer an innovative, high-class-
strong and prize-adequate product to the customer.
We wish you’ll get much satisfaction from all your do-it-
yourself activities, by using this tool.
Your IVT Swiss SA Team
NOTE: Illustrations, gures, photos and contents might
vary slightly due to our program of continuous product
improvements.
IT
CONGRATULAZIONI!
Gentile cliente,
l’azienda IVT desidera ringraziarLa per la scelta e per la
ducia dimostrata nel nostro prodotto.
Il nostro obiettivo è offrire sempre prodotti innovativi che
garantiscano un adeguato rapporto qualità/prezzo.
Le auguriamo che i suoi lavori di bricolage possano
diventare un piacere, utilizzando il nostro prodotto.
La squadra IVT Swiss SA
Nota: illustrazioni, gure, foto e contenuti potrebbero
variare leggermente a causa del nostro programma di
continuo miglioramento del prodotto.

3

4
710 6 41 112
3
5
12
89
SNWB-252

5
6
[F1] [F2]
[F4][F3]

6
EN
Instruction manual
TOOL SPECIFICATIONS
Model SNWB-252
Rated power [W] 5200
Engine power [HP] 9
No-load speed [RPM] 3600
Displacement [cc] 252
N° of cylinders 1
N° of strokes 4
Type of engine cooling air-cooled
Employed fuel unleaded gasoline
Fuel tank capacity [L] 3.5
Fuel consumption [g/kWh] 395
Starting system manual / electric
Driving mode self-propelled
Engine manufacturer Loncin
Clearing width [mm] 711
Intake height [mm] 540
Throwing distance [m] 11
Throwing operation hand control
Throwing direction [°] 190
Numbers of gears 6 forward / 2 reverse
Adjustable snow deection [°] 50
Vibration level [m/s
2
] 4.682 (K=1.5)
Sound pressure level [dB(A)] 88.2 (K=3)
Sound power level [dB(A)] 103.62 (K=3)
Weight [Kg] 103
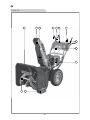
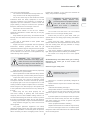
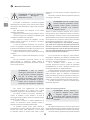
PART LIST
1. Drive control
2. Shift lever
3. Auger control
4. Chute directional control
5. Engine
6. Discharge chute
7. Chute deector
8. Skid shoe
9. Auger
10. Clean-out tool
11. Chute deector control
12. Light
CONTENT OF THE BOX
Instruction manual (1 pc), discharge chute (1 pc), chute
deector (1 pc), hardware assortment.
INTENDED USE
This tool is intended for sweeping the snow from paths
and streets.
SAFETY REGULATION FOR THE USE
General safety rules
The following listed safety instructions should serve you
for the right use of the tool and for the protection of your
own safety, therefore, please read this very carefully.
When passing this tool to a third person, these
instructions must be handed too.
Retain this user’s manual and all other literature
supplied with your tool for any future reference.
Comply with all the safety information and the warnings
on the tool.
Be familiar with the controls and the proper use of the
tool before attempting to use it and above all, make sure
you know how to stop to use it in case of emergency.
Following these simple instructions will also maintain

7
EN
Instruction manual
your tool in good working order.
∙ The tool must be assembled correctly before use.
∙ Only use the tool for its designed purposes.
∙ On the tool, there may be also decals and further
indications about the safety equipment to use that
must be considered. The prevention of accidents is
dependent upon the awareness, common sense and
proper training of everyone involved in the operation,
transport, maintenance and storage of the tool.
∙ Never leave the tool unattended.
∙ Never allow children to use the tool. Children
should be supervised to ensure that they do not play
with the tool.
∙ Keep children and pets away. All onlookers should
be kept at a safe distance away from the tool when it
is in use.
∙ The user is responsible for third parties while
working with the tool.
∙ People who aren’t acquainted with the operating
instructions, children, juveniles who have not yet
reached the minimum age for using this tool and people
under the inuence of alcohol, drugs or medication
are not allowed to use the tool. Local regulations may
restrict the age of the operator.
WARNING! The consumption of
alcohol, medication and drugs, plus
states of illness, fever and fatigue will
affect your ability to react. Do not use
this tool in any of these situations.
∙ Make sure that all the protective devices (if present)
are tted and are in good condition.
∙ Never operate the tool with defective safety devices
or guards (if present), or without safety devices in place.
∙ Inspect the entire tool to look for loose parts (e.g.
nuts, bolts, screws, etc.) and for any damage. Check
at frequent intervals if screws and bolts (if present)
are properly tight to be sure the equipment is in safe
working condition. Repair or replace them, if necessary,
before using the tool. Serious injury to the operator and
to the bystanders could result if there’s any damage to
the tool.
∙ While using the tool, dress properly. Do not
wear loose clothing or jewelery that could become
caught by the tool. Wear suitable working clothes. It is
recommended that legs and feet are covered, to protect
them from eventual ying debris. Do not work barefoot
or wearing open sandals. Long air should be tided back.
∙ Keep handles and grips dry, clean and free from
oil and grease.
∙ Use proper protective equipment. Use safety
glasses and safety gloves. Also use a dust mask during
pulverulent operations or if exhaust gases are present.
When necessary, use also non-slipping boots or shoes,
hardhat and earplugs. If the noise level exceeds 85
dB(A), ear protection is obligatory.
WARNING! Use personal protective
equipment! Safety devices and
personal protective equipment protect
your own health and the health of
others and ensure a trouble-free
operation of the tool.
∙ Do not start to use the tool if it is in an inverted
position or it is not in the right working order.
∙ Ensure that you have a good stand, while you
operate with the tool. Keep proper footing and balance
at all times.
∙ Keep work area clean. Cluttered areas invite
injuries. Before use, all foreign bodies must be removed
from the working area, also pay attention to foreign
objects during operation.
∙ Do not force the tool.
∙ Only work in daylight or sufciently good articial
light. Never operate the tool without good visibility.
∙ Be careful not to drop the tool or hit it against
obstacles.
ATTENTION! Stay alert. Watch what you are doing.
Distraction can cause you to lose control. Use
common sense.
Gasoline engine safety rules
WARNING! Petrol is highly ammable.
Handle fuel with care.
∙ Store fuel in containers specically designed for
this purpose.
∙ Refuel outdoors only and do not smoke while doing
this operation.
∙ Add fuel before starting the engine.
∙ Always allow mufer to cool before lling fuel tank.
∙ Never remove the cap of the fuel tank or add fuel
while the engine is running or when the engine is still
hot.
∙ If petrol is spilled, do not attempt to start the engine,
but move the machine away from the area of spillage
and avoid creating any source of ignition until petrol
fumes have dissipated.
∙ Clean up spilled fuel before restarting.
∙ Replace all fuel tanks and container caps securely.
∙ Do not run the engine indoor or in a conned space:
dangerous carbon monoxide fumes can collect. Exhaust
fumes are dangerous.

8
EN
Instruction manual
WARNING! Exhaust contains
poisonous carbon monoxide, a
colourless and odourless gas.
Breathing exhaust can cause loss of
consciousness and may lead to death.
Provide an adequate ventilation to
keep exhaust gas level as low as
possible.
∙ Never store the equipment with fuel in the tank
inside a building where fumes can reach an open ame
or spark.
∙ To reduce re hazard, keep the engine, silencer,
battery compartment and petrol storage area free of
vegetative material and excessive grease.
∙ The exhaust system gets hot enough to ignite
some materials. Keep ammable materials away from
the device.
∙ The mufer becomes very hot during operation and
remains hot for a while after stopping the engine. Be
careful not to touch the mufer while it is hot. Let the
engine cool before storing the machine indoors.
∙ Remove adjusting keys or wrenches before starting
the machine.
WARNING! During the use of certain
gasoline tools, some dust containing
chemicals known to cause cancer,
may occur.
Some of these chemicals are: lead from lead based
paints, crystalline silica from bricks and cement and
other masonry products, arsenic and chromium from
chemically treated lumber and other dangerous
products. If dust is present, your risk from these
exposures varies, depending on how often you do this
type of work.
To reduce your exposure to these chemicals, any
time you do pulverulent operations, work in a well
ventilated area and work with approved safety
equipment, such as dust masks that are specially
designed to lter out microscopic particles.
∙ If the machine strikes a foreign body, examine the
device for signs of damage and carry out any necessary
repairs before restarting and continuing to work.
∙ If the machine starts to vibrate abnormally, switch
off the motor and check for the cause immediately.
Vibration is generally a warning of trouble.
∙ Always turn off the machine and wait until the
machine completely stops whenever you leave
the machine, before carrying out maintenance,
before changing accessories, checking, cleaning,
troubleshooting or working on the machine.
∙ It is forbidden to move or modify any of the internal
parts of the machine.
Specic safety rules
CAUTION! This machine is capable
of amputating hands and feet and
throwing objects. Failure to observe
the following safety instruction could
result in serious injury or death.
Training
∙ Thrown objects can cause serious personal injury.
Plan your snow-throwing pattern to avoid discharge of
material toward roads and bystanders.
∙ Keep bystanders, helpers and pets at least 20
meters from the machine while it is in operation. Stop
machine if anyone enters the area.
∙ Exercise caution to avoid slipping or falling,
especially when operating in reverse mode.
Preparation
∙ Thoroughly inspect the area where the equipment
is to be used. Remove all doormats, newspapers, sleds,
wires and other foreign objects, which could be tripped
over or thrown by the auger.
∙ Disengage all clutch levers before starting the
engine.
Operation
∙ Never attempt to make any adjustments
while engine is running, except where specically
recommended in the operator’s manual.
∙ Let engine and machine adjust to outdoor
temperature before starting to clear snow.
∙ Do not put hands or feet near rotating parts, in
the auger housing or chute assembly. Contact with the
rotating parts can amputate hands and feet.
∙ The auger control is a safety device. Never bypass
its operation. Doing so makes the machine unsafe and
may cause personal injury.
∙ The controls must operate easily in both directions
and automatically return to the disengaged position
when released.
∙ Never operate with a missing or damaged chute
assembly. Keep all safety devices in place and working.
∙ Exercise extreme caution when operating on or
crossing gravel surface. Stay alert for hidden hazards
or trafc.
∙ Exercise caution when changing direction and
while operating on slopes.
∙ Plan your snow-throwing pattern to avoid discharge
towards windows, walls, cars etc. Thus avoiding
possible property damage or personal injuiry caused by
a ricochet.

9
EN
Instruction manual
∙ Never direct discharge at children, bystanders and
pets or allow anyone in front of the machine.
∙ Do not overload machine capacity by attempting to
clear snow at too fast of a rate.
∙ Always be sure of your footing and keep a rm hold
on the handles. Walk, never run.
∙ Disengage power to the auger when transporting
or not in use.
∙ Never operate machine at high transport speeds on
slipper surface. Look down and behind and use care
when in reverse.
∙ If the machine should start to vibrate abnormally,
stop the engine, disconnect the spark plug wire and
ground it against the engine. Inspect thoroughly for
damage.
∙ Disengage all controls and stop engine before
you leave the operating position (behind the handles).
Wait until the auger comes to a complete stop before
unclogging the chute assembly, making any adjustments
or inspections.
∙ Never touch a hot engine or mufer.
∙ Only operate the controls while the engine is
running.
∙ Never put your hand in the discharge or collector
openings. Always use the clean-out tool provided to
unclog the discharge opening. Do not unclog chute
assembly while engine is running. Shut off engine
and remain behind handles until all moving parts have
stopped before unclogging.
UNPACKING
When unpacking, check to make sure that all
components are included. Refer to the drawings on this
manual. If any parts are missing or broken, please call
an IVT assistance center.
CONTROL EXPLANATION
Drive control (1)
The drive control is located on the right handle. Squeeze
the drive control to engage the wheel drive. Release to
stop.
Shift lever (2)
The shift lever is used to determine both ground speed
and direction of travel. It can be moved into different
positions.
∙ Forward: your machine has some forward speeds,
with position number one being the slowest speed.
∙ Reverse: your machine has some reverse speeds,
with position number one being the slowest speed.
WARNING! Always release drive
control before changing speeds.
Auger control (3)
The auger control (3) is located on the left handle.
Squeeze the auger control (3) to engage the augers (9).
Release to stop the snow throwing action (drive control
must also be released).
Chute directional control (4) and chute deector
control (11)
The chute direction control (4) is located on the panel
of the machine.
To change the direction in which snow is thrown, turn
chute directional control (4) as follows:
∙ Crank clockwise to discharge to the right.
∙ Crank counterclockwise to discharge to the left.
Skid shoe (8)
The space between the shave plate and the ground can
be adjusted by positioning the skid shoes (8).
Clean-out tool (10)
Clean-out tool (10) helps you to clean out the clogged
chute assembly, never use your hands.
Shut off the engine (5) and remain behind handles until
all moving parts have stopped before unclogging.
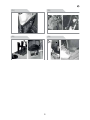
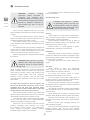
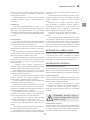
ASSEMBLY INSTRUCTIONS
Armrest [F1]
∙ First unscrew the nut, put in order four bores on the
upper armrest, plug in the bolt and screw it with a nut.
Connecting rod [F2]
∙ Pull out pinchcock and pin bearing, drill through a
bore on the connecting rod with a pin bearing, plug and
x the pinchcock in the pin bearing, and screw the other
side on the connecting rod with a nut.
Rocker [F3]
∙ Plug the rocker in the side of gimbal from the
armrest panel so that the rocker bore aims at the bore
on the gimbal, and then plug the pinchcock in.
Discharge chute (6) [F4]
∙ First unscrew the chute on the bolt, place it on the
chute seat, put down a xed block to aim with a bore,
and screw the xed block with a bolt.

10
EN
Instruction manual
PRE-OPERATION CHECK
WARNING! Before using your
machine for the rst time, be sure
that it is properly assembled. Check
that all parts are properly attached
and undamaged. If you are unsure
about the assembly or condition of
any of your machine parts, please call
customer service. Check that all parts
are attached and undamaged. Check
that all fasteners are tight.
∙ Check engine oil level with machine on level ground
and add gasoline
∙ Keep the area of operation free from foreign objects
that can be thrown by the auger (9) and or impeller
blades. Perform a thorough inspection of the area since
some objects may be hidden from view by surrounding
snow.
Wheel control
Before each use of your machine, check the wheel
pressure.
Over-inating could cause a wheel to burst and
cause severe bodily injury. The pressure can be
checked using an ordinary wheel pressure gauge.
Fill the wheels using a portable air compressor or
other compressed air source.
CAUTION! DO NOT OVER-INFLATE
THE WHEELS.
STARTING/STOPPING THE ENGINE (5)
Starting the engine (5) (a cold engine)
1. Turn the fuel valve lever to the ‘open’ position.
2. Turn the On/Off switch to the ON position (or insert
key into ignition switch if provided).
3. Place the throttle lever on ‘run position’ (
).
4. Fully move the choke lever to ‘closed position’ (
), if the engine (5) is cold.
5. Push the primer pump (if present) repeatedly few
minutes to prime the machine (ATTENTION! Avoid over
priming!).
NOTE: Do not use primer pump to start a warm engine.
6. Grasp the recoil starter handle and pull rope out
slowly until it pulls slightly harder. Let rope rewind
slowly. Pull recoil starter handle rapidly. Do not allow
the handle to snap back. Allow it to rewind slowly while
keeping a rm hold on the recoil starter handle.
7. As the engine starts and begins to operate evenly,
slowly move the choke control back to ‘open position’
(
) slowly. Allow a brief warm-up until engine runs
smoothly.
Electric starter
Determine that your house wiring is a three-wire
grounded system. Ask a licensed electrician if you are
not certain. If your house wiring system is not a three-
wire grounded system, do not use this electric starter
under any conditions.
WARNING: The electric starter is
equipped with a ground three-wire
power cord and plug and is designed
to operate on 230 volt AC household
current. It must be used with a properly
grounded three-prong receptacle at
all times to avoid the possibility of
electric shock. Follow all instructions
carefully prior to operating the electric
starter.
∙ If your home electrical system is grounded, but
a three-hole receptacle is not available, one should
be installed by a licensed electrician before using the
electric starter.
∙ If you have a grounded three-prong receptacle,
proceed as follows,
1. Push primer three times, making sure to cover vent
hole when pushing.
2. Move choke lever on the engine to “CHOKE”
position, and move on/off switch on the engine to “ON”
position.
3. Connect power cord to switch box on engine. Plug
the other end of power cord into a three-hole, grounded
230 volt AC receptacle.
4. Push starter button on the switch box to start the
engine.
5. When engine starts, release starter button, and
move choke lever on engine to “Run” position. If engine
falters, move choke lever immediately to “Choke” and
then gradually to “Run”
6. When disconnecting the power cord, always unplug
from the three–prong receptacle rst and then from the
snow thrower.
Stopping the engine (5)
When nished using your machine, perform the
following steps to shut it down.
1. Run the engine (5) for a few minutes to help dry off
any moisture on the engine (5). Stop the auger (9) by
releasing the left control handle.
2. Place the throttle lever on ‘slow position’ (
)
3. Set the engine (5) switch to the OFF position
(remove the ignition key if provided). This will stop the

11
EN
Instruction manual
engine (5).
4. Move the fuel valve lever to the OFF position.
5. Remove snow from the machine surfaces.
WARNING! Never store your machine
for extended periods of time with fuel
in the tank. Fuel stabilizer can be
added to the fuel to extend its shelf
life for storage.
Electric starter
∙ Connect power cord to switch box on engine, then
to 230 volt AC receptacle.
∙ With the engine running, push starter button and
spin the starter for several seconds. The unusual sound
made by spinning the starter will not harm engine or
starter.
∙ Disconnect the power cord from receptacle rst,
and then from switch box.
OPERATING INSTRUCTIONS
∙ Start your clearing path by throwing snow in a back
and forth motion. To clear in the opposite direction,
stop your machine and pivot it on its wheels to face the
opposite direction. Make sure to overlap clearing paths.
∙ If the machine hits an obstruction or picks up a
foreign object during use, stop the motor, remove the
obstruction, and inspect it for damage. Repair or replace
any damaged parts before restarting and operating with
machine.
∙ Determine the direction of the wind. If possible,
move in the same direction as the wind so that the snow
is not thrown against the wind, back into your face and
on the just cleared path.
∙ Do not walk in front of your running machine.
∙ Do not direct discharged snow towards bystanders.
∙ Do not apply additional man-made load to the
engine since this may damage the engine.
CAUTION! Do not use your hands to
unclog the machine.
NOTE: some parts of your machine may freeze under
extreme temperature conditions. Do not attempt to
operate your machine with frozen parts. If the parts
freeze while your machine is in use, stop your machine
and inspect the frozen parts. Thaw all parts before
restarting and operating your machine. Never force
parts or controls that have frozen. Never use an open
ame of any sort to thaw frozen parts.
Operation on pebbles, gravel or unpaved surfaces
To avoid throwing loose surface material along with the
snow, push down on the handle to raise the scraper at
the base of the unit above the pebbles or gravel.
Snow discharge direction
CAUTION! Never direct the snow
discharge chute (6) at the operator,
bystanders, vehicles or nearby windows.
The discharged snow and foreign
objects accidentally picked up by the
machine can cause serious damage
and severe bodily injury. Always point
the discharge chute (6) in the opposite
direction from potential hazards.
∙ The discharge chute (6) can be adjusted 190º by
rotating the chute directional control (4).
∙ Rotate the chute directional control (4) clockwise to
move the discharge chute (6) to the left.
∙ Counterclockwise to move the discharge chute (6)
to the right.
Skid shoes (8) adjustment
Adjustment of the skid shoes (8) governs the height
above the ground at which the auger shave plate
operates.
∙ For clearing snow from concrete, asphalt, and other
smooth surfaces, set the auger shave plate so that the
bottom of the shield scrapes the ground.
∙ For clearing snow from gravel, dirt, and other rough
surfaces to set the auger shave plate slightly above the
ground to avoid dirt and gravel from entering the auger
(9).
The optimal height of the shield will vary depending on
the type of surface being cleared. Surfaces with larger
gravel or stones would require a more raised auger
shield plate.
1. Make sure your machine is on a solid, smooth, and
level surface.
2. Place a spacer board on the ground underneath
the auger shave plate between the skid shoes (8). The
thickness of the board should be the same as the height
above the ground you wish to raise the auger shave
plate to. The skid shoes (8) should not touch the board.
3. Using a wrench, loosen the two nuts located on
each skid shoe (8) and allow the skid shoes (8) to slide
to the ground.
4. Re-tighten the nuts on the skid shoes (8) and wheel
your machine off of the spacer board.
Driving and auger (9) operation
1. Press down on the auger control (3) on the left-
hand side. The auger (9) should start spinning.

12
EN
Instruction manual
2. Press down on the drive control (1) on the right-
hand side. The machine should start moving in the
direction with the speed set by the shift lever (2).
3. When nished clearing a snow path, release the
auger control (3) and the drive control (1).
4. The drive speed can be adjusted by using the drive
shift lever (2). Be sure to release both the auger control
(3) and the drive control (1) before adjusting the shift
lever (2).
WARNING! Never change the speed
while your machine is moving. It could
damage the drive mechanism and void
the warranty.
Chute outlet direction adjustment
The angle of the chute deector (7) controls the throwing
distance of the snow leaving the chute. Raising the
angle will increase the throwing distance.
Lowering the angle will decrease the throwing distance.
1. Make sure the drive control (1) and auger control
(3) are released. The auger (9) has to come to a full
stop.
2. Loosen the knobs on the chute deector (7) and
adjust the chute deector (7) to the desired angle.Then
retighten the knobs on the chute deector (7). Do not
over-tighten.
SNOW THROWING TIPS
∙ Always operate the machine with the engine (5) at
full throttle. Full throttle offers the best performance.
∙ Go slower in deep, freezing or heavy wet snow.
Use the shift lever (2), not the throttle, to adjust speed.
∙ It is easier and more efcient to remove snow
immediately after it falls.
∙ The best time to remove snow is the early morning.
At this time the snow is usually dry and has not been
exposed to the direct sun and warming temperatures.
∙ Slightly overlap each successive path to ensure all
snow will be removed.
∙ Throw snow downwind whenever possible.
∙ Adjust the skid shoes (8) to proper height for current
snow conditions. For extremely heavy snow, reduce the
width of snow removal by overlapping previous path and
moving slowly.
∙ Keep engine (5) clean and clear of snow during
use. This will help air ow and extend engine (5) life.
WARNING! Do not operate machine if
weather conditions impair visibility.
Throwing snow during a heavy, windy
snowstorm can blind you and be
hazardous to the safe operation of the
machine.
MAINTENANCE AND STORAGE
CAUTION! Before carrying out any
maintenance operation, turn off
the engine and wait until it stops
completely.
∙ Always keep the tool and the ventilation slots (if
present) cleaned. Regular cleaning and maintenance of
the appliance will ensure efciency and prolong the life
of your tool.
∙ If the tool should fail despite the rigorous
manufacturing and testing procedures, the repair should
be carried out by an authorized IVT customer service.
∙ Keep all nuts, bolts, and screws tight, to be sure the
tool is in safe working condition.
∙ Replace worn or damaged parts for safety.
∙ Use only original spare parts. Parts not produced
by manufacturer may cause poor t and possible injury.
∙ Store the tool in a dry room out of reach of kids and
away from any ammable material.
∙ Store all fuel tanks securely. Never store the
equipment with fuel in the tank inside a building, where
fumes can reach an open ame or sparks.
IMPORTANT! Keep all grease and oil off of the
rubber friction wheel and aluminum drive plate.
∙ At least once a season, remove the shear pins on
the auger shaft. Spray lubricant inside the auger shaft
and lubricate the plastic auger bearings at least once
a season.
∙ Every season lubricate the auger bearings and the
bearings on the side of the frame with light oil.
∙ Lubricate at least once a season or after 25 hours
of operation. Remove the rear cover, lubricate any
chains, sprockets, gears, bearings, shafts, and shifting
mechanism at least once a season. Use engine oil or a
spray lubricant.
∙ The cams on the ends of the control rods which
interlock the drive control (1) and auger control (3)
accessed beneath the handle panel. Use a multi-
purpose automotive grease.
∙ The worm gear on the chute directional control
(4) should be greased with multipurpose automotive
grease.

13
EN
Instruction manual
∙ The gear case is lubricated with grease at the
factory and it does not require checking. If disassembled
for any reason, lubricated with 60ml of grease. Before
re-assembling, remove old sealant and apply new
sealant.
IMPORTANT! Do not overll the gear case, since
damage to the seals could result. Be sure the vent
plug is free of grease in order to relieve pressure.
Shave plate and skid shoe (8)
The shave plate and skid shoe (8) on the bottom of
the snow blower are subject to wear. They should be
checked periodically and replaced when necessary.
To remove skid shoe (8):
∙ Remove the carriage bolts and hex ange nuts.
∙ Reassemble new skid shoes (8) with the carriage
bolts and hex ange nuts.
To remove shave plate:
∙ Remove the carriage bolts and hex nuts.
∙ Reassemble new shave plate, making sure heads
of carriage bolts are to the inside of housing.
∙ Tighten securely.
Changing the engine oil
After the rst two hours and yearly, run the engine a
few minutes to warm the oil before changing it. Warm oil
ows better and carries more contaminants.
Change a spark plug
∙ Stop the engine and wait for all moving parts to
stop.
∙ Disconnect the wire from the spark plug.
∙ Clean around the spark plug.
∙ Remove the spark plug from the cylinder head.
NOTE: replace a cracked, fouled or dirty spark plug.
∙ Do not clean the electrodes because grit entering
the cylinder can damage the engine.
∙ Set the gap on the plug to 0.76 mm.
∙ Install the spark plug.
∙ Connect the wire to the spark plug.
Replacing the auger belt and drive belt
∙ Remove the belt cover on the front of the engine by
removing the self-tapping screws.
NOTE: drain the gasoline from the snow blower.
∙ Carefully pivot the machine up and forward so that
it rests on the auger housing. Remove the frame cover
from the underside of the machine by removing self-
tapping screws which secure it.
∙ For the drive belt, grasp the idler pulley and pivot it
toward the right.
∙ Roll the auger belt off the engine pulley.
For auger belt:
∙ Loosen and remove the shoulder screw.
∙ Unhook the support bracket spring from the frame.
∙ Remove the belt from around the auger pulley and
slip the belt between the support bracket and the auger
pulley.
NOTE: Do not forget to reinstall the shoulder screw
and reconnect the spring to the frame after installing a
replacement auger belt.
For drive belt:
∙ Lift the drive belt off engine pulley.
∙ Slip the drive belt off the pulley and between friction
wheel and friction wheel disc.
∙ Replace belt in the reverse order.
ENVIRONMENTAL PROTECTION
Recycle raw materials instead of
disposing as waste.
Tool, accessories and packaging should be sorted for
environment-friendly recycling.
The plastic components are labeled for categorized
recycling. These instructions are printed on recycled
paper manufactured without chlorine.
ATTENTION! DO NOT ATTEMPT TO REPAIR THE PRODUCT BY YOURSELF AND DO NOT
TAMPER WITH IT! Any operation of repairing or extraordinary maintenance must be carried
out only by a qualied and authorized IVT Service Centre. Do not try to modify any internal
part of the product! THIS WILL COMPLETELY VOID THE WARRANTY AND IT COULD CAUSE
SERIOUS INJURY AND DAMAGE

14
IT
Manuale di istruzioni
SPECIFICHE TECNICHE
Modello SNWB-252
Potenza nominale [W] 5200
Potenza del motore [HP] 9
Velocità a vuoto [RPM] 3600
Cilindrata [cc] 252
N° di cilindri 1
N° di tempi del motore 4
Sistema di raffreddamento ad aria
Tipo di carburante benzina senza piombo
Capacità del serbatoio carburante [L] 3.5
Consumo del carburante [g/kWh] 395
Sistema di avviamento manuale / elettrico
Sistema di guida semovente
Produttore del motore Loncin
Ampiezza di rimozione [mm] 711
Profondità massima [mm] 540
Distanza di lancio [m] 11
Operazione di lancio controllo manuale
Direzione di lancio [°] 190
Numero di marce 6 avanti / 2 indietro
Regolazione deviazione della neve [°] 50
Livello delle vibrazioni [m/s
2
] 4.682 (K=1.5)
Livello di pressione sonora [dB(A)] 88.2 (K=3)
Livello di potenza sonora [dB(A)] 103.62 (K=3)
Peso [Kg] 103
COMPONENTI
1. Leva di controllo dell’azionamento
2. Leva del cambio
3. Leva di controllo della coclea
4. Controllo direzionale dello scivolo
5. Motore
6. Scivolo di scarico
7. Deettore dello scivolo di scarico
8. Piastra di slittamento
9. Coclea
10. Strumento per la pulizia
11. Controllo del deettore
12. Luce a LED
CONTENUTO DELLA CONFEZIONE
Manuale d’istruzioni (1 pz), scivolo di scarico (1 pz),
deettore dello scivolo di scarico (1 pz), ferramenta.
UTILIZZO
Questo strumento è stato progettato per spazzare la
neve dai sentieri e dalle strade.
NORME DI SICUREZZA PER L’USO
Regole generali di sicurezza
Le seguenti istruzioni di sicurezza servono per il
corretto utilizzo dello strumento e per la tutela della
propria sicurezza, pertanto si prega di leggere molto
attentamente.
Quando si passa questo strumento ad una terza
persona, anche queste istruzioni devono essere
consegnate.
Conservare questo manuale di istruzioni e tutta la
documentazione in dotazione con lo strumento per farvi
riferimento in futuro, in caso di bisogno.
Integrare le seguenti norme di sicurezza con le
indicazioni riportate sul prodotto.
Prendere condenza con tutti i pulsanti e i controlli

15
IT
Manuale di istruzioni
e assicurarsi di conoscere il corretto utilizzo dello
strumento prima di iniziare a utilizzarlo, ma soprattutto
assicurarsi di sapere come interromperne l’uso in caso
di emergenza.
Seguire queste semplici istruzioni contribuirà inoltre a
mantenere lo strumento in buone condizioni di lavoro.
∙ Lo strumento deve essere montato correttamente
prima dell’uso.
∙ Usare lo strumento solamente per gli scopi per cui
è stato progettato.
∙ In aggiunta al prodotto sono state progettate anche
delle etichette di sicurezza che devono essere prese
in considerazione assieme con le indicazioni in merito
all’equipaggiamento di sicurezza che deve essere
adottato. La prevenzione di incidenti dipende dalla
consapevolezza, dal buon senso e dalla formazione
adeguata di tutti i soggetti coinvolti nell’utilizzo, nel
trasporto, nella manutenzione e stoccaggio dello
strumento.
∙ Non lasciare mai lo strumento incustodito.
∙ Non permettere ai bambini di utilizzare lo
strumento. I bambini devono essere tenuti sempre sotto
controllo per impedire che giochino con lo strumento.
∙ Tenere i bambini e gli animali domestici lontano.
I terzi devono essere mantenuti a un’opportuna
distanza di sicurezza quando lo strumento è in uso.
Interromperne l’utilizzo se vi sono nei paraggi altre
persone, specialmente bambini o animali domestici.
∙ L’utente è responsabile per i terzi, mentre lavora
con lo strumento.
∙ Le persone che non conoscono le istruzioni
per l’uso, i bambini, i minori che non hanno ancora
raggiunto l’età minima per l’utilizzo di questo strumento
e le persone sotto l’inuenza di alcool, droghe o
farmaci non sono autorizzati ad utilizzare lo strumento.
Alcune normative locali possono stabilire l’età minima
dell’utilizzatore.
ATTENZIONE! Il consumo di alcool,
farmaci e droghe, oltre a stati di
malattia, febbre e stanchezza possono
inuenzare la capacità di reagire. Non
usare lo strumento in una o più di
queste condizioni.
∙ Assicurarsi che tutti i dispositivi di protezione (se
presenti) siano montati correttamente e che siano in
buone condizioni.
∙ Non usare mai lo strumento con i dispositivi di
sicurezza o eventuali protezioni (se presenti) difettosi
o senza dispositivi di sicurezza correttamente montati.
∙ Ispezionare bene lo strumento per cercare parti
eventualmente allentate (per esempio: dadi, bulloni, viti,
etc) e eventuali danni. Controllare a intervalli frequenti,
che viti e bulloni siano adeguatamente serrati e che
le attrezzature siano in buone condizioni di lavoro.
Ripararle o sostituirle, se necessario, prima di utilizzare
lo strumento. Gravi lesioni all’operatore e ai presenti
possono vericarsi se vi è un danno allo strumento.
∙ Durante il funzionamento dello strumento, vestirsi
adeguatamente. Non indossare abiti larghi o gioielli
che potrebbero impigliarsi nello strumento. Indossare
indumenti da lavoro adatti. Si raccomanda che le
gambe e i piedi siano ben coperti, al riparo da eventuali
schegge durante il lavoro. Non utilizzare lo strumento
se si è a piedi nudi o con sandali aperti. I capelli lunghi
devono essere raccolti dietro la nuca.
∙ Mantenere tutte le impugnature e i manici asciutti,
puliti e privi di olio o grasso.
∙ Usare dispositivi di protezione. Usare occhiali
di protezione e guanti di sicurezza. Indossare anche
una mascherina antipolvere durante le operazioni
polverulente e se sono presenti gas di scarico. Quando
è necessario, indossare anche scarpe robuste e
antiscivolo, casco e tappi per le orecchie. Se il livello di
rumore supera 85 dB (A), è obbligatoria una protezione
acustica.
ATTENZIONE! Utilizzare dispositivi
di protezione personale! I dispositivi
di sicurezza e le attrezzature di
protezione personale proteggono la
propria salute e la salute degli altri
e garantiscono un funzionamento
senza problemi dello strumento.
∙ Non iniziare ad utilizzare lo strumento se questo è
capovolto o non è nella corretta posizione di lavoro.
∙ Accertarsi di avere una corretta posizione mentre si
opera con lo strumento. Mantenere una posizione salda
e un buon equilibrio in ogni momento.
∙ Tenere pulita l’area di lavoro. Prima dell’uso dello
strumento, tutti gli eventuali ostacoli devono essere
rimossi dalla zona di lavoro; prestare attenzione anche
a eventuali corpi estranei durante il lavoro.
∙ Non forzare lo strumento.
∙ Lavorare solo alla luce del giorno o comunque in
condizioni di sufciente illuminazione articiale. Non
utilizzare mai lo strumento senza una buona visibilità.
∙ Fare attenzione a non fare cadere lo strumento o
ad urtarlo contro ostacoli.
ATTENZIONE! Mantenere sempre un’attenzione
costante. Prestare attenzione a quello che si sta
facendo. La distrazione può causare la perdita di
controllo. Utilizzare il buon senso.
Regole di sicurezza per motori a benzina

16
IT
Manuale di istruzioni
ATTENZIONE! La benzina è altamente
inammabile. Maneggiare il
carburante con cura.
∙ Conservare il carburante in contenitori progettati
appositamente per questo scopo. Serrare bene il tappo
del serbatoio del carburante e il tappo della tanica del
carburante.
∙ Fare rifornimento solo all’aperto e non fumare
durante il rifornimento.
∙ Aggiungere il carburante prima di avviare il motore.
∙ Lasciare sempre che la marmitta si raffreddi prima
di riempire il serbatoio del carburante.
∙ Non rimuovere il tappo del serbatoio, né fare
benzina mentre il motore è in funzione o quando il
motore è ancora caldo.
∙ In caso di fuoriuscita di benzina, non avviare il
motore, ma spostare lo strumento lontano dalla zona di
fuoriuscita del carburante ed evitare l’accensione no a
che i vapori della benzina si saranno dissipati.
∙ Pulire il carburante fuoriuscito prima di riavviare la
macchina.
∙ Riporre tutti i contenitori del carburante in un luogo
sicuro.
∙ Non far funzionare il motore al chiuso o in uno
spazio limitato: ci potrebbero essere ristagni di
pericolose esalazioni di monossido di carbonio e fumi di
scarico molto dannosi.
ATTENZIONE! I fumi di scarico
contengono monossido di carbonio,
un gas incolore e inodore. Respirare
tale gas di scarico può causare
perdita di coscienza e può condurre
alla morte. Per mantenere il gas di
scarico ad un livello di sicurezza,
assicurare una ventilazione adeguata.
∙ Non riporre mai l’apparecchio con benzina
nel serbatoio all’interno di un edicio, dove i vapori
potrebbero raggiungere una amma libera o scintille.
∙ Per ridurre il rischio di incendio, mantenere il
motore, la marmitta, il vano batteria e la zona di
stoccaggio benzina pulita e tenere la macchina lontano
dal fuoco o da scintille.
∙ Il sistema di scarico si scalda abbastanza da
riuscire ad inammare alcuni materiali. Tenere il
dispositivo lontano da materiali inammabili.
∙ La marmitta diventa molto calda durante il
funzionamento e rimane calda per alcuni minuti dopo
l’arresto del motore. Fare attenzione a non toccare
la marmitta quando è ancora molto calda. Lasciar
raffreddare il motore prima di riporre il dispositivo al
chiuso.
∙ Rimuovere eventuali chiavi di regolazione prima di
accendere la macchina.
ATTENZIONE! Durante l’utilizzo degli
utensili a benzina, potrebbero essere
prodotte alcune polveri contenenti
sostanze chimiche che possono
causare il cancro.
Alcune di queste sostanze chimiche sono: vernici a
base di piombo, silice cristallina di mattoni e cemento e
altri prodotti per muratura, arsenico e cromo derivanti da
legname trattato chimicamente e altri prodotti pericolosi.
Se tali polveri sono presenti, il rischio varia in base alla
lunghezza dell’esposizione e al tipo di lavoro.
Per ridurre l’esposizione a tali sostanze chimiche,
ogni volta che si compiono operazioni polverulente,
lavorare in una zona ben ventilata con dispositivi di
sicurezza approvati, come le maschere anti-polvere,
che sono state appositamente progettate per ltrare
anche le particelle microscopiche.
∙ Se con lo strumento si colpisce un corpo estraneo,
esaminare il dispositivo per individuare eventuali danni
e procedere con tutte le riparazioni necessarie prima di
riavviare e continuare a lavorare.
∙ Se lo strumento inizia a vibrare in modo
anomalo, spegnere il motore e cercare di individuare
immediatamente la causa. Vibrazioni anomale sono
dovute generalmente a malfunzionamenti.
∙ Spegnere sempre la macchina e attendere che essa
si sia completamente arrestata prima di allontanarsi
dalla macchina, prima di effettuare manutenzione,
prima di cambiare gli accessori, prima di procedere con
operazioni di controllo, pulizia, risoluzione problemi e
prima di effettuare qualsiasi intervento sulla macchina.
∙ È proibito modicare o rimuovere qualsiasi parte
interna del dispositivo.
Regole di sicurezza speciche
ATTENZIONE! Questa macchina è
in grado di amputare mani e piedi
e scagliare oggetti. La mancata
osservanza delle seguenti istruzioni
di sicurezza può causare lesioni gravi
o mortali.
Istruzioni
∙ Gli oggetti lanciati possono provocare gravi lesioni
personali. Posizionare il modello di spazzaneve al ne di
evitare il lancio di materiale verso le strade e gli astanti.
∙ Tenere gli astanti, gli aiutanti e gli animali domestici

17
IT
Manuale di istruzioni
almeno a 20 metri di distanza dalla macchina mentre
è in funzione. Fermare la macchina se qualcuno si
avvicina all’area di lavoro.
∙ Prestare attenzione in modo da evitare di scivolare
o cadere, soprattutto mentre si utilizza l’attrezzo in
retromarcia.
Preparazione
∙ Controllare approfonditamente la zona in cui
l’attrezzo va usato e spostare eventuali zerbini, giornali,
slittini, cavi o altri oggetti estranei, in cui si potrebbe
inciampare o che potrebbero essere gettati dalla coclea.
∙ Togliere le marce e mettere in folle prima di avviare
il motore.
Funzionamento
∙ Non tentare mai di apportare eventuali modiche
mentre il motore è in funzione, salvo dove espressamente
raccomandato nel manuale dell’operatore.
∙ Lasciare che il motore e la macchina si adattino
alla temperatura esterna prima di iniziare a rimuovere
la neve.
∙ Non mettere le mani o i piedi vicino alle parti rotanti,
nella sede della coclea o nello scarico. Il contatto con le
parti rotanti potrebbe amputare mani e piedi.
∙ Il controllo della coclea è un dispositivo di sicurezza.
Non ignorare il suo funzionamento. In questo modo si
rende la macchina non sicura e si possono provocare
lesioni personali.
∙ I comandi devono operare agevolmente in
entrambe le direzioni e ritornare automaticamente nella
posizione di disinnesto quando vengono rilasciati.
∙ Non utilizzare mai la macchina con uno scarico
mancante o danneggiato. Mantenere tutti i dispositivi di
sicurezza installati e funzionanti.
∙ Prestare la massima attenzione quando si lavora
sopra o attraverso una supercie ghiaiosa. Stare
sempre attenti ai pericoli nascosti o al trafco.
∙ Prestare attenzione durante i cambi di direzione e
durante il funzionamento in pendenza.
∙ Posizionare il modello di spazzaneve in modo da
evitare lo scarico verso nestre, muri, automobili ecc
evitando così possibili danni all’ambiente circostante o
lesioni personali causate da un rimbalzo.
∙ Non posizionare mai lo scarico verso i bambini,
i passanti e gli animali domestici e non permettere a
nessuno di posizionarsi di fronte alla macchina.
∙ Non sovraccaricare la capacità della macchina
cercando di spalare la neve troppo velocemente.
∙ Assicurare sempre i vostri piedi e mantenere
una presa sicura sulle impugnature. Camminare, non
correre.
∙ Disinnestare l’alimentazione alla coclea durante il
trasporto o quando la macchina non è in uso.
∙ Non utilizzare mai la macchina ad una velocità di
trasporto elevata su una supercie scivolosa. Guardare
in basso e dietro e prestare attenzione quando è in
retromarcia.
∙ Se la macchina dovesse iniziare a vibrare in modo
anomalo, spegnere il motore e scollegare il lo della
candela. Ispezionare a fondo per cercare eventuali
danni.
∙ Sganciare tutti i controlli e spegnere il motore
prima di lasciare la postazione di lavoro (dietro le
impugnature). Attendere che la coclea arrivi ad un
arresto completo prima di sbloccare il gruppo dello
scarico, di effettuare regolazioni o ispezioni.
∙ Non toccare mai il motore caldo o la marmitta.
∙ Azionare i comandi solo mentre il motore è in
funzione.
∙ Non mettere mai le mani nelle aperture dello scarico
o del collettore. Utilizzare sempre lo strumento di pulizia
per sbloccare l’apertura dello scarico. Non sbloccare
lo scarico mentre il motore è in funzione. Spegnere il
motore e rimanere dietro le impugnature no a quando
tutte le parti mobili si sono fermate prima di sbloccare.
ESTRARRE DALL’IMBALLAGGIO
Quando si apre la confezione, assicurarsi che tutti
i componenti siano inclusi. Consultare le istruzioni
su questo manuale. Per eventuali parti mancanti o
danneggiate, si prega di contattare l’assistenza IVT.
ISTRUZIONI SUI CONTROLLI
Controllo dell’azionamento (1)
Il controllo dell’azionamento (1) è situato sull’impugnatura
destra. Premere il comando di trazione per innestare la
trazione integrale. Rilasciare per arrestare la macchina.
Leva del cambio (2)
La leva del cambio è utilizzata per determinare sia la
velocità di avanzamento sia la direzione di marcia. Può
essere spostata in differenti posizioni.
∙ Avanti: la macchina ha alcune marce in avanti,
dove la posizione numero uno è la velocità più bassa.
∙ Indietro: la macchina ha alcune velocità di
retromarcia, dove la posizione numero uno è la velocità
più bassa.
ATTENZIONE! Rilasciare sempre il
controllo dell’azionamento prima di
cambiare velocità.
Controllo della coclea (3)
Il controllo della coclea (3) è situato sull’impugnatura
sinistra. Premere il controllo della coclea (3) per attivare
le coclee (9). Rilasciare per fermare il lancio della neve
(il controllo dell’azionamento deve essere rilasciato).

18
IT
Manuale di istruzioni
Controllo direzionale dello scivolo (4) e controllo
del deettore (11)
Il controllo direzionale dello scivolo (4) è posizionato sul
pannello della macchina.
Per cambiare la direzione di lancio della neve, girare il
controllo direzionale dello scivolo (4) come segue:
∙ Far girare in senso orario per lanciare a destra.
∙ Far girare in senso antiorario per lanciare a sinistra.
Piastra di slittamento (8)
Lo spazio tra la piastra di rasatura e il terreno può
essere regolata posizionando la piastra di slittamento
(8).
Strumento per la pulizia (10)
Lo strumento di pulizia (10) consente di pulire lo scarico
intasato, non usare mai le mani.
Spegnere il motore (5) e rimanere dietro alle impugnature
no a quando tutte le parti mobili si saranno fermate
prima di sbloccare.
ISTRUZIONI DI MONTAGGIO
Braccetto [F1]
∙ Prima svitare il dado, allineare i quattro fori al
braccetto superiore, collegare il bullone e la vite con un
dado.
Biella [F2]
∙ Estrarre il perno e il cuscinetto del perno, avvitare
attraverso il foro sulla biella con un cuscinetto, inserire
e ssare il pin nel cuscinetto e avvitare l’altro lato della
biella con un dado.
Bilanciere [F3]
∙ Inserire il bilanciere nel lato del giunto cardanico dal
pannello del braccetto in modo che il foro del bilanciere
miri al foro sul giunto cardanico e quindi collegare il pin.
Scivolo di scarico (6) [F4]
∙ Dapprima svitare lo scivolo dal bullone, posizionarlo
sulla sede dello scivolo, posizionare un blocchetto sso
da puntare al foro e avvitare il blocchetto sso con un
bullone.
OPERAZIONI PRELIMINARI
ATTENZIONE! Prima di utilizzare la
macchina per la prima volta, assicurarsi
che sia montata correttamente.
Vericare che tutte le parti siano ssate
correttamente e non danneggiate. Se
si è incerti in merito all’assemblaggio
o alla condizione di uno dei pezzi
meccanici, si prega di chiamare il
servizio clienti. Vericare che tutte le
parti siano collegate e non danneggiate.
Controllare che tutti i dispositivi di
ssaggio siano ben serrati.
∙ Controllare il livello dell’olio motore con la macchina
in piano e aggiungere benzina.
∙ Mantenere l’area di funzionamento libera da oggetti
estranei che possono essere lanciati dalla coclea
(9) e/o dalle lame della girante. Eseguire un controllo
approfondito della zona dal momento in cui alcuni
oggetti possono essere nascosti alla vista dalla neve
circostante.
Controllo delle ruote
Prima di ogni utilizzo della macchina, controllare la
pressione delle ruote.
Un eccessivo gonaggio potrebbe causare lo
scoppio della ruota e provocare gravi lesioni
personali. La pressione può essere controllata con
un normale manometro per ruote. Gonare le ruote
mediante un compressore d’aria portatile o altra
fonte di aria compressa.
ATTENZIONE! NON GONFIARE
ECCESSIVAMENTE LE RUOTE.
ACCENSIONE / SPEGNIMENTO DEL
MOTORE (5)
Accensione del motore (5) (motore freddo)
1. Girare la leva della valvola del carburante in
posizione ‘aperto’.
2. Girare l’interruttore di accensione / spegnimento
in posizione ON (o inserire la chiave nel blocchetto di
accensione se previsto).
3. Posizionare la leva dell’acceleratore sulla
‘posizione di veloce’ (
).
4. Spostare completamente la leva dell’aria nella
‘posizione di chiusura’ (
), se il motore (5) è freddo.
5. Premere la pompa di adescamento (se presente)
ripetutamente per pochi minuti per innescare la

19
IT
Manuale di istruzioni
macchina (ATTENZIONE! Evitare un eccessivo
adescamento!).
NOTA: non utilizzare mai la pompa d’adescamento per
avviare un motore caldo.
6. Afferrare l’impugnatura per l’avviamento a strappo
e tirare la corda lentamente no a quando diventa più
dura. Lasciare che la corda si riavvolga lentamente.
Tirare l’impugnatura per l’avviamento a strappo
rapidamente. Non lasciare che scatti indietro. Lasciare
riavvolgere lentamente, mantenendo una stretta
costante sull’impugnatura per l’avviamento a strappo.
7. Quando il motore si avvia e comincia a girare
in modo uniforme, spostare lentamente il comando
dell’aria in ‘posizione di apertura’ (
). Lasciare
brevemente che il motore si scaldi no a quando
funziona uniformemente.
Avviamento elettrico
Assicurarsi che il cablaggio in casa sia un sistema
di messa a terra a tre li. Chiedere a un elettricista
qualicato se non si è certi. Se il sistema di cablaggio
in casa non è un sistema di messa a terra a tre li,
non utilizzare questo avviamento elettrico in qualsiasi
condizione.
ATTENZIONE: L’avviamento elettrico
è dotato di un cavo di alimentazione a
tre li di terra e spina ed è progettato
per funzionare con 230 Volt a
corrente alternata per la casa. Deve
essere utilizzato con una messa
a terra a tre poli in ogni momento
per evitare la possibilità di scosse
elettriche. Seguire tutte le istruzioni
attentamente prima di attivare il
motorino di avviamento elettrico.
∙ Se il sistema elettrico di casa è a terra, ma non
è a tre fori, dovrebbe esserne installato uno da un
elettricista qualicato prima di usare il motorino di
avviamento elettrico.
∙ Se si dispone di una messa a terra a tre poli,
procedere come segue:
1. Spingere il primer tre volte, facendo attenzione a
coprire il foro di sato in fase di spinta.
2. Spostare la leva dell’aria del motore in posizione
“CHOKE” e portare l’interruttore di accensione /
spegnimento in posizione “ON”.
3. Collegare il cavo di alimentazione alla scatola
dell’interruttore sul motore. Collegare l’altra estremità
del cavo di alimentazione ad una presa a tre fori, con
una presa di corrente messa a terra a 230 volt.
4. Premere il pulsante di avviamento sulla scatola
dell’interruttore per avviare il motore.
5. Quando il motore si avvia, rilasciare il pulsante
di avviamento e spostare la leva dell’accensione
in posizione RUN. Se il motore esita, spostare la
leva dell’aria immediatamente su CHOKE e poi
gradualmente su RUN.
6. Per scollegare il cavo di alimentazione, staccare
dalla presa a tre poli e poi dal spazzaneve.
Spegnimento del motore (5)
Una volta terminato di utilizzare la macchina, effettuare
le seguenti operazioni per spegnerla.
1. Far girare il motore (5) per alcuni minuti per far
asciugare l’eventuale umidità sul motore (5). Fermare
la coclea (9) rilasciando la manopola di comando a
sinistra.
2. Posizionare la leva dell’acceleratore sulla
‘posizione di lento’ (
).
3. Impostare l’interruttore del motore (5) in posizione
OFF (rimuovere la chiave di accensione se previsto).
Questo fermerà il motore (5).
4. Spostare la leva della valvola del carburante in
posizione OFF.
5. Rimuovere la neve dalle superci della macchina.
ATTENZIONE! Non riporre la
macchina per lunghi periodi di tempo
con il carburante nel serbatoio. Può
essere aggiunto al carburante uno
stabilizzatore del combustibile per
prolungare la vita per lo stoccaggio.
Spegnimento elettrico
∙ Collegare il cavo di alimentazione alla scatola
dell’accensione sul motore, poi ad una presa di corrente
a 230 volt.
∙ Con il motore acceso, premere il pulsante di
avviamento e far girare il motorino di avviamento per
alcuni secondi. Il suono insolito fatto facendo girare
il motorino di avviamento non danneggia il motore o
l’avviamento.
∙ Dapprima scollegare il cavo di alimentazione dalla
presa e poi dalla scatola dell’interruttore.
ISTRUZIONI OPERATIVE
∙ Iniziare a pulire il sentiero gettando neve con un
movimento avanti e indietro. Per pulire nella direzione
opposta, fermare la macchina e farla ruotare per andare
in direzione opposta. Assicurarsi di coprire i percorsi
puliti.
∙ Se la macchina colpisce un ostacolo o prende un
oggetto estraneo durante l’utilizzo, arrestare il motore,
rimuovere l’ostruzione e controllare che non sia
danneggiata. Riparare o sostituire le parti danneggiate
prima di riavviare ed operare con la macchina.
∙ Determinare la direzione del vento. Se possibile,

20
IT
Manuale di istruzioni
muoversi nella stessa direzione del vento in modo che
la neve non venga gettata contro vento, sul viso e sul
percorso appena pulito.
∙ Non camminare davanti alla macchina in corsa.
∙ Non dirigere la neve gettata verso gli astanti.
∙ Non applicare nessun carico articiale
supplementare al motore (5), in quanto ciò potrebbe
danneggiare il motore (5).
ATTENZIONE! Non usare le mani per
sbloccare la macchina.
NOTA: alcune parti della macchina potrebbero
congelare a temperature estreme. Non tentare di far
funzionare la macchina con le parti congelate. Se le
parti congelano mentre la macchina è in uso, fermare la
macchina e ispezionare le parti congelate. Scongelare
tutti i componenti prima di riavviare e far funzionare la
macchina. Non forzare mai parti o controlli che si sono
congelati. Non usare mai amme libere di qualsiasi tipo
per disgelare le parti congelate.
Operazione su ciottoli, ghiaia o superci non
asfaltate
Per evitare di gettare il materiale della supercie da
pulire insieme alla neve, spingere verso il basso la
maniglia per sollevare il raschiatore alla base della
macchina sopra i ciottoli o la ghiaia.
Direzione di scarico della neve
ATTENZIONE! Non dirigere mai
lo scivolo di scarico (6) verso gli
operatori, gli astanti, i veicoli o le
nestre vicine. La neve scaricata e i
corpi estranei presi accidentalmente
dalla macchina potrebbero causare
seri danni e gravi lesioni personali.
Puntare sempre lo scivolo di scarico
(6) nella direzione opposta ai
potenziali pericoli.
∙ Lo scivolo di scarico (6) può essere regolato
ruotando di 190º la leva di controllo direzionale dello
scarico (4).
∙ Ruotare la leva di controllo direzionale dello scarico
(4) in senso orario per spostare lo scivolo di scarico (6)
a sinistra.
∙ Antiorario per spostare lo scivolo di scarico (6) a
destra.
Regolazione della piastra di slittamento (8)
La regolazione della piastra di slittamento (8) regola
l’altezza dal suolo alla piastra di rasatura della coclea.
∙ Per la pulizia su cemento, asfalto e altre superci
lisce, impostare la piastra di rasatura della coclea in
modo che il fondo dello scudo tocchi terra.
∙ Per lo sgombero della neve da ghiaia, sporcizia
e altre superci ruvide impostare la piastra di rasatura
della coclea leggermente al di sopra del terreno per
evitare che sporco e ghiaia entrino nella coclea (9).
L’altezza ottimale dello scudo varierà a seconda del tipo
di supercie da pulire. Superci con ghiaia più grande
o più pietre richiederebbero che la piastra di rasatura
della coclea sia più sollevata.
1. Assicurarsi che la macchina sia su una supericie
solida, liscia e piana.
2. Posizionare un bordo distanziale a terra sotto
la piastra di rasatura della coclea tra le piastre di
slittamento (8). Lo spessore del bordo dovrebbe essere
lo stesso dell’altezza tra il suolo e il punto a cui si
desidera alzare la piastra di rasatura della coclea. La
piastra di slittamento (8) non deve toccare il bordo.
3. Con una chiave, allentare i due dadi che si trovano
su ogni piastra di slittamento (8) così da permettere che
le piastre di slittamento (8) scivolino a terra.
4. Serrare i dadi sulle piastre di slittamento (8) e sulle
ruote e togliere la macchina dal bordo distanziale.
Operazioni di guida e coclea (9)
1. Premere il controllo della coclea (3) situato sul lato
sinistro dei comandi. La coclea (9) dovrebbe iniziare a
girare.
2. Premere la leva di controllo dell’azionamento
(1) situato sul lato destro dei comandi. La macchina
dovrebbe iniziare a muoversi nella direzione desiderata
con la velocità impostata con la leva del cambio (2).
3. Una volta nito di pulire un sentiero dalla neve,
rilasciare la leva di controllo della coclea (3) e la leva di
controllo dell’azionamento (1).
4. La velocità del disco può essere regolata tramite
la leva del cambio (2). Assicurarsi di rilasciare sia il
controllo della coclea (3) sia il controllo motore (1) prima
di regolare la leva del cambio (2).
ATTENZIONE! Non cambiare mai la
velocità, mentre la macchina è in
movimento. Si potrebbe danneggiare
il meccanismo di azionamento e
invalidare la garanzia.
Regolazione della direzione di uscita dello scivolo
L’angolo del deettore dello scivolo (7) controlla la
distanza di proiezione della neve lanciata dallo scivolo.
Aumentando l’angolo aumenta la distanza di lancio.
Diminuendo l’angolo diminuisce la distanza di lancio.
1. Assicurarsi che la leva di controllo dell’azionamento
(1) e la leva di controllo della coclea (3) vengano
La pagina si sta caricando...
La pagina si sta caricando...
La pagina si sta caricando...
La pagina si sta caricando...
-
 1
1
-
 2
2
-
 3
3
-
 4
4
-
 5
5
-
 6
6
-
 7
7
-
 8
8
-
 9
9
-
 10
10
-
 11
11
-
 12
12
-
 13
13
-
 14
14
-
 15
15
-
 16
16
-
 17
17
-
 18
18
-
 19
19
-
 20
20
-
 21
21
-
 22
22
-
 23
23
-
 24
24


in altre lingue
- English: IVT SNWB-252 User manual
Documenti correlati
Altri documenti
-
Ariens 924126-ST11526DLE Manuale utente
-
Bolens 31AE9P3J565 Manuale del proprietario
-
Simplicity 722 7HP WB SNOWTHROWER, SNO PRO 522 WB Manuale utente
-
-
Stanley SPT-163-560 Manuale utente
-
-
Husqvarna Sneeuwmachine8024STE Manuale utente
-
-
McCulloch PM105 Manuale utente