
© Copyright 2019 ATEN
®
International Co., Ltd.
ATEN and the ATEN logo are trademarks of ATEN International Co., Ltd. All rights reserved. All
other trademarks are the property of their respective owners.
Part No. PAPE-1223-R20G Printing Date: 08/2019
2/4-Port USB3.0 4K HDMI KVMP
™
Switch
Quick Start Guide
CS1822/CS1824
Support and Documentation Notice
All information, documentation, fi rmware,
software utilities, and specifi cations contained in
this package are subject to change without prior
notifi cation by the manufacturer.
To reduce the environmental impact of our
products, ATEN documentation and software can
be found online at
http://www.aten.com/download/
Technical Support
www.aten.com/support
이 기기는 업무용(A급) 전자파적합기기로서 판매자 또는 사용자는 이 점을
주의하시기 바라며, 가정외의 지역에서 사용하는 것을 목적으로 합니다.
EMC Information
FEDERAL COMMUNICATIONS COMMISSION INTERFERENCE
STATEMENT:
This equipment has been tested and found to comply with the limits
for a Class A digital device, pursuant to Part 15 of the FCC Rules.
These limits are designed to provide reasonable protection against
harmful interference when the equipment is operated in a commercial
environment. This equipment generates, uses, and can radiate radio
frequency energy and, if not installed and used in accordance with
the instruction manual, may cause harmful interference to radio
communications. Operation of this equipment in a residential area
is likely to cause harmful interference in which case the user will be
required to correct the interference at his own expense.
FCC Caution: Any changes or modifi cations not expressly approved by
the party responsible for compliance could void the user's authority to
operate this equipment.
Warning: Operation of this equipment in a residential environment
could cause radio interference.
This device complies with Part 15 of the FCC Rules. Operation is subject
to the following two conditions:(1) this device mat not cause harmful
interference, and(2) this device must accept any interference received,
including interference that may cause undesired operation.
Important. Before proceeding, download the Installation and
Operation Manual by visiting the website, www.aten.com and
navigating to the product page. The manual includes important
warnings, loading specifi cations and grounding instructions.
Scan for
more information
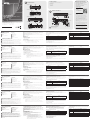
Package Contents
1 CS1822/CS1824 2/4-Port USB3.0 4K HDMI KVMP™ Switch
2/4 HDMI 2.0 Cables
2/4 USB 3.0 Cables
2/4 Audio Cables
1 Power Adapter
1 User Instructions
B
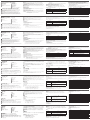
Hardware Installation
A
Hardware Review
To prevent damage to your installation
from power surges or static electricity,
it is important that all connected
devices are properly grounded.
CS1822 Front View
CS1824 Front View
CS1822 Rear View
CS1824 Rear View
21 3
4
5
1 2
1
432
21 3
1
4
32
6
7
4
5
6
7
6
CS1824 (Front)
CS1824 (Rear)
1
9
5 8
7
3
2
4 8
A
Description de l’appareil
Vue de face
1
Boutons-poussoirs de sélection des ports
2
Voyants des ports
3
Port audio
4
Port périphérique USB 3.1 Gen 1
Vue de dos
1
Port série RJ-11
2
Section ports console
3
Section ports KVM
4
Prise terre
5
Prise d’alimentation
6
Port audio
7
Port périphérique USB 3.1 Gen 1
B
Installation matérielle
1
Mettez le CS1822/CS1824 à la terre en connectant l’une des extrémités d’un fi l de terre à la prise
terre et l’autre extrémité du fi l à un objet approprié mis à la terre.
2
Branchez votre clavier USB et votre souris USB sur les ports USB de la console situés sur le panneau
arrière de l’appareil.
3
Branchez votre moniteur sur le port HDMI de la console situé sur le panneau arrière de l’appareil et
allumez-le.
4
Branchez vos haut-parleurs sur la prise haut-parleur de la console située sur le panneau avant de l’appareil.
Le câble audio doit être connecté côté CPU pour que cette connexion fonctionne.
5
Branchez vos haut-parleurs sur le port audio de la console situé sur le panneau arrière de l’appareil.
Les haut-parleurs branchés sur le panneau avant ont priorité sur ceux branchés sur le panneau
arrière.
6
À l’aide du câble HDMI, branchez le connecteur HDMI sur une prise HDMI disponible dans la section
port KVM du commutateur. Branchez le câble USB 3.0 et le câble des haut-parleurs sur les prises
correspondantes.
7
À l’autre extrémité des câbles de l’étape 6, branchez le câble HDMI, le câble USB 3.0 et le câble du
haut-parleur sur leurs ports respectifs de l’ordinateur.
8
(Optionnel) Branchez vos périphériques USB sur les ports de périphérique USB avant
ou arrière.
9
Branchez l’adaptateur secteur fourni avec votre commutateur sur une source d’alimentation CA, puis
branchez le câble de l’adaptateur secteur sur la prise d’alimentation du commutateur.
10
Allumez les ordinateurs.
Fonctionnement
Commutation manuelle du port
Pour amener complètement la cible (audio, KVM et USB) sur l’ordinateur, appuyez sur le
bouton-poussoir de sélection des ports correspondant à cet ordinateur.
Commutation à la souris
Pour la sélection du port à la souris : Double-cliquez sur la molette de défi lement de votre souris USB
pour basculer de façon cyclique entre les ports.
Remarque : 1. La commutation à la souris est uniquement prise en charge par les souris à 3 boutons
avec molette de défi lement USB.
2. La commutation à la souris est désactivée par défaut.*
3. La commutation à la souris n’est prise en charge que lorsque l’émulation de la souris
est activée.
*Consultez la section Mode de réglage des touches raccourci pour activer la
commutation à la souris.
Commutation par touche de raccourci
Tous les commutateurs de port de raccourcis commencent en appuyant deux fois sur la touche [Arrêt
Défi lement] . Le tableau ci-dessous décrit les actions que chaque combinaison effectue.
Remarque : Si l’utilisation de la touche [Arrêt Défi lement] crée un confl it avec les autres programmes
exécutés sur l’ordinateur, vous pouvez plutôt utiliser la touche [Ctrl].
Commutation par touche de raccourci
Raccourci Action
1. [Arrêt défil] [Arrêt
défil] [Entrée]
Déplace la cible KVM, concentrateur USB et audio du port sur lequel se trouve
actuellement la cible KVM jusqu'au port suivant sur le commutateur.
(de 1 à 2 ; de 2 à 1 pour le CS1822 ; de 1 à 2 ; de 2 à 3 ; de 3 à 4 ;
de 4 à 1 pour le CS1824).
2. [Arrêt défil] [Arrêt
défil] [n] [Entrée]
Déplace la cible KVM, concentrateur USB et audio vers l’ordinateur connecté au
port correspondant à l’ID port indiqué.
Remarque : Le n représente le numéro d’ID port de l’ordinateur (CS1822 : 1 ou 2. CS1824 :
1, 2, 3, ou 4).
Mode de réglage des touches de raccourci (HSM)
Le mode de réglage des touches de raccourci est utilisé pour régler les fonctions du commutateur.
Appelez l’HSM puis appuyez sur une touche du tableau ci-dessous. Suivez les étapes ci-dessous pour
appeler l’HSM et exécuter une fonction de raccourci.
1. Appuyez sur la touche [Verr num] et maintenez-la.
2. Appuyez et relâchez la touche [-].
3. Relâchez la touche [Verr num].
4. Appuyez sur la touche de raccourci pour exécuter la fonction souhaitée. Reportez-vous au tableau ci-
dessous pour la fonction.
Commutateur KVMP™ CS1822/CS1824 2/4-Port USB3.0 4K HDMI
www.aten.com
Tableau récapitulatif HSM
Touche Fonction
[E] Active / désactive la fonction d’alimentation sur détection.
[M] Active / désactive l’émulation de la souris.
[N] Active / désactive l’émulation du clavier.
[T]
Bascule entre les touches de commutation de port par défaut ([Arrêt défi l] [Arrêt
défi l]) et ([Ctrl] [Ctrl]) en alternative.
[W] Active / désactive la commutation de port à la souris.
[X][Entrée] Active / désactive la touche de raccourci de la commutation de port.
[u][p][g][r][a][d][e]
[Entrée]
appelle le mode de mise à niveau du fi rmware.
[F4]
Imprime les réglages actuels du commutateur via un éditeur de texte ou un
traitement de texte.
A
Hardwareübersicht
Ansicht von vorn
1
Portwahl-Drucktasten
2
Port-LEDs
3
Audioport
4
USB 3.1 Gen 1-Peripheriegeräteport
Ansicht von hinten
1
Serieller RJ-11-Port
2
Abschnitt Konsolenports
3
Abschnitt KVM-Ports
4
Erdungsklemme
5
Netzadapterbuchse
6
Audioport
7
USB 3.1 Gen 1-Peripheriegeräteport
B
Installation der Hardware
1
Erden Sie den CS1822/CS1824, indem Sie ein Ende der Erdungsleitung an die Erdungsklemme und
das andere Ende der Erdungsleitung an einen geeigneten geerdeten Gegenstand anschließen.
2
Verbinden Sie Ihre USB-Tastatur und Ihre USB-Maus mit den USB-Konsolenports auf der Rückseite
des Geräts.
3
Verbinden Sie Ihren Monitor mit dem HDMI-Konsolenport auf der Rückseite des Geräts und schalten
Sie ihn anschließend ein.
4
Verbinden Sie Ihre Lautsprecher mit der Konsolenlautsprecherbuchse auf der Vorderseite des Geräts.
Damit diese Verbindung funktioniert, müssen Sie CPU-seitig Audiokabel anschließen.
5
Verbinden Sie Ihre Lautsprecher mit dem Audiokonsolenport auf der Rückseite des Geräts. Die auf
der Vorderseite des Geräts angeschlossenen Lautsprecher haben vor den auf der Rückseite des
Geräts angeschlossenen Lautsprechern Priorität.
6
Stecken Sie den HDMI-Stecker eines HDMI-Kabels in eine verfügbare HDMI-Buchse des Switch-
Abschnitts KVM-Ports. Verbinden Sie das USB 3.0-Kabel und das Lautsprecherkabel mit den
entsprechenden Buchsen.
7
Stecken Sie die noch freien Stecker des HDMI-, USB 3.0- und Lautsprecherkabels aus Schritt 6 in den
jeweils für sie vorgesehenen Ports des Computers.
8
(Optional) Verbinden Sie Ihre USB-Peripheriegeräte mit den USB-Peripheriegeräteports auf der Vorder-
oder Rückseite des Geräts.
9
Stecken Sie den mit Ihrem Switch mitgelieferten Netzadapter in eine Netzsteckdose und anschließend
dessen Stecker in die Stromversorgungsbuchse des Switches.
10
Schalten Sie die Computer ein.
Bedienung
Manuelle Portumschaltung
Drücken Sie die dem Computer entsprechende Portauswahldrucktaste, um ihn vollständig zu fokussieren
(Audio, KVM und USB).
Mausumschaltung
Für die Mausportauswahl: Doppelklicken Sie das Scrollrad Ihrer USB-Maus, um sich durch die Ports zu
bewegen.
Hinweis: 1. Die Mausumschaltung wird nur von USB-Scrollradmäusen mit 3 Tasten unterstützt.
2. Standardmäßig ist die Mausumschaltung deaktiviert.*
3. Die Mausumschaltung wird nur unterstützt, wenn die Mausemulation aktiviert ist.
*Siehe Abschnitt Hotkey-Einstellmodus für die Aktivierung der Mausumschaltung.
Hotkey-Umschaltung
Jede Hotkey-Portumschaltung beginnt mit dem zweimaligen Antippen der [Scroll Lock]-Taste.
Die nachstehende Tabelle beschreibt, welche Aktion durch die einzelnen Kombinationen
durchgeführt wird.
Hinweis: Wenn die Benutzung der [Scroll Lock]-Taste zu Konfl ikten mit anderen auf dem Computer
ausgeführten Programmen führt, dann können Sie auch alternativ die [Strg]-Taste benutzen.
Hotkey-Umschaltung
Hotkey Aktion
1. [Scroll Lock]
[Scroll Lock] [Enter]
Ändert den aktuell fokussierten KVM-, USB-Hub- und Audioport auf den
nächsten Port des Switches.
(1 zu 2; 2 zu 1 beim CS1822; 1 zu 2; 2 zu 3; 3 zu 4; 4 zu 1 beim CS1824).
2. [Scroll Lock]
[Scroll Lock]
[n] [Enter]
Ändert den KVM-, USB-Hub- und Audiofokus auf den Computer, der an dem
Port angeschlossen ist, der der zugehörigen Port-ID entspricht.
Hinweis: Das n bezeichnet die Port-ID des Computers (CS1822: 1 oder 2. CS1824: 1, 2, 3 oder 4).
Hotkey-Einstellmodus (HSM)
Mit dem Hotkey-Einstellmodus können Sie die Funktionen auf dem Switch einstellen. Rufen Sie HSM auf
und drücken Sie anschließend eine der in nachstehender Tabelle beschriebenen Tasten. Folgen Sie den
nachstehenden Schritten, um HSM aufzurufen und eine Hotkey-Funktion auszuführen.
1. Halten Sie die [Num Lock]-Taste gedrückt.
2. Drücken Sie die [-]-Taste und lassen Sie sie wieder los.
3. Lassen Sie die [Num Lock]-Taste los.
4. Drücken Sie die entsprechende Hotkey-Taste, um die gewünschte Funktion auszuführen. Sehen Sie
bzgl. der Funktionen in nachstehender Tabelle nach.
CS1822/CS1824 2/4-Port-KVMP™-Switch mit USB 3.0 und 4K HDMI
www.aten.com
Tabelle HSM-Zusammenfassung
Taste Funktion
[E] Aktivierung / Deaktivierung der Einschalterkennung.
[M] Aktivierung / Deaktivierung der Mausemulation.
[N] Aktivierung / Deaktivierung der Tastaturemulation.
[T]
Umschalten zwischen der standardmäßigen Portumschaltungstastenkombination
([Scroll Lock] [Scroll Lock]) und der alternativen Portumschaltungstastenkombinat
ion ([Strg] [Strg]).
[W] Aktivierung / Deaktivierung der Mausportumschaltung.
[X][Enter] Aktivierung / Deaktivierung der Hotkey für die Portumschaltung.
[u][p][g][r][a][d][e]
[Enter]
Aufruf des Modus Firmwareaktualisierung.
[F4]
Ausgabe der aktuellen Switch-Einstellungen über einen Texteditor oder ein
Textverarbeitungsprogramm.
A
Reseña del hardware
Vista frontal
1
Botones de selección de puerto
2
Indicadores de puertos
3
Puerto de audio
4
Puerto periférico USB 3.1 de 1.ª generación
Vista posterior
1
Puerto serie RJ-11
2
Sección de puertos de consola
3
Sección de puertos KVM
4
Toma de tierra
5
Entrada de alimentación
6
Puerto de audio
7
Puerto periférico USB 3.1 de 1.ª generación
B
Instalación del hardware
1
Conecte a tierra el dispositivo CS1822/CS1824 acoplando uno de los extremos de un cable de toma
de tierra al borne de tierra y el otro extremo del cable a un objeto apropiado conectado a tierra.
2
Conecte su teclado USB y ratón USB a los puertos USB de consola ubicados en el panel posterior de
la unidad.
3
Conecte su monitor en el puerto HDMI de consola ubicado en el panel posterior de la unidad y
enciéndalo.
4
Conecte sus altavoces en el conector jack de consola para altavoces ubicado en el panel frontal de
la unidad. Es necesario conectar el cable de audio en el lado correspondiente a la CPU para que la
conexión funcione.
5
Conecte sus altavoces en el puerto de audio de consola ubicado en el panel posterior de la unidad.
Los altavoces conectados en el panel frontal tienen prioridad sobre los conectados en el panel
posterior.
6
Usando el cable HDMI, enchufe el conector HDMI en un conector hembra HDMI disponible en
la sección de puertos KVM del conmutador. Conecte el cable USB 3.0 y el cable del altavoz a los
conectores hembra correspondientes.
7
En cuanto al otro extremo de los cables referidos en el paso 6, enchufe el cable HDMI, el cable USB
3.0 y el cable del altavoz en sus puertos respectivos del ordenador.
8
Opcionalmente, conecte sus periféricos USB en los puertos periféricos USB frontales o posteriores.
9
Conecte el adaptador de corriente provisto con su conmutador a una fuente de alimentación
de corriente alterna y, luego, conecte el cable del adaptador de corriente en el conector jack de
alimentación del conmutador.
10
Encienda los ordenadores.
Funcionamiento
Conmutación manual de puertos
Para centrarse totalmente (audio, KVM y USB) en un ordenador, pulse el pulsador de selección de puerto
correspondiente a dicho ordenador.
Cambio de ratón
Selección del puerto del ratón: Pulse dos veces la rueda de desplazamiento de su ratón USB para
seleccionar sucesivamente los puertos.
Nota: 1. El cambio de ratón solo es compatible con los ratones USB con rueda de desplazamiento
y 3 botones.
2. El cambio de ratón está desactivado por defecto. *
3. La compatibilidad del cambio de ratón depende de que la emulación de ratón
esté activada.
* Consulte la sección «Modo de confi guración de teclas de acceso directo» para activar el
cambio de ratón.
Conmutación mediante una tecla de acceso directo
Todos los cambios de puerto mediante una tecla de acceso directo se realizan pulsando primeramente
la tecla [Bloq Despl] dos veces. En la siguiente tabla se describen las acciones que se ejecutan con cada
combinación.
Nota: Si el uso de la tecla [Bloq Despl] entra en confl icto con otros programas ejecutándose en el
ordenador, es posible usar la tecla [Ctrl] en su lugar.
Conmutación mediante una tecla de acceso directo
Tecla de acceso directo Acción
1. [Bloq Despl] [Bloq Despl]
[Entrar]
Traslada la centralización del concentrador USB, KVM y audio del puerto
que actualmente tiene dicha centralización del KVM al próximo puerto
del conmutador
(de 1 a 2 y de 2 a 1 en el dispositivo CS1822. De 1 a 2; 2 a 3; 3 a 4, y 4
a 1 en el dispositivo CS1824).
2. [Bloq Despl] [Bloq Despl]
[n] [Entrar]
Centraliza el concentrador USB, KVM y audio en el ordenador conectado
al puerto correspondiente al id. de puerto especifi cado.
Nota: La n se refi ere al número de id. de puerto del ordenador (CS1822: 1 o 2. CS1824: 1, 2, 3 o 4).
Modo de confi guración de teclas de acceso directo
El modo de confi guración de teclas de acceso directo se usa para establecer funciones en el conmutador.
Ejecute el modo de confi guración de teclas de acceso directo y, luego, pulse una de las teclas incluidas en
la siguiente tabla. Realice los siguientes pasos para ejecutar el modo de confi guración de teclas de acceso
directo y realizar una función de tecla de acceso directo.
1. Mantenga pulsada la tecla [Bloq Num].
2. Pulse y suelte la tecla [-].
Conmutador KVMP™ CS1822/CS1824 de 2/4 puertos USB 3.0 4K HDMI
www.aten.com
3. Suelte la tecla [Bloq Num].
4. Pulse la tecla de acceso directo para ejecutar la función deseada. Consulte las funciones en la tabla
siguiente.
Tabla de resumen del modo de confi guración de teclas de acceso directo
Tecla Función
[E] Activa/desactiva la alimentación al detectar.
[M] Activa/desactiva la emulación del ratón.
[N] Activa/desactiva la emulación del teclado.
[T]
Alterna entre las teclas de conmutación de puertos por defecto ([Bloq Despl] [Bloq
Despl]) y las teclas de conmutación de puertos alternativos ([Ctrl] [Ctrl]).
[W] Activa/desactiva la conmutación del puerto del ratón.
[X][Entrar] Activa/desactiva la tecla de acceso directo de conmutación del puerto.
[u][p][g][r][a][d][e]
[Entrar]
Ejecuta el modo de actualización del fi rmware.
[F4]
Imprime la confi guración actual del conmutador mediante un editor de textos o
un procesador Word.
A
Panoramica hardware
Vista anteriore
1
Pulsanti di selezione porte
2
LED porte
3
Porta Audio
4
Porta periferica USB 3.1 Gen 1
Vista posteriore
1
Porta seriale RJ-11
2
Sezione porte console
3
Sezione porte KVM
4
Terminale di messa a terra
5
Presa di alimentazione
6
Porta Audio
7
Porta periferica USB 3.1 Gen 1
B
Installazione hardware
1
Effettuare la messa a terra del CS1822/CS1824 collegando un’estremità del cavo di messa a terra al
terminale di terra e l’altra estremità del cavo a un oggetto opportunamente collegato a terra.
2
Inserire la tastiera e il mouse USB nelle porte console USB situate sul pannello posteriore dell'unità.
3
Inserire il monitor nella porta console HDMI situata sul pannello posteriore dell'unità e accenderlo.
4
Inserire gli altoparlanti nella presa altoparlante console sul pannello anteriore dell'unità. Perché la
connessione funzioni, occorre collegare il cavo audio al lato CPU.
5
Inserire gli altoparlanti nella porta console audio sul pannello posteriore dell'unità. Gli altoparlanti collegati
al pannello anteriore hanno la priorità su quelli collegati al pannello posteriore.
6
Tramite il cavo HDMI, collegare il connettore HDMI in una presa HDMI disponibile nella sezione porte
KVM dello switch. Inserire il cavo USB 3.0 e quello dell'altoparlante nelle relative prese.
7
All'altra estremità dei cavi usati al passo 6, collegare il cavo HDMI, il cavo USB 3.0 e il cavo
dell'altoparlante nelle relative porte sul computer.
8
(Opzionale) Inserire le periferiche USB nelle porte anteriori e posteriori per le periferiche USB.
9
Inserire l'adattatore di alimentazione in dotazione con lo switch a una sorgente elettrica CA, quindi
inserire il cavo dell'adattatore in una delle prese di alimentazione dello switch.
10
Accendere i computer.
Funzionamento
Commutazione manuale di porte
Per attivare tutti i dispositivi (audio, KVM, e USB) su un computer, premere il pulsante di seleziona della
porta corrispondente al computer in questione.
Commutazione del Mouse
Per selezionare la porta del mouse: Fare doppio clic sulla rotellina del mouse USB per selezionare le porte.
Nota: 1. La commutazione dei mouse è supportata solo dai mouse USB con rotellina di scorrimento
a 3 tasti.
2. La commutazione dei mouse è disabilitata per impostazione predefinita.*
3. La commutazione dei mouse è supportata solo in caso di attivazione dell'Emulazione
mouse.
*Consultare la sezione Modalità impostazione tasti di scelta per abilitare la commutazione dei
mouse.
Commutazione tasti di scelta
Tutti gli switch di porte per tasti di scelta rapida si avviamo toccando due volte il tasto
[Bloc Scroll] . La tabella seguente descrive le azioni eseguite da ciascuna combinazione.
Nota: Se l'uso del tasto [Bloc Scroll] crea confl itti con altri programmi in esecuzione sul computer, si può
usare il tasto [Ctrl].
Commutazione tasti di scelta
Tasto di scelta Azione
1. [Bloc Scroll] [Bloc Scroll]
[Invio]
Sposta KVM, hub USB e audio attivi dalla porta KVM attualmente in uso
alla porta successiva dello switch.
(da 1 a 2; da 2 a 1 per il CS1822; da 1 a 2; da 2 a 3; da 3 a 4;
da 4 a 1 per il CS1824).
2. [Bloc Scroll] [Bloc Scroll]
[n] [Invio]
Sposta KVM, hub USB e audio attivi al computer collegato alla porta
corrispondente all'ID Porta indicato.
Nota: La n indica il numero di ID Porta del computer (CS1822: 1 o 2. CS1824: 1, 2, 3, o 4).
Modalità Impostazione tasti di scelta (HSM)
La Modalità Impostazione tasti di scelta è usata per impostare le funzioni sullo switch. Attivare l'HSM
e premere uno dei tasti della tabella seguente. Applicare la seguente procedura per attivare l'HSM ed
eseguire una funzione con i tasti di scelta.
1. Tenere premuto il tasto [Bloc Num].
2. Premere e rilasciare il tasto [-].
3. Rilasciare il tasto [Bloc Num].
4. Premere il tasto di scelta rapida per eseguire la funzione. Consultare la seguente tabella per
la funzione.
Switch KVMP™ 4K HDMI CS1822/CS1824 con 2/4 Porte USB3.0
www.aten.com
Tabella di riepilogo HSM
Tasto Funzione
[E] Abilita / Disabilita Rilevamento accensione.
[M] Abilita / Disabilita l'emulazione del mouse.
[N] Abilita / Disabilita l'emulazione di tastiera.
[T]
Passa tra i tasti di Commutazione porte predefi niti ([Bloc Scroll] [Bloc Scroll])
e alternativi ([Ctrl] [Ctrl]).
[W] Abilita / Disabilita la Commutazione porte del Mouse.
[X][Invio] Abilita / Disabilita i tasti di scelta di Commutazione porte.
[u][p][g][r][a][d][e]
[Invio]
Attiva la modalità di Aggiornamento Firmware.
[F4]
Stampa le impostazioni attuali dello switch tramite un editor di testi o un
elaboratore di testi.
A
Обзор оборудования
Вид спереди
1
Кнопки выбора портов
2
Индикаторы портов
3
Аудиопорт
4
Периферийный порт USB 3.1 Gen 1
Вид сзади
1
Последовательный порт RJ-11
2
Секция консольных портов
3
Секция портов KVM
4
Клемма заземления
5
Разъем питания
6
Аудиопорт
7
Периферийный порт USB 3.1 Gen 1
B
Подготовка к работе
1
Выполните заземление CS1822/CS1824, подключив один конец заземляющего провода к
клемме заземления, а другой конец — к подходящему заземленному предмету.
2
Подключите USB-клавиатуру и мышь к консольным USB-портам на задней панели.
3
Подключите монитор к консольному порту HDMI на задней панели и включите питание
монитора.
4
Подключите динамики к соответствующим консольным разъемам на передней панели. Для
правильной работы аудиокабель необходимо подключать со стороны процессора.
5
Подключите динамики к консольному аудиопорту на задней панели. Динамики,
подключенные к передней панели, имеют приоритет над динамиками, подключенными к
задней панели.
6
С помощью кабеля HDMI подключите разъем HDMI к доступному гнезду HDMI в
секции портов KVM коммутатора. Подключите кабель USB 3.0 и кабель динамика в
соответствующие порты.
7
Подключите все другие концы кабелей из пункта 6 (кабель HDMI, кабель USB 3.0 и кабель
динамика) в соответствующие порты на компьютере.
8
(Опция) Подключите периферийные USB-устройства к периферийным USB-портам на
передней или задней панели.
9
Подключите комплектный блок питания к источнику переменного тока, после чего вставьте
шнур блока питания в гнездо питания коммутатора.
10
Включите компьютеры.
Эксплуатация
Ручное переключение портов
Нажмите на кнопку выбора порта на передней панели один раз для вывода аудио,
KVM и USB на компьютер, подключенный к соответствующему порту.
Переключение мышью
Для выбора порта мышью выполните следующие действия. Дважды нажмите на колесо
прокрутки USB-мыши для последовательного переключения портов.
Примечание:
1.
Переключение мышью выполняется только при использовании
трехклавишной USB-мыши с колесом прокрутки.
2.
По умолчанию переключение мышью отключено.*
3.
Переключение мышью поддерживается только в режиме эмуляции мыши.
*Порядок включения функции переключения портов мышью см. в разделе
«Режим установки клавиш быстрого вызова».
Переключение клавишами быстрого вызова
Все переключения портов с помощью клавиатуры начинаются с двойного нажатия клавиши
[Scroll Lock]. В следующих таблицах описываются действия каждой из комбинаций.
Примечание: Если использование клавиши [Scroll Lock] создает конфликт с другими
работающими программами, можно также использовать клавишу [Ctrl].
Переключение клавишами быстрого вызова
Клавиша быстрого
вызова
Действие
1.
[Scroll Lock] [Scroll
Lock] [Enter]
Перевод KVM, USB-концентратора и аудио с текущего порта, на который
был выведен KVM, к следующему порту коммутатора.
(с 1 к 2 и с 2 к 1 для CS1822; с 1 к 2, с 2 к 3, с 3 к 4, с 4 к 1 для CS1824).
2.
[Scroll Lock] [Scroll
Lock] [n] [Enter]
Перевод KVM, USB-концентратора и аудио на компьютер, подключенный
к порту, соответствующему указанному идентификатору порта.
Примечание: «n» означает идентификатор порта компьютера (CS1822: 1 или 2. CS1824: 1, 2, 3 или 4).
Режим установки клавиш быстрого вызова (HSM)
Режим установки клавиш быстрого вызова (HSM) используется для установки функций на
коммутаторе. Вызовите HSM и нажмите клавишу, указанную в следующей таблице. Для вызова
HSM выполните следующие действия.
1.
Нажмите и удерживайте клавишу [Num Lock].
2.
Нажмите и отпустите клавишу [-].
3.
Отпустите клавишу [Num Lock].
Коммутатор CS1822/CS1824 2/4-портовый USB 3.0 4K HDMI KVMP™
www.aten.com
4.
Нажмите клавишу быстрого вызова для выполнения соответствующей функции. Функции
приведены в таблице ниже.
Таблица описания HSM
Клавиша Функция
[E] Включение/выключение функции «Включение при обнаружении».
[M] Включение/выключение эмуляции мыши.
[N] Включение/выключение эмуляции клавиатуры.
[T]
Смена клавиши быстрого вызова для переключения портов по
умолчанию ([Scroll Lock] [Scroll Lock]) на дополнительную клавишу ([Ctrl]
[Ctrl]).
[W] Включение/выключение переключения портов мышью.
[X][Enter]
Включение/выключение переключения портов клавишей быстрого
вызова.
[u][p][g][r][a][d][e]
[Enter]
Вызов режима обновления микропрограммы.
[F4]
Печать текущих параметров коммутатора с помощью текстового
редактора.
A
Hardware Review
Front View
1
Port Selection Pushbuttons
2
Port LEDs
3
Audio Port
4
USB 3.1 Gen 1 Peripheral Port
Rear View
1
RJ-11 Serial Port
2
Console Ports Section
3
KVM Ports Section
4
Grounding Terminal
5
Power Jack
6
Audio Port
7
USB 3.1 Gen 1 Peripheral Port
B
Hardware Installation
1
Ground the CS1822/CS1824 by connecting one end of a grounding wire to the grounding terminal,
and the other end of the wire to a suitable grounded object.
2
Plug your USB keyboard and USB mouse into the USB console ports located on the unit’s rear panel.
3
Plug your monitor into the HDMI console port located on the unit’s rear panel and power it on.
4
Plug your speakers into the console speaker jack located on the unit’s front panel. Audio cable needs
to be connected on the CPU side for this connection to work.
5
Plug your speakers into the audio console port located on the unit’s rear panel. The speakers plugged into
the front panel have priority over those plugged into the rear panel.
6
Using the HDMI cable, plug the HDMI connector into an available HDMI socket on the KVM port
section of the switch. Plug the USB 3.0 cable and speaker cable into their corresponding sockets.
7
At the other end of the cables from step 6, plug the HDMI cable, USB 3.0 cable and speaker cable
into their respective ports on the computer.
8
(Optional) Plug your USB peripherals into the front or rear USB peripheral ports.
9
Plug the power adapter that came with your switch into an AC power source, then plug power
adapter cable into the switch’s Power Jack.
10
Power on the computers.
Operation
Manual Port Switching
To bring complete focus (audio, KVM, and USB) to a computer, press the port selection pushbutton that
corresponds to that computer.
Mouse Switching
For mouse port selection: Double-click the scroll wheel of your USB mouse to cycle through the ports.
Note: 1. Mouse switching is only supported by USB 3-key scroll wheel mice.
2. Mouse switching is disabled by default.*
3. Mouse switching is only supported when Mouse Emulation is enabled.
*See Hotkey Setting Mode section to enable mouse switching.
Hotkey Switching
All hotkey port switches begin with tapping the [Scroll Lock] key twice. The table below describes the
actions that each combination performs.
Note: If using the [Scroll Lock] key confl icts with other programs running on the computer, the [Ctrl] key
can be used instead.
Hotkey Switching
Hotkey Action
1. [Scroll Lock] [Scroll
Lock] [Enter]
Brings the KVM, USB hub, and audio focus from the port that currently has the
KVM focus to the next port on the switch.
(1 to 2; 2 to 1 for the CS1822; 1 to 2; 2 to 3; 3 to 4; 4 to 1 for the CS1824).
2. [Scroll Lock] [Scroll
Lock] [n] [Enter]
Brings the KVM, USB hub, and audio focus to the computer attached to the
port corresponding to the specifi ed Port ID.
Note: The n stands for the computer’s Port ID number (CS1822: 1 or 2. CS1824: 1, 2, 3, or 4).
Hotkey Setting Mode (HSM)
Hotkey Setting Mode is used to set functions on the switch. Invoke HSM and then press a key in the table
below. Follow the steps below to invoke HSM and perform a hotkey function.
1. Press and hold down the [Num Lock] key.
2. Press and release the [-] key.
3. Release the [Num Lock] key.
4. Press the hotkey to perform the desired function. Refer to the table below for the function.
CS1822/CS1824 2/4-Port USB3.0 4K HDMI KVMP™ Switch
www.aten.com
HSM Summary Table
Key Function
[E] Enables / disables Power on Detection.
[M] Enables / disables mouse emulation.
[N] Enables / disables keyboard emulation.
[T]
Toggles between the default ([Scroll Lock] [Scroll Lock]) and alternate ([Ctrl] [Ctrl])
Port Switching keys.
[W] Enables / disables Mouse Port Switching.
[X][Enter] Enables / disables Port Switching hotkey.
[u][p][g][r][a][d][e]
[Enter]
Invokes Firmware Upgrade Mode.
[F4] Prints the switch’s current settings via a text editor or word processor.
La pagina si sta caricando...
-
 1
1
-
 2
2


in altre lingue
- English: ATEN CS1822 Quick start guide
- français: ATEN CS1822 Guide de démarrage rapide
- español: ATEN CS1822 Guía de inicio rápido
- Deutsch: ATEN CS1822 Schnellstartanleitung
- русский: ATEN CS1822 Инструкция по началу работы
- português: ATEN CS1822 Guia rápido
- polski: ATEN CS1822 Skrócona instrukcja obsługi
- 日本語: ATEN CS1822 クイックスタートガイド
- Türkçe: ATEN CS1822 Hızlı başlangıç Kılavuzu