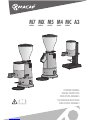
MACAP M4 Series Original Instructions Manual
- Categoria
- Accessori per la preparazione del caffè
- Tipo
- Original Instructions Manual


ATTENZIONE
Leggere attentamente le istruzioni prima di utilizzare la macchina.
CAUTION
Read the instructions before using the machine.
ATTENTION
Bien lire les instructions avant d’utiliser la machine.
ACHTUNG!
Vor Gebrauch bitte aufmerksam die Gebrauchsanleitung lesen.
¡ATENCION!
Leer con atención las instrucciones antes de utilizar el aparato.

INDICE:
1 AVVERTENZE GENERALI pag.04
2 DESCRIZIONE APPARECCHIO pag.04
3 DATI TECNICI pag.04
4 INFORMAZIONI SULLA SICUREZZA pag.05
5 INSTALLAZIONE ED ALLACCIAMENTO ALLA RETE ELETTRICA pag.05
6 FUNZIONAMENTO DELL’APPARECCHIO pag.06
7 MANUTENZIONE pag.07
8 PULIZIA pag.07
9 SMALTIMENTO pag.07
10 RUMORE AEREO pag.07
SUMMARY:
1 GENERAL WARNINGS pag.08
2 APPLIANCE DESCRIPTION pag.08
3 TECHNICAL DATA pag.08
4 SAFETY INFORMATION pag.09
5 INSTALLATION AND ELECTRIC CONNECTIONS pag.09
6 APPLIANCE FUNCTIONS pag.10
7 MAINTENANCE pag.11
8 CLEANING pag.11
9 DISPOSAL pag.11
10 AERIAL NOISE pag.11
TABLEAU:
1 AVERTISSEMENTS GENERAUX pag.12
2 DESCRIPTION DE L’APPAREIL pag.12
3 CARACTERISTIQUES TECHNIQUES pag.12
4 INFORMATIONS SUR LA SECURITE pag.13
5 INSTALLATION ET RACCORDEMENT AU RESEAU ELECTRIQUE pag.13
6 FONCTIONNEMENT DE L’APPAREIL pag.14
7 MAINTENANCE pag.15
8 NETTOYAGE pag.15
9 EMBALLAGE ET FIN DE VIE DE L’APPAREIL pag.15
10 BRUIT AÉRIEN pag.15
INDEX:
1 ALLGEMEINE HINWEISE pag.16
2 BESCHREIBUNG DES GERÄTES pag.16
3 TECHNISCHE DATEN pag.16
4 INFORMATIONEN ÜBER DIE SICHERHEIT pag.17
5 INSTALLATION UND ANSCHLUSS DES GERÄTES AM STROMNETZ pag.17
6 BETRIEB DES GERÄTES pag.18
7 WARTUNG pag.19
8 REINIGUNG pag.19
9 ENTSORGUNG pag.19
10 GERÄUSCHENTWICKLUNG pag.19
ÍNDICE:
1 ADVERTENCIAS GENERALES pag.20
2 DESCRIPCIÓN DE LA MÁQUINA pag.20
3 CARACTERISTICAS TECNICAS pag.20
4 INFORMACIONES SOBRE LA SEGURIDAD pag.21
5 INSTALACIÓN Y CONEXIÓN A LA RED ELÉCTRICA pag.21
6 FUNCIONAMIENTO DE LA MÁQUINA pag.22
7 MANTENIMIENTO pag.23
8 LIMPIEZA pag.23
9 ELIMINACIÓN EMBALAJE Y DESGUACE DEL APARATO pag.23
10 RUIDO AÉREO pag.23
ITALIANO
ENGLISH
FRANÇAIS
DEUTSCH
ESPAÑOL

ITALIANO
4
Segnale di pericolo che indica di osservare scrupolosamente le istruzioni a cui è riferito per evitare possibili
danneggiamenti alla macchina o infortuni all’operatore.
1 AVVERTENZE GENERALI
Prima di azionare l’apparecchio leggere attentamente il seguente manuale d’istruzioni. All’interno troverete indicazioni sulla
sicurezza, l’uso e la manutenzione dell’apparecchio.
L’azienda produttrice adotta una politica di continuo sviluppo e si riserva il diritto di effettuare modifiche e miglioramenti a
qualsiasi prodotto e manuale.
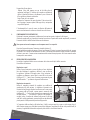
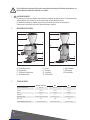
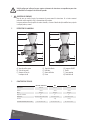
2 DESCRIZIONE APPARECCHIO
3 DATI TECNICI
A) Coperchio campana caffè
B) Campana caffè
C) Ventola chiusura campana caffè
D) Coperchio dosatore
E) Dosatore
F) Leva dosatore
G) Pressino
H) Interruttore
I) Piattino macinadosatore
L) Corpo macchina
M) Ferma sacchetto
A
B
D
E
G
I
C
F
L
H
A
B
M
I
C
H
L
Ø 75 mm
800 W
1400 rpm
P
250 x 360 x h 635
15,5 Kg
Ø 65 mm
340 W
1400 rpm
P
220 x 370 x h 600
13 Kg
M4 / M5 / M5 PLUS MX M7
25 s ON / 90 s OFF40 s ON / 120 s OFF
Ø 58 mm
250 W
1400 rpm
P
190 x 210 x h 430 / h 470 / h 505
9 Kg
60 s ON / 180 s OFF
Macine piane
Potenza
Motore
Dispositivo contadosi
Dimensioni (mm)
Peso netto
Ciclo di funzionamento (230 V - 50 Hz)

ITALIANO
5
4 INFORMAZIONI SULLA SICUREZZA
Quest’apparecchio è concepito esclusivamente per macinare caffè in grani, pertanto l’azienda produttrice non sarà ritenuta
responsabile di eventuali danni o incidenti nel caso in cui vengano macinati alimenti diversi dal caffè.
Ogni utilizzo improprio fa decadere la garanzia.
Soltanto personale qualificato può installare o eseguire interventi di assistenza tecnica su questo apparecchio. L’apparecchio
non è impermeabile, quindi posizionarlo lontano da getti d’acqua o luoghi particolarmente umidi.
Si ricorda che l’apparecchio è destinato all’uso professionale e non domestico pertanto solo persone qualificate ne possono fare uso.
Il presente apparecchio non deve essere utilizzato da bambini oppure da persone con ridotte capacità fisiche, mentali o
motorie oppure da persone che non abbiano esperienza o conoscenza, salvo nel caso in cui esse abbiano ricevuto formazione
o siano oggetto di supervisione.
Tenere lontano dalla portata dei bambini. Non permettere ai bambini di giocare con l’apparecchio.
La macchina è dotata di protezione termica del motore, nel caso in cui questa intervenga con conseguente blocco della
macinatura, staccare la spina dalla rete di alimentazione ed attendere almeno un’ora prima di riutilizzarla.
Se il cavo di alimentazione è danneggiato, esso deve essere sostituito dal costruttore o dal suo servizio assistenza tecnica o
comunque da una persona con qualifica similare, in modo da prevenire ogni rischio.
TOGLIETE LA SPINA DALLA PRESA DI ALIMENTAZIONE PRIMA DI EFFETTUARE QUALSIASI TIPO DI OPERAZIONE DI
MANUTENZIONE O PULIZIA.
5 INSTALLAZIONE ED ALLACCIAMENTO ALLA RETE ELETTRICA
L’installazione deve essere effettuata da personale tecnico qualificato.
L’installazione deve essere eseguita in conformità alle norme di sicurezza vigenti nel Paese di utilizzo. Sono da osservare in
modo particolare le disposizioni in merito a: prescrizioni di legge, antinfortunistiche, antincendio regolamentazioni dell’ente
erogante l’energia elettrica.
Posizionare l’apparecchio su una superficie piana in modo tale da garantirne un’ottima stabilità. Prima di allacciare
MX 900
Ø 65 mm
-
300 W
900 rpm
P
220 x 370 x h 600
13 Kg
40 s ON / 150 s OFF
M7 900
Ø 75 mm
-
600 W
900 rpm
P
250 x 360 x h 635
15,5 Kg
25 s ON / 60 s OFF
MXK
-
Ø 63 mm
350 W
350 rpm
P
220 x 370 x h 600
15 Kg
40 s ON / 160 s OFF
M7K
-
Ø 68 mm
520 W
350 rpm
P
250 x 360 x h 635
16 Kg
25 s ON / 90 s OFF
MC6
Ø 65 mm
340 W
1400 rpm
220 x 370 x h 600
12,5 Kg
40 s ON / 120 s OFF
MC7
Ø 75 mm
800 W
1400 rpm
250 x 360 x h 635
15 Kg
25 s ON / 90 s OFF
A3
-
-
-
P
220 x 210 x h 345
8 Kg
-
MC4 / MC5 / MC5 PLUS
Ø 58 mm
250 W
1400 rpm
190 x 210 x h 430 / h 470 / h 505
8,5 Kg
60 s ON / 180 s OFF
Macine piane
Macine coniche
Potenza
Motore
Dispositivo contadosi
Dimensioni (mm)
Peso netto
Ciclo di funzionamento (230 V - 50 Hz)
Macine piane
Potenza
Motore
Dispositivo contadosi
Dimensioni (mm)
Peso netto
Ciclo di funzionamento (230 V - 50 Hz)

6
ITALIANO
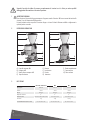
l’apparecchio alla rete elettrica:
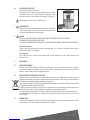
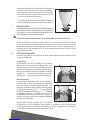
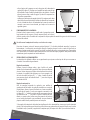
- allineate il foro della campana con uno dei fori della ghiera di
regolazione (vedi figura F1). Verificate che la ventola non impedisca di
togliere il coperchio del dosatore o di abbassare il perno di arresto del
disco regolazione, altrimenti cambiate foro.
Fissate il tutto con la vite apposita.
- verificare che l’interruttore sia spento (posizione 0) ed assicurarsi che i
dati di tensione e frequenza riportati sulla targa tecnica, corrispondano
con quelli dell’impianto.
E’ fondamentale che la presa di corrente sia allacciata all’impianto di
messa a terra funzionante e conforme con le attuali norme di sicurezza.
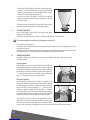
6 FUNZIONAMENTO DELL’APPARECCHIO
Posizionata la campana correttamente e stabilmente sul porta macine superiore, introdurre il caffè in grani.
Chiudere la campana caffè con il coperchio in dotazione e procedere con l’apertura della ventola campana caffè, consentendo
l’entrata dei chicchi di caffè all’interno della camera di macinatura.
Non operare mai senza la campana o con la campana senza il suo coperchio.
Per attivare l’apparecchio premere l’interruttore principale (posizione 1).
Nel macinadosatore automatico la partenza e l’arresto sono automatici. Di notte o in assenza di operatori nel locale, spegnete
l’interruttore. Per la versione del macinadosatore con timer, l’attivazione della macinatura avviene ruotando la manopola
del timer in senso orario. L’arresto avviene automaticamente al termine del tempo impostato. Per l’arresto manuale ruotare
la manopola in senso antiorario.
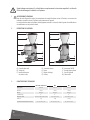
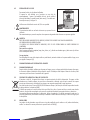
6-1 REGOLAZIONE DELLA MACINATURA
La macchina è regolata in fabbrica con una macinatura che si adatta a molti tipi di caffè in commercio.
Per modificare la macinatura:
Regolazione a scatti
Premere il perno fermamacine e ruotare la ghiera nel senso desiderato.
Una volta individuata la regolazione, rilasciare il perno per bloccare
la regolazione. Verificarne il bloccaggio prima di ogni accensione. La
regolazione va effettuata a motore spento e senza caffè tra le macine.
(vedi figura F2) “+” indica il senso di rotazione per aumentare la grana
del caffè macinato. “-“ per diminuire la grana del caffè macinato.
Regolazione micrometrica
Ruotare le manopoline orizzontali di regolazione per modificare la
granulometria del caffè macinato. La regolazione micrometrica non
necessita di alcun bloccaggio. Regolare la macinatura con il motore acceso
se è presente caffè tra le macine, a motore spento in assenza di caffè.
(vedi figura F3). “+” indica il senso di rotazione per aumentare la grana
del caffè macinato. “- “ per diminuire la grana del caffè macinato. Si
consiglia, inoltre, di macinare ed utilizzare pochi grammi di caffè ogni
volta che si varia la granulometria, questa procedura serve ad eliminare la
piccola quantità di caffè premacinato presente nell’apparecchio.
Se l’erogazione della macchina da caffè risulta lenta, il caffè è macinato troppo fine, mentre se risulta troppo veloce, il
caffè è macinato troppo grosso. Molti fattori possono inoltre influenzare l’erogazione del caffè tra cui la quantità di caffè, la
pressatura, la regolazione della macchina espresso la pulizia dei filtri e le condizioni climatiche.
F2
F3
F1

ITALIANO
7
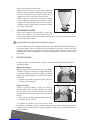
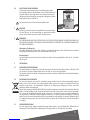
6-2 REGOLAZIONE DELLA DOSE
Per estrarre le dosi tirare la leva dosatore.
L’apparecchio è tarato dal produttore con una regolazione di circa 7 grammi.
Per modificare la dose, ruotate il pomello all’interno del dosatore in senso
orario (dose minore) o in senso antiorario (dose maggiore). Vedi figura F4.
Non riempite mai il dosatore oltre i 2/3 della capacità.
7 MANUTENZIONE
La manutenzione deve essere effettuata solo da personale tecnico qualificato.
Qualsiasi manutenzione che preveda la sostituzione di componenti usurati
deve essere sempre effettuata con ricambi originali.
8 PULIZIA
TOGLIETE LA SPINA DALLA PRESA DI ALIMENTAZIONE PRIMA DI EFFETTUARE QUALSIASI TIPO DI PULIZIA.
NON IMMERGETE MAI L’APPARECCHIO NELL’ACQUA.
SI CONSIGLIA DI NON USARE PRODOTTI ABRASIVI, L’UTILIZZO POTREBBE ROVINARE LE PARTI LUCIDE DELL’APPARECCHIO.
Parti mobili in plastica
Togliete le parti mobili della macchina (coperchio, campana,piattino, etc.) e lavatele con abbondante acqua e detersivo
neutro (non lavatele mai in lavastoviglie).
Corpo macchina
Per la pulizia del corpo macchina utilizzare panni umidi, facendo attenzione alle parti sensibili all’acqua come
l’interruttore (H).
9 SMALTIMENTO
9-1 SMALTIMENTO IMBALLO
Dopo aver aperto l’imballo verificare che l’apparecchio risulti integro e che non siano presenti danni dovuti al trasporto,
in caso contrario rivolgersi al rivenditore o dove è avvenuto l’acquisto. L’imballo non deve essere lasciato alla portata dei
bambini e conservato almeno fino allo scadere della garanzia.
9-2 SMALTIMENTO DELL’APPARECCHIO A FINE VITA
Al termine della sua vita, l’apparecchio va reso non operativo togliendo il cavo di alimentazione. L’apparecchio non va
abbandonato nell’ambiente, ma scomposto e smaltito in base al tipo di materiale. La ditta consiglia che la scomposizione e
lo smaltimento siano affidati ad aziende specializzate in tali operazioni.
Questo prodotto è soggetto alla direttiva 2002/96/EC del Parlamento europeo e del Consiglio dell’Unione europea sui rifiuti
di apparecchiature elettriche ed elettroniche (RAEE).
Il simbolo posto sulla targa tecnica, indica che a fine vita, l’apparecchio non deve essere trattato come rifiuto domestico ma
deve essere avviato nei centri di raccolta differenziata per apparecchiature elettriche ed elettroniche.
Per maggiori informazioni riguardanti lo smaltimento, rivolgersi al rivenditore o all’ufficio competente per la propria zona.
La raccolta differenziata e lo smaltimento contribuiscono a mantenere l’ambiente più pulito ed a ridurre i rischi per la
salute pubblica.
10 RUMORE AEREO
Le prove di rumore effettuate secondo le norme in vigore, hanno determinato che tutta la nostra gamma di macina caffè,
macina dosatori e macina caffè istantanei non supera il valore di 78dB (A).
+
-
F4

8
ENGLISH
Warning sign! Pay special attention to the instructions that are given to avoid damaging the appliance or harming
the operator.
1 GENERAL WARNINGS
Read this instruction manual carefully before using the appliance, as it gives important information for the safety, use and
maintenance of the appliance.
The manufacturer is constantly developing its products, and reserves the right to make changes or improvements to any of its
products or to the instruction manual.
2 APPLIANCE DESCRIPTION
3 TECHNICAL DATA
A) Beans hopper cover
B) Coffee beans hopper
C) Coffee hopper closing fan
D) Doser lid
E) Doseur
F) Dispenser handle
G) Tamper
H) ON/OFF switch
I) Grinder plate
L) Body of machine
M) Bag holder
A
B
D
E
G
I
C
F
L
H
A
B
M
I
C
H
L
Ø 75 mm
800 W
1400 rpm
P
250 x 360 x h 635
15,5 Kg
Ø 65 mm
340 W
1400 rpm
P
220 x 370 x h 600
13 Kg
M4 / M5 / M5 PLUS MX M7
25 s ON / 90 s OFF40 s ON / 120 s OFF
Ø 58 mm
250 W
1400 rpm
P
190 x 210 x h 430 / h 470 / h 505
9 Kg
60 s ON / 180 s OFF
Flat grinding blades
Power
Motor
Dosing counter
Dimensions (mm)
Net weight
Operating cycle (230 V - 50 Hz)

ENGLISH
9
4 SAFETY INFORMATION
This appliance has been designed exclusively for grinding coffee beans, consequently the manufacturer will not be held liable
for any damage or incidents that are caused if it is used for any other purpose.
The warranty will be automatically invalidated in the event the appliance is used improperly.
Only qualified operators must install the appliance or carry out any technical maintenance work.
The appliance is not waterproof and must be kept well clear of any potential water sprays or very damp areas.
The appliance has been designed for professional and not home use, and therefore must only be used by trained personnel.
The appliance must not be used by children, or by adults with reduced physical, mental or motor capacities, nor by anyone
without sufficient experience or knowledge, unless they receive specific training or use the appliance under the supervision
of a trained person.
Keep the appliance out of the reach of children. Children being supervised not to play with the appliance.
The appliance has a thermal circuit breaker for the motor, when it triggers and stops the grinder, unplug the appliance at the
mains and wait at least one hour before turning it back on again.
If the power cable is damaged it must be replaced by the manufacturer or by the technical assistance service, or at any rate
by a person with similar qualifications, so as to prevent all risks.
UNPLUG THE APPLIANCE AT THE MAINS BEFORE CARRYING OUT ANY MAINTENANCE OR CLEANING WORK.
5 INSTALLATION AND ELECTRICAL CONNECTIONS
Installation must be carried out by trained technical personnel.
Installation must be carried out in strict compliance with the safety provisions currently in force in the country of use, with
particular reference to the accident and fire prevention regulations and electricity authority regulations.
Place the appliance on a flat surface to ensure it is perfectly stable. Before connecting the appliance to the mains:
MX 900
Ø 65 mm
-
300 W
900 rpm
P
220 x 370 x h 600
13 Kg
40 s ON / 150 s OFF
M7 900
Ø 75 mm
-
600 W
900 rpm
P
250 x 360 x h 635
15,5 Kg
25 s ON / 60 s OFF
MXK
-
Ø 63 mm
350 W
350 rpm
P
220 x 370 x h 600
15 Kg
40 s ON / 160 s OFF
M7K
-
Ø 68 mm
520 W
350 rpm
P
250 x 360 x h 635
16 Kg
25 s ON / 90 s OFF
MC6
Ø 65 mm
340 W
1400 rpm
220 x 370 x h 600
12,5 Kg
40 s ON / 120 s OFF
MC7
Ø 75 mm
800 W
1400 rpm
250 x 360 x h 635
15 Kg
25 s ON / 90 s OFF
A3
-
-
-
P
220 x 210 x h 345
8 Kg
-
MC4 / MC5 / MC5 PLUS
Ø 58 mm
250 W
1400 rpm
190 x 210 x h 430 / h 470 / h 505
8,5 Kg
60 s ON / 180 s OFF
Flat grinding blades
Power
Motor
Dosing counter
Dimensions (mm)
Net weight
Operating cycle (230 V - 50 Hz)
Conical grinding blades
Flat grinding blades
Power
Motor
Dosing counter
Dimensions (mm)
Net weight
Operating cycle (230 V - 50 Hz)

10
ENGLISH
- align the hole of the bell with one of the holes of the adjusting ring-nut
(see figure F1). Ensure that the fan does not prevent you removing the
dispenser cover or lowering the stop pin of the adjusting disk - if it does,
change holes. Fasten, using the appropriate screw.
- make sure the switch is off (position 0) and that the voltage and
frequency data given on the data plate are commensurate with that
of the mains supply.
The power cable must be connected to the ground plate, which must be
perfectly efficient and in compliance with current safety regulations.
6 APPLIANCE FUNCTIONS
Once the coffee hopper is placed firmly on the upper grinding blades
holder, pour in the coffee beans.
Put the lid on the coffee hopper and open the fan, to allow the coffee beans to flow into the grinder.
Do not turn the appliance on without the coffee hopper or without its lid.
Turn on the main switch (position 1).
The automatic doser coffee-grinder model starts and stops automatically. Always switch off the appliance when not in use
and at the end of the day.
The grinding action of the timer grinder doser starts by turning the timer knob clockwise and it stops automatically at the end
of the time previously set. To stop the grinding process manually turn the timer knob anticlockwise.
6-1 GRINDING ADJUSTMENT
The appliance grinding is set in the factory at a coarseness that is suitable for many types of coffee that are on sale.
To adjust the grinding:
Stepped regulation
Press the grinder pin and turn the nut in the direction you wish. When the
right regulation has been found, release the pin to block the regulation.
Check it is firmly blocked before turning the grinder on. Always regulate the
grinder when it is turned off and without any coffee inside (see figure F2).
“+” shows the rotation direction to increase the coarseness of the ground
coffee. “-“ to decrease the coarseness of the ground coffee.
Micrometric regulation
Turn the horizontal regulation knobs to change the coarseness of the
ground coffee. Micrometric regulation does not require blocking. Regulate
the grinder with the motor turned on if there is any coffee in the grinder,
with it turned off if it is empty (see figure F3). “+” shows the rotation
direction to increase the coarseness of the ground coffee. “- “ to decrease
the coarseness of the ground coffee. We recommend grinding and using a
few grams of coffee each time you change the coarseness, which will help
remove the small amount of ground coffee already inside the grinder.
If the coffee flow is too slow it means that the ground coffee is too fine,
while if the flow is too fast it means the ground coffee is too course. Many
other factors can also affect the coffee flow, such as the amount of coffee,
how much it has been pressed, the appliance adjustment, the cleanliness of the filters and the climatic conditions.
F2
F3
F1

ENGLISH
11
+
-
F4
6-2 ADJUSTING THE DOSE
Pull the dosing lever to get the right dose of coffee.
The appliance is set by the manufacturer at approx. 7 grams per dose.
To change the dose, turn the knob inside the coffee dispenser in a clockwise
direction (smaller dose) or anti-clockwise direction (larger dose). See figure F4.
Never fill the coffee dispenser by more than 2/3rds.
7 MAINTENANCE
Only trained personnel must carry out the maintenance work.
If, during maintenance, any worn components need changing, only original
spare parts must be used.
8 CLEANING
ALWAYS UNPLUG THE APPLIANCE FROM THE MAIN SWITCH BEFORE CLEANING.
DO NOT PLACE THE APPLIANCE IN WATER.
DO NOT USE ANY ABRASIVE PRODUCTS AS THEY COULD DAMAGE THE SURFACE OF THE GLOSSY PARTS ON THE APPLIANCE.
Removable plastic parts
Detach all removable parts from the appliance (lid, coffee beans hopper, drip tray, etc.) and wash them in water and mild
detergent, (never clean them in a dishwasher).
Appliance body
Clean the appliance body with a damp cloth, paying attention to any parts that should not be exposed to water, like the
on-off switch (H).
9 DISPOSAL
9-1 PACKING DISPOSAL
After opening the packing, check the appliance is complete and has not been damaged during transport, otherwise contact
the retailer or wherever the appliance was purchased. Do not leave the packing within the reach of children. Keep the original
packing until such time as the warranty has expired.
9-2 APPLIANCE DISPOSAL
At the end of its life, the appliance must be rendered safe by removing the power cable.
Do not discard the appliance in the environment.
The appliance must be dismantled and disposed of according to the type of material. The manufacturer recommends that the
dismantling and disposal of the appliance are assigned to a specialised waste disposal company.
This product is subject to Directive 2002/96/EC by the European Parliament and Council regarding electrical and electrical
appliance refuse (EEAR).
The symbol on the data plate indicates that at the end of its life, the appliance must not be treated like domestic waste but
must be consigned for refuse sorting for electrical and electronic appliances.
For more information about disposal, contact the retailer or the relative office in your area.
Sorted collection and disposal help to keep the environment clean and protect public health.
10 AERIAL NOISE
Noise tests done in compliance with the standards in force have established that all coffee grinders, doser coffee grinders,
grinders on demand of our production don’t exceed the value of 78 Db (A ).

12
FRANÇAIS
Signal de danger avertissant qu’il y a lieu d’observer scrupuleusement les instructions auxquelles il se réfère afin
d’éviter des dommages à la machine ou à l’opérateur.
1 AVERTISSEMENTS GENERAUX
Avant de mettre l’appareil en marche, lisez attentivement le manuel d’instructions suivant. A l’intérieur, vous trouverez des
indications concernant la sécurité, l’utilisation et la maintenance de l’appareil.
La société productrice adopte une politique de développement continuel et se réserve le droit d’apporter des modifications et
des améliorations sur tout produit et manuel.
2 DESCRIPTION DE L’APPAREIL
3 CARACTERISTIQUES TECHNIQUES
A) Couvercle trémie café
B) Trémie café
C) Lamelle de fermeture
du réservoir à café
D) Couvercle du doseur
E) Doseur
F) Poignée de dosage
G) Presseur
H) Interrupteur ON/OFF
I) Soucoupe broyeur-doseur
L) Corps de l’appareil
M) Ferme sachet
A
B
D
E
G
I
C
F
L
H
A
B
M
I
C
H
L
Ø 75 mm
800 W
1400 rpm
P
250 x 360 x h 635
15,5 Kg
Ø 65 mm
340 W
1400 rpm
P
220 x 370 x h 600
13 Kg
M4 / M5 / M5 PLUS MX M7
25 s ON / 90 s OFF40 s ON / 120 s OFF
Ø 58 mm
250 W
1400 rpm
P
190 x 210 x h 430 / h 470 / h 505
9 Kg
60 s ON / 180 s OFF
Meules plates
Puissance
Moteur
Compte dosage
Dimensions (mm)
Poids net
Cycle de fonctionnement (230 V - 50 Hz)

FRANÇAIS
13
4 INFORMATIONS SUR LA SECURITE
Cet appareil est conçu exclusivement pour moudre du café en grains, c’est pourquoi la société productrice ne sera pas
responsable des éventuels dommages ou incidents si des aliments différents du café sont moulus.
Toute mauvaise utilisation fait tomber la garantie.
Seul un personnel qualifié peut installer ou effectuer des interventions d’assistance technique sur cet appareil. L’appareil n’est
pas imperméable, il y a donc lieu de le placer à l’écart des jets d’eau ou des endroits particulièrement humides.
Nous vous rappelons que l’appareil est destiné à une utilisation professionnelle et non domestique, c’est pourquoi seules des
personnes qualifiées peuvent l’utiliser.
Cet appareil ne doit pas être utilisé par des enfants ou par des personnes ayant des capacités physiques, mentales ou
motrices réduites ou bien par des personnes n’ayant aucune expérience ou connaissance, sauf si elles ont reçu une formation
appropriée ou travaillent sous surveillance.
Tenir hors de portée des enfants. Même sous surveillance, ne laissez jamais les enfants jouer avec l’appareil.
La machine est munie d’une protection thermique du moteur, si celle-ci intervient avec un blocage de la mouture, débrancher
la prise du réseau d’alimentation et attendre au moins une heure avant de la réutiliser.
Si le câble d’alimentation est endommagé, il doit être remplacé par le fabricant ou par son service d’assistance technique ou
de toute façon par une personne ayant un titre similaire, de façon à prévenir tout risque.
ENLEVER LA FICHE DE LA PRISE D’ALIMENTATION AVANT D’EFFECTUER TOUT TYPE D’OPERATION DE MAINTENANCE OU
DE NETTOYAGE.
5 INSTALLATION ET RACCORDEMENT AU RESEAU ELECTRIQUE
L’installation doit être effectuée par un personnel technique qualifié.
L’installation doit être effectuée conformément aux normes de sécurité en vigueur dans le pays d’utilisation. Il faut particulièrement
observer les dispositions au sujet : des prescriptions légales contre les accidents et contre les incendies des réglementations de
l’organisme qui distribue l’énergie électrique.
Placer l’appareil sur une surface plane de manière à garantir une excellente stabilité.
MX 900
Ø 65 mm
-
300 W
900 rpm
P
220 x 370 x h 600
13 Kg
40 s ON / 150 s OFF
M7 900
Ø 75 mm
-
600 W
900 rpm
P
250 x 360 x h 635
15,5 Kg
25 s ON / 60 s OFF
MXK
-
Ø 63 mm
350 W
350 rpm
P
220 x 370 x h 600
15 Kg
40 s ON / 160 s OFF
M7K
-
Ø 68 mm
520 W
350 rpm
P
250 x 360 x h 635
16 Kg
25 s ON / 90 s OFF
MC6
Ø 65 mm
340 W
1400 rpm
220 x 370 x h 600
12,5 Kg
40 s ON / 120 s OFF
MC7
Ø 75 mm
800 W
1400 rpm
250 x 360 x h 635
15 Kg
25 s ON / 90 s OFF
A3
-
-
-
P
220 x 210 x h 345
8 Kg
-
MC4 / MC5 / MC5 PLUS
Ø 58 mm
250 W
1400 rpm
190 x 210 x h 430 / h 470 / h 505
8,5 Kg
60 s ON / 180 s OFF
Meules plates
Puissance
Moteur
Compte dosage
Dimensions (mm)
Poids net
Cycle de fonctionnement (230 V - 50 Hz)
Meules coniques
Meules plates
Puissance
Moteur
Compte dosage
Dimensions (mm)
Poids net
Cycle de fonctionnement (230 V - 50 Hz)

14
FRANÇAIS
Avant de raccorder l’appareil au réseau électrique:
- alignez le trou de la coupole à l’un des trous du collier de réglage (voir
figure F1). Vérifiez que le ventilateur n’empêche pas de retirer le couvercle
du doseur ou de baisser le pivot d’arrêt du disque de réglage, auquel cas
changez de trou. Fixez le tout à l’aide de la vis prévue à cet effet
- vérifier si l’interrupteur est éteint (position 0) et vérifier si les données
de tension indiquées sur la plaque technique correspondent à celles de
l’installation. Il est fondamental que la prise de courant soit raccordée à
l’installation de mise à la terre fonctionnant correctement et conforme
aux normes de sécurité actuelles.
6 FONCTIONNEMENT DE L’APPAREIL
Placer la trémie correctement et de manière stable sur le porte-meules
supérieur, ensuite, introduire le café en grains. Fermer la trémie à café
avec le couvercle en dotation et procéder avec l’ouverture du ventilateur trémie café, qui consent l’entrée des grains de café
à l’intérieur de la chambre de mouture.
Ne jamais travailler sans la trémie ou avec la trémie sans son couvercle.
Pour activer l’appareil, appuyer sur l’interrupteur principal (position 1). Dans le moulin doseur automatique le démarrage et
l’arrêt sont automatiques. La nuit ou en cas d’absence de tout opérateur dans le local, désactiver l’interrupteur. Pour activer
la mouture du moulin doseur avec temporisateur il faut tourner le temporisateur dans le sens horaire. La mouture s’arrête
automatiquement à la fin du temps programmée. Pour arrêter la mouture manuellement il faut tourner le bouton dans le
sens antihoraire.
6-1 RÉGLAGE DE LA MOUTURE
La machine est réglée à l’usine avec une mouture qui s’adapte à beaucoup de types de café présents dans le commerce.
Pour modifier la mouture:
Réglage à déclenchement
Appuyer sur le goujon de bloc et tourner la frette. Une fois le réglage a
été identifié, laisser le goujon pour bloquer le réglage. Vérifier toujours
le blocage avant l’allumage de l’appareil. Le réglage doit être effectué
quand le moteur est fermé et quand il n’y a pas de café entre les meules.
(Voir figure F2).
“+” indique le sens de rotation pour augmenter le grain du café moulu
“-” pour réduire le grain du café moulu
Réglage micrométrique
TTourner les poignées horizontales de réglage pour changer la
granulométrie du café moulu. Le réglage micrométrique n’a pas besoin
de blocage. Régler la mouture quand le moteur allumé s’il y a du café
entre les meules et quand le moteur est fermé s’il n’y a pas de café. (Voir
figure F3).
“+”indique le sens de rotation pour augmenter le grain du café moulu
“-” pour réduire le grain du café moulu
Si la distribution de la machine à café est lente, la mouture est trop
fine, alors que si la distribution est rapide, la mouture est trop grosse. Plusieurs facteurs peuvent également influencer
la distribution du café : la quantité de café, le pressage, le réglage de la machine expresso, le nettoyage des filtres et les
conditions climatiques.
F2
F3
F1

FRANÇAIS
15
6-2 RÉGLAGE DE LA DOSE
Pour extraire les doses, tirer le levier doseur.
L’appareil est réglé par le producteur avec un réglage d’environ 7 grammes.
Pour modifier la dose, tourner le pommeau à l’intérieur du doseur dans le
sens des aiguilles d’une montre (plus petite dose) ou dans le sens contraire
des aiguilles d’une montre (plus grande dose). Voir figure F4.
Ne jamais remplir le doseur au-delà des 2/3 de la capacité.
7 MAINTENANCE
La maintenance doit être effectuée uniquement par un personnel technique
qualifié. Toute maintenance qui prévoit la substitution de composants usés
doit toujours être effectuée avec des pièces de rechange originales.
8 NETTOYAGE
ENLEVER LA FICHE DE LA PRISE D’ALIMENTATION AVANT D’EFFECTUER TOUT TYPE D’OPERATION DE NETTOYAGE.
NE JAMAIS PLONGER L’APPAREIL DANS L’EAU.
NOUS VOUS CONSEILLONS DE NE PAS UTILISER DE PRODUITS ABRASIFS, CEUX-CI POURRAIENT ABIMER LES PARTIES
BRILLANTES DE L’APPAREIL.
Pièces mobiles en plastique
Enlever les pièces mobiles de la machine (couvercle, trémie, plateau, etc.) et les laver avec beaucoup d’eau et du détergent
neutre (ne jamais les laver dans le lave-vaisselle).
Corps machine
Pour le nettoyage du corps de la machine, utiliser des chiffons humides en faisant attention aux pièces sensibles à l’eau,
comme l’interrupteur (H).
9 EMBALLAGE ET FIN DE VIE DE L’APPAREIL
9-1 ELIMINATION DE L’EMBALLAGE
Après avoir ouvert l’emballage, vérifier si l’appareil est intègre et s’il n’y a pas de dommages dus au transport, dans le cas
contraire, s’adresser au revendeur ou là où l’achat a eu lieu. L’emballage ne doit pas être laissé à la portée des enfants et
doit être conservé jusqu’à la fin de la garantie.
9-2 ELIMINATION DE L’APPAREIL À LA FIN DE SA VIE UTILE
A la fin de sa vie utile, l’appareil doit être rendu non opérationnel en enlevant son câble d’alimentation. L’appareil ne doit pas
être abandonné dans l’environnement, mais doit être démonté et éliminé en fonction du type de matériau. La société conseille
que le démontage et l’élimination soient confiés à des sociétés spécialisées dans ces opérations.
Ce produit est soumis à la directive 2002/96/EC du Parlement européen et du Conseil de l’Union Européenne sur les déchets
des appareillages électriques et électroniques (RAEE).
Le symbole placé sur la plaquette technique indique qu’à la fin de sa vie utile, l’appareil ne doit pas être traité comme
un déchet domestique, mais doit être acheminé vers des centres de collecte différenciée pour appareillages électriques et
électroniques. Pour de plus amples informations concernant l’élimination, s’adresser au revendeur ou au bureau compétent
de l’endroit où se trouve la machine. La collecte différenciée et l’élimination contribuent à maintenir l’environnement plus
propre et à réduire les risques pour la santé publique.
10 BRUIT AÉRIEN
Les testes sonores exécutés conformement à la loi en vigueur ont établi que le valeur maximum pour tous les moulins à café,
moulins doseur et moulin “on demand” de notre production est 78dB (A).
+
-
F4

16
DEUTSCH
Dieses Gefahrzeichen weist darauf hin, dass die entsprechenden Anweisungen strikt beachtet werden müssen, um
mögliche Maschinenschäden oder Unfälle des zu vermeiden.
1 ALLGEMEINE HINWEISE
Vor Benutzung des Gerätes muss folgende Gebrauchsanweisung aufmerksam durchgelesen werden. Die Gebrauchsanweisung
enthält die Hinweise für die Sicherheit, für eine korrekte Benutzung und für die Wartung des Gerätes.
Die Herstellerfirma entwickelt Ihre Produkte kontinuierlich weiter und behält sich das Recht vor, Änderungen bzw.
Verbesserungen an jedem Produkt und/oder der Gebrauchsanweisung vorzunehmen.
2 BESCHREIBUNG DES GERÄTES
3 TECHNISCHE DATEN
A) Bohnenbehälter-Deckel
B) Bohnenbehälter
C) Schließring des Kaffeetrichters
D) Dosierbehälter-Deckel
E) Dosierer
F) Dosierhebel
G) Druckscheibe
H) Schalter ON/OFF
I) Teller für Siebträger
L) Mühlenkörper
M) Beutelabstellen
A
B
D
E
G
I
C
F
L
H
A
B
M
I
C
H
L
Ø 75 mm
800 W
1400 rpm
P
250 x 360 x h 635
15,5 Kg
Ø 65 mm
340 W
1400 rpm
P
220 x 370 x h 600
13 Kg
M4 / M5 / M5 PLUS MX M7
25 s ON / 90 s OFF40 s ON / 120 s OFF
Ø 58 mm
250 W
1400 rpm
P
190 x 210 x h 430 / h 470 / h 505
9 Kg
60 s ON / 180 s OFF
Durchmesser Mahlscheiben
Leistung
Motor
Dosiszähler
Abmessungen (mm)
Reingewicht
Der betriebskreislauf (230 V - 50 Hz)

DEUTSCH
17
4 INFORMATIONEN ÜBER DIE SICHERHEIT
Dieses Gerät wurde ausschließlich für das Mahlen von Kaffeebohnen konzipiert, daher haftet die Herstellerfirma nicht für
eventuelle Schäden oder Unfälle, die auf das Mahlen von sonstigen Lebensmitteln außer Kaffee zurückzuführen sind.
Im Falle eines unsachgemäßen Gebrauchs verfällt die Garantie. Die Installation und technischen Eingriffe am Gerät dürfen nur
durch Fachpersonal durchgeführt werden. Das Gerät ist nicht wasserdicht und demzufolge muss es fern von Wasserstrahlen
und sehr feuchte Stellen aufgestellt werden. Das Gerät ist für den Fachgebrauch und nicht für den Haushalt bestimmt und
darf daher nur von Fachpersonal bedient werden. Das Gerät darf nicht von Kindern und körperlich oder geistig beeinträchtigten
oder unerfahrenen Personen benutzt werden oder nur dann, wenn diese in der Benutzung des Gerätes geschult wurden oder
überwacht werden.
Das Gerät darf nicht in Greifnähe von Kindern stehen. Kinder müssen von der Anlage ferngehalten werden.
Die Maschine ist mit einem Motor-Wärmeschutz ausgestattet. Sollte dieser Schutz ausgelöst und das Gerät blockiert werden,
muss der Stecker aus der Stromsteckdose herausgezogen werden und man muss mindestens eine Stunde vor dem neuen
Gebrauch des Gerätes warten.
Wenn das Stromkabel beschädigt ist, muss dieses, um jegliches Risiko zu vermeiden, vom Hersteller bzw. seinem technischen
Kundendienst oder einer ähnlichen, ausgebildeten Person gewechselt werden.
VOR JEDEM WARTUNGS- ODER REINIGUNGSEINGRIFF MUSS DER STECKER AUS DER STROMSTECKDOSE HERAUSGEZOGEN
WERDEN.
5 INSTALLATION UND ANSCHLUSS DES GERÄTES AM STROMNETZ
Die Installation darf nur durch qualifiziertes Fachpersonal durchgeführt werden. Die Installation muss entsprechend den
landesüblichen Sicherheitsnormen erfolgen. Es müssen insbesondere folgende Vorschriften beachtet werden:
Gesetzliche Bestimmungen hinsichtlich Unfallverhütung und Brandschutz sowie die Verordnungen des zuständigen
Elektrizitätswerkes. Das Gerät muss auf eine flache Oberfläche aufgestellt werden, damit eine gute Stabilität gewährleistet
werden kann. Bevor das Gerät an das Stromnetz angeschlossen wird:
- Das Loch der Glocke genau auf ein Loch des Schließrings positionieren (siehe Abb. F1). Verhindert der Ventilator das
MX 900
Ø 65 mm
-
300 W
900 rpm
P
220 x 370 x h 600
13 Kg
40 s ON / 150 s OFF
M7 900
Ø 75 mm
-
600 W
900 rpm
P
250 x 360 x h 635
15,5 Kg
25 s ON / 60 s OFF
MXK
-
Ø 63 mm
350 W
350 rpm
P
220 x 370 x h 600
15 Kg
40 s ON / 160 s OFF
M7K
-
Ø 68 mm
520 W
350 rpm
P
250 x 360 x h 635
16 Kg
25 s ON / 90 s OFF
MC6
Ø 65 mm
340 W
1400 rpm
220 x 370 x h 600
12,5 Kg
40 s ON / 120 s OFF
MC7
Ø 75 mm
800 W
1400 rpm
250 x 360 x h 635
15 Kg
25 s ON / 90 s OFF
A3
-
-
-
P
220 x 210 x h 345
8 Kg
-
MC4 / MC5 / MC5 PLUS
Ø 58 mm
250 W
1400 rpm
190 x 210 x h 430 / h 470 / h 505
8,5 Kg
60 s ON / 180 s OFF
Mahlwerk Konisch
Durchmesser Mahlscheiben
Leistung
Motor
Dosiszähler
Abmessungen (mm)
Reingewicht
Der betriebskreislauf (230 V - 50 Hz)
Durchmesser Mahlscheiben
Leistung
Motor
Dosiszähler
Abmessungen (mm)
Reingewicht
Der betriebskreislauf (230 V - 50 Hz)

18
DEUTSCH
Abnehmen des Dosiererdeckels bzw. das Niederdrücken des Arretierstifts am
Schließring, muß das Loch gewechselt werden. Das Ganze festschrauben.
- muss überprüft werden, dass der Schalter ausgeschaltet ist (Position 0) und
dass die auf dem Typenschild angegebene Betriebsspannung und Frequenz
des Geräts mit der Netzspannung übereinstimmen
Es ist wesentlich, dass die Netzsteckdose an eine funktionstüchtige und den
gültigen Sicherheitsnormen entsprechende Erdungsanlage angeschlossen ist.
6 BETRIEB DES GERÄTES
Den Bohnenbehälter korrekt und fest auf den oberen Mühlenhalter positionieren,
dann die Kaffeebohnen eingeben. Den Bohnenbehälter mit dem dazugehörenden
Deckel schließen und die untere Verschlussklappe des Bohnenbehälters öffnen,
damit die Kaffeebohnen in die innere Mahlkammer gelangen.
Das Gerät darf niemals ohne Bohnenbehälter oder der Bohnenbehälter ohne Deckel benutzt werden.
Das Gerät durch Drücken des Hauptschalters einschalten (Position 1). Am automatische Dosiermühle sind der Start und
der Stopp automatisch. Nachts oder bei Abwesenheit von zuständigem Personal den Schalter ausschalten. Bei der Version
des Kaffeemühle mit Timer wird der Mahlvorgang begonnen indem man den Timer-Schalter im Uhrzeigersinn dreht. Der
Mahlvorgang endet mit Ablauf der eingestellten Zeit. Um den Timer vorzeitig auszuschalten drehen Sie den Timer-Schalter
gegen den Uhrzeigersinn zurück.
6-1 EINSTELLUNG DES MAHLGRADES
Die Maschine wird im Werk mit einem für zahlreiche im Handel verfügbare Kaffeetypen geeigneten Mahlgrad eingestellt.
Will man den Mahlgrad ändern:
Stufeneinstellung
Den Mahlstoppstift drücken und den Einstellknopf in die gewünschte
Richtung drehen. Wurde die gewünschte Einstellung gefunden, ist der
Stift wieder freizugeben, um die vorgenommene Einstellung festzusperren.
Sperre vor jeder Einschaltung prüfen. Die Einstellung ist bei abgeschaltetem
Motor und ohne Kaffeebohnen zwischen den Mahlscheiben vorzunehmen
(siehe Abb. F2). “+” zeigt die Drehrichtung zur Erhöhung der gemahlenen
Kaffeekörnung an. “-” zur Verringerung der gemahlenen Kaffeekörnung.
Mikrometereinstellung
Die waagerechten Einstellknöpfchen drehen, um die Korngröße des
gemahlenen Kaffees zu ändern. Die mikrometrische Einstellung bedarf
keiner Sperre. Befindet sich zwischen den Mahlscheiben Kaffee, ist der
Mahlgrad bei eingeschaltetem Motor einzustellen; ohne Kaffee dagegen
bei abgeschaltetem Motor (siehe Abb. F3). “+” zeigt die Drehrichtung
zur Erhöhung der gemahlenen Kaffeekörnung an. “-” zur Verringerung
der gemahlenen Kaffeekörnung. Es empfiehlt sich ferner, bei jeder
Korngrößenänderung immer nur wenige Gramm Kaffee zu mahlen und zu
verwenden. Auf diese Weise wird die kleine vorgemahlene Kaffeemenge
beseitigt, die sich im Gerät befindet.
Wenn der Kaffee zu langsam ausgegeben wird, ist der Mahlgrad
der Kaffeebohnen zu fein, wird er dagegen zu schnell ausgegeben, ist der Mahlgrad zu grob. Viele Faktoren können
die Kaffeeausgabe beeinflussen, zum Beispiel die Kaffeemenge, das Pressen des Kaffeepulvers, die Einstellung der
Espressomaschine, die Reinigung der Filter sowie die klimatischen Zustände.
F2
F3
F1

DEUTSCH
19
6-2 EINSTELLUNG DER DOSIERMENGE
Zur Entnahme der Dosiermenge muss der Dosierhebel gezogen werden.
Das Gerät wird im Werk mit einer Einstellung von etwa 7 Gramm Kaffeepulver
eingestellt. Will man diese Menge ändern, muss der Knopf im Dosierer im
Uhrzeigersinn (kleinere Menge) bzw. entgegen dem Uhrzeigersinn (größere
Menge) gedreht werden. Siehe Abb. F4.
Der Dosierer darf nie über 2/3 seiner Kapazität gefüllt werden.
7 WARTUNG
Die Wartung des Gerätes darf nur durch qualifiziertes Fachpersonal erfolgen.
Bei jeder Wartung, die eine Auswechslung von abgenutzten Bauteilen
vorsieht, müssen immer originale Ersatzteile verwendet werden.
8 REINIGUNG
VOR JEDER REINIGUNG MUSS DER NETZSTECKER AUS DER STECKDOSE GEZOGEN WERDEN. DAS GERÄT DARF NIEMALS INS
WASSER GETAUCHT WERDEN. WIR EMPFEHLEN, KEINE SCHEUERMITTEL ZU BENUTZEN, DIESE KÖNNEN DIE BLANKEN TEILE
DES GERÄTES BESCHÄDIGEN.
Abnehmbare Plastikbauteile
Die mobilen Plastikbauteile (Deckel, Glocke, Tellerchen von der Maschine abbauen und mit reichlich Wasser und neutralem
Reinigungsmittel abwaschen (niemals in der Geschirrspülmaschine waschen).
Maschinenkörper
Den Maschinenkörper mit einem feuchten Tuch reinigen und dabei auf die wasserempfindlichen Teile, wie z.B. die Schalter
(H), Acht geben.
9 ENTSORGUNG
9-1 ENTSORGUNG DER VERPACKUNG
Die Verpackung öffnen und überprüfen, ob das Gerät unversehrt ist und keine Transportschäden aufweist. Sollte dies der Fall
sein, wenden Sie sich an den Wiederverkäufer oder an die Stelle, wo Sie das Gerät gekauft haben.
Die Verpackung darf nicht in Greifnähe von Kindern gelassen werden und sollte bis zum Ablauf der Garantiezeit/Gewährleistung
aufbewahrt werden.
9-2 ENTSORGUNG DES ALTGERÄTES
Am Ende seiner Lebenszeit muss das Gerät unbrauchbar gemacht werden, indem das Stromversorgungskabel abgetrennt
werden muss. Das Gerät darf nicht in die Umwelt gelassen werden, sondern muss zerlegt und entsprechend der Art des
Materials entsorgt werden. Die Herstellerfirma empfehlt mit der Zerlegung und Entsorgung des Gerätes eine hierfür
spezialisierte Fachfirma zu beauftragen.
Dieses Produkt unterliegt der Richtlinie 2002/96/EG des Europäischen Parlaments und des Rates der Europäischen Union über
Elektro- und Elektronik-Altgeräte. Das Symbol auf dem technischen Schild weist darauf hin, dass das Gerät am Lebensende
nicht als normaler Haushaltsmüll behandelt werden darf sondern an spezialisierte Firmen für getrennte Müllsammlung
von elektrischen und elektronischen Geräten abgegeben werden muss. Für nähere Informationen bezüglich der Entsorgung
wenden Sie sich bitte an den Wiederverkäufer oder an das zuständige Büro in Ihrem Gebiet. Die getrennte Müllsammlung und
die sorgfältige Entsorgung tragen dazu bei, die Umwelt sauberer zu halten und die Gefahren für die menschliche Gesundheit
zu verringern.
10 GERÄUSCHENTWICKLUNG
Die nach obigen Normen erfolgten Lautstärkenmessungen haben ergeben, dass alle Kaffeemühlen, Kaffeemühlen mit
Dosierung und Frische-Kaffemühlen mit Mahlvorgang auf Anfrage den Wert von 78 Dezibel nicht überschreiten.
+
-
F4

20
ESPAÑOL
Señal de peligro que indica que hay que respetar estrictamente las instrucciones correspondientes para evitar
posibles daños en la máquina o infortunios del operador.
1 ADVERTENCIAS GENERALES
Antes de poner en marcha el equipo, lea atentamente el presente manual de instrucciones. En su interior encontrará
indicaciones sobre la seguridad, el uso y el mantenimiento de la máquina.
La empresa productora tiene una política de continuo desarrollo y se reserva el derecho de aplicar modificaciones y mejorías
a cualquier producto y manual.
2 DESCRIPCIÓN DE LA MÁQUINA
3 CARACTERISTICAS TECNICAS
A) Tapa tolva café en granos
B) Tolva café en granos
C) Mampara de cierre de
la campana de café
D) Tapa del dosificador
E) Dosificador
F) Maneta dosificador
G) Prensa
H) Interruptor ON/OFF
I) Platillo
L) Cuerpo maquina
M) Pinza bolsa café
A
B
D
E
G
I
C
F
L
H
A
B
M
I
C
H
L
Ø 75 mm
800 W
1400 rpm
P
250 x 360 x h 635
15,5 Kg
Ø 65 mm
340 W
1400 rpm
P
220 x 370 x h 600
13 Kg
M4 / M5 / M5 PLUS MX M7
25 s ON / 90 s OFF40 s ON / 120 s OFF
Ø 58 mm
250 W
1400 rpm
P
190 x 210 x h 430 / h 470 / h 505
9 Kg
60 s ON / 180 s OFF
Muelas planas
Potencia
Motor
Dispositivo Contadosis
Dimensiones
Peso neto
Ciclo de funcionamiento (230 V - 50 Hz)
La pagina si sta caricando...
La pagina si sta caricando...
La pagina si sta caricando...
La pagina si sta caricando...
-
 1
1
-
 2
2
-
 3
3
-
 4
4
-
 5
5
-
 6
6
-
 7
7
-
 8
8
-
 9
9
-
 10
10
-
 11
11
-
 12
12
-
 13
13
-
 14
14
-
 15
15
-
 16
16
-
 17
17
-
 18
18
-
 19
19
-
 20
20
-
 21
21
-
 22
22
-
 23
23
-
 24
24


MACAP M4 Series Original Instructions Manual
- Categoria
- Accessori per la preparazione del caffè
- Tipo
- Original Instructions Manual
in altre lingue
- English: MACAP M4 Series
- français: MACAP M4 Series
- español: MACAP M4 Series
Altri documenti
-
La Marzocco VULCANO Manuale utente
-
Gaggia MD64 Manuale del proprietario
-
la Pavoni ZIP BASE Manuale utente
-
 Fiorenzato F4 ECO BY JOHN Manuale utente
-
Eureka Olympus_E Series User Handbook Manual
-
Eureka MYTHOS 220 Scheda dati
-
Rancilio KRYO 65 Manuale utente
-
-
-
la Pavoni JOLLY JL Manuale utente
