
Production technologies
Mod. 61220047A - Ago/2016
1
S.p.A.
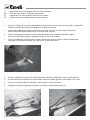
2 - Estrarre l’albero di trasmissione dal tubo telescopico ed applicare il grasso all’estremità.
2 - Extract the drive shaft from the telescopic tube and apply grease to the end of the shaft.
2 - Extraer el eje del tubo telescópico y aplicarle grasa en el extremo.
2 - Dégager l’arbre du tube télescopique et enduire l’extrémité de graisse.
IT - Operazioni di assemblaggio transmissione-motore
EN - Transmission-engine assembly operations
ES - Operaciones de ensamblaje transmisión-motor
FR - Opérations d’assemblage transmission-moteur
1 - Aprire il cilindro di cartone contenente il braccio di trasmissione rimuovendo il coperchio.
Estrarre il tubo telescopico ed adagiarlo sul piano di lavoro.
1 - Open the cardboard cylinder containing the transmission arm by removing the lid.
Extract the telescopic tube and lay it on the work surface.
1 - Abrir el embalaje de cartón cilíndrico del brazo de transmisión quitando el tapón.
Extraer el tubo telescópico y apoyarlo sobre la mesa de trabajo.
1 - Ouvrir l’emballage cylindrique en carton du bras de transmission en ôtant le bouchon.
Dégager le tube télescopique et le poser sur le plan de travail.

Production technologies
Mod. 61220047A - Ago/2016
2
S.p.A.
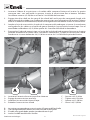
3 - Innestare l’albero di trasmissione sul codolo della campana frizione ed inserire la guaina
corrugata con i cavi nell’anello in gomma. Inserire la trasmissione no a battuta. Prendere
l’avvitatore tarato a 4,5÷5,0 Nm e serrare le 2 viti M5x30 del morsetto.
3 - Engage the drive shaft on the tang of the clutch bell and insert the corrugated sheath with
cables through the rubber ring. Engage the transmission arm fully against the terminal. Take an
electric screwdriver calibrated to 4,5-5,0 Nm and tighten the two M5x30 screws on the terminal.
3 - Acoplar el eje de transmisión al codo de la campana del embrague e insertar la envolvente
corrugada con los cables en el anillo de goma; introducir la transmisión hasta el tope. Con el
atornillador calibrado en 4,5÷5,0 Nm apretar los 2 tornillos M5x30 de la abrazadera.
3 - Emmancher l’arbre de transmission sur la tige de la cloche d’embrayage et faire passer la gaine
ondulée renfermant les câbles dans l’anneau en caoutchouc ; insérer la transmission à fond.
Prendre une visseuse étalonnée à 4,5÷5,0 Nm et serrer les 2 vis M5x30 du point de xation.
A - Innestare il braccio di trasmissione no a battuta
A - Engage the transmission arm fully.
A - Introducir la transmisión hasta el tope
A - Emboîter la transmission à fond
C - Serrare a 4,5÷5,0 Nm
C - Tighten to 4,5-5,0 Nm
C - Apretar a 4,5÷5,0 Nm
C - Serrer à 4,5÷5,0 Nm
B - La guaina corrugata deve essere inserita all’interno dell’occhiello
B - The corrugated cable sheath must be inserted in the eyelet
B - El cable corrugado debe quedar introducido en el ojal
B - Insérer le câble ondulé dans l’oeillet
A
BC

Production technologies
Mod. 61220047A - Ago/2016
3
S.p.A.
E
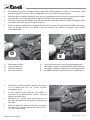
D - Posizione corretta
D - Correct position
D - Posición correcta
D - Position correcte
5 - Posizionare il fermacavo per tenere in posizione
i cavi. Imboccare le 3 viti, senza serrarle
completamente.
5 - Fit the cable clamp to keep the cables in
position. Screw down the 3 screws, without
tightening them fully.
5 - Bloquear los cables para mantenerlos en
posición. Introducir los 3 tornillos sin apretarlos
del todo.
5 - Placer le dispositif d’arrêt du l pour maintenir
les câbles dans la bonne position. Poser les 3 vis
sans les serrer à fond.
4 - Posizionare la guaina corrugata nella sede della cua motore e inserire i cavi elettrici nelle
apposite guide, assicurarsi di aver alloggiato tutti i cavi nelle rispettive guide.
4 - Position the corrugated sheath in the seat on the engine cover and insert the electrical cables
in the guides, ensuring that all the cables are tted in the corresponding guides.
4 - Poner la envolvente corrugada en el alojamiento del casco del motor e insertar y asegurar todos
los cables eléctricos en sus respectivas guías.
4 - Placer la gaine ondulée dans le logement du carter moteur et introduire les câbles électriques
dans les guides prévus à cet eet. S’assurer que tous les câbles sont dans leurs guides
correspondants.
E - I cavi devono essere inseriti negli alloggiamenti
E - The cables must be securely tted in the channels
E - Los cables se deben introducir en los alojamientos
E - Les câbles doivent se trouver dans les logements
D

Production technologies
Mod. 61220047A - Ago/2016
4
S.p.A.
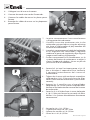
6 - Collegare i cavi di massa al motore
6 - Connect the earth wires to the Faston tabs.
6 - Conectar los cables de masa a las placas porta-
Fastom.
6 - Brancher les câbles de masse sur les plaquettes
porte Fastom.
7 - Inserire correttamente il cavo acceleratore
sull’aggancio del carburatore.
7 - Correctly insert the accelerator wire in the
carburettor grip and adjust using the adjusting
pin, leave a small amount of play between the
wire and the carburettor.
7 - Introducir correctamente el cable del acelerador
en el enganche del carburador y regularlo
mediante el perno de regulación; dejar algo de
juego entre el cable y el carburador.
7 - Insérer correctement le l d’accélérateur sur le
système de xation du carburateur et régler à
travers l’embout de réglage ; laisser un peu de
jeu entre le l et le carburateur.
8 - Serrare le 3 viti con l’avvitatore tarato a 1,0÷1,5
Nm e chiudere il coperchio ltro. Vericare
il corretto funzionamento del sistema di
accelerazione.
8 - Tighten the 3 screws with an electric screwdriver
calibrated to 1,0-1,5 Nm and close the lter
cover. Check that the acceleration system works
correctly.
8 - Apretar los 3 tornillos con el atornillador
calibrado en 1,0÷1,5 Nm y cerrar la tapa del ltro.
Vericar el funcionamiento correcto del sistema
de aceleración.
8 - Serrer les 3 vis à l’aide d’une visseuse étalonnée
à 1,0÷1,5 Nm puis fermer le couvercle du ltre.
Vérier si le système d’accélération fonctionne
correctement.
F
F - Serrare le viti a 1,0÷1,5 Nm
F - Tighten the screws to 1,0-1,5 Nm
F - Apretar los tornillos a 1,0÷1,5 Nm
F - Serrer les vis à 1,0÷1,5 Nm
-
 1
1
-
 2
2
-
 3
3
-
 4
4


Efco PTX 2710 Manuale del proprietario
- Tipo
- Manuale del proprietario
- Questo manuale è adatto anche per
in altre lingue
- English: Efco PTX 2710 Owner's manual
- français: Efco PTX 2710 Le manuel du propriétaire
- español: Efco PTX 2710 El manual del propietario
Altri documenti
-
Husqvarna SM 570 Manuale utente
-
-
-
-
Malaguti 4T Series Workshop Manuals
-
-
Yamaha 5UME Manuale del proprietario
-