Sonicare HX8462/01 Manuale utente
- Categoria
- Filo interdentale elettrico
- Tipo
- Manuale utente
Questo manuale è adatto anche per


English
Introduction
Congratulations on your purchase and welcome to
Philips! To fully benefit from the support that
Philips offers, register your product at
www.philips.com/welcome.
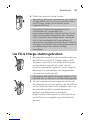
Use AirFloss Ultra with your favorite mouthwash as
part of your oral care routine. In addition to
brushing, AirFloss Ultra helps reduce the plaque in
between teeth in order to improve your gum
health.
Important
Read this user manual carefully before you use the
appliance and save it for future reference.
Danger
- Keep the charger away from water. Do not
place or store it over or near water
contained in a bathtub, washbasin, sink etc.
Do not immerse the charger in water or any
other liquid. After cleaning, make sure the
charger is completely dry before you
connect it to the mains.
Warning
- The mains cord cannot be replaced. If the
mains cord is damaged, discard the charger.
- Always have the charger replaced with one
of the original type in order to avoid a
hazard.
6English

- Use only charger type HX6100 provided
with the AirFloss Ultra to recharge the
battery.
- If the appliance is damaged in any way
(AirFloss Ultra nozzle, handle and/or
charger), stop using it.
- This appliance contains no serviceable
parts. If the appliance is damaged, contact
the Consumer Care Centre in your country
(see chapter ‘Guarantee and support').
- Do not use the charger outdoors or near
heated surfaces.
- This appliance can be used by children
aged from 8 years and above and persons
with reduced physical, sensory or mental
capabilities or lack of experience and
knowledge if they have been given
supervision or instruction concerning use of
the appliance in a safe way and understand
the hazards involved. Children shall not play
with the appliance. Cleaning and user
maintenance shall not be made by children
unless they are older than 8 and supervised.
7
English

Caution
- Consult your dentist before you use this
appliance if you have had recent oral or
gum surgery, suffer from an ongoing dental
condition, had extensive dental work in the
previous 2 months, or have suspected issues
with your dental work (filings, crowns, etc.).
- Consult your dentist if excessive bleeding
occurs after using this appliance or if
bleeding continues to occur after 4 weeks of
use.
- If you have medical concerns, consult your
doctor before you use this appliance.
- This Philips appliance complies with the
safety standards for electromagnetic
devices. If you have a pacemaker or other
implanted device, contact your physician or
the appliance manufacturer of the
implanted appliance prior to use.
- Do not use attachments other than the ones
recommended by the manufacturer.
- Do not exert excessive pressure on the
nozzle tip of the nozzle.
8English

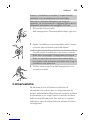
- To avoid physical injury, do not fill the
reservoir with hot water. Do not put foreign
objects in the reservoir.
- Only use the AirFloss Ultra for its intended
purpose as described in this user manual.
- To avoid physical injury, do not direct the
spray under the tongue or into the ear, nose,
eye or other sensitive area.
- The AirFloss Ultra and Fill & Charge station
needs to be cleaned on a regular basis to
assure proper function and to minimize
build up of unwanted biofilm. (see
'Cleaning')
- Do not clean the AirFloss Ultra nozzle, the
handle, the charger, the water reservoir and
its cover in the dishwasher or a microwave.
- To avoid an ingestion hazard, do not put
isopropyl alcohol or other cleaning fluids in
the reservoir.
- The AirFloss Ultra is a personal care
appliance and is not intended for use on
multiple patients in a dental practice or
institution.
9
English

Electromagnetic fields (EMF)
This Philips appliance complies with all applicable
standards and regulations regarding exposure to
electromagnetic fields.
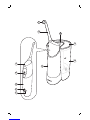
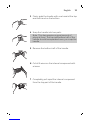
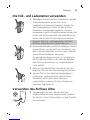
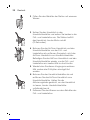
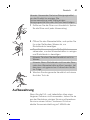
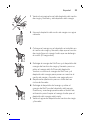
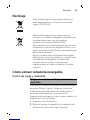
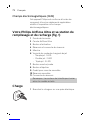
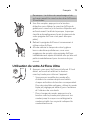
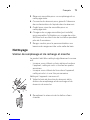
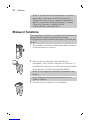
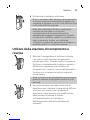
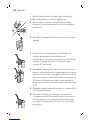
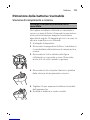
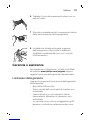
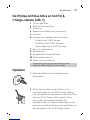
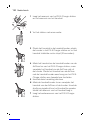
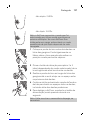
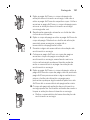
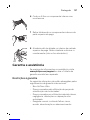
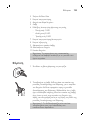
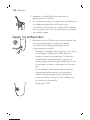
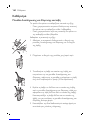
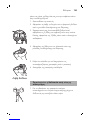
Your Philips AirFloss Ultra and Fill & Charge
station (Fig. 1)
1Nozzle tip
2AirFloss Ultra nozzle
3Activation button
4Reservoir and reservoir door
5Handle
6Charge & burst mode indicators
-Single burst: 1 LED
-Double burst: 2 LEDs
-Triple burst: 3 LEDs
7Power/mode button
8Eject button
9Removable handle cup
10 Removable reservoir
11 Reservoir lid
Note: The content of the box may vary based
on the model purchased.
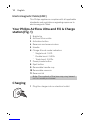
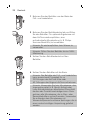
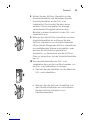
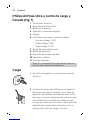
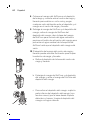
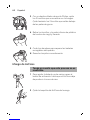
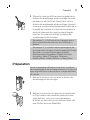
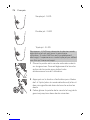
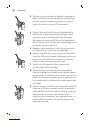
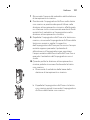
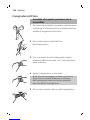
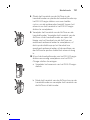
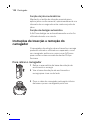
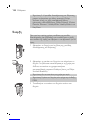
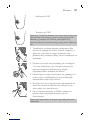
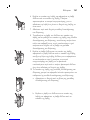
Charging
1Plug the charger into an electrical outlet.
10 English

2Place the AirFloss handle into the Fill & Charge
station cup, with the AirFloss reservoir door
facing toward the Fill & Charge station. Make
sure the handle is fully inserted into the handle
cup such that the holes in the handle reservoir
door align with ports in the Fill & Charge station
post.
Note 1: The AirFloss will only charge if placed in
the direction indicated above.
Note 2: The Fill & Charge station can charge
other Philips Sonicare devices, including the
following Philips Sonicare Rechargable Power
Toothbrushes: 3-Series, Flexcare, Flexcare+,
HealthyWhite, HealthyWhite+ and EasyClean.
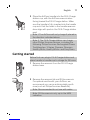
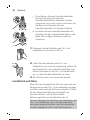
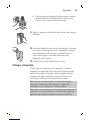
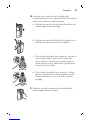
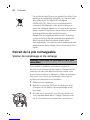
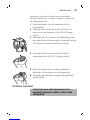
Getting started
Before first use, plug in Fill & Charge station and
place handle in handle cup to charge for 24 hours.
1Remove the reservoir from the Fill & Charge
station base.
2Remove the reservoir lid and fill the reservoir.
For optimal results with your AirFloss, we
recommend you use an antimicrobial mouth
rinse (such as Philips Sonicare BreathRx).
Note: Recommended to not use with water.
Note: Fill the reservoir only up to the MAX
indication.
11
English

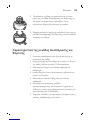
3Place the reservoir lid on the reservoir.
4Place the reservoir on the base.
Note: The Fill & Charge station reservoir holds
enough liquid for approximately 23 fillings of
your AirFloss Ultra or 40 fillings of your original
AirFloss.
Note: Do not use with mouthwash containing
isopropyl myristate (e.g. Dental Active) or high
concentrations of essential oils, as it may
damage the product. This includes all
mouthwash sold in glass or ceramic packaging.
Also, do not use with mouthwashes containing
hydrogen peroxide, or rinses sold with opaque
packaging.
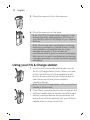
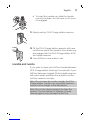
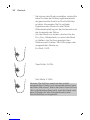
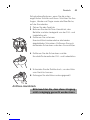
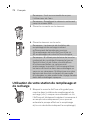
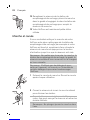
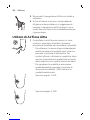
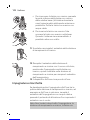
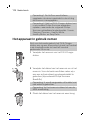
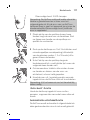
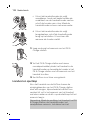
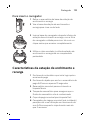
Using your Fill & Charge station
1Lock the AirFloss handle and handle cup into
the Fill & Charge station (click). When you hear
a click, the AirFloss is fully engaged and will
start to fill automatically (you may be able to
hear the pump fill and/or see bubbles
indicating filling).
Note: The Fill & Charge station fills your AirFloss
handle in 10 seconds.
1
2
2Once filled, press the eject button to release the
AirFloss handle and the handle cup (if the eject
button is pressed before the pump stops, the
pump shuts off automatically but your AirFloss
handle reservoir may not be full).
12 English

3Remove the AirFloss handle and begin using
your AirFloss.
4In order to minimize time for your daily oral care
routine, we suggest you refill your AirFloss
handle immediately after use so that it is ready
immediately for the following day's routine.
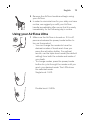
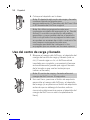
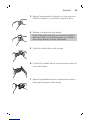
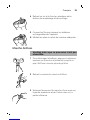
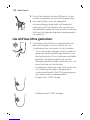
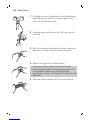
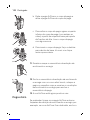
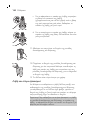
Using your AirFloss Ultra
1Make sure the AirFloss is turned on. If it is off,
press and release the power/mode button to
turn on the product.
-You can change the modes to have the
desired number of bursts each time you
press the activation button. For optimal
results, use the triple burst mode (the default
setting) from both the outside and inside of
your teeth.
-To change modes, press the power/mode
button to cycle through the modes until you
reach your desired mode. The LEDs show
the selected mode:
Single burst: 1 LED
Double burst: 2 LEDs
13
English

Triple burst: 3 LEDs
Note: The AirFloss remembers what mode was
selected last and it is ready for the next use. If your
AirFloss becomes fully drained of power, it will go
back to the triple burst default mode once it has
been recharged.
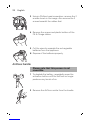
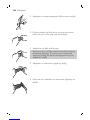
1Place the nozzle tip between two teeth at your
gum line. Slightly close your lips over the nozzle
when it is in place, to avoid splashing.
2Press the activation button to deliver 1-3 bursts
(depending on the selected mode) of air and
micro-droplets of mouthwash between the
teeth.
3Slide the nozzle tip along the gum line until you
feel it settle between the next two teeth.
4Continue until you have sprayed from in front of
and behind all spaces of the teeth, including
behind your back teeth.
5To turn off AirFloss, press and hold the
power/mode button for one second.
Note: Refill the handle reservoir as needed.
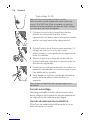
Auto-burst function
Hold the activation button to deliver bursts
continuously, approximately one second between
set of bursts.
Automatic shut-off function
The AirFloss automatically turns off if it has not
been used for one minute.
14 English

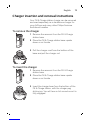
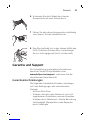
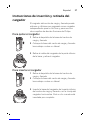
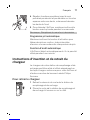
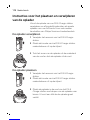
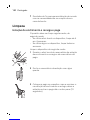
Charger insertion and removal instructions
Your Fill & Charge station charger can be removed
and used separately as a standalone charger for
your AirFloss and many other Philips Sonicare
toothbrush handles.
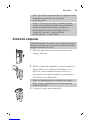
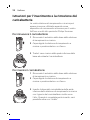
To remove the charger
1Remove the reservoir from the Fill & Charge
station base.
2Place the Fill & Charge station base upside
down or on its side.
3Pull the charger cord from the bottom of the
base and pull the charger out.
To insert the charger
1Remove the reservoir from the Fill & Charge
station base.
2Place the Fill & Charge station base upside
down or on its side.
3Insert the charger base from the bottom of the
Fill & Charge station, with the charger peg
sticking up. You will hear a click sound once it is
fully engaged.
15
English

4Use the cord wrap around the Fill & Charge
station to your desired length.
Fill & Charge station features
1Auto-fill that begins immediately upon handle
engagement
2Quick-fill that fills your AirFloss handle reservoir
completely in just 10 seconds
3Removable reservoir for easy filling and
cleaning
4Reservoir lid to ensure no contamination of
reservoir fluid
5Removable handle cup for easy cleaning
6Removable travel charger (pre-installed) to
allow for on-the-go use of your AirFloss while
away from home longer than 2 weeks
7Cord wrap for customization to your bathroom
storage needs
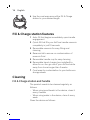
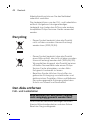
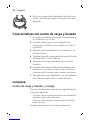
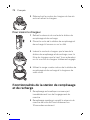
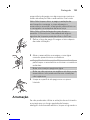
Cleaning
Fill & Charge station and handle
The product needs to be cleaned regularly as
follows:
- When using mouthwash in the device, clean it
every 4 weeks.
- When using water in the device, clean it every
week.
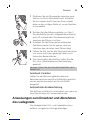
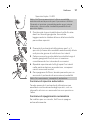
Clean the device as follows:
16 English

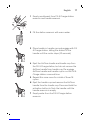
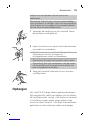
1Empty mouthwash from Fill & Charge station
reservoir and handle reservoir.
2Fill the station reservoir with warm water.
3Place handle in handle cup and engage with Fill
& Charge station; letting the station fill the
handle until the motor stops (10 seconds).
1
2
4Eject the AirFloss handle and handle cup from
the Fill & Charge station, but do not remove the
AirFloss handle from handle cup. Re-engage
AirFloss handle and handle cup to run the Fill &
Charge station a second time.
5Repeat this once more for a total of three fill
cycles.
6Eject the handle cup and remove the AirFloss
handle from the handle cup. Press and hold the
activation button to flush the handle until the
handle reservoir is empty.
7Empty water from the Fill & Charge station
reservoir.
17
English

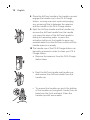
8Place the AirFloss handle in the handle cup and
engage the handle cup to the Fill & Charge
station, running one more cycle and purging
any remaining fluid in between the reservoir
and the handle in the Fill & Charge station.
1
2
9Eject the AirFloss handle and the handle cup,
remove the AirFloss handle from the handle
cup, open the door of the AirFloss handle to
dump out remaining water, or press the
activation button on the handle to spray any
residual water from the AirFloss nozzle until the
handle reservoir is empty.
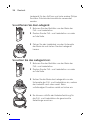
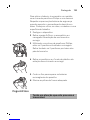
10 The handle cup of the Fill & Charge station can
be easily removed in order to clean your Fill &
Charge station:
a Remove the reservoir from the Fill & Charge
station base.
1
2
b Eject the AirFloss handle and handle cup
and remove the AirFloss handle from the
handle cup.
c To remove the handle cup: pinch the bottom
of the handle cup (using both hands) from its
base from the front and back. Clean the
handle cup with warm water.
18 English

d To insert the handle cup: slide the handle
cup into the base. You will hear a click once
it is engaged.
11 Empty and dry Fill & Charge station reservoir.
12 Fill the Fill & Charge station reservoir with new
mouthrinse, place the handle in the handle cup
and engage with the Fill & Charge station to fill
the handle reservoir.
13 Your AirFloss is now ready to use.
Handle and nozzle
If you want to clean your AirFloss handle between
Fill & Charge station cleanings, for example, if your
AirFloss becomes clogged, fill the handle reservoir
with warm water and press the activation button
until the reservoir is empty.
Note: Do not clean the nozzle, handle, the Fill &
Charge station, handle cup, removable reservoir,
reservoir lid or charger in the dishwasher.
Note: Do not use cleaning agents to clean the
product. The formulation or strength of some
cleaning agents may damage the AirFloss.
19
English

1Remove the nozzle from the handle. Rinse the
nozzle after each use.
2Open the reservoir and rinse it under a faucet to
eliminate residue.
Tip: You can also use a cotton swab to wipe the
reservoir and remove the remaining residue.
Note: Do not immerse the handle in water.
Note: Failure to remove residue from the nozzle
or reservoir may result in an unhygienic
condition.
3Wipe the entire surface of the handle with a
damp cloth.
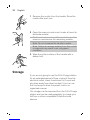
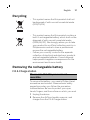
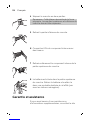
Storage
If you are not going to use the Fill & Charge station
for an extended period of time, unplug it from the
electrical outlet, clean it and store it in a cool and
dry place away from direct sunlight. You can use
the cord wrap to store the power cord in an
organized manner.
The charger can be removed from the Fill & Charge
station and can be used separately to charge your
AirFloss or other compatible Philips Sonicare
devices.
20 English
La pagina si sta caricando...
La pagina si sta caricando...
La pagina si sta caricando...
La pagina si sta caricando...
La pagina si sta caricando...
La pagina si sta caricando...
La pagina si sta caricando...
La pagina si sta caricando...
La pagina si sta caricando...
La pagina si sta caricando...
La pagina si sta caricando...
La pagina si sta caricando...
La pagina si sta caricando...
La pagina si sta caricando...
La pagina si sta caricando...
La pagina si sta caricando...
La pagina si sta caricando...
La pagina si sta caricando...
La pagina si sta caricando...
La pagina si sta caricando...
La pagina si sta caricando...
La pagina si sta caricando...
La pagina si sta caricando...
La pagina si sta caricando...
La pagina si sta caricando...
La pagina si sta caricando...
La pagina si sta caricando...
La pagina si sta caricando...
La pagina si sta caricando...
La pagina si sta caricando...
La pagina si sta caricando...
La pagina si sta caricando...
La pagina si sta caricando...
La pagina si sta caricando...
La pagina si sta caricando...
La pagina si sta caricando...
La pagina si sta caricando...
La pagina si sta caricando...
La pagina si sta caricando...
La pagina si sta caricando...
La pagina si sta caricando...
La pagina si sta caricando...
La pagina si sta caricando...
La pagina si sta caricando...
La pagina si sta caricando...
La pagina si sta caricando...
La pagina si sta caricando...
La pagina si sta caricando...
La pagina si sta caricando...
La pagina si sta caricando...
La pagina si sta caricando...
La pagina si sta caricando...
La pagina si sta caricando...
La pagina si sta caricando...
La pagina si sta caricando...
La pagina si sta caricando...
La pagina si sta caricando...
La pagina si sta caricando...
La pagina si sta caricando...
La pagina si sta caricando...
La pagina si sta caricando...
La pagina si sta caricando...
La pagina si sta caricando...
La pagina si sta caricando...
La pagina si sta caricando...
La pagina si sta caricando...
La pagina si sta caricando...
La pagina si sta caricando...
La pagina si sta caricando...
La pagina si sta caricando...
La pagina si sta caricando...
La pagina si sta caricando...
La pagina si sta caricando...
La pagina si sta caricando...
La pagina si sta caricando...
La pagina si sta caricando...
La pagina si sta caricando...
La pagina si sta caricando...
La pagina si sta caricando...
La pagina si sta caricando...
La pagina si sta caricando...
La pagina si sta caricando...
La pagina si sta caricando...
La pagina si sta caricando...
La pagina si sta caricando...
La pagina si sta caricando...
La pagina si sta caricando...
La pagina si sta caricando...
La pagina si sta caricando...
La pagina si sta caricando...
La pagina si sta caricando...
La pagina si sta caricando...
La pagina si sta caricando...
La pagina si sta caricando...
La pagina si sta caricando...
La pagina si sta caricando...
La pagina si sta caricando...
La pagina si sta caricando...
La pagina si sta caricando...
La pagina si sta caricando...
La pagina si sta caricando...
La pagina si sta caricando...
La pagina si sta caricando...
La pagina si sta caricando...
La pagina si sta caricando...
La pagina si sta caricando...
La pagina si sta caricando...
La pagina si sta caricando...
La pagina si sta caricando...
La pagina si sta caricando...
La pagina si sta caricando...
La pagina si sta caricando...
La pagina si sta caricando...
La pagina si sta caricando...
La pagina si sta caricando...
La pagina si sta caricando...
La pagina si sta caricando...
La pagina si sta caricando...
La pagina si sta caricando...
La pagina si sta caricando...
La pagina si sta caricando...
La pagina si sta caricando...
La pagina si sta caricando...
La pagina si sta caricando...
La pagina si sta caricando...
La pagina si sta caricando...
La pagina si sta caricando...
La pagina si sta caricando...
La pagina si sta caricando...
La pagina si sta caricando...
La pagina si sta caricando...
La pagina si sta caricando...
La pagina si sta caricando...
La pagina si sta caricando...
La pagina si sta caricando...
La pagina si sta caricando...
La pagina si sta caricando...
La pagina si sta caricando...
La pagina si sta caricando...
La pagina si sta caricando...
La pagina si sta caricando...
La pagina si sta caricando...
La pagina si sta caricando...
La pagina si sta caricando...
La pagina si sta caricando...
La pagina si sta caricando...
La pagina si sta caricando...
La pagina si sta caricando...
La pagina si sta caricando...
La pagina si sta caricando...
-
 1
1
-
 2
2
-
 3
3
-
 4
4
-
 5
5
-
 6
6
-
 7
7
-
 8
8
-
 9
9
-
 10
10
-
 11
11
-
 12
12
-
 13
13
-
 14
14
-
 15
15
-
 16
16
-
 17
17
-
 18
18
-
 19
19
-
 20
20
-
 21
21
-
 22
22
-
 23
23
-
 24
24
-
 25
25
-
 26
26
-
 27
27
-
 28
28
-
 29
29
-
 30
30
-
 31
31
-
 32
32
-
 33
33
-
 34
34
-
 35
35
-
 36
36
-
 37
37
-
 38
38
-
 39
39
-
 40
40
-
 41
41
-
 42
42
-
 43
43
-
 44
44
-
 45
45
-
 46
46
-
 47
47
-
 48
48
-
 49
49
-
 50
50
-
 51
51
-
 52
52
-
 53
53
-
 54
54
-
 55
55
-
 56
56
-
 57
57
-
 58
58
-
 59
59
-
 60
60
-
 61
61
-
 62
62
-
 63
63
-
 64
64
-
 65
65
-
 66
66
-
 67
67
-
 68
68
-
 69
69
-
 70
70
-
 71
71
-
 72
72
-
 73
73
-
 74
74
-
 75
75
-
 76
76
-
 77
77
-
 78
78
-
 79
79
-
 80
80
-
 81
81
-
 82
82
-
 83
83
-
 84
84
-
 85
85
-
 86
86
-
 87
87
-
 88
88
-
 89
89
-
 90
90
-
 91
91
-
 92
92
-
 93
93
-
 94
94
-
 95
95
-
 96
96
-
 97
97
-
 98
98
-
 99
99
-
 100
100
-
 101
101
-
 102
102
-
 103
103
-
 104
104
-
 105
105
-
 106
106
-
 107
107
-
 108
108
-
 109
109
-
 110
110
-
 111
111
-
 112
112
-
 113
113
-
 114
114
-
 115
115
-
 116
116
-
 117
117
-
 118
118
-
 119
119
-
 120
120
-
 121
121
-
 122
122
-
 123
123
-
 124
124
-
 125
125
-
 126
126
-
 127
127
-
 128
128
-
 129
129
-
 130
130
-
 131
131
-
 132
132
-
 133
133
-
 134
134
-
 135
135
-
 136
136
-
 137
137
-
 138
138
-
 139
139
-
 140
140
-
 141
141
-
 142
142
-
 143
143
-
 144
144
-
 145
145
-
 146
146
-
 147
147
-
 148
148
-
 149
149
-
 150
150
-
 151
151
-
 152
152
-
 153
153
-
 154
154
-
 155
155
-
 156
156
-
 157
157
-
 158
158
-
 159
159
-
 160
160
-
 161
161
-
 162
162
-
 163
163
-
 164
164
-
 165
165
-
 166
166
-
 167
167
-
 168
168
-
 169
169
-
 170
170


Sonicare HX8462/01 Manuale utente
- Categoria
- Filo interdentale elettrico
- Tipo
- Manuale utente
- Questo manuale è adatto anche per
in altre lingue
- français: Sonicare HX8462/01 Manuel utilisateur
- español: Sonicare HX8462/01 Manual de usuario
- Deutsch: Sonicare HX8462/01 Benutzerhandbuch