Neomounts NM-D775BLACKPLUS Manuale utente
- Categoria
- Supporti da scrivania a schermo piatto
- Tipo
- Manuale utente

NM-D775BLACKPLUS
IT
EN
NL
DE
FR
ES
PT
DK
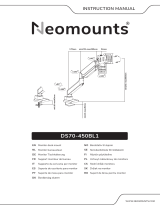
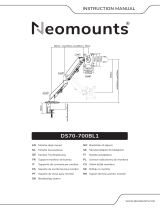
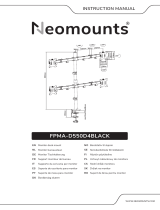
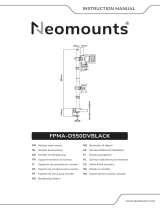
Monitor desk mount
Monitor bureausteun
Monitor Tischhalterung
Support moniteur de bureau
Supporto da scrivania per monitor
Soporte de escritorio para monitor
Suporte de mesa para monitor
Bordbeslag skærm
NO
SE
FI
PL
CS
SK
RO
Bordstativ til skjerm
Skrivbordsfäste för bildskärm
Näytön pöytäteline
Uchwyt nabiurkowy do monitora
Stolní držák monitoru
Držiak na monitor
Suport de birou pentru monitor
WWW.NEOMOUNTS.COM
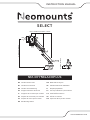
INSTRUCTION MANUAL
±90°
±180°
min270mm-max600mm
75mm
100mm
115mm
-45°
+45°
75mm
100mm
115mm
206mm
70mm min255mm-max320mm
±90°
min10mm-max45mm
±90° ±180°
min10mm-max45mm

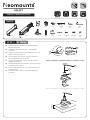
PARTS
NM-D775BLACKPLUS
75x75 -
100x100 mm
27-60 cm 0-63 cm
1-18 kg
10-45mm
Tool Drill
A. (x1) B. (x1) I. (x1) K. (x1) L. (x1) M-C. D5
(x4)
C. (x1) D. (x1) E. (x1) G. 3mm
(x1)
H. 6mm
(x1)
F. M8x150
(x1)
J. M8x90
(x1)
M-A. M4x12
(x4)
M-B. M5x12
(x4)
L
K
H
J
I
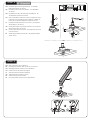
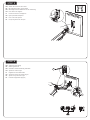
Install the clamp to the desk - for desktop thickness
between 10-45 mm
Installeer de klem aan het bureau - voor bladdikte
10-45 mm
Installieren Sie der Klemme am Schreibtisch - für Tisch-
stärken zwischen 10-45 mm
Vissez la pince sur le bureau - pince prévue pour un
bureau d'épaisseur entre 10-45 mm
Installa il morsetto sulla scrivania - per spessore del
desktop tra 10-45 mm
Instale la abrazadera en el escritorio - para el grosor del
escritorio entre 10-45 mm
Instale a braçadeira na mesa - para espessura de mesa
entre 10-45 mm
Zainstaluj zacisk na biurku - dla grubości pulpitu od
10-45 mm
EN
NL
DE
FR
IT
ES
PT
PL
STEP 1 AClamp

Install the grommet through the desk - for desktop
thickness between 10-45 mm
Installeer de doorvoer in het bureau - voor bladdikte
10-45 mm
Installieren Sie der Tülle durch den Schreibtisch - für
Tischstärken zwischen 10-45 mm
Pour une fixation traversante, vissez le support à travers
le bureau avec la plaque (E) sous le plateau - l'œillet est
prévu pour un bureau d'épaisseur entre 10-45 mm
Installa l'occhiello attraverso la scrivania - per spessore
del desktop tra 10-45 mm
Instale la arandela a través del escritorio - para el grosor
del escritorio entre 10-45 mm
Instale o anel através da mesa - para espessura de mesa
entre 10-45 mm
Zainstaluj przelotkę przez biurko - dla grubości pulpitu
od 10-45 mm
EN
NL
DE
FR
IT
ES
PT
PL
Attach the lower arm to the base
Bevestig het onderste deel van de arm aan de voet
Befestigen Sie den unteren Arm an der Basis
Insérez le bras sur la base du support
Attaccare il braccio inferiore alla base
Adjuntar el brazo inferior a la base
Anexar o braço inferior à base
Przymocuj dolne ramię uchwytu do podstawy
EN
NL
DE
FR
IT
ES
PT
PL
10-45mm
or
±180° ±90°
STEP 2
F
I
H
E
A
D
GG
STEP 1 B Grommet

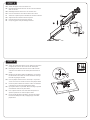
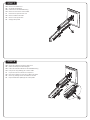
Attach the upper arm to the lower arm
Bevestig het bovenste deel van de arm aan het onderste
deel van de arm
Befestigen Sie den oberen Arm am unteren Arm
Fixez le second bras sur le bras inférieur et le visser
Attaccare la parte superiore del braccio al braccio inferiore
Adjuntar el brazo inferior al brazo superior
Prenda o braço inferior ao braço superior
Przymocuj góne ramię do dolnego ramienia
EN
NL
DE
FR
IT
ES
PT
PL
Attach the VESA plate to the screen. Note: Do not loosen
or tighten the screw in the centre of the VESA plate
Bevestig de VESA-plaat aan het scherm. NB: Draai de
schroef in het midden van de VESA-plaat niet losser of
vaster
Bringen Sie die VESA-Platte am Bildschirm an. Hinweis:
Die Schraube in der Mitte der VESA-Platte darf nicht ge-
löst oder angezogen werden
Fixez la plaque VESA à l'écran. Remarque : ne pas des-
serrer ou serrer la vis située au centre de la plaque VESA
Fissare la piastra VESA allo schermo. Nota: non allentare
o stringere la vite al centro della piastra VESA
Fije la placa VESA a la pantalla. Nota: No afloje ni apriete
el tornillo del centro de la placa VESA
Fixar a placa VESA ao ecrã. Nota: Não desapertar ou
apertar o parafuso no centro da placa VESA
Przymocuj płytkę VESA do ekranu. Uwaga: Nie należy
luzować ani dokręcać śruby znajdującej się na środku
płytki VESA
EN
NL
DE
FR
IT
ES
PT
PL
12
STEP 3
STEP 4
B
G
M-C
M-B
M-A
* Not Included

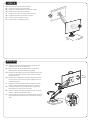
Attach the screen to the mount
Bevestig het scherm aan de steun
Befestigen Sie den Bildschirm an der Halterung
Fixer l'écran au support
Fissare lo schermo al supporto
Fijar la pantalla al soporte
Fixar o ecrã ao suporte
Przymocuj ekran do uchwytu
EN
NL
DE
FR
IT
ES
PT
PL
Adjust the gas spring
Stel de gasveer af
Gasfeder-Höhenverstellung einstellen
Ajuster le ressort à gaz
Regolare la forza della molla
Ajustar la fuerza de resorte de gas
Ajuste a força da mola a gás
Ustawić naprężenie sprężyny
EN
NL
DE
FR
IT
ES
PT
PL
1
2
STEP 5
STEP 6
H
H

Remove the cable cover
Verwijder de kabelgoot
Entfernen Sie die Kabelabdeckung
Retirez les couvercles caches câbles
Rimuovere la copertura del cavo
Retire la cubierta del cable
Remova a tampa do cabo
Zdejmij osłonę kabli
EN
NL
DE
FR
IT
ES
PT
PL
Route the cable(s) through the cable cover
Geleid de kabel(s) door de kabelgoot
Führen Sie das/die Kabel durch die Kabelabdeckung
Faire passer le(s) câble(s) par le cache-câble
Far passare il/i cavo/i attraverso il copricavo
Pase el/los cable(s) a través de la cubierta de cables
Passe o(s) cabo(s) através da cobertura do cabo
Poprowadzić kabel (kable) przez osłonę kabla
EN
NL
DE
FR
IT
ES
PT
PL
STEP 7
STEP 8

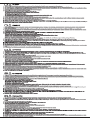
Place the screen in the correct position
Plaats het scherm in de juiste positie
Bringen Sie den Bildschirm in die richtige Position
Placer l'écran dans la bonne position
Posizionare lo schermo nella posizione corretta
Coloque la pantalla en la posición correcta
Colocar o ecrã na posição correcta
Umieść ekran we właściwej pozycji
EN
NL
DE
FR
IT
ES
PT
PL
Adjust the mount to the desired position and insert the
Allen keys into the slot for future use
Stel de steun in op de gewenste positie en bewaar de
inbussleutels in de houder toekomstig gebruik
Bringen Sie die Halterung in die gewünschte Position und
stecken Sie den Inbusschlüssel in den Schlitz für zukünf-
tige Verwendung
Positionnez le support dans la position désirée en désser-
rant et conservez les clés Allen dans le support pour une
utilisation ultérieure
Regolare il supporto nella posizione desiderata e conser-
vare le chiavi a brugola nel supporto per un uso futuro
Coloque el soporte en la posición deseada y guarde las
llaves Allen en el soporte para uso futuro
Ponha o suporte na posição desejada e manter as chaves
Allen no suporte para utilização futura
Dostosuj pozycję uchwytu do twoich wymagań i zachować
klucze imbusowe wuchwytach do wykorzystania w przys-
złości
EN
NL
DE
FR
IT
ES
PT
PL
STEP 10
±90°/180°
+45°
-45°
±90°
±180°
±90°
STEP 9
H
G

-
 1
1
-
 2
2
-
 3
3
-
 4
4
-
 5
5
-
 6
6
-
 7
7
-
 8
8


Neomounts NM-D775BLACKPLUS Manuale utente
- Categoria
- Supporti da scrivania a schermo piatto
- Tipo
- Manuale utente
in altre lingue
Documenti correlati
-
 Neomounts DS70-450BL1 Manuale utente
-
Neomounts DS75-450BL2 Manuale utente
-
-
Neomounts DS75-450WH2 Manuale utente
-
-
 Neomounts DS70-700BL1 Manuale utente
-
 Neomounts DS70-700BL1 Manuale utente
-
 Neomounts FPMA-D540BLACK Manuale utente
-
 Neomounts FPMA-D550D4BLACK Manuale utente
-
 Neomounts FPMA-D550DVBLACK Manuale utente


