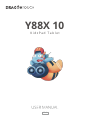
Dragon Touch Y88X 10 Manuale utente
- Categoria
- Compresse
- Tipo
- Manuale utente
Questo manuale è adatto anche per

KidzPad Tablet
Y88X 10
V1.1


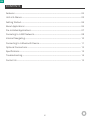
Features ------------------------------------------------------------------------------------------------- 02
Unit at A Glance -------------------------------------------------------------------------------------- 03
Getting Started---------------------------------------------------------------------------------------- 04
About Applications ---------------------------------------------------------------------------------- 06
Pre-Installed Applications------------------------------------------------------------------------- 07
Conneting to A Wifi Network--------------------------------------------------------------------- 08
Internet Navigating---------------------------------------------------------------------------------- 10
Connecting to A Bluetooth Device ------------------------------------------------------------- 11
Optional Connections ------------------------------------------------------------------------------ 12
Specifications------------------------------------------------------------------------------------------ 13
Troubleshooting-------------------------------------------------------------------------------------- 14
Contact Us---------------------------------------------------------------------------------------------- 15
CONTENTS
01 02 03 04 05 06 07 08 09 10 11 12 13 14 15
16 17 18 19 20 21 22 23 24 25 26 27 28 29 30
31 32 33 34 35 36 37 38 39 40 41 42 43 44 45
46 47 48 49 50 51 52 53 54 55 56 57 58 59 60
61 62 63 64 65 66 67 68 69 70 71 72 73 74 75
76 77 78 79 80 81 82 83 84 85 86 87 88 89 90
EN

Browse the web
Visit your favorite websites.
Check your e-mail
Keep in touch with friends and family.
Watch YouTube™ videos
Browse the world’s most popular video- sharing community.
Download your favorite Apps
Discover thousands of apps for Android games, applications, and more with Play
Store (Customers need to download it from Google Play Store).
Connect to the Internet wirelessly
With high-speed Wifi 802.11 a/b/g/n (2.4GHz/5GHz) networking, you can enjoy your
media library anytime and anywhere.
Portable powerhouse (5000mAh battery) makes you feel free to listen popular
music, watch videos, and search photos.
Enjoy your media library anywhere
Portable powerhouse plays popular music, video, and photo formats.
MicroSD memory card reader
Increase your storage capacity (up to 128GB supported)
Built-in camera
Convenient front-facing camera 2.0MP/rear camera 8.0MP (support flash).
Automatic orientation detection
Read any way you want; the display adjusts automatically!
FEATURES
01 02 03 04 05 06 07 08 09 10 11 12 13 14 15
16 17 18 19 20 21 22 23 24 25 26 27 28 29 30
31 32 33 34 35 36 37 38 39 40 41 42 43 44 45
46 47 48 49 50 51 52 53 54 55 56 57 58 59 60
61 62 63 64 65 66 67 68 69 70 71 72 73 74 75
76 77 78 79 80 81 82 83 84 85 86 87 88 89 90
EN

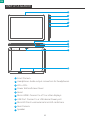
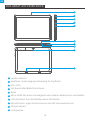
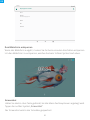
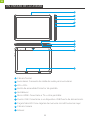
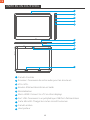
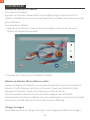
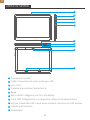
UNIT AT A GLANCE
Speaker
2
3
4
1
9
10
7
6
8
5
Front Camera
Headphone: Audio output connection for headphones.
VOL+/VOL-
Power Button/Screen Saver
Reset
Micro HDMI: Connect to a TV or other displays.
USB Port: Connect to a USB device/Power port.
MicroSD Card: Load external microSD cards here.
Rear Camera
1
2
3
4
5
6
7
8
9
10
01 02 03 04 05 06 07 08 09 10 11 12 13 14 15
16 17 18 19 20 21 22 23 24 25 26 27 28 29 30
31 32 33 34 35 36 37 38 39 40 41 42 43 44 45
46 47 48 49 50 51 52 53 54 55 56 57 58 59 60
61 62 63 64 65 66 67 68 69 70 71 72 73 74 75
76 77 78 79 80 81 82 83 84 85 86 87 88 89 90
EN

GETTING STARTED
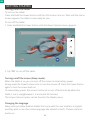
Turning on/off the tablet
To turn on the tablet:
Press and hold the Power button until the LCD screen turns on. Wait until the Home
screen appears, the tablet is now ready for use.
To turn off the tablet:
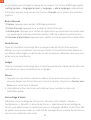
1. Press and hold the Power button until the Device Options menu appears.
2. Tap “OK” to turn off the tablet.
Turning on/off the screen (Sleep mode)
When the tablet is on, you can turn off the screen to save battery power.
Simply press the Power button once to turn the screen off. Press the Power button
again to turn the screen back on.
To save battery power, the screen can be set to turn off automatically when the
tablet is not in using(between 1 minute and 30 minutes).
This screen timeout option can be found in the Display menu.
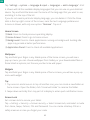
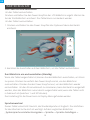
Changing the language
Many users purchase Android tablets that come with the user interface in English,
and they want to use their native language, like Spanish, French, Chinese, German
and so on.
Power off
Restart
Screenshot
01 02 03 04 05 06 07 08 09 10 11 12 13 14 15
16 17 18 19 20 21 22 23 24 25 26 27 28 29 30
31 32 33 34 35 36 37 38 39 40 41 42 43 44 45
46 47 48 49 50 51 52 53 54 55 56 57 58 59 60
61 62 63 64 65 66 67 68 69 70 71 72 73 74 75
76 77 78 79 80 81 82 83 84 85 86 87 88 89 90
EN

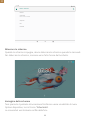
Wallpaper
Tap and hold your finger in any blank space of the home screen, you will see a
pop-up menu; you can choose wallpaper from Gallery or your downloaded files or
those listed as options; set the one you like to be wall paper.
Widgets
Tap and hold your finger in any blank space of home screen, you will see a pop-up
menu with widget.
Tip:
1. Tap one icon and move on to top of another icon, you can create a new folder on
home screen. Open the folder; click ‘Unnamed Folder’ to rename the folder.
2. Swipe down vertically from top part of a display to enter quick notification menu.
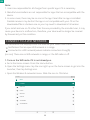
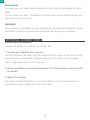
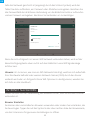
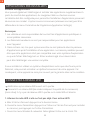
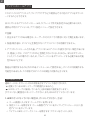
Screen Lock
Set a screen lock to secure your tablet.
Tap → Setting → Security → Screen security → Select screen lock, and select a mode
from None, Swipe, Pattern, PIN and Password. You can create a Backup PIN as a
safety measure in case you forget your code.
Tap "settings → system → language & input → languages → add a language". A list
is shown with all the available display languages that you can use on your Android
device. Tap and hold the lines near the name of the language that you want to use,
and drag it to the top of the list.
If you do not need a particular display language, you can delete it. Click the three
dots in the top-right corner of the screen, near the text Language preferences.
A menu is shown, with only one option: "Remove". Tap on it.
Home Screen
Back: Press to check previous operating display.
Home Screen: Press to go to home screen.
Background: Press to check applications running on background. Existing idle
apps may provide a better performance.
Application Panel: Press to check all available Applications.
01 02 03 04 05 06 07 08 09 10 11 12 13 14 15
16 17 18 19 20 21 22 23 24 25 26 27 28 29 30
31 32 33 34 35 36 37 38 39 40 41 42 43 44 45
46 47 48 49 50 51 52 53 54 55 56 57 58 59 60
61 62 63 64 65 66 67 68 69 70 71 72 73 74 75
76 77 78 79 80 81 82 83 84 85 86 87 88 89 90
EN

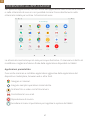
ABOUT APPLICATIONS
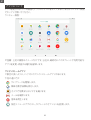
To open an application, tap the application icon on the home screen or in the
Launcher where you can tap the icon right up on the home screen to get in.
Unlocking the Screen
When the screen turns off, you will have to unlock the screen when you turn it back
on. To unlock the screen, swipe up the lock icon.
Screen shot
Press and hold the power button until the Device Options menu appears, tap the
icon “Screenshot”. The screenshot will be saved in the photos file.
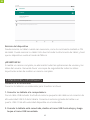
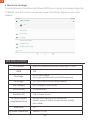
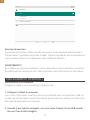
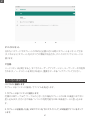
Choose screen lock
9:13 AM
None
PIN
Swipe
Current screen lock
Pattern
Password
01 02 03 04 05 06 07 08 09 10 11 12 13 14 15
16 17 18 19 20 21 22 23 24 25 26 27 28 29 30
31 32 33 34 35 36 37 38 39 40 41 42 43 44 45
46 47 48 49 50 51 52 53 54 55 56 57 58 59 60
61 62 63 64 65 66 67 68 69 70 71 72 73 74 75
76 77 78 79 80 81 82 83 84 85 86 87 88 89 90
EN

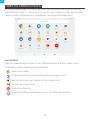
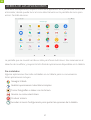
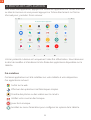
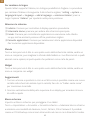
The screen shown above is for illustrative purposes only. We reserve the right to
modify and improve the final list of applications available on the tablet.
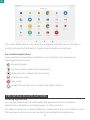
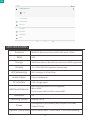
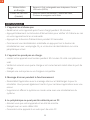
Pre-installed Applications
Some applications have been installed on your tablet for your convenience.
These applications include:
PRE-INSTALLED APPLICATIONS
Installing Applications
You can also download and install additional applications from the device’s
applications marketplace, the web browser, or other sources.
The tablet must be set to allow installation of applications from non-market sources.
The unknown sources option can be set in the Application settings menu.
Browse the web.
Perform simple mathematical operations.
Take pictures or videos with the camera.
Check your e-mail.
Play music.
Access the Settings menu to adjust the tablet’s options.
01 02 03 04 05 06 07 08 09 10 11 12 13 14 15
16 17 18 19 20 21 22 23 24 25 26 27 28 29 30
31 32 33 34 35 36 37 38 39 40 41 42 43 44 45
46 47 48 49 50 51 52 53 54 55 56 57 58 59 60
61 62 63 64 65 66 67 68 69 70 71 72 73 74 75
76 77 78 79 80 81 82 83 84 85 86 87 88 89 90
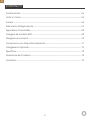
EN

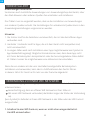
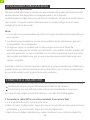
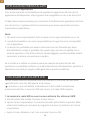
Note:
1. Users are responsible for all charges from specific apps if it is necessary.
2. Manufacturers/sellers are not responsible for apps that are incompatible with the
device.
3. In some cases, there may be no icon in the app Panel after an app is installed.
Possible reasons may be that this app is not compatible with your OS or the
downloaded file is a broken one so you may need to download a full version.
If you install and use an OS other than the one provided by the manufacturer, it may
cause your device to malfunction, therefore, your device will no longer be covered
by the warranty in this condition.
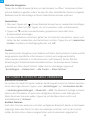
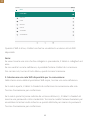
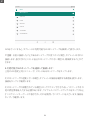
CONNECT TO A Wifi NETWORK
The Notification bar displays icons that indicate your tablet’s Wifi status.
Notification that an open Wifi network is in range.
Connected to a Wifi network (waves indicate connection strength).
[no icon] There are no Wifi networks in range, or the Wifi radio is off.
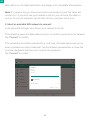
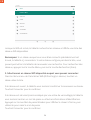
1. Turn on the Wifi radio if it is not already on.
a. Go to the Home screen: Press the Home button.
b. Open the Settings menu: tap the icon right up on the home screen to get into the
launcher, then tap Settings icon.
c. Open the Wireless & networks menu: Slide the icon to ON status.
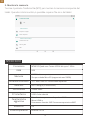
Wi-Fi
Use Wi-Fi
9:14 AM
CPGC-2.4G
HuaWei
aWiFi-b7d9
CPGC-5G
TP-LINKAD5E
TP-LINKAD5E-5G
01 02 03 04 05 06 07 08 09 10 11 12 13 14 15
16 17 18 19 20 21 22 23 24 25 26 27 28 29 30
31 32 33 34 35 36 37 38 39 40 41 42 43 44 45
46 47 48 49 50 51 52 53 54 55 56 57 58 59 60
61 62 63 64 65 66 67 68 69 70 71 72 73 74 75
76 77 78 79 80 81 82 83 84 85 86 87 88 89 90
EN

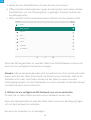
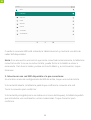
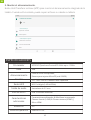
When Wifi is on, the tablet will look for and display a list of available Wifi networks.
Note: If a network that you have connected to previously is found, the tablet will
connect to it. If you don’t see your network in the list, you can force the tablet to
re-scan. To scan for networks, tap the Menu button, and then touch Scan.
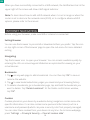
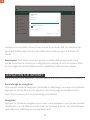
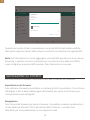
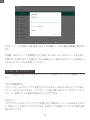
2. Select an available Wifi network to connect:
In the same Wifi settings menu above, tap a network in the list.
If the network is open, the tablet will prompt you to confirm connection to the network.
Tap “Connect” to confirm.
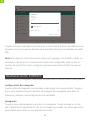
If the network is secured (as indicated by a Lock icon), the tablet will prompt you to
enter a password or other credentials. Tap the Wireless password box to show the
on-screen keyboard and then use it to enter the password.
Tap “Connect” to confirm.
Wi-Fi
Use Wi-Fi
9:14 AM
CPGC-2.4G
HuaWei
aWiFi-b7d9
CPGC-5G
TP-LINKAD5E
TP-LINKAD5E-5G
CPGC-2.4
Security
Password
Advanced options
CANCEL CONNECT
WPA2 PSK
Show password
01 02 03 04 05 06 07 08 09 10 11 12 13 14 15
16 17 18 19 20 21 22 23 24 25 26 27 28 29 30
31 32 33 34 35 36 37 38 39 40 41 42 43 44 45
46 47 48 49 50 51 52 53 54 55 56 57 58 59 60
61 62 63 64 65 66 67 68 69 70 71 72 73 74 75
76 77 78 79 80 81 82 83 84 85 86 87 88 89 90
EN

When you have successfully connected to a Wifi network, the Notifications bar at the
upper right of the screen will show a Wifi signal indicator.
Note: To learn about how to add a Wifi network when it is not in range or when the
router is set to obscure the network name (SSID), or to configure advanced Wifi
options, please refer to the manual.
INTERNET NAVIGATING
Before using your browser, make sure Wifi or internet is connected.
Setting Browser
You can use the browser to pre-install or download others you prefer. Tap the icon
on top right corner of the browser page to open the sub-menu for more detailed
setting.
Navigating
Tap the browser icon to open your browser. You can access a website quickly by
entering the URL on screen keypad. Websites are optimized for viewing on your
actual devices.
Bookmarks
1. Tap on any web page to add a bookmark. You can then tap ”OK” to save or
rename the website.
2. Tap to view bookmarked sites, pages you saved and your browsing history.
3. To delete a bookmark, go to bookmarks page, tap and hold the bookmark you
want to delete. Tap “Delete bookmark”. At the Delete confirmation window,
tap “OK”.
Cookies
Cookies placed on your device by a website during navigation contain some site-
specific information. It can also contain some personal information (such as a
username and password) which can pose a security risk if not properly managed.
You can clear these cookies from your device at any time. Go to Home webpage,
press “Settings → Privacy & Security → Clear all cookies data”.
01 02 03 04 05 06 07 08 09 10 11 12 13 14 15
16 17 18 19 20 21 22 23 24 25 26 27 28 29 30
31 32 33 34 35 36 37 38 39 40 41 42 43 44 45
46 47 48 49 50 51 52 53 54 55 56 57 58 59 60
61 62 63 64 65 66 67 68 69 70 71 72 73 74 75
76 77 78 79 80 81 82 83 84 85 86 87 88 89 90
EN

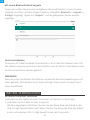
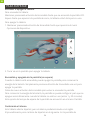
CONNECT TO A BLUETOOTH DEVICE
Turn on Bluetooth
You must pair your device with another device before you can transfer files between
them. Under “Settings”, tap “Connected devices → Connection preferences →
Bluetooth → ON”, the Bluetooth indicator then appears in the status bar. It will start
searching for available devices nearby. If you need re-scan, tap the menu on the top
right corner, and tap “refresh”.
Scan Device
After scanning, there will be a list of all available Bluetooth devices in range. If the
device you want to pair with isn’t in the list, ensure that the other device is turned on
and set to be discoverable.
Pair with Bluetooth Device
Tap the name of an available Bluetooth device you want to pair with. On the target
device you will get a “Bluetooth Pairing Request” dialog. Tap “Pair”, it will then show
you paired devices.
Bluetooth
On
9:16 AM
Device name
Notepad_K10
Pair new device
When Bluetooth is turned on, your device can communicate with other nearby Bluetooth devices.
01 02 03 04 05 06 07 08 09 10 11 12 13 14 15
16 17 18 19 20 21 22 23 24 25 26 27 28 29 30
31 32 33 34 35 36 37 38 39 40 41 42 43 44 45
46 47 48 49 50 51 52 53 54 55 56 57 58 59 60
61 62 63 64 65 66 67 68 69 70 71 72 73 74 75
76 77 78 79 80 81 82 83 84 85 86 87 88 89 90
EN

Device Reset
You may reset your tablet when necessary, such as forgotten password or PIN of
tablet.
You can reset your tablet. This will clear all information in your tablet and get your
device back to factory mode.
WARNING!
If you perform a Hard Reset, all user applications, user data will be deleted. Please
remember to backup any important data before per-forming a Hard Reset.
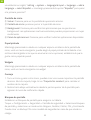
OPTIONAL CONNECTIONS
Connecting to a Computer
Connect the tablet to a computer to transfer files.
1. Connect your tablet to the computer.
With the included USB cable: Plug the small end of the cable into the USB 2.0 high
speed connector of the tablet. Plug the large end of the cable into an available
USB 2.0 high speed port on the computer.
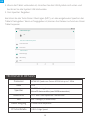
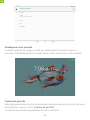
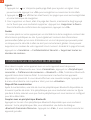
2. When your tablet is connected, slide down the USB icon then touch icon USB
connected.
3. Mount the storage.
Tap button Transfer files (MTP) to mount the tablet’s built-in storage. When it is
mounted, you can copy files to or from your tablet.
01 02 03 04 05 06 07 08 09 10 11 12 13 14 15
16 17 18 19 20 21 22 23 24 25 26 27 28 29 30
31 32 33 34 35 36 37 38 39 40 41 42 43 44 45
46 47 48 49 50 51 52 53 54 55 56 57 58 59 60
61 62 63 64 65 66 67 68 69 70 71 72 73 74 75
76 77 78 79 80 81 82 83 84 85 86 87 88 89 90
EN

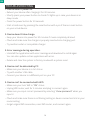
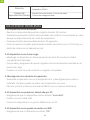
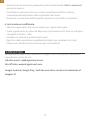
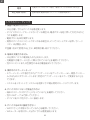
SPECIFICATIONS
Processor
RAM
Storage
Display
Wifi Networking
Audio Output
PC Interface
Additional Features
Operating System
Power
Playback Time (hours)
MTK8163 Quad-core Cortex-A53 64-bit up to 1.3GHz
2GB
32GB flash built-in; MicroSD card slot (max128GB supported)
10.1” 800*1280 IPS Capacitive Touchscreen
802.11a/b/g/n (2.4GHz/5GHz)
3.5mm headphone
USB 2.0 high speed
Up to 8 hours music, 5 hours video, 5 hours web browsing
Built-in microphone and 2X1W speakers
Micro HDMI
Front camera 2MP and Rear camera 8MP
Android 9.0 Pie
Rechargeable Li-poly battery with included USB Power
Adapter(5V/2A)
Bluetooth 4.0
USB Preferences
9:18 AM
USB
USB controlled by
Use USB for
Connected device
This device
File Transfer
USB tethering
MIDI
01 02 03 04 05 06 07 08 09 10 11 12 13 14 15
16 17 18 19 20 21 22 23 24 25 26 27 28 29 30
31 32 33 34 35 36 37 38 39 40 41 42 43 44 45
46 47 48 49 50 51 52 53 54 55 56 57 58 59 60
61 62 63 64 65 66 67 68 69 70 71 72 73 74 75
76 77 78 79 80 81 82 83 84 85 86 87 88 89 90
EN

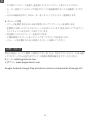
TROUBLESHOOTING
1. Device doesn’t power on.
• Reboot your device after charging it for 30 minutes.
• Shortly press your power button to check if it lights up in case your device is in
sleep mode.
• Press the power button for 20 seconds.
• Start a hard reset by pressing the reset button with a pin if there is reset button
on your actual device.
2. Device doesn’t take charge.
• Keep your device into power for 30 minutes if it was completely drained.
• Check and make sure the charger is properly inserted into charging port.
• Try another outlet or compatible charger.
3. Error message during operation.
• Uninstall the application with error message and download to install again.
You can also update certain application with error.
• Delete and clear the system to factory mode with a system reset.
4. Device can’t be detected by PC.
• Make sure your device is in ‘on’ status.
• Try with another USB cable.
• Connect your device to a different port on your PC.
5. Device can’t be connected with Wifi.
• Make sure your turn Wifi to "ON" status.
• Unplug Wifi router, wait for 2 minutes and plug to connect again.
• Make sure you input correct password by selecting "show password" when you
input it.
• Check and make sure there is no filtering setting or device connection limit in your
router setting.
• Forget original Wifi connection, reset Wifi router, and connect again.
01 02 03 04 05 06 07 08 09 10 11 12 13 14 15
16 17 18 19 20 21 22 23 24 25 26 27 28 29 30
31 32 33 34 35 36 37 38 39 40 41 42 43 44 45
46 47 48 49 50 51 52 53 54 55 56 57 58 59 60
61 62 63 64 65 66 67 68 69 70 71 72 73 74 75
76 77 78 79 80 81 82 83 84 85 86 87 88 89 90
EN

CONTACT US
For any inquiries with DragonTouch products, please feel free to contact us, we will
respond within 24 hours.
E-mail address: [email protected]
Tel: 888-811-1140 (US) Mon-Fri (except holiday) 9am-5pm (EST)
Official website: www.dragontouch.com
Google, Android, Google Play and other marks are trademarks of Google LLC.
6. Storage not enough.
• Delete applications you don't use often to spare some space.
• Clean caches in your device regularly. “Setting-APPs-Click” the app and clear cache
or data.
• Install a third-party system cleaner.
• Factory reset your tablet to clear all data.
• Get an extended memory card to expend storage.
01 02 03 04 05 06 07 08 09 10 11 12 13 14 15
16 17 18 19 20 21 22 23 24 25 26 27 28 29 30
31 32 33 34 35 36 37 38 39 40 41 42 43 44 45
46 47 48 49 50 51 52 53 54 55 56 57 58 59 60
61 62 63 64 65 66 67 68 69 70 71 72 73 74 75
76 77 78 79 80 81 82 83 84 85 86 87 88 89 90
EN

Eigenschaften ----------------------------------------------------------------------------------------- 17
Das Gerät Auf Einen Blick ------------------------------------------------------------------------- 18
Inbetriebnahme -------------------------------------------------------------------------------------- 19
Über die Anwendungen --------------------------------------------------------------------------- 22
Vorinstalliert ------------------------------------------------------------------------------------------- 23
Verbindung Zu Einem Wifi Netzwerk --------------------------------------------------------- 23
Internet Navigieren --------------------------------------------------------------------------------- 25
Mit Einem Bluetooth Gerät Verbinden ------------------------------------------------------- 26
Weitere Verbindungen ----------------------------------------------------------------------------- 27
Technische Details----------------------------------------------------------------------------------- 28
Problembehandlung-------------------------------------------------------------------------------- 29
Kontaktiere Uns -------------------------------------------------------------------------------------- 30
INHALT
01 02 03 04 05 06 07 08 09 10 11 12 13 14 15
16 17 18 19 20 21 22 23 24 25 26 27 28 29 30
31 32 33 34 35 36 37 38 39 40 41 42 43 44 45
46 47 48 49 50 51 52 53 54 55 56 57 58 59 60
61 62 63 64 65 66 67 68 69 70 71 72 73 74 75
76 77 78 79 80 81 82 83 84 85 86 87 88 89 90
DE

Surfen Sie im Web
Besuchen Sie Ihre Lieblingswebseiten.
Checken Sie Ihre E-mail
Bleiben Sie mit Freunden und Familie in Verbindung.
Schauen Sie YouTube™ Videos
Durchforsten Sie die weltweit berühmteste Video-Sharing Community.
Laden Sie Ihre Lieblings-Apps herunter
Entdecken Sie tausende von Android Spiele Apps, andere Anwendungen und mehr
mit dem Play Store (muss vom Google Play Store heruntergeladen werden).
Verbinden Sie sich kabellos mit dem Internet
High-speed Wifi 802.11 a/b/g/n (2.4GHz/5GHz) Netzwerk.
Mit dem tragbaren Kraftpaket (5000mAh-Akku) können Sie gerne populäre Musik
hören. Videos ansehen und Fotos suchen.
Genießen Sie Ihre Medienbibliothek überall
Das tragbare Tablet spielt berühmte Musik, Videos und jegliche Foto Formate ab.
MicroSD Kartenleser
Erweitern Sie die Speicherkapazität (bis zu 128GB wird unterstützt).
Eingebaute Kamera
Praktische, nach vorne gerichtete Kamera mit 2.0MP/Kamera auf der Rückseite
8.0MP.
Automatische Ausrichtungserkennung
Lesen Sie so, wie Sie es möchten. Der Bildschirm passt sich automatisch an!
EIGENSCHAFTEN
01 02 03 04 05 06 07 08 09 10 11 12 13 14 15
16 17 18 19 20 21 22 23 24 25 26 27 28 29 30
31 32 33 34 35 36 37 38 39 40 41 42 43 44 45
46 47 48 49 50 51 52 53 54 55 56 57 58 59 60
61 62 63 64 65 66 67 68 69 70 71 72 73 74 75
76 77 78 79 80 81 82 83 84 85 86 87 88 89 90
DE

DAS GERÄT AUF EINEN BLICK
Lautsprecher
2
3
4
1
9
10
7
6
8
5
Vordere Kamera
Kopfhörer: Audio Ausgang Verbindung für Kopfhörer
VOL+/VOL-
Ein-/Ausschalter/Bildschirmschoner
Reset
Micro HDMI: Mit einem Fernsehgerät oder anderen Bildschirmen anschließen.
USB-Anschluss: Zum Anschließen eines USB-Geräts.
MicroSD Karte: Legen Sie hier externe microSD Speicherkarten ein.
Hintere Kamera
1
2
3
4
5
6
7
8
9
10
01 02 03 04 05 06 07 08 09 10 11 12 13 14 15
16 17 18 19 20 21 22 23 24 25 26 27 28 29 30
31 32 33 34 35 36 37 38 39 40 41 42 43 44 45
46 47 48 49 50 51 52 53 54 55 56 57 58 59 60
61 62 63 64 65 66 67 68 69 70 71 72 73 74 75
76 77 78 79 80 81 82 83 84 85 86 87 88 89 90
DE
La pagina si sta caricando...
La pagina si sta caricando...
La pagina si sta caricando...
La pagina si sta caricando...
La pagina si sta caricando...
La pagina si sta caricando...
La pagina si sta caricando...
La pagina si sta caricando...
La pagina si sta caricando...
La pagina si sta caricando...
La pagina si sta caricando...
La pagina si sta caricando...
La pagina si sta caricando...
La pagina si sta caricando...
La pagina si sta caricando...
La pagina si sta caricando...
La pagina si sta caricando...
La pagina si sta caricando...
La pagina si sta caricando...
La pagina si sta caricando...
La pagina si sta caricando...
La pagina si sta caricando...
La pagina si sta caricando...
La pagina si sta caricando...
La pagina si sta caricando...
La pagina si sta caricando...
La pagina si sta caricando...
La pagina si sta caricando...
La pagina si sta caricando...
La pagina si sta caricando...
La pagina si sta caricando...
La pagina si sta caricando...
La pagina si sta caricando...
La pagina si sta caricando...
La pagina si sta caricando...
La pagina si sta caricando...
La pagina si sta caricando...
La pagina si sta caricando...
La pagina si sta caricando...
La pagina si sta caricando...
La pagina si sta caricando...
La pagina si sta caricando...
La pagina si sta caricando...
La pagina si sta caricando...
La pagina si sta caricando...
La pagina si sta caricando...
La pagina si sta caricando...
La pagina si sta caricando...
La pagina si sta caricando...
La pagina si sta caricando...
La pagina si sta caricando...
La pagina si sta caricando...
La pagina si sta caricando...
La pagina si sta caricando...
La pagina si sta caricando...
La pagina si sta caricando...
La pagina si sta caricando...
La pagina si sta caricando...
La pagina si sta caricando...
La pagina si sta caricando...
La pagina si sta caricando...
La pagina si sta caricando...
La pagina si sta caricando...
La pagina si sta caricando...
La pagina si sta caricando...
La pagina si sta caricando...
La pagina si sta caricando...
La pagina si sta caricando...
La pagina si sta caricando...
La pagina si sta caricando...
La pagina si sta caricando...
La pagina si sta caricando...
-
 1
1
-
 2
2
-
 3
3
-
 4
4
-
 5
5
-
 6
6
-
 7
7
-
 8
8
-
 9
9
-
 10
10
-
 11
11
-
 12
12
-
 13
13
-
 14
14
-
 15
15
-
 16
16
-
 17
17
-
 18
18
-
 19
19
-
 20
20
-
 21
21
-
 22
22
-
 23
23
-
 24
24
-
 25
25
-
 26
26
-
 27
27
-
 28
28
-
 29
29
-
 30
30
-
 31
31
-
 32
32
-
 33
33
-
 34
34
-
 35
35
-
 36
36
-
 37
37
-
 38
38
-
 39
39
-
 40
40
-
 41
41
-
 42
42
-
 43
43
-
 44
44
-
 45
45
-
 46
46
-
 47
47
-
 48
48
-
 49
49
-
 50
50
-
 51
51
-
 52
52
-
 53
53
-
 54
54
-
 55
55
-
 56
56
-
 57
57
-
 58
58
-
 59
59
-
 60
60
-
 61
61
-
 62
62
-
 63
63
-
 64
64
-
 65
65
-
 66
66
-
 67
67
-
 68
68
-
 69
69
-
 70
70
-
 71
71
-
 72
72
-
 73
73
-
 74
74
-
 75
75
-
 76
76
-
 77
77
-
 78
78
-
 79
79
-
 80
80
-
 81
81
-
 82
82
-
 83
83
-
 84
84
-
 85
85
-
 86
86
-
 87
87
-
 88
88
-
 89
89
-
 90
90
-
 91
91
-
 92
92


Dragon Touch Y88X 10 Manuale utente
- Categoria
- Compresse
- Tipo
- Manuale utente
- Questo manuale è adatto anche per
in altre lingue
- English: Dragon Touch Y88X 10 User manual
- français: Dragon Touch Y88X 10 Manuel utilisateur
- español: Dragon Touch Y88X 10 Manual de usuario
- Deutsch: Dragon Touch Y88X 10 Benutzerhandbuch
- 日本語: Dragon Touch Y88X 10 ユーザーマニュアル