Sony CDX-M9900 Manuale del proprietario
- Categoria
- Ricevitori multimediali per auto
- Tipo
- Manuale del proprietario

Operating Instructions
Bedienungsanleitung
Mode d’emploi
Istruzioni per l’uso
Gebruiksaanwijzing
3-265-745-21 (1)
Wichtig!
Bitte nehmen Sie sich etwas Zeit, um den Geräte-Pass vollständig
auszufüllen. Dieser befindet sich auf der hinteren Umschlagseite dieser
Bedienungsanleitung.
Si dichiara che l’apparecchio è stato fabbricato in conformità all’art. 2, Comma 1 del D.M. 28.08.
1995 n. 548.
CDX-M9900
For installation and connections, see the supplied installation/connections manual.
Zur Installation und zum Anschluss siehe die mitgelieferte Installations-/Anschlussanleitung.
En ce qui concerne l’installation et les connexions, consulter le manuel d’installation/
raccordement fourni.
Per l’installazione e i collegamenti, fare riferimento al manuale di istruzioni per
l’installazione e i collegamenti in dotazione.
Zie voor het monteren en aansluiten van het apparaat de bijgeleverde handleiding "Installatie
en aansluitingen".
© 2004 Sony Corporation
NL
IT
FR
DE
GB
FM/MW/LW Compact Disc Player
FM
/
MW
/
LW
Compact Disc Player

2

3
Welcome !
Thank you for purchasing this Sony Compact
Disc Player.
FEATURING:
• Video input terminal provided for viewing
video images.
• Store video images for various visual effects.
• MP3 file playback recorded on a disc is
possible.
• CD-R/CD-RW which can have a session added
can be played (page 10).
• Discs recorded in Multi Session (CD-Extra,
Mixed CD, etc.) can be played, depending on
the recording method (page 10).
• Optional CD/MD units (both changers and
players)*
1
.
•ID3 tag*
2
version 1.0, 1.1, 2.2, 2.3 or 2.4
information (displayed when an MP3 file is
played).
• CD TEXT information (displayed when a CD
TEXT disc*
3
is played).
• Supplied controller accessory
Card remote commander RM-X144
• Optional controller accessory
Wired rotary commander RM-X4S
Wireless rotary commander RM-X6S
*1 This unit works with Sony products only.
*2 ID3 tag is an MP3 file that contains information
about album name, artist name, track name, etc.
*3 A CD TEXT disc is an audio CD that includes
information such as the disc name, artist name,
and track names. This information is recorded on
the disc.
About this manual
• Instructions in this manual describe how to use the
functions by mainly using the card remote
commander.
• Illustrations in this manual may differ from the actual
device.
R
The BBE MP process improves digitally
compressed sound, such as MP3, by restoring
and enhancing the higher harmonics lost through
compression. BBE MP works by generating
even-order harmonics from the source material,
effectivel
y
recoverin
g
warmth, detail and nuance.
T
his label is located on the bottom of the
c
hassis.

4
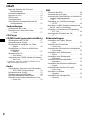
Table of Contents
Location of controls . . . . . . . . . . . . . . . . . . . .6
Precautions. . . . . . . . . . . . . . . . . . . . . . . . . . .8
Notes on discs . . . . . . . . . . . . . . . . . . . . . . . .9
About MP3 files. . . . . . . . . . . . . . . . . . . . . .10
Basic operations. . . . . . . . . . . . . . . . . . . . . .12
Selecting the display mode and display
pattern . . . . . . . . . . . . . . . . . . . . . . . . . . .13
Getting Started
Resetting the unit . . . . . . . . . . . . . . . . . . . . .15
Setting the clock and the calendar
— Clock. . . . . . . . . . . . . . . . . . . . . . . . . .15
CD Player
CD/MD Unit (optional)
Playing a disc . . . . . . . . . . . . . . . . . . . . . . . .16
Display items . . . . . . . . . . . . . . . . . . . . . . . .17
Playing tracks repeatedly
— Repeat. . . . . . . . . . . . . . . . . . . . . . . . .18
Playing tracks in random order
— Shuffle . . . . . . . . . . . . . . . . . . . . . . . .19
Labelling a CD
— Disc Memo . . . . . . . . . . . . . . . . . . . . .19
Locating a disc by name
— Disc List* . . . . . . . . . . . . . . . . . . . . . .20
* Functions available with optional CD/MD unit
Radio
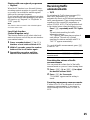
Storing stations automatically
— BTM (Best Tuning Memory) . . . . . . .21
Display items . . . . . . . . . . . . . . . . . . . . . . . .21
Receiving the stored stations . . . . . . . . . . . .22
Storing only desired stations . . . . . . . . . . . .22
Tuning in a station through a list
— Preset List. . . . . . . . . . . . . . . . . . . . . .23
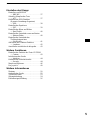
RDS
Overview of RDS . . . . . . . . . . . . . . . . . . . . 23
Display items. . . . . . . . . . . . . . . . . . . . . . . . 24
Automatic retuning for best reception results
— AF . . . . . . . . . . . . . . . . . . . . . . . . . . . 24
Receiving traffic announcements
— TA/TP . . . . . . . . . . . . . . . . . . . . . . . . 25
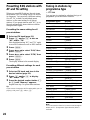
Presetting RDS stations with AF and TA
setting . . . . . . . . . . . . . . . . . . . . . . . . . . . 26
Tuning in stations by programme type
— PTY List. . . . . . . . . . . . . . . . . . . . . . . 26
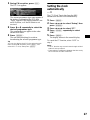
Setting the clock automatically
— CT . . . . . . . . . . . . . . . . . . . . . . . . . . . 27
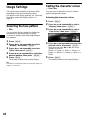
Image Settings
Selecting the face pattern
— Skin . . . . . . . . . . . . . . . . . . . . . . . . . . 28
Setting the character colour
— Char Color . . . . . . . . . . . . . . . . . . . . . 28
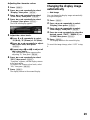
Changing the display image automatically
— Auto Image . . . . . . . . . . . . . . . . . . . . 29
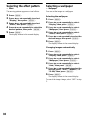
Selecting the effect pattern
— Effect . . . . . . . . . . . . . . . . . . . . . . . . . 30
Selecting a wallpaper
— Wallpaper. . . . . . . . . . . . . . . . . . . . . . 30
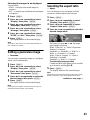
Setting a panorama image
— Panorama . . . . . . . . . . . . . . . . . . . . . . 31
Selecting the aspect ratio
— Aspect . . . . . . . . . . . . . . . . . . . . . . . . 31
Turning off the display characters
— Auto Clear . . . . . . . . . . . . . . . . . . . . . 33
Storing the images
— Snapshot. . . . . . . . . . . . . . . . . . . . . . . 33
Selecting the start-up image
— Opening . . . . . . . . . . . . . . . . . . . . . . . 34

5
Sound Setting
Setting the BBE MP
— BBE MP . . . . . . . . . . . . . . . . . . . . . . .35
Quickly attenuating the sound
— ATT . . . . . . . . . . . . . . . . . . . . . . . . . .35
Setting the Dynamic Soundstage Organizer
— DSO . . . . . . . . . . . . . . . . . . . . . . . . . .35
Setting the equalizer
— EQ7. . . . . . . . . . . . . . . . . . . . . . . . . . .36
Adjusting the bass and treble
— Bass/Treble. . . . . . . . . . . . . . . . . . . . .37
Adjusting the front and rear volume
— Balance/Fader. . . . . . . . . . . . . . . . . . .37
Adjusting the subwoofer volume
— Sub Woofer. . . . . . . . . . . . . . . . . . . . .38
Setting the loudness
— Loudness. . . . . . . . . . . . . . . . . . . . . . .39
Connecting auxiliary audio equipment . . . .40
Other Functions
Setting the custom function
— Custom . . . . . . . . . . . . . . . . . . . . . . . .40
Initializing the unit
— Initialize . . . . . . . . . . . . . . . . . . . . . . .41
Setting the security code
— Security. . . . . . . . . . . . . . . . . . . . . . . .41
Menus and items . . . . . . . . . . . . . . . . . . . . .42
Using the rotary commander . . . . . . . . . . . .45
Additional Information
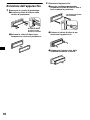
Maintenance. . . . . . . . . . . . . . . . . . . . . . . . .47
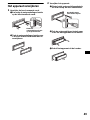
Removing the unit . . . . . . . . . . . . . . . . . . . .48
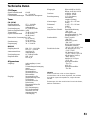
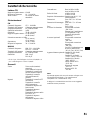
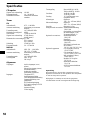
Specifications. . . . . . . . . . . . . . . . . . . . . . . .49
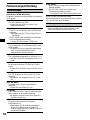
Troubleshooting. . . . . . . . . . . . . . . . . . . . . .50
Error displays/Message . . . . . . . . . . . . . . . .52

6
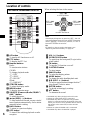
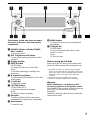
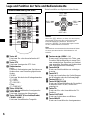
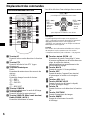
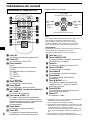
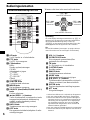
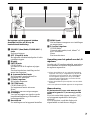
Location of controls
a AF button
To turn the AF function on or off.
b PTY button
To display the PTY list.
c Number buttons
Radio:
To store/receive stations.
CD/MD:
To change playback mode.
(1): REP
(2): SHUF
(6): PAUSE*
1
Sound:
(5): BBE MP*
1
d SCREEN button
To select the display mode.
e MENU button
To display the main menu.
f SOURCE (Power on/Radio/CD/MD*
2
/
AUX*
3
) button
To select the source.
g </, (SEEK –/+) buttons
To skip tracks/fast-forward, reverse a track/
tune in stations automatically, find a station
manually/select a setting.
h BACK button
To return to a previous display.
i OFF button
To turn off the unit/stop playback or radio
reception.
j VOL (+/–) buttons
k OPEN/CLOSE button
To open/close the front panel/To eject a disc
when loaded.
l TA button
To turn the TA function on or off.
m CAPTURE button
To store images.
n IMAGE button
To select the display pattern.
o MODE button
To change the radio band/playback unit.
p M/m (DISC +/–) buttons
To receive preset stations/change the disc*
4
,
skip albums*
5
/select a menu.
q ENTER button
To decide an item/apply a setting.
r ATT button
To attenuate the sound.
*1 Available only when playing back on this unit.
*2 When an optional MD unit is connected.
*3 Available only when an optional Sony portable
device is connected to AUX IN terminal of the unit.
When you connect a Sony portable device and CD/
MD unit(s) at the same time, use the AUX IN
selector.
*4 When an optional CD/MD unit is connected.
*5 Available only when an MP3 file is played.
Card remote commander RM-X144
DISC
–
ATTOFF
OPEN/CLOSE
REP SHUF
BBE MP PAUSE
1
4
CAPTURE
2
5
3
PTY AF TA
6
SOURCE
DISC
+
SEEK
+
SEEK
–
BACK
EN
TER
MENU
MODE
SCREEN IMAGE
VOL
+
–
DISC
–
SOURCE
DISC
+
SEEK
+
SEEK
–
Note
If the display disappears by pressing (OFF), the unit
cannot be operated with the card remote commander
unless (SOURCE) on the unit is pressed, or a disc is
inserted to activate the unit first.
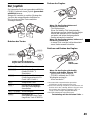
Tip
For details on how to replace the battery, see
“Replacing the lithium battery” on page 47.
(SEEK) (<):
to select
leftwards
(DISC) (M):
to select upwards
(DISC) (m):
to select downwards
(SEEK) (,):
to select
rightwards
When selecting the item in the menus

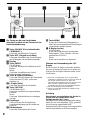
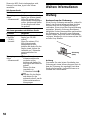
7
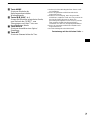
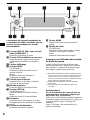
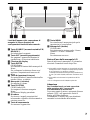
The buttons on the unit share the same
functions as those on the card remote
commander.
a SOURCE (Power on/Radio/CD/MD/
AUX*
1
) button
To select the source.
b OFF (Stop/Power off) button
To turn off the unit/stop playback or radio
reception.
c Display window
d ENTER button
CD/MD/Radio:
To change the functions of the R dial.
Menu:
To decide an item/apply a setting of the
menu item.
e Z (Open/Close) button
To open/close the front panel/To eject a disc
when loaded.
f L (Left) dial
To adjust the volume.
g CUSTOM button
CD/MD/Radio/AUX:
To perform the function assigned.
Menu:
To return to a previous display.
h Receptor
To receive signals from the card remote
commander or wireless rotary commander.
i Reset button
To reset the unit.
j MENU button
To display the main menu for settings and
adjustments.
k R (Right) dial
CD/MD/Radio:
To select the desired radio station, track,
album*
2
or disc*
3
.
Menu:
To select an item.
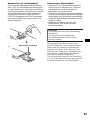
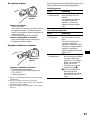
Note on using the L/R dials
Before using the L/R dials, push in and release
them first. Push in again when storing after use.
*1 Available only when an optional Sony portable
device is connected to AUX IN terminal of the unit.
When you connect a Sony portable device and CD/
MD unit(s) at the same time, use the AUX IN
selector.
*2 Available only when an MP3 file is played.
*3 When an optional CD/MD unit is connected.
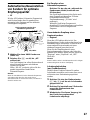
Warning
When installing in a car without an ACC
(accessory) position on the ignition switch
After turning off the ignition, be sure to press and
hold (OFF) on the unit until the display
disappears.
Otherwise, the display does not turn off and this
causes battery drain.
CDX-M9900
SOURCE
CUSTOM
OFF
VOL
MENU
ENTER

8
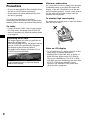
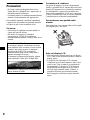
Precautions
• If your car was parked in direct sunlight, allow
the unit to cool off before operating it.
• Power aerial will extend automatically while
the unit is operating.
If you have any questions or problems
concerning your unit that are not covered in this
manual, please consult your nearest Sony dealer.
On safety
• Comply with the Traffic Laws in your country.
• For your safety, the images from VIDEO IN
turns off automatically when the parking brake
is not applied.
Moisture condensation
On a rainy day or in a very damp area, moisture
condensation may occur inside the lenses and
display of the unit. Should this occur, the unit
will not operate properly. In such a case, remove
the disc and wait for about an hour until the
moisture has evaporated.
To maintain high sound quality
Be careful not to splash juice or other soft drinks
onto the unit or discs.
Notes on LCD display
• Do not push the LCD display strongly. It may
cause injury or damage the display.
• Bright points of light (red, blue, or green) or
black dots may appear on the LCD display.
This is not a malfunction. The LCD is made
with high-precision technology and more than
99.99 % of the picture element is intact.
However, tiny elements of the picture may
show the above symptoms.
Preventing an accident
The images appear only after you park the car
and set the parking brake.
When the car starts moving, the images coming
from the VIDEO IN automatically disappear
after displaying the following caution.
The images on the display are turned off, but
CD/MP3 sound can be heard.
Do not operate the unit or watch the display
window while driving.

9
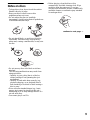
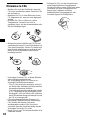
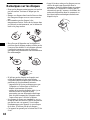
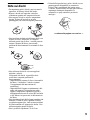
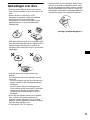
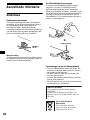
Notes on discs
• To keep discs clean, do not touch the surface.
Handle a disc by its edge.
• Keep your discs in their cases or disc
magazines when not in use.
• Do not subject the discs to heat/high
temperature. Avoid leaving them in parked cars
or on dashboards/rear trays.
• Do not attach labels, or use discs with sticky
ink/residue. Such discs may stop spinning
when used, causing a malfunction, or may ruin
the disc.
• Do not use any discs with labels or stickers
attached.
The following malfunctions may result from
using such discs:
– Inability to eject a disc (due to a label or
sticker peeling off and jamming the eject
mechanism).
– Inability to read audio data correctly (e.g.,
playback skipping, or no playback) due to
heat shrinking of a sticker or label causing a
disc to warp.
• Discs with non-standard shapes (e.g., heart,
square, star) cannot be played on this unit.
Attempting to do so may damage the unit. Do
not use such discs.
• You cannot play 8 cm CDs.
• Before playing, clean the discs with a
commercially available cleaning cloth. Wipe
each disc from the centre out. Do not use
solvents such as benzine, thinner, commercially
available cleaners, or antistatic spray intended
for analogue discs.
continue to next page t

10
Music discs encoded with copyright
protection
This product is designed to play back discs that
conform to the Compact Disc (CD) standard.
Recently, various music discs encoded with
copyright protection are marketed by some
record companies. Please be aware that among
those discs, there are some that do not conform to
the CD standard and may not be playable by this
product.
Notes on CD-Rs (recordable CDs)/CD-
RWs (rewritable CDs)
This unit can play the following discs:
• Some CD-Rs/CD-RWs (depending on the
equipment used for its recording or the
condition of the disc) may not play on this unit.
• You cannot play a CD-R/CD-RW that is not
finalized*.
• You can play MP3 files recorded on CD-
ROMs, CD-Rs, and CD-RWs.
• A CD-R/CD-RW to which a session can be
added can be played.
* A process necessary for a recorded CD-R/CD-RW
disc to be played on the audio CD player.
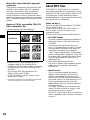
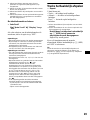
About MP3 files
MP3 (MPEG 1 Audio Layer-3) is a standard
technology and format for compressing a sound
sequence. The file is compressed to about 1/10 of
its original size. Sounds outside the range of
human hearing are compressed while the sounds
we can hear are not compressed.
Notes on discs
You can play MP3 files recorded on CD-ROMs,
CD-Rs, and CD-RWs.
The disc must be in the ISO 9660*
1
level 1 or
level 2 format, or Joliet or Romeo in the
expansion format.
You can use a disc recorded in Multi Session*
2
.
*
1
ISO 9660 Format
The most common international standard for
the logical format of files and folders on a
CD-ROM.
There are several specification levels. In
Level 1, file names must be in the 8.3 format
(no more than 8 characters in the name, no
more than 3 characters in the extension
“.MP3”) and in capital letters. Folder names
can be no longer than 8 characters. There can
be no more than 8 nested folder levels. Level
2 specifications allow file names up to 31
characters long.
Each folder can have up to 8 trees.
For Joliet or Romeo in the expansion format,
make sure of the contents of the writing
software, etc.
*
2
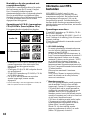
Multi Session
This is a recording method that enables
adding of data using the Track-At-Once
method. Conventional CDs begin at a CD
control area called the Lead-in and end at an
area called Lead-out. A Multi Session CD is a
CD having multiple sessions, with each
segment from Lead-in to Lead-out regarded
as a single session.
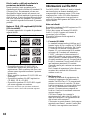
CD-Extra: The format which records audio
(audio CD data) as tracks on session 1, and
records data as tracks on session 2.
Mixed CD: In this format, data is recorded as
track 1, and audio (audio CD data) is recorded
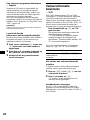
as track 2.
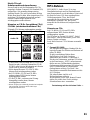
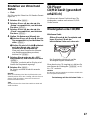
Type of discs Label on the disc
Audio CD
MP3 files

11
Notes
• With formats other than ISO 9660 level 1 and level 2,
folder names or file names may not be displayed
correctly.
• When naming, be sure to add the file extension
“.MP3” to the file name.
• If you put the extension “.MP3” to a file other than
MP3, the unit cannot recognise the file properly and
will generate random noise that could damage your
speakers.
• The following discs take a longer time to start
playback.
– a disc recorded with complicated tree structure.
– a disc recorded in Multi Session.
– a disc to which data can be added.
Cautions when playing a disc that is recorded in
Multi Session
• When the first track of the first session is audio CD
data:
Only audio CD data is played back.
Non-audio CD data/MP3 file information (track
number, time, etc.) is displayed with no sound.
• When the first track of the first session is not audio
CD data:
– If an MP3 file is in the disc, only MP3 file(s) play
back and other data is skipped (Audio CD data is
not recognised).
– If no MP3 file is in the disc, “Disc NO Music” is
displayed and nothing is played back (Audio CD
data is not recognised).
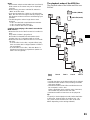
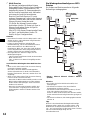
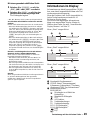
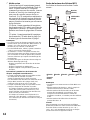
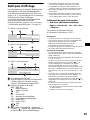
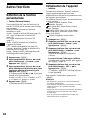
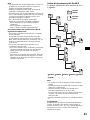
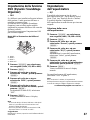
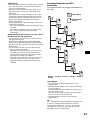
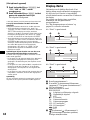
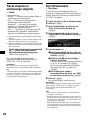
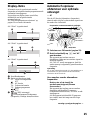
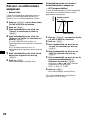
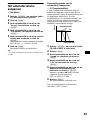
The playback order of the MP3 files
The playback order of the folders and files is as
follows:
Notes
• A folder that does not include an MP3 file is skipped.
• Maximum folder number: 150 (including root folder
and empty folders).
• Maximum number of MP3 files and folders that can
be contained in a disc: 300.
When a file/folder name contains many characters,
this number may become less than 300.
• Maximum number of trees that can be played: 8.
Tip
To specify a desired playback order, before the folder
or file name, input the order by number (e.g., “01,”
“02”), then record contents onto a disc (The order
differs depending on the writing software).
1
2
6
3
5
7
1
2
6
7
4
8
3
5
8
4
9
Folder (album)
MP3 file (track)
Tree 1
(root)
Tree 2
Tree 4
Tree 5
Tree 3

12
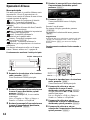
Basic operations
Main menu
You can set the various setting from the main
menu. Setting items and functions are
categorized into menus as follows:
List - Displaying the lists.
Display - Settings for display images.
Edit - Editting disc names/Controlling stored
contents.
Setup - Settings for the system of the unit.
Sound - Settings for sound quality.
Custom - Assigning functions to the
CUSTOM button.
PlayMode - Settings for playback and radio
reception.
For details on menu items, see “Menus and
items” on page 42.
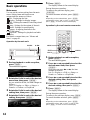
Operation by the main unit:
1 During playback or radio reception,
press (MENU).
The main menu appears.
2 Rotate the R dial to select the desired
menu item, then press (ENTER).
As you rotate the R dial, the item changes as
follows:
List y Display y Edit y Setup y
Sound y Custom y PlayMode
3 Rotate the R dial to select the desired
setting item, then press (ENTER).
4 Rotate the R dial to select the desired
setting, then press (ENTER).
5 Press (MENU).
The display returns to the normal display.
During the menu operation:
To return to the previous display, press
(CUSTOM).
To cancel the menu selection, press (MENU).
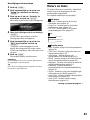
Tip
Depending on the selected item, press (ENTER)
repeatedly to select “ON” or “OFF” in step 3, then
press (MENU) to return to the normal display.
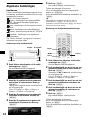
Operation by the card remote commander:
1 During playback or radio reception,
press (MENU).
The main menu appears.
2 Press < or , repeatedly to select the
desired menu item, then press
(ENTER).
Each time you press < or ,, the item
changes as follows:
List y Display y Edit y Setup y
Sound y Custom y PlayMode
3 Press < or , repeatedly to select the
desired setting item, then press
(ENTER).
4 Press < or , repeatedly to select the
desired setting, then press (ENTER).
5 Press (MENU).
The display returns to the normal display.
During the menu operation:
To return to the previous display, press (BACK).
To cancel the menu selection, press (MENU).
Tip
Depending on the selected item, press (ENTER)
repeatedly to select “ON” or “OFF” in step 3, then
press (MENU) to return to the normal display.
ENTER
MENUCUSTOM
R dial
DISC
–
OPEN/CLOSE
REP SHUF
BBE MP PAUSE
1
4
CAPTURE
2
5
3
PTY AF TA
6
SOURCE
DISC
+
SEEK
+
SEEK
–
BACK
ENTER
MENU
MODE
SCREEN IMAGE
ENTER
MENU
BACK

13
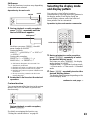
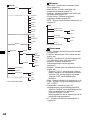
Shift menu
The R dial functions in various ways depending
on the shift menu selected.
Operation by the main unit:
1 During playback or radio reception,
press (ENTER) repeatedly until the
desired shift menu appears.
Each time you press (ENTER), the shift
menu changes as follows:
During playback:
AMS+/–*
2
t ALBUM+/–*
3
t DISC+/–*
4
t AMS+/–*
2
During radio reception:
PRESET+/–*
2
t SEEK+/–*
5
t
MANUAL+/– t PRESET+/–*
2
*1 Shift menus disappear in 8 seconds if no
operation is performed.
*2 Available only when no shift menu is displayed.
*3 Available only when an MP3 file is played.
*4 Available only when an optional CD/MD unit is
connected.
*5 To stop searching, rotate the R dial in the
reverse direction.
2 Rotate the R dial to select the desired
operation.
Custom function
You can assign one of the functions in the custom
menu to the CUSTOM button to perform the
function easily.
During playback or radio reception,
press (CUSTOM).
For details on assigning the function, see
“Setting the custom function” on page 40.
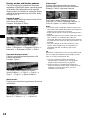
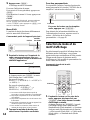
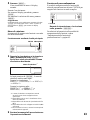
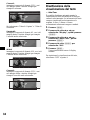
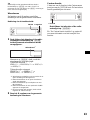
Selecting the display mode
and display pattern
You can enjoy visual effects in various
combinations by selecting the display patterns in
the display modes. Each display mode has
several display patterns, and visual effects of
these patterns can be customized.
Operation by the card remote commander:
1 During playback or radio reception,
press ( SC REEN ) repeatedly to select
the desired display mode.
Each time you press (SCREEN), the display
mode changes as follows:
Standard mode t Spectrum Analyser mode
t Movie mode t Video mode t Standard
mode
2 Press (IMAGE) repeatedly to select the
desired display pattern.
The display pattern changes depending on the
selected display mode.
ENTER
R dial
Shift menu*
1
CUSTOM
continue to next page t
DISC
–
OPEN/CLOSE
REP SHUF
BBE MP PAUSE
1
4
CAPTURE
2
5
3
PTY AF TA
6
SOURCE
DISC
+
SEEK
+
SEEK
–
BACK
ENTER
MENU
MODE
SCREEN IMAGE
IMAGE
SCREEN

14
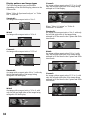
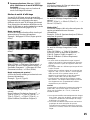
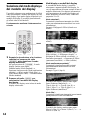
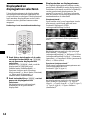
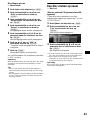
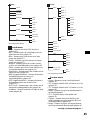
Display modes and display patterns
The following display patterns are selectable
depending on the display mode, and setting items
in the menu differ depending on the selected
display pattern. For details on setting the display
patterns in the Standard mode and Video mode,
see page 28 to 34.
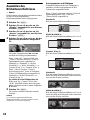
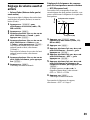
Standard mode*
1
Displays images and/or pre-stored visual effects
with various information.
Example: Wallpaper & Effect
Example: Panorama & Effect
The display pattern changes as follows:
Effect t Wallpaper t Wallpaper & Effect t
Panorama t Panorama & Effect t Effect
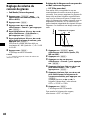
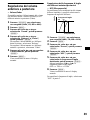
Spectrum Analyser mode*
1
Displays pre-stored animated patterns with
various information.
Example: Type-A
The display pattern changes as follows:
Space Producer*
2
t Type-A t Type-B t
Type-C t Type-D t Space Producer*
2
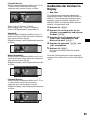
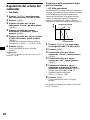
Movie mode*
1
Displays pre-stored moving pictures with various
information.
The display pattern changes as follows:
Movie-1 t Movie-2 t ... t Movie-13
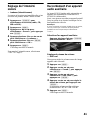
Video mode*
1
Displays video images and/or pre-stored
spectrum analysers with various information.
Example: Video & Spectrum Analyser
The Display pattern changes as follows:
Video full t Video & Spectrum Analyser t
Video & Capture t Video & Slideshow
Notes
• The Video mode is available when the video unit is
connected to the VIDEO IN terminal, and signals are
output from the video unit connected.
• Video images appear only when the parking break is
applied.
• Make sure that the colour system of this unit is set to
“PAL” or “NTSC” according to the video unit
connected. When the colour system of this unit does
not conform to the video unit, the Video mode is not
available.
• This unit conforms to the PAL and NTSC colour
system. Video images from an equipment not
compatible with PAL and NTSC may not be
displayed.
Tip
When AUX is selected as a source in the Video mode,
you can adjust the brightness of the display in step
from –5 to +5 by rotating the R dial.
*1 You can change the images in sequence
automatically. For details, see “Changing the
display image automatically” on page 29.
*2 Space Producer is developed GUI feature in
Spectrum Analyser mode, which produces music
ambience on screen with colour, size and
movement of the objects.

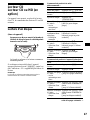
15
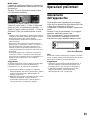
Getting Started
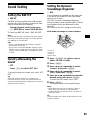
Resetting the unit
Before operating the unit for the first time, or
after replacing the car battery or changing the
connections, you must reset the unit.
Press the reset button with a pointed object, such
as a ballpoint pen.
After pressing the reset button, the start-up image
appears and the demonstration starts
automatically.
Note
Pressing the reset button will erase some stored
contents such as the clock/calender settings in the
memory of the unit.
Tips
• During the demonstration display, you can adjust the
brightness of the display in 11 steps (from 0 to 10)
by rotating the R dial.
• You can change the start-up image. For details, see
“Selecting the start-up image” on page 34.
Setting the clock and the
calendar
— Clock
The clock uses a 24-hour digital indication.
1 Press (MENU).
2 Press < or , repeatedly to select
“Setup,” then press (ENTER).
3 Press < or , repeatedly to select
“Clock,” then press (ENTER).
4 Set the date and time.
1 Press M or m repeatedly to select
the day, then press (ENTER).
2 Follow the step 1 to set the month,
the year, hour and minute.
The confirmation display appears after
setting the minute, then press (ENTER).
5 Press < or , to select “YES,” then
press (ENTER).
“Complete” appears, and the display returns
to the main menu.
6 Press (MENU).
The display returns to the normal display.
Note
If your car has no ACC position, turn on the unit first,
then set the clock and the calendar.
Tip
You can set the year from 2004 to 2099.
Reset button

16
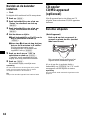
CD Player
CD/MD Unit (optional)
In addition to playing a CD with this unit, you
can also control external CD/MD units.
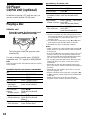
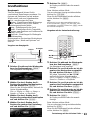
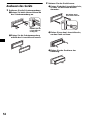
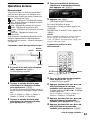
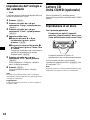
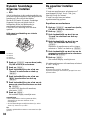
Playing a disc
(With this unit)
Press Z to open the front panel, and
insert the disc (labelled side up).
The front panel closes and playback starts
automatically.
If a disc is already inserted, press (SOURCE)
repeatedly until “CD” appears to start playback.
Note
The front panel closes automatically after the caution
alarm sounds.
Operation by the card remote commander:
Operation by the main unit:
*1 Pause is available only when playing back on this
unit (when playing back on the optional unit, pause
is not available). To cancel pause, press (6)
(PAUSE) again.
*2 To skip tracks continuously, press < or ,, then
press again and hold within about 2 seconds.
*3 Available only when an MP3 file is played.
Notes
• There is a delay for a few seconds after pressing Z
before the disc is ejected, while the data in the disc
is being read.
• If you press Z on the front panel to eject a disc and
leave it in the slot, the disc protective function will
work. The ejected disc will be automatically pulled
into the slot 15 seconds after being ejected.
• Do not apply excessive pressure to the front panel
(especially when it is open), as this may cause a
malfunction.
• Depending on the recording method used on the
disc, it may take a minute or more before playing the
first track.
• Depending on the condition of the disc, it may not
play back (page 9, 10).
• While the first/last track on the disc is playing, if <
or , is pressed, playback skips to the last/first track
of the disc.
• When the last track on the disc has finished,
playback restarts from the first track of the disc.
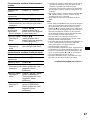
To
Pause*
1
Press (6) (PAUSE).
Stop playback Press (OFF).
Eject the disc Press (OPEN/CLOSE).
Skip tracks*
2
–Automatic
Music Sensor
Press </,
[once for each track].
Fast-forward/
reverse
–Manual Search
Press </,
[hold until the desired
point].
Skip albums*
3
–Album selection
Press M/m
[hold until the desired
album].
Skip discs
–Disc selection
Press M/m
[once for each disc].
To
Stop playback Press (OFF).
Eject the disc Press Z.
Skip tracks
–Automatic Music
Sensor
Rotate the R dial
[until the desired track].
Skip albums*
3
–Album selection
Press (ENTER), then rotate
the R dial
[until the desired album].
Skip discs
–Disc selection
Press (ENTER), then rotate
the R dial
[until the desired disc].

17
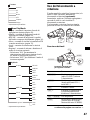
(With optional unit)
1 Press (SOURCE) repeatedly until “CD,”
“MD,” or “MS”* appears.
2 Press (MODE) repeatedly until the
desired unit appears.
Playback starts.
* MS: MG Memory Stick System-up Player MGS-X1
Cautions when connecting MGS-X1 and MD unit(s)
This unit recognises MGS-X1 as an MD unit.
• When you want to play MGS-X1, press (SOURCE) to
select “MS” or “MD.” When “MS” appears in the
source display, MGS-X1 starts to play. When “MD”
appears in the source display, press (MODE) to
select “MS,” to start playback.
• When you want to play an MD unit, press (SOURCE)
to select “MD” or “MS.” When your desired MD unit
appears in the source display, it starts to play. When
“MS” or another MD unit appears in the source
display, press (MODE) to select your desired MD
unit, to start playback.
Notes when playing back a disc with non-audio CD
data/MP3 file
If a disc with non-audio CD data/MP3 file is inserted:
– in the case of this unit, “Disc NO Music” appears in
the display, and the display becomes the clock
display (CD playback stops).
– in the case of an optional MP3 compatible CD unit,
“Disc NO Music” appears in the display and
playback of the next disc starts.
– in the case of an optional CD unit, which is
incompatible with MP3, the disc will play back with
no sound.
Note
With an optional unit connected, playback of the same
source will continue to the optional CD/MD unit.
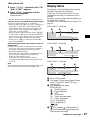
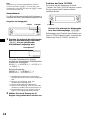
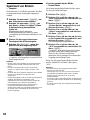
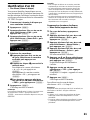
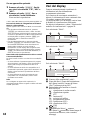
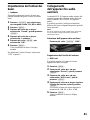
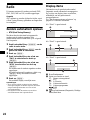
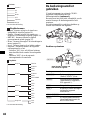
Display items
Information on the disc/album/track currently
selected is automatically displayed.
If the Auto Scroll function is set to on, text
information exceeding 16 characters will be
scrolled.
Positions of display items differ depending on
the selected face pattern.
For details, see “Selecting the face pattern” on
page 28.
When “Skin1” is selected.
When “Skin2” is selected.
When “Skin3” is selected.
A Source/Unit number*
1
B Disc name*
2
/Artist name/Album (folder)
name*
3
/Track (file) name*
3
/ID3 tag
information*
3
C Function and mode status
BBE:BBE MP
: Shuffle playback
: Repeat playback
:ATT
AF: AF function
TA: Traffic announcements
TP: Traffic programme
LP2: LP2 playback*
4
LP4: LP4 playback*
4
:DSO
:EQ7
D :Disc number/ :Album number*
3
/
:Track number/Elapsed playing time,
Current status/Messages
continue to next page t
A B C
D
A D C
B
A DB
C

18
*1 Available only when two or more optional CD (MD)
units are connected.
*2 Only when the disc has been labelled by this unit
using the Disc Memo function.
*3 Available only when an MP3 file is played.
*4 Available only when an optional MD unit with the
MDLP function is connected, and an MDLP disc is
played.
Scrolling the text information
— Auto Scroll
Set “Auto Scroll” in “Display” to “ON.”
To cancel scrolling the text information, set to
“OFF.”
Notes
• Some characters cannot be displayed.
• For some CD TEXT discs or ID3 tags with very
many characters, some information may not be
displayed or scroll.
• This unit cannot display the artist name for each
track of a CD TEXT disc.
Notes on MP3
• When playing MP3 with ID3 tag, the ID3 tag
information (artist name/album name/track name) is
displayed.
• This unit can read ID3 tag version 1.0, 1.1, 2.2, 2.3
and 2.4.
• Some characters and signs cannot be displayed
(appear as “ x”). The maximum number of
displayable characters for an album (folder) name/
track (file) is 50 (Romeo) or 32 (Joliet); ID3 tag 30
characters (1.0 and 1.1) or 50 characters (2.2, 2.3
and 2.4).
• The ID3 tag character codes comply with ASCII and
ISO 8859-1 standards. Joliet format discs can only
be displayed in ASCII. Incompatible characters will
be displayed as “ x.”
• In the following cases, elapsed playing time may not
be displayed accurately.
– when an MP3 file of VBR (variable bit rate) is
played.
– during fast-forward/reverse.
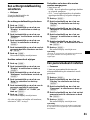
Playing tracks repeatedly
— Repeat
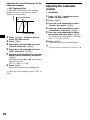
You can select:
• Track — to repeat the current track.
•Album*
1
— to repeat the tracks in the current
album.
•Disc*
2
— to repeat the tracks in the current
disc.
*1 Available only when an MP3 file is played.
*2 Available only when one or more optional CD/MD
units are connected.
During playback, press (1) (REP)
repeatedly until the desired playback
mode appears.
Repeat Play starts.
To return to normal play mode, press (1) (REP)
repeatedly to select “OFF.”
Tip
You can also select the repeat play mode by using the
main menu. During playback, press (MENU), then set
“Repeat” in “PlayMode” to the desired playback mode.

19
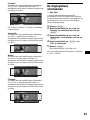
Playing tracks in random
order
— Shuffle
You can select:
• Album*
1
— to play the tracks in the current
album in random order.
• Disc — to play the tracks on the current disc in
random order.
• Magazine*
2
— to play the tracks in the current
optional CD (MD) unit in random order.
•ALL*
3
— to play all the tracks in all the
connected CD (MD) units (including this unit)
in random order.
*1 Available only when an MP3 file is played.
*2 Available only when one or more optional CD (MD)
units are connected.
*3 Available only when one or more optional CD units,
or two or more optional MD units are connected.
During playback, press (2) (SHUF)
repeatedly until the desired playback
mode appears.
Shuffle Play starts.
To return to normal play mode, press (2)
(SHUF) repeatedly to select “OFF.”
Note
“ALL” will not shuffle tracks between CD units and MD
units.
Tip
You can also select the shuffle play mode by using the
main menu. During playback, press (MENU), then set
“Shuffle” in “PlayMode” to the desired playback mode.
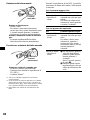
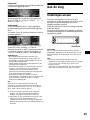
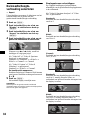
Labelling a CD
— Disc Memo
You can label each disc with a custom name of
up to 16 characters. As a display item, the Disc
Memo always takes priority over any original CD
TEXT information.
1 Start playing a disc you want to label.
2 Press (MENU).
3 Press < or , repeatedly to select
“Edit,” then press (ENTER).
4 Press < or , repeatedly to select
“Name Edit,” then press (ENTER).
5 Enter the characters.
1 Press < or , repeatedly to select
the desired character, then press
(ENTER).
2 Repeat step 1 to enter entire name.
To move the cursor, select “C” or “c,” then
press (ENTER).
To delete the entered character, select
“BS,” then press (ENTER).
3 To finish, press < or , repeatedly
to select “END,” then press
(ENTER).
6 Press (MENU).
The display returns to the normal display.
Note
To finish labelling in step 5, be sure to select “END”
then press (ENTER), otherwise the Disc Memo will not
be stored.
Tips
• Simply overwrite or enter a blank space to correct or
erase a character.
• The Disc Memo can store up to 50 disc names in the
memory of this unit (When 50 disc names are
already stored, “Name Edit” does not appear in the
menu).
• The Disc Memo will be stored in the memory of this
unit, and the CUSTOM FILE functions of the CD unit
connected are not available with this unit.
continue to next page t

20
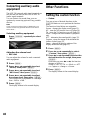
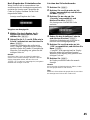
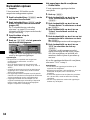
Erasing the Disc Memo
— Name Delete
1 During playback, press (MENU).
2 Press < or , repeatedly to select
“Edit,” then press (ENTER).
3 Press < or , repeatedly to select
“Name Delete,” then press (ENTER).
4 Press < or , repeatedly to select
“Select,” then press (ENTER).
The stored names appear.
5 Press M or m repeatedly to select the
desired name to delete, then press
(ENTER).
The confirmation display appears.
6 Press < or , to select “YES,” then
press (ENTER).
“Complete” appears, and the name is deleted.
7 Press (MENU).
The display returns to the normal display.
To delete all the disc names, select “ALL” in step
4.
Note
When the Disc Memo for a CD TEXT disc is deleted,
the original CD TEXT information is displayed.
Tips
• In step 3, if there is no Disc Memo, the display will
return to the previous display automatically.
• If all the Disc Memo is deleted in step 7, the display
will return to the previous display automatically.
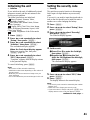
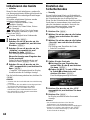
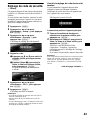
Locating a disc by name
— Disc List
(With an optional CD unit, or an MD unit)
You can use this function for discs that have been
assigned custom names*
1
or for CD TEXT
discs*
2
.
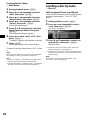
1 During playback, press (MENU).
2 Press < or , repeatedly to select
“List,” then press (ENTER).
The Disc List appears.
3 Press M or m repeatedly to select the
desired disc, then press (ENTER).
Playback starts.
*1 Locating a disc by its custom name: when you
assign a name for a CD (page 19).
*2 Locating discs by the CD TEXT information: when
you play a CD TEXT disc on a CD unit with the CD
TEXT function.
Note
In the case of CD TEXT discs and MDs, some
characters cannot be displayed.
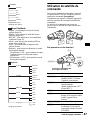
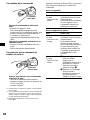
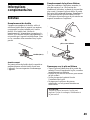
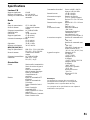
La pagina sta caricando ...
La pagina sta caricando ...
La pagina sta caricando ...
La pagina sta caricando ...
La pagina sta caricando ...
La pagina sta caricando ...
La pagina sta caricando ...
La pagina sta caricando ...
La pagina sta caricando ...
La pagina sta caricando ...
La pagina sta caricando ...
La pagina sta caricando ...
La pagina sta caricando ...
La pagina sta caricando ...
La pagina sta caricando ...
La pagina sta caricando ...
La pagina sta caricando ...
La pagina sta caricando ...
La pagina sta caricando ...
La pagina sta caricando ...
La pagina sta caricando ...
La pagina sta caricando ...
La pagina sta caricando ...
La pagina sta caricando ...
La pagina sta caricando ...
La pagina sta caricando ...
La pagina sta caricando ...
La pagina sta caricando ...
La pagina sta caricando ...
La pagina sta caricando ...
La pagina sta caricando ...
La pagina sta caricando ...
La pagina sta caricando ...
La pagina sta caricando ...
La pagina sta caricando ...
La pagina sta caricando ...
La pagina sta caricando ...
La pagina sta caricando ...
La pagina sta caricando ...
La pagina sta caricando ...
La pagina sta caricando ...
La pagina sta caricando ...
La pagina sta caricando ...
La pagina sta caricando ...
La pagina sta caricando ...
La pagina sta caricando ...
La pagina sta caricando ...
La pagina sta caricando ...
La pagina sta caricando ...
La pagina sta caricando ...
La pagina sta caricando ...
La pagina sta caricando ...
La pagina sta caricando ...
La pagina sta caricando ...
La pagina sta caricando ...
La pagina sta caricando ...
La pagina sta caricando ...
La pagina sta caricando ...
La pagina sta caricando ...
La pagina sta caricando ...
La pagina sta caricando ...
La pagina sta caricando ...
La pagina sta caricando ...
La pagina sta caricando ...
La pagina sta caricando ...
La pagina sta caricando ...
La pagina sta caricando ...
La pagina sta caricando ...
La pagina sta caricando ...
La pagina sta caricando ...
La pagina sta caricando ...
La pagina sta caricando ...
La pagina sta caricando ...
La pagina sta caricando ...
La pagina sta caricando ...
La pagina sta caricando ...
La pagina sta caricando ...
La pagina sta caricando ...
La pagina sta caricando ...
La pagina sta caricando ...
La pagina sta caricando ...
La pagina sta caricando ...
La pagina sta caricando ...
La pagina sta caricando ...
La pagina sta caricando ...
La pagina sta caricando ...
La pagina sta caricando ...
La pagina sta caricando ...
La pagina sta caricando ...
La pagina sta caricando ...
La pagina sta caricando ...
La pagina sta caricando ...
La pagina sta caricando ...
La pagina sta caricando ...
La pagina sta caricando ...
La pagina sta caricando ...
La pagina sta caricando ...
La pagina sta caricando ...
La pagina sta caricando ...
La pagina sta caricando ...
La pagina sta caricando ...
La pagina sta caricando ...
La pagina sta caricando ...
La pagina sta caricando ...
La pagina sta caricando ...
La pagina sta caricando ...
La pagina sta caricando ...
La pagina sta caricando ...
La pagina sta caricando ...
La pagina sta caricando ...
La pagina sta caricando ...
La pagina sta caricando ...
La pagina sta caricando ...
La pagina sta caricando ...
La pagina sta caricando ...
La pagina sta caricando ...
La pagina sta caricando ...
La pagina sta caricando ...
La pagina sta caricando ...
La pagina sta caricando ...
La pagina sta caricando ...
La pagina sta caricando ...
La pagina sta caricando ...
La pagina sta caricando ...
La pagina sta caricando ...
La pagina sta caricando ...
La pagina sta caricando ...
La pagina sta caricando ...
La pagina sta caricando ...
La pagina sta caricando ...
La pagina sta caricando ...
La pagina sta caricando ...
La pagina sta caricando ...
La pagina sta caricando ...
La pagina sta caricando ...
La pagina sta caricando ...
La pagina sta caricando ...
La pagina sta caricando ...
La pagina sta caricando ...
La pagina sta caricando ...
La pagina sta caricando ...
La pagina sta caricando ...
La pagina sta caricando ...
La pagina sta caricando ...
La pagina sta caricando ...
La pagina sta caricando ...
La pagina sta caricando ...
La pagina sta caricando ...
La pagina sta caricando ...
La pagina sta caricando ...
La pagina sta caricando ...
La pagina sta caricando ...
La pagina sta caricando ...
La pagina sta caricando ...
La pagina sta caricando ...
La pagina sta caricando ...
La pagina sta caricando ...
La pagina sta caricando ...
La pagina sta caricando ...
La pagina sta caricando ...
La pagina sta caricando ...
La pagina sta caricando ...
La pagina sta caricando ...
La pagina sta caricando ...
La pagina sta caricando ...
La pagina sta caricando ...
La pagina sta caricando ...
La pagina sta caricando ...
La pagina sta caricando ...
La pagina sta caricando ...
La pagina sta caricando ...
La pagina sta caricando ...
La pagina sta caricando ...
La pagina sta caricando ...
La pagina sta caricando ...
La pagina sta caricando ...
La pagina sta caricando ...
La pagina sta caricando ...
La pagina sta caricando ...
La pagina sta caricando ...
La pagina sta caricando ...
La pagina sta caricando ...
La pagina sta caricando ...
La pagina sta caricando ...
La pagina sta caricando ...
La pagina sta caricando ...
La pagina sta caricando ...
La pagina sta caricando ...
La pagina sta caricando ...
La pagina sta caricando ...
La pagina sta caricando ...
La pagina sta caricando ...
La pagina sta caricando ...
La pagina sta caricando ...
La pagina sta caricando ...
La pagina sta caricando ...
La pagina sta caricando ...
La pagina sta caricando ...
La pagina sta caricando ...
La pagina sta caricando ...
La pagina sta caricando ...
La pagina sta caricando ...
La pagina sta caricando ...
La pagina sta caricando ...
La pagina sta caricando ...
La pagina sta caricando ...
La pagina sta caricando ...
La pagina sta caricando ...
La pagina sta caricando ...
La pagina sta caricando ...
La pagina sta caricando ...
La pagina sta caricando ...
La pagina sta caricando ...
La pagina sta caricando ...
La pagina sta caricando ...
La pagina sta caricando ...
La pagina sta caricando ...
La pagina sta caricando ...
La pagina sta caricando ...
La pagina sta caricando ...
La pagina sta caricando ...
La pagina sta caricando ...
La pagina sta caricando ...
La pagina sta caricando ...
La pagina sta caricando ...
La pagina sta caricando ...
La pagina sta caricando ...
La pagina sta caricando ...
La pagina sta caricando ...
La pagina sta caricando ...
La pagina sta caricando ...
La pagina sta caricando ...
La pagina sta caricando ...
La pagina sta caricando ...
La pagina sta caricando ...
La pagina sta caricando ...
La pagina sta caricando ...
La pagina sta caricando ...
La pagina sta caricando ...
La pagina sta caricando ...
La pagina sta caricando ...
La pagina sta caricando ...
La pagina sta caricando ...
La pagina sta caricando ...
La pagina sta caricando ...
La pagina sta caricando ...
La pagina sta caricando ...
La pagina sta caricando ...
La pagina sta caricando ...
La pagina sta caricando ...
-
 1
1
-
 2
2
-
 3
3
-
 4
4
-
 5
5
-
 6
6
-
 7
7
-
 8
8
-
 9
9
-
 10
10
-
 11
11
-
 12
12
-
 13
13
-
 14
14
-
 15
15
-
 16
16
-
 17
17
-
 18
18
-
 19
19
-
 20
20
-
 21
21
-
 22
22
-
 23
23
-
 24
24
-
 25
25
-
 26
26
-
 27
27
-
 28
28
-
 29
29
-
 30
30
-
 31
31
-
 32
32
-
 33
33
-
 34
34
-
 35
35
-
 36
36
-
 37
37
-
 38
38
-
 39
39
-
 40
40
-
 41
41
-
 42
42
-
 43
43
-
 44
44
-
 45
45
-
 46
46
-
 47
47
-
 48
48
-
 49
49
-
 50
50
-
 51
51
-
 52
52
-
 53
53
-
 54
54
-
 55
55
-
 56
56
-
 57
57
-
 58
58
-
 59
59
-
 60
60
-
 61
61
-
 62
62
-
 63
63
-
 64
64
-
 65
65
-
 66
66
-
 67
67
-
 68
68
-
 69
69
-
 70
70
-
 71
71
-
 72
72
-
 73
73
-
 74
74
-
 75
75
-
 76
76
-
 77
77
-
 78
78
-
 79
79
-
 80
80
-
 81
81
-
 82
82
-
 83
83
-
 84
84
-
 85
85
-
 86
86
-
 87
87
-
 88
88
-
 89
89
-
 90
90
-
 91
91
-
 92
92
-
 93
93
-
 94
94
-
 95
95
-
 96
96
-
 97
97
-
 98
98
-
 99
99
-
 100
100
-
 101
101
-
 102
102
-
 103
103
-
 104
104
-
 105
105
-
 106
106
-
 107
107
-
 108
108
-
 109
109
-
 110
110
-
 111
111
-
 112
112
-
 113
113
-
 114
114
-
 115
115
-
 116
116
-
 117
117
-
 118
118
-
 119
119
-
 120
120
-
 121
121
-
 122
122
-
 123
123
-
 124
124
-
 125
125
-
 126
126
-
 127
127
-
 128
128
-
 129
129
-
 130
130
-
 131
131
-
 132
132
-
 133
133
-
 134
134
-
 135
135
-
 136
136
-
 137
137
-
 138
138
-
 139
139
-
 140
140
-
 141
141
-
 142
142
-
 143
143
-
 144
144
-
 145
145
-
 146
146
-
 147
147
-
 148
148
-
 149
149
-
 150
150
-
 151
151
-
 152
152
-
 153
153
-
 154
154
-
 155
155
-
 156
156
-
 157
157
-
 158
158
-
 159
159
-
 160
160
-
 161
161
-
 162
162
-
 163
163
-
 164
164
-
 165
165
-
 166
166
-
 167
167
-
 168
168
-
 169
169
-
 170
170
-
 171
171
-
 172
172
-
 173
173
-
 174
174
-
 175
175
-
 176
176
-
 177
177
-
 178
178
-
 179
179
-
 180
180
-
 181
181
-
 182
182
-
 183
183
-
 184
184
-
 185
185
-
 186
186
-
 187
187
-
 188
188
-
 189
189
-
 190
190
-
 191
191
-
 192
192
-
 193
193
-
 194
194
-
 195
195
-
 196
196
-
 197
197
-
 198
198
-
 199
199
-
 200
200
-
 201
201
-
 202
202
-
 203
203
-
 204
204
-
 205
205
-
 206
206
-
 207
207
-
 208
208
-
 209
209
-
 210
210
-
 211
211
-
 212
212
-
 213
213
-
 214
214
-
 215
215
-
 216
216
-
 217
217
-
 218
218
-
 219
219
-
 220
220
-
 221
221
-
 222
222
-
 223
223
-
 224
224
-
 225
225
-
 226
226
-
 227
227
-
 228
228
-
 229
229
-
 230
230
-
 231
231
-
 232
232
-
 233
233
-
 234
234
-
 235
235
-
 236
236
-
 237
237
-
 238
238
-
 239
239
-
 240
240
-
 241
241
-
 242
242
-
 243
243
-
 244
244
-
 245
245
-
 246
246
-
 247
247
-
 248
248
-
 249
249
-
 250
250
-
 251
251
-
 252
252
-
 253
253
-
 254
254
-
 255
255
-
 256
256
-
 257
257
-
 258
258
-
 259
259
-
 260
260
-
 261
261
-
 262
262
-
 263
263
-
 264
264
-
 265
265
-
 266
266
-
 267
267
-
 268
268
-
 269
269
-
 270
270


Sony CDX-M9900 Manuale del proprietario
- Categoria
- Ricevitori multimediali per auto
- Tipo
- Manuale del proprietario
in altre lingue
- English: Sony CDX-M9900 Owner's manual
- français: Sony CDX-M9900 Le manuel du propriétaire
- Deutsch: Sony CDX-M9900 Bedienungsanleitung
- Nederlands: Sony CDX-M9900 de handleiding