Electrolux KIR6042K Manuale utente
- Categoria
- Piani cottura
- Tipo
- Manuale utente


WE’RE THINKING OF YOU
Thank you for purchasing an Electrolux appliance. You’ve chosen a product that brings
with it decades of professional experience and innovation. Ingenious and stylish, it has
been designed with you in mind. So whenever you use it, you can be safe in the
knowledge that you’ll get great results every time.
Welcome to Electrolux.
Visit our website to:
Get usage advice, brochures, trouble shooter, service and repair information:
www.electrolux.com/support
Register your product for better service:
www.registerelectrolux.com
Buy Accessories, Consumables and Original spare parts for your appliance:
www.electrolux.com/shop
CUSTOMER CARE AND SERVICE
Always use original spare parts.
When contacting our Authorised Service Centre, ensure that you have the following data
available: Model, PNC, Serial Number.
The information can be found on the rating plate.
Warning / Caution-Safety information
General information and tips
Environmental information
Subject to change without notice.
CONTENTS
1. SAFETY INFORMATION................................................................................................ 2
2. SAFETY INSTRUCTIONS.............................................................................................. 4
3. INSTALLATION...............................................................................................................7
4. PRODUCT DESCRIPTION.............................................................................................9
5. DAILY USE....................................................................................................................10
6. HINTS AND TIPS..........................................................................................................12
7. CARE AND CLEANING................................................................................................ 13
8. TROUBLESHOOTING.................................................................................................. 14
9. TECHNICAL DATA....................................................................................................... 15
10. ENERGY EFFICIENCY...............................................................................................16
1. SAFETY INFORMATION
Before the installation and use of the appliance, carefully read
the supplied instructions. The manufacturer is not responsible
for any injuries or damage that are the result of incorrect
2 ENGLISH

installation or usage. Always keep the instructions in a safe
and accessible location for future reference.
1.1 Children and vulnerable people safety
• This appliance can be used by children aged from 8 years
and above and persons with reduced physical, sensory or
mental capabilities or lack of experience and knowledge if
they have been given supervision or instruction concerning
the use of the appliance in a safe way and understand the
hazards involved. Children of less than 8 years of age and
persons with very extensive and complex disabilities shall
be kept away from the appliance unless continuously
supervised.
• Children should be supervised to ensure that they do not
play with the appliance.
• Keep all packaging away from children and dispose of it
appropriately.
• WARNING: Keep children and pets away from the
appliance when it operates or when it cools down.
Accessible parts become hot during use.
• If the appliance has a child safety device, it should be
activated.
• Children shall not carry out cleaning and user maintenance
of the appliance without supervision.
1.2 General Safety
• WARNING: The appliance and its accessible parts become
hot during use. Care should be taken to avoid touching
heating elements.
• WARNING: Unattended cooking on a hob with fat or oil can
be dangerous and may result in fire.
• NEVER try to extinguish a fire with water, but switch off the
appliance and then cover flame e.g. with a lid or a fire
blanket.
• WARNING: The appliance must not be supplied through an
external switching device, such as a timer, or connected to
a circuit that is regularly switched on and off by a utility.
ENGLISH 3

• CAUTION: The cooking process has to be supervised. A
short term cooking process has to be supervised
continuously.
• WARNING: Danger of fire: Do not store items on the
cooking surfaces.
• Metallic objects such as knives, forks, spoons and lids
should not be placed on the hob surface since they can get
hot.
• Do not use the appliance before installing it in the built-in
structure.
• Do not use a steam cleaner to clean the appliance.
• After use, switch off the hob element by its control and do
not rely on the pan detector.
• If the glass ceramic surface / glass surface is cracked,
switch off the appliance and unplug it from the mains. In
case the appliance is connected to the mains directly using
junction box, remove the fuse to disconnect the appliance
from power supply. In either case contact the Authorised
Service Centre.
• If the supply cord is damaged, it must be replaced by the
manufacturer, an authorized Service or similarly qualified
persons in order to avoid a hazard.
• WARNING: Use only hob guards designed by the
manufacturer of the cooking appliance or indicated by the
manufacturer of the appliance in the instructions for use as
suitable or hob guards incorporated in the appliance. The
use of inappropriate guards can cause accidents.
2. SAFETY INSTRUCTIONS
2.1 Installation
WARNING!
Only a qualified person must
install this appliance.
WARNING!
Risk of injury or damage to the
appliance.
• Remove all the packaging.
• Do not install or use a damaged
appliance.
• Follow the installation instructions
supplied with the appliance.
• Keep the minimum distance from other
appliances and units.
• Always take care when moving the
appliance as it is heavy. Always use
safety gloves and enclosed footwear.
4 ENGLISH

• Seal the cut surfaces with a sealant to
prevent moisture from causing swelling.
• Protect the bottom of the appliance from
steam and moisture.
• Do not install the appliance next to a door
or under a window. This prevents hot
cookware from falling from the appliance
when the door or the window is opened.
• Each appliance has cooling fans on the
bottom.
• If the appliance is installed above a
drawer:
– Do not store any small pieces or
sheets of paper that could be pulled
in, as they can damage the cooling
fans or impair the cooling system.
– Keep a distance of minimum 2 cm
between the bottom of the appliance
and parts stored in the drawer.
• Remove any separator panels installed in
the cabinet below the appliance.
2.2 Electrical Connection
WARNING!
Risk of fire and electric shock.
• All electrical connections should be made
by a qualified electrician.
• The appliance must be earthed.
• Before carrying out any operation make
sure that the appliance is disconnected
from the power supply.
• Make sure that the parameters on the
rating plate are compatible with the
electrical ratings of the mains power
supply.
• Make sure the appliance is installed
correctly. Loose and incorrect electricity
mains cable or plug (if applicable) can
make the terminal become too hot.
• Use the correct electricity mains cable.
• Do not let the electricity mains cable
tangle.
• Make sure that a shock protection is
installed.
• Use the strain relief clamp on the cable.
• Make sure the mains cable or plug (if
applicable) does not touch the hot
appliance or hot cookware, when you
connect the appliance to the near sockets.
• Do not use multi-plug adapters and
extension cables.
• Make sure not to cause damage to the
mains plug (if applicable) or to the mains
cable. Contact our Authorised Service
Centre or an electrician to change a
damaged mains cable.
• The shock protection of live and insulated
parts must be fastened in such a way that
it cannot be removed without tools.
• Connect the mains plug to the mains
socket only at the end of the installation.
Make sure that there is access to the
mains plug after the installation.
• If the mains socket is loose, do not
connect the mains plug.
• Do not pull the mains cable to disconnect
the appliance. Always pull the mains plug.
• Use only correct isolation devices: line
protecting cut-outs, fuses (screw type
fuses removed from the holder), earth
leakage trips and contactors.
• The electrical installation must have an
isolation device which lets you disconnect
the appliance from the mains at all poles.
The isolation device must have a contact
opening width of minimum 3 mm.
2.3 Use
WARNING!
Risk of injury, burns and electric
shock.
• Remove all the packaging, labelling and
protective film (if applicable) before first
use.
• This appliance is for household (indoors)
use only.
• Do not change the specification of this
appliance.
• Make sure that the ventilation openings
are not blocked.
• Do not let the appliance stay unattended
during operation.
• Set the cooking zone to “off” after each
use.
• Do not rely on the pan detector.
• Do not put cutlery or saucepan lids on the
cooking zones. They can become hot.
• Do not operate the appliance with wet
hands or when it has contact with water.
• Do not use the appliance as a work
surface or as a storage surface.
• If the surface of the appliance is cracked,
disconnect immediately the appliance
ENGLISH 5

from the power supply. This to prevent an
electrical shock.
• Users with a pacemaker must keep a
distance of minimum 30 cm from the
induction cooking zones when the
appliance is in operation.
• When you place food into hot oil, it may
splash.
WARNING!
Risk of fire and explosion
• Fats and oil when heated can release
flammable vapours. Keep flames or
heated objects away from fats and oils
when you cook with them.
• The vapours that very hot oil releases can
cause spontaneous combustion.
• Used oil, that can contain food remnants,
can cause fire at a lower temperature than
oil used for the first time.
• Do not put flammable products or items
that are wet with flammable products in,
near or on the appliance.
WARNING!
Risk of damage to the appliance.
• Do not keep hot cookware on the control
panel.
• Do not put a hot pan cover on the glass
surface of the hob.
• Do not let cookware boil dry.
• Be careful not to let objects or cookware
fall on the appliance. The surface can be
damaged.
• Do not activate the cooking zones with
empty cookware or without cookware.
• Do not put aluminium foil on the
appliance.
• Cookware made of cast iron, aluminium or
with a damaged bottom can cause
scratches on the glass / glass ceramic.
Always lift these objects up when you
have to move them on the cooking
surface.
• This appliance is for cooking purposes
only. It must not be used for other
purposes, for example room heating.
2.4 Care and cleaning
• Clean the appliance regularly to prevent
the deterioration of the surface material.
• Switch off the appliance and let it cool
down before cleaning.
• Do not use water spray and steam to
clean the appliance.
• Clean the appliance with a moist soft
cloth. Use only neutral detergents. Do not
use abrasive products, abrasive cleaning
pads, solvents or metal objects.
2.5 Service
• To repair the appliance contact the
Authorised Service Centre. Use original
spare parts only.
• Concerning the lamp(s) inside this product
and spare part lamps sold separately:
These lamps are intended to withstand
extreme physical conditions in household
appliances, such as temperature,
vibration, humidity, or are intended to
signal information about the operational
status of the appliance. They are not
intended to be used in other applications
and are not suitable for household room
illumination.
2.6 Disposal
WARNING!
Risk of injury or suffocation.
• Contact your municipal authority for
information on how to dispose of the
appliance.
• Disconnect the appliance from the mains
supply.
• Cut off the mains electrical cable close to
the appliance and dispose of it.
6 ENGLISH

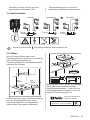
3. INSTALLATION
WARNING!
Refer to Safety chapters.
3.1 Before the installation
Before you install the hob, write down the
information below from the rating plate. The
rating plate is on the bottom of the hob.
Serial number ...........................
3.2 Built-in hobs
Only use the built-in hobs after you assemble
the hob into correct built-in units and work
surfaces that align to the standards.
3.3 Connection cable
• The hob is supplied with a connection
cable.
• To replace the damaged mains cable, use
the cable type: H05V2V2-F which
withstands a temperature of 90 °C or
higher. Contact an Authorised Service
Centre. The connection cable may only be
replaced by a qualified electrician.
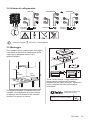
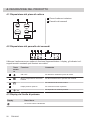
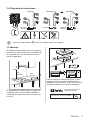
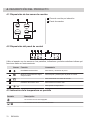
3.4 Connection diagram
220V-240V
N N
220V-240V
220V-240V
PE
L L
220V-240V 1N
220V-240V
N PE
L
400V 2N
220V-240V
220V-240V
N
L1
L2
PE
Insert the shunts between the screws as shown.
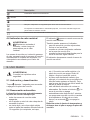
3.5 Assembly
If you install the hob under a hood, please
see the installation instructions of the hood
for the minimum distance between the
appliances.
ENGLISH 7

min.
50mm
min.
500mm
If the appliance is installed above a drawer,
the hob ventilation can warm up the items
stored in the drawer during the cooking
process.
Find the video tutorial "How to install your
Electrolux Induction Hob - Worktop
installation" by typing out the full name
indicated in the graphic below.
www.youtube.com/electrolux
www.youtube.com/aeg
How to install your Electrolux
Induction Hob - Worktop installation
8 ENGLISH

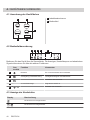
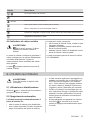
4. PRODUCT DESCRIPTION
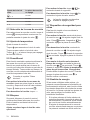
4.1 Cooking surface layout
210 mm
145 mm
180 mm
145 mm
1
1
1 1
2
1
Induction cooking zone
2
Control panel
4.2 Control panel layout
1 32 4 5
Use the sensor fields to operate the appliance. The displays, indicators and sounds tell which
functions operate.
Sensor
field
Function Comment
1
ON / OFF To activate and deactivate the hob.
2
Lock / Child Safety Device To lock / unlock the control panel.
3
- To select the cooking zone.
4
- Heat setting display To show the heat setting.
5
/
- To set a heat setting.
4.3 Heat setting displays
Display Description
The cooking zone is deactivated.
-
The cooking zone operates.
ENGLISH 9

Display Description
PowerBoost operates.
+ digit
There is a malfunction.
A cooking zone is still hot (residual heat).
Lock / Child Safety Device operates.
Incorrect or too small cookware or no cookware on the cooking zone.
Automatic Switch Off operates.
4.4 Residual heat indicator
WARNING!
As long as the indicator is on,
there is a risk of burns from
residual heat.
The induction cooking zones produce the
heat necessary for the cooking process
directly in the bottom of the cookware. The
glass ceramic is heated by the heat of the
cookware.
The indicator
appears when a cooking
zone is hot.
The indicator may also appear:
• for the neighbouring cooking zones even
if you are not using them,
• when hot cookware is placed on cold
cooking zone,
• when the hob is deactivated but the
cooking zone is still hot.
The indicator disappears when the cooking
zone has cooled down.
5. DAILY USE
WARNING!
Refer to Safety chapters.
5.1 Activating and deactivating
Touch for 1 second to activate or
deactivate the hob.
5.2 Automatic Switch Off
The function deactivates the hob
automatically if:
• all cooking zones are deactivated,
• you do not set the heat setting after you
activate the hob,
• you spill something or put something on
the control panel for more than 10
seconds (a pan, a cloth, etc.). An acoustic
signal sounds and the hob deactivates.
Remove the object or clean the control
panel.
• the hob gets too hot (e.g. when a
saucepan boils dry). Let the cooking zone
cool down before you use the hob again.
• you use incorrect cookware. The symbol
comes on and the cooking zone
deactivates automatically after 2 minutes.
• you do not deactivate a cooking zone or
change the heat setting. After some time
comes on and the hob deactivates.
The relation between the heat setting and
the time after which the hob deactivates:
10 ENGLISH

Heat setting The hob deactivates
after
, 1 - 2
6 hours
3 - 4 5 hours
5 4 hours
6 - 9 1.5 hour
5.3 Selecting the cooking zone
To select a cooking zone touch the sensor
field corresponding to this zone. The
display shows the heat setting ( ).
5.4 The heat setting
Set the cooking zone.
Touch to increase the heat setting. Touch
to decrease the heat setting. Touch
and at the same time to deactivate the
cooking zone.
5.5 PowerBoost
This function makes more power available to
the induction cooking zones. The function
can be activated for the induction cooking
zone only for a limited period of time. After
this time the induction cooking zone
automatically sets back to the highest heat
setting.
Refer to “Technical data”
chapter.
To activate the function for a cooking
zone: first set the cooking zone and than set
the maximum heat setting. Touch
until
comes on.
To deactivate the function: touch
.
5.6 Lock
You can lock the control panel while cooking
zones operate. It prevents an accidental
change of the heat setting.
Set the heat setting first.
To activate the function: touch .
comes on for 4 seconds.
To deactivate the function: touch . The
previous heat setting comes on.
When you deactivate the hob,
you also deactivate this function.
5.7 Child Safety Device
This function prevents an accidental
operation of the hob.
To activate the function: activate the hob
with . Do not set any heat setting. Touch
for 4 seconds. comes on. Deactivate
the hob with
.
To deactivate the function: activate the hob
with . Do not set any heat setting. Touch
for 4 seconds. comes on. Deactivate
the hob with .
To override the function for only one
cooking time: activate the hob with
.
comes on. Touch for 4 seconds. Set the
heat setting in 10 seconds. You can
operate the hob. When you deactivate the
hob with
the function operates again.
5.8 Power management
If multiple zones are active and the
consumed power exceeds the limitation of
the power supply, this function divides the
available power between all cooking zones.
The hob controls heat settings to protect the
fuses of the house installation.
• If the hob reaches the limit of maximum
available power (refer to the rating plate),
the power of the cooking zones will be
automatically reduced.
• The heat setting of the cooking zone
selected last is always prioritised. The
remaining power will be divided between
the previously activated cooking zones in
reverse order of selection.
• The heat setting display of the reduced
zones changes between the initially
selected heat setting and the reduced
heat setting.
ENGLISH 11

• Wait until the display stops flashing or
reduce the heat setting of the cooking
zone selected last. The cooking zones will
continue operating with the reduced heat
setting. Change the heat settings of the
cooking zones manually, if necessary.
6. HINTS AND TIPS
WARNING!
Refer to Safety chapters.
6.1 Cookware
For induction cooking zones a
strong electro-magnetic field
creates the heat in the cookware
very quickly.
Use the induction cooking zones with
suitable cookware.
• The bottom of the cookware must be as
thick and flat as possible.
• Ensure pan bases are clean and dry
before placing on the hob surface.
• In order to avoid scratches, do not slide or
rub the pot across the ceramic glass.
Cookware material
• correct: cast iron, steel, enamelled steel,
stainless steel, multi-layer bottom (with a
correct marking from a manufacturer).
• not correct: aluminium, copper, brass,
glass, ceramic, porcelain.
Cookware is suitable for an induction hob
if:
• water boils very quickly on a zone set to
the highest heat setting.
• a magnet pulls on to the bottom of the
cookware.
Cookware dimensions
• Induction cooking zones adapt to the
dimension of the bottom of the cookware
automatically.
• The cooking zone efficiency is related to
the diameter of the cookware. The
cookware with a diameter smaller than the
minimum receives only a part of the
power generated by the cooking zone.
• For both safety reasons and optimal
cooking results, do not use cookware
larger than indicated in "Cooking zones
specification". Avoid keeping cookware
close to the control panel during the
cooking session. This might impact the
functioning of the control panel or
accidentally activate hob functions.
Refer to "Technical data".
6.2 The noises during operation
If you can hear:
• crack noise: cookware is made of different
materials (a sandwich construction).
• whistle sound: you use a cooking zone
with a high power level and the cookware
is made of different materials (a sandwich
construction).
• humming: you use a high power level.
• clicking: electric switching occurs.
• hissing, buzzing: the fan operates.
The noises are normal and do not indicate
any malfunction.
6.3 Examples of cooking
applications
The correlation between the heat setting of a
zone and its consumption of power is not
linear. When you increase the heat setting, it
is not proportional to the increase of the
consumption of power. It means that a
cooking zone with the medium heat setting
uses less than a half of its power.
The data in the table is for
guidance only.
12 ENGLISH

Heat setting Use to: Time
(min)
Hints
- 1
Keep cooked food warm. as neces‐
sary
Put a lid on the cookware.
1 - 2 Hollandaise sauce, melt: butter, choco‐
late, gelatine.
5 - 25 Mix from time to time.
1 - 2 Solidify: fluffy omelettes, baked eggs. 10 - 40 Cook with a lid on.
2 - 3 Simmer rice and milkbased dishes,
heat up ready-cooked meals.
25 - 50 Add at least twice as much liquid as
rice, mix milk dishes halfway through
the procedure.
3 - 4 Steam vegetables, fish, meat. 20 - 45 Add a couple of tablespoons of liquid.
4 - 5 Steam potatoes. 20 - 60 Use max. ¼ l of water for 750 g of po‐
tatoes.
4 - 5 Cook larger quantities of food, stews
and soups.
60 - 150 Up to 3 l of liquid plus ingredients.
6 - 7 Gentle fry: escalope, veal cordon bleu,
cutlets, rissoles, sausages, liver, roux,
eggs, pancakes, doughnuts.
as neces‐
sary
Turn halfway through.
7 - 8 Heavy fry, hash browns, loin steaks,
steaks.
5 - 15 Turn halfway through.
9 Boil water, cook pasta, sear meat (goulash, pot roast), deep-fry chips.
Boil large quantities of water. PowerBoost is activated.
7. CARE AND CLEANING
WARNING!
Refer to Safety chapters.
7.1 General information
• Clean the hob after each use.
• Always use cookware with a clean base.
• Scratches or dark stains on the surface
have no effect on how the hob operates.
• Use a special cleaner suitable for the
surface of the hob.
• Use a special scraper for the glass.
7.2 Cleaning the hob
• Remove immediately: melted plastic,
plastic foil, sugar and food with sugar,
otherwise, the dirt can cause damage to
the hob. Take care to avoid burns. Use a
special hob scraper on the glass surface
at an acute angle and move the blade on
the surface.
• Remove when the hob is sufficiently
cool: limescale rings, water rings, fat
stains, shiny metallic discoloration. Clean
the hob with a moist cloth and a non-
abrasive detergent. After cleaning, wipe
the hob dry with a soft cloth.
• Remove shiny metallic discoloration:
use a solution of water with vinegar and
clean the glass surface with a cloth.
ENGLISH 13

8. TROUBLESHOOTING
WARNING!
Refer to Safety chapters.
8.1 What to do if...
Problem Possible cause Remedy
You cannot activate or operate
the hob.
The hob is not connected to an elec‐
trical supply or it is connected incor‐
rectly.
Check if the hob is correctly connected
to the electrical supply.
The fuse is blown. Make sure that the fuse is the cause of
the malfunction. If the fuse is blown
again and again, contact a qualified
electrician.
You do not set the heat setting for
10 seconds.
Activate the hob again and set the
heat setting in less than 10 seconds.
You touched 2 or more sensor fields
at the same time.
Touch only one sensor field.
There is water or fat stains on the
control panel.
Clean the control panel.
An acoustic signal sounds and
the hob deactivates.
An acoustic signal sounds when
the hob is deactivated.
You put something on one or more
sensor fields.
Remove the object from the sensor
fields.
The hob deactivates. You put something on the sensor
field .
Remove the object from the sensor
field.
Residual heat indicator does not
come on.
The zone is not hot because it oper‐
ated only for a short time or the sen‐
sor is damaged.
If the zone operated sufficiently long to
be hot, speak to an Authorised Service
Centre.
The heat setting changes be‐
tween two levels.
Power management operates. Refer to "Daily use".
The sensor fields become hot. The cookware is too large or you put
it too near to the controls.
Put large cookware on the rear zones,
if possible.
comes on.
Child Safety Device or Lock oper‐
ates.
Refer to "Daily use".
comes on.
There is no cookware on the zone. Put cookware on the zone.
The cookware is unsuitable. Use suitable cookware. Refer to "Hints
and tips".
The diameter of the bottom of the
cookware is too small for the zone.
Use cookware with correct dimen‐
sions. Refer to "Technical data".
14 ENGLISH

Problem Possible cause Remedy
and a number come on.
There is an error in the hob. Deactivate the hob and activate it
again after 30 seconds. If comes
on again, disconnect the hob from the
electrical supply. After 30 seconds,
connect the hob again. If the problem
continues, speak to an Authorised
Service Centre.
You can hear a constant beep
noise.
The electrical connection is incor‐
rect.
Disconnect the hob from the electrical
supply. Ask a qualified electrician to
check the installation.
8.2 If you cannot find a solution...
If you cannot find a solution to the problem
yourself, contact your dealer or an
Authorised Service Centre. Give the data
from the rating plate. Give also three digit
letter code for the glass ceramic (it is in the
corner of the glass surface) and an error
message that comes on. Make sure, you
operated the hob correctly. If not the
servicing by a service technician or dealer
will not be free of charge, also during the
warranty period. The information about
guarantee period and Authorised Service
Centres are in the guarantee booklet.
9. TECHNICAL DATA
9.1 Rating plate
Model KIR6042K PNC 949 492 483 01
Typ 63 B4A 00 AA 220 - 240 V 50 - 60 Hz
Induction 3.0 kW Made in Romania
Ser.Nr. ................. 3.0 kW
ELECTROLUX
9.2 Cooking zones specification
Cooking zone Nominal power
(maximum heat
setting) [W]
PowerBoost [W] PowerBoost
maximum dura‐
tion [min]
Cookware diame‐
ter [mm]
Left front 2300 2800 10 180 - 210
Left rear 1200 - - 125 - 145
Right front 1200 1800 4 125 - 145
Right rear 1800 - - 145 - 180
The power of the cooking zones can be
different in some small range from the data in
the table. It changes with the material and
dimensions of the cookware.
For optimal cooking results use cookware no
larger than the diameter in the table.
ENGLISH 15

10. ENERGY EFFICIENCY
10.1 Product information*
Model identification KIR6042K
Type of hob Built-In Hob
Number of cooking zones 4
Heating technology Induction
Diameter of circular cooking zones (Ø) Left front
Left rear
Right front
Right rear
21.0 cm
14.5 cm
14.5 cm
18.0 cm
Energy consumption per cooking zone (EC electric
cooking)
Left front
Left rear
Right front
Right rear
190.1 Wh / kg
181.0 Wh / kg
181.0 Wh / kg
181.6 Wh / kg
Energy consumption of the hob (EC electric hob) 183.4 Wh / kg
* For European Union according to EU 66/2014. For Belarus according to STB 2477-2017, Annex A. For Ukraine
according to 742/2019.
EN 60350-2 - Household electric cooking appliances - Part 2: Hobs - Methods for measuring performance
10.2 Energy saving
You can save energy during everyday
cooking if you follow below hints.
• When you heat up water, use only the
amount you need.
• If it is possible, always put the lids on the
cookware.
• Before you activate the cooking zone put
the cookware on it.
• Put the smaller cookware on the smaller
cooking zones.
• Put the cookware directly in the centre of
the cooking zone.
• Use the residual heat to keep the food
warm or to melt it.
11. ENVIRONMENTAL CONCERNS
Recycle materials with the symbol . Put
the packaging in relevant containers to
recycle it. Help protect the environment and
human health by recycling waste of electrical
and electronic appliances. Do not dispose of
appliances marked with the symbol with
the household waste. Return the product to
your local recycling facility or contact your
municipal office.
16 ENGLISH

NOUS PENSONS À VOUS
Merci d’avoir choisi un appareil Electrolux. Vous avez choisi un produit qui bénéficie de
décennies d'expérience professionnelle et d'innovation. Ingénieux et élégant, il a été
pensé pour vous. C'est la raison pour laquelle vous pouvez avoir la certitude d'obtenir
d'excellents résultats à chaque utilisation.
Bienvenue chez Electrolux
Consultez notre site pour :
Obtenir des conseils d’utilisation, des brochures, un dépanneur, des informations sur
le service et les réparations :
www.electrolux.com/support
Enregistrer votre produit pour un meilleur service :
www.registerelectrolux.com
Acheter des accessoires, consommables et pièces de rechange d’origine pour votre
appareil :
www.electrolux.com/shop
SERVICE ET ASSISTANCE À LA CLIENTÈLE
N’utilisez que des pièces de rechange d’origine.
Avant de contacter notre centre de service agréé, assurez-vous de disposer des
informations suivantes : Modèle, PNC, numéro de série.
Ces informations figurent sur la plaque signalétique.
Avertissement/Consignes de sécurité
Informations générales et conseils
Informations environnementales
Sous réserve de modifications.
TABLE DES MATIÈRES
1. INFORMATIONS DE SÉCURITÉ..................................................................................17
2. CONSIGNES DE SÉCURITÉ........................................................................................20
3. INSTALLATION.............................................................................................................22
4. DESCRIPTION DE L'APPAREIL.................................................................................. 24
5. UTILISATION QUOTIDIENNE...................................................................................... 25
6. CONSEILS.................................................................................................................... 27
7. ENTRETIEN ET NETTOYAGE..................................................................................... 29
8. DÉPANNAGE................................................................................................................29
9. CARACTÉRISTIQUES TECHNIQUES......................................................................... 31
10. RENDEMENT ÉNERGÉTIQUE.................................................................................. 31
1. INFORMATIONS DE SÉCURITÉ
Avant d'installer et d'utiliser cet appareil, lisez soigneusement
les instructions fournies. Le fabricant ne pourra être tenu pour
responsable des blessures et dégâts résultant d'une
FRANÇAIS 17

mauvaise installation ou utilisation. Conservez toujours les
instructions dans un lieu sûr et accessible pour vous y référer
ultérieurement.
1.1 Sécurité des enfants et des personnes
vulnérables
• Cet appareil peut être utilisé par des enfants âgés d'au
moins 8 ans et par des personnes ayant des capacités
physiques, sensorielles ou mentales réduites ou dénuées
d’expérience ou de connaissance, s'ils sont correctement
surveillés ou si des instructions relatives à l'utilisation de
l'appareil en toute sécurité leur ont été données et s’ils
comprennent les risques encourus. Les enfants de moins
de 8 ans et les personnes ayant un handicap très important
et complexe doivent être tenus à l'écart de l’appareil, à
moins d'être surveillés en permanence.
• Veillez à ce que les enfants ne jouent pas avec l’appareil.
• Ne laissez pas les emballages à la portée des enfants et
jetez-les convenablement.
• AVERTISSEMENT : tenez les enfants et les animaux
éloignés de l'appareil lorsqu'il est en cours de
fonctionnement ou lorsqu'il refroidit. Les parties accessibles
deviennent chaudes en cours d'utilisation.
• Si l'appareil est équipé d'un dispositif de sécurité enfants,
nous vous recommandons de l'activer.
• Le nettoyage et l'entretien par l'usager ne doivent pas être
effectués par des enfants sans surveillance.
1.2 Sécurité générale
• AVERTISSEMENT : L'appareil et ses parties accessibles
deviennent chauds pendant l'utilisation. Veillez à ne pas
toucher les éléments chauffants.
• AVERTISSEMENT : Il peut être dangereux de laisser
chauffer de la graisse ou de l'huile sans surveillance sur
une table de cuisson car cela pourrait provoquer un
incendie.
18 FRANÇAIS

• N'essayez JAMAIS d'éteindre un feu avec de l'eau. Mettez
à l’arrêt l'appareil puis couvrez les flammes, par exemple
avec un couvercle ou une couverture ignifuge.
• AVERTISSEMENT : L'appareil ne doit pas être branché à
l'alimentation en utilisant un appareil de connexion externe
comme un minuteur, ou branché à un circuit qui est
régulièrement activé/désactivé par un fournisseur d'énergie.
• ATTENTION : Toute cuisson doit être surveillée. Une
cuisson courte doit être surveillée en permanence.
• AVERTISSEMENT : Risque d'incendie : N'entreposez rien
sur les surfaces de cuisson.
• Les objets métalliques tels que les couteaux, les
fourchettes, les cuillères et les couvercles ne doivent pas
être placés sur la surface de la table de cuisson car ils
peuvent devenir chauds.
• N'utilisez pas l'appareil avant de l'avoir installé dans la
structure encastrée.
• N'utilisez pas de nettoyeur à vapeur pour nettoyer l'appareil.
• Après utilisation, mettez toujours à l’arrêt la table de
cuisson à l'aide de la manette de commande et ne vous fiez
pas à la détection des récipients.
• Si la surface vitrocéramique / en verre est fissurée, mettez
à l’arrêt l'appareil et débranchez-le. Si l'appareil est branché
à l'alimentation secteur directement en utilisant une boîte
de jonction, retirez le fusible pour déconnecter l'appareil de
l'alimentation secteur. Dans tous les cas, veuillez contacter
le service après-vente agréé.
• Si le câble d'alimentation est endommagé, il doit être
remplacé par le fabricant, un service de maintenance agréé
ou un technicien qualifié afin d'éviter tout danger.
• AVERTISSEMENT : Utilisez uniquement les dispositifs de
protection pour table de cuisson conçus ou indiqués comme
adaptés par le fabricant de l'appareil de cuisson dans les
instructions d'utilisation, ou les dispositifs de protection pour
table de cuisson intégrés à l'appareil. L'utilisation de
FRANÇAIS 19

dispositifs de protection non adaptés peut entraîner des
accidents.
2. CONSIGNES DE SÉCURITÉ
2.1 Installation
AVERTISSEMENT!
L'appareil doit être installé
uniquement par un professionnel
qualifié.
AVERTISSEMENT!
Risque de blessure corporelle ou
de dommages matériels.
• Retirez l'intégralité de l'emballage.
• N'installez pas et ne branchez pas un
appareil endommagé.
• Suivez scrupuleusement les instructions
d'installation fournies avec l'appareil.
• Respectez l'espacement minimal requis
par rapport aux autres appareils et
éléments.
• Soyez toujours vigilants lorsque vous
déplacez l'appareil car il est lourd. Utilisez
toujours des gants de sécurité et des
chaussures fermées.
• Isolez les surfaces découpées à l'aide
d'un matériau d'étanchéité pour éviter que
la moisissure cause des gonflements.
• Protégez la partie inférieure de l'appareil
de la vapeur et de l'humidité.
• N'installez pas l'appareil à proximité d'une
porte ou sous une fenêtre. Les récipients
chauds risqueraient de tomber de
l'appareil lors de l'ouverture de celles-ci.
• Chaque appareil est doté de ventilateurs
de refroidissement dans le fond.
• Si l'appareil est installé au-dessus d'un
tiroir :
– Ne rangez pas de feuilles ni de petits
bouts de papier qui pourraient être
aspirés et endommager les
ventilateurs de refroidissement ou le
système de refroidissement.
– Laissez une distance d'au moins 2 cm
entre le fond de l'appareil et les objets
rangés dans le tiroir.
• Ôtez tout panneau de séparation installé
dans le meuble sous l'appareil.
2.2 Branchement électrique
AVERTISSEMENT!
Risque d'incendie ou
d'électrocution.
• Tous les raccordements électriques
doivent être effectués par un électricien
qualifié.
• L’appareil doit être relié à la terre.
• Avant toute intervention, assurez-vous
que l'appareil est débranché.
• Assurez-vous que les paramètres figurant
sur la plaque signalétique correspondent
aux données électriques nominale de
l’alimentation secteur.
• Assurez-vous que l'appareil est bien
installé. Un câble d'alimentation lâche et
inapproprié ou une fiche (si présente) non
serrée peuvent être à l'origine d'une
surchauffe des bornes.
• Utilisez le câble d'alimentation électrique
approprié.
• Ne laissez pas le câble d'alimentation
s'emmêler.
• Assurez-vous qu'une protection anti-
électrocution est installée.
• Utilisez un collier anti-traction sur le câble.
• Assurez-vous que le câble d'alimentation
ou la fiche (si présente) n'entrent pas en
contact avec les surfaces brûlantes de
l'appareil ou les récipients brûlants
lorsque vous branchez l'appareil à des
prises électriques situées à proximité.
• N'utilisez pas d'adaptateurs multiprise et
de rallonges.
• Veillez à ne pas endommager la fiche
secteur (si présente) ni le câble
d'alimentation. Contactez notre service
après-vente agréé ou un électricien pour
remplacer le câble d'alimentation s'il est
endommagé.
• La protection contre les chocs des parties
sous tension et isolées doit être fixée de
telle manière qu'elle ne puisse pas être
enlevée sans outils.
20 FRANÇAIS
La pagina si sta caricando...
La pagina si sta caricando...
La pagina si sta caricando...
La pagina si sta caricando...
La pagina si sta caricando...
La pagina si sta caricando...
La pagina si sta caricando...
La pagina si sta caricando...
La pagina si sta caricando...
La pagina si sta caricando...
La pagina si sta caricando...
La pagina si sta caricando...
La pagina si sta caricando...
La pagina si sta caricando...
La pagina si sta caricando...
La pagina si sta caricando...
La pagina si sta caricando...
La pagina si sta caricando...
La pagina si sta caricando...
La pagina si sta caricando...
La pagina si sta caricando...
La pagina si sta caricando...
La pagina si sta caricando...
La pagina si sta caricando...
La pagina si sta caricando...
La pagina si sta caricando...
La pagina si sta caricando...
La pagina si sta caricando...
La pagina si sta caricando...
La pagina si sta caricando...
La pagina si sta caricando...
La pagina si sta caricando...
La pagina si sta caricando...
La pagina si sta caricando...
La pagina si sta caricando...
La pagina si sta caricando...
La pagina si sta caricando...
La pagina si sta caricando...
La pagina si sta caricando...
La pagina si sta caricando...
La pagina si sta caricando...
La pagina si sta caricando...
La pagina si sta caricando...
La pagina si sta caricando...
La pagina si sta caricando...
La pagina si sta caricando...
La pagina si sta caricando...
La pagina si sta caricando...
La pagina si sta caricando...
La pagina si sta caricando...
La pagina si sta caricando...
La pagina si sta caricando...
La pagina si sta caricando...
La pagina si sta caricando...
La pagina si sta caricando...
La pagina si sta caricando...
La pagina si sta caricando...
La pagina si sta caricando...
La pagina si sta caricando...
La pagina si sta caricando...
La pagina si sta caricando...
La pagina si sta caricando...
La pagina si sta caricando...
La pagina si sta caricando...
-
 1
1
-
 2
2
-
 3
3
-
 4
4
-
 5
5
-
 6
6
-
 7
7
-
 8
8
-
 9
9
-
 10
10
-
 11
11
-
 12
12
-
 13
13
-
 14
14
-
 15
15
-
 16
16
-
 17
17
-
 18
18
-
 19
19
-
 20
20
-
 21
21
-
 22
22
-
 23
23
-
 24
24
-
 25
25
-
 26
26
-
 27
27
-
 28
28
-
 29
29
-
 30
30
-
 31
31
-
 32
32
-
 33
33
-
 34
34
-
 35
35
-
 36
36
-
 37
37
-
 38
38
-
 39
39
-
 40
40
-
 41
41
-
 42
42
-
 43
43
-
 44
44
-
 45
45
-
 46
46
-
 47
47
-
 48
48
-
 49
49
-
 50
50
-
 51
51
-
 52
52
-
 53
53
-
 54
54
-
 55
55
-
 56
56
-
 57
57
-
 58
58
-
 59
59
-
 60
60
-
 61
61
-
 62
62
-
 63
63
-
 64
64
-
 65
65
-
 66
66
-
 67
67
-
 68
68
-
 69
69
-
 70
70
-
 71
71
-
 72
72
-
 73
73
-
 74
74
-
 75
75
-
 76
76
-
 77
77
-
 78
78
-
 79
79
-
 80
80
-
 81
81
-
 82
82
-
 83
83
-
 84
84


Electrolux KIR6042K Manuale utente
- Categoria
- Piani cottura
- Tipo
- Manuale utente
in altre lingue
- English: Electrolux KIR6042K User manual
- français: Electrolux KIR6042K Manuel utilisateur
- español: Electrolux KIR6042K Manual de usuario
- Deutsch: Electrolux KIR6042K Benutzerhandbuch